
0xC19001E1 is an error code generated when trying to install an update through automatic mode. What this problem does is cause Windows update process to fail and show a message right in the middle of scanning or downloading.
The prime suspects of this Windows update error are third party antivirus tool, defective Windows update database, incorrect Service configurations, sluggish network, and corrupted system files. Furthermore, outdated drivers and faults with file structure are equally responsible to trigger Windows update error 0xC19001E1. However, you can quickly and easily fix this problem by following the workarounds.
Update Error 0xC19001E1 in Windows 10 or 11
Here is how to fix update error 0xC19001E1 In Windows 11 or 10 –
Way-1: Uninstall third-party programs
Major investigations reveal that this error code is the consequence of presence of antivirus creating conflicts with the system files or another program. So it is necessary to remove the third-party tool using below steps –
- Press Winkey and R.
- Type – appwiz.cpl.
- When Program and Features window appears, right-click on the antivirus program
- Select Uninstall and click Yes on the verification popup.
- In case, an Uninstall wizard shows up follow instructions there to complete the removal.
- Restart the computer and check if error 0xC19001E1 is solved or it still persists.
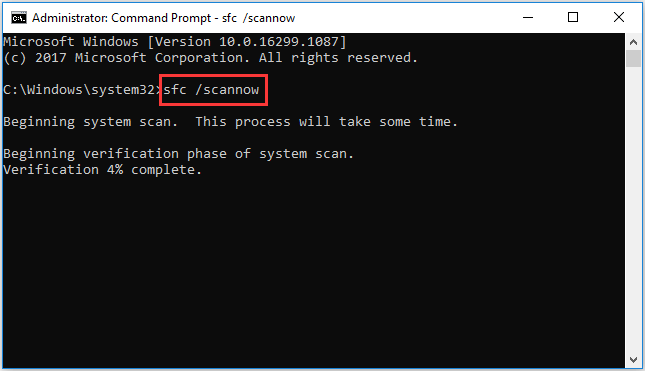
Way-2: Use System File Checker and DISM utilities
When it comes to corruption of system files and integrity of Windows image which are potential reasons for this problem with failed Windows update 0xC19001E1 there are 2 built-in tools SFC and DISM.
Running the command line utilities will rescue your computer from the error condition if you follow the steps –
- Right-click on – Start.
- Select – Run.
- Type cmd.exe.
- Press Ctrl + Shift + Enter.
- On the UAC dialog box, click on Yes.
- Now type the cmd command
sfc /scannowand hit Enter. - After this process is completed, run the following commands, one at a time –
DISM /Online /Cleanup-Image /CheckHealth
DISM /Online /Cleanup-Image /ScanHealth
DISM /Online /Cleanup-Image /RestoreHealth- Once the execution of DISM commands is finished, restart your computer. Hopefully, the error should be fixed now.
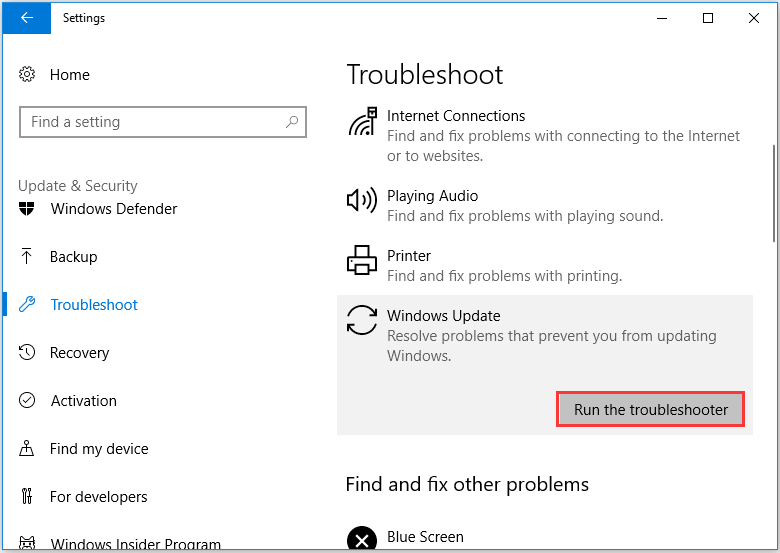
Way-3: Run the Windows update troubleshooter
You might be thinking of a Fixit tool having the capability to solve failed installation of updates. Yes, Windows provides a problem-resolver utility to deal with any update error including 0xC19001E1 that too using a single click.
So bring Windows update troubleshooter into use and resolve the error code –
- Click on Start and type troubleshoot.
- Press the Enter key to reach Settings.
- Select – “Other troubleshooters” (Windows 11) or “Additional troubleshooters” (Windows 10).
- Find Windows update in the list.
- Click on “Run” if you are running Windows 11 and “Run the troubleshooter” if it is Windows 10.
- The troubleshooter will detect problems, check for pending restart, initialize the diagnostic, and examine the registry keys.
- If the tool shows any recommendations follow them.
- Restart the computer and go to Settings => Windows update.
- Select the – Check for updates.
Way-4: Reset Windows update database cache
When Windows 10 or 11 renders 0xC19001E1 during trying to install update, the most probable factor worth focusing on is database cache. There is a folder in the Installation drive to accumulate files and folders downloaded via update but this is corrupted due to glitchy buggy patches and rollouts.
As a result, the system generates install error having a code with failed procedure of Windows update. So follow the guidelines and reset the database cache –
- Press Windows and R keys
- Type – cmd.
- Now press – Ctrl + Shift + Enter.
- Select Yes on the User account control dialog box.
- Copy the following lines of commands successively, paste them into the Command prompt and hit Enter –
net stop wuauserv
net stop cryptSvc
net stop bits
net stop msiserver
Ren C:\Windows\SoftwareDistribution SoftwareDistribution.old
Ren C:\Windows\System32\catroot2 Catroot2.old
net start wuauserv
net start cryptSvc
net start bits
net start msiserver- Exit the Command prompt and restart your computer.
- Now try installing the Windows update.
- In case, you are a beginner and do not want to follow these steps manually then directly download a reset script – Reset_Windows_11_update.zip.
- Right-click on this ZIP file and choose Extract all.
- Once unpacked, browse the folder to access WuReset.bat and right-click on it.
- Select – Run as administrator.
- Confirm the UAC (Yes) and when Command prompt appears, click any key to Continue.
- Allow the reset process complete and reboot the device in the end.
See – How to Reset Windows Update to Default in Windows 10.
Way-5: Install the Windows update manually
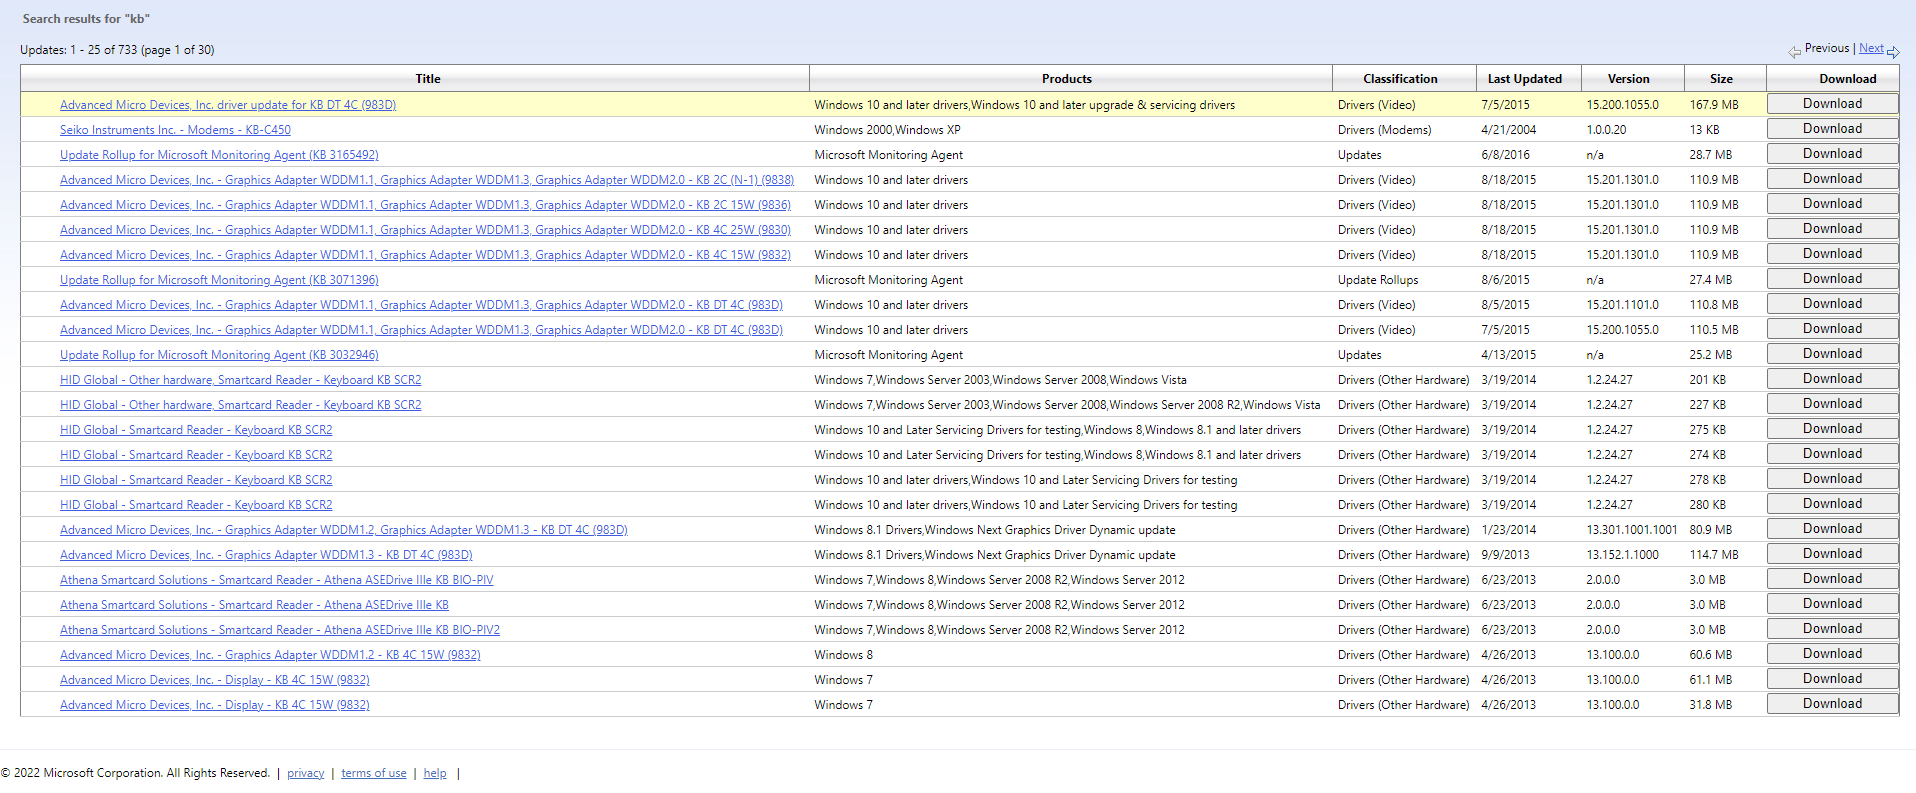
Update Error 0xC19001E1 In Windows 11 or 10 is not the end of life because there is still one option available to install it. Microsoft update catalog keeps a standalone copy of each patch, LCU, out-of-band, and emergency release using which you can manually install the same. Therefore, move forward with the steps –
- In a browser, search for Microsoft update catalog.
- Open this website from the result and type KB number in Search bar.
- Locate the update file (such as x64, ARM64) in the list and click on Download.
- Select Standalone file’s link from a separate popup page.
- This will download the Windows update on your computer in .MSU format. Double-click on this and allow running the process.
- After a couple of reboots, the update will be successfully installed.
Way-6: Disconnect the peripherals
Sometimes, devices connected to laptop or desktop block Windows update and the system throw this error message. So if peripherals like mouse, Keyboard, external drive, audio device are attached to the computer then the 0xC19001E1 may display.
Detach them one by one for a while, restart your computer and then try to install the Windows update.
Way-7: Run disk cleanup
Clutters, garbage, and lack of free disk space can also be a reason for the unsuccessful Windows update process. But don’t worry you can clean them and restore some room using below method –
- Click on Start.
- Type – cleanmgr.
- Hit the Enter key.
- Select (C:) and click OK.
- When “Disk cleanup for (C:)” window appears click on Cleanup system files.
- On the next window, check all the boxes and select “OK”.
- If a confirmation pop-up shows up, click on Yes.
Way-8: Choose in-Place upgrade to receive the update
This method has an arrangement where a fresh Windows will be installed on the PC and at the same time, the latest cumulative update will also be input. Hence, go ahead with the steps if the update got stuck –
- Access the web page – https://www.microsoft.com/en-in/software-download/windows11.
- Get down to the section which says – Download Windows 11 Disk Image (ISO).
- Click on Download located underneath Windows 11 (multi-edition ISO).
- Choose the product language using dropdown.
- Select – Confirm.
- You will come to view a button named 64-bit Download (It may be different on your PC).
- Now, right-click on the downloaded ISO file and select Mount. On my PC it is Win11_22H2_Language_x64v1.iso.
- Launch setup.exe by double-clicking on it.
- Proceed with by clicking Yes on User account control.
- Then you will see the Install Windows 11 wizard; click Next.
- On the license agreement wizard, select – Accept.
- Windows will make sure there is enough free space in your system.
- On the Ready to install, select – Keep personal files and apps.
- Click on – Install.
- The computer will reboot several times and finally the lock screen will arrive.
Methods:
Way-1: Uninstall third-party programs
Way-2: Use System File Checker and DISM utilities
Way-3: Run the Windows update troubleshooter
Way-4: Reset Windows update database cache
Way-5: Install the Windows update manually
Way-6: Disconnect the peripherals
Way-7: Disconnect the peripherals
Way-8: Disconnect the peripherals
That’s all!!
What is the error 0xc19001e1? What may cause the error 0xc19001e1? How to fix this Windows update error 0xc19001e1 1903? This post from MiniTool will show you the solutions. In addition, you can visit MiniTool to find more Windows update problems and tips.
What Is the Error 0xc19001e1?
Some people reported that they failed to update Windows 10 1903 and encountered an error with code 0xc19001e1. In this way, your computer can’t perform Windows update. The error Windows update error 0xc19001e1 may be caused by the corrupted system files, the third-party antivirus program, insufficient disk space or some other reasons.
Hence, in the following section, we will show you how to fix the error 0xc19001e1 Windows 10 update 1903.
How to Fix Windows Update Error 0xc19001e1?
In this part, we will show you how to fix the error 0xc19001e1.
Solution 1. Disable Third-Party Antivirus Program
The Windows update error 0xc19001e1 may be caused by the third-party software. So, in order to fix this Windows Update error, you can try disabling third-party antivirus program.
After disabling the antivirus program, you can reboot your computer and run Windows Update error and check whether the error 0xc19001e1 is solved.
If this solution is not effective, try other solutions.
Solution 2. Run Windows Update Troubleshooter
If you come across the error 0xc19001e1, you can choose to run Windows Update Troubleshooter.
Now, here is the tutorial.
- Press Windows key and I key together to open Settings.
- In the pop-up window, choose Update & Security to continue.
- Then navigate to Troubleshoot tab, find out Windows Update, and click Run the troubleshooter.
Then the Windows Update Troubleshooter will begin to detect the problems on your computer. If there are problems, you can follow the on-screen wizard to fix it.
After that, reboot your computer and check whether the error 0xc19001e1 is solved.
Solution 3. Run System File Checker
If there are corrupted system files on your computer, you may also come across the error 0xc19001e1. In this situation, you can run System File Checker to check and repair the corrupted system files on your computer.
Now, here is the tutorial.
- Open Command Prompt as administrator.
- In the command line window, type the command sfc /scannow and hit Enter to continue.
- Then the System File Checker begins to scan corrupted system files on your computer and repair them. And please do not close the command line until you see the message verification 100% complete.
When the scanning process is finished, reboot your computer and check whether the error 0xc19001e1 is solved.
Related article: Quickly Fix – SFC Scannow Not Working (Focus on 2 Cases)
Solution 4. Reset Windows Update Components
If you come across the error 0xc19001e1, the error may be caused by the corrupt Windows tools. In this situation, you can choose to reset Windows Update Components to continue.
Now, here is the tutorial.
1. Open Command Prompt as administrator.
2. In the command line window, type the following commands and hit Enter after each command.
net stop wuauserv
net stop cryptSvc
net stop bits
net stop msiserver
Ren C:\Windows\SoftwareDistribution SoftwareDistribution.old
Ren C:\Windows\System32\catroot2 Catroot2.old
net start wuauserv
net start cryptSvc
net start bits
net start msiserver
When the process is finished, reboot your computer and check whether the Windows Update error 0xc19001e1 is fixed.
If this solution does not take effect, try the next one.
Solution 5. Free Up Disk Space
Sometimes, the error 0xc19001e1 may occur due to not enough disk space on the disk. A bare minimum of 20GB is required for a fresh installation and 2GB for Windows up-gradation. So, if there is not enough free space on hard disk, you may also come across the error 0xc19001e1 Windows 10 Update 1903.
So, in order to fix this error, you can choose to free disk space.
Now, here is the tutorial.
- Open Settings app.
- Then click System.
- In the pop-up window, choose Storage from the left panel.
- On the right-panel, click Change how we free up space under Storage Sense.
- Then check the options under Temporary Files.
- Then click Clean Now to continue.

When it is finished, your computer has been cleaned. And you can read the post 10 Ways to Free up Disk Space in Windows 10 [2020 Update] to know more ways to free up disk space.
When disk space has been extended, reboot your computer and check whether the error 0xc19001e1 is solved.
Final Words
To sum up, this post has introduced 5 ways to fix 0xc19001e1 Windows 10 Update 1903. If you come across the same issue, try these solutions. If you have any better idea to fix 0xc19001e1 1903, you can share it in the comment zone.
When you’re trying to get your computer updated, error code 0xc19001e1 may sometimes ruin your plans. No matter how many times you hit Retry, the update process suddenly ends with this annoying error. If restarting your computer did not solve the problem, pursue the troubleshooting solutions below.
Contents
- 1 How Do I Fix Windows Update Error 0xc19001e1?
- 1.1 Check If Something’s Blocking the Update
- 1.2 Run the Update Troubleshooter
- 1.3 Restart the Update Components
- 1.4 Check Your Disk for Errors
- 1.5 Download the Updates Manually
- 1.6 Conclusion
Check If Something’s Blocking the Update
There are various apps, processes, and even hardware items that could be interfering with the update process.
- Make sure to disconnect all unnecessary peripherals before hitting the “Check for updates” button.
- Close all the programs running in the background. You can use the Task Manager to get the job done or simply clean boot your computer.
- Temporarily disable your antivirus, firewall, or other security programs.
- If you’re using a wireless network, disconnect all the devices connected to the network to free up more bandwidth for Windows Update. Ideally, use a cable connection when downloading and installing the updates.
- Don’t forget to restart your router as well. A quick power cycle will flush out your router’s cache and allow it to re-select the fastest channel for your connection.
Run the Update Troubleshooter
The Windows Update troubleshooter automatically detects and fixes the issues preventing your computer from installing the latest OS updates.
- Press the Windows and X keys.
- Then go to Settings.
- Go to Update and Security.
- Click Troubleshooter.
- Select Additional troubleshooters.
- Run the Update troubleshooter.
Restart the Update Components
Try resetting the Windows Update components and check if this solution solves your problem.
- Press the Windows and X keys.
- Select Command Prompt (Admin).
- Then, enter the commands below one by one, hitting Enter after each one:
net stop wuauservnet stop cryptSvcnet stop bitsnet stop msiservernet start wuauservnet start cryptSvcnet start bitsnet start msiserver
- Check if you can install the latest OS updates now.
Check Your Disk for Errors
If the disk sector where the OS saves your update files got corrupted, that could explain why you’re getting error code 0xc19001e1.
- Launch Command Prompt with admin rights.
- Then, enter the commands below one by one:
dism /online /cleanup-image /scanhealthdism /online /cleanup-image /checkhealthdism /online /cleanup-image /restorehealth
- Restart your computer and check for updates again.

Download the Updates Manually
Suppose you’re still getting error code 0xc19001e1 when using the Windows Update service. In that case, you can force the process by manually downloading the latest Windows updates.
You’ve got two main options, depending on the type of update that you’re trying to install.
- If you want to install a feature update, download Microsoft’s Update Assistant first. Basically, you need to download the Media Creation Tool and then select “Upgrade this PC now.” Follow the on-screen steps to install the problematic update.
- On the other hand, if you’re trying to install a security or cumulative update, go to Microsoft’s Update Catalog.
Conclusion
If error code 0xc19001e1 prevents you from installing the latest Windows updates, first restart your computer and router. Then, check if there’s anything that could be blocking the update process. Additionally, run the Update troubleshooter, restart the Windows Update components, and check your disk for errors. If the issue persists, download the problematic updates manually.
Which of the solutions above solved the problem for you? Do let us know in the comments below.
Windows Update is a crucial aspect of maintaining a healthy and secure operating system. However, users may encounter various error codes during the update process, and one such code is 0xc19001e1 windows update
This error can be frustrating, but understanding its causes and implementing the right solutions can help get your system back on track.
Windows 10 20H2 Update Error Code 0xc19001e1 is generally caused due to the corrupt system files. Many users encounter this Windows Update Error 0xc19001e1 when trying to upgrade their PC to 20H2 and displays a message stating that Windows failed to install the updates.
In this post, we will discuss the reasons behind this Windows Update Error Code 0xc19001e1 and the solution to resolve this 0xc19001e1 windows 10 update 22h2 completely.
Reasons for 0xc19001e1 windows 10 update
0xc19001e1 windows 10 update 20h2 indicate that the OS is missing some files required by Windows Update to perform it. This error code 0xc19001e1 will also appear.
Windows cannot finish updating the operating system. Other common reasons may include incorrect user input and accidentally deleted files from the registry that now cause system malfunctions.
Insufficient Disk Space:
One common cause is not having enough free space on your system drive for the update to be installed.
Corrupted System Files:
If essential system files are corrupted, the update process may fail, leading to error 0xC19001E1.
Third-Party Software Interference:
Certain third-party applications or security software can interfere with the update process, causing errors.
[KB9199277]-Solutions to fix Windows Update Error code 0xc19001e1
Run Windows Update Troubleshooter
- Firstly, go to Settings and open Update and Security option
- After that, click Troubleshooter tab and Select Additional troubleshooters

- Finally, Run the Update troubleshooter and Restart your PC
If persist this 0xc19001e1 error, follow the instruction below or chat with our Microsoft experts for help.
Repair Corrupted System Files to fix the Error 0xc19001e1
Perform SFC scan
- Firstly, open Command Prompt and Run as administrator
- After that, use the following command and press EnterSFC/SCANNOW
- Finally, reboot your system
- If SFC returned an error, then use the following command lines and press Enter after each command
- DISM /Online /Cleanup-Image /Check Health
- DISM /Online /Cleanup-Image /Scan Health
- DISM /Online /Cleanup-Image /Restore Health
Reset Windows Update Component
1.Firstly, open Command Prompt and Run as administrator
2.After that, type the following commands and press Enter after each command
- net stop bits
- net stop wuauserv
- net stop appidsvc
- net stop cryptSvc
Reset Software Distribution Folder
- Firstly, open the Command Prompt and Run as Administrator
- After that, copy and paste following commands one by one and press Enter
- ren C:\Windows\SoftwareDistribution Software Distribution. old
- ren C:\Windows\System32\catroot2 Catroot2.old
Download the Updates Manually
- First, you must visit Microsoft’s Update History website to find the update number
- Once you find the updated code, you must visit the Microsoft Update Catalog
- It should start with KB and some numbers
- Enter the update code in the search field, and the results list should appear
In Conclusion:
At last, follow the above explained steps and restart your system services will ideally resume your updates to work. If you still need help to resolve this windows 10 update error code 0xc19001e1, we suggest you to chat with our experts. I am sure they will help you resolve this issue completely. You can also visit our website for more details and information.
Windows 10/11 is a popular and productive operating system, but it is not free from issues. The 0xc19001e1 error is one such problem that users may encounter while updating to the 20H2 version.
Well, we all know and understand the importance of keeping your Windows 10/11 operating system up-to-date, right? Microsoft regularly releases new updates to resolve known bugs and issues, introduce new features, and improve the operating system’s performance. These updates also fix security loopholes to prevent attacks. But with the Windows 10 version 20h2 – error 0xc19001e1 keeping you from installing updates, is there anything else you can do?
Of course, there is! And in this blog, we will talk about the 20h2 update failed 0xc19001e1 error on Windows 10/11 and suggest fixes that can fix it.
What Is the Windows Update Error 0xc19001e1?
The error 0xc19001e1 20h2 that appears during a Windows update is one that is quite frustrating to deal with. It ruins your plans as it prevents the update from being downloaded and installed. No matter how many times you attempt to install the update, it just doesn’t end up successful.
So, what causes the 0xc19001e1 error code to appear? The most common causes are:
- Corrupted System Files – Corrupted system files are the primary reasons that trigger the 0xc19001e1 Windows 10/11 update error. Most of the time, doing an SFC or DISM scan will resolve the issue.
- Several Updates Are in Queue – One of the known causes of Windows update failures is when multiple updates are in the queue. In this case, rebooting your computer will do the trick.
- Insufficient Disk Space – If there is not enough disk space to complete the update, it is likely that the update will stop, and Windows will give you an error message. To fix this, use a PC repair tool to get rid of any unnecessary temp and junk files in your folders.
- Corrupted Update Files – Did you accidentally shut down your computer? Was there an unexpected power interruption that caused your device to switch off suddenly while installing the update? Chances are the update files have now become corrupted, resulting in the error 0xc19001e1. Deleting these corrupted update files should fix the problem.
- Hardware Component Conflict – The error 0xc19001e1 may also appear if there is a hardware component that is connected to your PC and interrupts the entire update process. Disconnect these components and see if the update completes without any problem.
- Driver Incompatibility or Conflict – Are your device drivers obsolete? Are they corrupted? If they are, there are possibilities that they will interrupt the whole Windows Update process. Make sure they are up to date and compatible with your software by using third-party software updater tools.
- Malware – Malware entities can also cause Windows update errors to show. These harmful entities can mess with your system processes or important files. As a result, you see update errors.
What to Do When You Encounter the Windows Update 0xc19001e1 Error
So, you’ve come across the Windows update error 0xc19001e1. What should you do? Before anything else, perform these basic troubleshooting steps:
- Ensure all unnecessary external peripherals are disconnected before installing the updates. Disconnect your printers, speakers, and other components that won’t be needed during the Windows update.
- Close and exit the programs that are actively running in the background. For this, you may use Task Manager or clean boot your PC.
- Disable your firewall, antivirus, or security programs temporarily as they may interfere with the update process.
- If you are connected to a wireless network, make sure that there are no other devices using it as well. In that scenario, they may consume more bandwidth, which is needed for downloading the updates.
- Restart your computer and your router. A quick restart will flush your cache and allow you to choose another faster channel for your network.
If none of the above troubleshooting steps works, proceed to the fixes below:
Fix #1: Run the Windows Update Troubleshooter
Windows 10/11 users have a handy tool that can be used if ever problems with Windows updates arise. It is called the Windows Update Troubleshooter. It automatically detects and resolves issues that prevent your device from installing the most recent OS updates.
Here’s how to run the troubleshooter on Windows 10/11:
- Open the WinX menu by pressing the Windows + X keys.
- From the menu that appears, select Settings.
- A window will now open. Navigate to the Update and Security section and click Troubleshooter.

- Then choose Additional Troubleshooters.
- Finally, hit the Update Troubleshooter button.
- At this point, the troubleshooter will do its task. Wait for it to complete before reinstalling the update.
Fix #2: Restart the Windows Update Components
For some affected users, restarting the Windows Update components resolved the problem. Restarting basically gives the components a fresh start. Here’s a detailed guide on how to restart the Windows update components:
- Open the WinX menu by pressing the Windows + X keys simultaneously.
- A menu will pop up now. Here, choose Command Prompt (Admin).
- Next, input the commands below one at a time. Make sure to press the Enter key on your keyboard after each command:
- net stop wuauserv
- net stop cryptSvc
- net stop bits
- net stop msiserver
- net start wuauserv
- net start cryptSvc
- net start bits
- net start msiserver
- Once done, check if you can now install the available Windows Update.
Fix #3: Check Your Hard Disk for Errors
If there are problematic sectors in your hard disk, it is possible that you get error codes like 0xc19001e1. So, try to scan your hard disk and see if problems exist in your disk. Here’s how to do that:
- Click the search field and type command prompt.
- Right-click on the top-most or relevant result and choose Run as Administrator.
- In the Command Prompt window, type these commands one at a time:
- dism /online /cleanup-image /scanhealth
- dism /online /cleanup-image /checkhealth
- dism /online /cleanup-image /restorehealth
- Lastly, restart your computer and see if the Windows update error 0xc19001e1 persists.
Fix #4: Run the SFC Command
If you are still being disturbed by the error, and it is affecting your productivity and PC’s performance, you can use the System File Checker utility. It will help you scan and repair corrupted or faulty system files automatically. Here’s how:
- Launch the Run applet using the Windows + R command.
- Input cmd into the blank field and press the CTRL + Shift + Enter keys simultaneously.
- Hit Yes if prompted by the UAC dialog.
- Into the command line, input the basic sfc /scannow command and tap Enter.
- The process may take several minutes to complete. Make sure you don’t interrupt the process, so wait patiently.
- Restart your computer to apply the changes and try to install the update.
Fix #5: Download the Windows Update Manually
Assuming you are still seeing the error 0xc19001e1 while updating Windows. What you can do is force the update process by manually downloading the files and installing them by yourself.
You have two ways to do this, but your choice depends on the type of update you need to install. For instance, if you wish to install a feature update, you need to get the Microsoft Update Assistant first. And once you have the update assistant, download the Media Creation Tool to proceed. You will then have the option to upgrade your PC. Follow the instructions shown on your screen to install the update. If you are installing a cumulative or security update, you can get it on Microsoft’s official Update Catalog website.
Fix #6: Disable Windows Defender Temporarily
Windows has an in-built feature called Windows Defender that protects it against viruses and other threats. It also prevents data leaks from your PC. Although it is a useful feature, in some cases, it blocks important system processes, especially those involved in installing updates. So, it is worth trying to temporarily disable this feature. To do that, follow these steps:
- Right-click on the Windows menu, and from the list of choices, select Run.
- In the blank field, input firewall.cpl and hit Enter.
- In the new window that appears, select the Turn Windows Defender Firewall On or Off option.
- Then check the boxes next to Turn off Windows Defender Firewall for both public and private network settings.
- Scroll down and tap OK.
- Log out of your current Windows account then log in.
- Install the update once again.
Fix #7: Perform a Clean Install
After trying a couple of workarounds, and the error still appears, we suggest that you perform a clean installation of Windows. Here’s how:
- Begin by inserting the Windows Media Creation Tool into an available port. Then restart your computer.
- While BIOS is loading, press a function key.
- On the screen that appears, hit Next then select Install Now.
- Now, provide a genuine product key if asked.
- Next, delete every partition available and reallocate the space to your hard drive.
- Choose your keyboard layout, preferred language, and region. Hit Next.
- Follow the on-screen instructions to proceed.
- Once done, try to install the pending update.
Fix #8: Update the Display Driver
You may be wondering why the need to update the display driver. In case you don’t know, the display driver plays an important role in keeping the system free from errors and ensuring smooth navigation. If the display driver is corrupted or damaged, it is possible that you may encounter an update error.
To fix any problems with your display driver, install any available update. Here’s how:
- Press the Windows + R keys to access the Run applet.
- Input devmgmt.msc into the text field and press Enter.
- Then expand the Display Adapter section and right-click on your installed graphics driver.
- Select Update Driver.
- After that, choose the option that searches for an updated driver software automatically.
- Now, your system will search the web for a compatible driver for your display. It will also install it automatically.
- Once done, restart your Windows 10/11 computer to save the latest changes.
- Then reinstall the update and see if the error is already gone.
Fix #9: Disable Any Third-Party Antivirus Program
Antivirus programs are designed to protect your computer against malware entities and other threats. But sometimes, these programs are too strict to the point that they interfere with the update process.
To rule out the possibility of your antivirus causing the issue, disable it temporarily. Here’s how:
- Right-click on the Windows menu and choose Settings.
- Then choose Apps and Apps & Feature.
- After that, scroll down the list and find your antivirus program.
- Hit the Uninstall button.
- If asked to confirm, click Yes.
- Once the task is done, restart your device.
Fix #10: Uninstall Any Unused Device Drivers
Did you just connect a new device to your computer? In this scenario, a new driver may have been installed on your system, and this new driver may continue to exist even if you no longer need it.
Now, unnecessary device drivers may prohibit the Windows update process and result in errors while downloading patches. The best solution to fix this–remove these unused device drivers. Here’s how:
- Right-click on the Windows icon or menu, and select Device Manager.
- When the Device Manager window opens, a list of apps and drivers will show. Find the specific device driver that you want to remove.
- Right-click on it and select the Uninstall Device option.
- A warning window will pop up. Select Yes to grant access.
- Finally, restart your Windows 10/11 computer to apply your recent changes.
In Conclusion
If you find yourself dealing with the Windows update error 0xc19001e1, fret not. You know you have this article. The first thing you have to do is perform basic troubleshooting steps like restarting your PC and router or disconnecting external hardware components. This way, you can find out if anything is blocking the update process.
Now, if basic troubleshooting methods don’t work, you can proceed to other fixes, such as using the Windows update troubleshooter, restarting the Windows Update components, or scanning your disk for errors. You can also try updating the display drivers or uninstalling any unused device drivers. But if all else fails, and you wish to still install the update, feel free to download it manually.
Which of the above fixes worked for you? Share your experience below!
Give us some love and rate our post!