
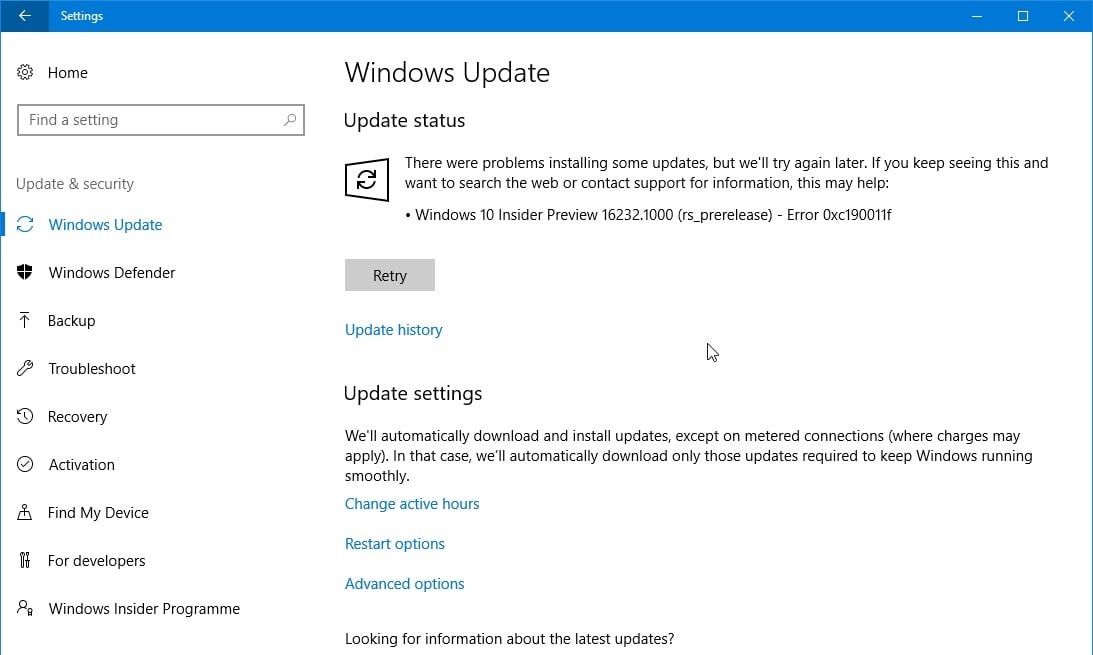
Ошибка 0xc190011f проявляется во время обновления операционной системы Windows 10. В сообщении этой ошибки указывается следующая информация:
С установкой некоторых обновлений возникли проблемы, но позднее будет предпринята еще одна попытка. Если вы продолжаете видеть это сообщение и хотите поискать дополнительные сведения в Интернете или обратиться в службу поддержки, вам может помочь следующая информация:
Windows 10 Insider Preview ***** — Error 0xc190011f
Что вызывает ошибку 0xc190011f?
- Глюк в работе Центра обновления. Порой данная ошибка возникает по причине появления глюка в работе Центра обновления Windows. Конкретно эта проблема затрагивает лишь Windows 10. Решается ошибка при помощи системного средства устранения неполадок.
- Повреждение системных файлов. В некоторых случаях ошибка 0xc190011f проявляется после повреждения системных файлов Windows 10. Самостоятельно определить, что было повреждено является практически невозможной задачей, тем не менее программы SFC и DISM найдут и устранят повреждения.
- Некорректно работающие компоненты Центра обновления. Некоторые компоненты Центра обновления Windows 10 могут внезапно работать не так, как было задумано. В подобной ситуации нужно сбросить компоненты Центра обновления.
- Неправильный регион и язык. В очень редких случаях виновниками появления ошибки 0xc190011f могут служить язык и регион, выставленные в настройках Windows 10. Чтобы избавиться от ошибки, достаточно установить корректные регион и язык для вашей системы.
- VPN/прокси утилита конфликтует с Центром обновления. Появлялись сообщения о том, что эту ошибку могут вызывать прокси/VPN-утилиты, установленные на компьютере пользователя. Якобы они могут входить в конфликт с Центром обновления. Можно попробовать удалить такую утилиту, если она есть на ПК.
Методы решения ошибки 0xc190011f
Метод №1 Запуск средства устранения неполадок
Самый первый шаг — запуск системного средства устранения неполадок. Эта утилита просканирует ваш компьютер, найдет проблемы в работе Центра обновления и предложит вам решение. Для ее запуска сделайте следующее:
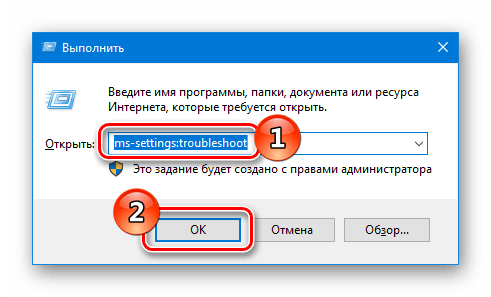
- нажмите комбинацию Windows+R;
- пропишите в строчке «ms-settings:troubleshoot» и нажмите Enter;
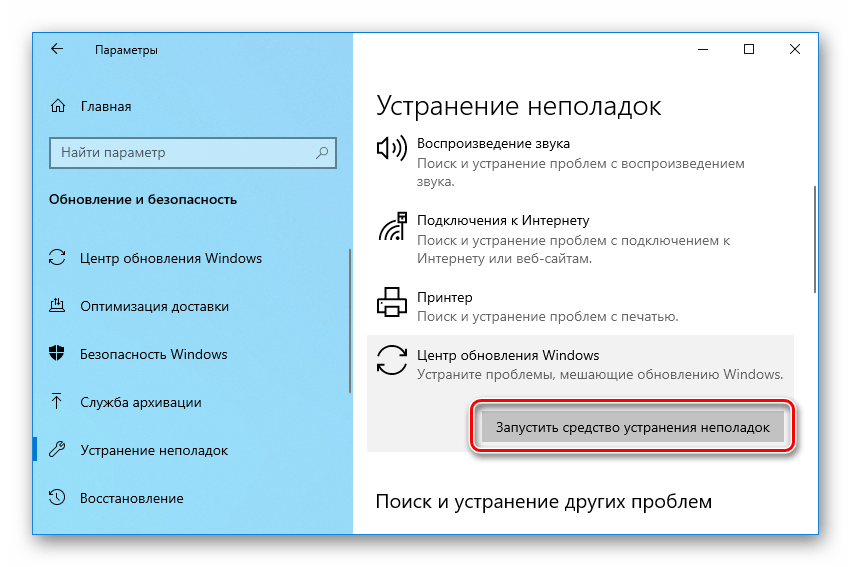
- нажмите на пункт «Центр обновления Windows» и кликните кнопку «Запустить средство устранения неполадок»;
- подождите окончания процесса сканирования системы на наличие неполадок;
- нажмите на кнопку «Применить это исправление»;
- перезагрузите компьютер, когда средство закончит работу.
Попробуйте снова обновить Windows 10, чтобы проверить, появится ли ошибка 0xc190011f или нет.
Метод №2 Использование SFC и DISM
Утилиты SFC и DISM просканируют вашу систему на наличие поврежденных системных файлов и попытаются восстановить их. Все, что вам нужно сделать — это выполнить в командной строке парочку команд. Сделайте следующее:
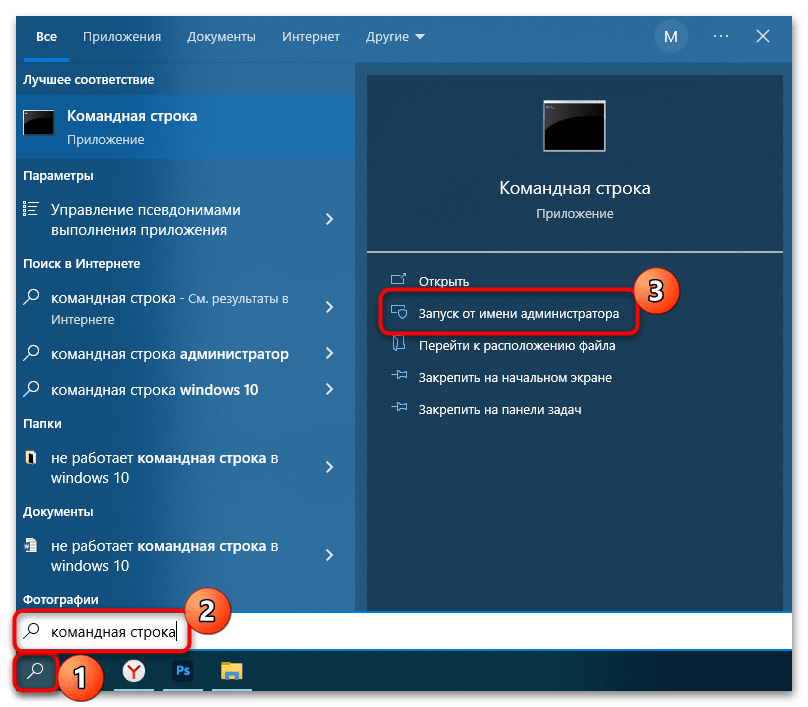
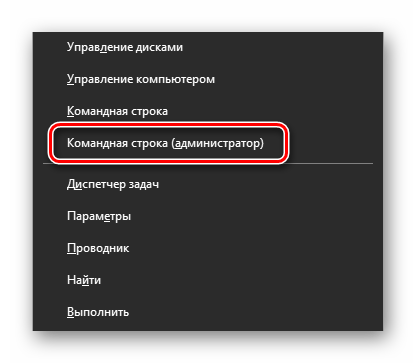
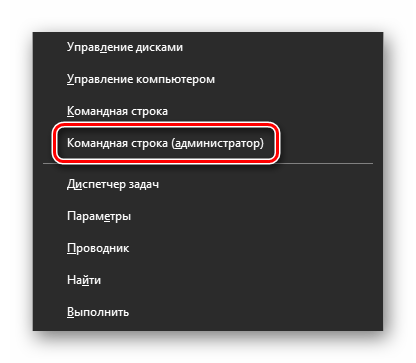
- кликните правой кнопкой мыши на Пуск;
- выберите «Командная строка (администратор)»;
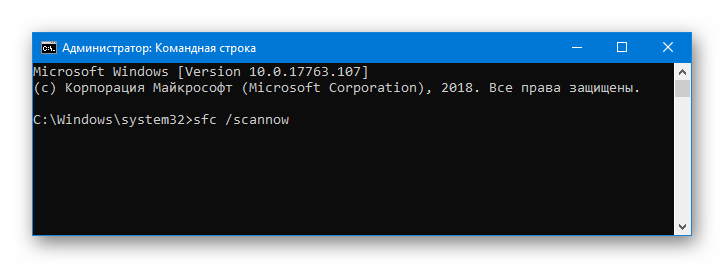
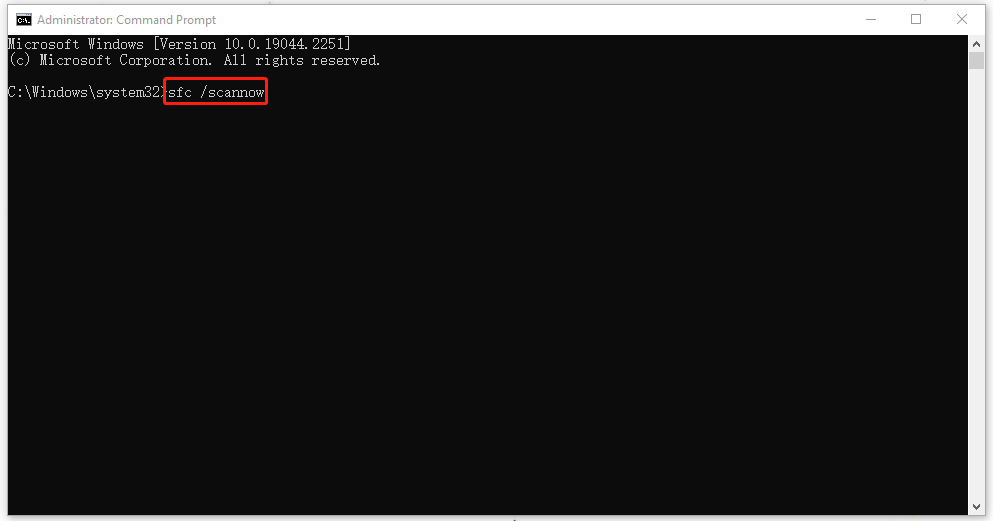
- пропишите команду «sfc /scannow» и нажмите Enter;
- подождите окончания работы утилиты SFC и перезагрузите компьютер;
- проверьте, появляется ли ошибка или нет;
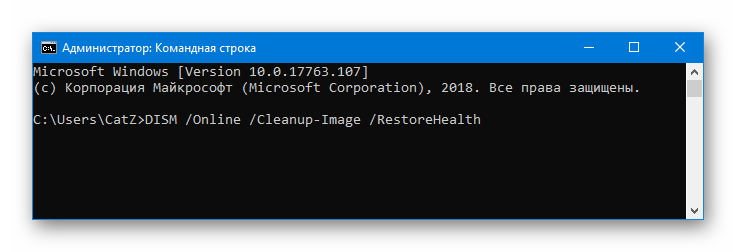
- если она все еще есть, то откройте командную строку и выполните команду «DISM /Online /Cleanup-Image /RestoreHealth»;
- дождитесь окончания работы утилиты DISM и перезагрузите компьютер.
Снова заходим в Центр обновления и пытаемся выполнить обновление системы. Если были повреждены системные файлы, то ошибка 0xc190011f исчезнет.
Метод №3 Сброс компонентов Центра обновления
Возможно, вы столкнулись с проблемами во время апдейта своей системы потому, что некоторые компоненты Центра обновления Windows 10 начали сбоить. Если это так, то вам нужно попробовать выполнить их сброс и посмотреть, что исправит ли это ситуацию. Сделайте следующее:
- кликните ПКМ на Пуск и выберите «Командная строка (администратор)»;
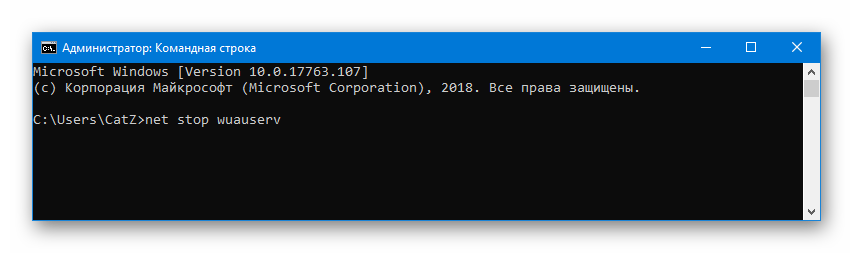
- выполните в командной строке следующий ряд команд:
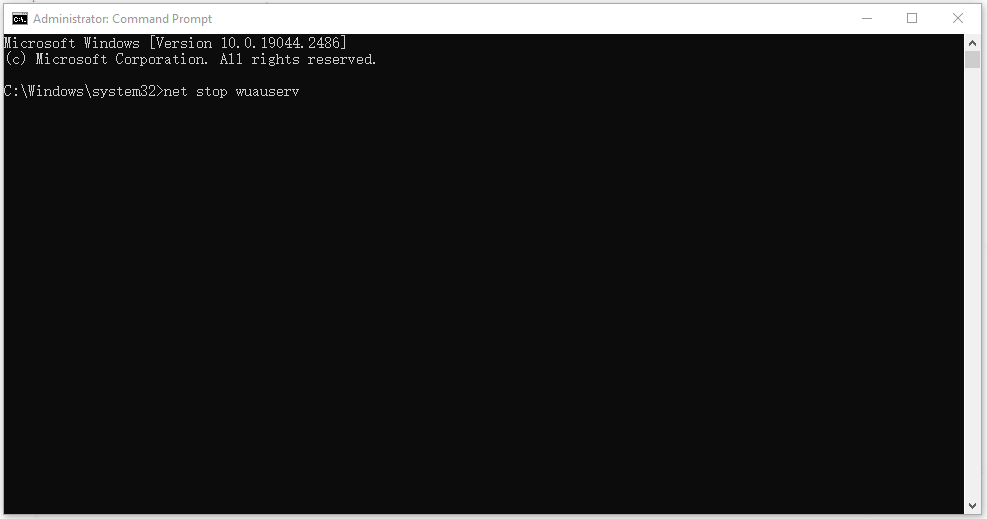
- net stop wuauserv;
- net stop cryptSvc;
- net stop bits;
- net stop msiserver;
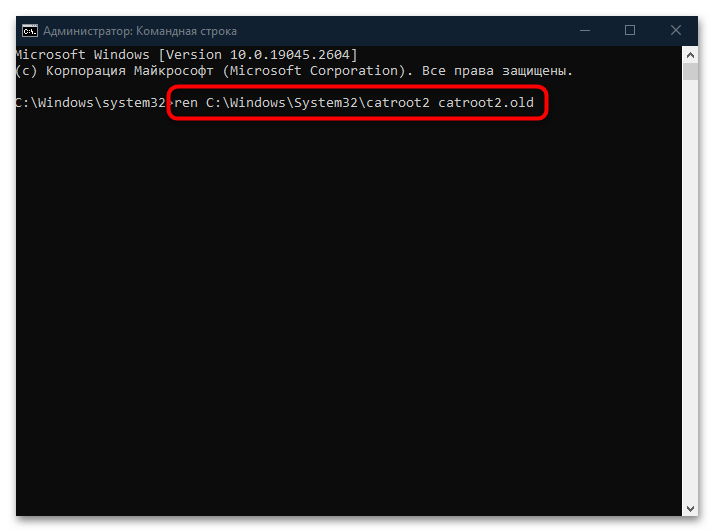
- ren C:\Windows\SoftwareDistribution SoftwareDistribution.old;
- ren C:\Windows\System32\catroot2 catroot2.old;
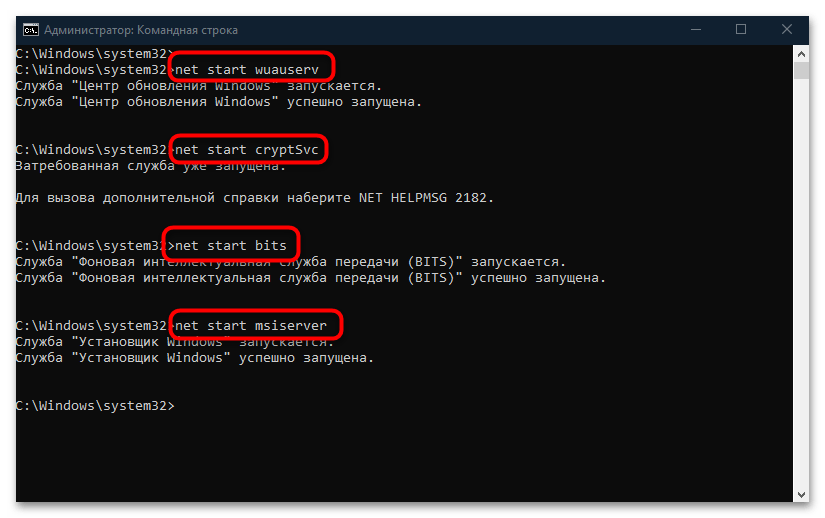
- net start wuauserv;
- net start cryptSvc;
- net start bits;
- net start msiserver;
- после выполнения команд перезагрузите свой компьютер.
Направляемся в Центр обновления и смотрим, пропала ли ошибка 0xc190011f.
Метод №4 Изменения региона и языка
Проблемы с обновлением могут возникать на тех компьютерах, где некорректно выставлены регион и язык для системы. Попробуйте изменить эти настройки на своем ПК и гляньте, поменяется ли что-то. Для изменения настроек региона и языка сделайте следующее:
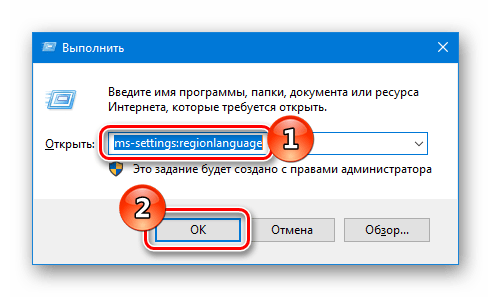
- нажмите Windows+R;
- впишите в пустую строку «ms-settings:regionlanguage» и нажмите Enter;
- выберите корректную страну и язык для нее;
- перезагрузите свой компьютер после внесенных изменений.
Неверные язык и регион частенько становятся проблемой при обновлении Windows 10. Подобрав корректные параметры, ошибка 0xc190011f должна будет исчезнуть.
Метод №5 Удаление VPN/прокси программ
VPN и прокси программы могут быть невероятно полезны в соответствующих ситуациях. Тем не менее они также могут и препятствовать нормальной работе операционной системы. Если у вас в Windows 10 установлены подобные программы, то мы настоятельно рекомендуем вам избавиться от них и проверить, решит ли это проблему в виде ошибки 0xc190011f.
Чтобы удалить ту или иную программу, сделайте следующее:
- нажмите Windows+R;
- напишите «appwiz.cpl» и нажмите Enter;
- найдите VPN/прокси программу и нажмите на нее ПКМ;
- кликните на «Удалить» и следуйте инструкциям на экране;
- после удаления программы перезагрузите компьютер.
Мы надеемся, что хоть какой-то из вышеперечисленных методов помог вам исправить ошибку 0xc190011f.
Все способы:
- Способ 1: Встроенное средство устранения неполадок
- Способ 2: Проверка работы связанных служб
- Способ 3: Сброс настроек «Центра обновления»
- Способ 4: Изменение настроек языка и региона
- Способ 5: Восстановление поврежденных файлов
- Способ 6: Удаление VPN
- Способ 7: Ручная установка обновления
- Вопросы и ответы: 0
Способ 1: Встроенное средство устранения неполадок
Как правило, ошибка 0x190011f появляется при попытке установить обновления с использованием штатного средства – «Центра обновлений Windows». Есть один универсальный способ, позволяющий проверить программный компонент на наличие неисправностей, затем устранить их при наличии такой возможности:
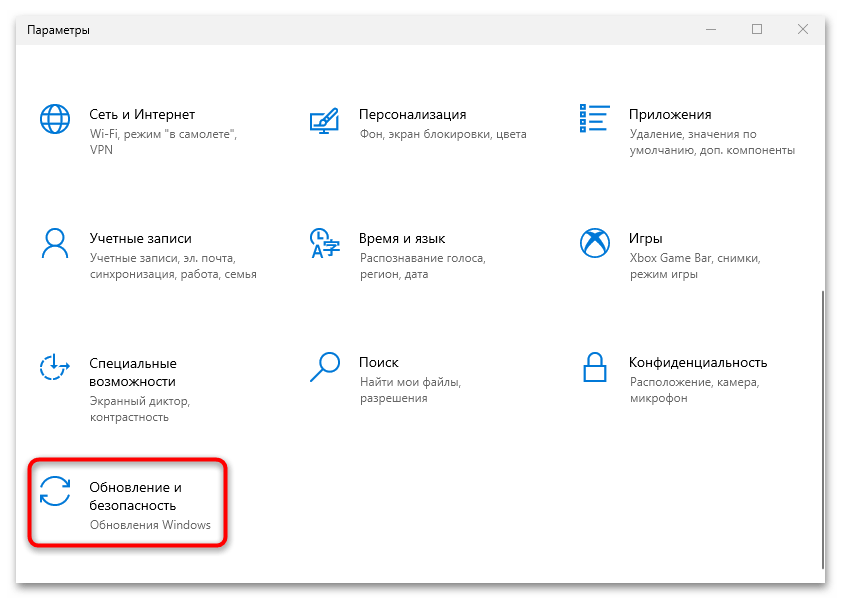
- Через главное меню операционной системы запустите приложение «Параметры».
- В новом окне выберите раздел «Обновление и безопасность».
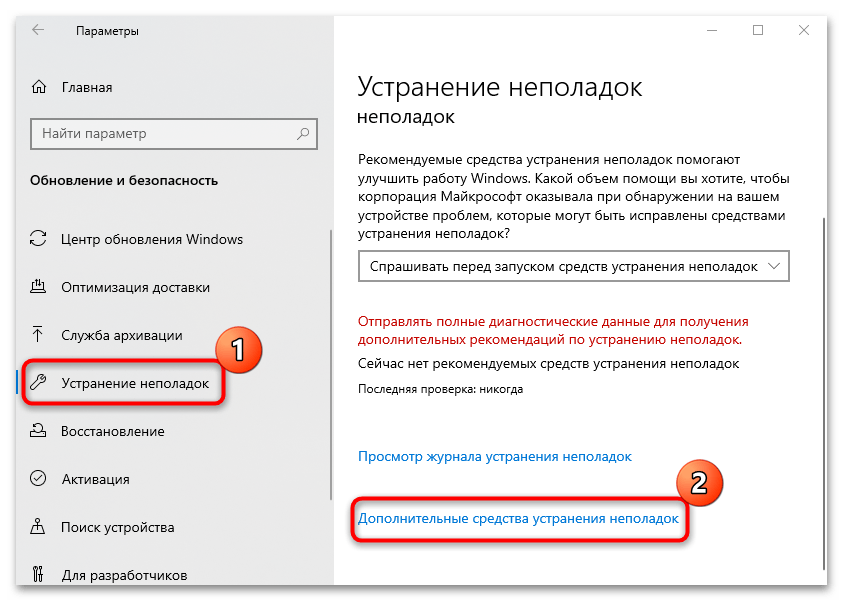
- Кликните по вкладке «Устранение неполадок», которая располагается слева, а в центральной части окна выберите строку «Дополнительные средства устранения неполадок».
- В списке доступных компонентов выберите «Центр обновления Windows», затем нажмите на кнопку, запускающую средство.
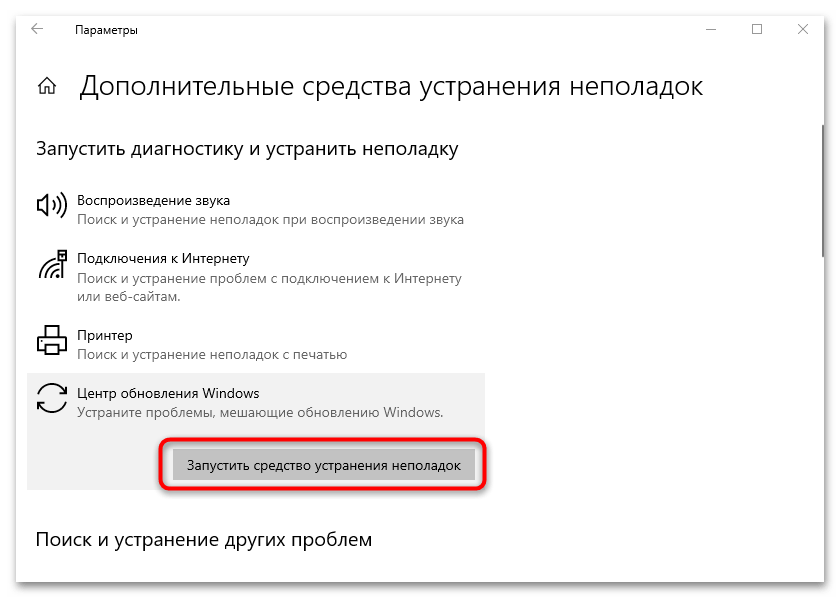
Как только проверка начнется, отобразится соответствующее окно с ее прогрессом. При выявлении ошибок будут предложены методы их исправления. Если проблем не было найдено, переходите к другим способам решения неполадки.
Способ 2: Проверка работы связанных служб
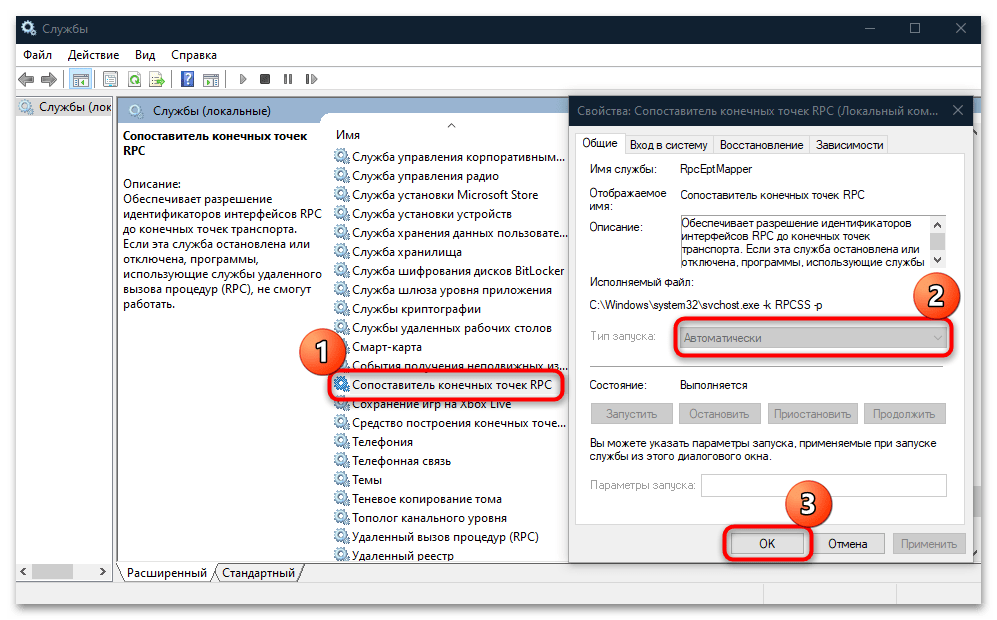
За установку обновлений в Windows 10 отвечают специальные службы, которые должны работать корректно, в противном же случае вероятно появление различных ошибок, в том числе с кодом 0x190011f. Вы можете проверить состояние каждой из них и изменить тип запуска при необходимости, используя встроенную оснастку «Службы»:
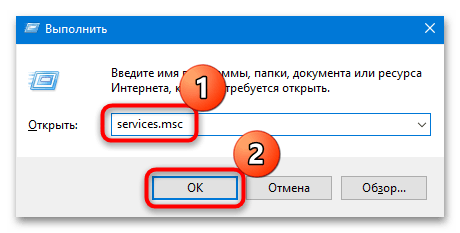
- Вызовите диалоговое окно «Выполнить», одновременно нажав на клавиши «Win + R». В текстовом поле введите
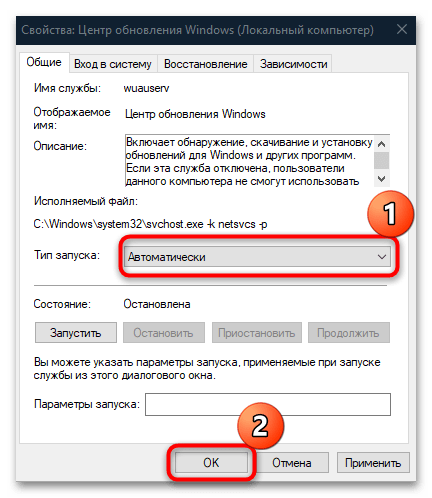
services.mscи нажмите на кнопку «ОК» для запуска нужной нам оснастки. - Далее нужно проверить состояние некоторых служб. В первую очередь найдите основную — «Центр обновления Windows» — и дважды кликните левой кнопкой мыши по названию.
- В меню «Тип запуска» выберите «Автоматически» и примените настройки.
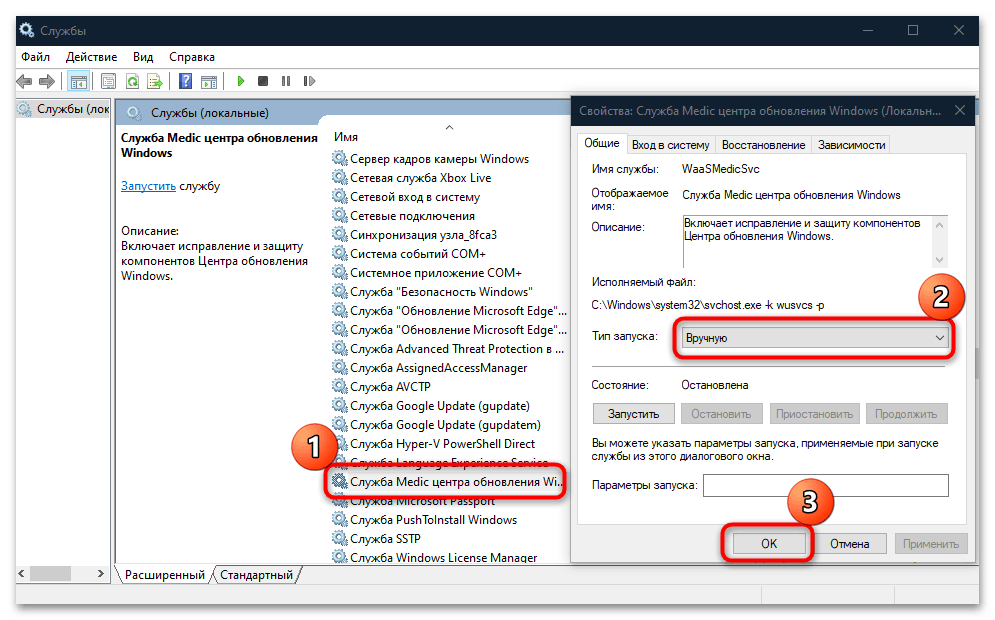
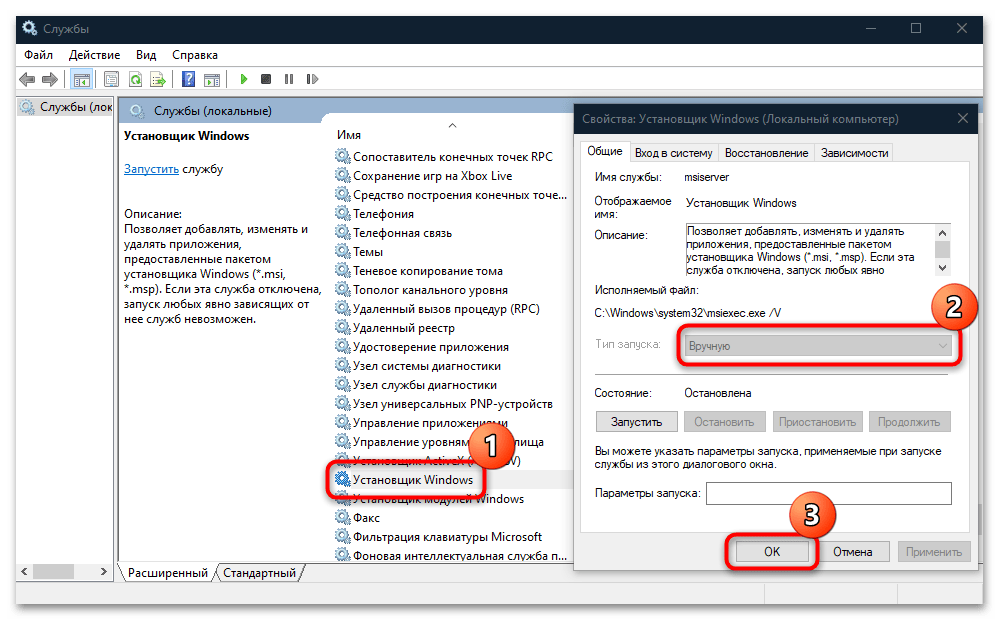
- Затем нужно настроить работу некоторых дополнительных, но непосредственно влияющих на установку апдейтов, служб. Через общий список двойным кликом откройте «Службу Medic центра обновления Windows» и в качестве типа запуска выберите значение «Вручную».
- Перейдите к следующей службе – «Фоновой интеллектуальной службе передачи (BITS)». В окне со свойствами установите автоматический тип запуска.
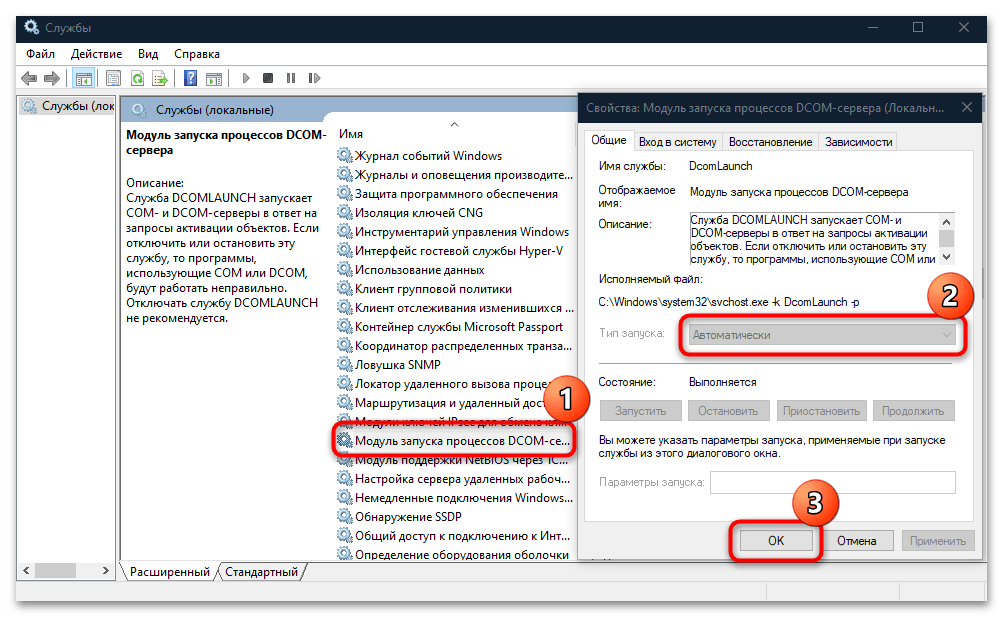
- То же самое проделайте с «Модулем запуска процессов DCOM-сервера» (автоматический тип запуска).
- Для службы «Сопоставитель конечных точек RPC» также выбираем тип запуска как «Автоматически».
- И останется проверить «Установщик Windows». Для его правильной работы нужно установить ручной тип запуска, если установлено другое значение.


На этом проверка состояния необходимых для правильной установки обновлений служб завершена. Если вам пришлось откорректировать их значения, то после выполнения рекомендаций выше попытайтесь снова инсталлировать апдейты, используя «Центр обновления Windows».
Способ 3: Сброс настроек «Центра обновления»
Нередко рассматриваемая ошибка является следствием проблем в работе самого «Центра обновления Windows». Такое случается, когда во время скачивания компонентов программного обеспечения произошла ошибка — например, из-за сбоя в сети или каких-либо системных неполадок. Тогда может помочь сброс его настроек, и самый быстрый и простой способ сделать это – использовать «Командную строку» и специальные команды:
- Запустите консоль от имени администратора. Для этого можете воспользоваться строкой системного поиска или «Пуском», после чего выберите соответствующий вариант в результате.
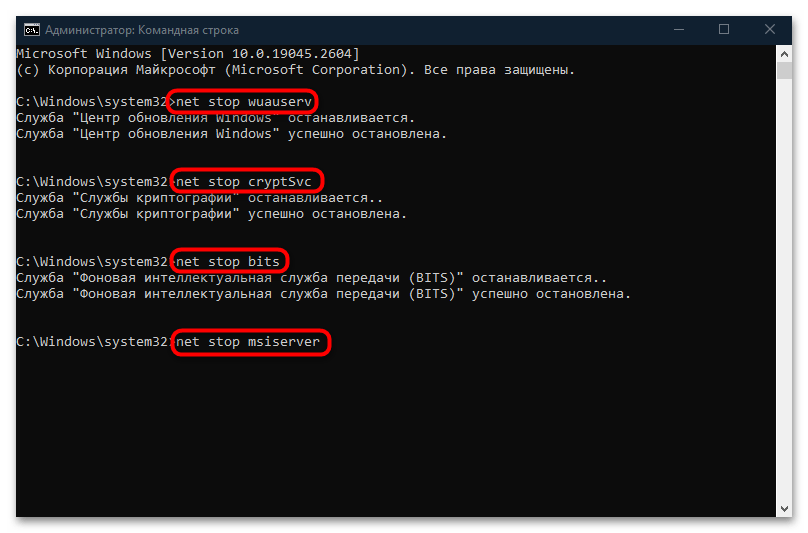
- Принцип достаточно прост: сначала нужно выключить «Центр обновления», а также связанные службы. Для этого используйте несколько команд, каждую из которых нужно выполнить, нажав на клавишу «Enter»:
net stop wuauserv
net stop cryptSvc
net stop bits
net stop msiserver - Следующие команды предназначены для переименования папок на локальном диске, где хранятся загрузки предыдущих обновлений. Активируйте запрос
ren C:\Windows\SoftwareDistribution SoftwareDistribution.old, введя соответствующую команду и нажав на клавишу ввода. Затем измените имя второму каталогу аналогичным образом. Для этого примените командуren C:\Windows\System32\catroot2 catroot2.old. - Далее останется вновь запустить отключенные службы, поочередно выполняя следующие команды:
net start wuauserv
net start cryptSvc
net start bits
net start msiserver
На этом сброс «Центра обновления Windows» завершен. Попробуйте снова выполнить инсталляцию апдейтов для операционной системы.
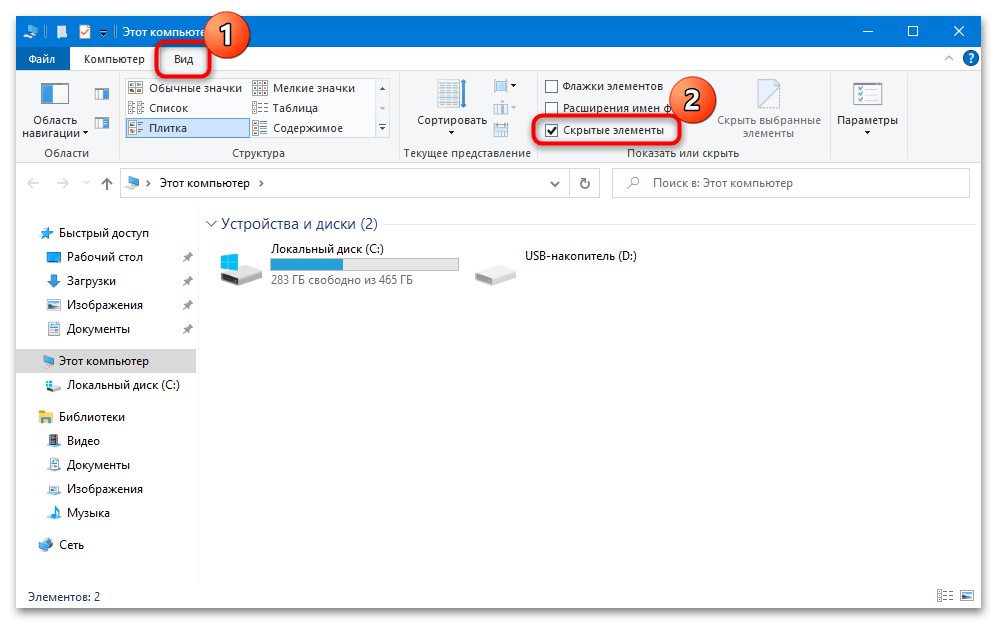
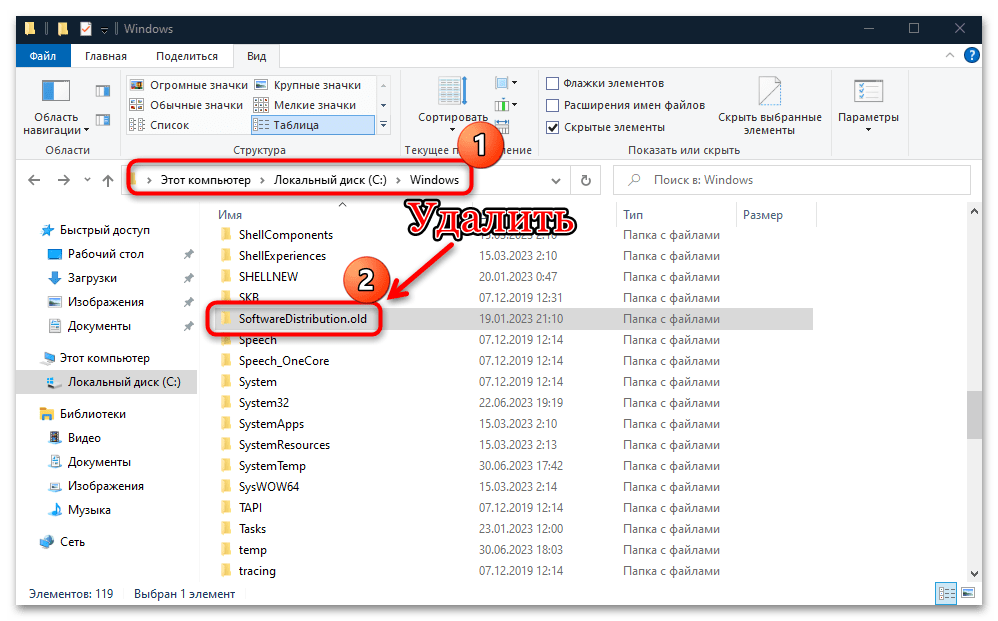
Данные, которые остались в переименованных папках можно удалить, если способ помог. Это позволит освободить некоторое место на локальном диске. Тогда запустите «Проводник» и для начала включите отображение скрытых элементов на вкладке «Вид» в блоке «Показать или скрыть».
Далее перейдите по адресу C:\Windows\System32\ и удалите любым удобным способом каталог под названием «catroot2.old». То же самое проделайте с папкой «SoftwareDistribution.old», расположенной по адресу C:\Windows.
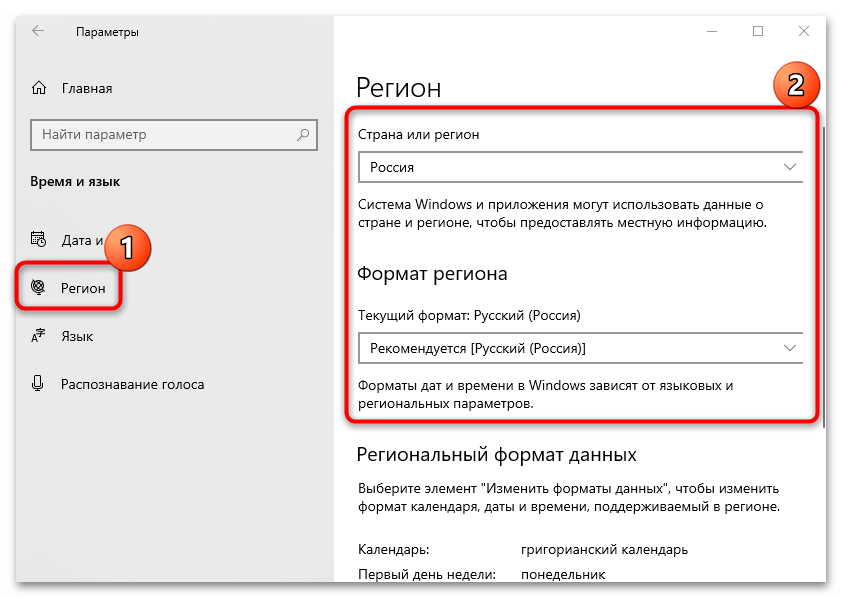
Способ 4: Изменение настроек языка и региона
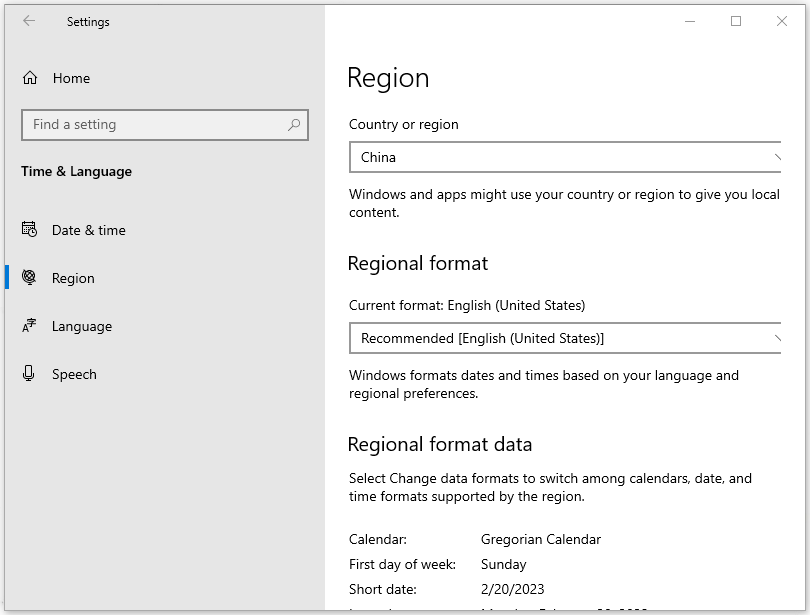
Во время загрузки обновлений с официального сайта Microsoft (что и делает «Центр обновления Windows») могут происходить сбои, если ваши региональные настройки отличаются от текущего местоположения. Дело в том, что поиск и скачивание апдейтов основан именно на этих параметрах. Проверьте параметры языка и региона в настройках операционной системы и измените их на корректные, если это потребуется:
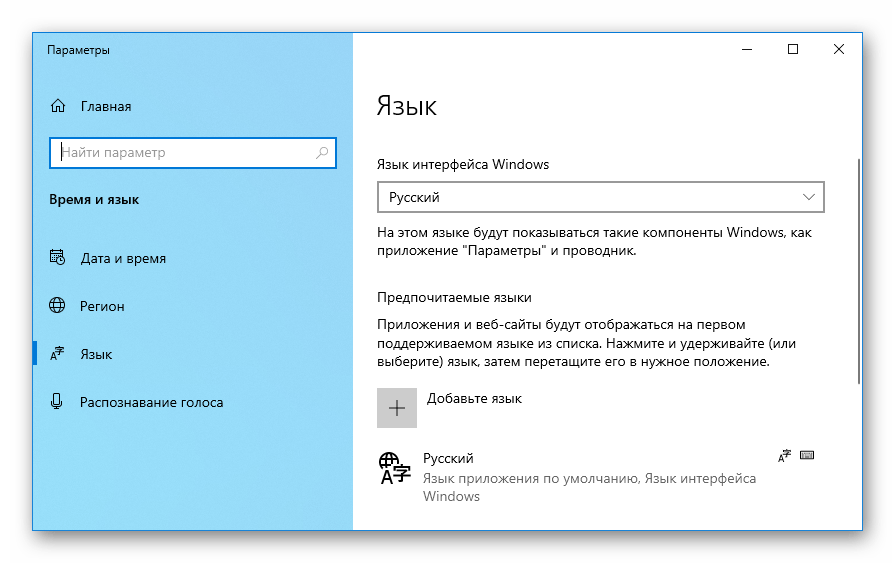
- Через приложение «Параметры» перейдите в раздел «Время и язык».
- На вкладке «Регион», расположенной на панели слева, выберите ваше текущее местоположение.
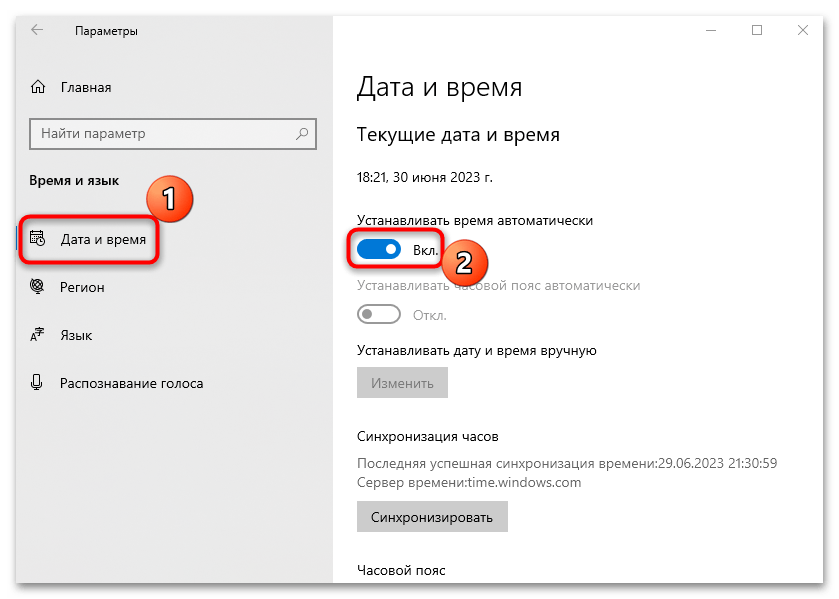
- Затем нажмите на «Дата и время» слева и выставите нужные параметры. Обычно достаточно активировать опцию «Устанавливать время автоматически», после чего произойдет синхронизация данных для наиболее точных сведений.

После того как параметры даты и времени, а также региональные настройки будут выставлены, попробуйте снова установить обновления для Windows 10.
Способ 5: Восстановление поврежденных файлов
Еще одной из причин проблем с «Центром обновлений» и, соответственно, установкой апдейтов может быть нарушение целостности системных файлов. Это происходит по различным причинам: возможно, из-за вирусных атак в прошлом или серьезных сбоев в работе ОС. Так или иначе, нет смысла искать, почему произошло повреждение, однако можно восстановить проблемные данные с помощью встроенных утилит, запускаемых консольными командами. Читайте об этом более подробно в нашем отдельном руководстве.
Подробнее: Использование и восстановление проверки целостности системных файлов в Windows 10

Способ 6: Удаление VPN
Если у вас установлена VPN-программа, вполне вероятно, она при обновлении Windows 10 и вызывает ошибку 0x190011f. Принцип работы большинства подобного софта заключается в том, что он автоматически устанавливает свои драйверы для виртуальной сетевой карты, чтобы перенаправлять подключение к интернету.
Различные приложения с VPN могут стать причиной неполадки, когда система пытается обратиться к сетевым библиотекам Microsoft и получить актуальные обновления. Для исправления ситуации попытайтесь вручную полностью удалить программное обеспечение вместе с драйверами (обычно это происходит автоматически при деинсталляции программы).
Способ 7: Ручная установка обновления
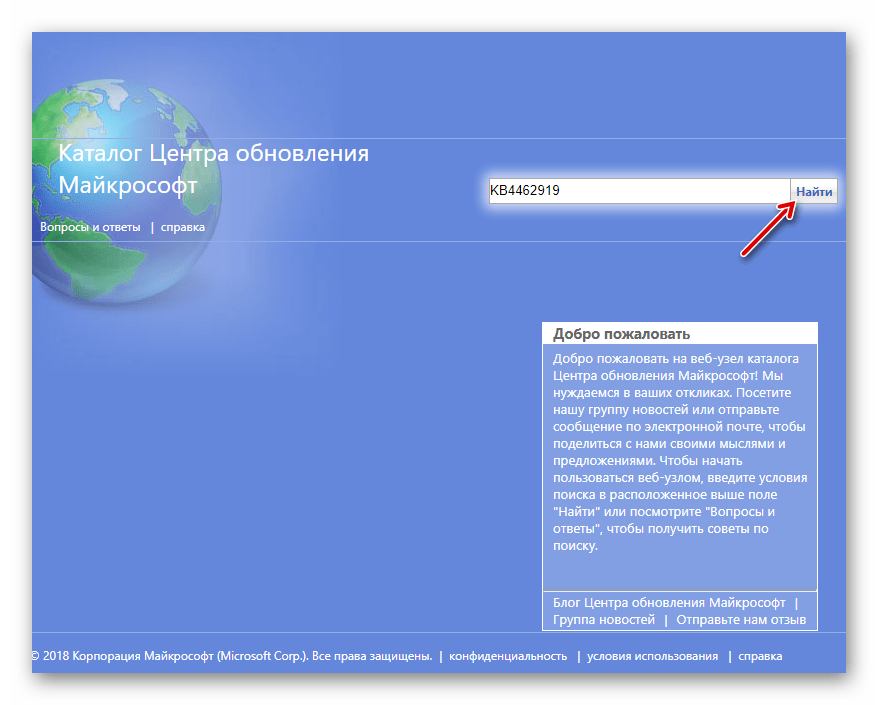
В случае если ни один способ из статьи не помог, но вы знаете наверняка, с каким патчем произошла ошибка при скачивании или установке, рекомендуем отыскать и инсталлировать обновление самостоятельно. Достаточно посетить официальный сайт Microsoft, найти апдейт и загрузить его, затем вручную выполнить установку. Ознакомьтесь с нашей отдельной статьей, где подробно описан алгоритм действий.
Подробнее: Устанавливаем обновления для Windows 10 вручную
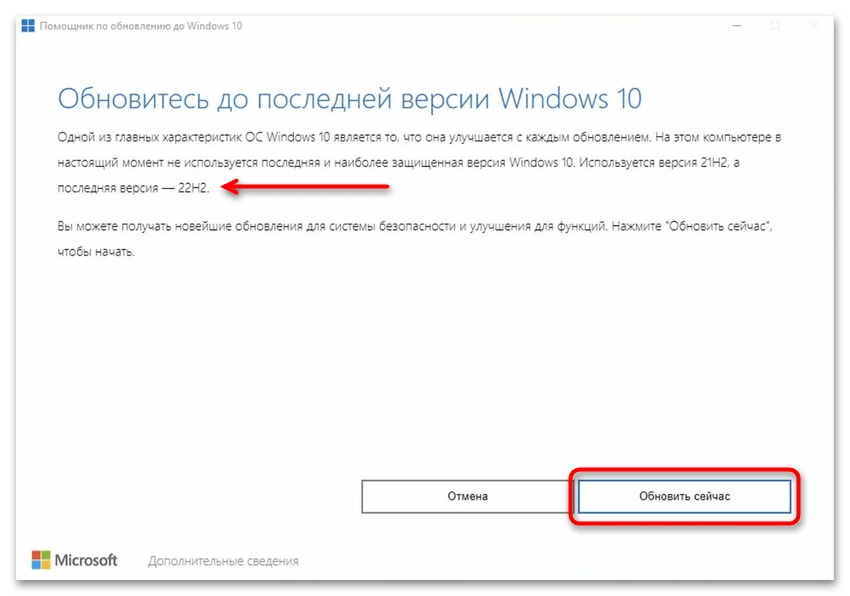
Вместо этого, если должно установиться крупное обновление, можете воспользоваться фирменной утилитой Update Assistant от Microsoft. Это довольно удобный метод, к тому же иногда помогающий справиться с невозможностью перехода до новой версии ОС через «Центр обновления Windows». Скачайте его с сайта компании (ссылка ниже), удостоверьтесь, что помощником обнаружена новая версия, нажмите «Обновить сейчас» и следуйте указаниям приложения.
Скачать Update Assistant с официального сайта
Наша группа в TelegramПолезные советы и помощь
Recently we come across an update error code 0xc190011f while upgrading Windows 11 to its latest version 22h2. If you did also encounter the same error code and want to know the reasons why it occurred, read this guide till the end. In addition to the reasons involved, we will also discuss the four fixes that should resolve this issue on your behalf.

What causes this error code 0xc190011f in Windows 11?
This update error mostly occurs when the update components have corrupted somehow. Enabling all update services to run automatically should address this error code. Sometimes, this error could also be the direct result of accumulated stored cache under SoftwareDistribution or catroot2 folders.
Purge both these folders and check if this resolves the update failing on Windows 11. In case you are still struggling with the same error code, consider manually downloading and installing the available updates for your computer.
How to Clean Install Windows 10 22H2
If you are encountering an error code 0xc190011f while updating Windows 11 to version 22h2, attempt the below fixes one after another.
1] Troubleshoot Windows Update
Microsoft includes a great built-in tool that can look for the underlying causes behind an update error and have them resolves resolved. This tool is no other than the Windows Update troubleshooter itself. Here’s how to locate this tool and start troubleshooting with it –
- Launch Settings by pressing Windows + I.
- Go to System > Troubleshoot > Other troubleshooters.
- Under “Most frequent”, locate Windows Update and hit the Run button available on it.

- The troubleshooting window will launch immediately afterward.
Click Next and follow the on-screen instructions to have the error 0xc190011f resolved in Windows 11. After you are done with the troubleshooting process, make sure to reboot your Windows PC.
Windows 11 22H2 FAQs – Frequently Asked Questions
2] Check and Enable All Update Services
Windows 11 update to version 22h2 might fail when the update-related services are either disabled or not running in the background. Go and check the current status of all such services and enable them to run automatically. There are some services that you better leave to run manually or via triggered manual.
Follow the below instructions on what to do with all services which are responsible for a failing update on Windows 11 –
- Launch the Run dialog first by pressing Win + R.
- Type
services.mscon it and hit OK. - On the Services window, scroll down and locate Background Intelligent Transfer Service.
- When found, right-click on it, and select Properties.
- On its properties window, use the drop-down menu next to Startup type and change it to Manual.
- Click Apply and then OK to confirm the recent changes.
- Repeat the above steps for all the following services as well and change their startup types to the one provided next to their names –
Cryptographic Services – Automatic
DCOM Server Process Launcher – Automatic
RPC Endpoint Mapper – Automatic
Windows Installer – Manual
Windows Update Medic Services – Manual
Windows Update Service – Manual (Triggered)
- Assuming you did find and change the above services, close the Services window.
Restart your Windows 11 PC and when it does reboot, check if you can update normally to version 22h2.
3] Reset update Components
If the error code 0xc190011f is still appearing, this must be either because of an unnecessarily stored cache, corrupt update components, or some DLL files missing from your system. You may handle all these issues separately, however, as all of them are related, we recommend resetting the Update components on your computer. Here’s how to perform this task –
- First of all, press Win + X, and select Terminal (Admin).
- The UAC window will appear next, click Yes to authorize opening this built-in command tool.
- Use Ctrl + Shift + 2 to invoke the Command prompt on the same terminal.
- On the elevated console, execute these commands to stop all update services –
net stop bits
net stop wuauserv
net stop cryptSvc

- Now that you have disabled all update services, purge the Windows cache folders. For this, you have to execute the below two commands –
rmdir %systemroot%\SoftwareDistribution /S /Q
rmdir %systemroot%\system32\catroot2 /S /Q
- Running the above two codes will add a .old extension to the folders – SoftwareDistriution and Catroot2. You may use the renamed folders in case something goes wrong on your computer.
- Copy/paste the below command and press Enter to remove all the qmgr*.dat files existing under BITS.
Del "%ALLUSERSPROFILE%\Application Data\Microsoft\Network\Downloader\*.*"
- You may now re-register all DLL files on your computer. You may perform this task by executing the below codes one after another –
regsvr32.exe /s atl.dll
regsvr32.exe /s urlmon.dll
regsvr32.exe /s mshtml.dll
regsvr32.exe /s shdocvw.dll
regsvr32.exe /s browseui.dll
regsvr32.exe /s jscript.dll
regsvr32.exe /s vbscript.dll
regsvr32.exe /s scrrun.dll
regsvr32.exe /s msxml.dll
regsvr32.exe /s msxml3.dll
regsvr32.exe /s msxml6.dll
regsvr32.exe /s actxprxy.dll
regsvr32.exe /s softpub.dll
regsvr32.exe /s wintrust.dll
regsvr32.exe /s dssenh.dll
regsvr32.exe /s rsaenh.dll
regsvr32.exe /s gpkcsp.dll
regsvr32.exe /s sccbase.dll
regsvr32.exe /s slbcsp.dll
regsvr32.exe /s cryptdlg.dll
regsvr32.exe /s oleaut32.dll
regsvr32.exe /s ole32.dll
regsvr32.exe /s shell32.dll
regsvr32.exe /s initpki.dll
regsvr32.exe /s wuapi.dll
regsvr32.exe /s wuaueng.dll
regsvr32.exe /s wuaueng1.dll
regsvr32.exe /s wucltui.dll
regsvr32.exe /s wups.dll
regsvr32.exe /s wups2.dll
regsvr32.exe /s wuweb.dll
regsvr32.exe /s qmgr.dll
regsvr32.exe /s qmgrprxy.dll
regsvr32.exe /s wucltux.dll
regsvr32.exe /s muweb.dll
regsvr32.exe /s wuwebv.dll
- After you successfully re-register all DLL files, make sure to enable the update services that you stopped earlier. To do so, use these commands –
net start wuauserv
net start bits
net start crypytSvc
- Run the below codes to solve any network-related issue on your computer as well –
netsh winsock reset
netsh winsock reset proxy
- Close the Terminal, and restart your PC.
Sign back into your device again and check if you can update to Windows 11, version 22h2 without encountering the same error code 0xc190011f again.
4] Manually download and install pending updates
If none of the above solutions help to address the error code 0xc190011f on Windows 11, you should manually download the relevant standalone package from the Microsoft Update catalog. For this, you must know the KB number in advance. Well, you can look for the same by visiting Windows 11 Update history, and picking your own version there.
Here’s a complete guide on how to manually download and install pending updates on Windows 11.
Should I skip updating Windows?
Microsoft releases new security updates, non-security patches, optional updates, and out-of-band updates from time to time for different Windows versions. One should definitely download and install the security update as this improves all Windows components and Microsoft Services.
Nowadays, all driver and firmware updates are included in Windows Update instead of Device Manager. It is because of this reason alone, you should not skip downloading and installing the latest cumulative updates on your PC.
Go for all other updates only when you are finding some issues within your operating system. You may check the update history page of Windows to find if any new bug fixes come for your version.
For how long one can defer updates?
If you are on a limited data pack and don’t want to install updates regularly, you may pause updates for a maximum of 5 weeks. To disable installing updates beyond, you have to configure the local group policy accordingly.
For security purposes only, we don’t recommend disabling updates on Windows 11.
How do I Fix Windows 11 Update Error 0xc1190011f?
Windows update errors mostly occur because of update services not running in the background, update components being corrupted, or due to unnecessarily accumulated cache. Enabling all update-related services, resetting Windows update components, and purging Windows cache folders are effective ways to overcome any update error in Windows.
In case the error 0xc1190011f persists even after this, you should manually download and install the latest standalone package on your Windows 11 PC.
Чаще всего неполадка с кодом 0xc190011f появляется во время попытки обновления десятки. Windows сообщает пользователю, что произошел сбой при установке некоторых обновлений, и ОС постарается повторить попытку ещё раз позже. Конкретно данная ошибка появляется только в Windows 10. В нашей статье мы расскажем, почему возникает неполадка и что можно предпринять, чтобы её устранить.
Причины возникновения ошибки
Самой распространенной причиной появления неполадки является некорректное функционирование центра обновлений Windows. Устранить проблему можно будет с помощью встроенного системного средства. Также можно воспользоваться сбросом настроек центра обновления, а если ошибка появляется вследствие повреждения системных файлов, то в такой ситуации нам потребуется запустить утилиту для их проверки.
Если на компьютере используются различные VPN программы, то и они могут помешать обновлению системы, потребуется их деактивировать или полностью удалить. Неполадка также может быть вызвана некорректными настройками языка и региона в параметрах Windows.
Варианты устранения проблемы
Чтобы избавиться от ошибки 0xc190011f, мы можем воспользоваться системным средством устранения неполадок, сбросить настройки центра обновлений вручную, проверить системные компоненты, а также установить соответствующее местоположение и язык в настройках Windows. Рассмотрим каждый из вариантов устранения проблемы в деталях.
Способ №1: Используем средство устранения неполадок
Для решения проблем с центром обновлений в десятой версии Windows имеется специальное средство устранения неполадок. Чтобы им воспользоваться, проделаем следующие операции:
- Нажимаем комбинацию «Win+R» на клавиатуре.
- В появившееся окно вводим команду ms-settings:troubleshoot
- Кликаем по кнопке «OK».

Запускаем окно с утилитами для устранения неполадок
- В списке справа выбираем «Центр обновления Windows» и нажимаем «Запустить средство устранения неполадок».

Запускаем поиск проблем центра обновлений
- Ждем, пока утилита попытается устранить ошибку, по завершении операции перезагружаем компьютер и проверяем, исчезла ли ошибка.
Загрузка …
Способ №2: Проверка системных файлов
Иногда сбой с кодом 0xc190011f может происходить из-за неполадок с системными файлами. В таком случае мы можем воспользоваться специальной программой для их проверки. Чтобы её начать, проделаем следующее:
- Из контекстного меню кнопки «Пуск» выбираем вариант «Командная строка (администратор)».

Открываем командную строку из меню
- В открывшееся окно вводим команду sfc /scannow и жмем «Enter».

Запускаем проверку системных файлов
- Ждем завершения операции и перезапускаем систему.
Если после этого ошибка появляется снова, то опять запускаем командную строку и уже используем другую команду:
DISM /Online /Cleanup-Image /RestoreHealth
Запускаем другой вариант исправления ошибок
После проделанных операций ошибка не должна больше появляться.
Загрузка …
Способ №3: Сброс настроек центра обновления
Еще один метод, к которому можно прибегнуть для устранения неполадки 0xc190011f, — это сброс параметров центра обновления. Чтобы его осуществить, проделаем следующие шаги:
- Запускаем командную строку с привилегиями администратора из меню кнопки «Пуск».
Открываем командную строку из контекстного меню
- Далее вводим в неё следующие команды:
net stop wuauserv
Вводим команды для устранения проблемы
net stop cryptSvc
net stop bits
net stop msiserver
ren C:\Windows\SoftwareDistribution SoftwareDistribution.old
ren C:\Windows\System32\catroot2 catroot2.old
net start wuauserv
net start cryptSvc
net start bits
net start msiserver
После этого перезапускаем систему и проверяем, устранилась ли проблема.
Загрузка …
Способ №4: Изменение настроек региона и языка
Неполадки при обновлении Windows 10 также могут появиться, если на компьютере неправильно установлен регион и язык системы. Чтобы проверить эти параметры, нам нужно сделать следующее:
- Нажимаем «Win+R» на клавиатуре для вызова окна «Выполнить».
- Далее вписываем туда команду ms-settings:regionlanguage и кликаем «OK».
Открываем настройки языка и региона
- Устанавливаем правильные настройки региона и языка.

Устанавливаем правильные настройки
- Перезагружаем компьютер и проверяем наличие ошибки.
Загрузка …
Кроме перечисленных в статье методов устранения проблемы, при выполнении обновления не помешает отключить VPN программы, если они используются на компьютере. В некоторых случаях они могут мешать процессу обновления.
Желаем удачи в устранении неполадки!
Загрузка …
Post Views: 8 046
Windows updates are necessary to perform and errors will follow sometimes. When you encounter these errors, they can be troubles ahead and targeting different error codes, the fixes may be varied. This article on MiniTool will show you some solutions to get rid of Windows update error 0xc190011f.
Windows Update Error Code 0xc190011f
We found that in the Microsoft forum, some users reported that the error message – feature update to windows 10, version 1709 – error 0xc190011f occurs on their computer every time when the Windows tries to install the 1709 update version and more than hundreds of people have this similar issue.
According to what they reported, most people who have this error 0xc190011f seem to have a Corei5 processor, 8 or 16GB of RAM, and Windows 64 either Home or Pro.
So far, the official does not issue specific methods to get rid of Windows update error code 0xc190011f but here are some possible reasons we can speculate to fix it.
- Conflicting Software – If you have installed other third-party VPN or Proxy software, they may cause conflicts with the updating component. Of course, other software can also make this Windows update error 0xc190011f; you may check if you have ever downloaded and installed any suspicious program.
- System File Corruption – Corrupted, damaged, or missing system files can trigger much more issues, and system update failure can be one of them. In this way, DISM and SFC scans play an important role to fix these errors.
- Windows Update Glitch – If your Windows update tool is stuck for some annoying glitches or bugs, the error will appear and you can use Windows Update Troubleshooter to repair that.
- Glitched Windows Update Components – Some people find that the error code 0xc190011f is made by wrongly settled Windows Update components services and it is possible that one of the Windows Update components is stuck in a limbo state. You can check for that or directly reset the Windows Update components.
- Incorrect Region Languages – Some people may mistake their Windows time and region settings, which can result in a series of unexpected issues, including error code 0xc190011f.
Sometimes malware leftovers and incorrect installations of applications can cause corruption in system folders and data. This kind of Windows update failed with error codes often happen, such as the error codes 0x800f0845, 0x80070057, and 0xc0000409.
They may happen for the same reasons but you’d better resolve the error code based on your situation. Just find out the real culprit and troubleshoot it with one of the following methods. If you are not sure, you can also try them one by one to fix the error code 0xc190011f.
Fix Windows Update Error Code 0xc190011f
Fix 1: Run Windows Update Troubleshooter
We will start the solution from the easiest one – run the Windows Update Troubleshooter. It is a built-in tool dedicated to repairing some glitches or bugs in Windows Update components. So, if you encounter Windows update error codes, you can try this tool first.
Step 1: Go to Start > Settings > Update & Security > Troubleshoot > Additional troubleshooters.
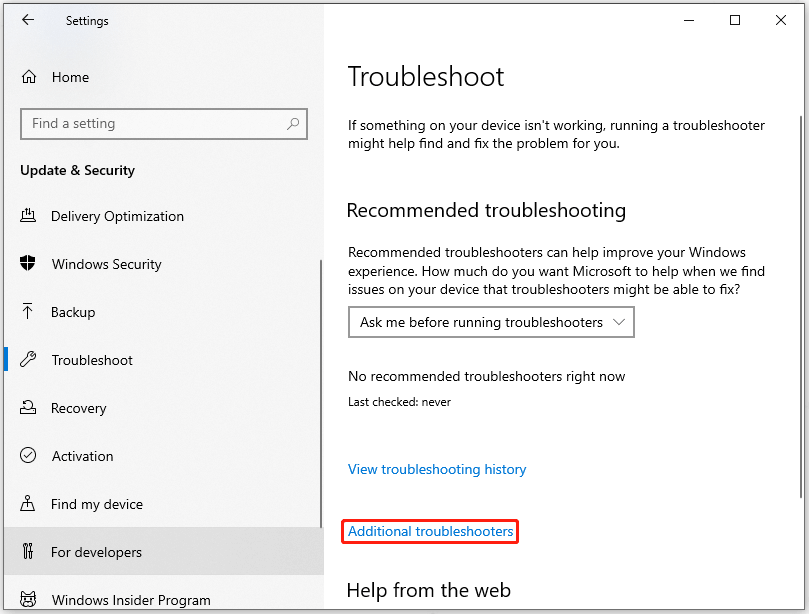
Step 2: Under Get up and running, click Windows Update and then choose Run the troubleshooter.
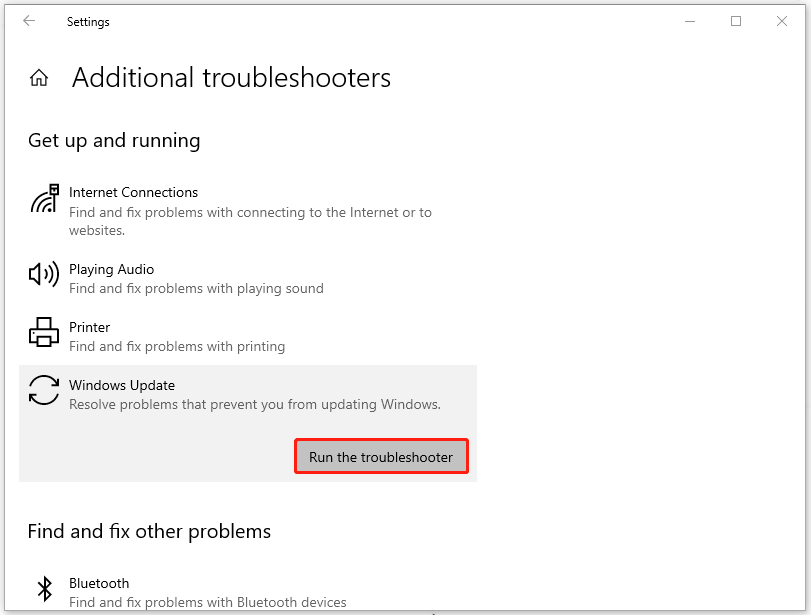
Once the service is prepared, click Next at the first prompt and follow the next on-screen instructions to finish the detecting and repair.
After that, please try your update again to see if the Windows update error code 0xc190011f has been fixed.
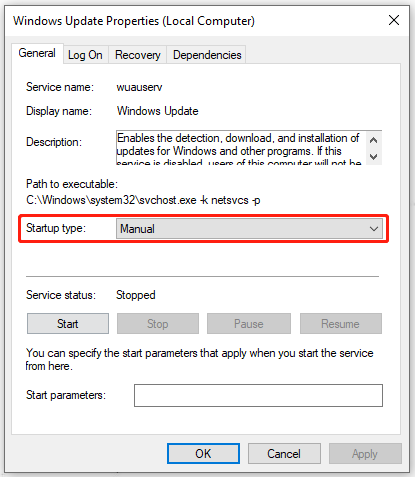
Fix 2: Check Windows Update Related Services Status
When you run Windows updates, it requires a series of related services running together to ensure its performance. As usual, the services will be enabled by default but you may accidentally turn some of them off. Go to check these services by the following steps.
Step 1: Open the Run dialog box by pressing Win + R and input services.msc to enter Services.
Step 2: When the Services window opens, please check Startup Types of the services as per the following instructions.
- Windows Update – Manual (Triggered)
- Windows Update Medic Services – Manual
- Cryptographic Services – Automatic
- Background Intelligent Transfer Service – Manual
- DCOM Server Process Launcher – Automatic
- RPC Endpoint Mapper – Automatic
- Windows Installer – Manual
If you find one of them wrongly configured, you can right-click on the service and choose Properties to change its startup types selection. Then click Apply and OK to save the changes.
If you have checked all of the services and made sure they are right but the error code 0xc190011f is not gone, you can go on to try the next method.
Fix 3: Reset the Windows Update Components
Some users report that they get rid of the Windows update error by resetting the Windows Update components. If that works, it means the error 0xc190011f is caused by a glitch or cache issue. Anyhow, you can have a try!
Step 1: Open Search by pressing Win + S and input Command Prompt to run it as an administrator.
Step 2: Then please input the following commands and press Enter after each of them to execute the command.
- net stop wuauserv
- net stop cryptSvc
- net stop bits
- net stop msiserver
- ren C:\Windows\SoftwareDistribution SoftwareDistribution.old
- ren C:\Windows\System32\catroot2 catroot2.old
- net start wuauserv
- net start cryptSvc
- net start bits
- net start msiserver
Is there any other method to reset Windows Update components? Yes, you can read this article to have a try: How to Reset Windows Update Components in Windows 11/10.
Once all the command is processed successfully, close the window and try your Windows Update again; if it still does not work, continue the troubleshooting.
Fix 4: Change the Region Language
Another possible culprit that triggers the Windows update error 0xc190011f is the incorrect region settings. Your selected region that is set inside the Settings tab is way different from your actual location and then the update failure error code occurs.
To change the settings, please do as follows.
Step 1: Go to Start > Settings > Time & Language.
Step 2: Switch to the Region tab from the left panel and on the right panel, make sure you have chosen the right region under Country or region and have used the recommended one under Regional format.
Once you have finished your changes, please restart your computer and try to update it again.
Fix 5: Run SFC and DISM Scans
If the above methods are all proven useless, you can doubt if the system file corruption happens and to fix this issue, you can run SFC and DISM scans. These two tools need to run your Command Prompt as an administrator first and then please type the following commands and press Enter after each of them.
sfc /scnnow – this command is used to perform an SFC scan and when the verification is up to 100%, you will see the scan results.
DISM /Online /Cleanup-Image /CheckHealth – this order is to perform a quick check for the DISM scan.
DISM /Online /Cleanup-Image /ScanHealth – this order is to check your OS image with a more advanced scan.
DISM /Online /Cleanup-Image /RestoreHealth – this order is to fix any problems it finds automatically.
Then please restart your PC and see if the error 0xc190011f is still there.
What’s the difference between SFC and DISM scans? If you are interested in this question, please read this article: CHKDSK vs ScanDisk vs SFC vs DISM Windows 10 [Differences].
Fix 6: Uninstall VPN or Proxy Providers
As we mentioned, the error code 0xc190011f can be triggered by some conflicting software, especially VPN and Proxy clients. Therefore, if you have installed the third-party software, you can temporarily uninstall them and try your Windows update again.
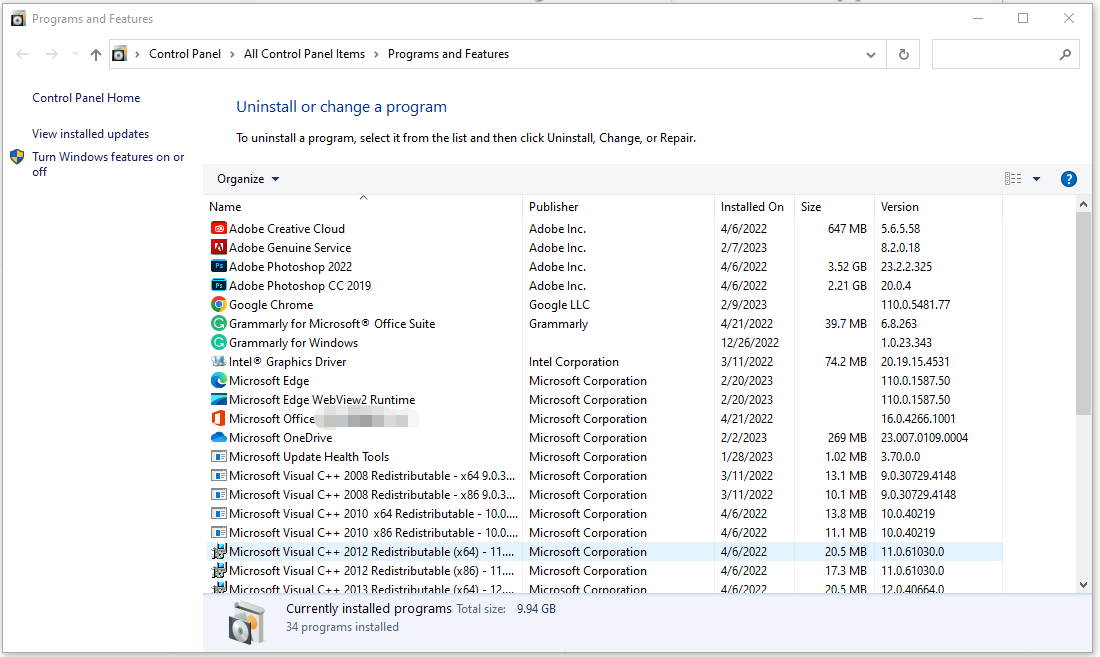
Step 1: Open the Run dialog box and input appwiz.cpl to enter Programs and Features.
Step 2: Once the window opens, scroll down to locate your VPN or Proxy app and right-click on the program to choose Uninstall from the context menu.
Step 3: Then please follow the on-screen instruction to uninstall it. After that, restart your computer and download and install your updates.
Fix 7: Reset Windows 10
The last resort to fix the error code 0xc190011f is to reset Windows 10. The Reset feature allows you to choose whether to keep your files or remove them, and then reinstall Windows, but we still recommended you back up your important data to an external drive in advance.
Step 1: Please go to Start > Settings > Update & Security.
Step 2: Go to the Recovery tab and under Reset this PC, click on Get started.
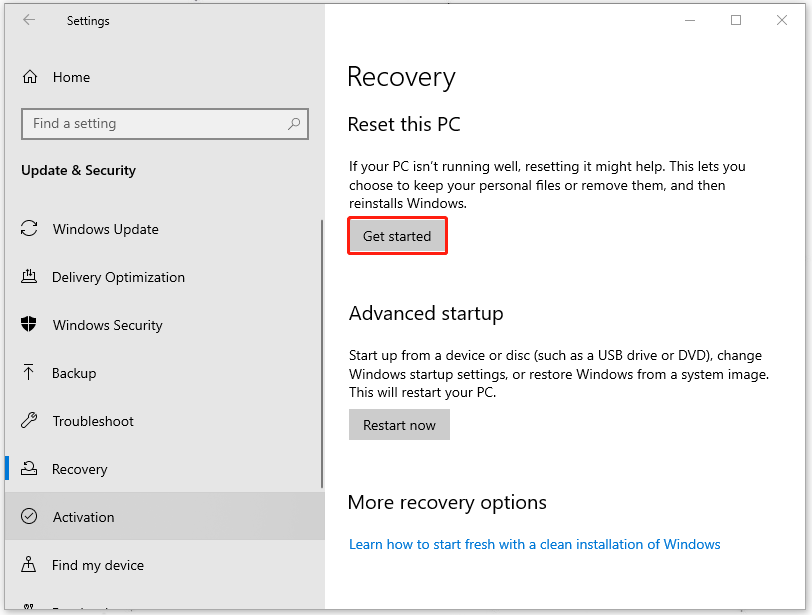
Step 3: When the next window pops up, when it asks you to choose an option between Keep my files and Remove everything, you can choose Keep my files, then select cloud or local, change your settings, and set Restore preinstalled apps? to No.
Note:
Note: If you don’t see the option to Restore preinstalled apps, it means your PC doesn’t have preinstalled apps configured.
Top Recommendation: Back up Your Data
Because some of the fixes are complicated and easily result in data loss, it is advised to back up your data before you start the above methods. In a worst-case scenario, you can restore your backup and try again.
Besides, some people reported that the files are gone after the Windows update; By default, all your files and data will transfer when you attempt to update Windows but accidents can happen once you meet the update failure. So, it is highly advised to back up your data before the process.
How to back up your data safely and quickly? We recommend an all-in-one backup program – MiniTool ShadowMaker that can back up files and folders, disks and partitions, and even the system. The Clone Disk and Sync features are also available.
The good news is that MiniTool ShadowMaker allows you to enjoy 30 days for free with the trial version. Go to download and install it and click Keep Trial after opening it.
MiniTool ShadowMaker TrialClick to Download100%Clean & Safe
Step 1: Go to the Backup tab and the system has been set by default in the SOURCE section, so you don’t need to change it. Besides, you can select your other backup sources when you need them, including disk and partitions, and folders and files.
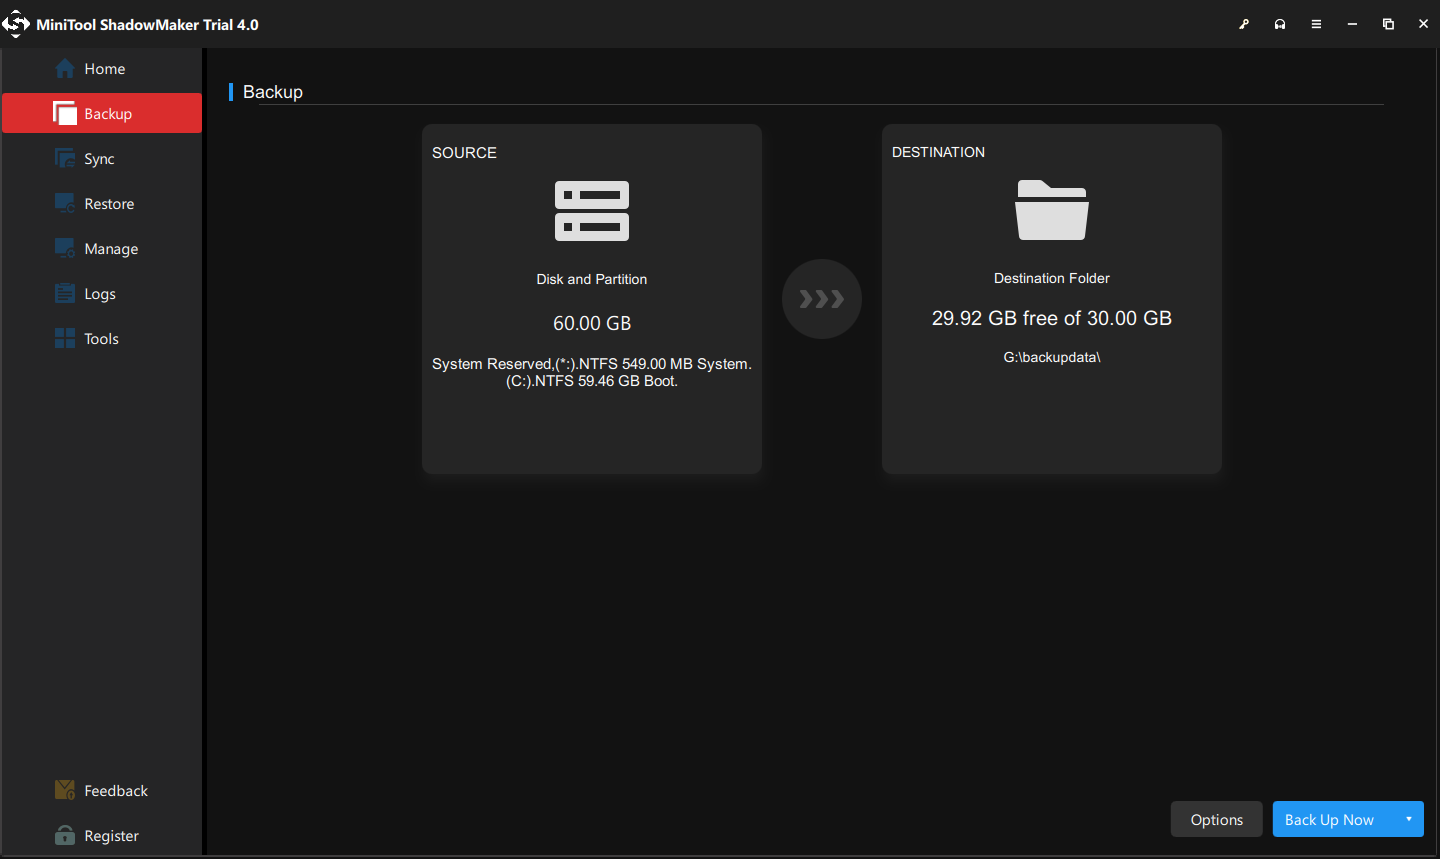
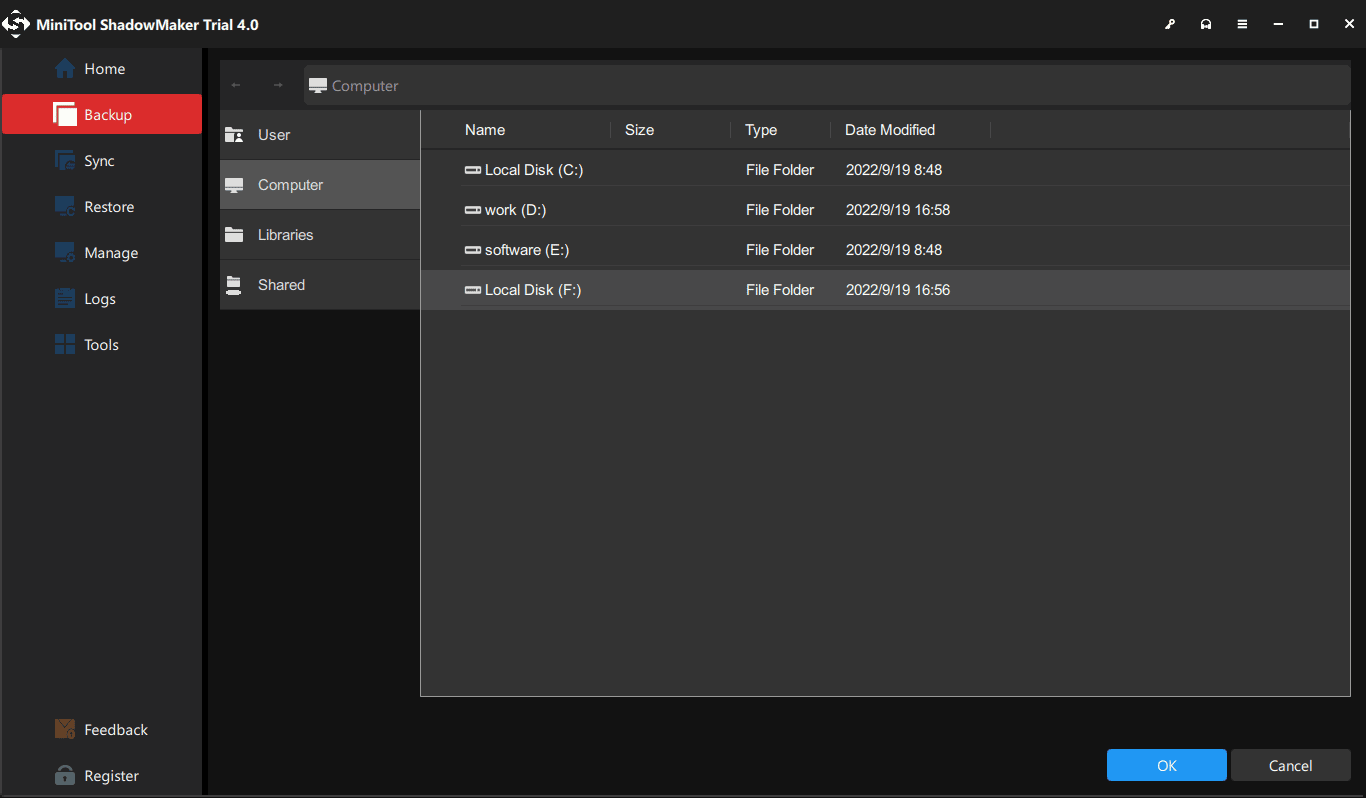
Step 2: Go to the DESTINATION part where you can see four options containing the Users, Libraries, Computer, and Shared. Then choose your destination path.
Note:
Note: It is advised to back up your system to an external hard drive, which can be your plan B when a system crash happens.
Step 3: Click the Back Up Now option to start the process immediately or the Back Up Later option to delay the backup. The delayed backup task is on the Manage page.
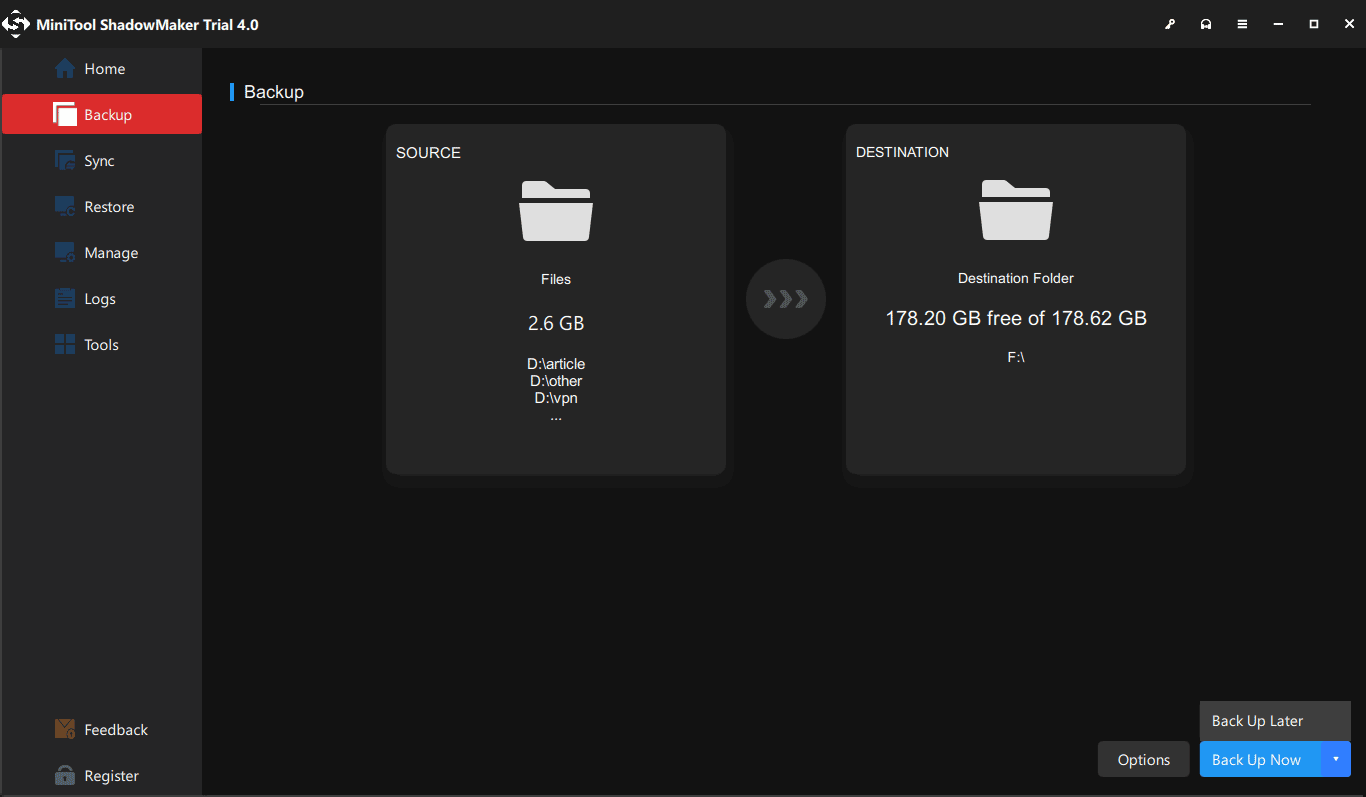
Besides, you can go to Options to click Schedule Settings to set the date you want to start backing up. If you want to choose a different backup scheme, there are three choices available – Full, Differential, and Incremental backup.
Are you still struggling with the Windows update failed with the error code 0xc190011f? Please read this article and find the solution. If you like it, you can share it on Twitter.Click to Tweet
Bottom Line:
After updating your Windows, you may encounter some Windows update error codes and error 0xc190011f is one of them. Now, you have nothing to worry about this related issue because possible solutions have been listed and you can get rid of this error code by following the above methods.
If you have encountered any issues when using MiniTool ShadowMaker, you can leave a message in the following comment zone and we will reply as soon as possible. If you need any help when using MiniTool software, you may contact us via [email protected].