
During our recent Windows 10 feature update deployment from 1809 to 20H2, we ran in to an issue on some clients where they reported back error 0XC190012E to ConfigMgr.
The error code its self is just a generic code and I couldn’t find it in either
Windows update error code list
Windows Update error code list by component – Windows Deployment | Microsoft Docs
or the Windows 10 upgrade errors doc
Get help with Windows 10 upgrade and installation errors (microsoft.com)

We first checked the temporary location that feature update deploys to c:\$Windows.~BT, to check if there was any issue in the compatibility xml file or in the setup logs under sources\panther, but there was no folders other than sources.

Since there was no files I though this might be a space issue so ran some remote WMI commands to check the disk space available. I used the below PowerShell using Get-WMIObject.
Get-WmiObject Win32_logicaldisk -ComputerName RemoteComputerName | Select-Object @{Name="Drive";E={$_.DeviceID}},
@{Name="Size(GB)";E={[math]::Round($_.size/1gb)}},
@{Name="Free Space(GB)";E={[math]::Round($_.freespace/1gb)}},
@{Name="%Free Space";E={"{0:N2}" -f (($_.freespace/$_.size)*100)}}
In this case it wasn’t disk space a there was over 100GB free.
There wasn’t much online about the error other than the usually run scf /scannow, diskcheck and run the update troubleshooter but none of these worked.
Then found this post on the Microsoft forms that pointed to an issue with the setupconfig.ini
Generic 0xc190012e trying to upgrade Windows 10 1909 to 20H2 – Microsoft Community
C:\Users\Default\AppData\Local\Microsoft\Windows\WSUS

We aren’t using any custom setting in the setupconfig.ini so there was no issue for me to remove this.
Once I removed the file and kicked off the feature update again it now completes without issue.
I don’t know how the setupconfig.ini file was created on only a few devices but it was a quick fix once we found the issue was the config file.
Published
0xc190012e — одна из ошибок, которая может встречаться при установке новых обновлений Windows. В качестве альтернативного сообщения будет надпись о невозможности обновления. Обычно индикатор установки доходит до 100%, после чего происходит сбой и появляется данное окно.
Как и в случае многих других ошибок Windows, причин может быть несколько. От банально сбоя подключения к сети, до серьёзных повреждений системных файлов. Ниже приведены несколько методов решения проблемы, действенность которых зависит от каждого отдельного случая.
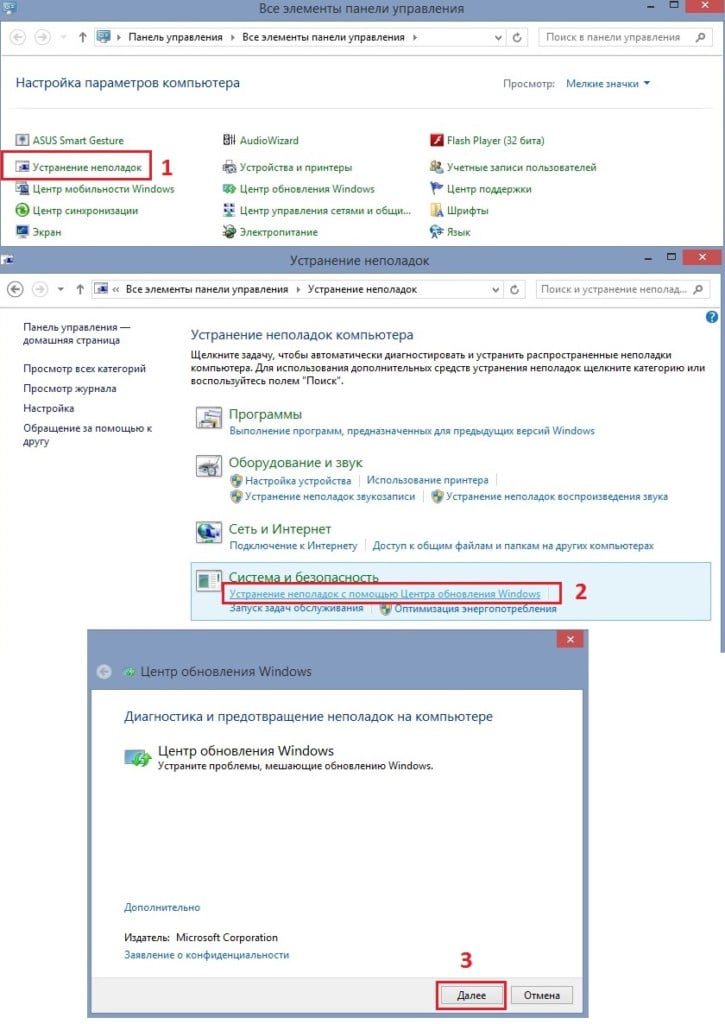
Решение 1. Используйте средство устранения неполадок Центра обновления Windows
Если у вас когда-либо возникают ошибки с обновлениями Windows, первое, что нужно пробовать — это устранять неполадку с помощью встроенного инструмента. Данный метод не всегда решает проблему, но может указать на её причины.
- Нажмите правой кнопкой мыши на значок Windows (внизу, слева) и выберите Панель управления.
- Перейдите в раздел Устранение неполадок.
- Выберите пункт Устранение неполадок с помощью Центра обновления Windows.
- В новом окне нажмите Далее и дождитесь окончания диагностики.
Решение 2. Отключите сторонний антивирус
В некоторых случаях сторонний антивирус является одной из причин неудачного обновления Windows. Поэтому следует временно отключить его, и попробовать загрузить обновление ещё раз. В случае успешной установки, стоит задуматься о смене антивирусного ПО. В крайнем случае, всегда есть встроенный Защитник Windows.
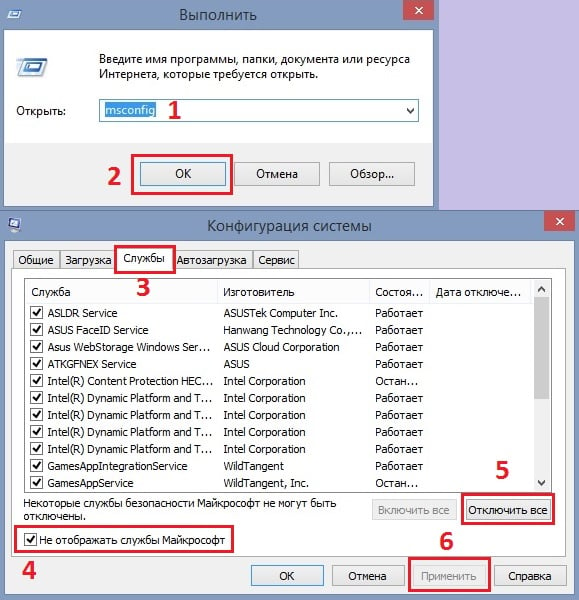
Решение 3. Выполните чистую загрузку
Это можно сделать так:
- Нажмите ПКМ по значку Windows, и выберите Выполнить.
- Введите команду msconfig, и нажмите Enter.
- В открывшемся окне конфигурации системы, перейдите на вкладку Службы.
- Поставьте галочку напротив пункта Скрыть все службы Microsoft, и отключите остальные службы, нажав Отключить все.
- Кликните применить.
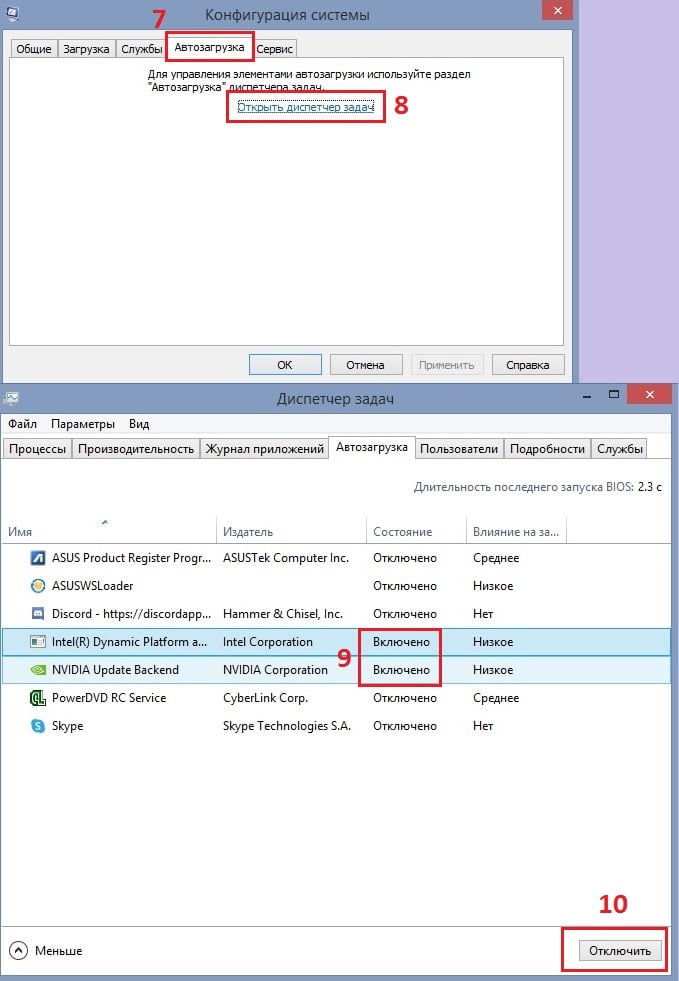
- Далее перейдите на вкладку Автозагрузка и вызовите Диспетчер задач.
- В новом окне отключите все процессы, которые запускаются вместе с системой.
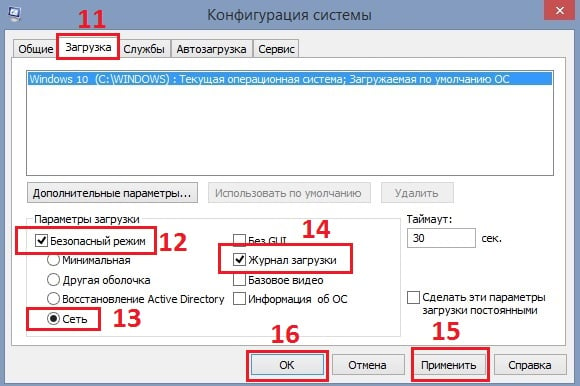
- Затем снова вернитесь к окну Конфигурации системы, и перейдите на вкладку Загрузка.
- Установите флажок Безопасная загрузка, выберите возможность подключения к сети и журнал загрузки.
- Нажмите Применить и Ок.
- После перезагрузки компьютера попробуйте ещё раз установить обновление.
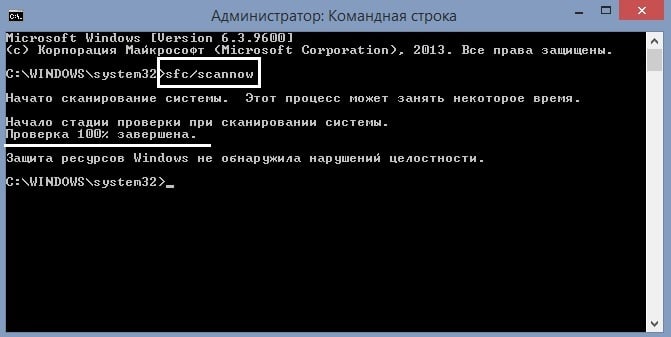
Решение 4. Исправьте повреждённые системные файлы
Если некоторые из ваших системных файлов Windows повреждены, ОС не сможет правильно выполнить стандартный процесс обновления.
- Нажмите ПКМ по значку Windows, и выберите Командная строка (Администратор).
- В открывшемся системном окне введите команду sfc/scannow
- Нажмите Enter, дождитесь окончания диагностики и перезагрузите систему.
Если сканирование SFC не смогло восстановить повреждённые системные файлы, снова откройте командную строку от имени администратора, и введите следующие команды, нажимая после каждой Enter:
- Dism/Online/Cleanup-Image/CheckHealth
- Dism/Online/Cleanup-Image/ScanHealth
- Dism/Online/Cleanup-Image/RestoreHealth
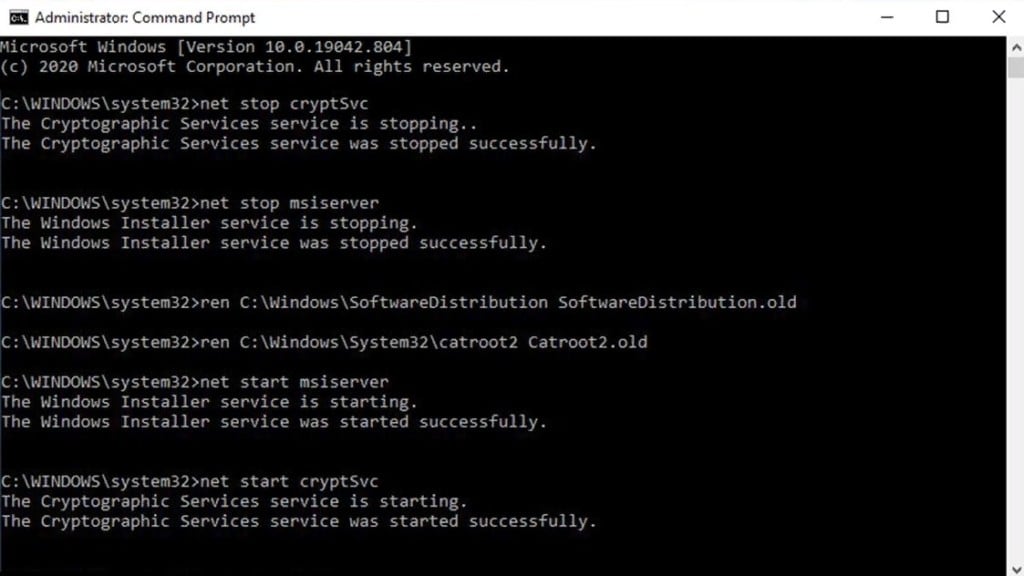
Решение 5. Сбросьте компоненты Центра обновления Windows
В Windows работают десятки служб, которые обеспечивают правильную работу операционной системы. Например, BITS отвечает за загрузку данных в фоновом режиме, поэтому, если она не запущена, обновление завершится с ошибкой. Таким образом, сброс BITS и других соответствующих служб может помочь исправить ситуацию.
- Откройте командную строку от имени администратора, как в предыдущем варианте.
- Введите следующие команды, нажимая Enter после каждой.
- net stop wuauserv
- net stop cryptSvc
- net stop bits
- net stop msiserver
- ren C:\\Windows\\SoftwareDistribution SoftwareDistribution.old
- ren C:\\Windows\\System32\\catroot2 Catroot2.old
- net start wuauserv
- net start cryptSvc
- net start bits
- net start msiserver
- Перезагрузите компьютер.
Решение 6. Загрузите обновление вручную
Если Windows не обновляется автоматически через меню настроек, можно попробовать сделать это вручную следующим образом:
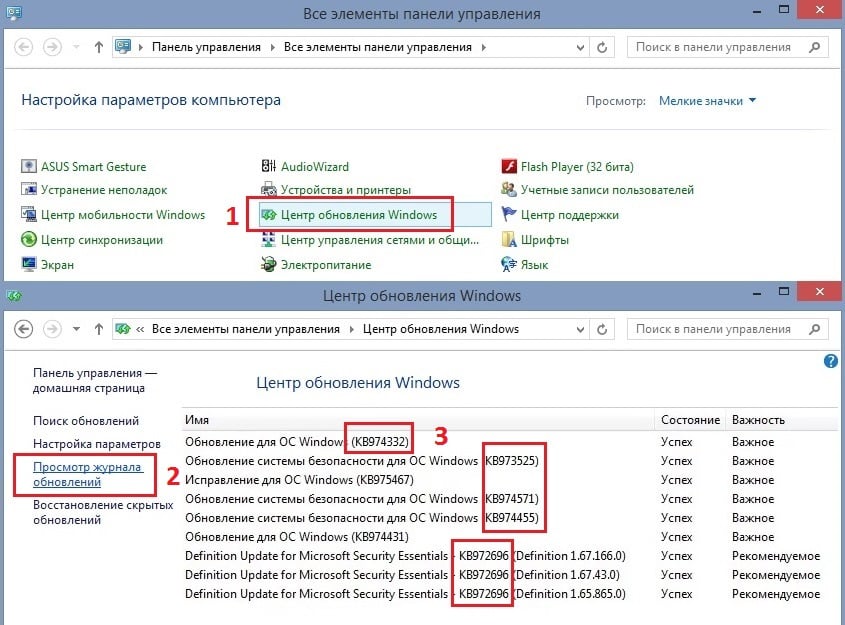
- Нажмите ПКМ по значку Windows, и выберите Панель управления.
- Зайдите в раздел Центр обновления Windows, и далее в Просмотр журнала обновлений.
- Запишите код загрузки, которое не получается установить.
- Перейти в каталог Центра обновления Microsoft.
- Введите код проблемного обновления в строку поиска справа.
- Выберите 64-битную или 32-битную версию обновления (в зависимости от вашей ОС) и загрузите его.
- После этого дважды щёлкните по установщику и следуйте инструкциям на экране.
- Перезагрузите компьютер.
Several users have reported getting the Windows Update error 0xc190012e whenever they try updating their Windows 10 operating system.
It seems that the most common situation in which this error appears is when users try to upgrade from Windows 10 Insider Preview.
This issue can be very annoying, especially if you’re trying to upgrade your Windows 10 OS for security reasons. This error can also stop you from accessing any new or updated features.
For these reasons, in this article, we will explore some of the best troubleshooting methods to try and solve this issue once and for all. Please follow the steps presented in this guide closely.
What is the Windows Update error 0xc190012e and why does it appear?
To explain today’s error in a more detailed way, keep in mind that it is directly related to a Windows Update glitch or some kind of system file corruption.
Plus, you have to consider that experts’ tests also claimed the Dell Encryption, Dell Data Security, and BitLocker interference as one of the most common causes of this issue.
According to some Windows 10 users, this occurs while attempting to install a few particular Windows feature updates. In most cases, it seems like versions 1903 and 1909 are the ones that are giving headaches.
Now, let’s see how you can easily fix the Windows Update error 0xc190012e in just a few simple steps.
How to fix the error 0xc190012e?
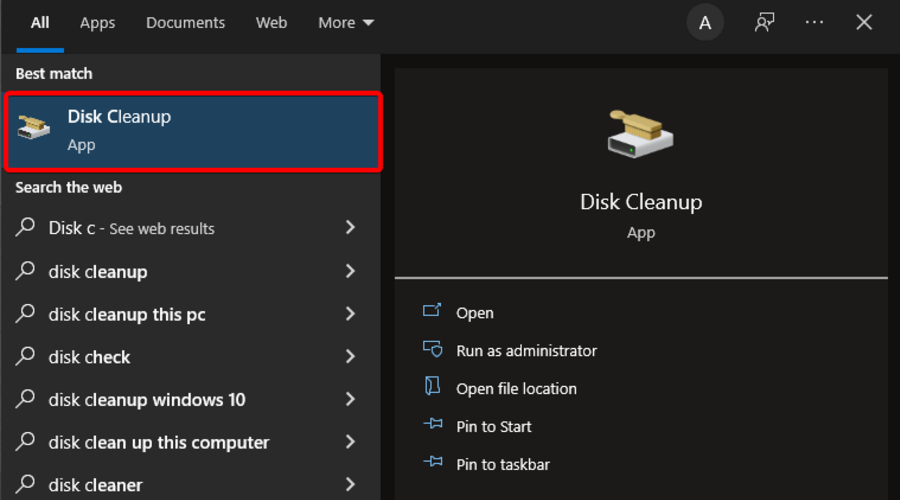
1. Clear temporary files
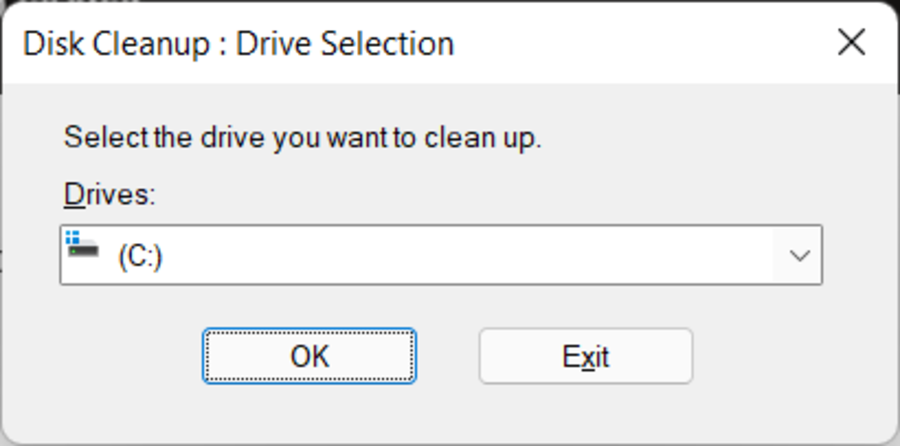
- Click on Cortana search box, type in Disk Cleanup, and open it.

- Select Drive C, then click Ok.

- Windows will now calculate all the files that can be removed.
- Select all the files that you want to remove from the list, and select Ok.
- Try to see if this solved your issue.
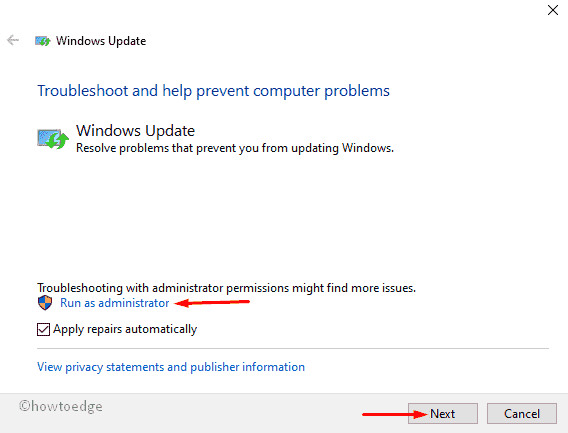
2. Reset Windows 10 update components
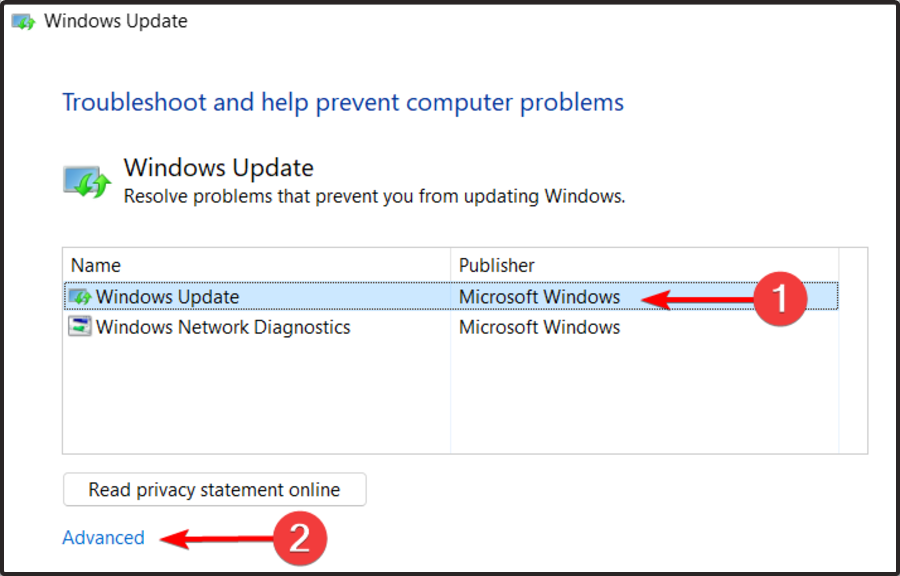
- Download the Windows Update Troubleshooter from Microsoft.
- Open the file and select the Windows Update option, then click on the Advanced button.

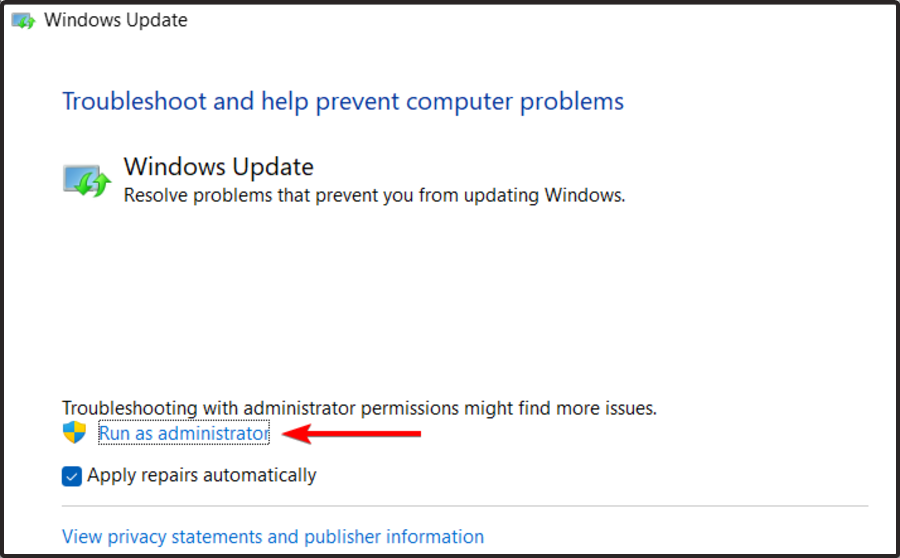
- Choose to Run as administrator.

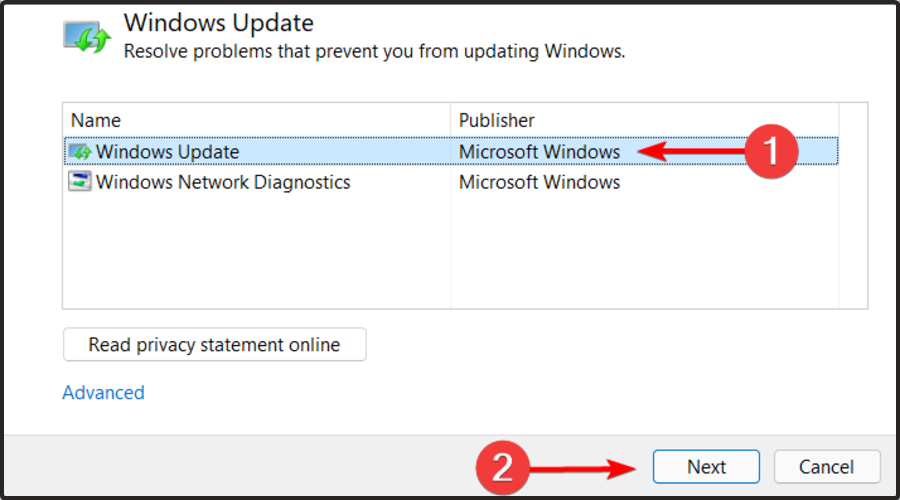
- Select Windows Update again, and click Next.
- Wait for the process to complete, and close the troubleshooter.
- Open Windows Update Troubleshooter again.
- Click again on Advanced, then choose to Run as administrator.
- Select the second option in the list Windows Network Diagnostics.
- Click on Next.
- After the process is completed, restart your computer and try to see if you can update your Windows 10 normally.
In case you didn’t manage to get rid of the Windows Update error 0xc190012e, your situation might be related to some corrupted files that need to be cleared.
Make sure you read all the listed solutions below because you’re surely going to discover one that will fit your needs.
- Microsoft says a “really bad” bug halted Windows 11 25H2 rollout to Canary channel
- Windows 11 is getting new Start menu, Notepad upgrades, and more
3. Try MiniTool Partition Wizard Pro
Many users claimed that MiniTool Partition Wizard pro successfully supported them when encountering Windows Update errors, such as the one presented in today’s guide.
What is this tool exactly? It is one of the best disk cloning programs available for Windows users, is especially dedicated to those who need to back up or upgrade components, without spending hours reinstalling Oss or apps.
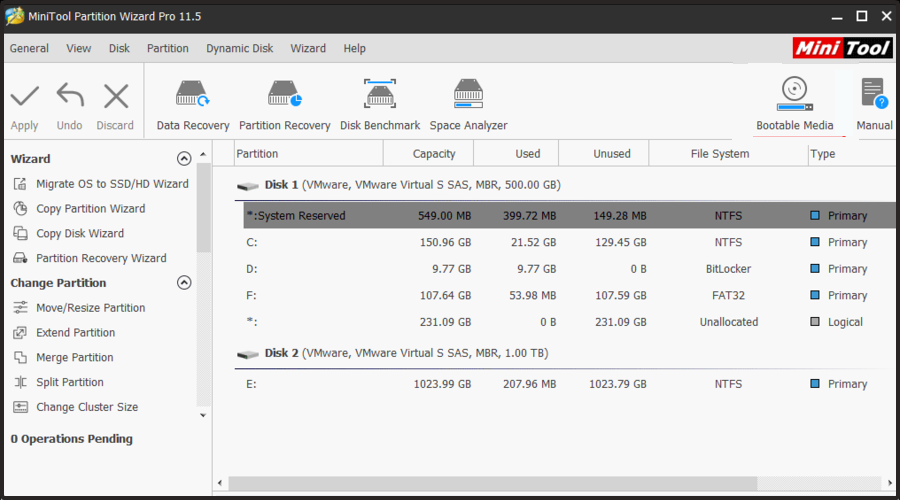
As many beginners choose MiniTool Partition Wizard Pro, we can strongly agree that it is extremely user-friendly and easy to use.
It seems like this tool will help you a lot when you got to migrate from a Hard disk to an SSD a Hardware Cloner, to quickly change partitions types and define them.
MiniTool Partition Wizard Pro is not only a disk cloning app, but it can also be considered as an all-in-one partition manager that works impeccably in recovering data and diagnosing disks.
With this software, you’ll be able to create, delete, move, resize, format, and extend partitions, convert disks between MBR and GPT, and many other amazing actions.
Partition Wizard can also run diagnostics on disks, measuring things like the read/write speed, verifying the integrity of the file system, fixing file system errors, and detecting bad sectors.
Because this tool can be simultaneously connected to up to 5 PCs, it would be a great idea to share the experience with your loved ones.
Plus, MiniTool Partition Wizard Pro is compatible with multiple Windows operating clients. In this matter, we have to consider Windows 2000, XP, Vista, 7, 8, 8.1, and 10.
Thus, do not hesitate to use it also on aged devices, as it would work smoothly and without any faced troubles.
As an overall conclusion, we have to admit the MiniTool Partition Wizard Pro is an excellent choice if you want to take care of your data storage setup, changes, and maintenance.
The Ultimate license of MiniTool Partition Wizard Pro offers the following features:
- Merge Partition
- Convert Dynamic disk to Basic disk
- Change cluster size
- Partition Copy, Disk Copy
- Data recovery and partition recovery
- Support up to 5 PCs
MiniTool Partition Wizard Pro
If you face the Windows Update error 0xc190012e, you should use one of the best partition managers!
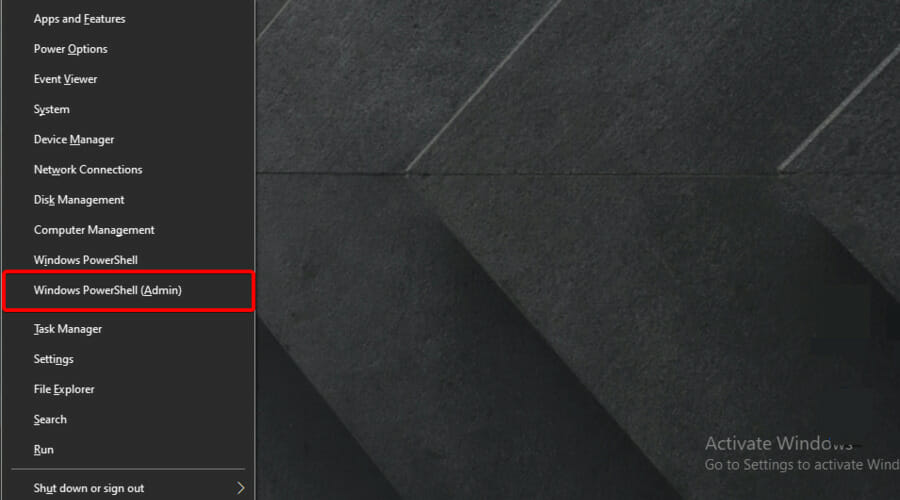
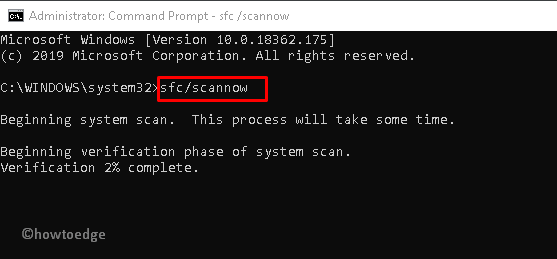
4. Run SFC command
- Press simultaneously on the following keys: Windows + X.
- Select Windows PowerShell (Admin).
- Inside the PowerShell window, input the following command, then press on Enter:
SFC /scannow - Wait for the Windows to check for missing or corrupt files, then restart your computer.
This command will help you not only with the Windows Update error 0xc190012e but also in case you face many other issues, like the 0x1000007e bugcheck blue screen error.
As it can be extremely useful in multiple situations, we strongly recommend saving it somewhere you can easily access it. If Sfc /scannow stops on Windows 10/11, make sure you also check a dedicated fixing guide.
5. Run CHKDSK command
- Use the following keyboard shortcut: Windows + X.
- Navigate to Windows PowerShell (Admin).
- Type in this command then hit Enter:
chkdsk C: /f /r /x - In case the volume you want to check is C, then the command will not run (the system is using it now).
- Then, you will receive the message that asks you Would you like to schedule this volume to be checked the next time the system restarts?
- Type in Y and press Enter so that the system performs the check next time your computer restarts.
- Microsoft says a “really bad” bug halted Windows 11 25H2 rollout to Canary channel
- Windows 11 is getting new Start menu, Notepad upgrades, and more
- Windows 11 KB5055653 Beta improves HDR and Windows Update
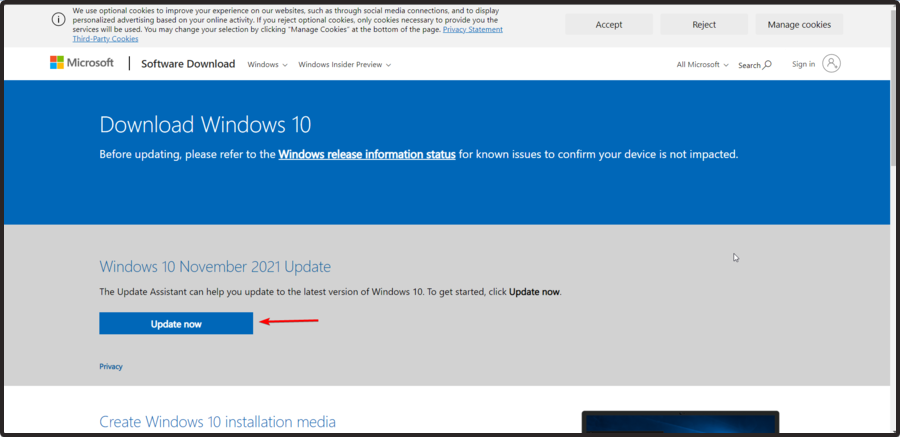
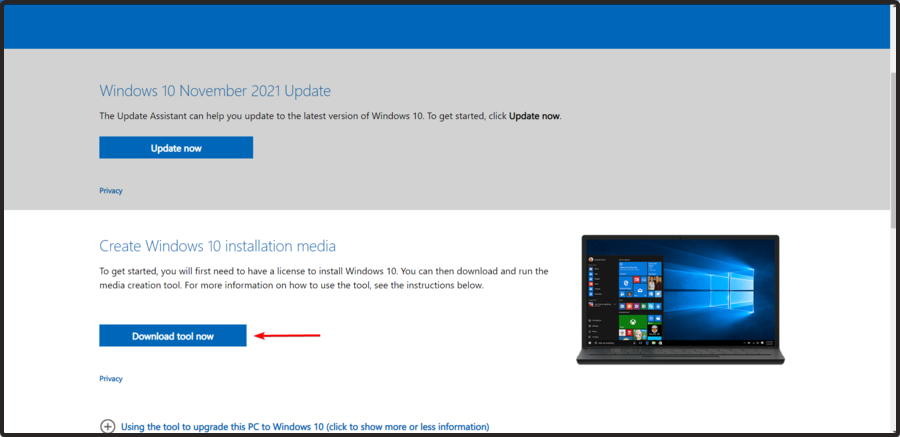
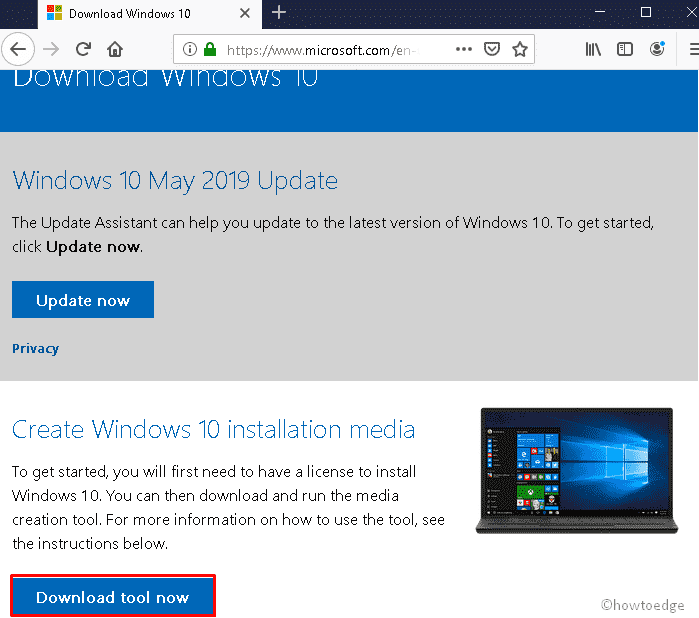
6. Update Windows 10 manually (using ISO file)
- Navigate to the Windows 10 Download Tool official page.
- To update Windows 10, click on the Update now button.

- If you want to create a Windows 10 installation media, select the Download tool now button.
- Open the setup and follow the on-screen instructions to install the update
NOTE
Keep in mind that if you want to use the above solution, you have to first make sure that you own a Windows 10 license.
What other Windows Update errors should I be aware of?
- Windows could not search for new updates in Windows 7 or 10 – This is also known as Windows 80072EFE error and seems to be pretty common among worldwide users.
- Windows Update error 8007005 – This one occurs during Windows updates with an error message that states the following – Error 8007005: Windows encountered an unknown error.
- The Windows Update error 0x800f0845 – Some users claimed that this error shows up when they’re trying to install the update component KB4056892, and during the installation of other update components.
- Error 0xc0000409 in Windows 10/11 – According to our experiments, the error code 0xc0000409 can be the result of a known issue with the new Windows 10 Insider Preview Build 19624.
- Windows Update error 0x800704c7 – In this case, you might face missing/corrupted files or background processes conflicting with the update due to which you are not able to get the latest update.
- Windows 10/11 update error 0x8007000e – This one Error is an update error that affects some users when they try to search for new updates via Settings.
In this article, we explored some of the best troubleshooting methods for dealing with the error 0xc190012e. Feel free to let us know if this guide helped you by using the comment section below.
Milan Stanojevic
Windows Toubleshooting Expert
Milan has been enthusiastic about technology ever since his childhood days, and this led him to take interest in all PC-related technologies. He’s a PC enthusiast and he spends most of his time learning about computers and technology.
Before joining WindowsReport, he worked as a front-end web developer. Now, he’s one of the Troubleshooting experts in our worldwide team, specializing in Windows errors & software issues.
Getting the 0xc190012e error when trying to update or install Windows? Well, you are not alone, you might be witnessing this message during your upgrade,“Updates failed There were problems installing some updates, but we’ll try again later.” This problem may be quite annoying since it prevents you from installing quality updates and new features for your program. Don’t worry though; we are covering with some suggestions for how to address the problem and bring your system up to date.
The 0xc190012e problem has been traced down to several different root causes. This might be the result of a shaky internet connection, malicious malware, a malfunctioning third-party anti-virus program, or corrupted system files. All of these might cause a snag in the update process, however, using a dedicated partition manager and following the various suggestion we have mentioned below might help you resolve the issue quite seamlessly. See: Fix Windows 10 Upgrade or Install Error 0x800707E7 – 0x3000D
Windows Update or Upgrade Error 0xc190012e
Here is how to fix Windows Update or Upgrade Error 0xc190012e –
Use Windows Update Troubleshooter
The Windows Update Troubleshooter is a built-in tool that has goal is to get your computer back into a healthy state so that it can receive and install the updates from Microsoft. To figure out the upgrade error, you must try out this fix-it tool by following the guide:
- Press the “Windows” key and select Settings.
- Select “System”.
- Then, scroll downward in the right panel and click on “Troubleshoot”.
- Select – Other troubleshooters.
- Locate “Windows Update” and click on Run.
Use Common Windows Update Troubleshooter on Windows 11, 10, 8.1, 7
Manually install the Windows Update
It’s understandable to feel discouraged after receiving Windows Update or Upgrade Error 0xc190012e. A potentially viable option is to acquire the patch or build manually.
Sometimes the error arises because of a problem with the automated update procedure, and the problem may be cleared out by doing the update manually. Here is the procedure to be followed for the same:
- Pree Winkey.
- Type Updates and press Enter.
- Click View Update History.
- Note down the KB number of the failed update.
- Go to Microsoft Update Catalog.
- Type in the KB number and click Search.
- Choose the appropriate version (x64, ARM64, or x86) and click on Download.
- Select the link on the prompted page.
- Double-click the installer and follow the on-screen instructions.
- Reboot your PC.
How to Download and Install Update from Microsoft update catalog on Windows 11/10
Reset Windows Update Components
Facing the 0xc190012e error while installing Windows is one of the rising issues and a brilliant way to deal with it can be resetting the Windows update components. This problem might appear when one or more of these parts becomes muddled or corrupted, preventing updates from installing properly. The steps to be followed are mentioned below:
- Press Windows+S and type cmd.exe.
- Choose Run as administrator from the result.
- Copy and paste the following commands, pressing Enter after each:
net stop wuauserv
net stop cryptSvc
net stop bits
net stop msiserver
ren C:\\Windows\\SoftwareDistribution SoftwareDistribution.old
ren C:\\Windows\\System32\\catroot2 Catroot2.old
net start wuauserv
net start cryptSvc
net start bits
net start msiserver- Restart your computer.
Alternatively, you can run the WUReset.bat after downloading and extracting the file: Reset_Windows_11_update.zip.
How to Reset Windows Update to Default in Windows 10
Temporarily Removing the Third Party Antivirus
It’s frustrating to have to rescue Windows Update or upgrade error 0xc190012e, however, temporarily removing your third-party antivirus can be a very handy fix! Having a third-party antivirus program on your computer might make it overprotective at times preventing Windows from being updated or upgraded.
So, let’s get to the steps on how to carry out this solution:
- Click on Search and type control.
- Press Enter to open Control Panel.
- Then, click on Programs and Features.
- Find your third-party antivirus in the list.
- Right-click and select Uninstall.
- Follow the on-screen instructions to complete the uninstallation.
- Restart your computer.
Fix Corrupted System Files
To resolve the 0xc190012e error code you should try to tackle it by fixing corrupted system files as these can disrupt the update process causing the error to appear.
- Click on Start.
- Type cmd in Windows search.
- Select – Run as administrator.
- Write this command and press Enter:
sfc /scannow
- Wait for the scan to finish and restart your PC.
- If needed, run these commands one by one:
Dism /Online /Cleanup-Image /CheckHealth
Dism /Online /Cleanup-Image /ScanHealth
Dism /Online /Cleanup-Image /RestoreHealth- Restart the system.
SFC /Scannow, DISM.Exe, CHKDSK Windows 10
Clear Temporary Files
Another potential solution for the concerned error is to clear out your temporary files as they can get ahead of your seamless update. Follow these steps:
- Click on Start and type cleanmgr.
- Press Enter and when Drive selection popup appears, select C: and click OK.
- Windows will calculate files that can be removed.
- Select Clean up system files.
- Again choose C: and press “Enter”.
- Under the Files to delete heading, check all the options in the list.
- Click OK and confirm the prompt.
- Check if this solves your error code 0xc190012e.
Try Clean Boot
Another way to settle this upgrade error is by performing a clean boot. It might sound a bit technical, but it’s not that complicated because when you perform a clean boot, you’re starting up your computer with only the essential services and drivers running. Here are the steps to follow:
- Type msconfig in Windows search and press Enter.
- Go to the Services tab, check Hide all Microsoft services, and click Disable all.
- Move to the Startup tab, and click Open Task Manager.
- Right-click each item and select Disable for all startup items separately.
- Close Task Manager and go back to System Configuration.
- Then click Apply and OK to save the changes.
- Restart your computer.
- Try downloading the Windows update again.
Run Windows Media Creation Tool
If you haven’t found the right solution for the pesky Windows Update error 0xc190012e you should use the Media Creation tool which in such a situation can be a useful workaround because this program installs a brand new version of the Operating.
- Navigate to Windows 11 installation media from Microsoft’s website.
- Scroll down to the “Create Windows 11 Installation Media” field and click on Download Now.
- Double-click the mediacreationtool.exe and agree to the Terms.
- Choose Upgrade this PC now and click Next.
- Let Windows download and install the updates.
- After completion, your PC will reboot with the newest version installed.
We hope with these 8 ways you must be able to fix Fix Windows Update or Upgrade Error 0xc190012e on your PC.
Methods:
Use Windows Update Troubleshooter
Manually install the Windows Update
Reset Windows Update Components
Temporarily Removing the Third Party Antivirus
Fix Corrupted System Files
Clear Temporary Files
Try Clean Boot
Run Windows Media Creation Tool
That’s all!!
Did you encounter an update error 0xc190012e while upgrading your operating system to its next available OS Build version? Well, in this post, we have covered all possible reasons that may cause this issue, along with six working fixes for it.
When this error occurs, Windows Update simply fails and displays the following error message – “Your device is missing important security and quality fixes”.
Note: This is a common bug that appears mostly on Windows 10 and even on Insider Previews.

What may cause an update error 0xc190012e in Windows?
The Windows Update error 0xc190012e primarily occurs due to corrupt system files, obsolete Update components, or stored cache. To get rid of this bug, you may repair corrupt system files, delete temporary files, troubleshoot Windows Update, etc.
Sometimes, improving BCD may also help you to overcome this update error code. If the issue persists even after this, try running the DISM command to check the disk health performance.
Let’s explore these methods in detail –
- Reset Windows 10 update components
- Clear temporary files
- Run SFC command
- Run CHKDSK command
- Run BCD code
- Manually Update Windows 10 (using ISO file)
Methods to solve Windows Update error 0xc190012e
Here, we depict step-wise different workarounds to fix Windows Update error 0xc190012e on Windows 10 PC.
1. Reset Windows 10 update components
Resetting Windows Update components is the best way to diagnose the Update error 0xc190012e while upgrading your PC. Follow these steps to reset the Update Components in Windows –
- Download Windows Update troubleshooter from the official site.
- Once the wizard appears in front of you, select Windows Update.
- Now hit Advanced followed by Run as administrator.
- Succeeding after, select Windows Update followed by the Next button.

- Wait for a while till the task gets completed. After this, close the troubleshooter.
- Move to the Windows Update troubleshooter wizard again.
- Select Advanced from the appeared window and choose Run as administrator.
- Here, choose the second option i.e. Windows Network Diagnostics followed by Next.

After completing this process, Restart your system and update the system normally.
2. Clear temporary files
The temporary cache stored in the HDD may also cause this update error 0xc190012e on a Windows PC. Remove all the temporary files from the root drive and check if this update issue resolves afterward.
- Press Win + S together to launch Search.
- Type Disk Cleanup in the search bar and double-click on the top result.
- In the next window, select the root drive (mostly C:) followed by OK to proceed.
- Wait for a few seconds, while Windows is calculating the cache.
- Here, mark all the checkboxes thereafter OK to remove it.
Once finished, Restart your PC and check if the problem 0xc190012e arises while updating or not.
3. Run the SFC command
Missing or corrupt system files may also cause different issues on your Windows PC. The System file checker command may help you to find and repair the corrupt system files on your computer. Follow these steps –
- Press WinKey + S.
- Type Command prompt in the search field and right-click on the well-matching result.
- Select Run as administrator from the context menu.
- If UAC prompts, tap Yes.
- Near the blinking cursor, type the following code thereafter hit Enter key.
sfc/scannow
- This will take approx. 10 minutes to complete the whole scanning and repairing process.
Once the above process is over, reboot the PC and try to update again. Hope this time, you will not receive any issues while updating.
4. Run CHKDSK command
Usually, the bad sector in the disk drive may also make your PC operations slow; thus popping a 0xc190012e error. If that’s the case, use CHKDSK (an inbuilt app of Windows) to repair such bugs. Here is the complete guideline-
- Open Command Prompt as an administrator.
- Make a right-click on the well-matching result and select Run as Administrator.
- If the UAC dialog appears, tap Yes.
- Near the blinking cursor, type the following code and hit Enter to execute the same.
chkdsk C: /f /r /x

- Here C: denotes the root drive, and f implies fixing the issue. Similarly, r is there to identify the problem and X instructs the concerned volume to scan.
- Next to this, press Y to start scanning.
After you complete the above steps, Restart your PC. From the next login, you should no longer receive this error.
5. Purge Windows Cache Folders
Windows Cache folders contain the relevant information about all past updates. These data become obsolete over a period of time and may even trigger an update error. There are two such folders and it is suggested to purge both these folders. Here’s how to perform this task –
- Press Win and R to launch Run.
- In the void box, type cmd and simultaneously press Ctrl+ Shift+ Enter to launch Command Prompt as Admin.
- When UAC prompts, tap Yes.
- On the elevated prompt, type the following command lines. Make sure to press Enter at the end of each command.
net stop wuauserv
net stop cryptSvc
net stop bits
net stop msiserver
Ren C:WindowsSoftwareDistribution SoftwareDistribution.old
Ren C:WindowsSystem32catroot2 Catroot2.old
net start wuauserv
net start cryptSvc
net start bits
net start msiserver
- At last, Reboot your System to save the changes made so far.
6. Manually Update Windows 10 (using ISO file)
In case, you are still struggling with Windows Update error 0xc190012e, it is better to Upgrade your Windows 10 with the latest version. Go through the below instructions –
- Firstly go to the Microsoft official website and click the Download tool now button.
- When the Media Creation Tool is downloaded, right-click on it and select Run as Administrator.
- Afterward, choose to Upgrade this PC now and click the Accept button to proceed further.
- Make sure that you have selected keep your files and apps on the succeeding window.
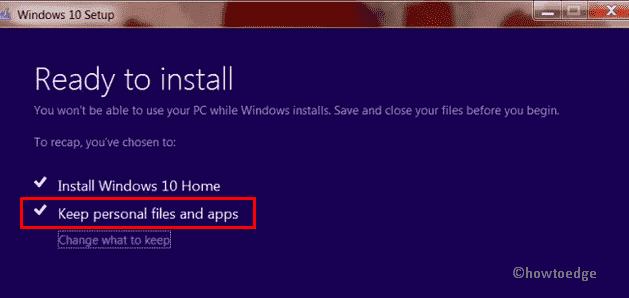
- Tap Install and follow the on-screen instructions to complete the upgrade.
- The installation process will begin automatically. This will take several minutes to complete the new operating system installation.
I hope this article helps you troubleshoot the error 0xc190012e on Windows 10.