
При апдейте ОС может появляться сообщение об ошибке с кодом 0x80240031. Чаще всего оно вызвано повреждением файлов обновлений.
Устранение ошибки 0x80240031
Для решения неисправности выполняйте следующие действия.
- Используйте стандартное средство исправления ошибок Windows Update. Перейдите по ссылке, выберете на страничке вашу версию ОС, загрузите и установите приложение. Оно самостоятельно отыщет и устранит причину сбоя.
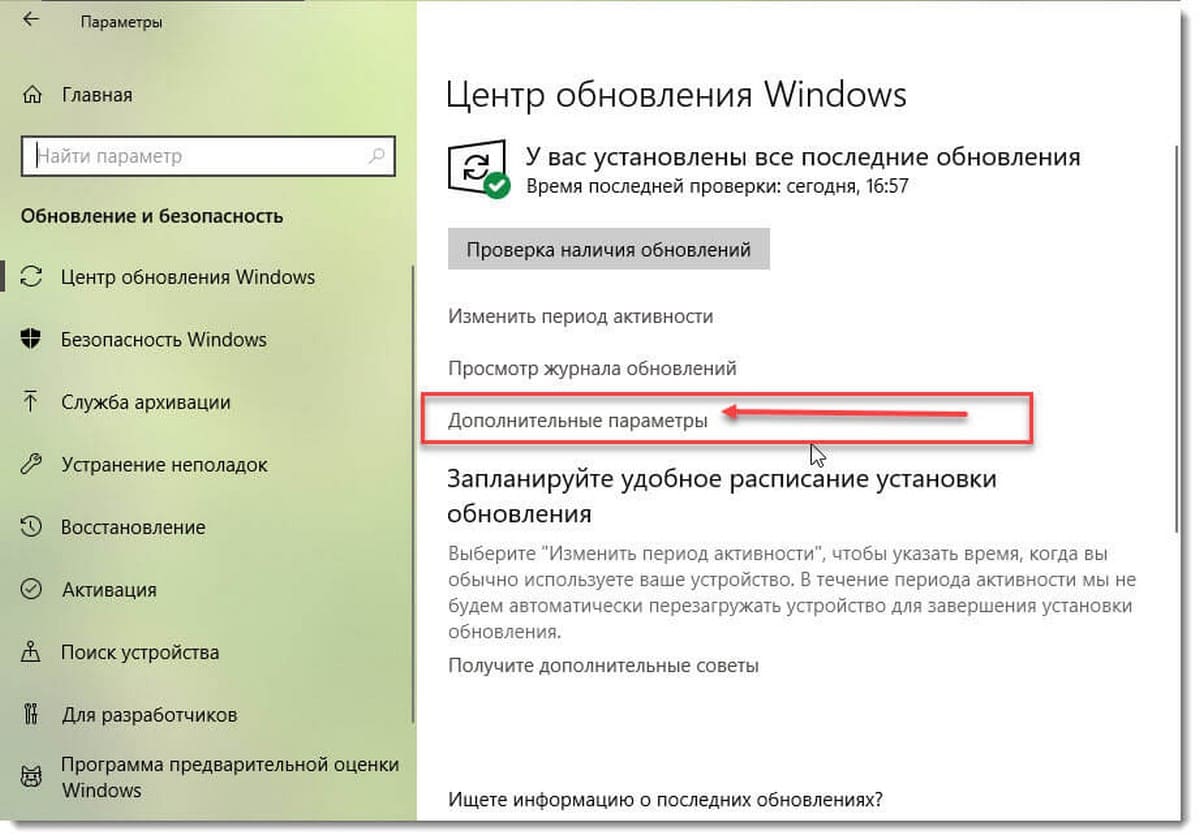
- Выключите получение апдейтов из нескольких источников. Необходимо в десятой версии Виндовс следовать по такому пути: «Параметры» => «Обновление и безопасность» => «Центр обновления Windows» => «Дополнительные параметры». В окне отключите блок, который начинается «Когда этот параметр…». После перегрузите систему и попытайтесь обновиться повторно.
- Перезапустите сервис апдейта ОС. Здесь не обойтись без Командной строки, открытой под администраторскими правами. Скопируйте в нее следующие запросы, подтверждая исполнение каждой нажатием на Enter:
- net stop wuauserv
- regsvr32 %windir%\system32\wups2.dll
- net start wuauserv
Это избавит от ошибки 0x80240031, если первые два способа не дали результата.
Если при попытке установки сборки Windows 10 с номером 14279 с помощью Windows Update вы получаете Ошибка 0x80240031. Есть несколько способов, с помощью которых вы можете попробовать справится с ошибкой , прежде чем Microsoft решит проблему. Как выяснилось проблема решается просто:
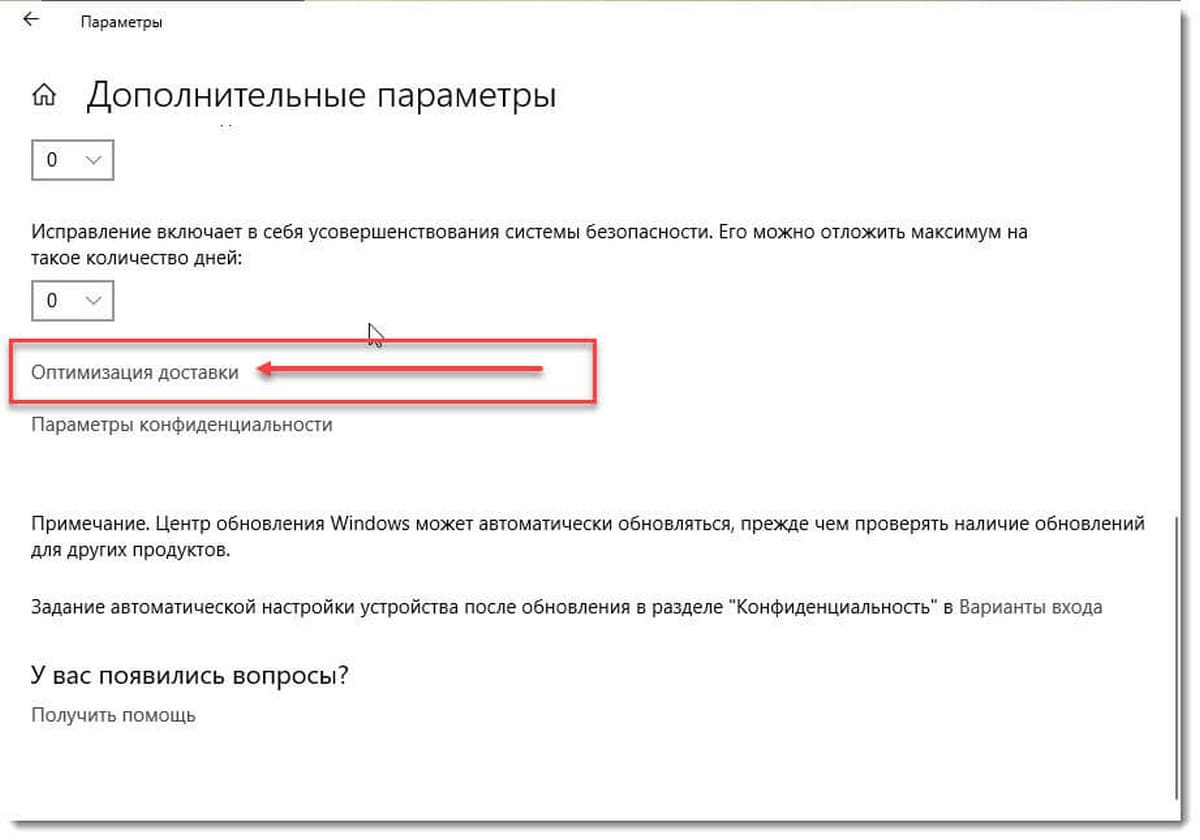
- Откройте «Центр обновления Windows» → «Дополнительные Параметры» → «Оптимизация доставки».
- Отключите параметр «Разрешить загрузки с других компьютеров».
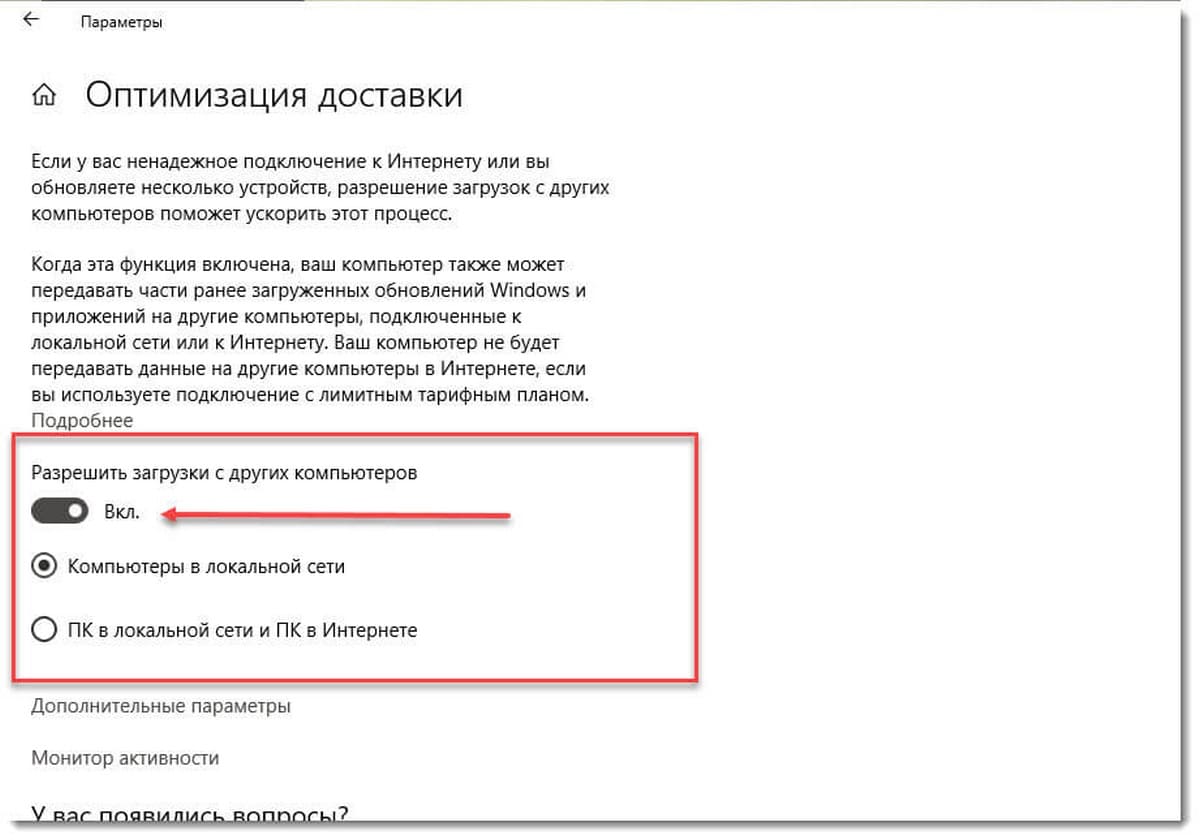
- Перезагрузите компьютер.
Теперь снова запустите Центр обновления Windows 10 и установите новую сборку или обновление.
Причиной ошибки 0x80240031 также может быть:
Антивирусная программа блокирующая Windows Update. Вы можете попробовать ее удалить или создать в программе правило исключения для обновления Windows.
Еще один способ заключается в том, чтобы Восстановить Центр обновления Windows:
Откройте командную строку от имени администратора и введите эти команды последовательно нажимая клавишу Enter :
- net stop wuauserv
- regsvr32 %windir%\system32\wups2.dll
- net start wuauserv
Вот и все. Теперь вы можете снова попытаться загрузить обновление.
How to Fix Error 0x80240031 in Windows 10
Like all Windows Update errors, error code 0x80240031 prevents you from installing updates. Fortunately, there are several ways to fix this error, which you will find in this article.
When Does Error 0x80240031 Occur
The earliest case of error 0x80240031 occurred with the Windows 10 Anniversary Update release that updated the operating system to version 1607.
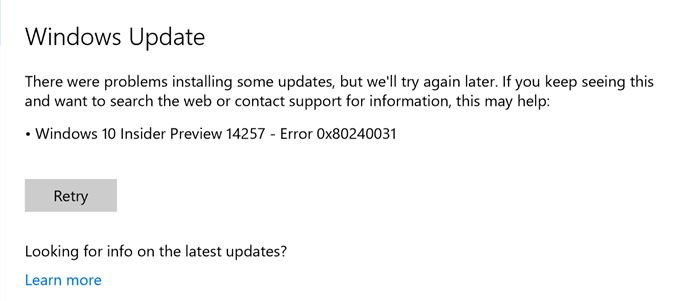
Many users got error 0x80240031 when installing the Windows 10 Insider Preview 14257, 14332, and 14986. However, this error isn’t exclusive to Insider Previews.
Users often encountered this error when updating Windows 10 to version 1703, version 1709, and later version 1803. Many have noticed that this error typically occurs when installing a big update, such as a feature update, and when trying to update Windows 10 to a newer build.
What Causes This Error
Error 0x80240031 may occur due to software and hardware conflicts. Therefore, before you try any of our solutions to fix this error, you should disconnect all external storage devices and drives, including USB Flash Drives and docks. You should also disconnect other hardware, such as Bluetooth receivers, external card readers, and gaming controllers.
In addition, close any unnecessary software that may conflict with Windows Update services. Then, try running the update.
Windows Update files may also become corrupt if you had network-related issues during the update process. In such a case, the best thing to do is clear the Windows Update cache, which will prompt Windows to re-download the corrupted files.
Video Guide on How to Fix Windows Update Error 0x80240031
Table of Contents:
- Introduction
- Solution 1. Perform a Clean Boot
- Solution 2. Run Windows Update Troubleshooter
- Solution 3. Clear Windows Update Cache
- Solution 4. Run Deployment Imaging and Servicing Management (DISM) Scan
- Solution 5. Run System File Checker (SFC) Scan
- Video Guide on How to Fix Windows Update Error 0x80240031
Download Computer Malware Repair Tool
It is recommended to run a free scan with Combo Cleaner — a tool to detect viruses and malware on your device. You will need to purchase the full version to remove infections. Free trial available. Combo Cleaner is owned and operated by Rcs Lt, the parent company of PCRisk.com read more.
Solution 1. Perform a Clean Boot
Error 0x80240031 may occur due to third-party applications interfering with the process. Therefore, the solution is to disable third-party services.
1. Hold down Windows+R keys to open Run.
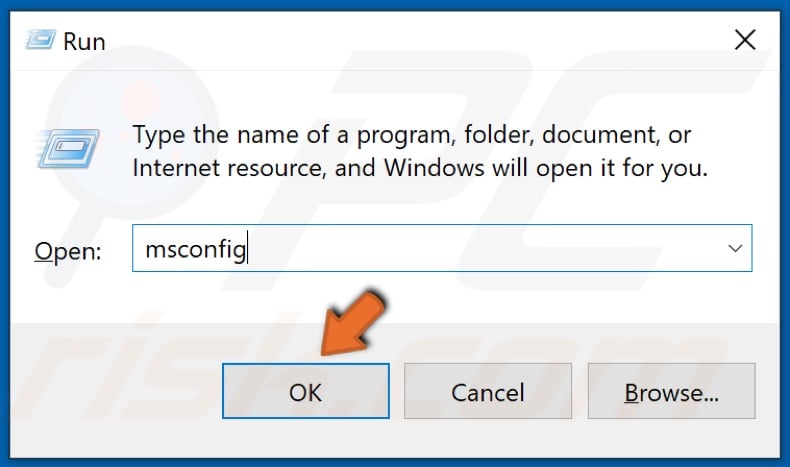
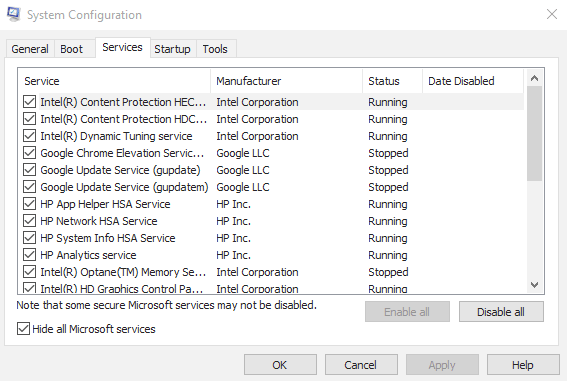
2. In the Run dialog, type in MSConfig and click OK.

3. In the resulting System Configuration window, select the Services tab.
4. Then, mark the Hide all Microsoft services checkbox at the bottom left corner of the window.
5. Click Disable all.
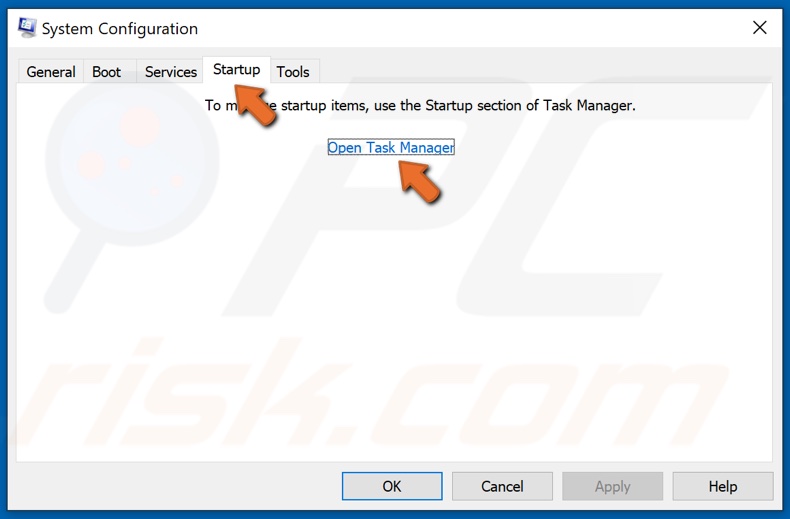
6. Then, Navigate to the Startup tab.
7. Click Open Task Manager.

8. Select each application, and click Disable.
9. Close the Task Manager.
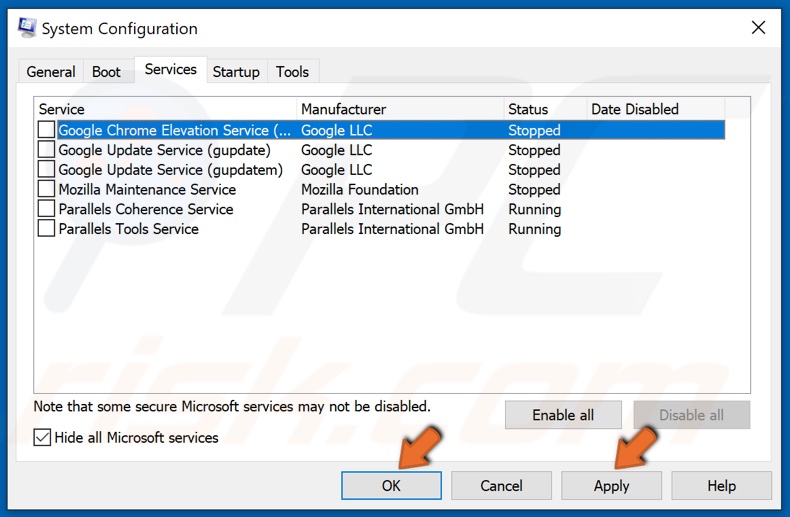
10. In the System Configuration window, click Apply and click OK.
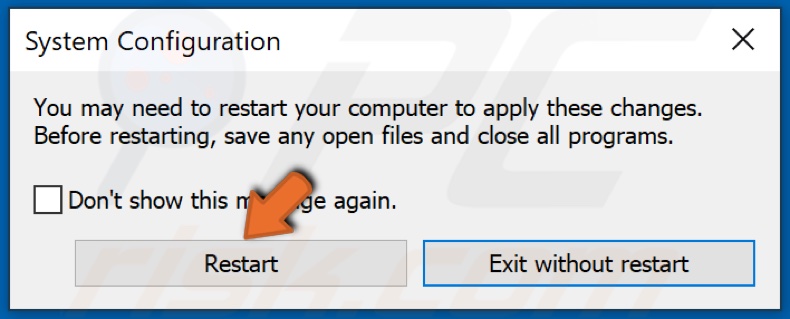
11. Click Restart when prompted.
12. Now, try updating Windows.
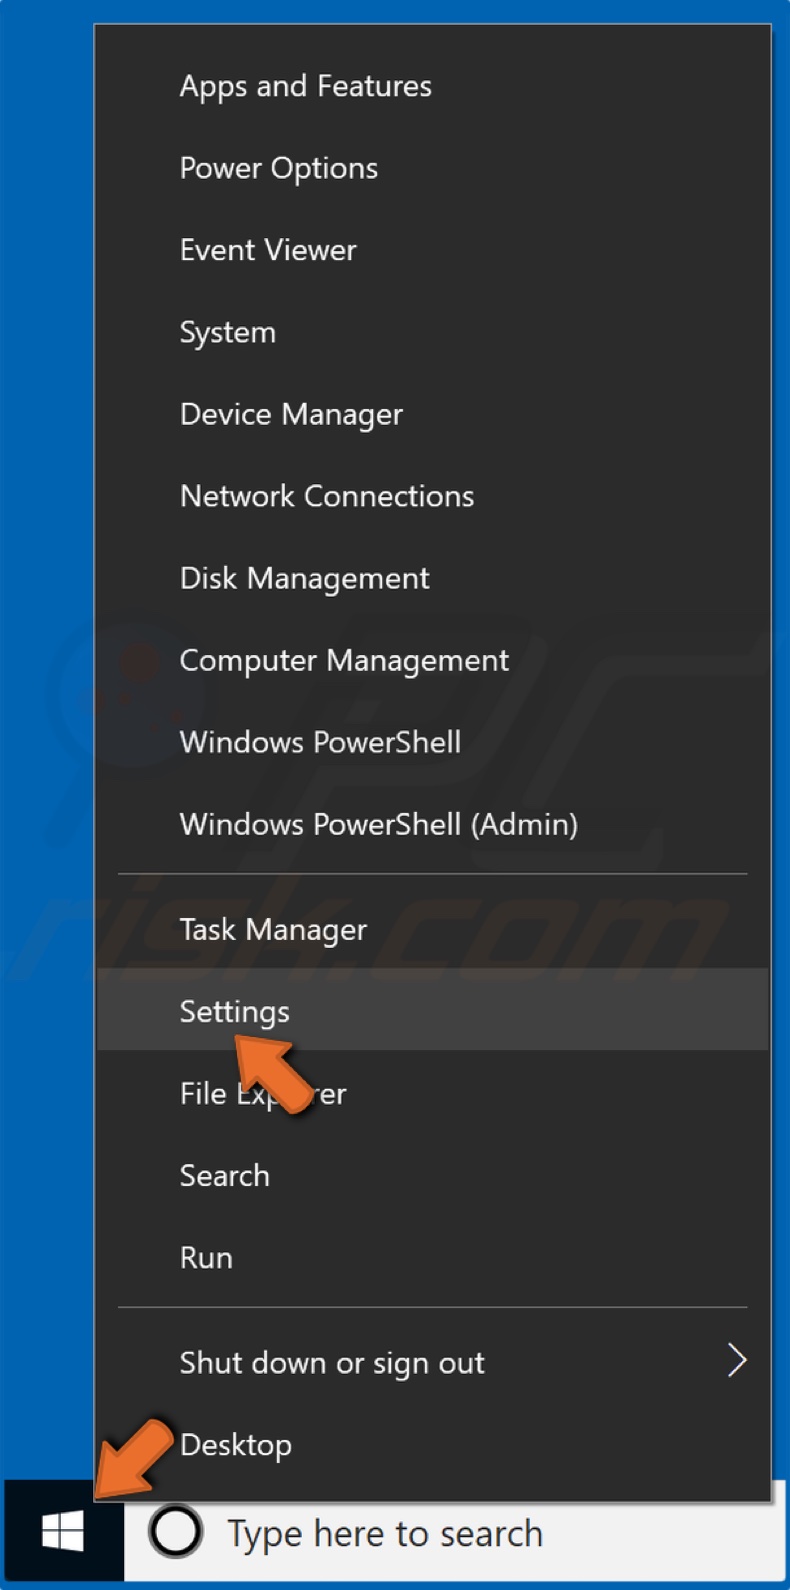
13. Right-click the Start Menu button and click Settings.
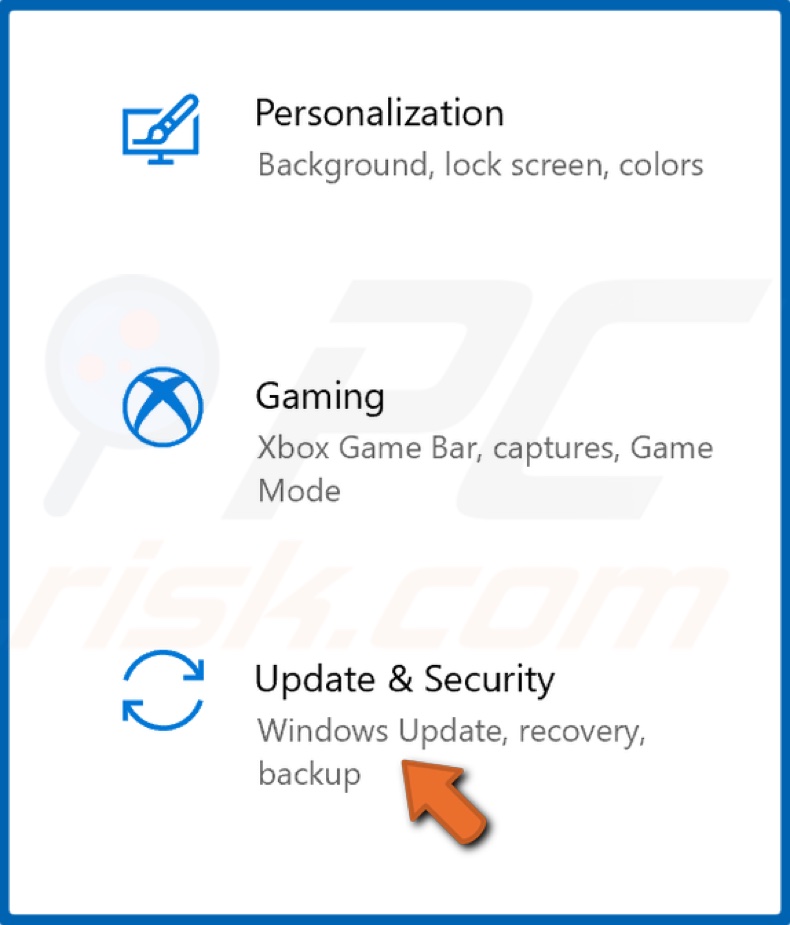
14. Go to Update & Security.
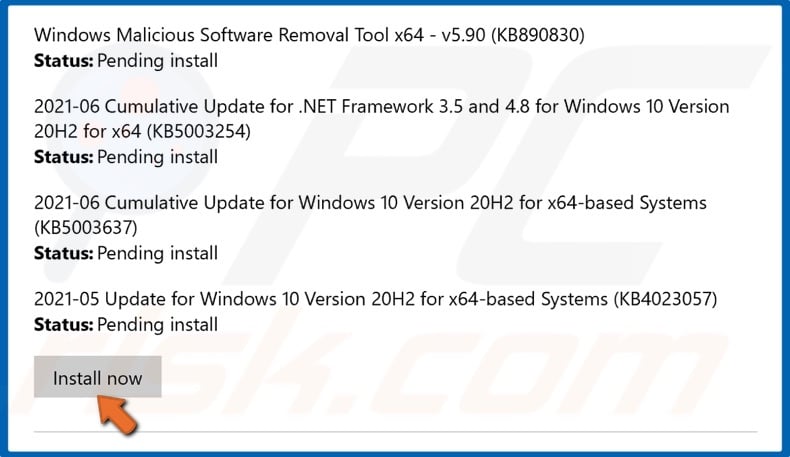
15. To begin installing updates, click Install now.
16. If the update is successful, you can restart your PC in regular mode.
17. Hold down Windows+R keys to open Run.
18. In the Run dialog, type in MSConfig and click OK.
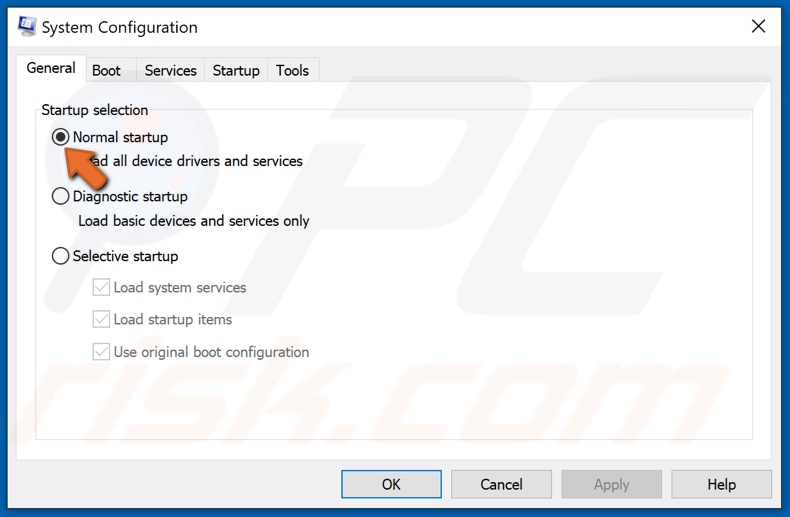
19. In the General tab, select Normal startup.
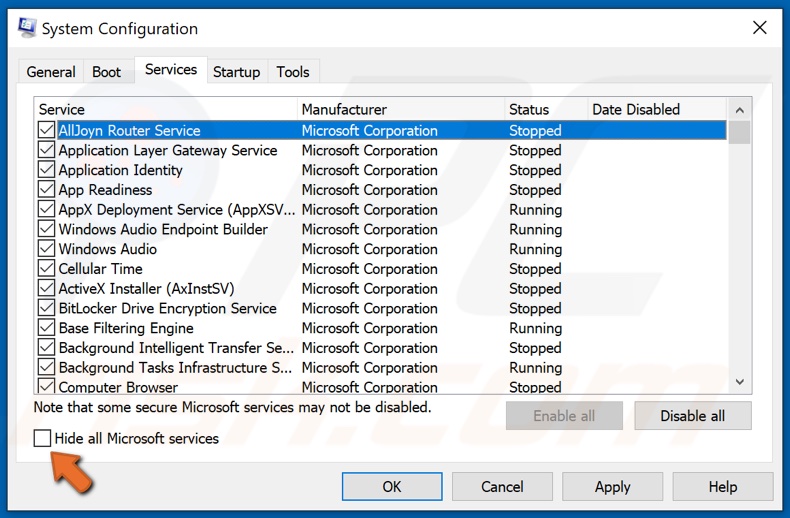
20. Then, go to the Services tab and ensure that the Hide all Microsoft services option is unchecked.
21. Lastly, go to the Startup tab and click Open Task Manager.
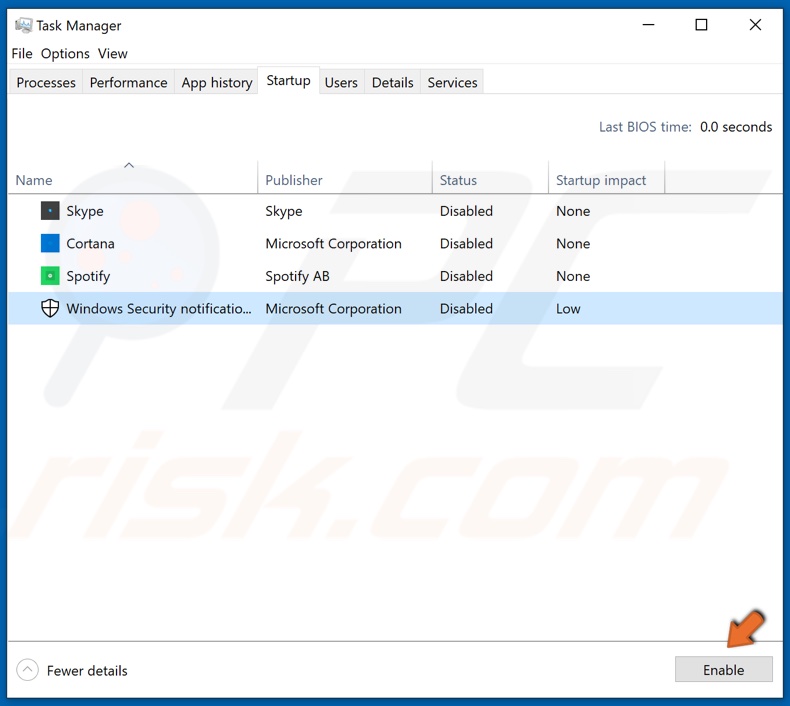
22. Select and enable the previously disabled applications.
23. Close the Task Manager.

24. In the System Configuration window, click Apply and click OK.
25. Click Restart when prompted.
[Back to Table of Contents]
Solution 2. Run Windows Update Troubleshooter
1. Right-click the Start Menu and click Settings.
2. Select Update & Security.
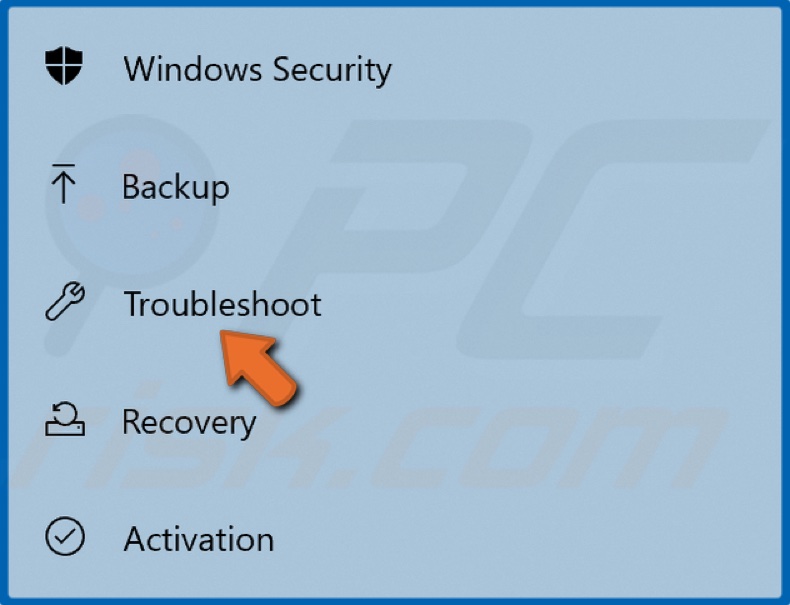
3. Select Troubleshoot.
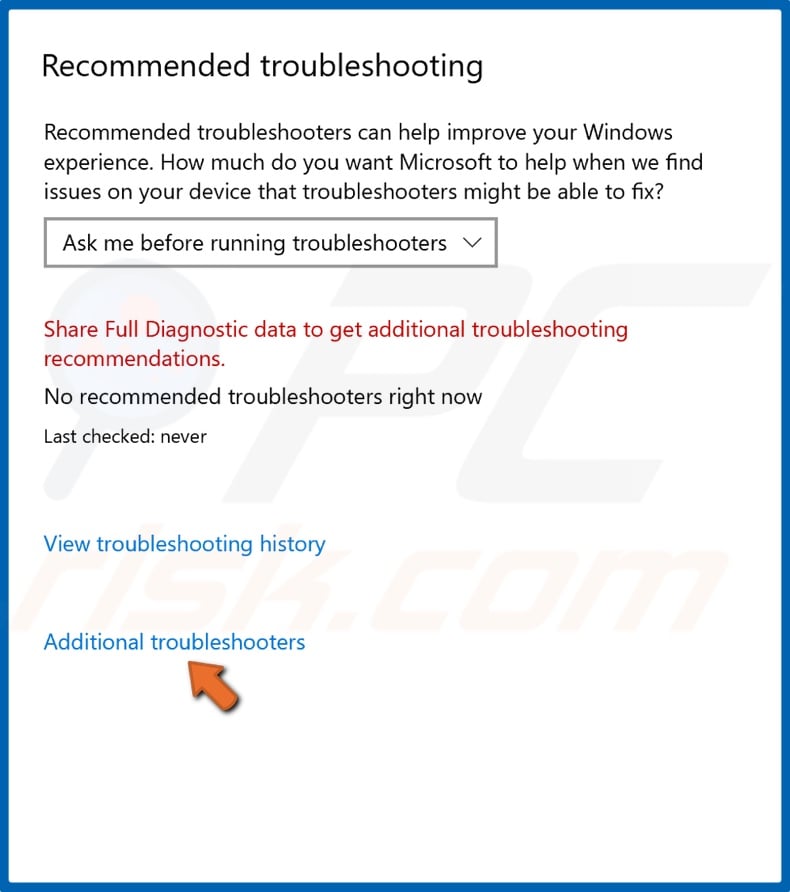
4. Click Additional troubleshooters.
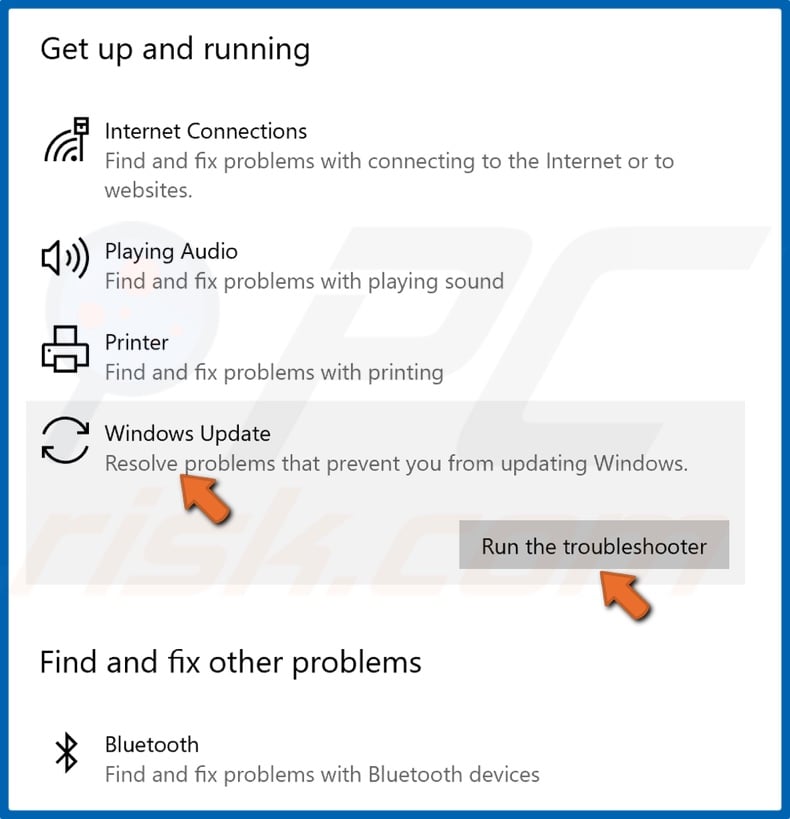
5. Select Windows Update and click Run the troubleshooter.
6. The troubleshooter will identify the issue and apply a fix automatically.
[Back to Table of Contents]
Solution 3. Clear Windows Update Cache
Clearing the Windows Update cache is an effective way to fix Windows Update-related issues. The SoftwareDistribution folder is where all of the update-related files are cached. The SoftwareDistribution folder is an essential component for Windows Update as it temporarily stores files needed to install new updates.
1. Hold down Windows+R keys to open Run.
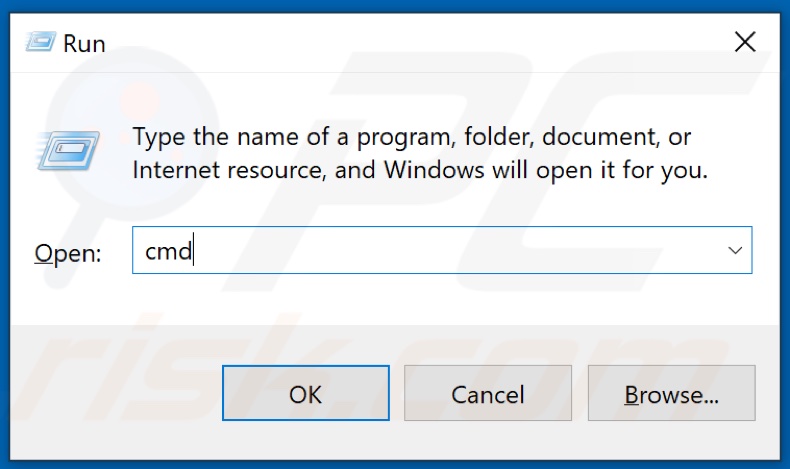
2. In the Run dialog, type in CMD and hold down Ctrl+Shift+Enter keys to open the elevated Command Prompt.
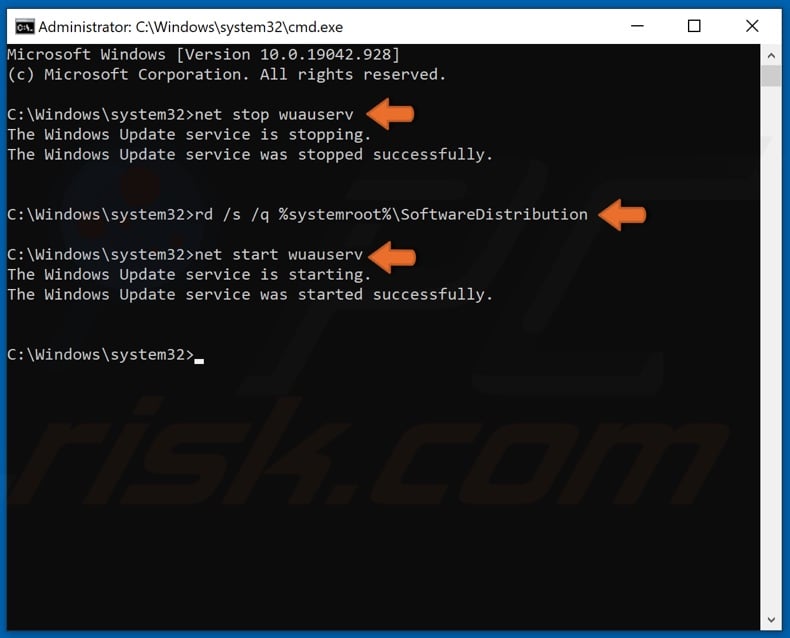
3. In the Command Prompt window, type in net stop wuauserv and hit Enter.
4. Then, type in rd /s /q %systemroot%\SoftwareDistribution and hit Enter.
5. Lastly, type in net start wuauserv and hit Enter.
6. Close the Command Prompt and try updating Windows.
[Back to Table of Contents]
Solution 4. Run Deployment Imaging and Servicing Management (DISM) Scan
The Deployment Image Servicing and Management (DISM) is a command-line tool designed to prepare, modify, and repair system images. You can try running a DISM scan, which will identify and repair corrupted Windows system image files. As a result, repairing the image may fix error 0x80240034.
1. Hold down Windows+R keys to open Run.
2. In the Run dialog, type in CMD and hold down Ctrl+Shift+Enter keys to open the elevated Command Prompt.
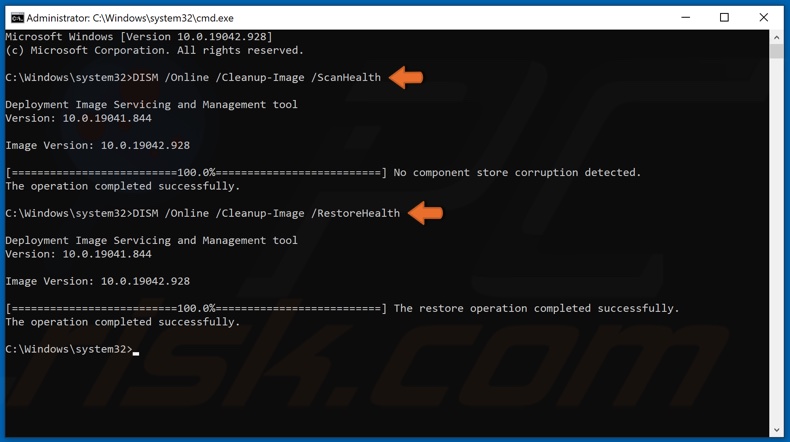
3. Then, type in DISM /Online /Cleanup-Image /ScanHealth in the Command Prompt window, and hit Enter.
4. Lastly, type in DISM /Online /Cleanup-Image /RestoreHealth and press the Enter key.
5. Close the Command Prompt, restart your PC, and try updating Windows.
[Back to Table of Contents]
Solution 5. Run System File Checker (SFC) Scan
You can also run the System File Checker tool to repair missing or corrupted system files. The SFC /ScanNow command scans all protected system files and replaces corrupted files with a cached copy found in a compressed folder at %WinDir%\System32\dllcache.
1. Hold down Windows+R keys to open Run.
2. In the Run dialog, type in CMD and hold down Ctrl+Shift+Enter keys to open the elevated Command Prompt.
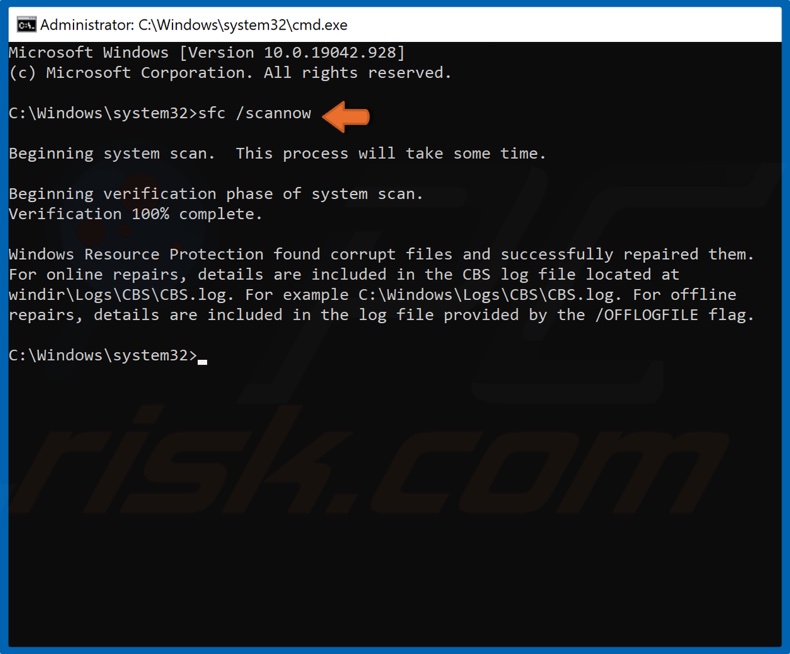
3. In the Command Prompt window, type in SFC /ScanNow and hit the Enter key to start the scan.
4. Once the scan is complete, close the Command Prompt, restart your PC, and try updating Windows.
[Back to Top]
Some users encountered Error Code 0x80240031 while attempting to upgrade their Windows 10 OS to a newer build. This error code generally occurs due to the damaged system files or corrupted registry files.
Earlier this error was only associated with Windows 8 and Windows 8.1 but nowadays it has become a serious concern for Windows 10. If you’re looking for any resolution to avoid this problem then this article may help you.
In this article, we have included some effective workarounds that may likely help you to fix this issue. So let’s see how to fix this error.
To fix update error code 0x80240031 in Windows 10, use the steps –
Solutions List
- Perform a clean boot
- Run System File Checker and DISM Tool
- Disable the Graphics Card Driver
- Perform an Automatic Repair
1. Perform a clean boot
- Press the Windows+S shortcut key to open the Windows Search bar.
- In the text bar, type System Configuration and press Enter.
- Once the System Configuration window opens, switch to the Services tab.
- Now go to the left bottom corner and mark the checkbox next to Hide All Microsoft Services.
- Then click Disable all available at the right-bottom.
- Go to the Startup tab and hit Open the task Manager.
- In the Task Manager, select the services one by one and hit the Disable button.
- Repeat this process until you turn off all the running services.
- Now close the window and back to the System Configuration page again.
- Click Apply > OK button to save the changes.
- Restart your computer.
Once you complete the process, try to install the update again and check if it works.
Now open the System Configuration again as explained above. On the General tab, select Normal Startup. Then go to the Services tab and unmark the Hide all Microsoft services option.
After that, move to the Startup tab and select Open Task Manager link. In the Task Manager, select Enable All to activate all startup programs. Lastly, hit OK and restart your device.
2. Run System File Checker and DISM Tool
If performing the clean boot doesn’t fix it then run the System File Checker tool to fix the corrupted or damaged system files. To continue, follow the instructions below:
- First of all, open the command prompt with admin rights.
- In the elevated command prompt, type the below command and press Enter.
sfc /scannow
- This will take a couple of minutes to complete the searching/repairing process, so wait till then.
- Once it is over, restart your computer to apply the changes.
Now run Deployment Image Servicing and Management (DISM) scan to repair the corrupted system files. Here are the steps:
- Open the elevated command prompt again.
- Type the following commands and hit enter after each one –
Dism /Online /Cleanup-Image /ScanHealth
Dism /Online /Cleanup-Image /CheckHealth
Dism /Online /Cleanup-Image /RestoreHealth
-
It may take a couple of minutes to finish the work. So wait patiently without intervening it. Once it completed, restart your PC to apply the changes.
3. Disable the Graphics Card Driver
Sometimes these types of problems also occur due to the graphics card driver installed on your computer. So, we suggest you disable your graphics card driver temporarily and then try to upgrade your operating system. Here is how to do:
- Right-click on the Start button and select Device Manager from the menu list.
- Once the Device Manager opens, go to the Display Adapters and then expand it.
- Now right-click your graphics card and select Properties from the options.
- In the Properties window, go to the Driver tab and select Disable Device.
- Then click the OK button to save the changes.
Now reboot your computer and check if it works. Once you’ve complete the process successfully, navigate to the manufacturer website, and install the latest version of your driver.
4. Perform an Automatic Repair
If you are still encountering Error 0x80240031 while upgrading Windows, we recommend you to perform an automatic repair. Here are the steps:
- Launch Windows Settings using Win+I shortcut key.
- Select Update & Security >Recovery.
- In the right pane, click Restart now under Advanced Startup.
- Once it starts up, navigate to Troubleshoot >Advanced Options >Automatic Repair.
Jun. 23, 2022 / Updated by
Bessie Shaw to
Windows 10
Are you experiencing error 0x80240031 on Windows 10 update? If you keep seeing error code “Windows 10 Insider Preview 14332 — Error 0x80240031” when you are trying to upgrade to Windows 10 new build, don’t be panic, have a try with the following 6 solutions to fix that error.
Method 1. Disable or Uninstall Antivirus Software to Fix Error 0x80240031 on Windows 10 Update
Many users have reported that AVG antivirus software can cause the error code 0x80240031 on Windows 10 Update. To rule out that possibility, it is suggested that you should disable the antivirus software installed on your computer or uninstall them temporarily when getting a 0x80240031 error.
Method 2. Using the SFC /SCANNOW with Run as Administrator
Bear in mind that this method requires to run command prompt as the administrator. Follow the step-by-step guide.
1. Click the Start button and then type cmd in the search box
2. Right Click Command Prompt and then select Run as administrator.
3. Type sfc /scannow and then press Enter in the command prompt mode.
4. Restart your computer and update Windows 10 one more time.
Note: Once error message is appeared when you are typing src /scannow, type dism /online / cleanup-image / restore health in the same command prompt window.
Method 3. Disable Your Graphic Card Drivers
Graphic card driver issues can cause update error code 0x80240031. To avoid that probability, you should use Device Manager to disable your graphics card drivers.
Step 1. Press Windows shortcut keys Win + R to open the Run dialog.
Step 2. Enter devmgmt.msc and then hit OK.
Step 3. Expand the Display adapters and select your graphics card, right-click on it and then select Properties.
Step 4. Choose Disable under the Driver tab and then click OK.
Step 5. Reboot your computer and upgrade Windows 10 again.
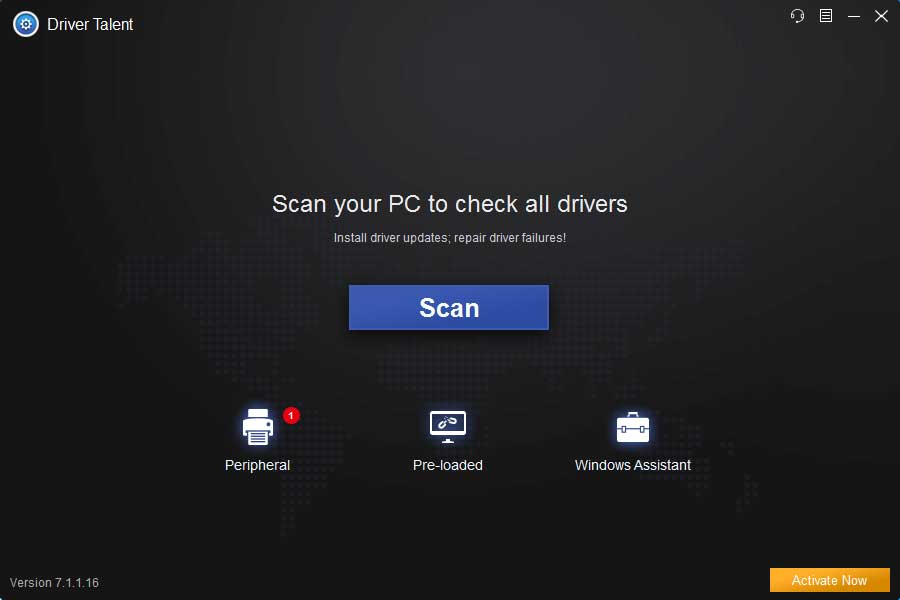
Method 4. Try to Install Latest Updates and Drivers
To save you time and energy, you might as well try a professional driver update and management utility tool, like Driver Talent, which is able to search for the compatible drivers that you computer needs and download them automatically within two minutes.
Download Now
Follow the three easy steps to download and update drivers.
Step 1. Identify the Problematic Drivers
Launch Driver Talent. Click “Scan” to identify the incorrect drivers on Windows 10.
Step 2. Download and Update Drivers
All the missing, outdated, corrupt or broken drivers will be listed after scan, click “Repair” to fix those drivers or you are also able to update them to the latest versions by clicking “Update”.
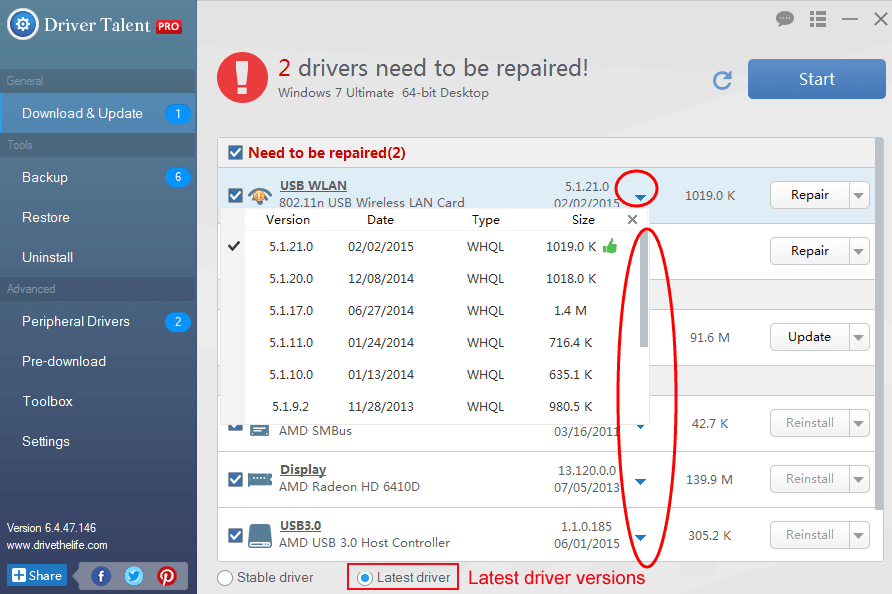
Note:It is recommended that you don’t update drivers when they aren’t broken.
Step 3. Reboot Your PC
Restart your computer to make the updated drivers come into effect.
Note: In case of driver conflicts or driver crashes, it is recommended to perform a back up of drivers with Driver Talent before installing new drivers.
Read More: Free Download and Install Drivers after Window 10 Update
Free Download & Update Graphics Driver, Video Card Driver, Monitor Driver, Display Card Driver
Method 5. Perform Automatic Repair
If the issue 0x80240031 persists after all the above fixes are used, you could perform automatic repair to troubleshoot this problem.
1. Press Win + Q.
2. Click Settings and then type Advanced Startup and hit Enter.
3. Scroll down to find “Advanced Startup” menu and click Restart Now.
4. Choose Troubleshoot >Advanced Options >Automatic Repair.
Method 6. Refresh Your PC
Should automatic repair fail to fix 0x80240031 errors, try to refresh your computer. To do so, you just need to repeat method four’s step 1 to step 3, and then navigate to Troubleshoot >Refresh.
If you have more wonderful suggestions on how to fix error code 0x80240031 on Windows 10 update, please share with us in the comment section below.
Recommended Download
|
ExplorerMax |
Driver Talent for Network Card | |||
| Smart and advanced file explorer tool for Windows platforms | Download & Install Network Drivers without Internet Connection | |||
|
30-day Free Trial |
Free Download |