
How to Install DirectX 12 on Windows 11
DirectX 12 is a powerful application programming interface (API) developed by Microsoft that benefits gamers and developers by allowing for more advanced graphics and processing capabilities. It is particularly effective in enhancing the performance of games and applications that require heavy graphical processing. As Windows 11 users, you may be eager to harness the full power of DirectX 12. This article will guide you through everything you need to know about installing and optimizing DirectX 12 on Windows 11.
Understanding DirectX 12 and Windows 11
Before delving into the installation process, it’s essential to understand what DirectX 12 offers. DirectX is a set of APIs used in Windows OS for handling tasks related to multimedia, especially game programming and video. DirectX 12 is designed to provide better performance and more control over hardware resources, enabling developers to create richer graphics and smoother gaming experiences.
Windows 11 comes with DirectX 12 pre-installed, but it is important to ensure that your installation is up-to-date. This ensures compatibility with the latest games and software, as well as optimizing performance.
System Requirements
Although DirectX 12 can be installed on systems running Windows 10 and earlier editions, Windows 11 natively supports it, making the installation process simpler. Here are the basic requirements to consider:
- Operating System: Windows 11 (64-bit)
- Processor: 1 GHz or faster with at least 2 cores on a compatible 64-bit processor
- RAM: At least 4 GB of RAM
- Graphics Card: DirectX 12 compatible Graphics card (Most modern graphics cards are compatible)
- Storage: Sufficient storage space for Windows updates and gaming applications
Step-by-Step Installation Guide
Step 1: Verify Existing DirectX Version
Before installing DirectX 12, it’s wise to check which version is currently installed on your Windows 11 system.
- Press Win + R to open the Run dialog box.
- Type
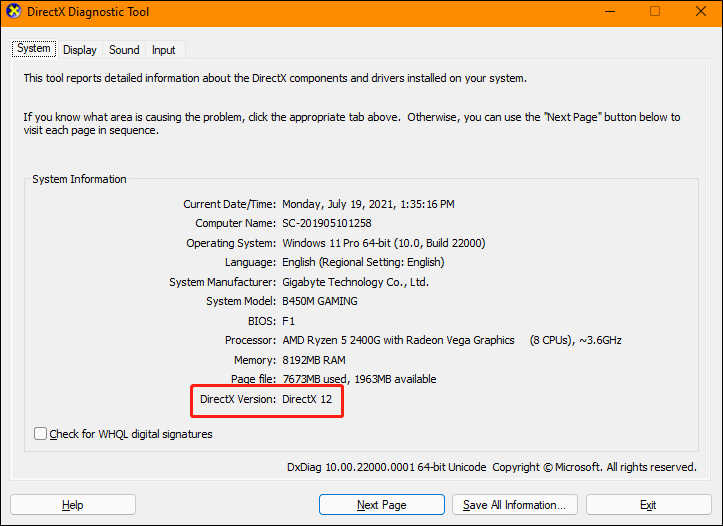
dxdiagand hit Enter. - The DirectX Diagnostic Tool will appear. Check the «DirectX Version» at the bottom of the window.
If you see «DirectX 12,» you are all set! If not, proceed to the next steps.
Step 2: Update Windows 11
Updating Windows is critical as it not only installs essential patches but also updates your DirectX version along with other system components.
- Click on the Start menu and select Settings (the gear icon).
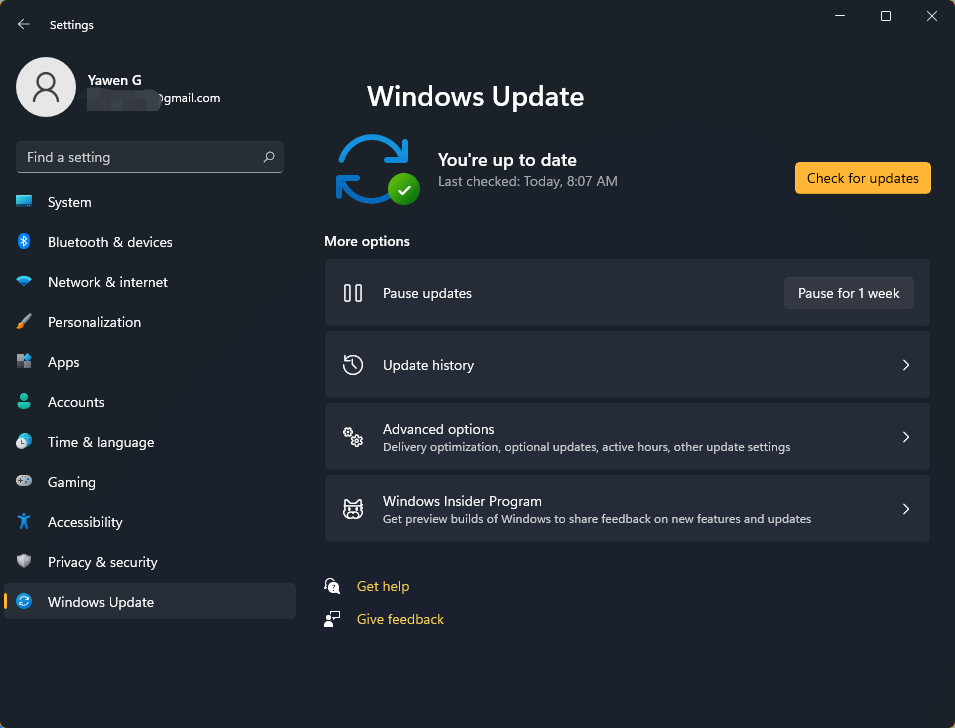
- Navigate to Windows Update.
- Click on Check for updates.
- If there are updates available, download and install them.
- Restart your computer if prompted.
Step 3: Check for Graphics Driver Updates
DirectX relies heavily on your graphics driver. Outdated drivers can limit DirectX capabilities, so ensuring they are current is essential.
- Right-click on the Start menu and select Device Manager.
- Expand the Display adapters section.
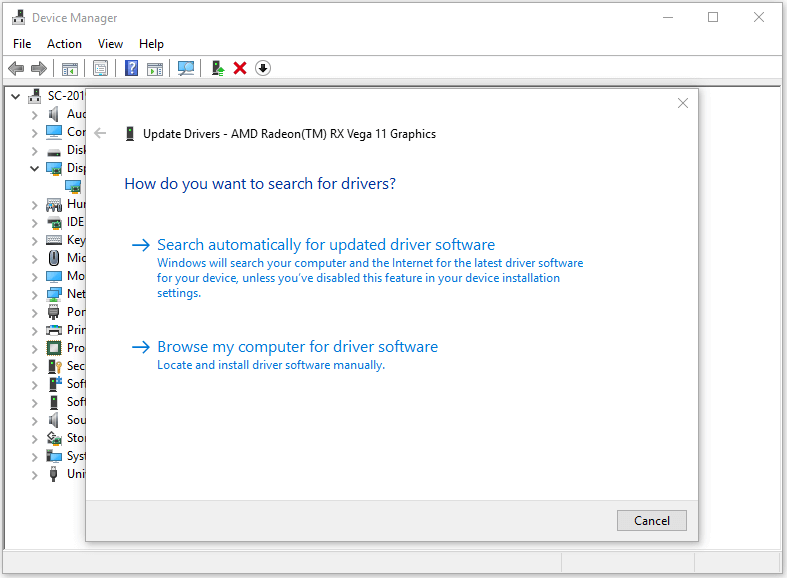
- Right-click on your graphics card and select Update driver.
- Choose Search automatically for updated driver software.
- Follow the prompts to install any available updates, and restart your PC if required.
Step 4: Install DirectX 12 Manually (If Needed)
If your system still does not have DirectX 12 after performing the above steps, you may opt for a manual installation. Here’s how:
-
Download the DirectX End-User Runtime: Go to the official Microsoft website and search for «DirectX End-User Runtime Web Installer.» Download it from the official source to ensure safety.
-
Run the Installer: Once downloaded, navigate to your downloads folder and run the installer.
-
Follow the Installation Wizard: The installer will guide you through the steps. Accept the license agreement, and the installation wizard will begin installing required components.
-
Restart Your Computer: After installation is complete, restart your computer to apply all changes.
Step 5: Verify DirectX 12 Installation Again
After installation and system updates, it’s wise to double-check whether DirectX 12 is correctly installed:
- Again, press Win + R, type
dxdiag, and hit Enter. - Go to the DirectX Version field to confirm it now reads “DirectX 12.”
Step 6: Optimizing DirectX for Gaming
Once DirectX 12 is installed, consider optimizing its settings for gaming. Here are some tips:
-
Adjust Graphics Settings in Games: Many games allow you to toggle between DirectX versions. Within the graphics settings menu, opt for DirectX 12 to take full advantage.
-
Configure Windows Graphics Settings: Head over to Settings > System > Display > Graphics settings. Here, you can choose the desired graphics preference for specific games.
-
Ensure High Performance Mode: Make sure your PC is set to High Performance mode. You can find this option in Control Panel > Power Options.
-
DirectX 12 Ultimate Features: If using a compatible GPU, enable ray tracing and variable rate shading (VRS) for enhanced visual quality.
Troubleshooting Installation Issues
Common Issues and Solutions
Problem: Installation Stalls or Fails
- Solution: Ensure that your Windows is updated, and you have a stable internet connection. Disable any security software temporarily as it may interfere with installation.
Problem: DirectX Version Remains Unchanged
- Solution: Revisit the Device Manager to ensure that the graphics drivers are updated properly. If needed, roll back to a stable version and then attempt to reinstall the latest version.
Problem: Compatibility Issues with Older Games
- Solution: Try running the game in compatibility mode. Right-click the game’s executable, go to Properties, and navigate to the Compatibility tab to select the desired mode.
Keeping DirectX Up-to-Date
To ensure the best performance and compatibility with new applications or games, always keep your DirectX updated. Regular system updates via Windows Update will help maintain the latest DirectX version on your machine.
- Make it a habit to check for updates regularly.
- Join forums or communities related to gaming and technology to stay informed about the latest updates or patches released by Microsoft.
Conclusion
Installing DirectX 12 on Windows 11 is typically a straightforward process thanks to its native support in the OS. Follow the proper guidelines to ensure that your system is fully optimized for gaming and multimedia purposes. Keeping your system updated, along with understanding the performance features of DirectX 12, will enhance your gaming experience and allow for smoother graphics integration.
With your system updated and properly configured, you can now dive into the immersive world of gaming with the latest technologies that DirectX 12 has to offer. Enjoy your gaming sessions, and unleash the potential of your graphics hardware!
Applies ToWindows 8.1 Windows 8.1 Enterprise Windows 8.1 Pro Windows 8 Windows 8 Enterprise Windows 8 Pro Windows RT Windows 7 Enterprise Windows 7 Home Basic Windows 7 Home Premium Windows 7 Professional Windows 7 Starter Windows 7 Ultimate Windows Server 2008 R2 Datacenter Windows Server 2008 R2 Enterprise Windows Server 2008 R2 for Itanium-Based Systems Windows Server 2008 R2 Standard Windows Vista Business Windows Vista Enterprise Windows Vista Home Basic Windows Vista Home Premium Windows Vista Starter Windows Vista Ultimate Windows Server 2008 Datacenter Windows Server 2008 Enterprise Windows Server 2008 for Itanium-Based Systems Windows Server 2008 Standard Microsoft Windows XP Service Pack 3 Microsoft Windows Server 2003 Service Pack 1 Microsoft Windows Server 2003 Service Pack 2 Windows 10
Что такое DirectX?
DirectX — это набор компонентов в Windows, который позволяет программному обеспечению, в первую очередь и особенно играм, работать непосредственно с видео- и аудиоустройством. Игры, использующие DirectX, могут более эффективно использовать встроенные в оборудование функции мультимедийного акселератора, что улучшает общий мультимедийный интерфейс.
Определение версии DirectX, установленной на компьютере
Инструмент DxDiag представляет подробную информацию о компонентах и драйверах DirectX, которые установлены в вашей системе и доступны к использованию.
-
Нажмите кнопку «Пуск», введите в поле поиска запрос dxdiag, затем нажмите клавишу «ВВОД».
-
Выберите элемент dxdiag в списке результатов поиска
-
Проверьте строку версия DirectX на первой странице отчета в разделе Информация о системе.
-
Проведите пальцем от правого края экрана к центру и коснитесь кнопки «Поиск». Введите запрос dxdiag в поле поиска. Или введите запрос dxdiag в строку поиска в меню «Пуск».
-
Выберите элемент dxdiag в списке результатов поиска
-
Проверьте строку версия DirectX на первой странице отчета в разделе Информация о системе.
-
Нажмите кнопку «Пуск» и введите в поле поиска запрос dxdiag.
-
Выберите элемент dxdiag в списке результатов поиска
-
Проверьте строку версия DirectX на первой странице отчета в разделе Информация о системе.
Версии DirectX и обновления через операционную систему
В этих версиях Windows DirectX 11.3 и 12 предустановлены.
Обновления будут доступны через Центр обновления Windows. Отдельного пакета данных версий DirectX не существует.
-
DirectX 11.1 входит в состав Windows 8, Windows RT и Windows Server 2012. Отдельного пакета обновления для DirectX 11.1 не существует. Эту версию DirectX можно установить только через клиентский компонент Центра обновления Windows в Windows 8, Windows RT и Windows Server 2012.
-
DirectX 11.2 предустановлен в системах Windows 8.1, Windows RT 8.1 и Windows Server 2012 R2. Отдельного пакета обновлений для DirectX 11.2 не существует. Эту версию DirectX можно установить только через Центр обновлений Windows в системах Windows 8.1, Windows RT 8.1 и Windows Server 2012 R2.
Примечание.Для дальнейшего обновления DirectX вам необходимо обновить операционную систему.
-
DirectX 11.0 предустановлен в системы Windows 7 и Server 2008 R2. Отдельного пакета обновлений для данной версии не существует. Вы можете обновить DirectX, установив пакет обновлений, а также обновления, перечисленные ниже.
-
DirectX 11.1 доступен для Windows 7 с пакетом обновления 1 (SP1) и Windows Server 2008 RS с пакетом обновления 1 (SP1) с обновлением платформы для Windows 7 и Windows Server 2008 (KB2670838).
Примечание. Для дальнейшего обновления DirectX вам необходимо обновить операционную систему.
-
DirectX 10 предустановлен в системах Windows Vista. Отдельного пакета обновлений для данной версии не существует. Вы можете обновить DirectX, установив пакет обновлений, а также обновления, перечисленные ниже.
-
DirectX 10.1 предустановлен в системах Windows Vista с пакетом обновления 1 (SP1) или более поздней версии и Windows Server с пакетом обновления 1 (SP1) или более поздней версии. Отдельного пакета обновлений для данной версии не существует. Вы можете обновить DirectX, установив пакет обновлений, а также обновления, перечисленные ниже.
-
DirectX 11.0 доступен для Windows Vista с пакетом обновления 2 (SP2) и Windows Server 2008 с пакетом обновления 2 (SP2) с установленными KB971512.
Примечание. Для дальнейшего обновления DirectX вам необходимо обновить операционную систему.
DirectX 9.0c доступен для Windows XP и Windows Server 2003 путем установки DirectX 9.0c End-User Runtime.
Некоторые приложения и игры требуют наличия DirectX 9. Тем не менее, на вашем компьютере установлена более поздняя версия DirectX. Если вы установили и запустили приложение или игру, для которой требуется DirectX 9, может появиться сообщение об ошибке, например «Запуск программы невозможен, так как на компьютере отсутствует d3dx9_35.dll. Попробуйте переустановить программу».
Чтобы устранить эту проблему, установите DirectX End-User Runtime.
Примечания.
-
При запуске этот пакет не вносит изменения в версию DirectX, Direct3D 9, Direct3D 10.x, Direct3D 11.x, DirectInput, DirectSound, DirectPlay, DirectShow и DirectMusic.
-
Для дальнейшего обновления DirectX необходимо обновить операционную систему.
Нужна дополнительная помощь?
Нужны дополнительные параметры?
Изучите преимущества подписки, просмотрите учебные курсы, узнайте, как защитить свое устройство и т. д.
This post provides a detailed guide for DirectX 12 (Ultimate) download for Windows 10 or Windows 11. It also introduces what is DirectX 12, DirectX 12 Ultimate, DirectX 12 (Ultimate) requirements, how to install the latest version of DirectX, and how to update the drivers for your DirectX 12 (Ultimate). For more computer tips and tricks, please visit MiniTool Software website.
DirectX 12 (Ultimate) Download for Windows 10/11 PC
There are no standalone packages for DirectX 12 or DirectX 12 Ultimate. To download and install the latest version of DirectX 12 (Ultimate) on Windows 10 or Windows 11, you can use Windows Update. The DirectX update will come along with Windows Update. Check the detailed guides below.
For Windows 10:
If you are running on Windows 10 OS, then you’ve already installed DirectX 12. But if the version of your DirectX is not DirectX 12 or you want to download DirectX 12 Ultimate on Windows 10, you can follow the instructions below.
Step 1. Press Windows + R, type winver, and press Enter to check which version of Windows 10 is installed on your computer.
If your Windows 10 version is Version 2004 or higher, then you can download DirectX 12 Ultimate on your computer. If your OS version number is lower than 2004, then you can only get DirectX 12 downloaded on your Windows 10 computer.
Step 2. Then click Start -> Settings -> Update & Security -> Windows Update, and click Check for updates button. Windows will automatically download and display newer versions of Windows 10. You can update your Windows 10 OS to a newer version that is higher than Version 2004.
To check your current Windows 10 version after Windows Update, you can type winver in Run dialog again.
Step 3. After updating Windows 10 to a higher version than 2004, you have downloaded and installed DirectX 12 Ultimate on your Windows 10 computer.
For Windows 11:
DirectX 12 Ultimate feature will be built in Windows 11. To download and install DirectX 12 Ultimate latest version, you can still use Windows Update.
Just click Start -> Settings -> Windows Update -> Check for updates to do it.
To check your current DirectX version, you can press Windows + R, type dxdiag, and press Enter to open DirectX Diagnostic Tool, you can see DirectX 12 next to DirectX Version although the DirectX 12 Ultimate has been already installed.
What Is DirectX 12 (Ultimate)?
What is DirectX 12?
Microsoft DirectX APIs (application programming interfaces) is a set of software components on Windows platforms that allow software or games to work efficiently with your video and audio hardware. It is specially used for dealing with tasks related to games, videos, other multimedia on Windows PCs and laptops. The latest version of DirectX 12 is released on May 19, 2019. Windows 10 OS supports DirectX 12.
What is DirectX 12 Ultimate?
DirectX 12 Ultimate is the newest version of DirectX.
DirectX 12 Ultimate is the exclusive software component of Windows 11. It takes games to a new level and provides a new standard for the next generation of games. DirectX 12 Ultimate in Windows 11 provides new features like ray tracing, variable rate shading, mesh shaders, and sampler feedback.
DirectX 12 Ultimate requirements:
Currently, only the GeForce RTX series graphics PCs support the DirectX 12 Ultimate gaming features.
DirectX 12 Ultimate supported graphics cards: GeForce RTX 3090, 3080 (Ti), 3070 (Ti), 3060 (Ti), RTX 30/20 series laptops, TITAN RTX, 2080 (Ti), 2080 Super, 2070 (Ti), 2070 Super, 2060, 2060 Super.
Only Windows 10 version 2004 (also Windows 10 May 2020 Update) or higher versions support the complete set of DirectX 12 Ultimate features.
For developers, after you update Windows 10 to the latest version, you still need to install Visual Studio, Windows 10 SDK, related drivers and hardware, PIX, etc. to use DirectX 12 Ultimate features for your programs.
Fix Your System Does Not Support DirectX 12 Ultimate
If your Windows 10 or Windows 11 computer doesn’t support DirectX 12 Ultimate, then you can try to update your system and download DirectX 12 Ultimate by following the guide above. Still, check your graphics card to see if it supports DirectX 12 Ultimate or not. The supported graphics cards are listed above.
How to Update the Drivers for DirectX 12 (Ultimate)
To get the best gaming performance, it’s advised you update your graphics card driver to the latest version. You can do this through Windows Update. The guide is included above.
Alternatively, you can also update driver in Device Manager.
- Press Windows + X and select Device Manager.
- Expand Display adapters.
- Right-click your graphics card and select Update driver.
- Select Search automatically for updated driver software. Windows will automatically download and install the available latest version of your graphics card.
Bottom Line
This tutorial provides a DirectX 12 (Ultimate) download guide for Windows 10/11 and gives some explanation for DirectX 12 and DirectX 12 Ultimate, hope it helps.
Прежде всего: компоненты DirectX 12 и DirectX 11 по умолчанию присутствуют в Windows 11 сразу после установки. Однако, несмотря на это вы можете столкнуться с ошибками, имеющими отношение к DirectX при запуске игр и программ. В этом случае может пригодиться загрузка и установки недостающих библиотек DirectX с сайта Майкрософт.
В этой инструкции подробно о том, как скачать DirectX для Windows 11 с официального сайта, а также о дополнительных причинах, которые могут вызвать ошибки, связанные с DirectX несмотря на то, что он установлен.
Скачивание и установка DirectX всех актуальных версий
Как было отмечено выше, в Windows 11 уже есть DirectX последних версий, однако, это не означает, что любая игра будет исправно работать: если для её запуска требуется какая-то старая версия, то на DirectX 12 или 11 она сообщит об ошибке.
Решение — использовать веб-установщик библиотек DirectX с сайта Майкрософт: он автоматически обнаружит, каких компонентов не хватает на вашем компьютере, скачает и установит их. Шаги будут следующими:
- Зайдите на официальную страницу загрузки веб-установщика исполняемых библиотек DirectX — https://www.microsoft.com/ru-ru/download/details.aspx?id=35
- Скачайте веб-установщик и запустите его.

- В установщике примите условия лицензионного соглашения и снимите отметку с «Установка панели Bing».
- Установщик автоматически проверит, какие компоненты DirectX требуется установить, сообщит о размере загружаемых файлов. Нажмите «Далее».

- Дождитесь завершения скачивания DirectX и установки компонентов на компьютер.


Готово: если ваша проблема была вызвана необходимостью наличия нужных версий DirectX в Windows 11, после скачивания и установки она будет решена.
Другие возможные причины ошибок DirectX при запуске игр в Windows 11
Даже при наличии всех необходимых библиотек DirectX в Windows 11, игры могут сообщать об ошибках. Обычно это вызвано одним из факторов:
- Не установлены драйверы видеокарты — не только дискретной, но и интегрированной. Вручную скачайте их с официального сайта и установите (в диспетчере устройств не должно быть никаких пунктов вида Базовый видеоадаптер Майкрософт или аналогичных). Сообщение о том, что наиболее подходящий драйвер уже установлен при попытке обновления в диспетчере устройств не означает, что это действительно так.
- У вас неподходящая видеокарта, не поддерживающая необходимые функции, суть проблемы описана в инструкции: Как исправить DX11 feature level 10.0 is required to run the engine или DX11 feature level 11.0 is required.
Остались вопросы? Задавайте их в комментариях, я постараюсь помочь.
DirectX – дополнительные библиотеки файлов для Windows, необходимые для работы графических компонентов, связанных с драйверами видеокарты. Сегодня я не буду подробно вдаваться в принцип работы данных файлов, а покажу, как установить их в Windows 11 и обеспечить корректную работу программ и игр, которые жалуются на отсутствие компонентов DirectX определенных версий при запуске.
Для проверки текущей установленной версии DirectX на компьютере можно использовать соответствующее средство диагностики. Запустите утилиту «Выполнить», используя для этого сочетание клавиш Win + R. Введите в поле dxdiag и нажмите Enter. В новом окне вы увидите строку с названием «Версия DirectX», которая и показывает требуемые сведения.
Способ 1: Добавление дополнительных графических компонентов
Одно из примечательных нововведений в Windows 11 – появился список дополнительных компонентов, которыми можно управлять вручную, устанавливая обновления или удаляя текущие версии. Сюда входят и графические библиотеки, к которым относится DirectX. Это самый простой и правильный метод, к которому следует прибегнуть, если появилась такая необходимость.
-
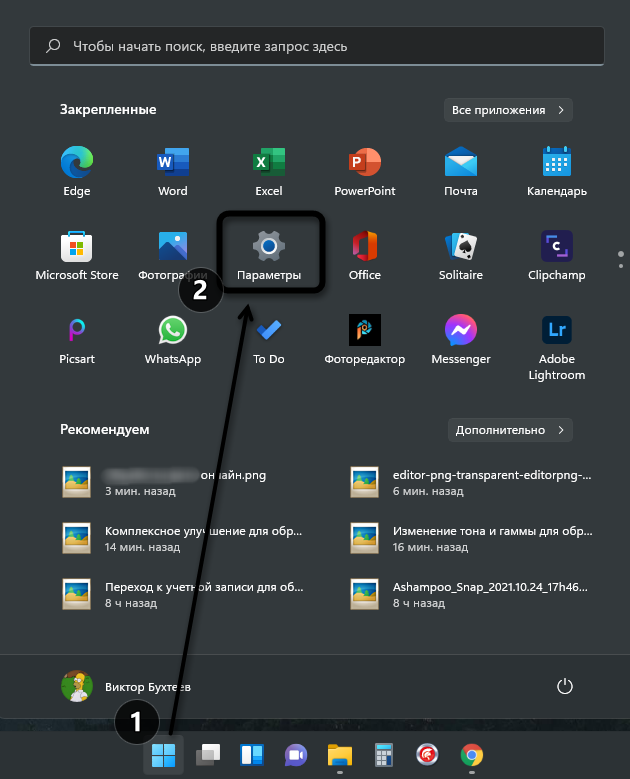
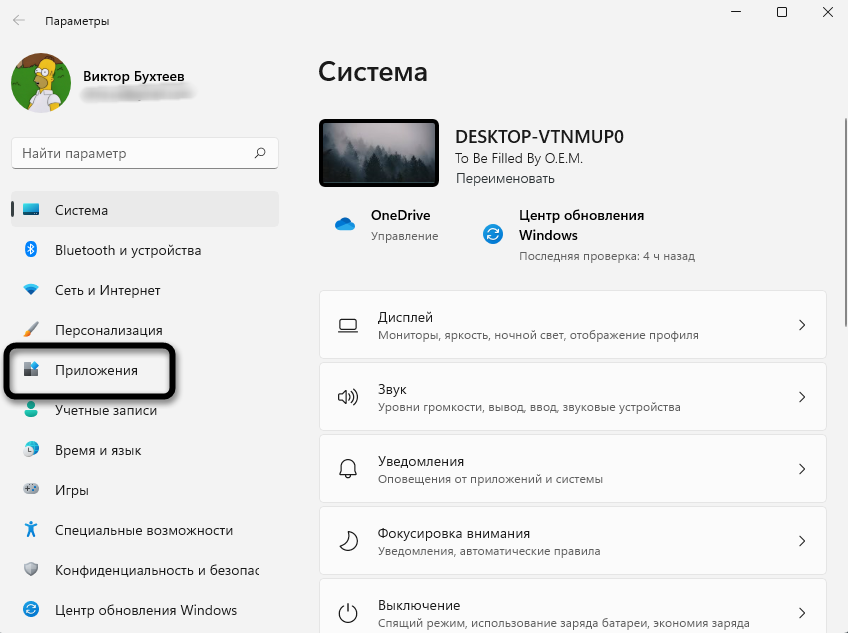
Откройте меню «Пуск» и перейдите в «Параметры», щелкнув по соответствующему значку с шестеренкой.

-
На панели слева вас интересует раздел «Приложения».
-
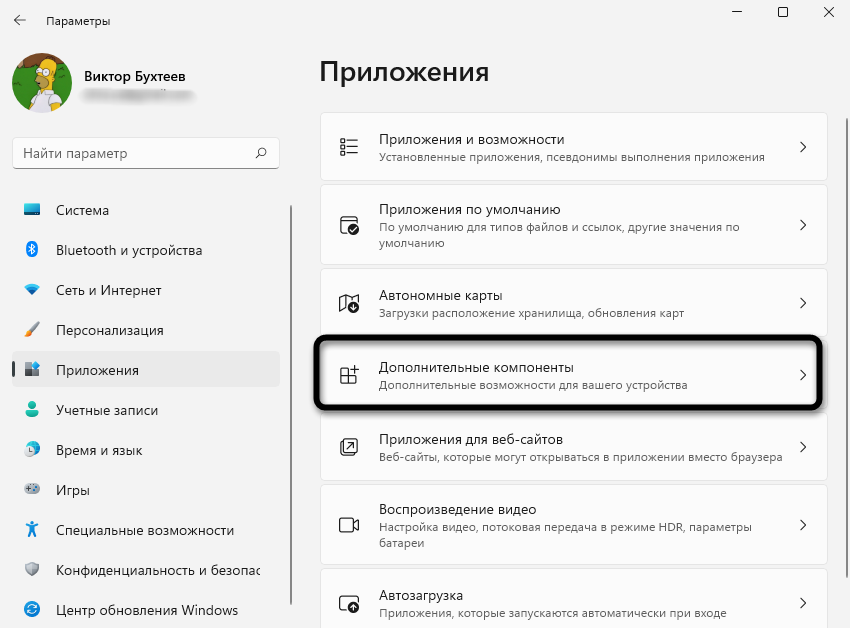
Нажмите по плитке «Дополнительные компоненты».
-
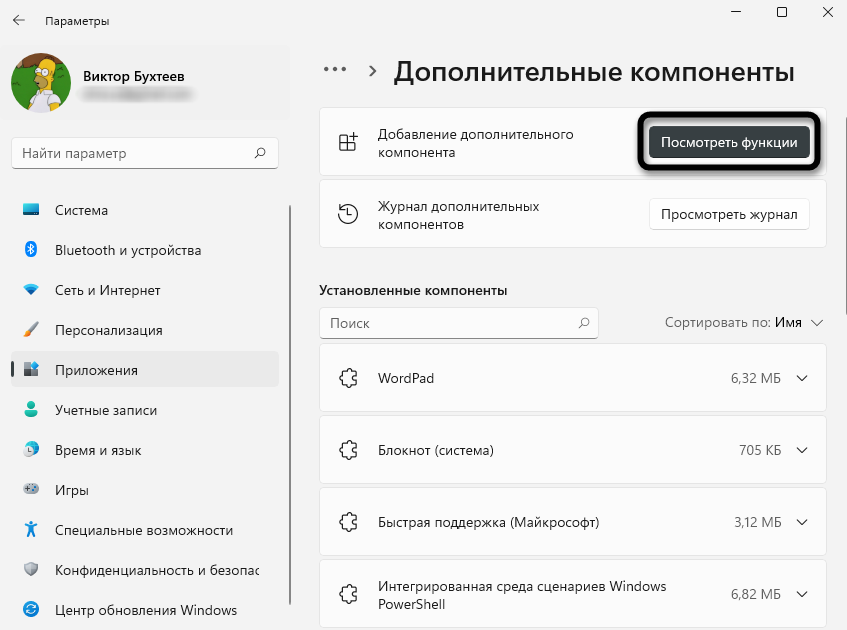
Перейдите к инструменту добавления дополнительного компонента, нажав на «Просмотреть функции».
-
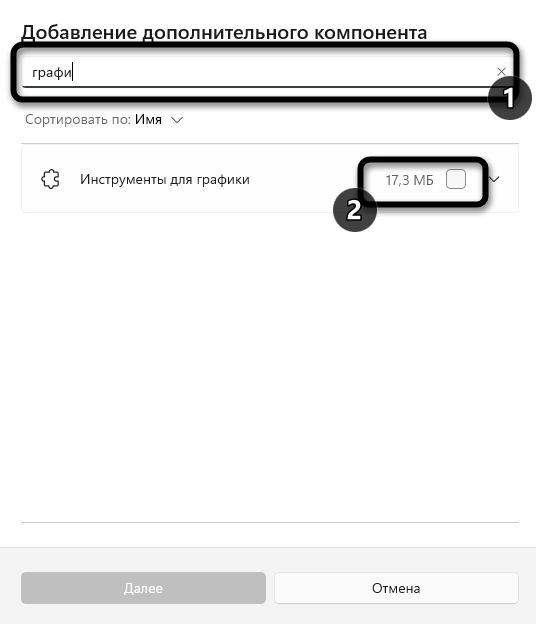
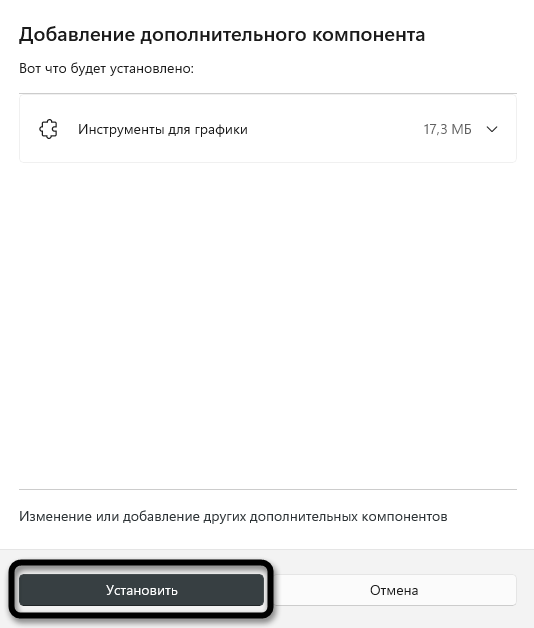
Через поиск вбейте «Графики» и выберите соответствующие инструменты, объем которых составляет 17.3 мегабайта (значение может поменяться через некоторое время). Отметив компонент галочкой, щелкните по «Далее».
-
Подтвердите его установку (можете предварительно развернуть описание, чтобы самостоятельно удостовериться в связи данной инсталляции с DirectX).
-
Следите за установкой в том же окне, а по завершении перезагрузите компьютер и переходите к проверке наличия библиотек.

Комьюнити теперь в Телеграм
Подпишитесь и будьте в курсе последних IT-новостей
Подписаться
Способ 2: Ручное скачивание DirectX
Этот метод утратил свою актуальность с выходом Windows 10. Однако вы можете использовать его, если считаете, что на компьютере отсутствует не только актуальная версия DirectX, но и все остальные, выпускаемые Microsoft ранее. Принцип действий подразумевает скачивание веб-установщика с официального сайта, который и проверит наличие файлов, по необходимости установив недостающие версии автоматически.
Скачать веб-установщик DirectX с официального сайта
-
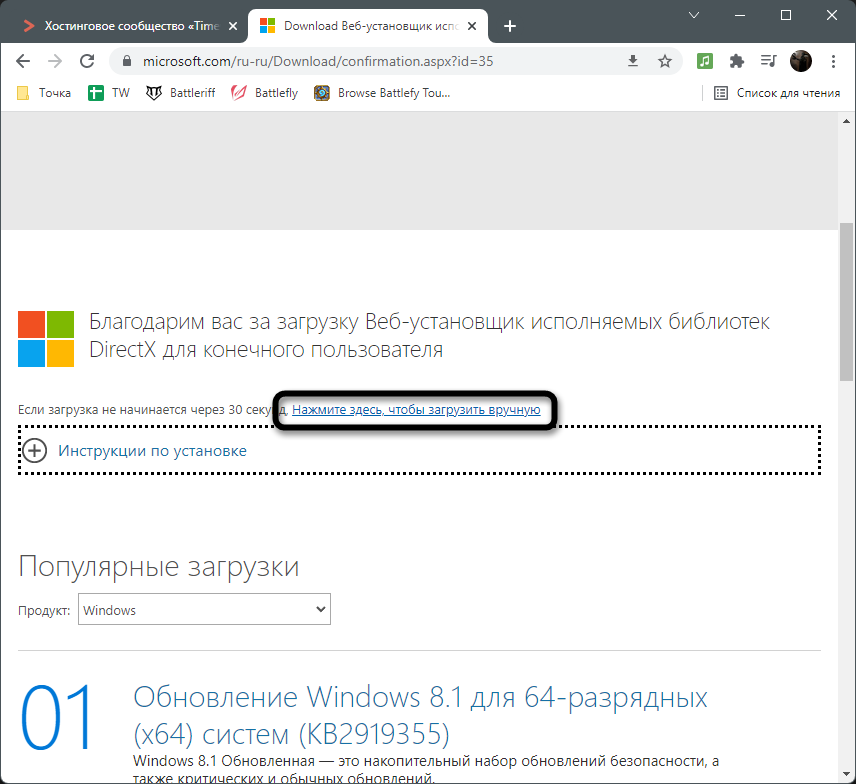
Щелкните по ссылке выше, чтобы оказаться на требуемой странице Microsoft. Скачивание установщика начнется автоматически. Если этого не произошло, нажмите по соответствующей надписи для ручного запуска.
-
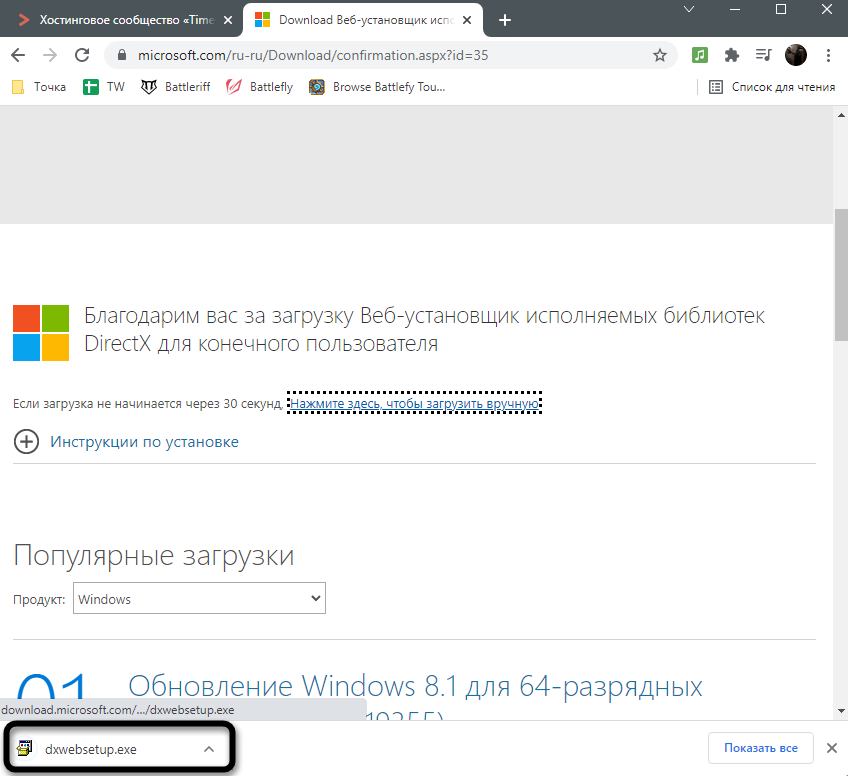
По завершении загрузки запустите полученный EXE-файл.
-
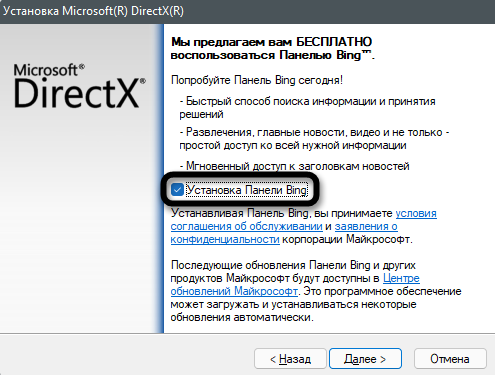
В новом окне примите условия лицензионного соглашения и переходите далее.
-
Рекомендую отменить установку Панели Bing, поскольку обычно она не нужна юзеру.
-
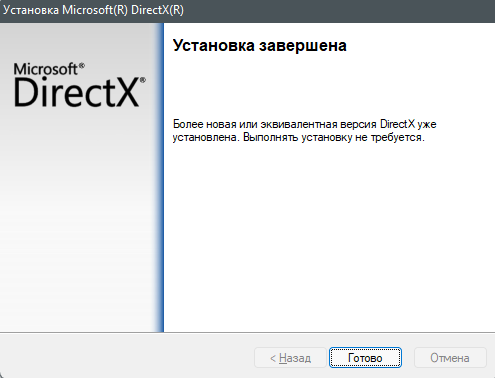
После этого начнется проверка обновлений. Если такие найдены не будут, вы получите соответствующее уведомление. В противном случае начнется установка, по окончании которой останется только перезагрузить операционную систему.

Способ 3: Включение компонентов DirectX прежних версий
Если предыдущие два варианта были связаны с чистой установкой или обновлением DirectX в Windows 11, то этот подойдет только в тех случаях, если вы запускаете старые версии программ или игр и получаете уведомления об отсутствии файлов, связанных с DirectX 7 или более ранних версий. Метод подразумевает включение поддержки компонента DirectPlay, который и нужен для корректного запуска устаревших приложений.
-
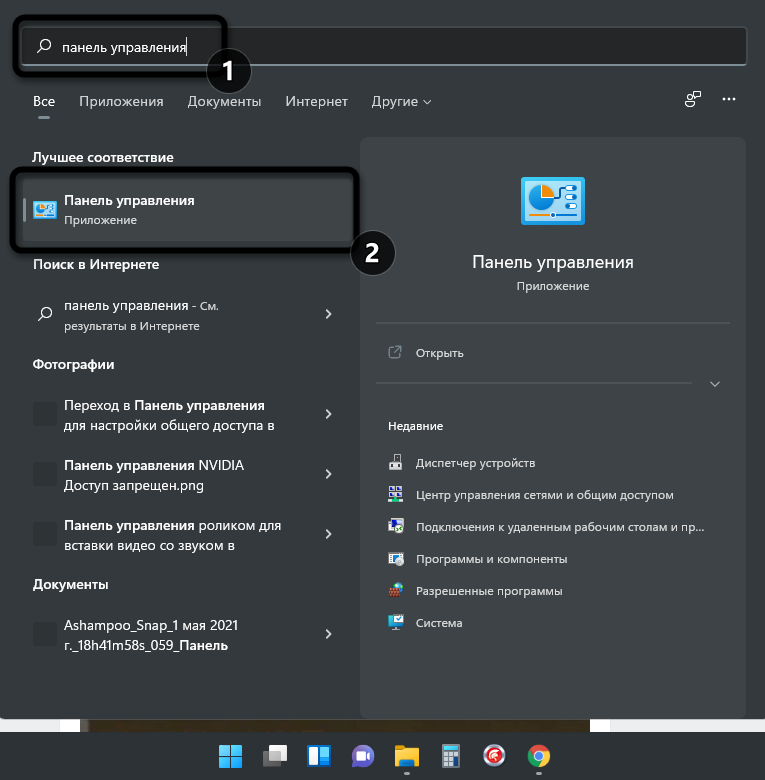
Откройте «Пуск», через поиск отыщите «Панель управления» и перейдите в данное окно.
-
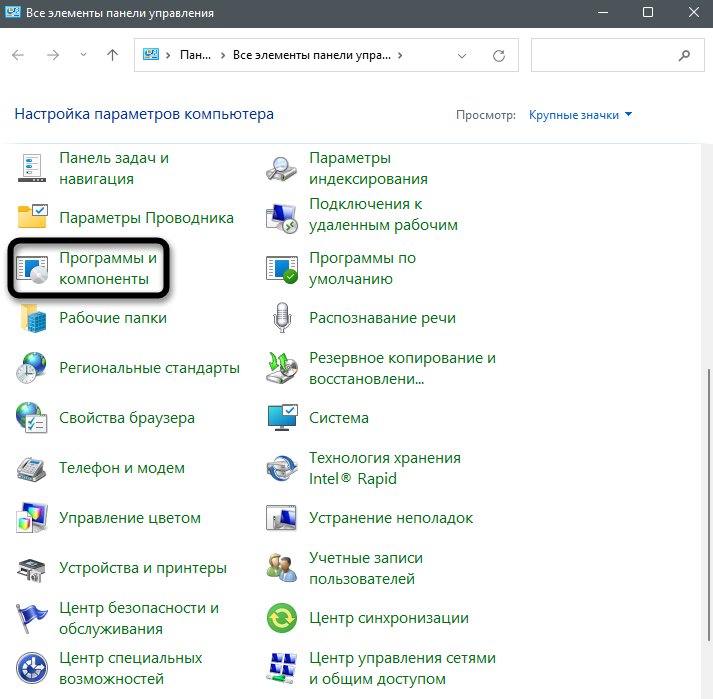
В нем выберите «Программы и компоненты».
-
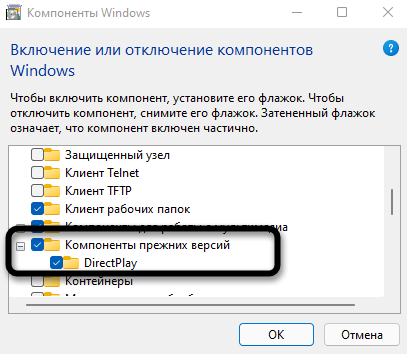
Через панель слева перейдите во «Включение или отключение компонентов Windows».
-
Откройте папку «Компоненты прежних версий» и отметьте галочкой находящуюся там директорию. Применение изменений займет около минуты, после чего вы можете перезапустить ПК и проверить, решились ли ошибки с запуском программ или игр.

В завершение отмечу, что, как и в Windows 10, в Windows 11 последняя поддерживаемая версия DirectX устанавливается автоматически. Если понадобятся обновления, они будут загружены и установлены системой. Из этого можно сделать вывод, что обновление компонента вручную требуется крайне редко, а если это и произошло, описанные выше методы помогут справиться с поставленной задачей.