
Характеристики
Описание
Версии
Обновлено
Совместимость
Windows XP, Windows Vista, Windows 7, Windows 8, Windows 10
Описание
ASUS WinFlash — это незаменимая программа для тех, кто планирует обновить BIOS на ПК с материнской платой от Asus.
ASUS WinFlash сделает обновление BIOS максимально простым и удобным даже для новичков. Она избавит вас от необходимости создания загрузочных носителей с новой версией прошивки. Вместо этого, вы сможете обновить BIOS прямо из Windows.
Всё, что вам потребуется для работы с программой — скачать актуальную версию прошивки с сайта производителя. Затем, просто откройте эту программу и укажите путь к файлу BIOS. После этого, вам останется лишь нажать на кнопку «Flash» и перезугрузить компьютер после завершения установки.
Приятной особенностью программы ASUS WinFlash является возможность выполнить откат на более раннюю версию прошивки.
Хотите обновить версию BIOS на своём ПК с материнской платой от ASUS? Тогда скачайте ASUS WinFlash с нашего сайта.
Версии
Нет официального представителя разработчика на сайте
Нажмите, для быстрой оценки
Оставить отзыв
Похожие приложения
Актуальные статьи
FAQ
How to update BIOS in Windows
Applicable Products: Notebook, Desktop, All-in-One PC, Gaming Handheld, MiniPC
Note: The following update method is exclusively applicable to devices with x86/x64 architecture. For devices with ARM architecture (such as the Qualcomm® CPU platform), please Click Here to learn How to update the BIOS for ARM-based devices.
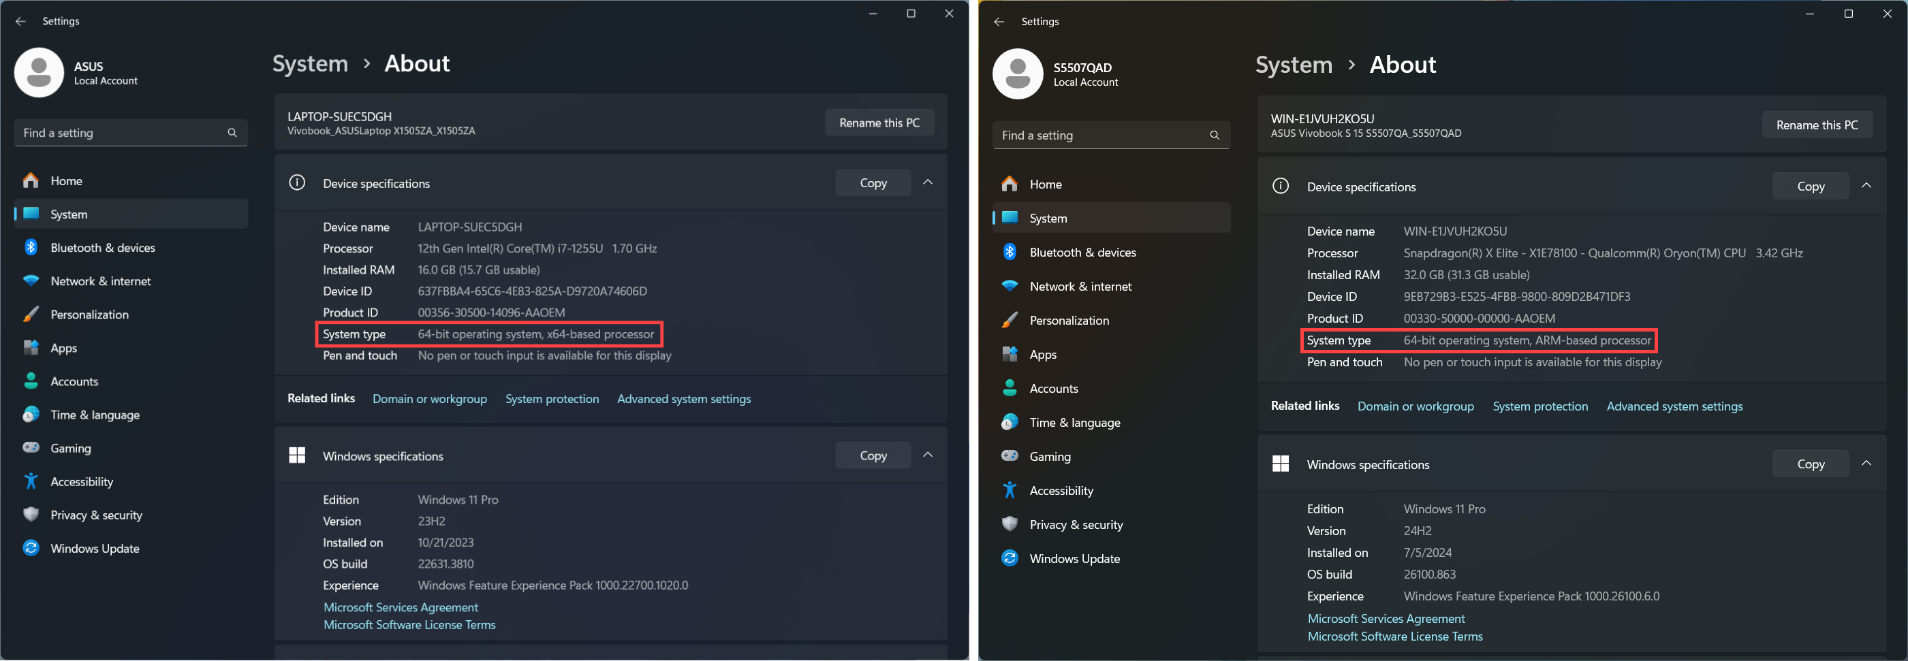
Note: How to determine the architecture of your device
Navigate to Windows Settings > System > About. Here, you can view the architecture of your device under System type. (The image on the left shows an x64 architecture; the image on the right shows an ARM architecture.)
There are two operating environments to update BIOS:
- Update BIOS in Windows
- Update BIOS in BIOS Utility (by using EZ Flash tool)
Since it is a little complicated to enter BIOS Utility for updating BIOS, this article will only introduce how to update BIOS in Windows.
To provide you more detailed instruction, you can also click ASUS YouTube video link below to know more about How to Update BIOS in Windows.
You can download and update the BIOS from MyASUS or the official ASUS website. Please refer to the following steps for each method:
Note: If you encounter any issues during the BIOS update process, please contact ASUS service center.
Method 1: Update BIOS via MyASUS
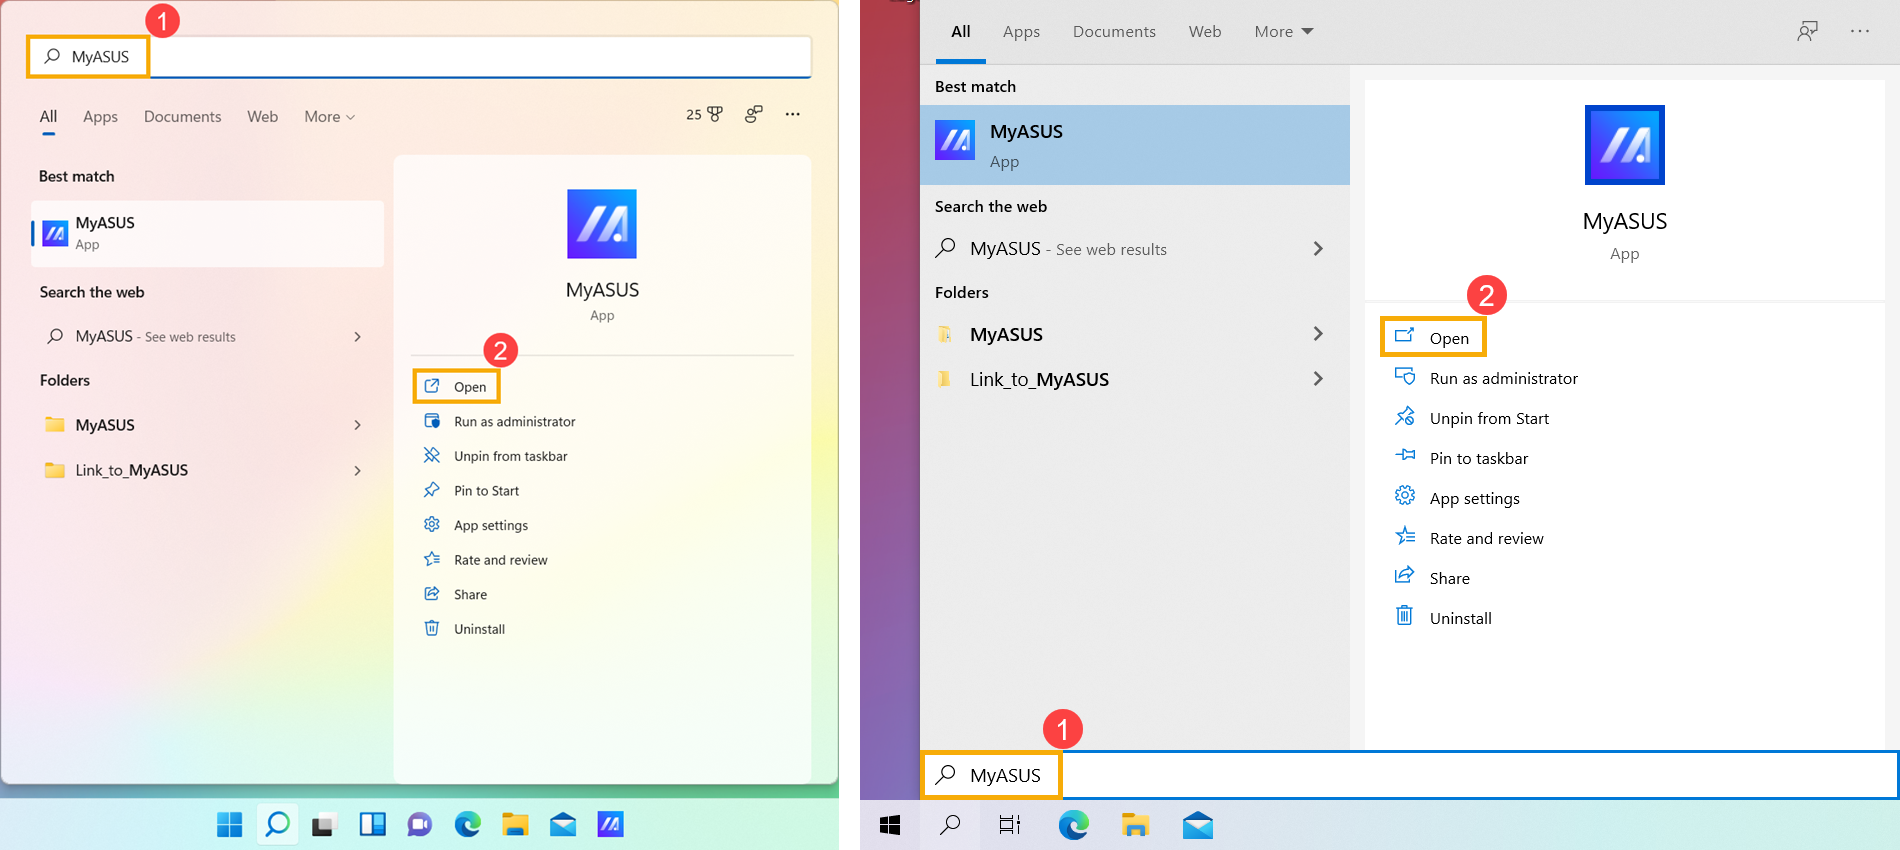
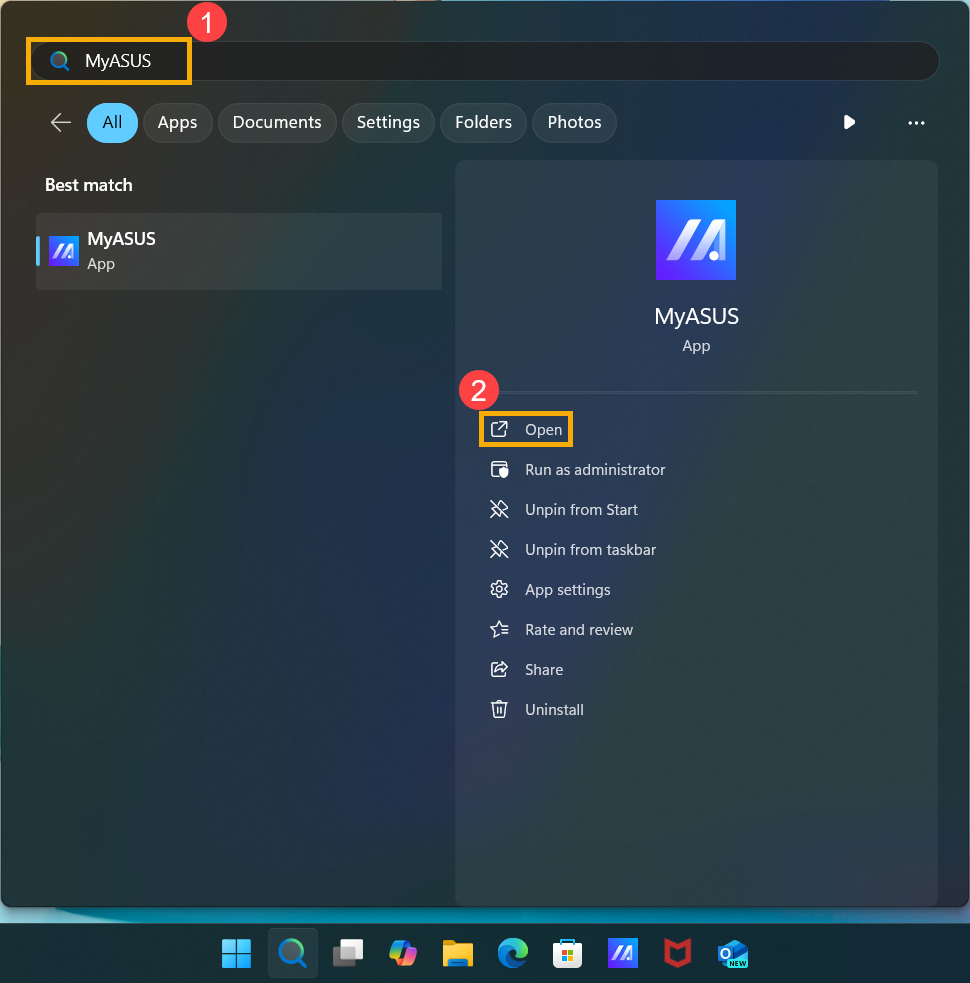
- Type and search [MyASUS] in the Windows search bar①, then click [Open]②. (The left-side search illustration below is in Windows 11, and the right-side is Windows 10.)
Note: If there is no result searched, it means your device may not install it, and please refer to How to install MyASUS.
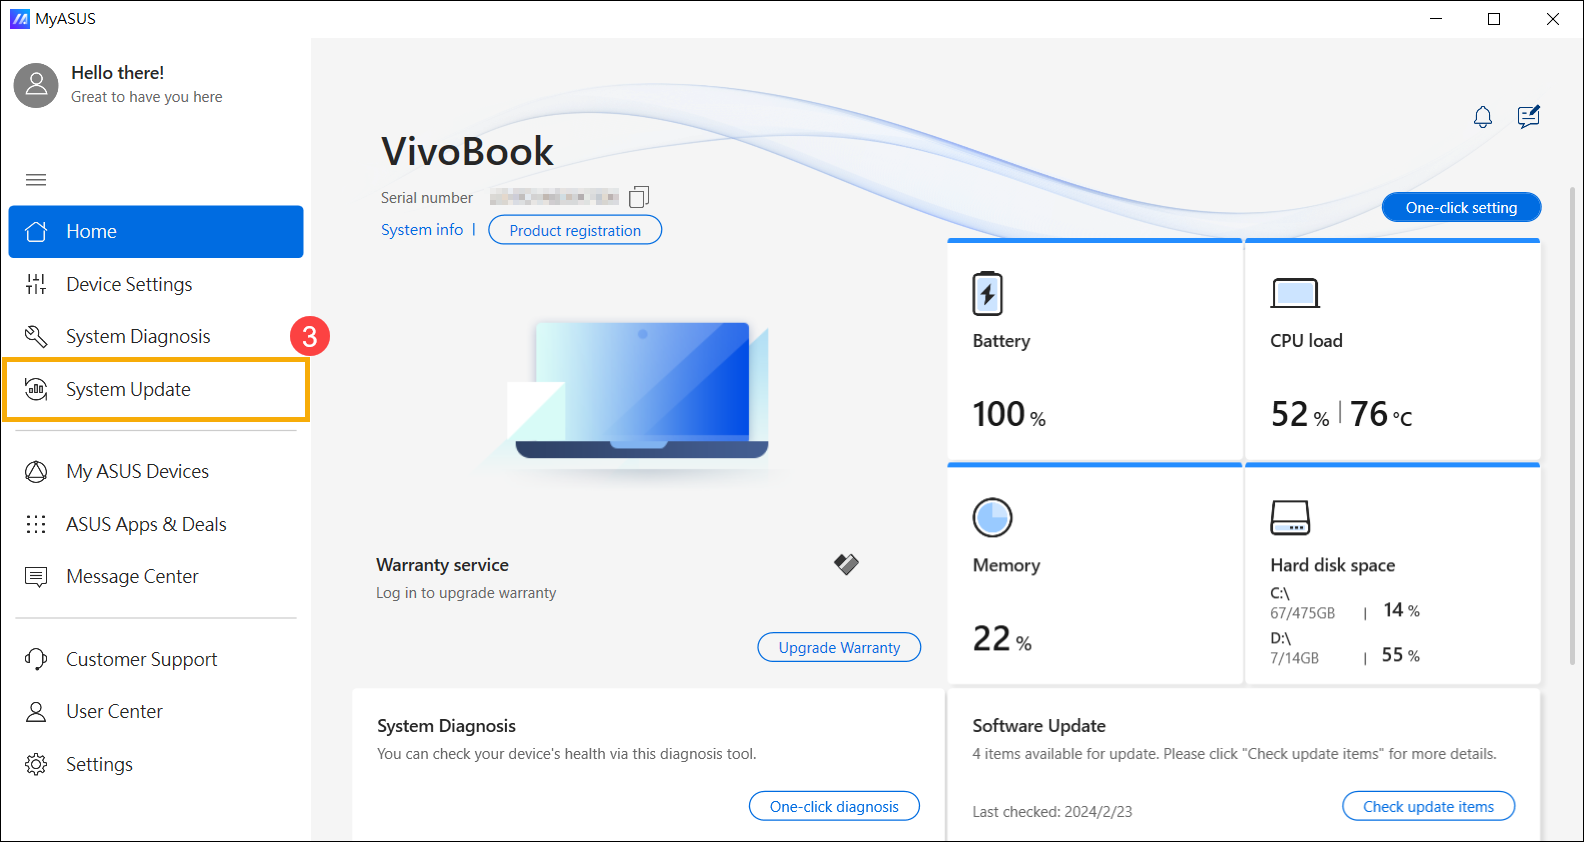
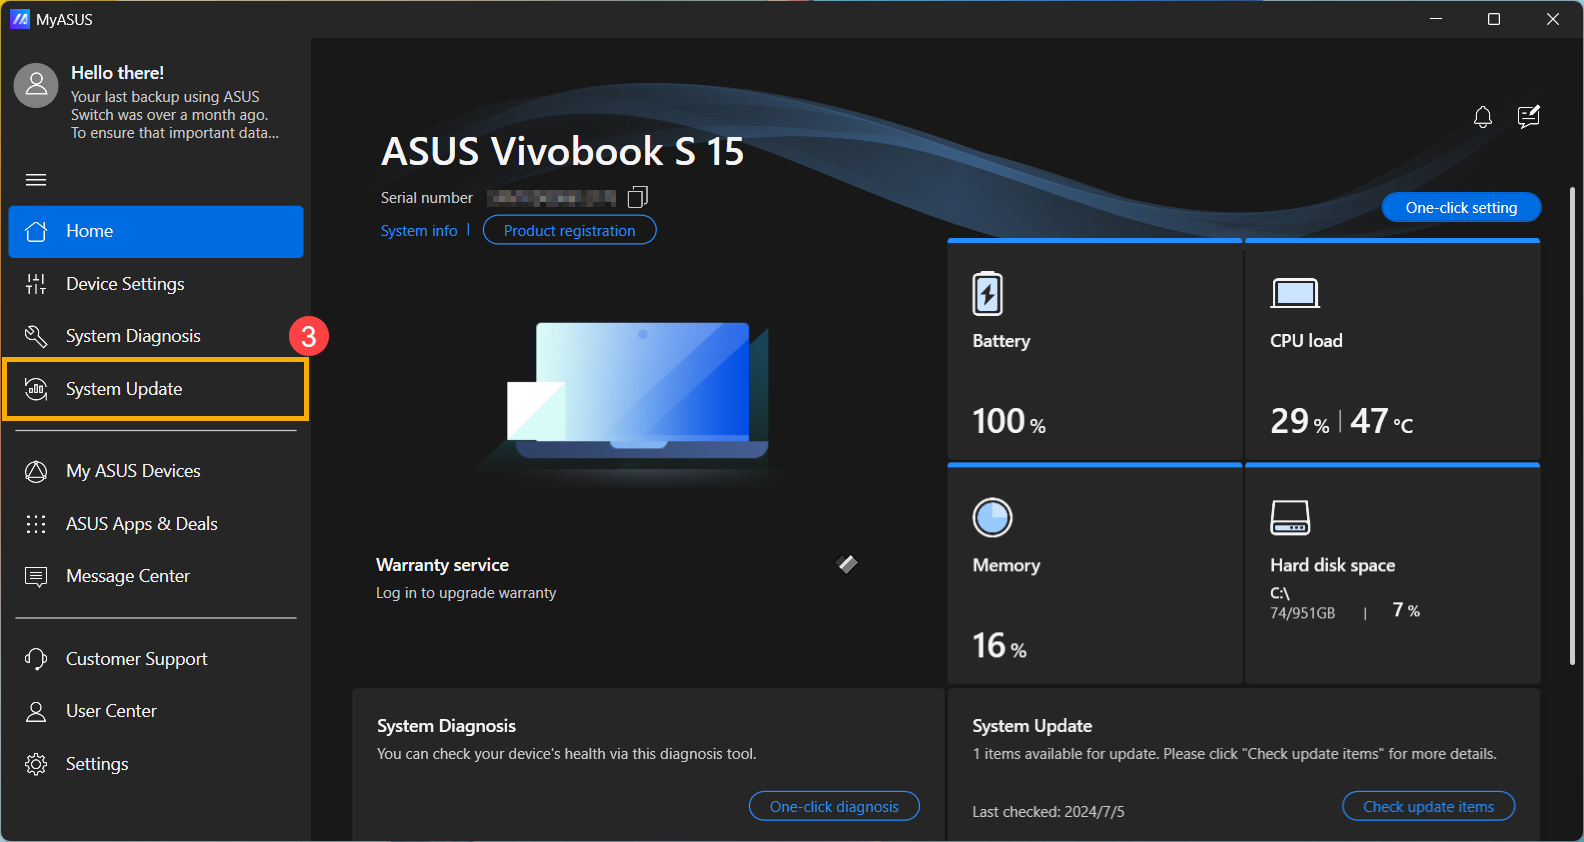
- In the MyASUS window, click [System Update]③.
Note: If your device does not display the System Update tab, it means your device does not support this feature. You can use Method 2: Download and update BIOS via the ASUS support site. Learn more about Why can I only see the partial features in the MyASUS app.
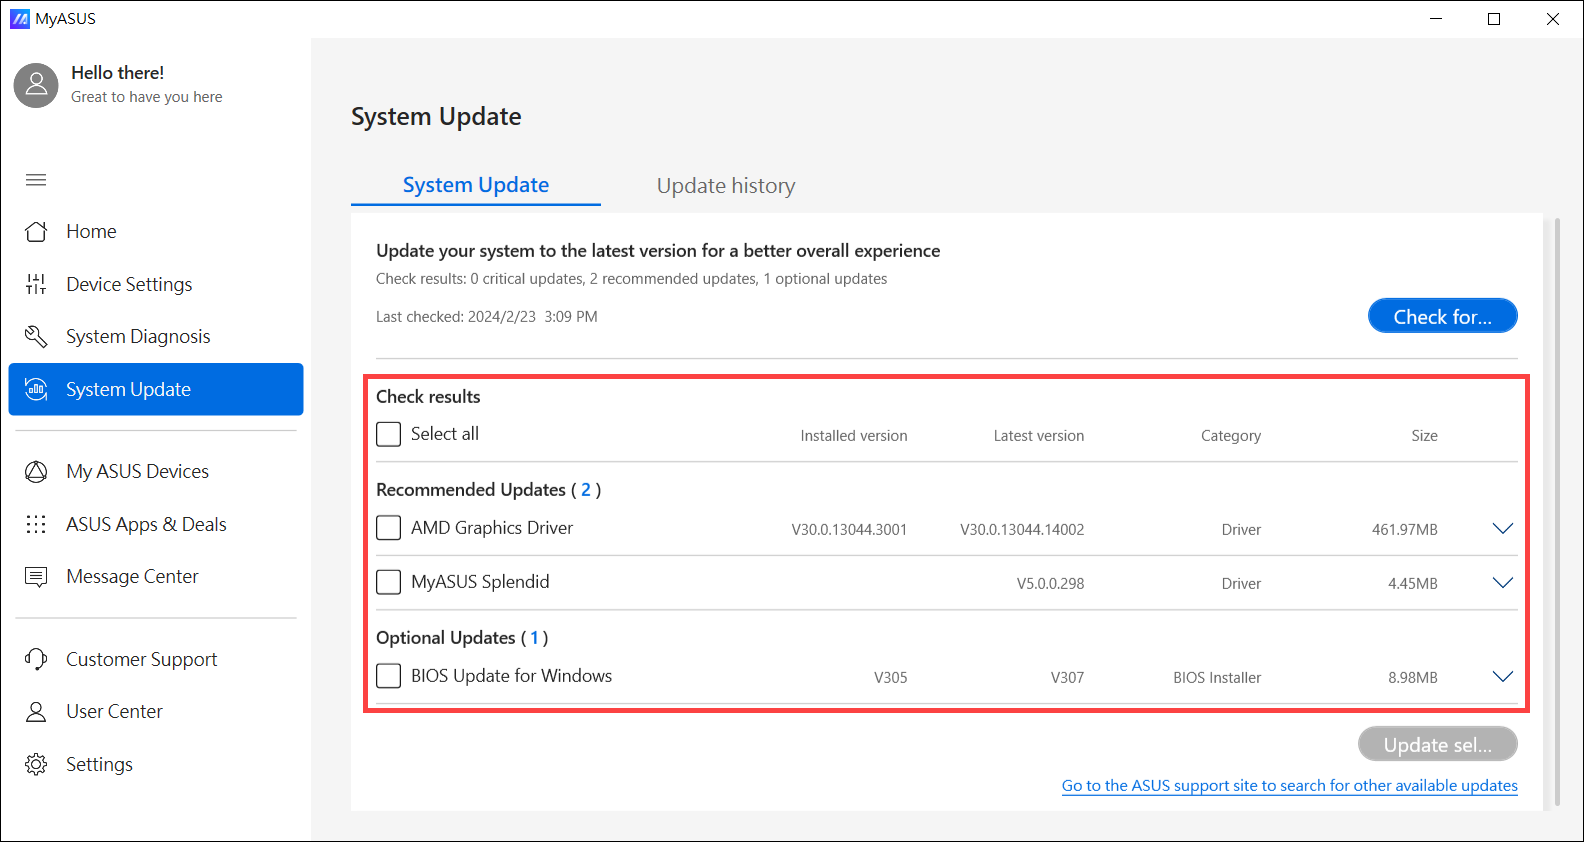
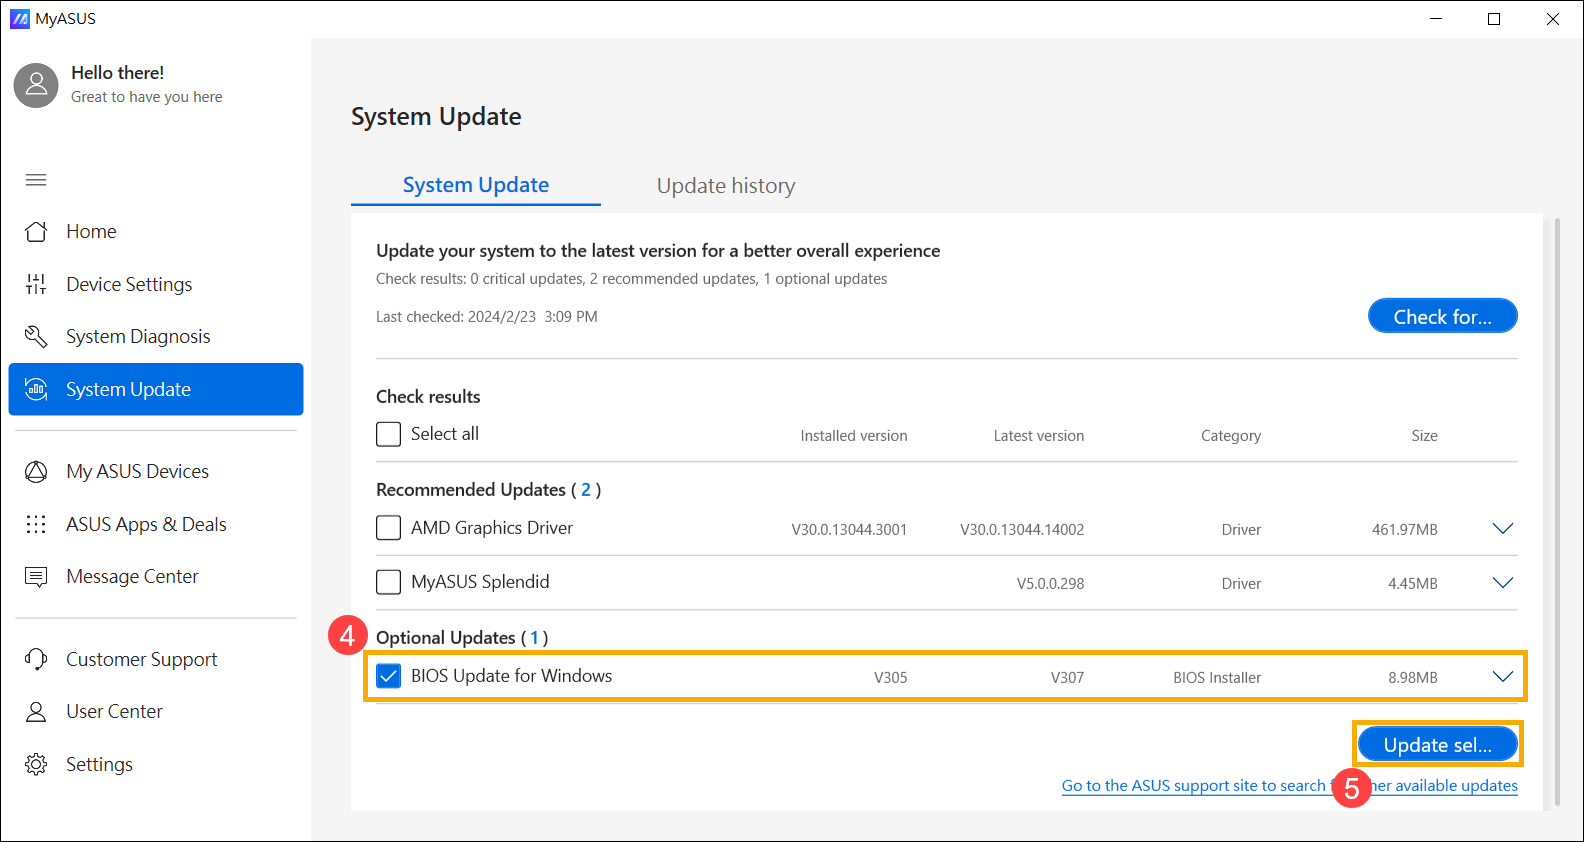
- When entering the System Update page, MyASUS will automatically check and list the items that need updating for your system.
Note: If no update items are displayed on this page, it means your system is already up to date.
- Select [BIOS Update for Windows or BIOS Installer for Windows]④, then click [Update Selected Items]⑤.
Note: If you do not see 「BIOS Update for Windows」 or 「BIOS Installer for Windows」, since some models may not support updating BIOS in Windows, please refer to How to use EZ Flash to update BIOS.
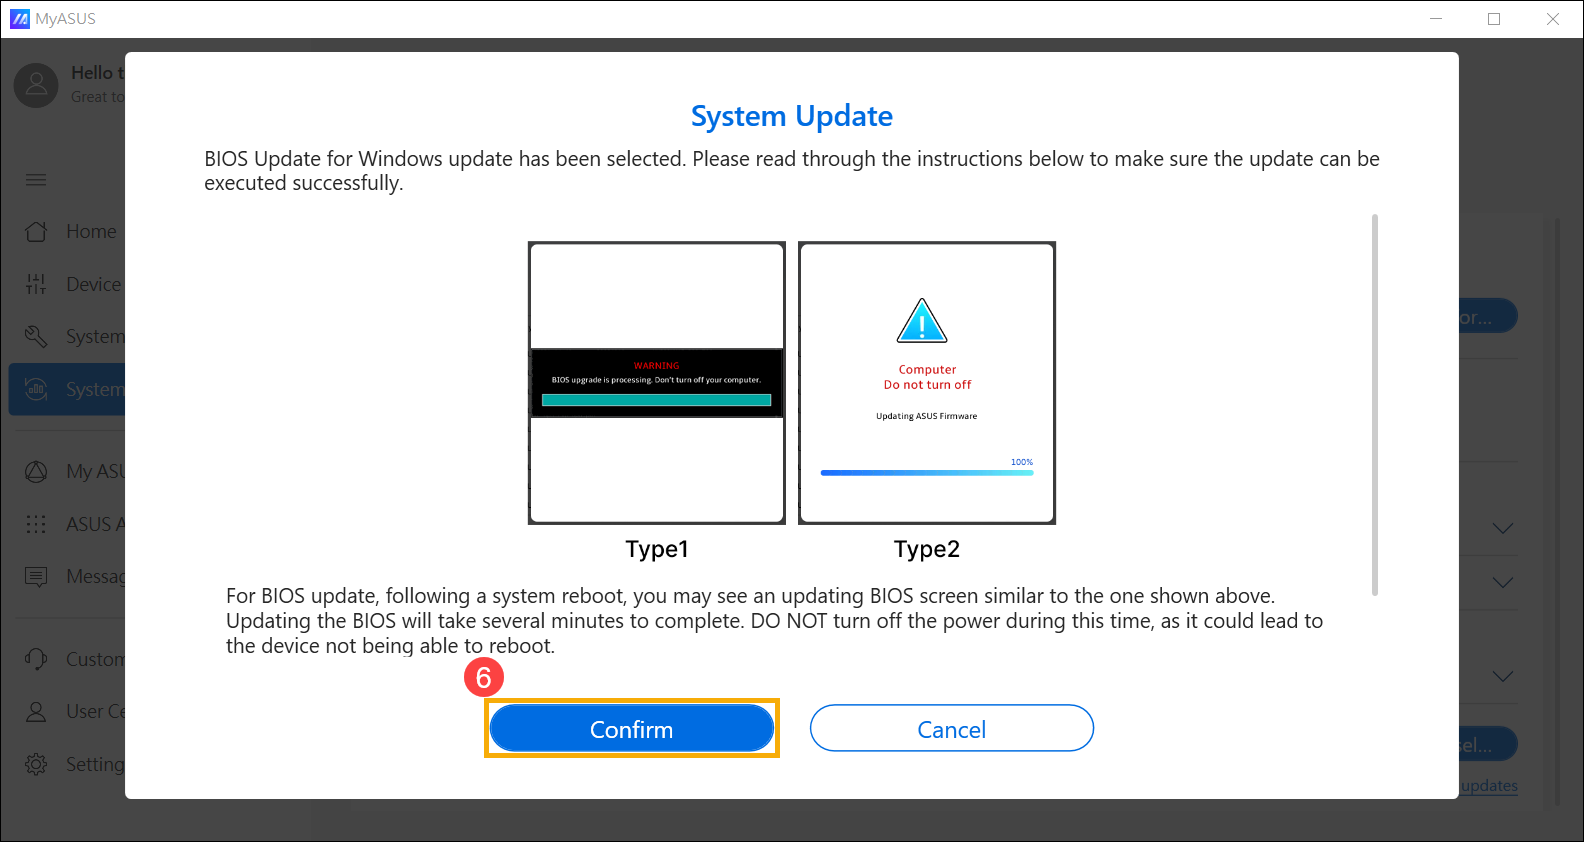
- Review the BIOS update details, then click [Confirm]⑥ to start downloading the BIOS file.
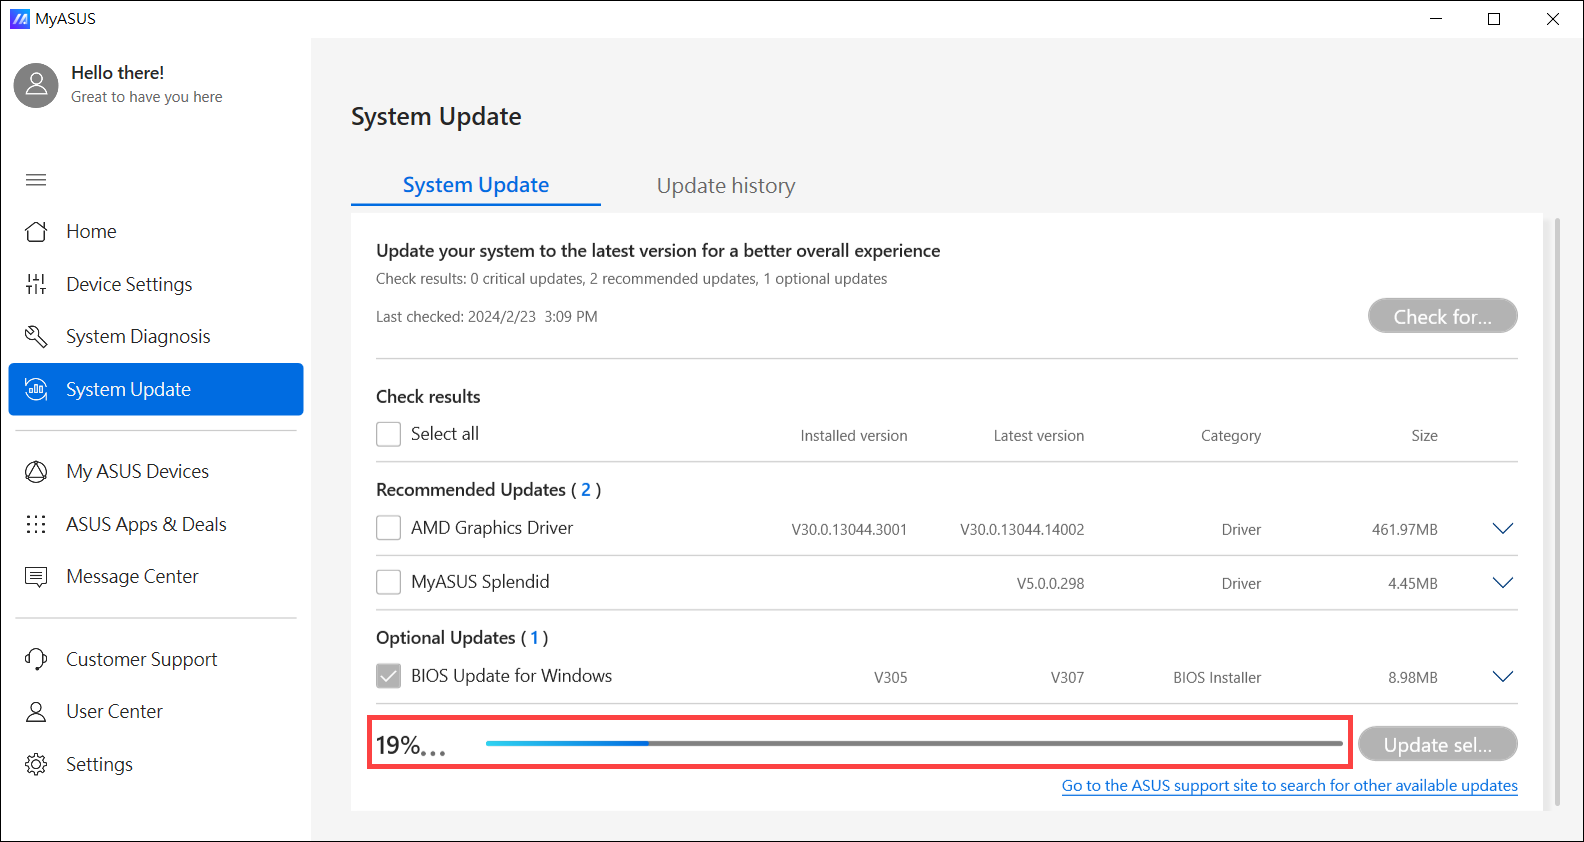
- MyASUS will begin downloading the BIOS file.
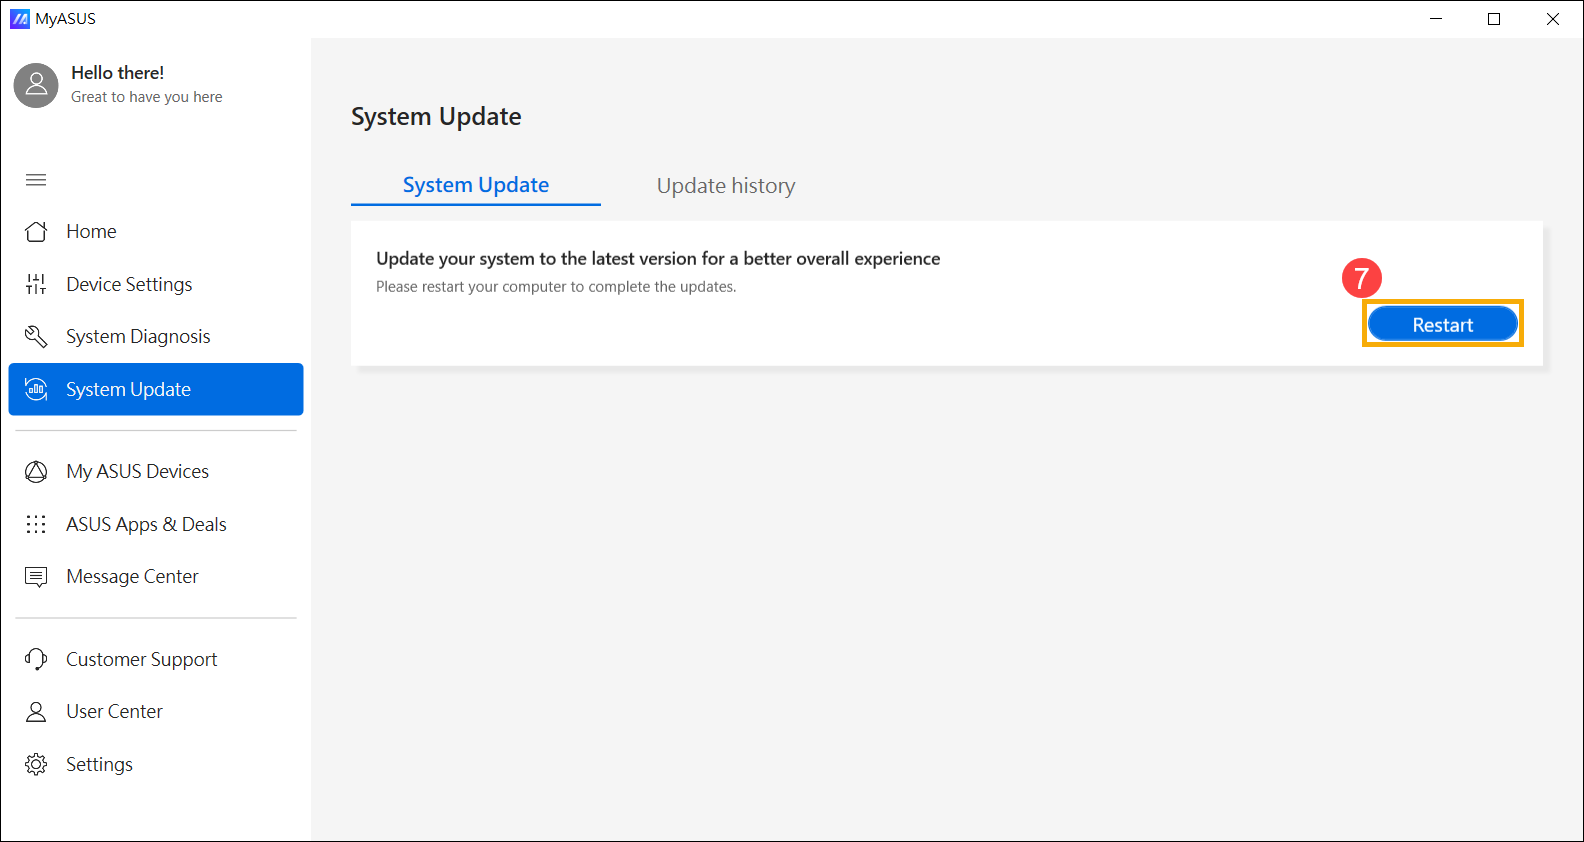
- After the BIOS file download is complete, click [Restart]⑦ to initiate the BIOS update.
- The device will restart and enter the BIOS update screen. Please refer to your BIOS interface for the subsequent steps:
Note: The BIOS update screen below may vary slightly depending on the model.
UEFI interface
- Click [Yes]⑧ to begin the BIOS update.
Note: Ensure that the device is connected to power and do not force shutdown during the BIOS update to prevent any abnormal issues.
- The device is now performing the BIOS update. Please wait patiently for the BIOS update to complete.
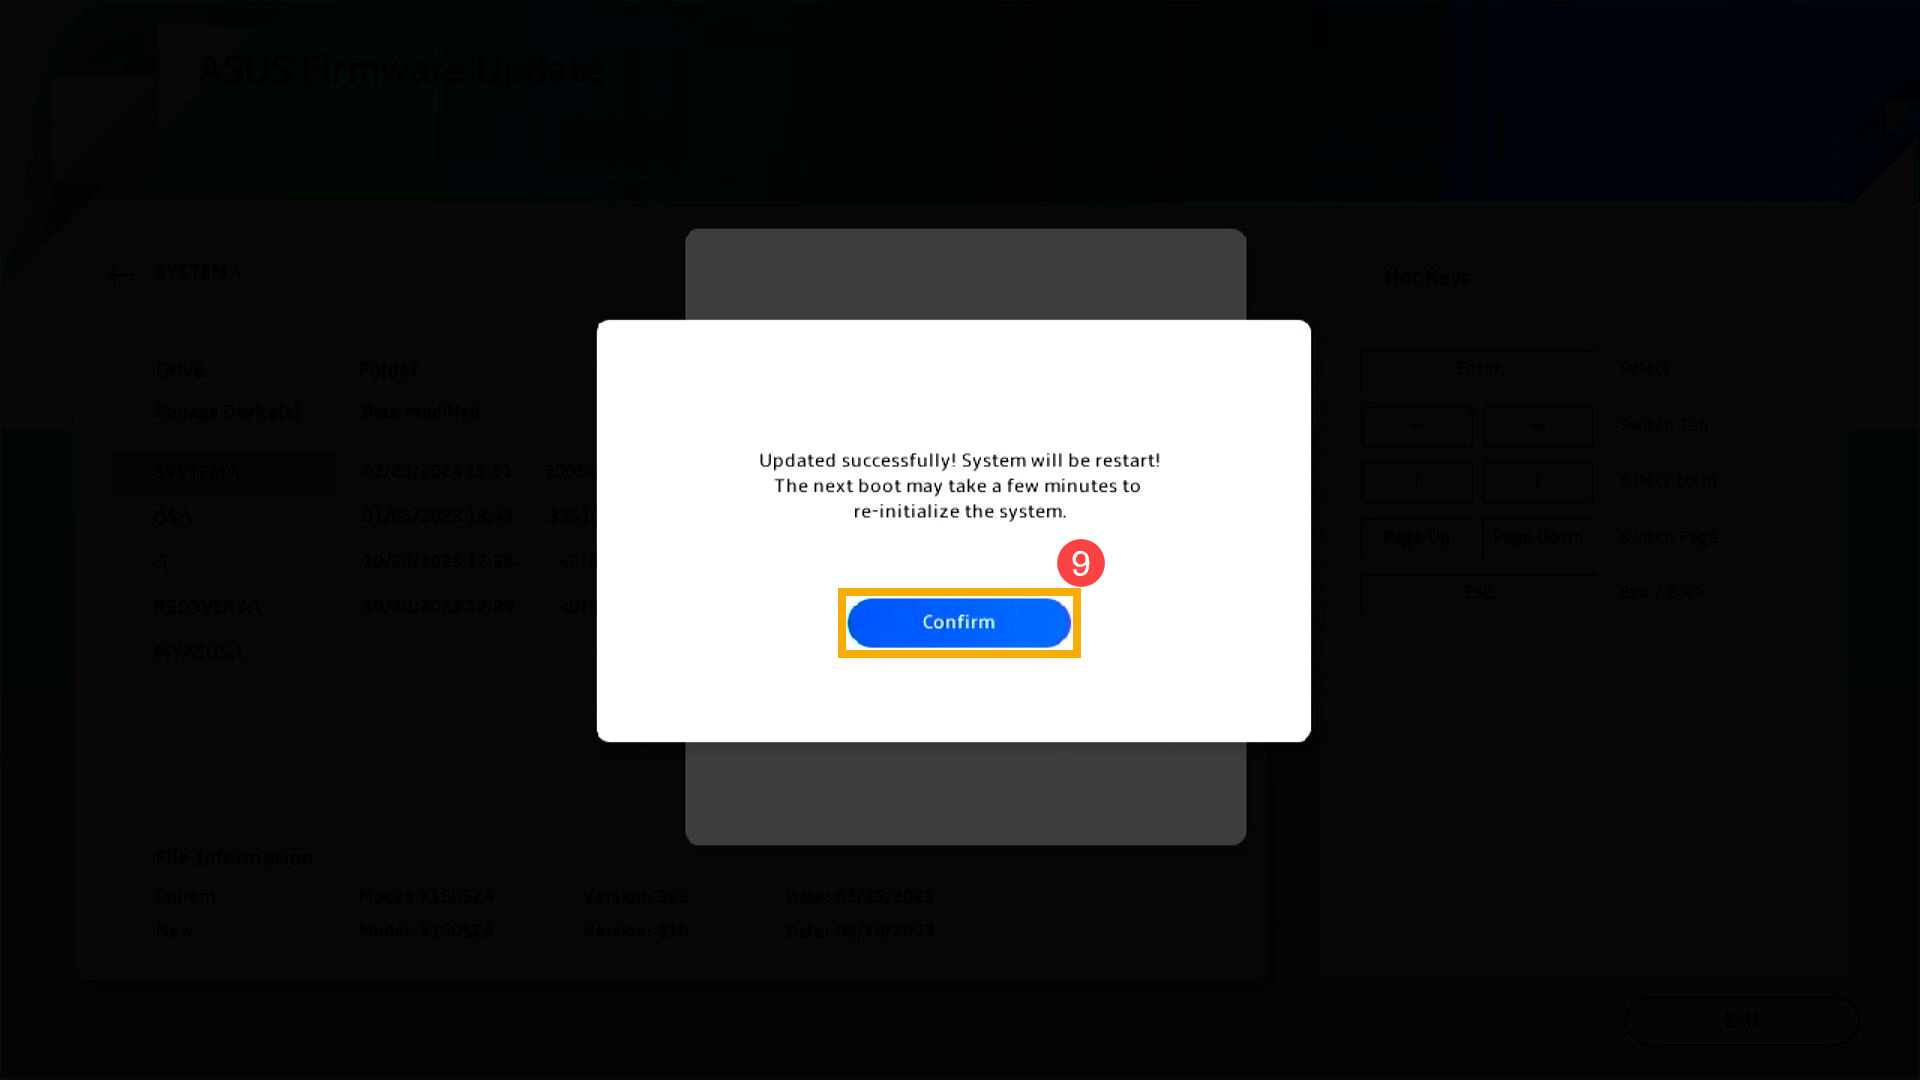
- Once the following screen appears, it indicates that your device has completed the BIOS update. Click [Ok]⑨, and the device will restart into the Windows operating system.


MyASUS in UEFI
- Click [Confirm]⑧ to begin the BIOS update.
Note: Ensure that the device is connected to power and do not force shutdown during the BIOS update to prevent any abnormal issues.
- The device is now performing the BIOS update. Please wait patiently for the BIOS update to complete.
- Once the following screen appears, it indicates that your device has completed the BIOS update. Click [Confirm]⑨, and the device will restart into the Windows operating system.

Method 2: Download and update BIOS via the ASUS support site
- Go to the ASUS support site with your device’s model name, here you can learn more about How to search and download BIOS.
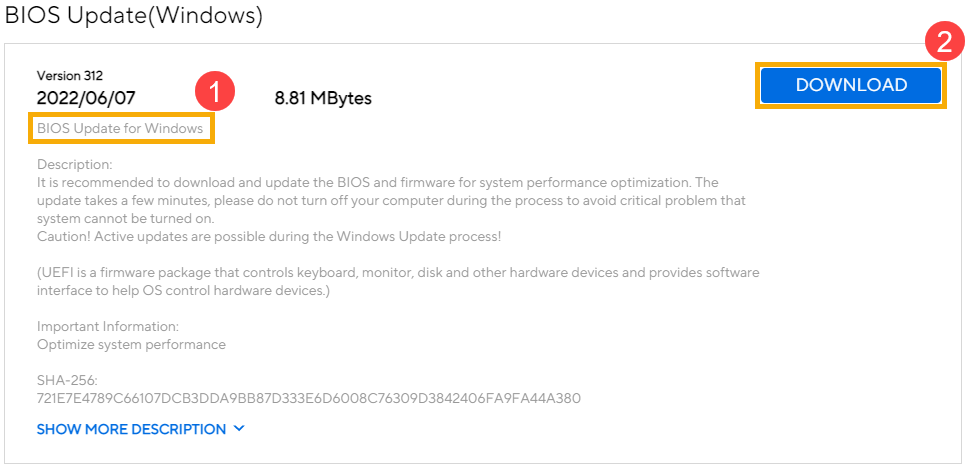
Note: To download the corresponding BIOS file, please refer to How to check the model name. - In the support page, please search for [BIOS Update for Windows or BIOS Installer for Windows] which is located in the BIOS Update(Windows) category①. If you are able to see the file, please click [Download]②.
Note: If you do not see 「BIOS Update for Windows」 or 「BIOS Installer for Windows」, since some models may not support updating BIOS in Windows, please refer to How to use EZ Flash to update BIOS.
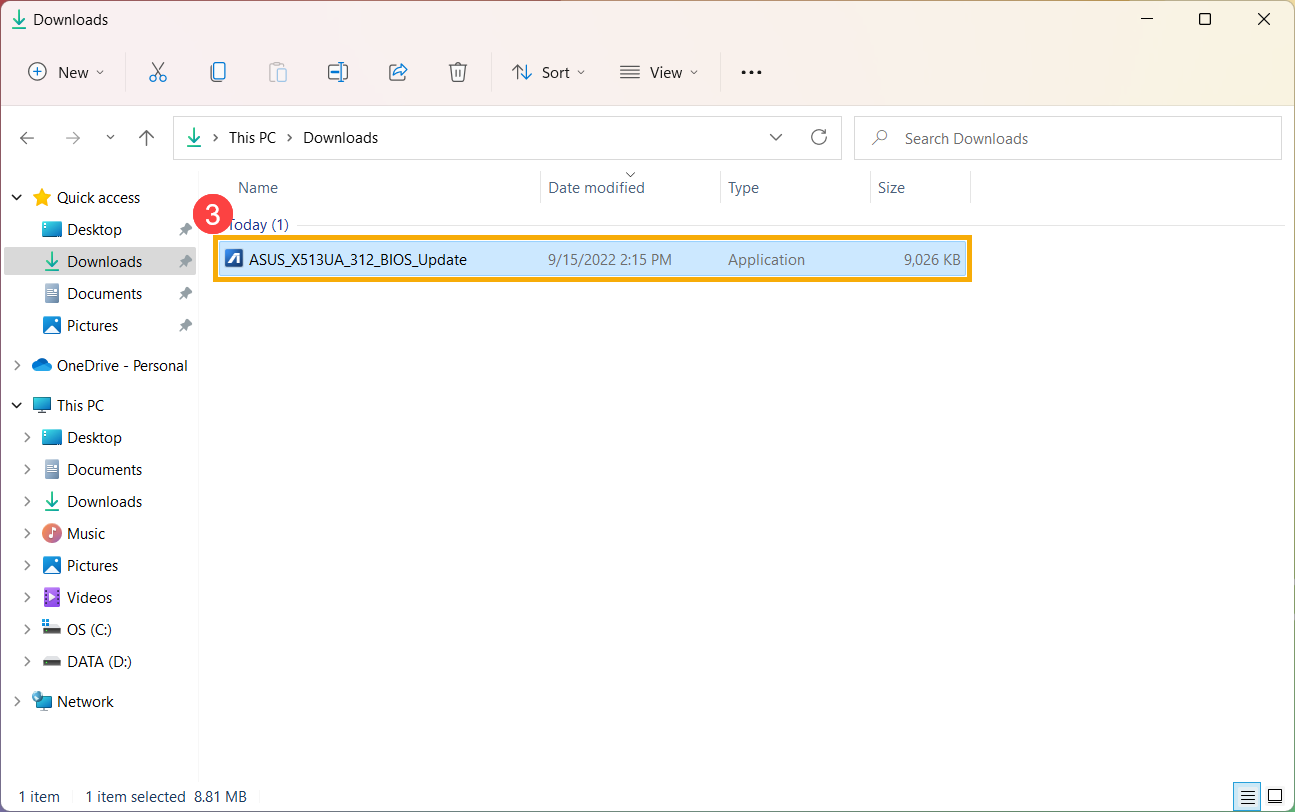
- After downloading the BIOS Update for Windows file, double-click the BIOS Update application to start updating BIOS③.
If the type of the downloaded file is Compressed (Zipped), please right-click the file > select Extract All.
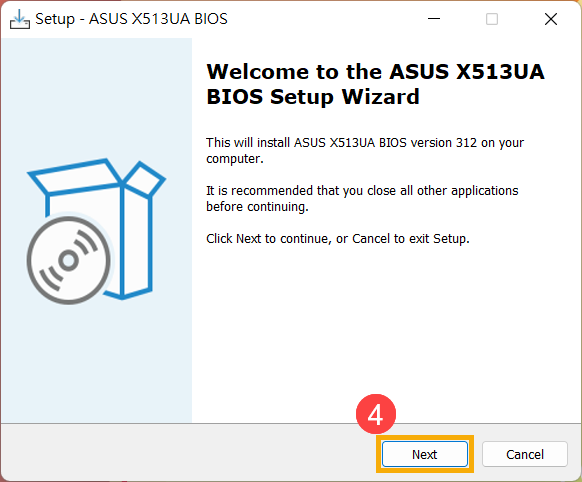
- The setup wizard will guide you to start the BIOS update process, click [Next]④.
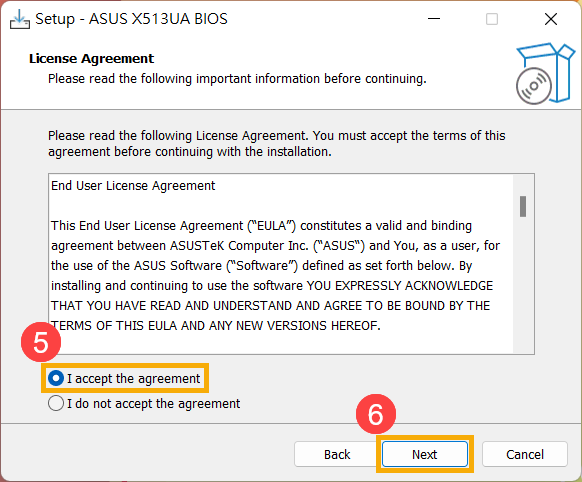
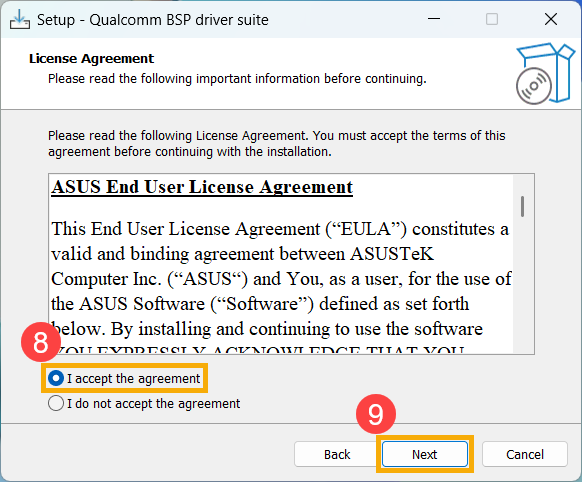
- Please read the License Agreement, and check the box to [I accept the agreement]⑤ and then select [Next]⑥.
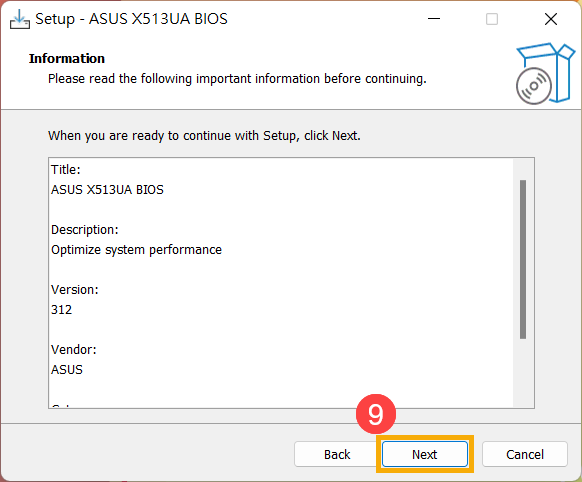
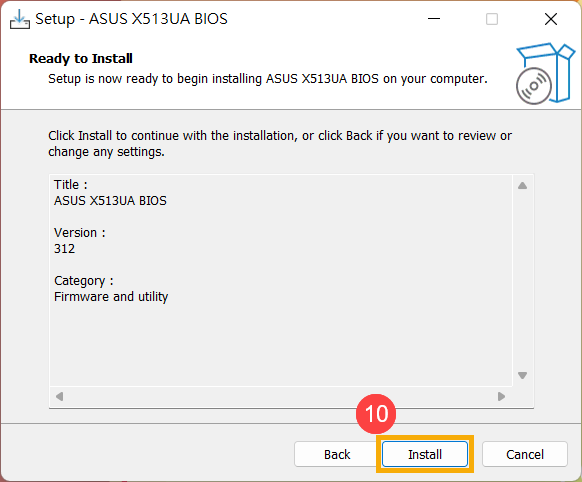
- Follow the indicator to process the BIOS update installation.
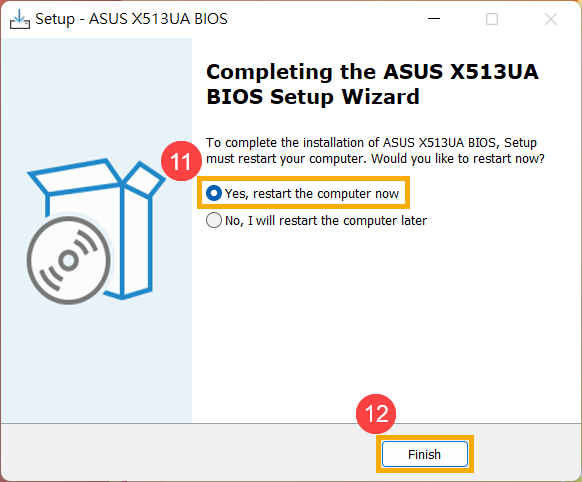
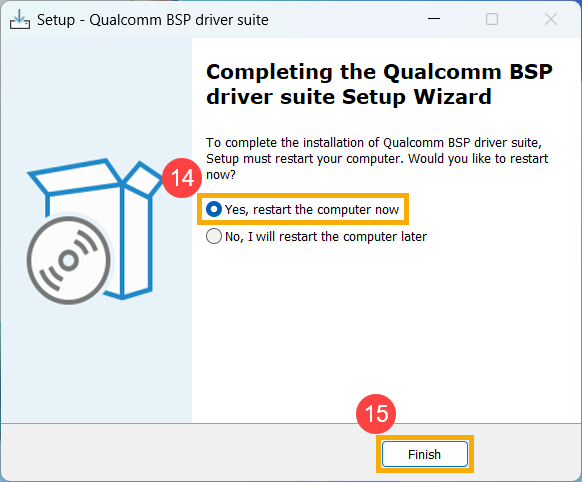
- Select [Yes, restart the computer now]⑪, then click [Finish]⑫. The device will restart and enter the BIOS update screen.
Note: Before restarting the device, please ensure to save your work to prevent any data loss.
- The device will restart and enter the BIOS update screen. Please refer to your BIOS interface for the subsequent steps:
Note: The BIOS update screen below may vary slightly depending on the model.

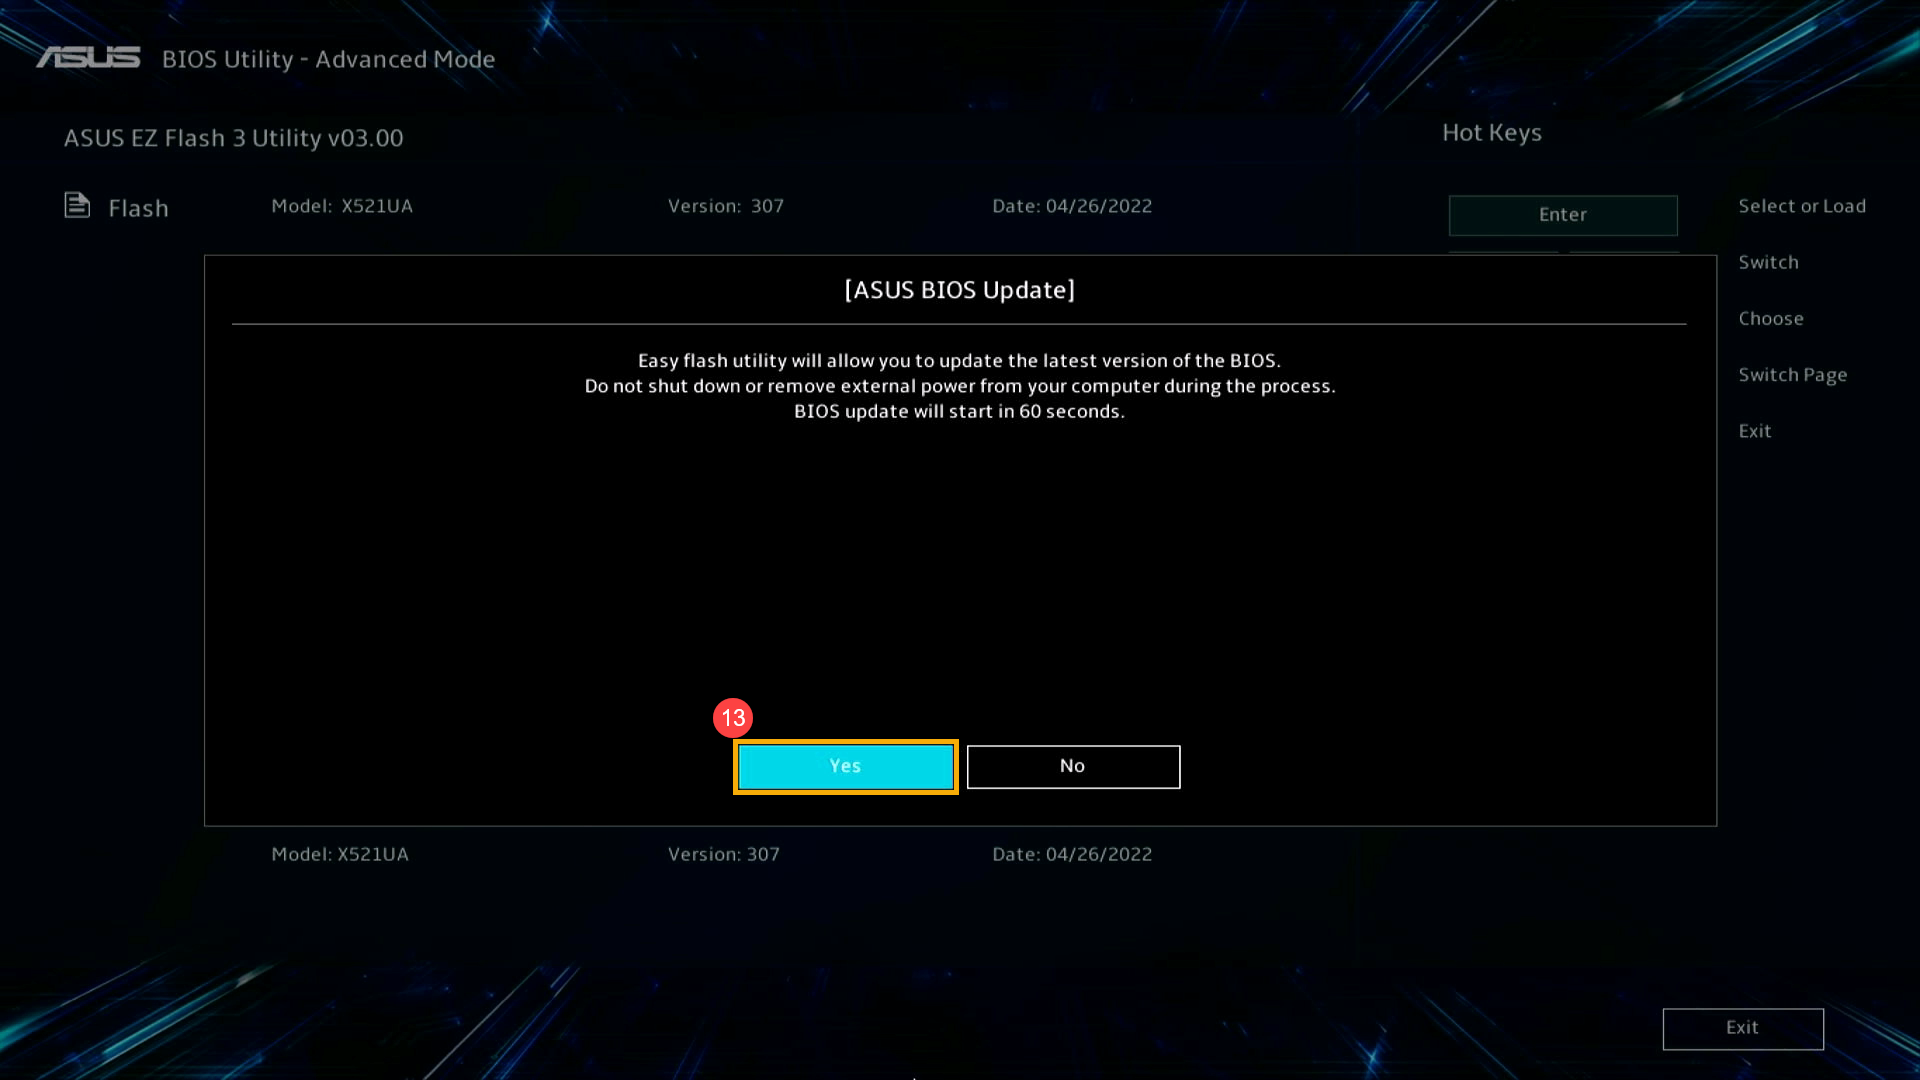
UEFI interface
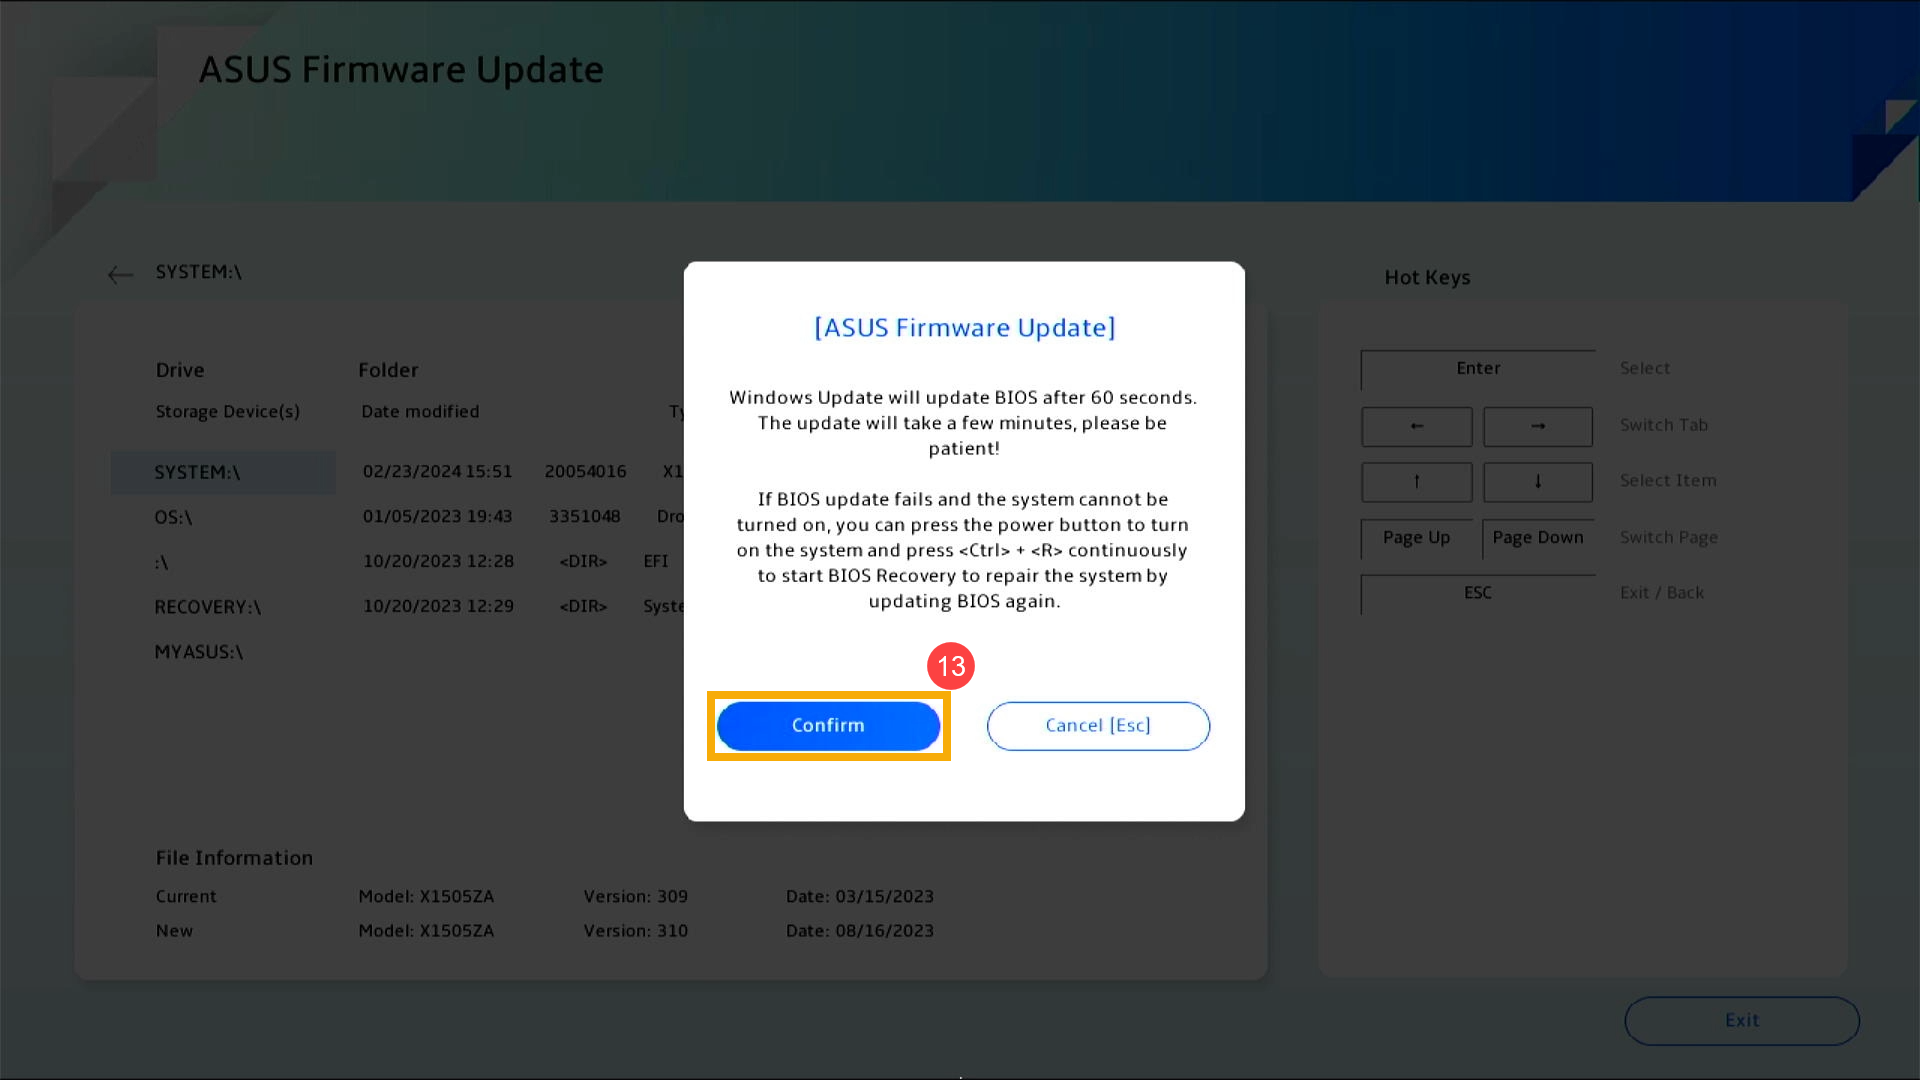
- Click [Yes]⑬ to begin the BIOS update.
Note: Ensure that the device is connected to power and do not force shutdown during the BIOS update to prevent any abnormal issues.
- The device is now performing the BIOS update. Please wait patiently for the BIOS update to complete.
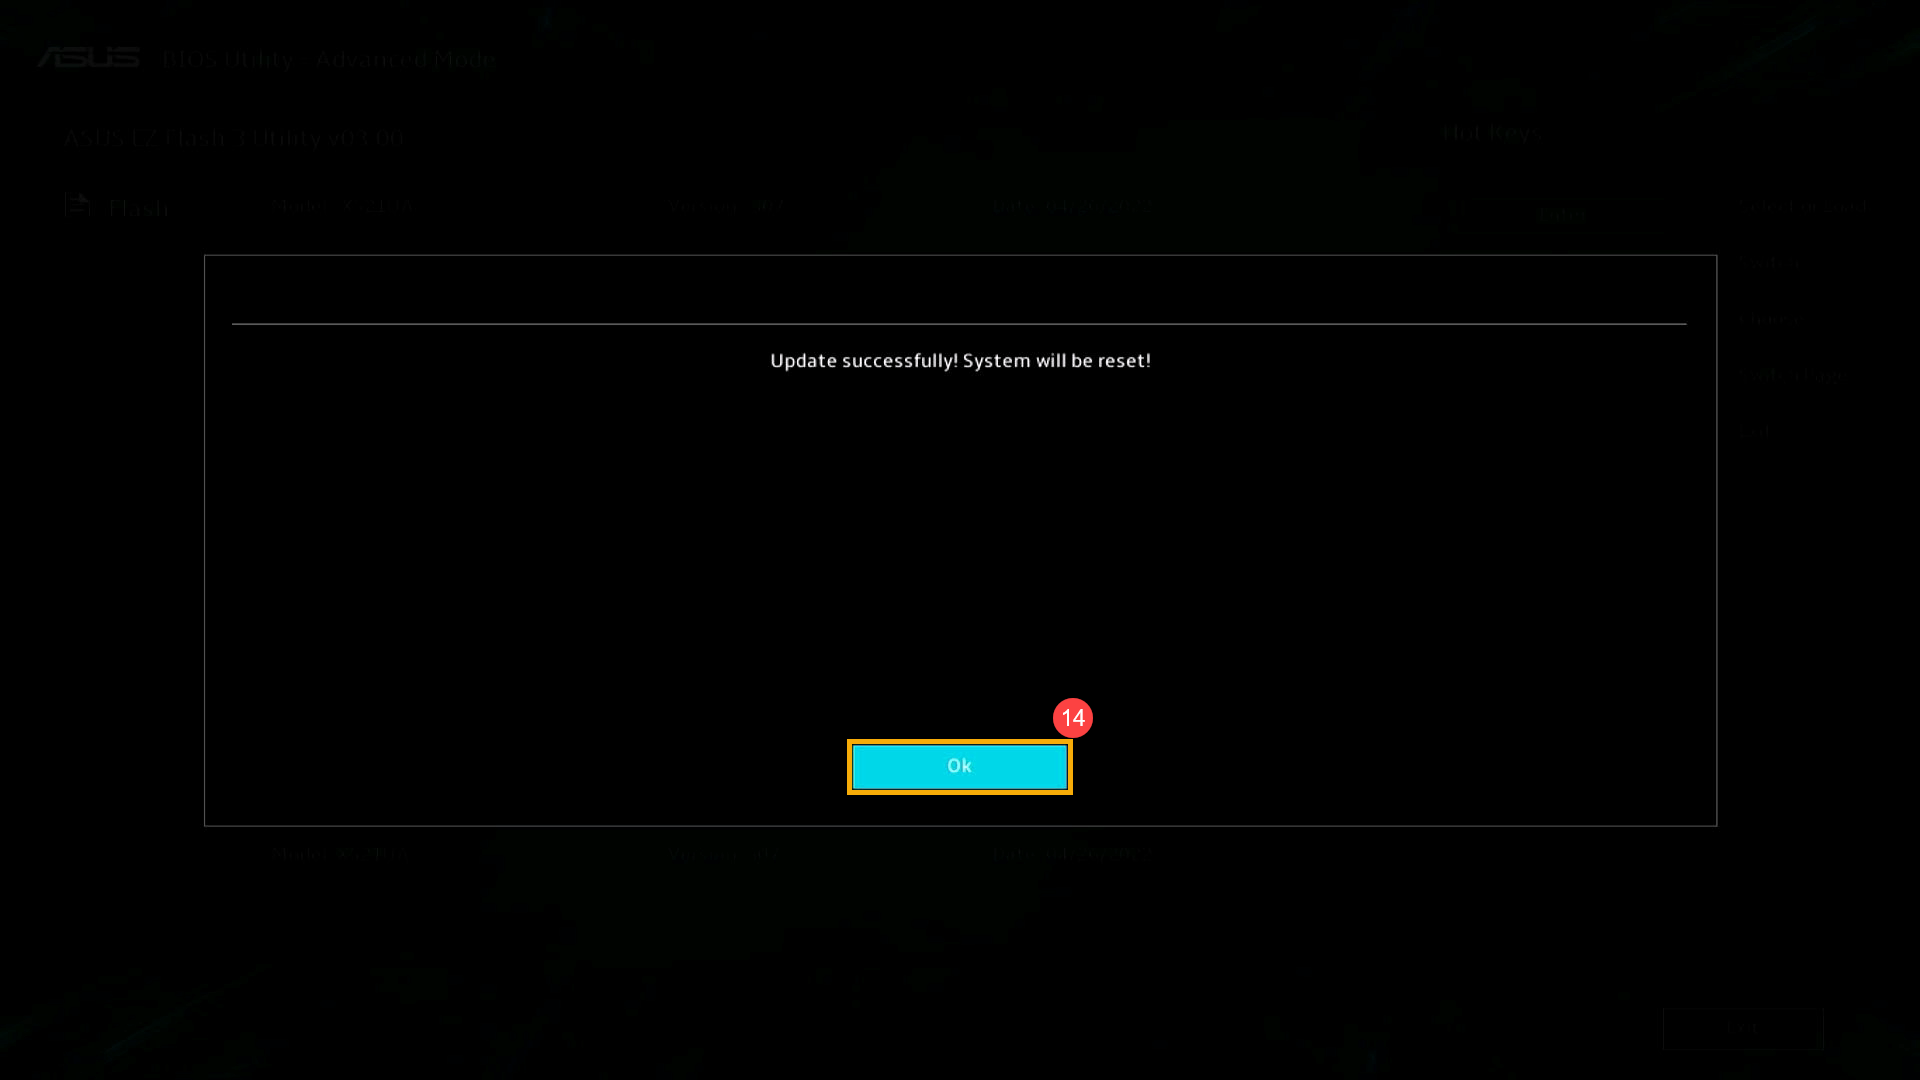
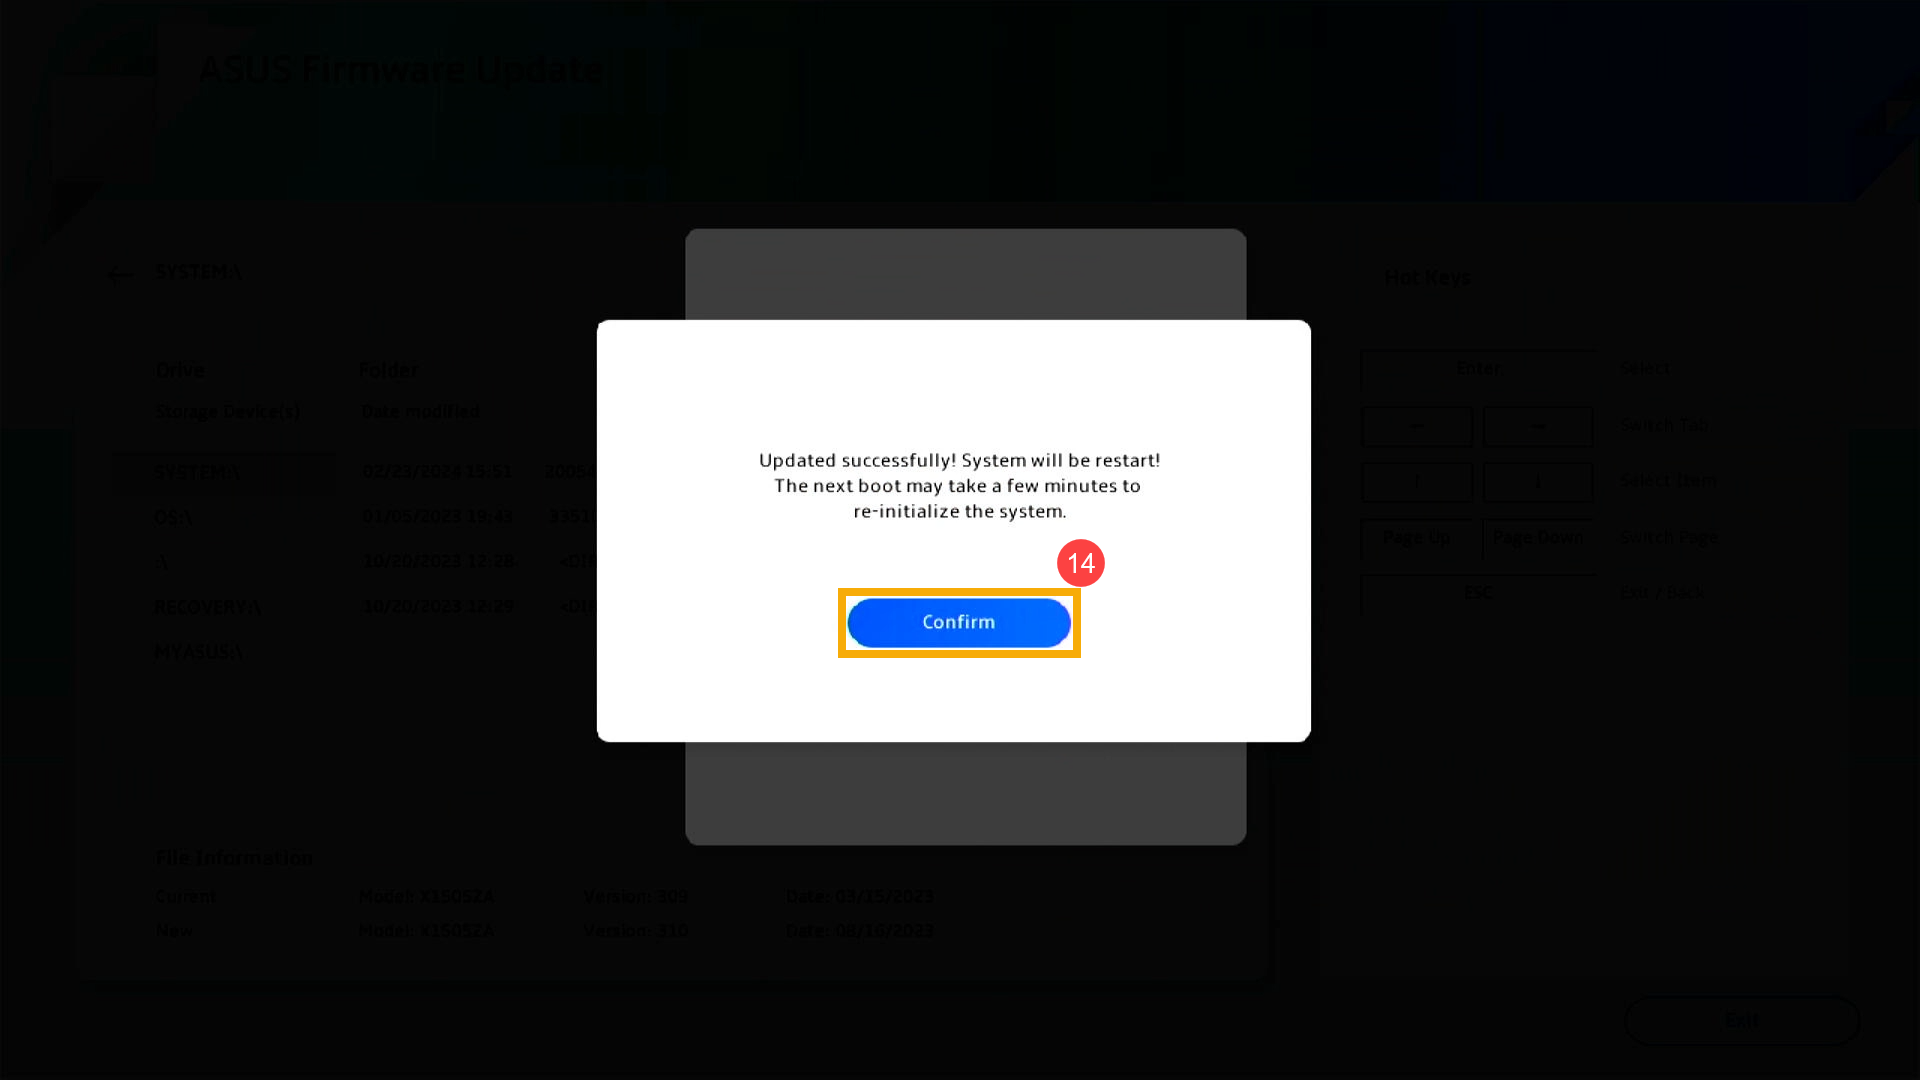
- Once the following screen appears, it indicates that your device has completed the BIOS update. Click [Ok]⑭, and the device will restart into the Windows operating system.
MyASUS in UEFI
- Click [Confirm]⑬ to begin the BIOS update.
Note: Ensure that the device is connected to power and do not force shutdown during the BIOS update to prevent any abnormal issues.
- The device is now performing the BIOS update. Please wait patiently for the BIOS update to complete.
- Once the following screen appears, it indicates that your device has completed the BIOS update. Click [Confirm]⑭, and the device will restart into the Windows operating system.
How to update the BIOS with ARM-based devices
You can download and update the BIOS from MyASUS or the official ASUS website. Please refer to the following steps for each method:
Note: If you encounter any issues during the BIOS update process, please contact ASUS service center.
Method 1: Update BIOS via MyASUS
- Type and search [MyASUS] in the Windows search bar①, then click [Open]②.
Note: If there is no result searched, it means your device may not install it, and please refer to How to install MyASUS.
- In the MyASUS window, click [System Update]③.
- When entering the System Update page, MyASUS will automatically check and list the items that need updating for your system.
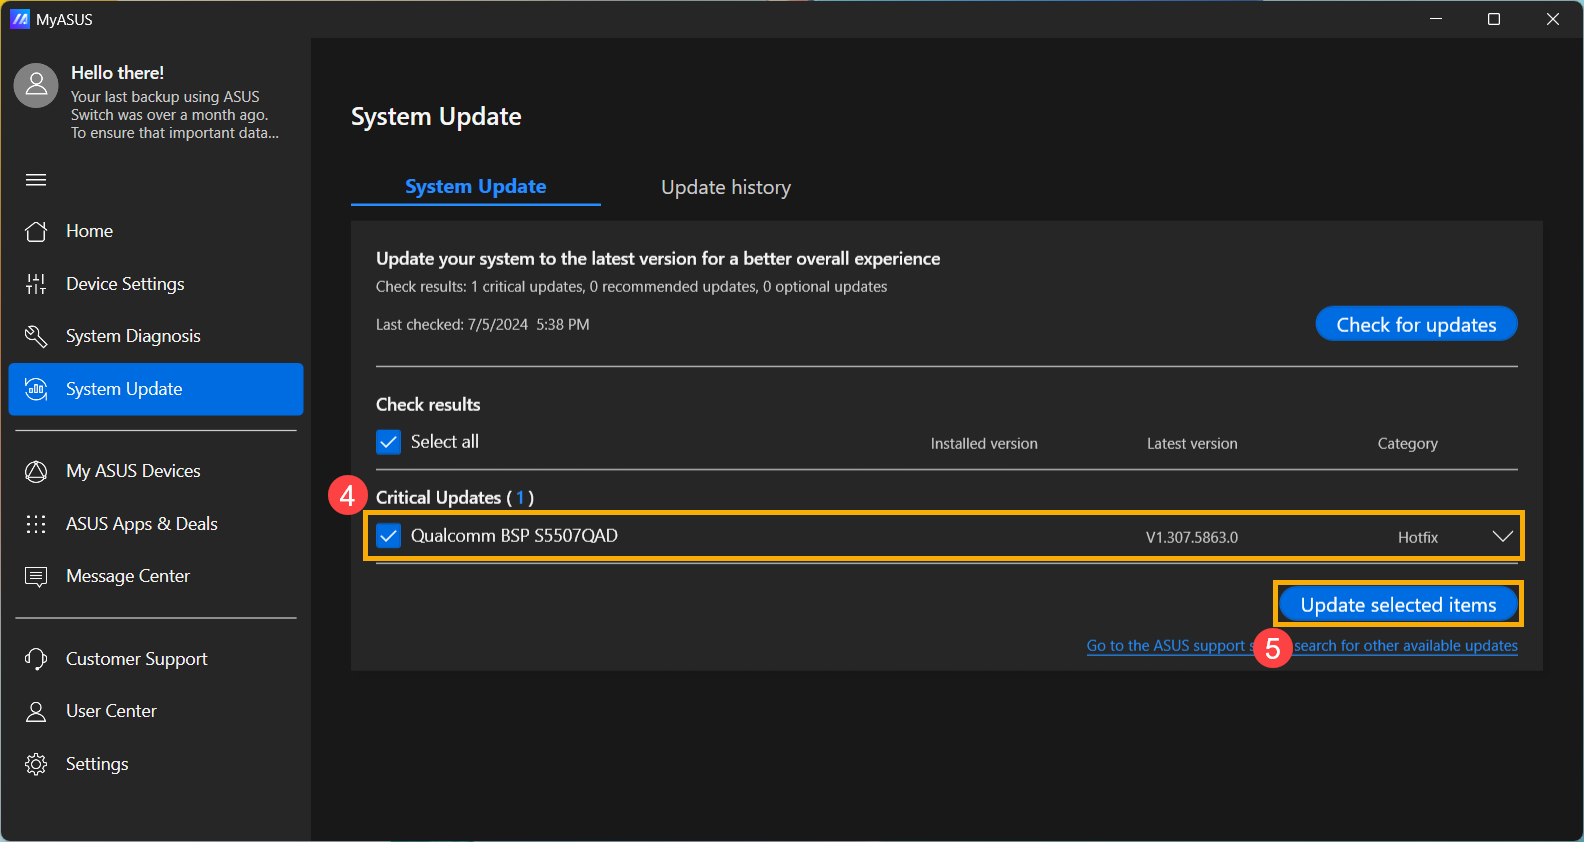
Note: If no update items are displayed on this page, it means your system is already up to date. - Select [BSP] package④, then click [Update Selected Items]⑤.
Note: This package includes BIOS, System, Multimedia, Peripherals and Connectivity drivers. Utilizing this package will update both the BIOS and drivers to the latest versions.
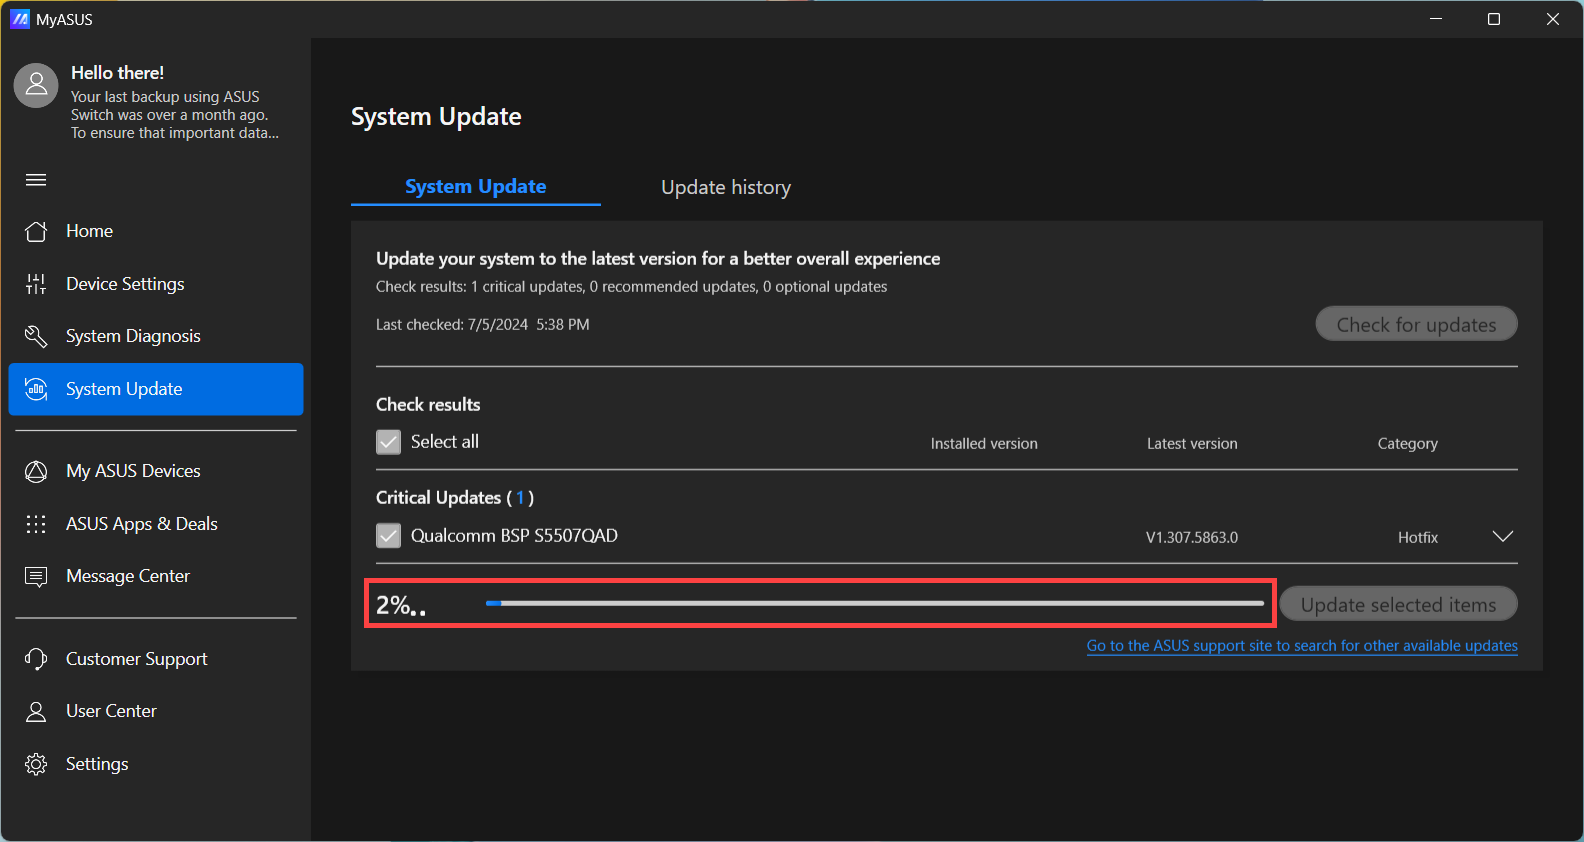
- MyASUS will begin downloading the BSP package file.
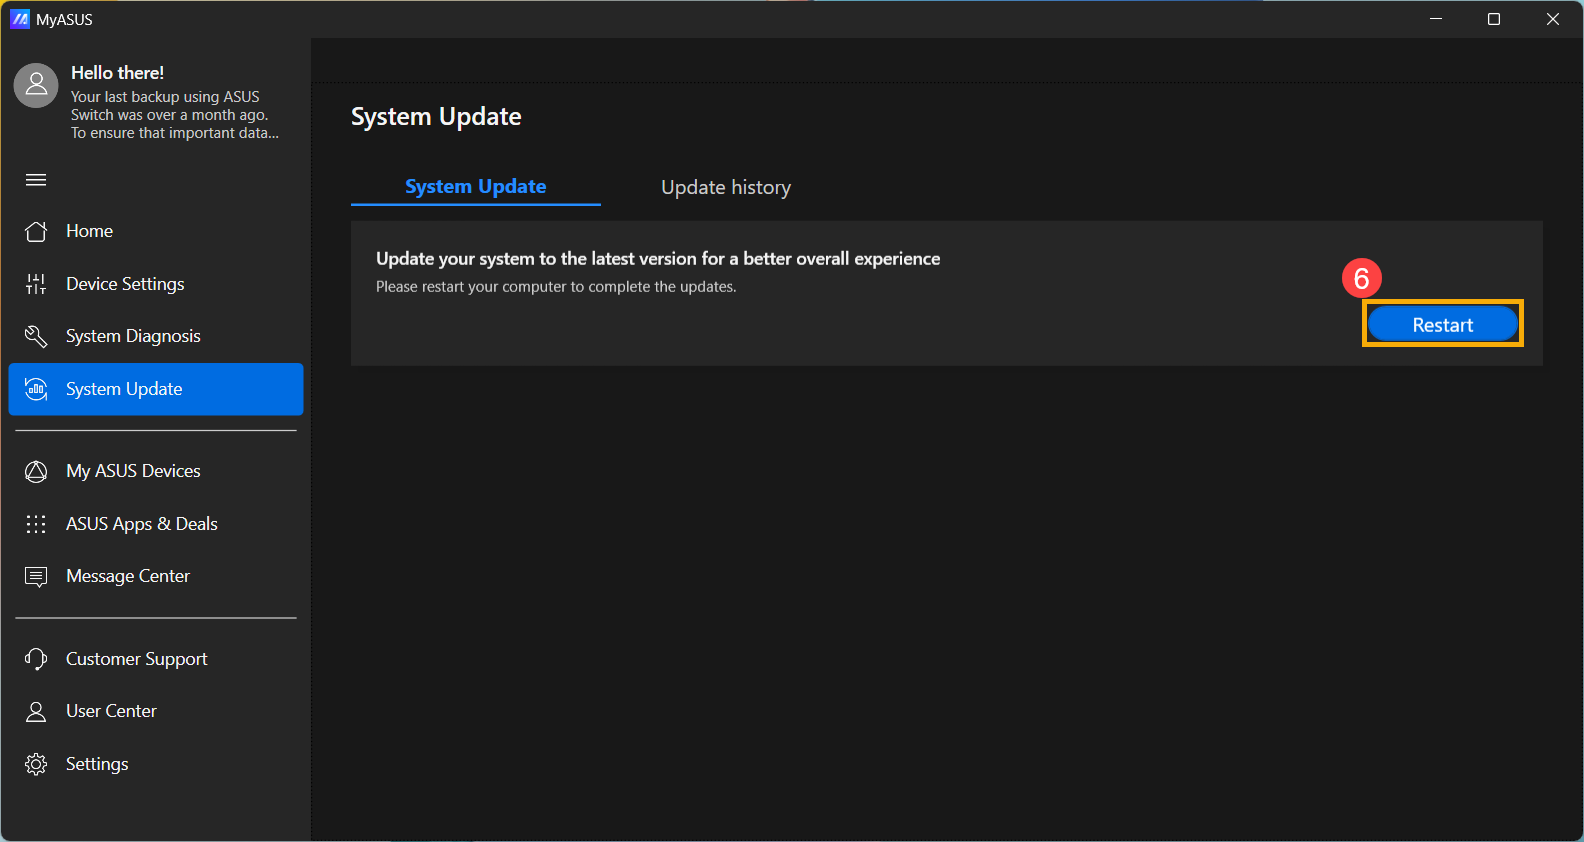
- After the BSP package file download is complete, click [Restart]⑥ to initiate the update.
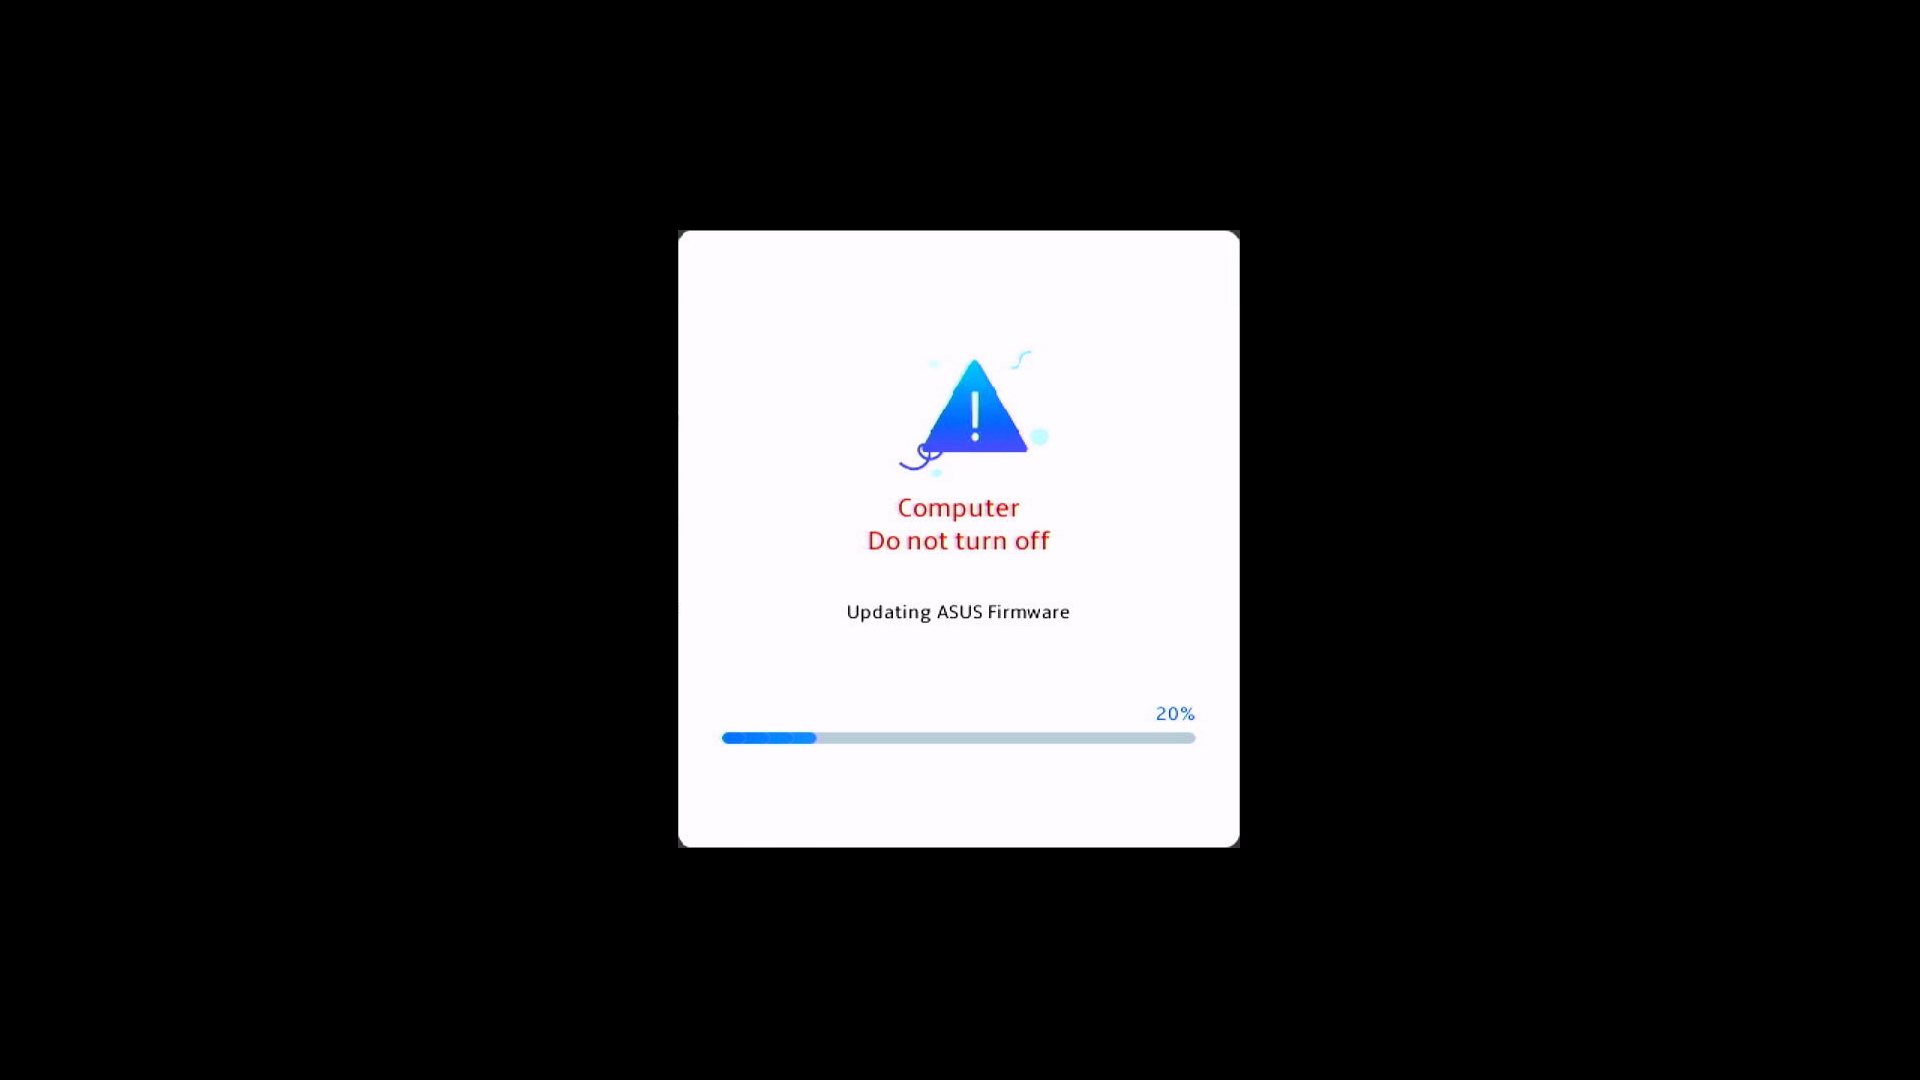
- The device is currently undergoing an update.
Note: Ensure that the device is connected to power and do not force shutdown during the update to prevent any abnormal issues.
- Upon completion of the update, the device will automatically reboot into the Windows operating system.
Method 2: Download and update BIOS via the ASUS support site
- Go to the ASUS support site with your device’s model name, here you can learn more about How to search and download BIOS.
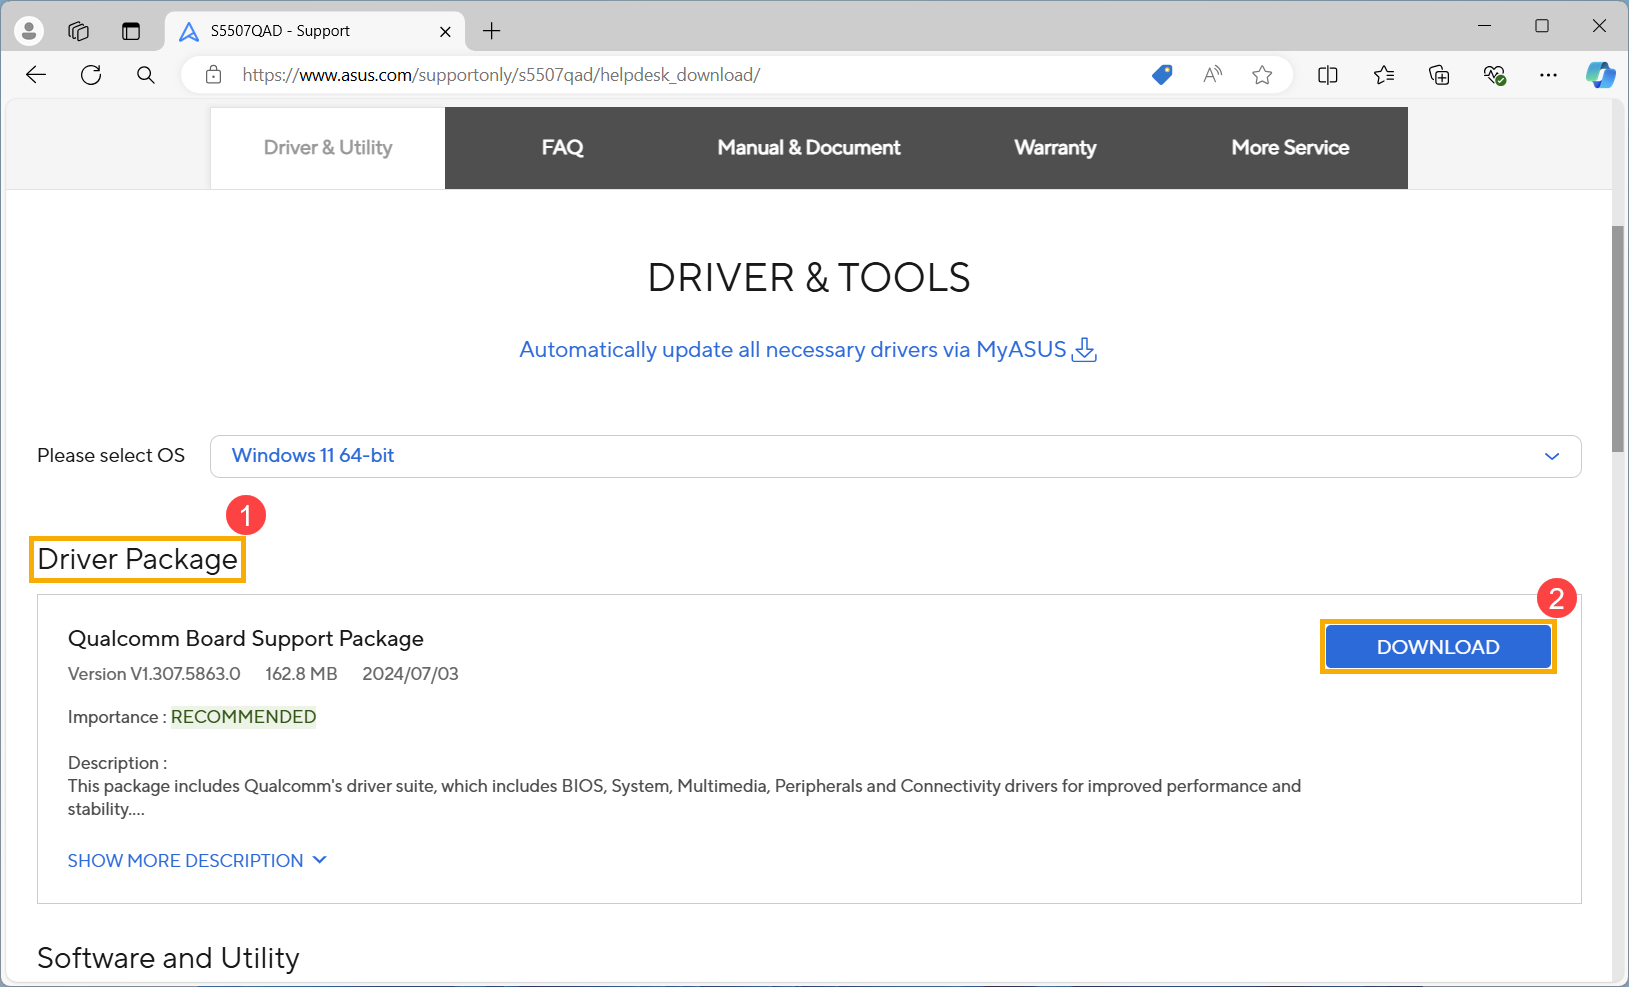
Note: To download the corresponding BIOS file, please refer to How to check the model name. - After accessing the product support download page, locate the latest version of the Board Support Package① under the Driver Package category, and then click [Download]②.
Note: This package includes BIOS, System, Multimedia, Peripherals and Connectivity drivers. Utilizing this package will update both the BIOS and drivers to the latest versions.
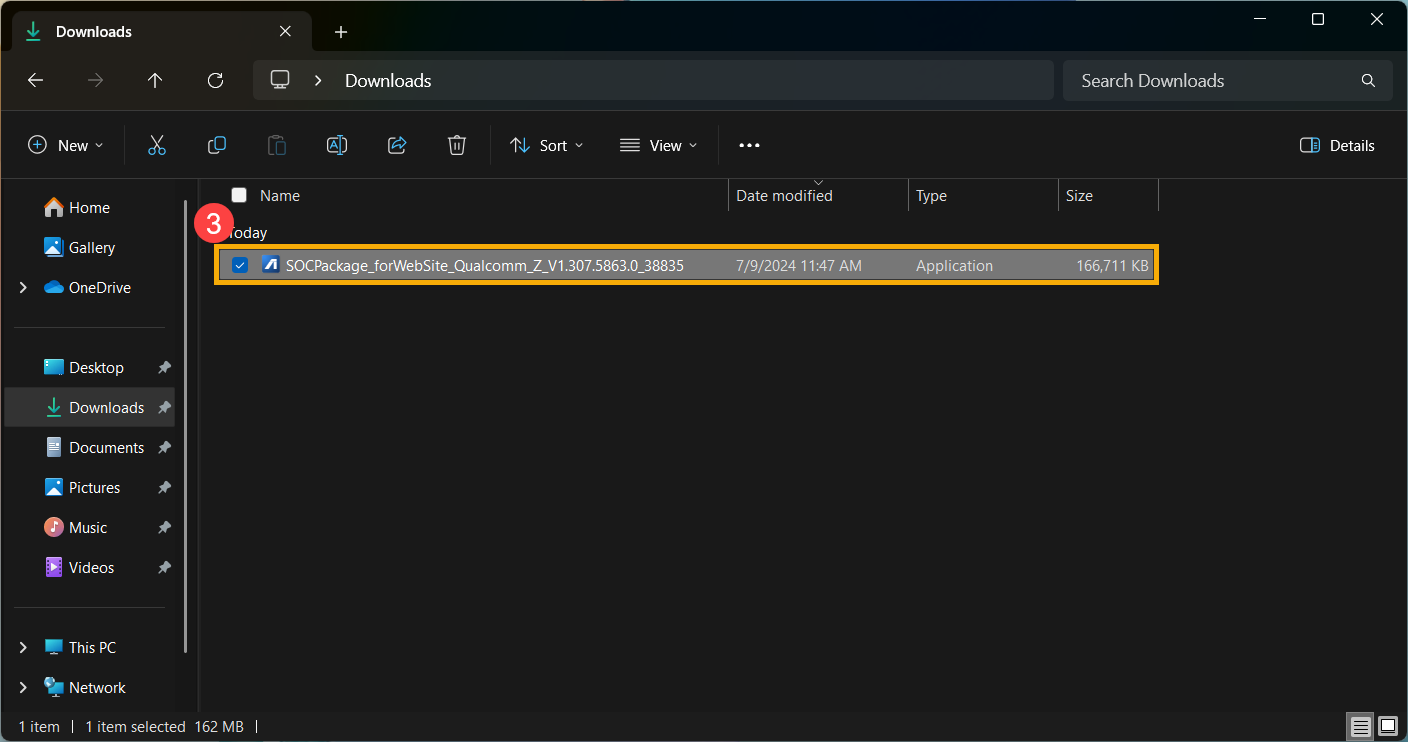
- After downloading, double-click the file you just downloaded to begin the BSP update process③.
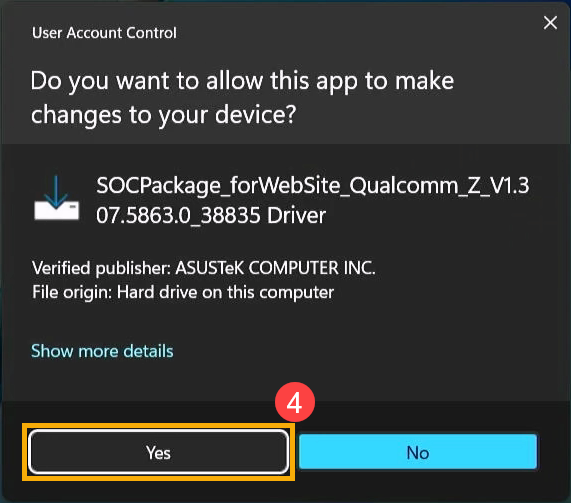
- If a User Account Control window appears, click [Yes]④.
- Choose the language you want to use in the installation program⑤, then click [OK]⑥.
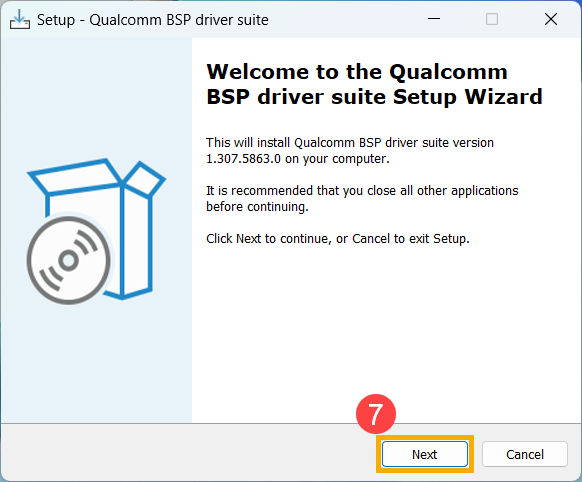
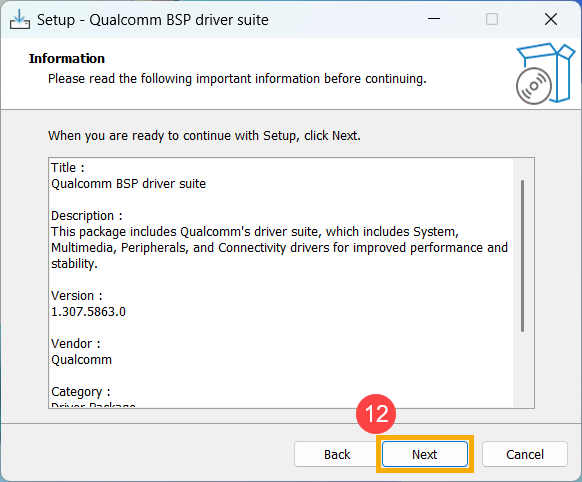
- The setup wizard will guide you to start the BSP update process, click [Next]⑦.
- Please read the License Agreement, and check the box to [I accept the agreement]⑧ and then select [Next]⑨.
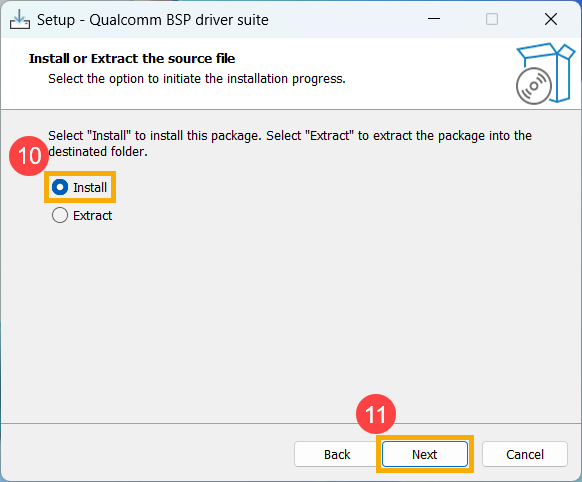
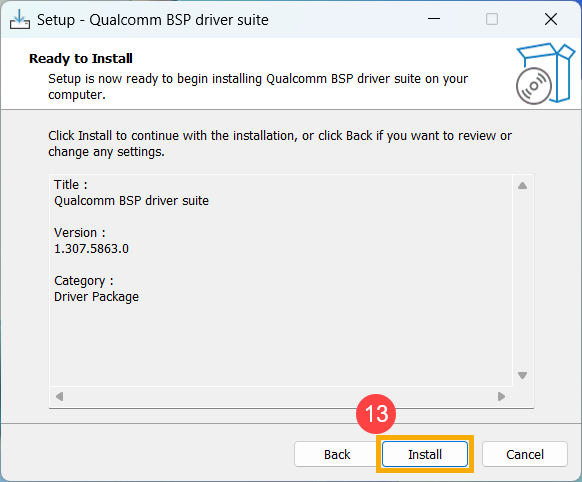
- Follow the indicator to process the BSP update installation.
- Select [Yes, restart the computer now]⑭, then click [Finish]⑮. The device will restart and enter the update screen.
Note: Before restarting the device, please ensure to save your work to prevent any data loss.
- The device is currently undergoing an update.
Note: Ensure that the device is connected to power and do not force shutdown during the update to prevent any abnormal issues.
- Upon completion of the update, the device will automatically reboot into the Windows operating system.
Was this information helpful?
Yes
No
- Above information might be partly or entirely quoted from exterior websites or sources. please refer to the information based on the source that we noted. Please directly contact or inquire the sources if there is any further question and note that ASUS is neither relevant nor responsible for its content/service
- This information may not suitable for all the products from the same category/series. Some of the screen shots and operations could be different from the software versions.
- ASUS provides the above information for reference only. If you have any questions about the content, please contact the above product vendor directly. Please note that ASUS is not responsible for the content or service provided by the above product vendor.
- Brand and product names mentioned are trademarks of their respective companies.
BIOS is pre-installed on the motherboard of a computer. When you encounter a bug that can’t be fixed in other ways or certain hardware can’t be recognized/supported by a computer, you may consider updating BIOS to the latest version. This MiniTool page shows you how to update BIOS ASUS in different ways.
About BIOS Update
Before going any further to methods for ASUS motherboard BIOS updates, I’d like to introduce BIOS to you briefly.
What Is BIOS
The full name of BIOS is Basic Input/Output System, which is pre-installed and essential firmware stored in a ROM chip on the PC motherboard. BIOS is mainly responsible for performing hardware initialization during the PC booting process and providing runtime services for operating systems and programs.
How to Check for a BIOS Update
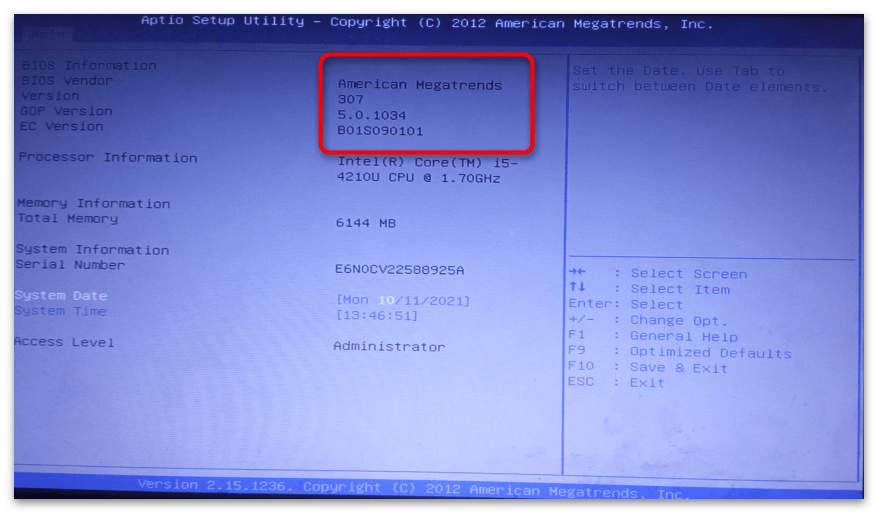
Step 1: Check the BIOS version on your computer: press Win + S > type System Information and hit Enter > find BIOS Version/Date option.
Step 2: Visit your manufacturer’s official website (or contact tech support) > search for your motherboard model > check whether there’s a new firmware update available.
Risks of BIOS Update
Making changes to your Windows BIOS could be risky. There are also some reasons to explain why you shouldn’t do ASUS update BIOS.
- The motherboard will be damaged and you won’t be able to boot your computer if the update process failed.
- The new version of BIOS may not support your exact hardware.
- Different motherboard model requires different BIOS versions. Problems may be caused even if the new BIOS version is slightly different.
- You may probably meet some new bugs with the new version of the BIOS even if it’s the correct one.
If you still want to make an ASUS BIOS update, there are different ways for you in the following sections.
Note:
Before updating BIOS, you’d better back up your system, your disk, or at least the important files saved on your ASUS computer with a reliable tool like MiniTool ShadowMaker. The BIOS update may end up in failure sometimes, which will brick your motherboard and ruin your data.
Method 1: Update BIOS in Windows
The following content will show you how to update ASUS BIOS in Windows 10.
Part 1: Download BIOS Update Utility
You can either download the BIOS update utility from MyASUS or the ASUS support site.
Download the Update Utility from MyASUS
Step 1: Press Win + S and type MyASUS into the search box.
Step 2: Hit Enter to open the MyASUS window.
Step 3: Select Customer Support > Live Update > Latest. If you can’t find the Live Update tab, it means your computer doesn’t support this feature. Please try the second method.
Step 4: Locate the BIOS Update (Windows) section, then find the BIOS Update for Windows file and click on the download icon after it to get the ASUS BIOS Installer.
Tips:
If you can’t find MyASUS, you can find solutions in this post.
Download the Update Utility from the ASUS Support Site
Step 1: Go to the official ASUS support site.
Step 2: Type the model name of your computer into the search bar. (Don’t include ASUS; the name should be 4~5 letters/numbers.)
Step 3: Locate the BIOS Update (Windows) section on the support page.
Step 4: Look for the BIOS Installer for Windows file and click on the DOWNLOAD button.
Step 5: You can also locate the BIOS-Utilities section and download the Windows BIOS Flash Utility (WinFlash) if you can’t find the BIOS installer.
If there is no choice of either BIOS Installer for Windows or BIOS Update for Windows, please refer to the next method.
Part 2: Update BIOS with the Utility You Downloaded
Update BIOS with the BIOS Installer
Step 1: Navigate to the BIOS Installer file and right-click on it.
Step 2: Select Extract All from the context menu and click Browse to specify a destination.
Step 3: Click Extract and wait.
Step 4: Go to the destination and double-click on the BIOS Update (or BIOS Installer) application file.
Step 5: The setup wizard will appear: click Next > check I accept the agreement and click Next > click Next > click Install > check Yes, restart the computer now, then click Finish.
Step 6: Wait for the BIOS update process to finish.
Update BIOS with the WinFlash
Step 1: Navigate to the Winflash file and right-click on it.
Step 2: Select Extract All, then specify a destination and click Extract.
Step 3: When the extraction is completed, please go to the destination.
Step 4: Double-click on the Setup file to see the WinFlash setup wizard.
Step 5: Follow the on-screen instructions to install WinFlash properly.
Step 6: Double-click on the WinFlash application file.
Step 7: Click Next in the WinFlash app to continue.
Step 8: Select Get BIOS from the Web or Get BIOS from Device, and click Update.
Step 9: Click on the Exit button and your computer will restart automatically to continue the updating process.
Method 2: Update BIOS in BIOS Utility (with EZ Flash)
This part shows you how to use the USB drive and the ASUS EZ Flash to update your ASUS BIOS. You’d better save the BIOS file to a USB drive.
Part 1: Download the BIOS File
Download the BIOS file from MyASUS:
Step 1: Search MyASUS by using the Windows search feature.
Step 2: Go to Customer Support > Live Update > Latest.
Step 3: Look for BIOS for ASUS EZ Flash Utility or BIOS version under the BIOS section.
Step 4: Click on the download icon and wait.
Download the BIOS file from the ASUS support site:
Step 1: Visit the ASUS support site.
Step 2: Type the computer’s model name > click Driver & Utility > shift to BIOS & FIRMWARE.
Step 3: Search for the BIOS for ASUS EZ Flash Utility file or the BIOS version file under BIOS on the support page.
Step 4: Click DOWNLOAD and save the file to your USB drive.
Part 2: Update BIOS with EZ Flash
Update BIOS ASUS in UEFI Mode
Step 1: Insert the USB drive and extract the BIOS file you downloaded.
Step 2: Restart your ASUS computer and press the DEL key to enter the BIOS Utility.
Step 3: Click Advanced Mode and shift to the Tool tab.
Step 4: Select ASUS EZ Flash 3 Utility on this interface.
Step 5: Choose the disk where the BIOS file is saved, then choose the file.
Step 6: In the popup window, choose Yes.
Step 7: Click Yes again to confirm the BIOS information and update.
Wait for the process to finish. Then, your computer will be restarted automatically.
Update BIOS ASUS in Legacy Mode
Step 1: Insert the USB drive and extract the BIOS file.
Step 2: Restart your PC to enter the BIOS Utility.
Step 3: Shift to the Advanced tab.
Step 4: Navigate to ASUS EZ Flash 3 Utility and press Enter.
Step 5: Select the target storage device and choose the BIOS file.
Step 6: Navigate to Yes and press Enter to continue.
When the process of BIOS update is finished, your PC will auto-reboot.
Method 3: Update BIOS Using AI Suite 3 (EZ Update)
Step 1: You can get the BIOS file with the steps in Method 2.
Step 2: Extract the file to your USB.
Step 3: Download and install AI suite3.
Visit the ASUS Download Center > enter the model name > click Driver & Utility > select Drivers and Tools > select the operating system > look for the AI Suite 3 file under Software and Utility > click DOWNLOAD.
Step 4: Extract the AI Suite 3 file to your USB.
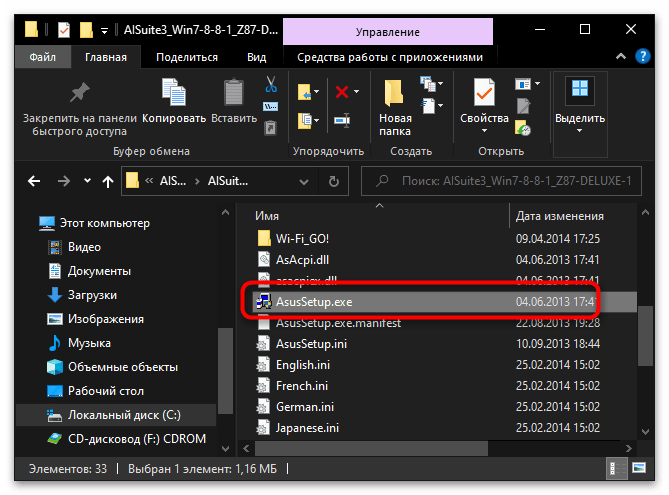
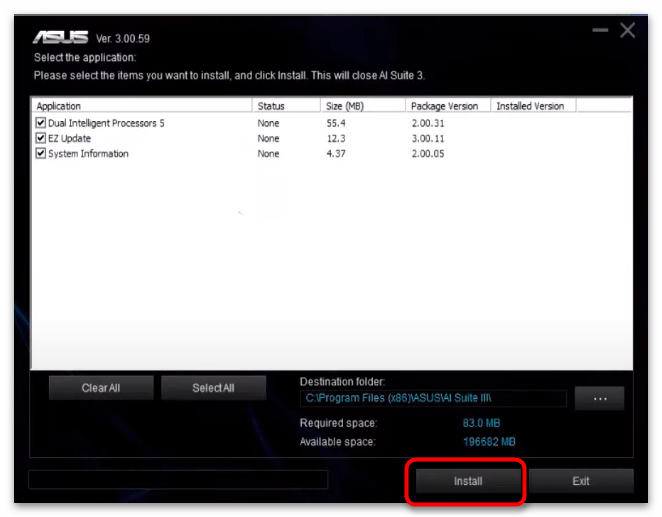
Step 5: Find and double-click on the AsusSetup.exe file, then click Install to install AI Suite 3.
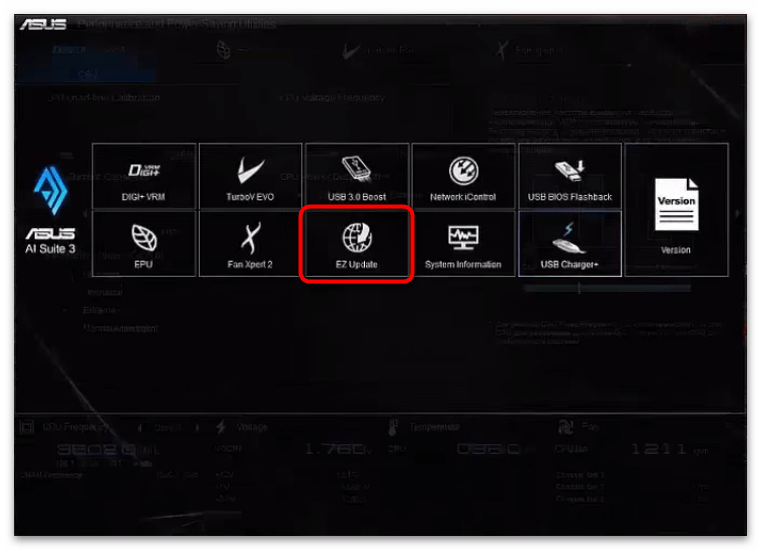
Step 6: After restarting the computer, run the EZ Update to update the BIOS.
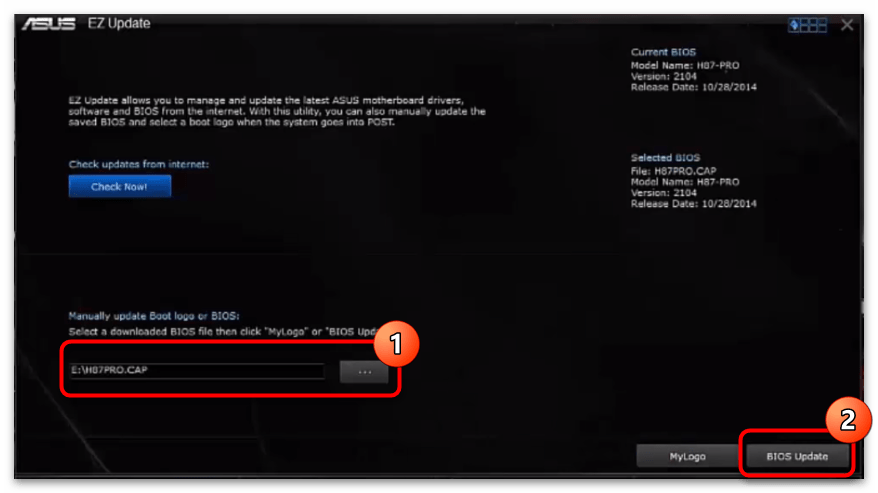
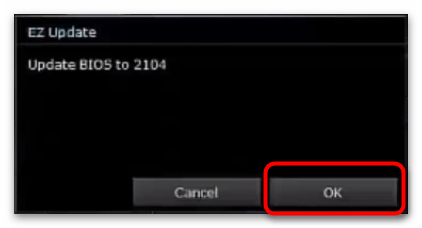
Click on the Start icon > select EZ update from the left pane > click on the three dots icon under Manually update boot logo or BIOS > select the extracted BIOS file > click Update > click Flash > click OK > restart the ASUS computer > the EZ Flash interface appears > wait for the update to complete > restart the computer again.
Method 4: Update BIOS Using USB BIOS FlashBack
There’s a special way to update BIOS ASUS: update under the Shutdown or Uninstall CPU Status (USB BIOS FlashBack).
This method is only available for some models of the ASUS computer. If you want to figure out whether your motherboard can support the USB BIOS FlashBack function and how to use BIOS FlashBack™ in detail, please refer to this ASUS support page.
You should be careful when trying to update BIOS with the steps above. If, unfortunately, the BIOS update failed, your computer may encounter boot issues. When your computer can’t boot up normally, please rescue your files from this problematic computer. In this case, you need to search for help from third-party data recovery software.
MiniTool Power Data Recovery, the best free data recovery software, is able to restore files under various data storage devices, including formatted USB flash drives, inaccessible SD cards, unbootable computers, etc. Besides, this software can recover types of files, like pictures, archives, files, videos, and so on.
Recover Files from an Unbootable ASUS Computer
If you want to use MiniTool Power Data Recovery to rescue important files from the problematic computer, you need to prepare a USB flash drive (the size is between 4GB and 64GB) and find a well-performing computer. Then, you can create a bootable disk with a snap-in WinPE Bootable Builder in MiniTool Power Data Recovery. After that, use this created bootable media to recover files from the unbootable computer. For specific steps, please keep reading.
Part 1: Create a Bootable Media
Step 1: Download and install MiniTool Power Data Recovery on a well-performing computer.
MiniTool Power Data Recovery FreeClick to Download100%Clean & Safe
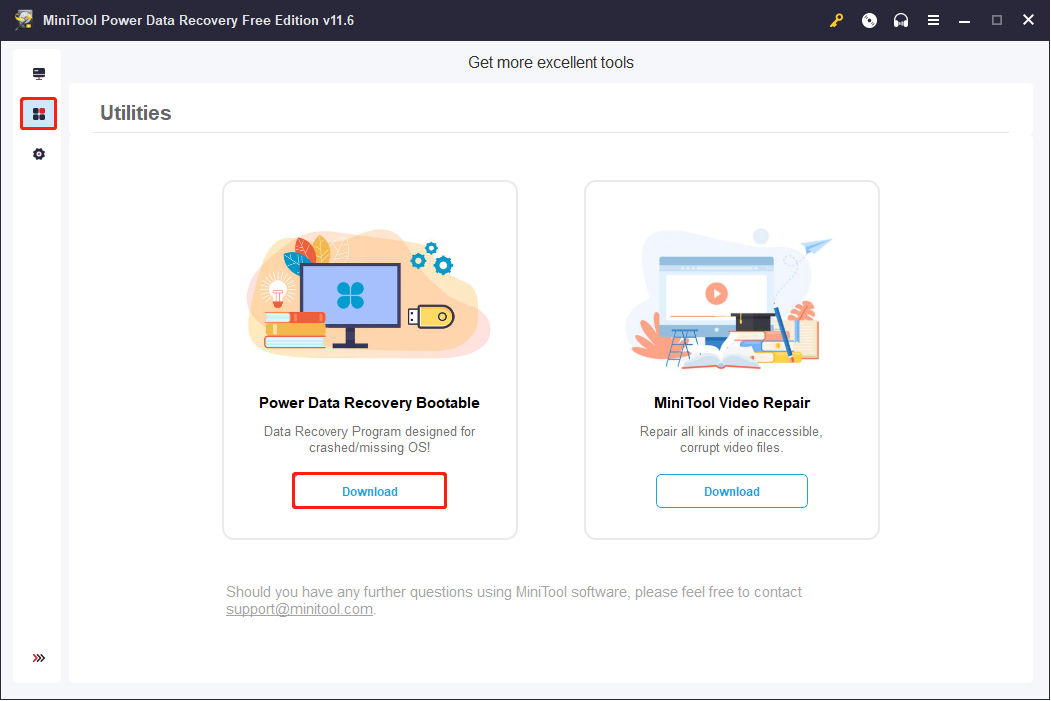
Step 2: Launch the software and click on the Utilities button on the left sidebar.
Step 3: Click on the Download button under the Power Data Recovery Bootable section. Then, you need to update the edition. Please be careful when choosing an advanced edition. You need to select one that contains a snap-in WinPE Bootable Media Builder.
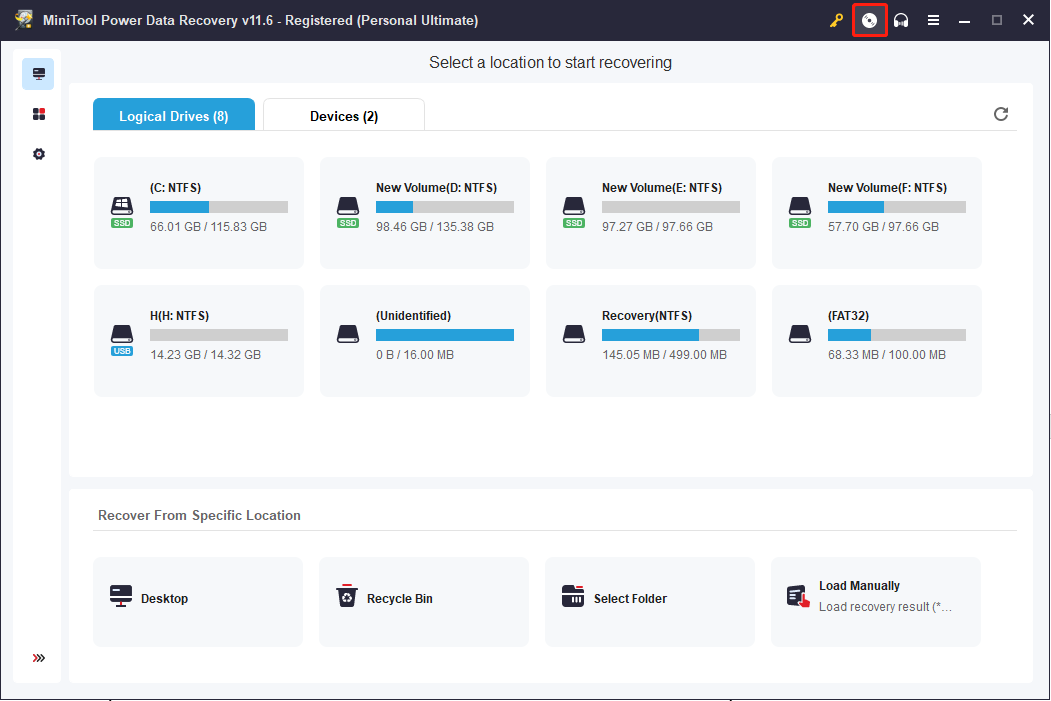
Step 4: Back to This PC interface, then click on the key icon and input your registry key. The registry key will send to you by email after updating the software.
Step 5: Connect the prepared USB drive to the computer and click on the Refresh button.
Step 6: Choose Bootable Media on the top right to open MiniTool Media Builder.
Step 7: Follow the on-screen instruction to create a bootable media.
Step 8: Click Finish when the file preparation process is completed.
Part 2: Recover Data from an Unbootable Computer
Step 1: Plug the USB drive into the problematic computer.
Step 2: Restart your computer and press and hold F2 to enter the BIOS menu.
Tips:
If you can’t enter the BIOS menu with the F2 key, you can try the Del key again.
Step 3: Adjust the boot order to make your computer boot from the created bootable disk.
Step 4: Click F10 to save the change and hit Enter to exit the BIOS menu.
Step 5: After the computer restart, you can find the MiniTool PE Loader window on your screen. Wait for a few seconds. It will open MiniTool Power Data Recovery automatically.
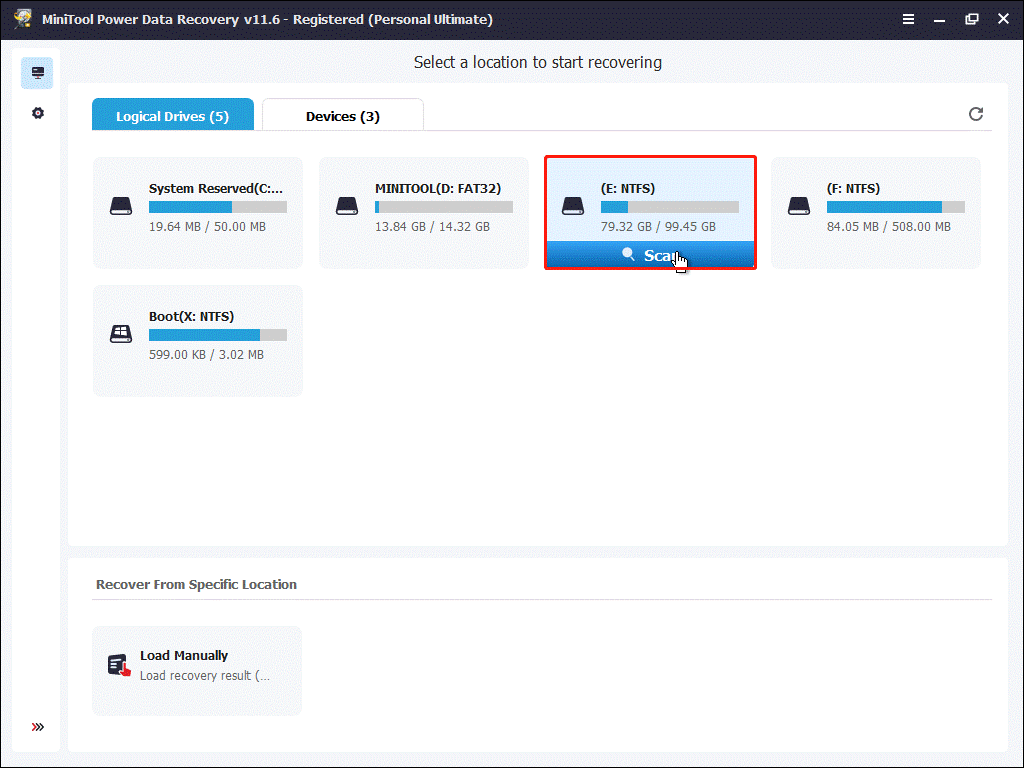
Step 6: Choose a partition where you want to recover files from and click on the Scan button.
Step 7: Wait for the process to finish. You can browse the result page to find the wanted files. Since there might be numerous files, you can use Filter, Type, and Search functions to filter the desired files. Then, use the Preview feature to check the correction of the selected file.
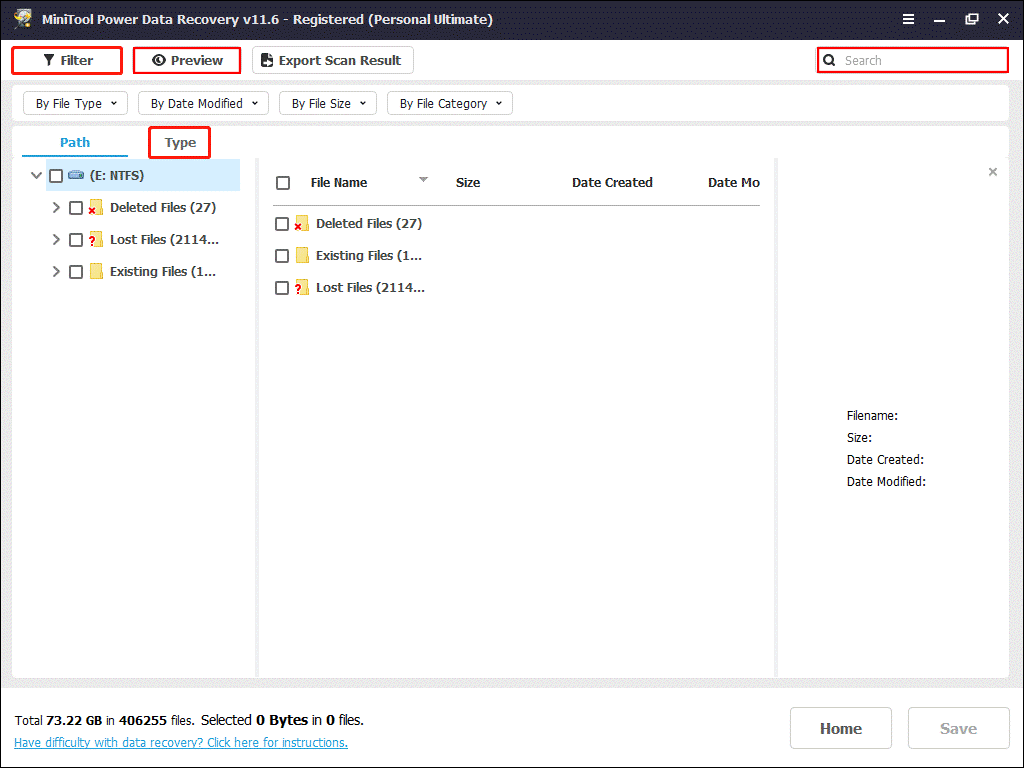
Step 8: Check all the files you wanted and click on the Save button.
Step 9: Choose a proper path to store the files and click OK to confirm.
Recover Files from Bootable ASUS Computer
If you successfully update the BIOS, you can check whether your files are lost. If yes, you can recover lost files with MiniTool Power Data Recovery as well. The free edition allows you to make a deep scan of your drive and recover up to 1GB of files. If you prefer a large recovery capacity, you can go to this site to find a suitable advanced edition. For personal users, the Personal Ultimate edition is highly recommended.
MiniTool Power Data Recovery FreeClick to Download100%Clean & Safe
Conclusion
This article introduces how to process ASUS BIOS updates in four useful methods. You can also recover your files with MiniTool Power Data Recovery even if the ASUS computer fails to start up. If you have any problems with MiniTool software, please connect with us via [email protected].
ASUS WinFlash for Windows 10 – Learn how to download & install ASUS WinFlash on Windows 10 PC/laptop in simple way. How to update the BIOS version in Windows system?. Now, this Cleaning and Tweaking app is available for Windows 10 (64-bit) PC/laptop.
How to update the BIOS version in Windows system?
Table of Contents
ASUS WinFlash Latest Version Overview
ASUS WinFlash is a Cleaning and Tweaking application like Mail PassView, Process Check, and Xpadder from Asus. ASUS WinFlash is an efficient software that is recommended by many Windows PC users. It has a simple and basic user interface, and most importantly, it is free to download.
Although there are many popular Cleaning and Tweaking software, most people download and install the Freeware version. ASUS WinFlash works with most Windows Operating System, including Windows 10 (64-bit). Don’t forget to update the programs periodically.
ASUS WinFlash has unique and interesting features, unlike some other Cleaning and Tweaking apps. This app is a fast, small, compact and innovative Freeware Cleaning and Tweaking app for Windows PC. It is developed to be simple for beginners and powerful for experts. You can get ASUS WinFlash free and download its latest version for Windows 10 (64-bit) PC from below.
ASUS WinFlash Technical Details
It’s better to know the app’s technical details and to have a knowledge background about the app. Therefore, you can find out if ASUS WinFlash will work on your Windows device or not.
| App Name: | ASUS WinFlash |
| Developer: | Asus |
| Version: | ASUS WinFlash 3.2.10 |
| Updated: | February, 26th 2019 |
| Category | Cleaning and Tweaking |
| File Size: | 2.47 MB |
| File Type: | EXE file |
| Requirement: | PC/laptop/tablet running Windows (Windows 10 (64-bit)) |
| License: | Freeware |
Download ASUS WinFlash for Windows 10 (64/32-bit) PC/laptop
Download ASUS WinFlash (latest version) free for Windows 10 (64-bit and 32-bit) PC/laptop/tablet. Safe Download and Install from the official link!
ASUS WinFlash 64-bit and 32-bit download features:
- Compatible with Windows 10 64-bit and 32-bit
- Latest version update
- ASUS WinFlash direct, free and safe download
- Download ASUS WinFlash for your PC or laptop
ASUS WinFlash Setup Installer
Download & install the latest offline installer version of ASUS WinFlash for Windows PC/laptop. It works with both 32-bit & 64-bit of Windows 10 (64-bit).
✔ Safe & Free Download for Windows PC/laptop – 2.47 MB
Safety (Virus) Test:
✔ Tested and is 100% Safe to download and install on your Windows 10 (64-bit) device (PC/laptop/tablet).
What is New in the ASUS WinFlash Latest Version?
✓ Compatibilities improvement for new Windows update.
✓ Fixes bugs.
How to download and install ASUS WinFlash for Windows 10 PC/laptop
Now let’s just move to the next section to share the steps you have to follow to download ASUS WinFlash for Windows PC. So here we go:
- Download the ASUS WinFlash installer file from the link above.
- Save the downloaded file to your computer.
- Double-click on the downloaded ASUS WinFlash installer file.
- Now, a smart screen might appear and ask for a confirmation.
- Click “Yes” to confirm.
- Finally, follow the installation instructions until you get a confirmation notification of a successful installation process.
So those are all the processes that you have to follow to download ASUS WinFlash for Windows PC. Then let’s go on to the next section where we will discuss ASUS WinFlash itself. So you can understand the application and its features. So here we go:
Best Features of ASUS WinFlash for Windows PC
ASUS WinFlash is one of the most popular Cleaning and Tweaking alongside LockHunter, PC Optimizer, and Avira Speedup. This app has its advantages compared to other Cleaning and Tweaking applications. ASUS WinFlash is lightweight and easy to use, simple for beginners and powerful for professionals. ASUS WinFlash application is free to download and offers easy-to-install, easy-to-use, secure, and reliable Cleaning and Tweaking applications.
This application’s primary functions are comprehensive and go beyond the features offered by others that can be considered as its rivals.
- ASUS WinFlash for PC – fast, reliable, and robust by Asus.
- ASUS WinFlash Free & Safe Download.
- ASUS WinFlash latest version for the best experience.
- User-friendly Interface.
- Easy to Use.
- Lightweight and consume low resources.
- It works/compatible with almost all Windows versions, including Windows 10 (64-bit).
- Free of Cost!
- Privacy and Security!
- Best for Cleaning and Tweaking application.
- PC User’s choice!
How to uninstall ASUS WinFlash in Windows PC/laptop?
Steps to uninstall ASUS WinFlash in Windows 10 / Windows 8 / Windows 7 / Windows Vista
- Click the Windows Start menu.
- Locate and select the Control Panel menu, then select Programs.
- Under Programs, click the Uninstall a Program.
- Select ASUS WinFlash and then right-click, select Uninstall/Change.
- Then click Yes to confirm the ASUS WinFlash uninstallation process.
Steps to uninstall ASUS WinFlash in Windows XP
- Click the Windows Start menu.
- Locate and select the Control Panel menu, then select Add or Remove Programs icon.
- Select the ASUS WinFlash and then click Remove/Uninstall.
- Then click Yes to confirm the ASUS WinFlash uninstallation process.
Steps to uninstall ASUS WinFlash in Windows 95, 98, Me, NT, 2000
- Click the Windows Start menu.
- Locate and select the Control Panel menu, then double-click the Add/Remove Programs icon.
- Select the ASUS WinFlash and then right-click, select Uninstall/Change.
- Then click Yes to confirm the ASUS WinFlash uninstallation process.
Top ASUS WinFlash Alternative Apps for Windows
Isn’t ASUS WinFlash what you were looking for? We prepared a list of similar apps below!
- LockHunter
- PC Optimizer
- Avira Speedup
- Data Recovery
- WinUtilities
LockHunter, PC Optimizer, and Avira Speedup is the strong competitor of ASUS WinFlash. Otherwise, Data Recovery and WinUtilities also quite good as the alternative of this software. There are also other similar apps such as Xpadder, Process Check, and Mail PassView that also need to try if you want to find the best alternative of ASUS WinFlash.
In Conclusion
The ASUS WinFlash for Windows PC is unquestionably the best Cleaning and Tweaking that you can find nowadays. It also is the most reliable when it comes to performance and stability. You can find that out for yourself. That is why a lot of PC users recommend this app.
Get superb and impressive experience using this ASUS WinFlash application developed by Asus. ASUS WinFlash nowadays are already getting better each time.
If you have some questions related to this app, feel free to leave your queries in the comment section. Or you can share with us your experience when using this ASUS WinFlash on your Windows 10 PC. And if you know other people who want to experience ASUS WinFlash for Windows PC, you can share this article to help them. Enjoy using ASUS WinFlash for Windows PC.
Find other interesting articles that will help you how to download LockHunter for Windows 10 PC, install PC Optimizer for Windows 10, Avira Speedup review, or about best Data Recovery alternative apps for Windows 10.
ASUS WinFlash FAQ (Frequently Asked Questions)
Q: What is ASUS WinFlash for PC?
A: For more information about this app, please go to the developer link on the above of this page.
Q: Is ASUS WinFlash free? If not, how much does it price to download this app?
A: Absolutely no cost! You can download this app from official websites for free by this website—any extra details about the license you can found on the owner’s websites.
Q: How do I access the free ASUS WinFlash download for Windows PC?
A: It is easy! Just click the free ASUS WinFlash download button in the above of this page. Clicking the download button will start the installer to download ASUS WinFlash free for a PC/laptop.
Q: Is this ASUS WinFlash will typically run on any Windows?
A: Yes! The ASUS WinFlash for PC will typically work on most recent Windows operating systems, including Windows 10 (64-bit) 64-bit and 32-bit.
Q: What’s the difference between 64-bit and 32-bit versions of ASUS WinFlash?
A: The ASUS WinFlash 64-bit version was specially designed for 64-bit Windows Operating Systems and performed much better on those. The ASUS WinFlash 32-bit version was initially intended for 32-bit Windows Operating Systems, but it can also run on 64-bit Windows Operating Systems.
Q: What’s the importance of downloading the latest version of ASUS WinFlash?
A: We recommend downloading the latest version of ASUS WinFlash because it has the most recent updates, which improves the quality of the application.
Disclaimer
ASUS WinFlash is an application that builds by Asus. All trademarks, product names, company names, and logos mentioned here are their respective owners’ property. This site (autotechint.com) is not affiliated with them directly. All information about applications, programs, or games on this website has been found in open sources on the Internet.
We don’t host or store ASUS WinFlash on our servers. Downloads are done through the Official Site. We are firmly against piracy, and we do not support any sign of piracy. If you think that the application you own the copyrights is listed on our website and want to remove it, please contact us.
We are always compliant with DMCA regulations and respect the application owners. We are happy to work with you. Please find the DMCA / Removal Request page below.
Все способы:
- Подготовка к прошивке
- Способ 1: Системная утилита
- Способ 2: ASUS Ai Suite 3
- Способ 3: USB BIOS FlashBack
- Вопросы и ответы: 2
После обновления BIOS может потребоваться дополнительная настройка, так как все параметры по окончании процедуры становятся заводскими.
Читайте также: Настройка UEFI BIOS на устройствах ASUS
Подготовка к прошивке
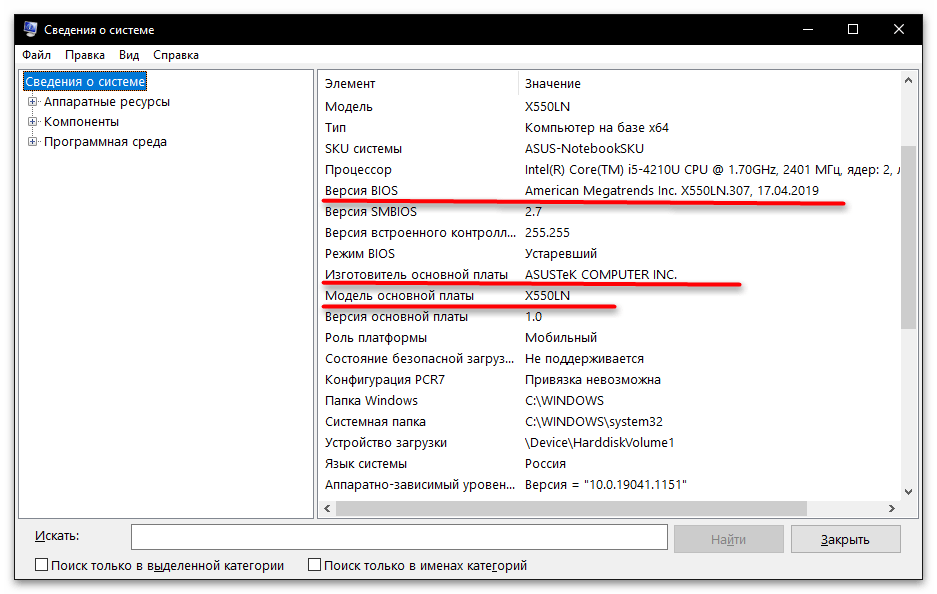
Чтобы обновить BIOS на ASUS, следует выяснить ряд сведений о вашем компьютере. Как правило, вам потребуется: марка производителя, модель материнской платы и актуальность прошивки. Эти данные можно получить в окне «Сведения о системе». Информацию о вашем компьютере стоит узнать в первую очередь, ведь она потребуется для установки прошивки, в противном же случае вы рискуете нарушить работоспособность материнской платы.
Подробнее: Как определить модель материнской платы в Windows
Актуальная версия прошивки находится на сайте изготовителя материнских плат. Чтобы её скачать:
Перейти на официальный сайт ASUS
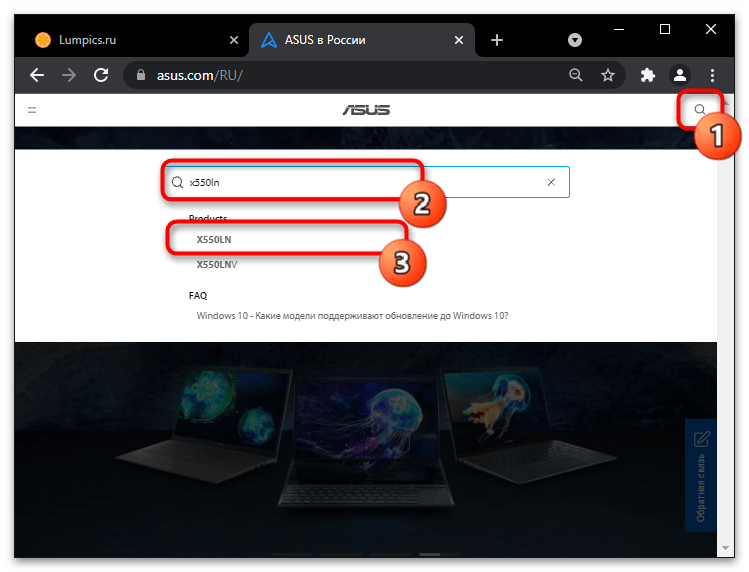
- Откройте официальный сайт фирмы АСУС по указанной выше ссылке, щёлкните на иконку лупы и в появившемся текстовом поле наберите запрос с наименованием модели вашей системной платы, а из поискового списка выберите подходящий продукт.
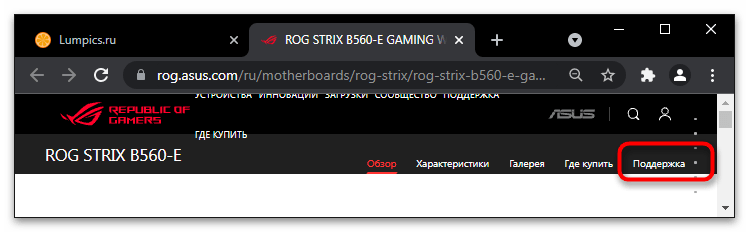
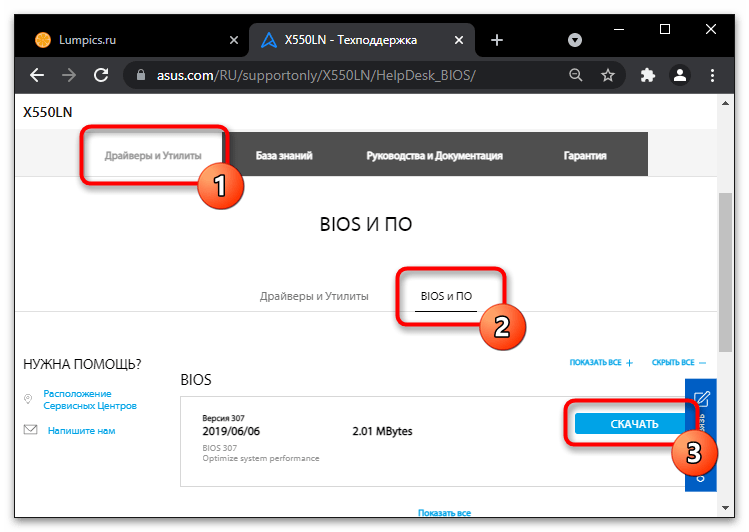
- На странице товара откройте вкладку поддержки, кликнув по соответствующему компоненту.
- Далее в панели «Драйверы и Утилиты» выберите раздел «BIOS и ПО». Ниже представится список имеющихся обновлений. Щёлкните по кнопке «Скачать» наиболее актуальной версии BIOS под вашу материнскую плату – самая верхняя строчка.
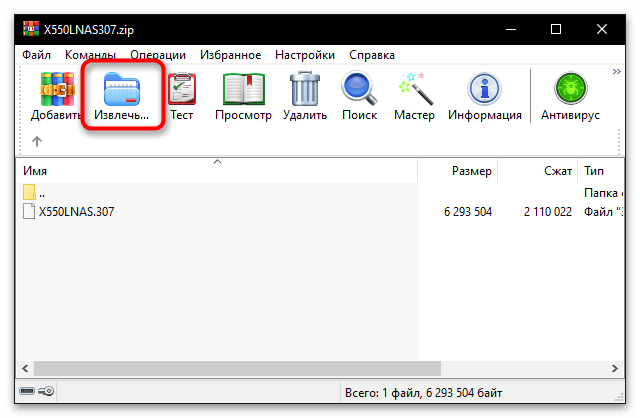
- Загруженный ZIP-файл извлеките в любое удобное место на компьютере или flash-накопителе. Для этого подойдёт как стандартный ZIP-распаковщик Windows 10, так и архиватор WinRAR.
- Теперь подготовьте flash-накопитель, на котором должно быть более 4 гигабайт памяти и файловая система FAT32. На всякий случай проведите форматирование, чтобы исключить помехи, которые могут возникнуть из-за лишних файлов, в том числе скрытых.
Способ 1: Системная утилита
Прошивку БИОС можно обновить стандартным способом, предусмотренным во всех моделях материнских плат ASUS. Из-под базовой оболочки вашего компьютера доступна утилита «ASUS Easy Flash», благодаря которой удастся запустить файл обновления. Такой метод подойдёт не только для стационарных ПК с платами АСУС, но и для ноутбуков этой фирмы с родственными запчастями.
- Чтобы обновиться при помощи «ASUS Easy Flash», запустите своё устройство в режиме работы BIOS.
Подробнее: Входим в BIOS на ноутбуке или компьютере ASUS
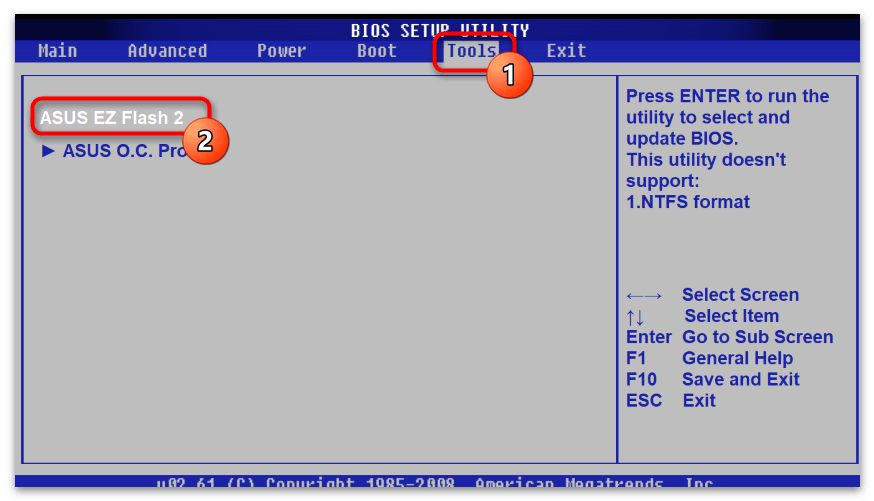
- Расположение и наименование утилиты отличается в зависимости от модели материнской платы. Она может быть как на вкладке «Advanced», так и в «Tools», называясь при этом «ASUS Easy Flash», «ASUS EZ Flash 2» или «ASUS EZ Flash 3». Откройте данную утилиту соответственно с вашим типом системы.
- В диалоговом окне «Save Setup Values» сохраните настройки конфигурации системы, чтобы в случае сбоя компьютер можно было легко восстановить.
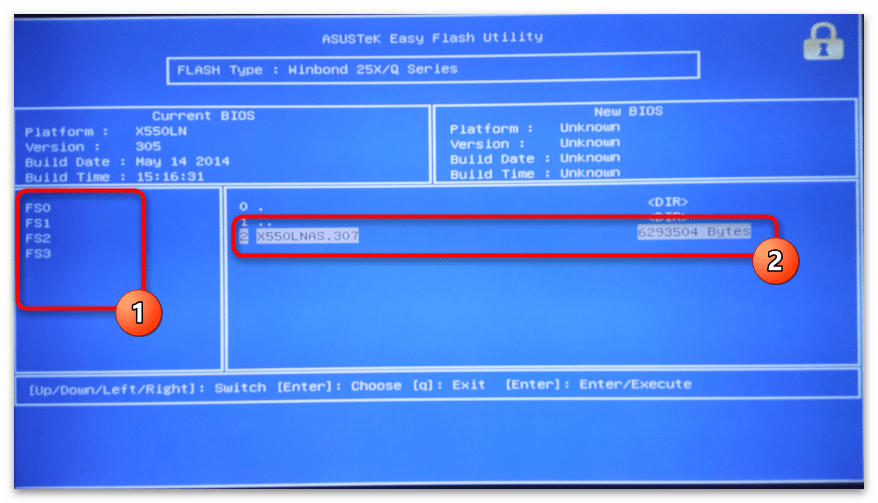
- Слева будет список подключенных информационных носителей и разделов жёсткого диска. Вам нужно выбрать тот, на котором находится скачанная прошивка BIOS.
- В правой части отображается файловая структура: здесь нужно методом перебора найти директорию, куда распаковывался файл, и запустить его нажатием клавиши «Enter».
- Подтвердите своё намерение обновить BIOS.
- Обязательно дождитесь окончания установки обновления.
- Теперь проверьте информацию о версии BIOS — сведения об обновлении можно посмотреть на вкладке «Main» BIOS или даже в Windows, запустив встроенное приложение «Сведения о системе».
Внимание: на этом этапе ни в коем случае нельзя выключать компьютер, иначе прошивка BIOS удалится и устройство запустить не удастся!


Способ 2: ASUS Ai Suite 3
ASUS Ai Suite поможет обновить BIOS или UEFI прямо из Windows. Вам не придётся взаимодействовать с системным интерфейсом напрямую, весь процесс выполняется программно. Стоит отметить: этот способ подходит только для современных видов материнских плат. На компьютерах со старыми версиями микросхем утилита попросту не запустится.
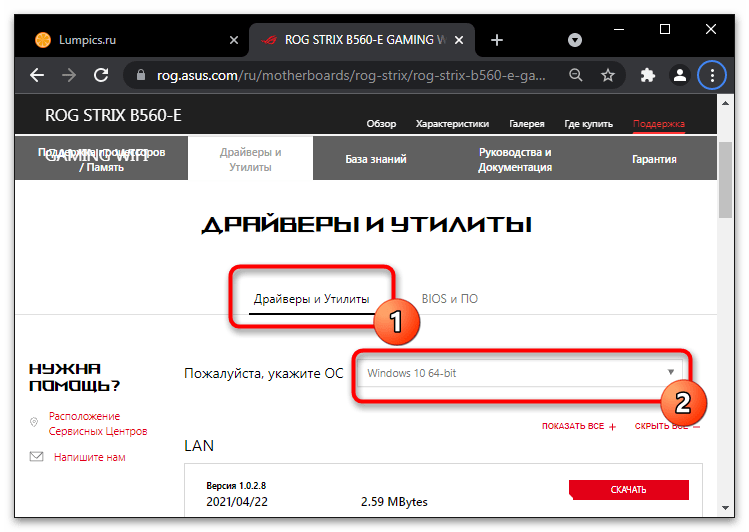
- На сайте производителя на вкладке поддержки вашего устройства перейдите в «Драйверы и Утилиты» и в поле выбора операционной системы укажите свою версию ОС.
- В появившемся списке утилит скачайте «ASUS Ai Suite 3» и распакуйте архив в любую удобную папку.
- Откройте извлечённый каталог программы и запустите файл «AsusSetup.exe».
- В мастере установки нажмите кнопку «Install», при этом у вас должны быть отмечены галочками все дополнения.
- После завершения установки потребуется перезагрузить компьютер, для этого можно щёлкнуть «Yes».
- Запустите программу и в правом верхнем углу нажмите элемент вывода списка приложений.
- Выберите утилиту «EZ Update».
- Теперь в поле ввода укажите путь к файлу BIOS для вашей материнской платы, который скачали с официального сайта производителя, и кликните по кнопке «BIOS Update».
- Далее потребуется нажать «Finish».
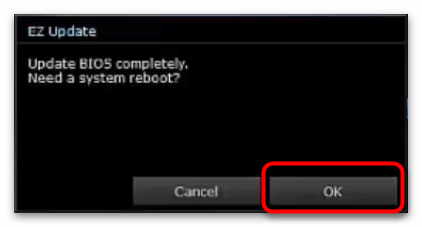
- Кнопкой «OK» подтвердите намерение установить новую прошивку.
- Только когда увидите запрос на ребут устройства, можно нажать «OK» для перезапуска.


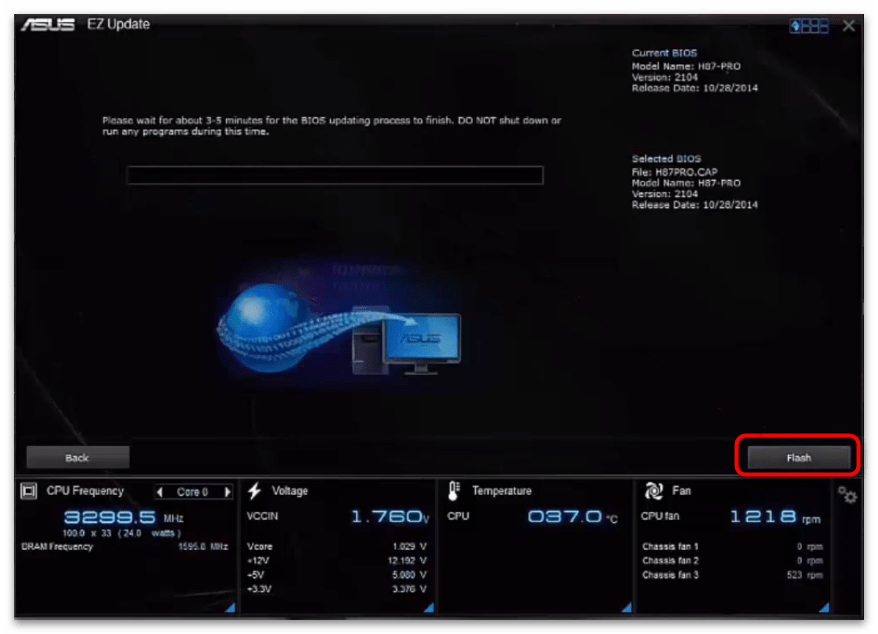
Во время начавшейся установки ни в коем случае не перезагружайте компьютер и не закрывайте программу — дождитесь, пока полоса загрузки заполнится до конца!
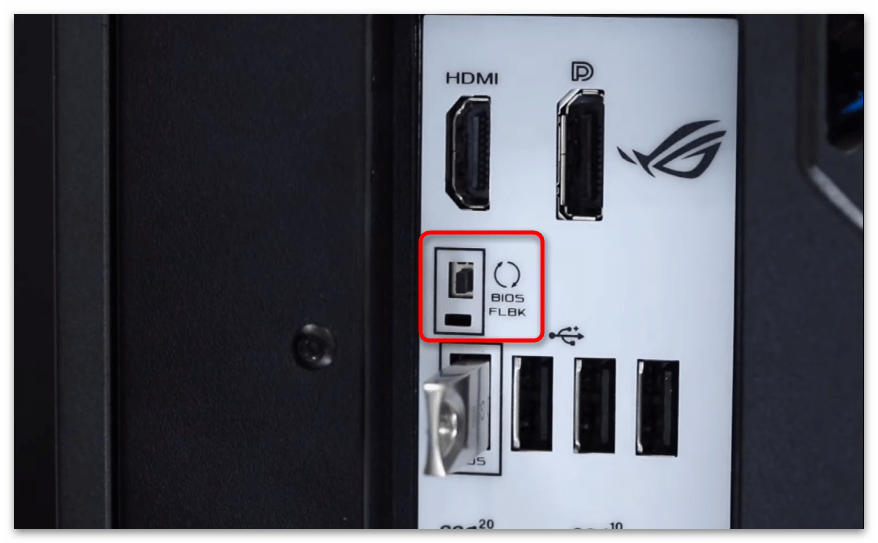
Способ 3: USB BIOS FlashBack
На современных материнских платах ASUS предусмотрен автоматизированный процесс прошивки БИОС. При помощи внешнего носителя через порт «USB BIOS FlashBack» (чуть ниже показано, как он выглядит) можно обновиться, даже не запуская компьютер. Данный способ ещё актуален, когда базовое программное обеспечение вышло из строя вследствие неправильной эксплуатации или перепрошивки, для отката к прежней версии.
- На сайте изготовителя ASUS проверьте, доступна ли подобная опция на вашем компьютере. Для этого в разделе характеристик продукта клавишами «CTRL» + «F» выполните поиск по фразе «bios flashback».
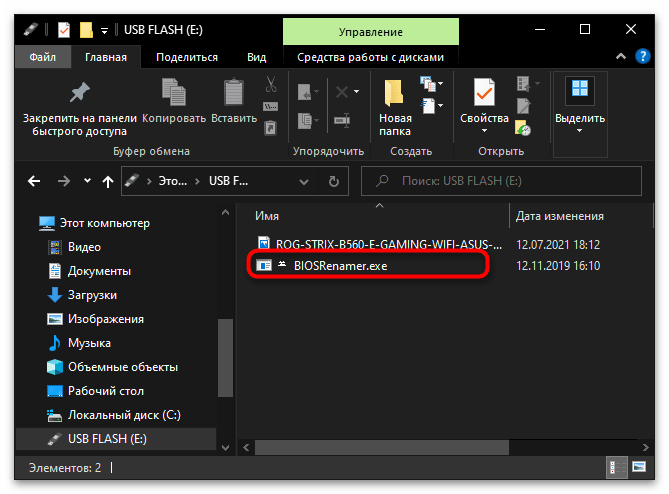
- Распакуйте скачанный ZIP-архив с прошивкой BIOS для вашей материнской платы на флешку и запустите «BIOSRenamer.exe».
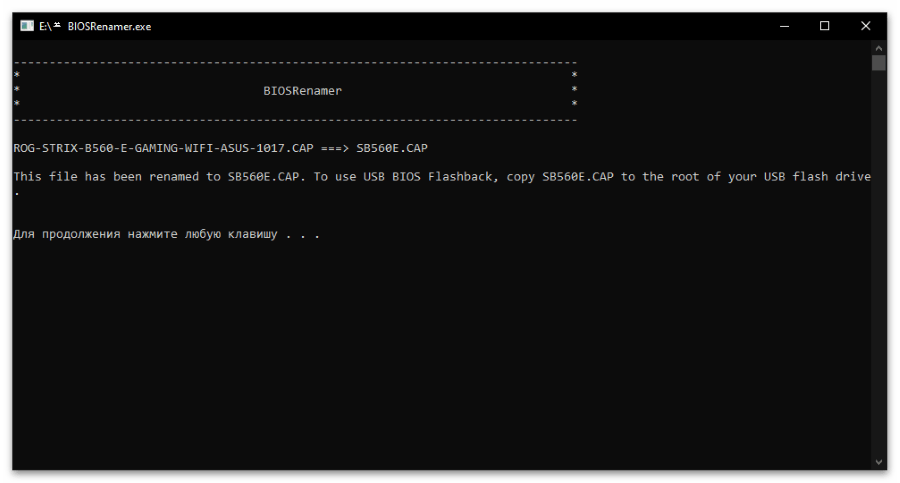
- Подождите, пока программа переименует файл прошивки должным образом, и закройте открывшуюся «Командную строку».
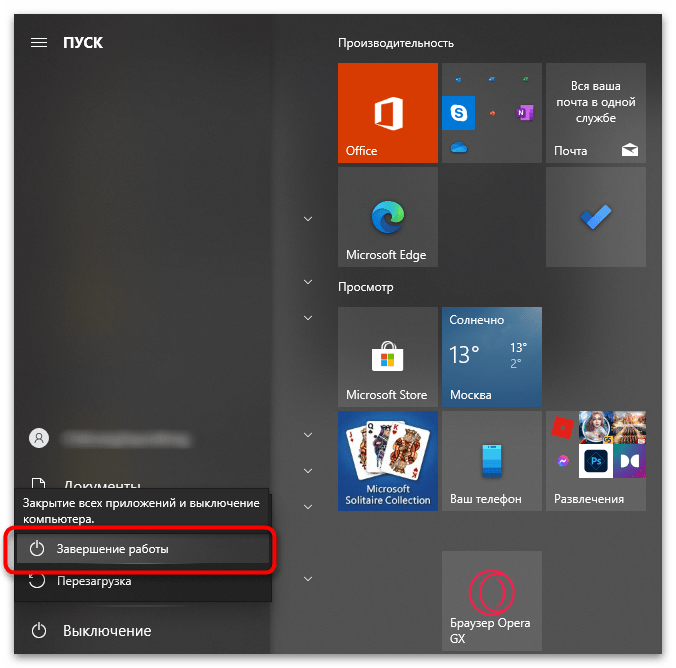
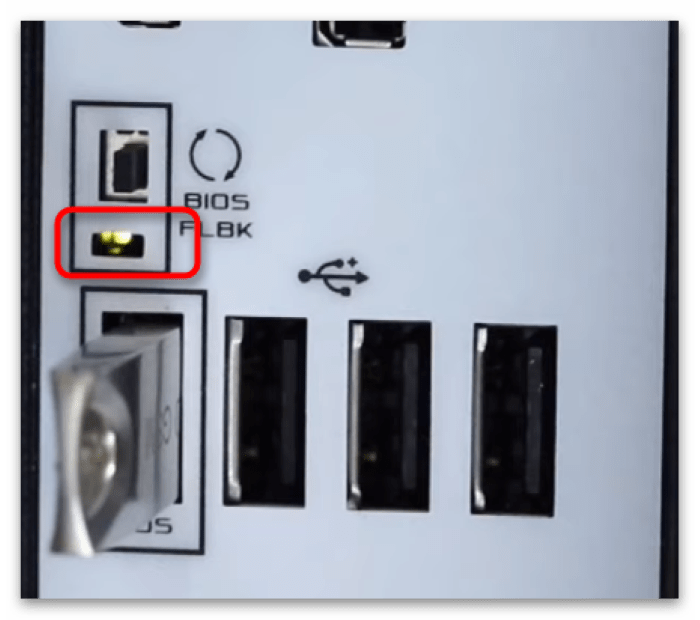
- Теперь выключите компьютер и вставьте flash-накопитель в разъем USB BIOS FlashBack.
- На внешнем корпусе найдите кнопку, подписанную как «BIOS FlashBack», и нажмите её.
- Пока мигает индикатор, не отключайте компьютер от электропитания, потому что обновление удаляет прежнюю прошивку и устанавливает новую. В случае прерывания данной операции компьютер перестанет запускаться. Решается это повторным запуском функции «BIOS FlashBack».

Наша группа в TelegramПолезные советы и помощь