
Can you upgrade Windows Server 2016 to 2022? Of course, you can. Then, how to do the update operation on your PC? Continue reading and this post on MiniTool covers two options for Server 2016 to 2022 upgrade – an in-place upgrade and a clean install of Windows Server 2022.
Should You Upgrade Server 2016 to 2022
Windows Server plays a crucial role in many organizations due to its robust security features. Always keeping the Server operating system up to date is vital to performance and safety. To be specific, running the new version of Windows Server can greatly protect against modern security threats, you can use new features and get enhanced performance, etc.
If you are running Windows Server 2016, it is a good option to upgrade Windows Server 2016 to 2022/2019. According to Microsoft, Windows Server 2016 end of life is Jan 12, 2027, Server 2019 will end on Jan 9, 2029, and Server 2022 will last until Oct 14, 2031.
When comparing Windows Server 2019 and Server 2022, the latter brings more powerful features – TPM (Trusted Platform Module) 2.0, Virtualization-based security (VBS), Direct Memory Access (DMA) protection, UEFI secure boot, Azure hybrid capabilities, etc. You can choose to upgrade Windows Server 2016 to 2022 to enjoy these features.
Tips:
If you wonder about more details about Windows Server 2016, 2019, and 2022, refer to our related post — Windows Server 2022 vs 2019 vs 2016 – Which One to Choose.
Next, let’s explore some things to do before an update and how to do the upgrade task.
Preparations Before Windows Server 2016 to 2022 Upgrade
Before taking measures to perform the server upgrade, you should pay attention to some things for a successful update.
Check System Requirements
It is necessary to evaluate the compatibility and know if the computer hardware meets Windows Server 2022’s system requirements.
These minimum requirements include:
- CPU: 1.4 GHz 64-bit processor that is compatible with x64 instruction set and supports NX, DEP, CMPXCHG16b, LAHF/SAHF, PrefetchW, and Second Level Address Translation (EPT or NPT)
- RAM: 512 MB for Server Core or 2 GB for Server with Desktop Experience
- Storage: 32GB of space
- Network: An Ethernet adapter that can achieve a throughput of at least 1 gigabit per second; compliant with the PCI Express architecture specification
For certain features, some requirements are necessary:
- Trusted Platform Module (TPM)
- UEFI 2.3.1c-based system and firmware that supports secure boot
- Super VGA (1024 x 768) or higher-resolution
You can confirm these specifications by visiting the official documentation from Microsoft.
Back up Your Data
Data backup is a task of primary importance. Before you upgrade Windows Server 2016 to 2022, make sure you create a backup for your crucial files and folders. This is primarily because data loss is a significant risk during any Windows upgrade. Besides, if you do the upgrade task via a clean install, files on the Desktop will be also deleted, and having a backup is necessary.
What’s more, you can also back up Windows configurations to avoid potential system instability, which can easily restore your system to its previous state when any issues arise during the upgrade process.
To ensure the safety of your critical information, we recommend using a reliable solution for data backup. MiniTool ShadowMaker, a piece of professional and comprehensive backup software, plays a great role in file backup, folder backup, system backup, disk backup, and partition backup.
Moreover, if you want to regularly back up your files or create a backup for the only added or changed files, this backup program also satisfies your needs. In addition, it supports moving Windows to another drive and cloning HDD to SSD.
Next, let’s explore how to back up your significant files before you upgrade Windows Server 2016 to 2022.
Step 1: Click the button below to download MiniTool ShadowMaker Trial Edition and use the .exe file to install it on your computer.
MiniTool ShadowMaker TrialClick to Download100%Clean & Safe
Step 2: Connect a USB drive or external drive to your machine and then launch MiniTool ShadowMaker, and click Keep Trial to continue.
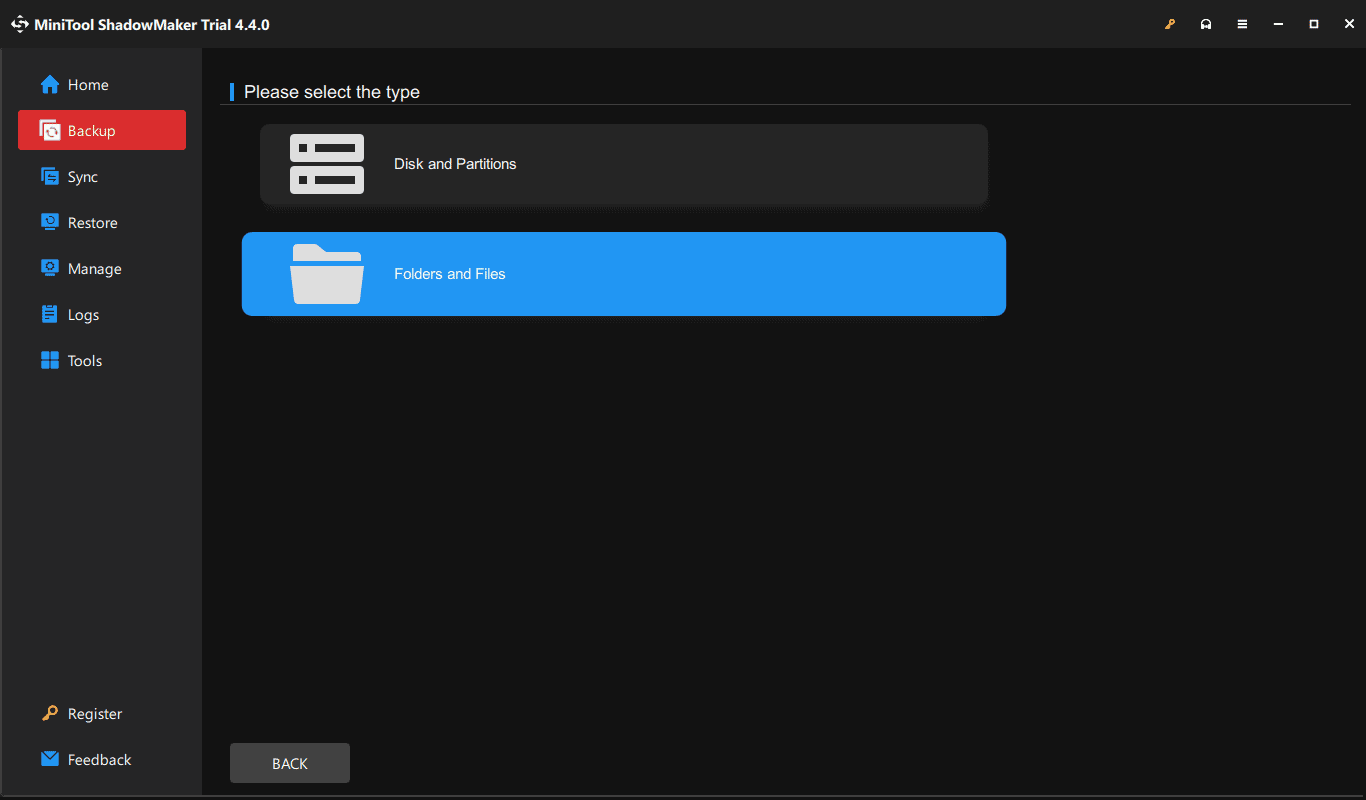
Step 3: Click Backup in the left pane, tap on SOURCE, click Folders and Files, then go to Computer to find and check the items you want to back up and click OK.
Step 4: Choose a drive to save the backup under DESTINATION.
Step 5: At last, click Back Up Now to begin data backup. Based on data size, the backup time is different.
Other Things to Notice Before Proceed
- Make sure you have a valid product key and activation method. The method varies depending on the distribution channel you got Windows Server media from (OEM, Retail, Commercial Licensing program)
- Check any third-party application vendor support requirements
- Review Microsoft server application compatibility
In the next moment, it is time to upgrade Server 2016 to 2022. To install Windows Server 2022 on your Windows 2016 computer, you can try two options: an in-place upgrade and a clean install. Follow the step-by-step guide now.
As far as the upgrade is concerned, the option that comes to your mind may be an in-place upgrade that allows you to go from an older OS to a newer one while keeping the server roles, settings, and data intact.
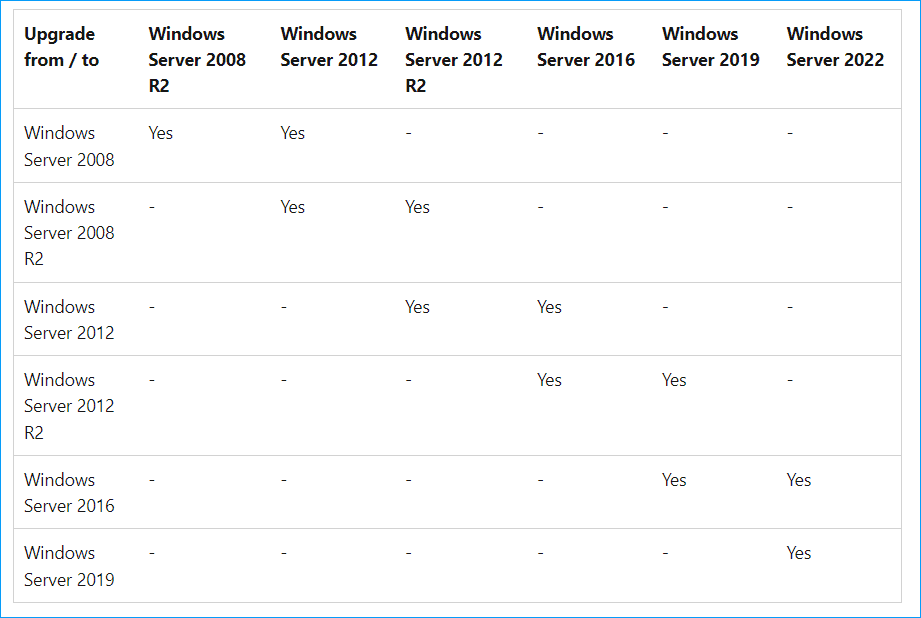
For Windows Server, not all the Server operating systems support an in-place upgrade. When checking for the following upgrade path from Microsoft, you will find it is available to run an in-place upgrade from Windows Server 2016 to 2019 and 2022.
So, how can you run Server 2016 to 2022 in-place upgrade? Start the upgrade process by following the step-by-step guide:
Step 1: Download Windows Server 2022 from Microsoft
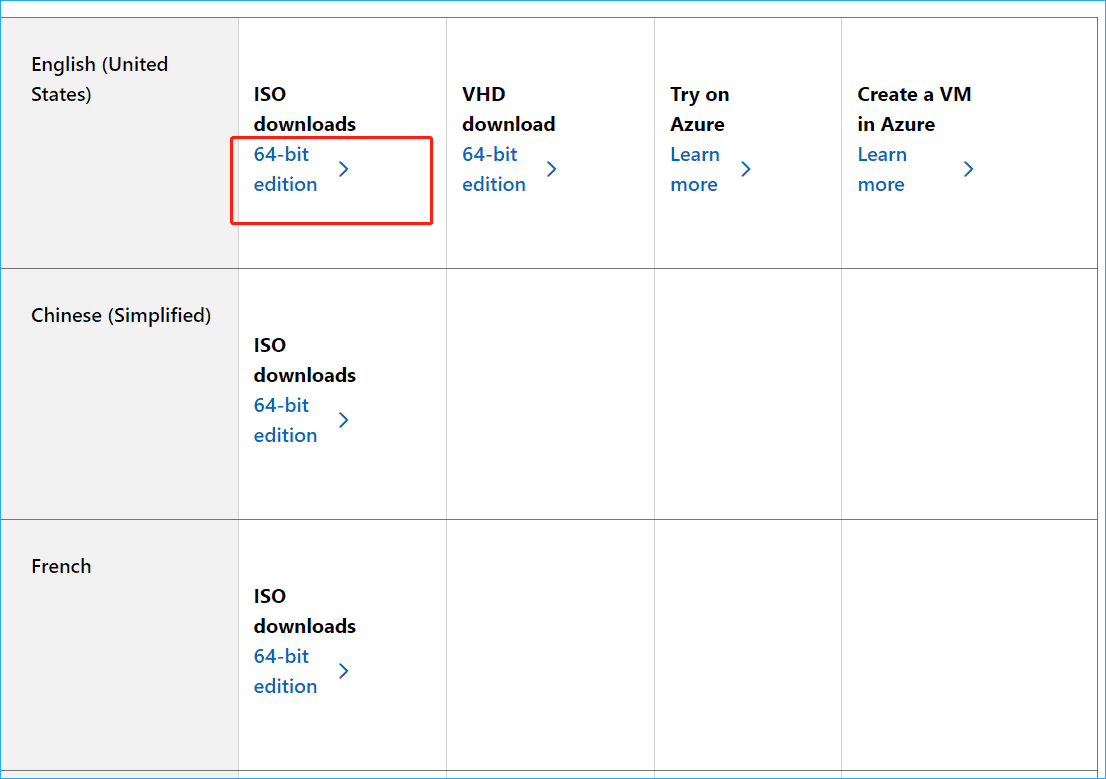
- In a web browser, access this link: https://www.microsoft.com/en-us/evalcenter/download-windows-server-2022.
- Then, click the proper link as per your language to begin downloading Server 2022 ISO. This can take some time if your download speed is slow.
Tips:
In addition to getting ISO from the Microsoft Evaluation Center, some other options are also offered in this guide — Download Windows Server 2022 ISO (3 Options) & Install Server.
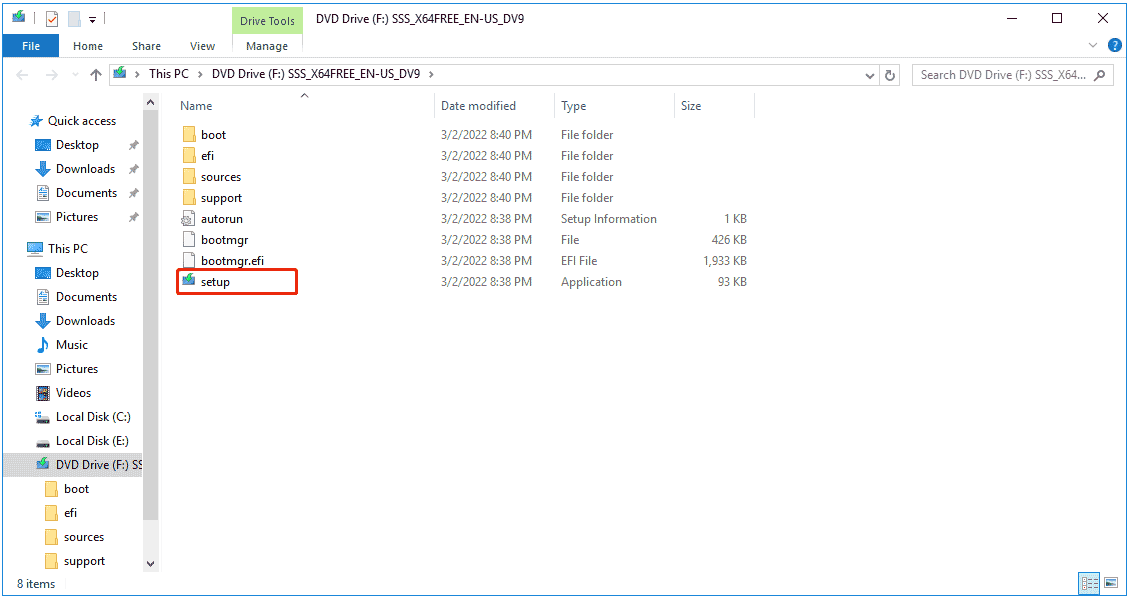
Step 2: After getting the Windows Server 2022 ISO file, right-click on this ISO and choose Mount. Then, you get a virtual drive in File Explorer that contains information for Server 2016 to 2022 in-place upgrade.
Step 3: Open this drive and double-click on the setup file. If you are prompted to allow setup to make changes to your device by the User Account Control, click Yes to continue.
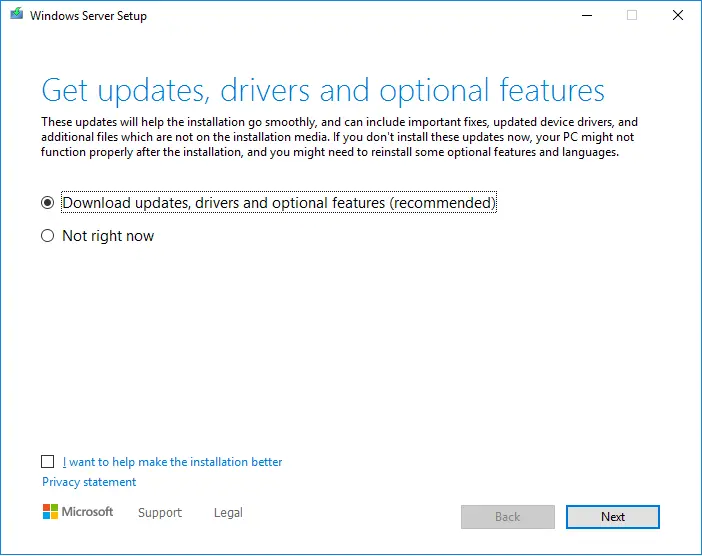
Step 4: When Windows Server Setup runs, check the box of I want to help make the installation better and click Next.
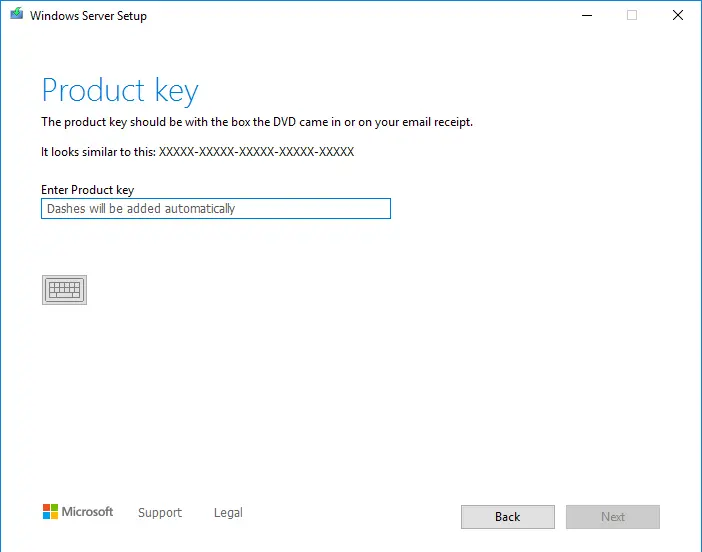
Step 5: If prompted, type the product key of Windows Server 2022 into the text box. If you don’t have one now, click I don’t have a product key to go on. If not prompted, skip this step.
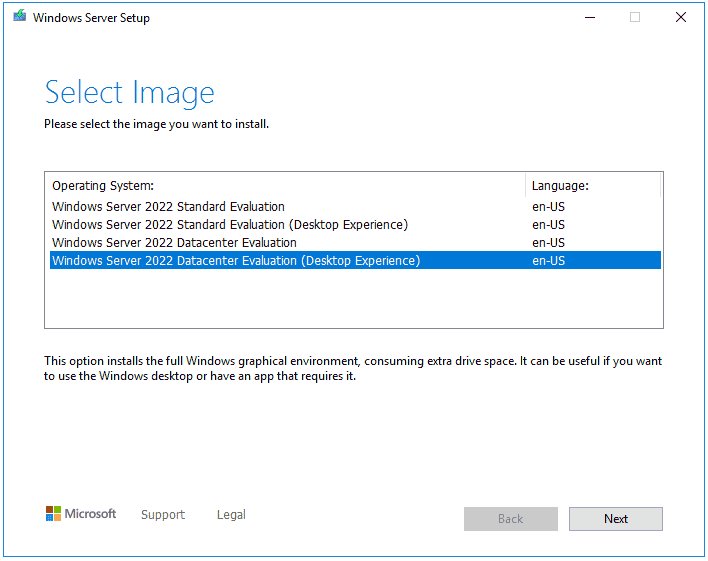
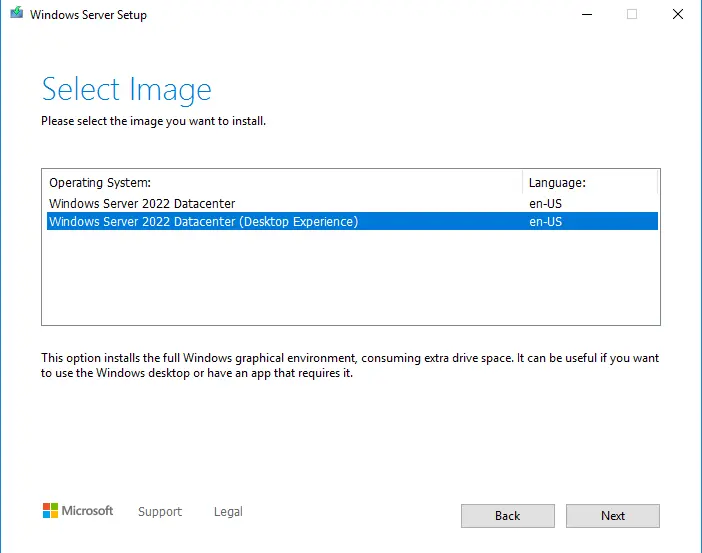
Step 6: On the Select Image interface, choose an edition that you want to install and click Next.
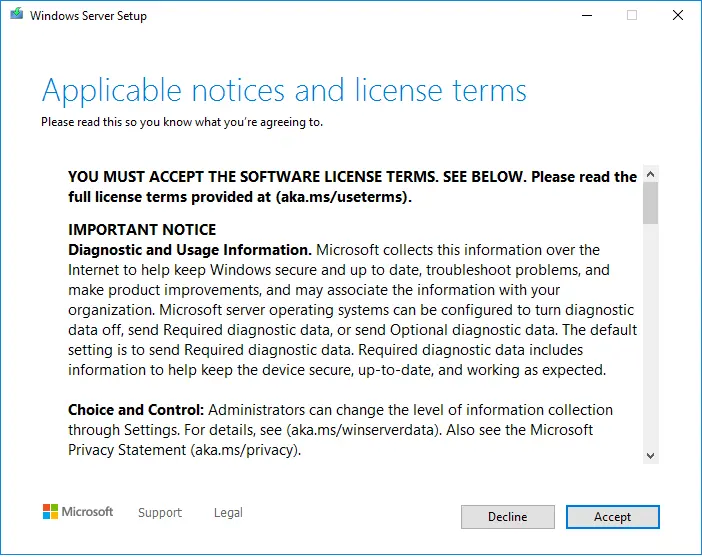
Step 7: After accepting applicable notices and license terms, decide what to retain on your computer. We recommend ticking Keep files, settings, and apps to preserve your data.
Tips:
Choosing Nothing will delete all your files, settings, and apps. If you need to wipe the entire operating system and install Windows Server 2022, this option is your choice.
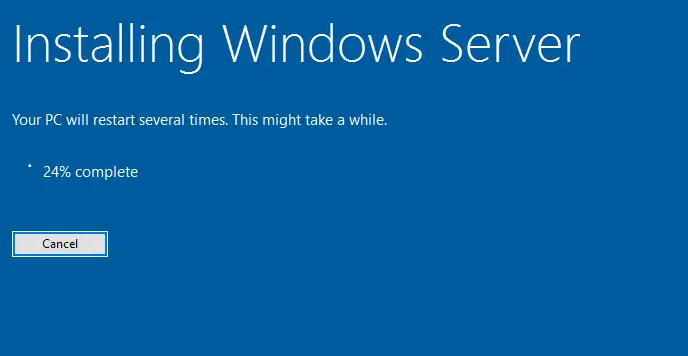
Step 8: Windows Setup will start getting updates and analyzing your device. Then, it shows you the Read to install screen. Click the Install button to begin the upgrade process.
After completing Server 2016 to 2022 in-place upgrade, log in to Server 2022 and check if applications and services are running as expected. Besides, you can run PowerShell and execute the command – Get-ComputerInfo -Property WindowsProductName to verify that the edition matches the media and values you selected during the setup.
Upgrade to Windows Server 2022 via Clean Install
Besides performing an in-place upgrade, you can choose to upgrade Windows Server 2016 to 2022 via a clean install. This option erases your certain files, so don’t forget to back up them, especially the files saved on the Desktop. For file backup, run MiniTool ShadowMaker and move to the second part to view details.
MiniTool ShadowMaker TrialClick to Download100%Clean & Safe
Then, install Windows Server 2022 on your Server 2016. The steps are not complicated if you follow the instructions below. To do this:
Step 1: Also, prepare an ISO image file of Windows Server 2022 (Refer to Step 1 in the in-place upgrade part).
Step 2: Create a Bootable Windows Server USB drive.
- Download Rufus, open it, connect your USB flash drive to the Server, and choose this USB drive.
- Click SELECT to choose the ISO you have downloaded, configure some options, and click the START button.
- Customize Windows installation as per your needs and click OK to begin burning Windows Server 2022 to the USB drive.
Step 3: Shut down your computer. Reboot it, press a key like Del, F2, etc. (it varies from computer brand) to access the BIOS menu, and change the boot order to start up the system from the bootable USB drive.
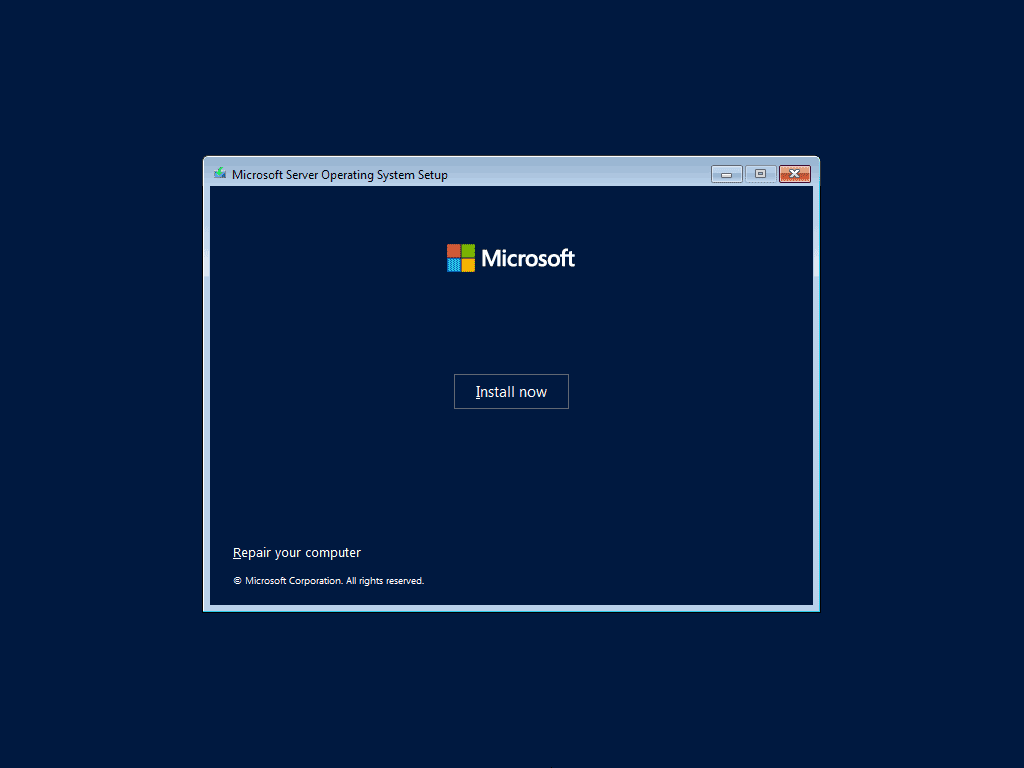
Step 4: After opening Microsoft Server Operating System Setup, enter your language and other preferences, then click Next.
Step 5: Tap on the Install now button to continue.
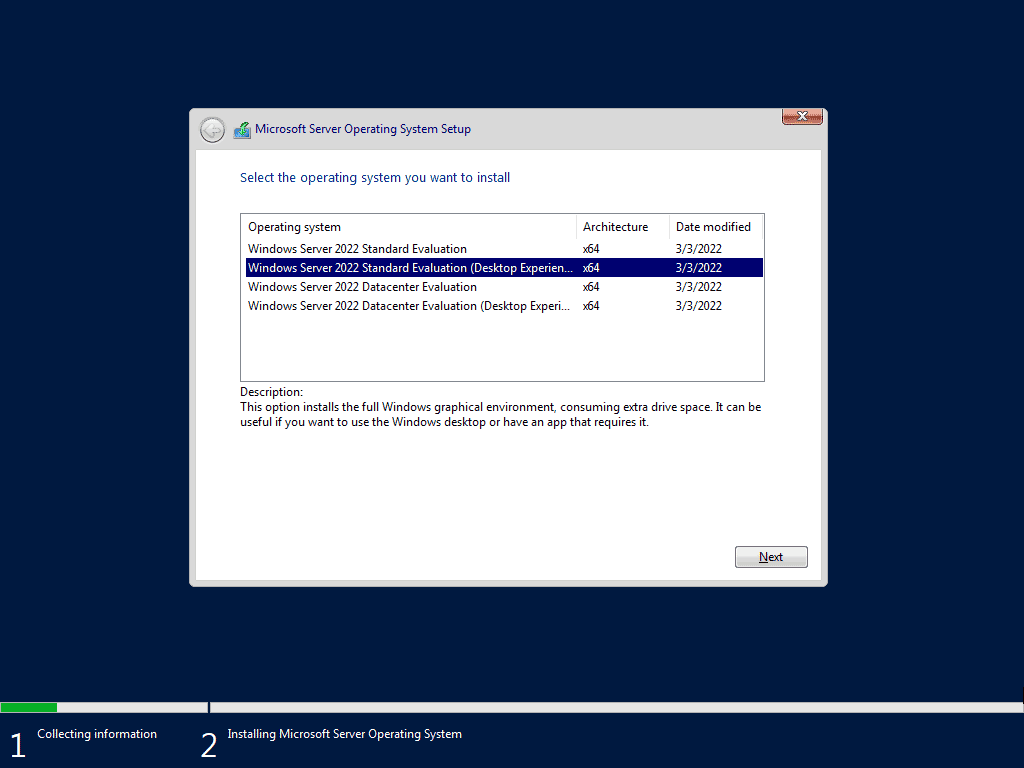
Step 6: Choose the operating system you want to install – Windows Server 2022 Standard Evaluation, Standard Evaluation (Desktop Experience), DataCenter Evaluation and DataCenter Evaluation (Desktop Experience).
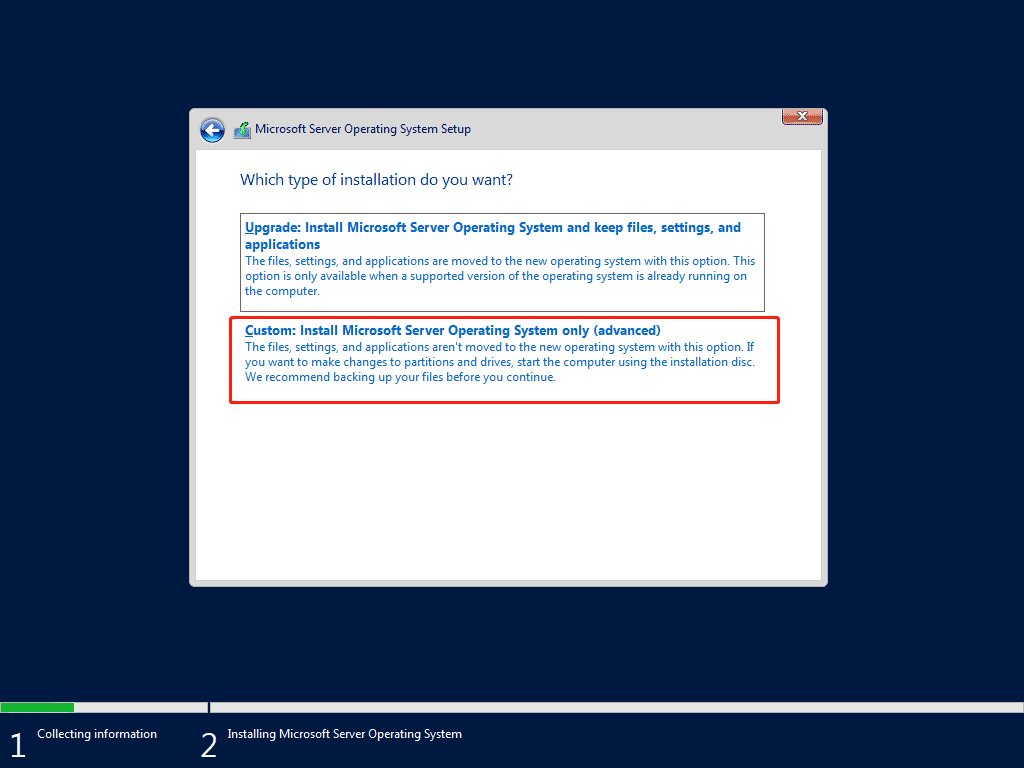
Step 7: Accept applicable notice and license terms and choose the second option to install the Server OS only.
Step 8: Decide which drive to install the operating system on. Then, start the installation process.
Once done, configure Windows Server 2022 as per your preferences. If you want to know details on how to set up and configure it, refer to our previous post – How to Install, Set up, and Configure Windows Server 2022.
What to Do After Windows Server 2016 Upgrade
Currently, you have upgraded your system to Windows Server 2022 from Server 2016 via an in-place upgrade or clean install. After getting the new system, you should take some measures to keep the OS more reliable and secure.
- Install the latest Windows updates for Server 2022: access Settings by pressing Win + I, navigate to Update & Security > Windows Update, check for available updates, and download & install them.
- Update your apps to the latest version
- Update device drivers in Device Manager
- Back up your PC regularly/automatically using MiniTool ShadowMaker
Wrap Things up
It is necessary to upgrade Windows Server 2016 to 2022 to ensure reliability, security, and improved system performance. You can perform a Server 2016 to 2022 in-place upgrade or install Windows Server 2022 from USB. Try one way depending on your needs.
Before you proceed, don’t forget to create a backup for your important files using MiniTool ShadowMaker. Or else, nothing is more frustrating than data loss. You can’t be too careful.
MiniTool ShadowMaker TrialClick to Download100%Clean & Safe
Upgrade Windows Server 2016 to 2022 FAQ
Can I upgrade Windows Server 2016 to 2022?
Of course, you can. The self-upgrading from Server 2016 to 2022 is possible. Besides, you can also use an ISO file, burn it to a USB drive, and perform an installation.
How do I upgrade Windows Server 2016 to the latest build?
An in-place upgrade (Server 2016 to 2019/2022) and a clean install are for you to choose. The step-by-step guide in this post helps you a lot.
This article will show you how to upgrade Server 2016 to 2022. If you wish to keep the same hardware and all your server roles you have already set up without demolishing the server, you will need to do an in-place upgrade. In-place upgrades allow you to go from an older operating system to a new operating system while keeping server roles, settings, and data intact.
Table of Contents
Before you Start in-Place Upgrade
Before you begin the Windows Server 2016 upgrade, we recommend that you collect some information from your system for troubleshooting and diagnostic purposes. This information is intended for use only if the upgrade fails. You should make sure that you saved the information somewhere that you can access it off of your device.
Before starting to upgrade, have an Overview of Windows Server upgrades.
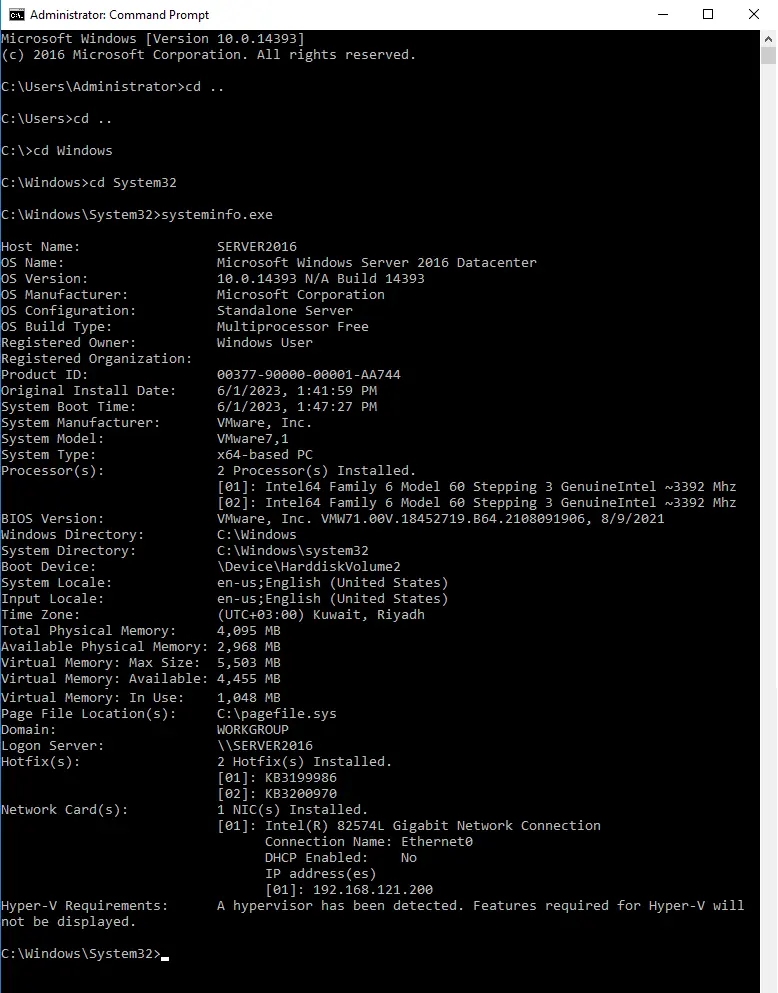
How to Collect System Info
Run a command prompt with admin rights, go to C:\Windows\system32, and then enter systeminfo.exe. Please store the resulting system information somewhere off of your device.
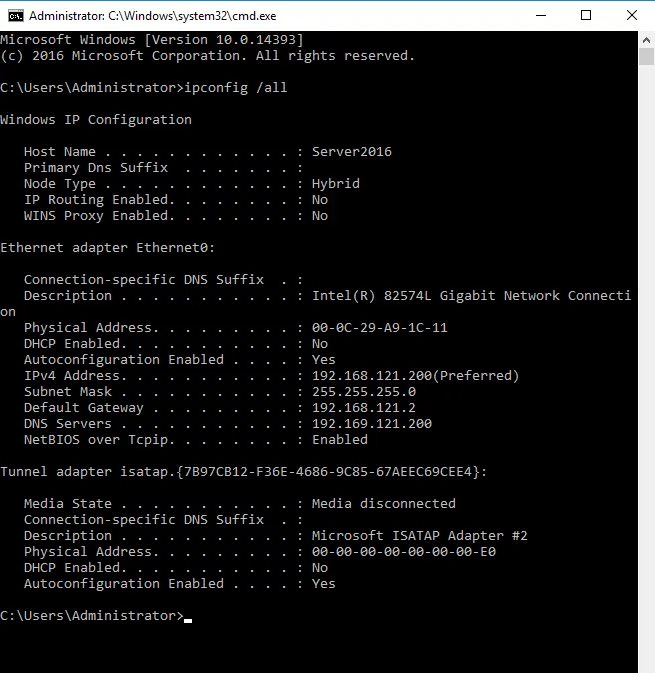
Enter ipconfig /all into the CMD let, and then save the resulting configuration information in the same place as above.
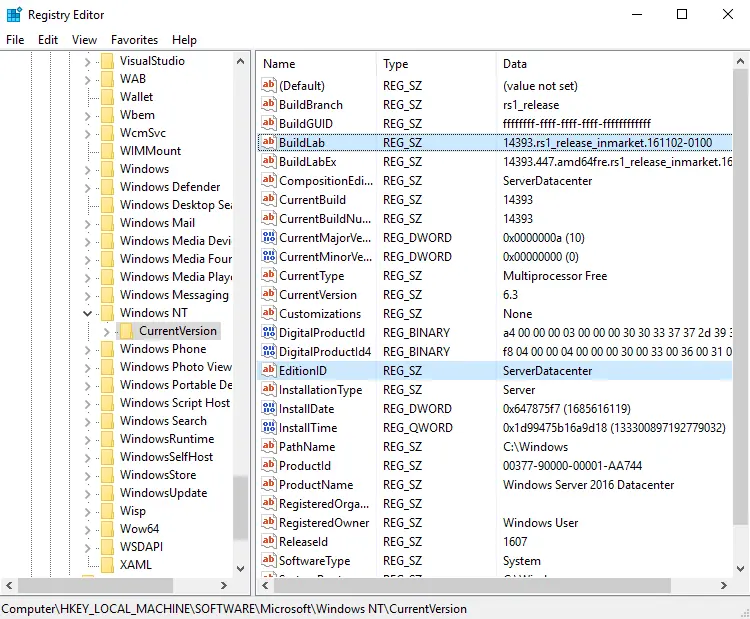
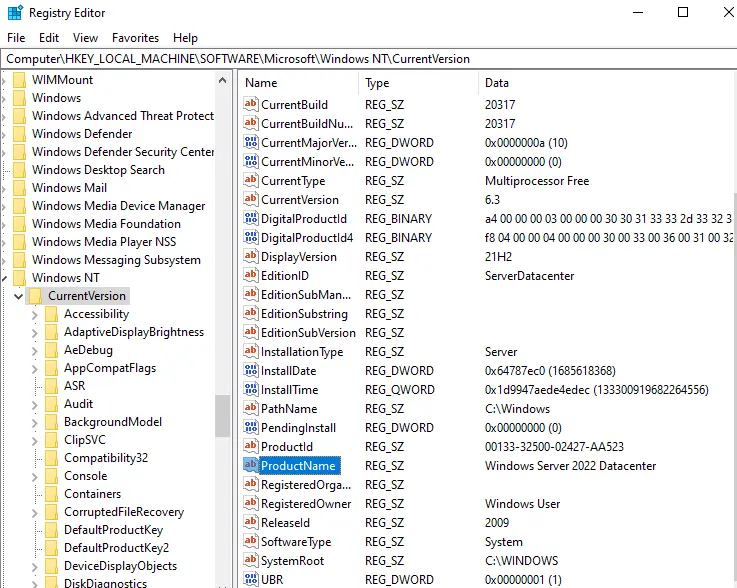
Verify Server Build Version
Open the Registry Editor and then go to the HKEY_LOCAL_MACHINE\SOFTWARE\Microsoft\Windows NT\CurrentVersion location. Save the Windows Server BuildLabEx (version) and EditionID (edition).
Once you have stored all of your Windows Server related information,. Now you need to back up your operating system. Please make sure that no virtual machines running during the upgrade.
To Perform the Upgrade Server 2016 to 2022
Insert the Windows Server 2022 Setup media, and then run setup.exe.
On the Windows Server Setup page, tick the box “Get updates, drivers, and optional features (recommended), and then choose next.
It depends on the distribution channel that you received server media from (Volume License, OEM, etc.) and the license for your server in 2022. You need to enter a licensing key to continue.
Choose the Windows Server 2022 edition you wish to upgrade, and then choose next.
Accept the terms of your licensing agreement.
Tick the box “Keep personal files and apps” to choose to do an in-place upgrade, and select next.

Once the server setup analyzes your device, it will induce you to proceed with the upgrade by selecting the Install button.

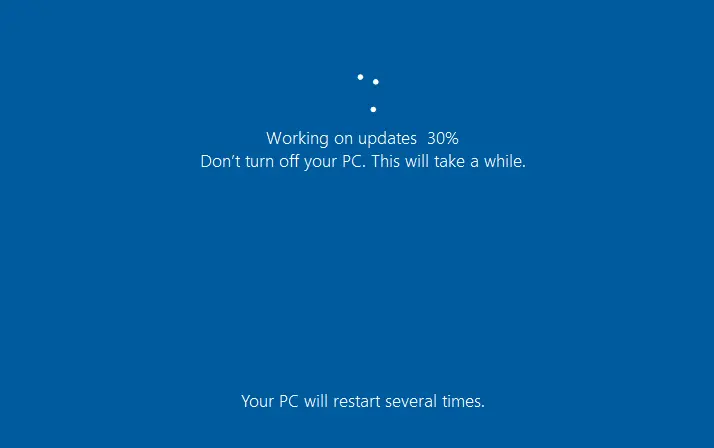
The in-place upgrade begins and shows you the Upgrading Windows screen with its progress. During the server upgrade process, the server will restart.
Working on updates
Verify Server Upgrade
Once your upgrade is done, you need to make sure the upgrade to Windows Server 2022 was successful.
To Make Sure Server Upgrade was Successful
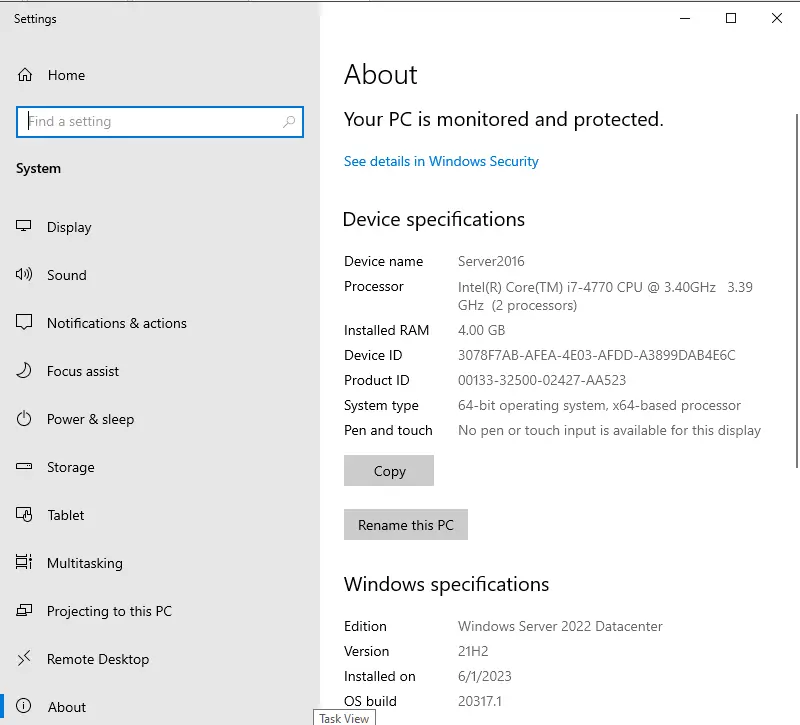
Open the server registry editor, go to HKEY_LOCAL_MACHINE\SOFTWARE\Microsoft\Windows NT\CurrentVersion, and view the ProductName. You will see the edition of Windows Server 2022, for example, Windows Server 2022 Datacenter.
Now you need to make sure all of your apps are running and your users connections to the applications are successful.
Refer to this article to get more information.
Jamilhttp://jamiltech.com
A Professional Technology Blog Writer | An energetic professional with more than 20+ years of rich experience in Technology, Planning, Designing, Installation, and Networking.
It’s a significant step to upgrade Windows Server 2016 to 2022 to ensure your organization’s IT infrastructure remains up-to-date, secure, and capable of meeting evolving business needs. Windows Server 2022 brings a host of new features, improvements, and enhanced security measures that can benefit your environment.
In this article, we will guide you through the step-by-step upgrade process, helping you seamlessly transition from your existing Windows Server 2016 environment to the latest Windows Server 2022. Whether you’re running critical workloads, managing virtualized servers, or simply looking to take advantage of the latest capabilities, this comprehensive guide will provide the insights and instructions you need to successfully upgrade your Windows Server infrastructure.
Let’s embark on this journey of upgrading to Windows Server 2022, unlocking its full potential for your organization’s IT operations.
Table of Contents
Preparing for the Upgrade
Before you begin the upgrade process from Windows Server 2016 to Windows Server 2022, it’s crucial to undertake thorough preparations to ensure a smooth transition. Here are the essential steps to get you started:
Backup Critical Data and Configurations
- Prioritize the backup of critical data, configurations, and settings from your existing Windows Server 2016 environment. This includes files, databases, user profiles, and any other essential information.
- Utilize backup and disaster recovery solutions to create reliable and up-to-date backups. Verify the integrity of these backups to ensure they can be restored if needed during or after the upgrade.
Review Hardware and Software Requirements
- Carefully assess your existing server hardware to ensure it meets the requirements for Windows Server 2022. Pay attention to factors such as CPU, RAM, disk space, and network adapters. Windows Server 2022 may have different hardware requirements than Windows Server 2016.
- Verify the compatibility of your software applications and workloads with Windows Server 2022. Some older applications may require updates or adjustments to function correctly on the new platform.
Check for Hardware Compatibility
- Consult the Hardware Compatibility List (HCL) provided by Microsoft to confirm that your server hardware is certified and compatible with Windows Server 2022. This ensures that your hardware is recognized and supported by the new operating system.
Plan for Licensing and Activation
- Review your existing Windows Server 2016 licensing and understand how it applies to Windows Server 2022. Licensing requirements can vary depending on your specific scenario.
- Prepare for the activation process, which may involve obtaining new product keys or configuring Key Management Services (KMS) for activation.
Document Your Current Configuration
- Create comprehensive documentation of your current Windows Server 2016 configuration. This should include details about server roles, features, network settings, and any third-party software or drivers in use.
- Having a detailed record of your existing setup will aid in recreating the environment on Windows Server 2022.
Test the Upgrade Process
- Consider setting up a test environment that mirrors your production environment. This allows you to practice the upgrade process, identify potential issues, and fine-tune your upgrade strategy without impacting critical operations.
By diligently preparing for the upgrade, you minimize the risk of data loss, compatibility issues, and downtime. These initial steps lay a solid foundation for the successful migration to Windows Server 2022, ensuring a secure and efficient transition for your organization.
Choosing the Upgrade Path
When you upgrade Windows Server 2016 to 2022, it’s essential to choose the right upgrade path that aligns with your organization’s needs, existing infrastructure, and preferences. Here, we explore the available upgrade paths and factors to consider when selecting the appropriate approach:
Available Upgrade Paths
- In-Place Upgrade: This path involves upgrading the existing Windows Server 2016 installation to Windows Server 2022 while retaining server roles, features, settings, and data. It’s a straightforward process but requires careful planning and validation to ensure compatibility with existing configurations.
- Migration: Migration involves setting up a new Windows Server 2022 environment alongside your existing Windows Server 2016 setup. You then migrate server roles, data, and settings to the new environment. This approach allows for a more controlled transition and can be useful when upgrading hardware simultaneously.
Factors to Consider
- Compatibility: Evaluate the compatibility of your existing hardware, software applications, and workloads with Windows Server 2022. Some applications or hardware drivers may require updates or modifications to function correctly on the new platform.
- Downtime Tolerance: Consider the level of downtime your organization can tolerate during the upgrade. An in-place upgrade typically involves less downtime, while migration may require more planning to minimize disruption.
- Testing: If possible, conduct a test upgrade in a non-production environment to identify and address any issues before performing the actual upgrade. This is particularly important if you have critical applications or workloads.
- Resource Requirements: Ensure that your hardware meets or exceeds the minimum and recommended requirements for Windows Server 2022. Consider factors such as CPU, RAM, disk space, and network adapters to avoid performance issues.
- Data Backup: Regardless of the chosen upgrade path, maintain up-to-date backups of critical data and configurations. This is essential in case any issues arise during the upgrade process and you need to roll back to the previous state.
- Application Compatibility: Contact software vendors to confirm that your applications are compatible with Windows Server 2022. Identify any necessary updates or patches for third-party applications.
- Licensing and Activation: Understand how your existing Windows Server 2016 licensing applies to Windows Server 2022. Ensure you have the necessary licenses and activation keys for the new version.
- Documentation: Keep thorough records of your upgrade plan, including the selected path, hardware specifications, software compatibility assessments, and backup procedures. Documentation is crucial for troubleshooting and future reference.
- Rollback Plan: Develop a rollback plan that outlines the steps to revert to your previous Windows Server 2016 environment in case of unforeseen issues during the upgrade.
- User Communication: Inform relevant stakeholders, including IT staff and end-users, about the upgrade schedule and potential downtime. Clear communication helps manage expectations and minimize disruptions.
The choice of upgrade path should align with your organization’s goals, risk tolerance, and existing infrastructure. Thoroughly assess your environment and consider these factors to make an informed decision, ensuring a successful transition to Windows Server 2022.
Verifying Software Compatibility
Ensuring the compatibility of your applications, services, and third-party software is a critical step when upgrade Windows Server 2016 to 2022. Here’s how to effectively address software compatibility issues before initiating the upgrade:
- Compatibility Assessment
Begin by creating a comprehensive inventory of all the applications, services, and third-party software running on your Windows Server 2016 environment. Document their names, versions, and any specific configurations.
- Vendor Communication
Contact the software vendors or developers of your critical applications and services. Inquire about their compatibility with Windows Server 2022. Many vendors provide guidance or updates to ensure their software works seamlessly on the latest operating systems.
- Review Vendor Documentation
Visit the vendor’s official website or documentation to find compatibility information. Vendors often publish guides or release notes detailing which versions of their software are compatible with specific Windows Server editions.
- Testing Environment
If possible, set up a testing environment that mirrors your production environment. Install Windows Server 2022 and deploy your critical applications and services. Test their functionality and performance thoroughly to identify any issues or incompatibilities.
- Compatibility Mode
Some older applications may run in compatibility mode on Windows Server 2022. Experiment with compatibility settings, such as running the software in a compatibility mode for an earlier Windows version, and assess if this resolves any compatibility issues.
- Application Updates and Patches
Check for available updates or patches for your software. Many software vendors release updates to ensure compatibility with new operating systems. Apply any updates as recommended.
- Virtualization and Containerization
Consider running incompatible applications within virtual machines (VMs) or containers. This can isolate them from the host OS and maintain compatibility. Hyper-V, Docker, and other virtualization technologies can be useful for this purpose.
- Application Replacement or Alternatives
In cases where a critical application or service is not compatible with Windows Server 2022, explore alternative software solutions that are compatible. Ensure that data migration plans are in place when transitioning to new applications.
- Custom Scripts and Code
Review any custom scripts, code, or in-house-developed applications. Ensure they are compatible with Windows Server 2022, and make any necessary updates or modifications.
- Documentation
Maintain detailed documentation of your software compatibility assessments and any actions taken to address compatibility issues. This documentation will be valuable for reference during and after the upgrade.
By proactively addressing software compatibility concerns and conducting thorough testing, you can minimize the risk of issues arising during the upgrade process. Ensuring that your critical applications and services are compatible with Windows Server 2022 is essential for a successful and smooth transition.
Performing a Trial Upgrade
Performing a trial upgrade in a controlled test environment is a crucial step to identify and resolve potential issues before upgrading your production Windows Server 2016 environment to Windows Server 2022. Here’s a step-by-step guide:
- Set Up a Test Environment: Create a dedicated test environment that mirrors your production environment as closely as possible. This should include matching hardware, software, and configurations.
- Backup Your Current Environment: Before proceeding with any upgrade activities, back up your entire Windows Server 2016 environment, including critical data, configurations, and settings. Ensure that the backup is up-to-date and can be restored if needed.
- Install Windows Server 2022: In your test environment, install Windows Server 2022 following the chosen upgrade path (in-place upgrade or migration). Use the same edition and settings as your production environment.
- Select Test Workloads: Identify representative workloads, applications, and services that are critical in your production environment. These should include both Microsoft and third-party software.
- Perform the Trial Upgrade: Initiate the upgrade process on the Windows Server 2022 test server, following the steps you’ve planned for your production environment. This may include in-place upgrade or migration procedures.
- Monitor and Test: During and after the upgrade, monitor the process closely. Pay attention to any error messages, warnings, or unexpected behavior. Test the functionality of critical applications and services to identify any compatibility issues.
- Document Findings: Maintain detailed records of the trial upgrade process, including any issues encountered, error messages, and their resolutions. This documentation is valuable for reference and troubleshooting.
- Address Compatibility Issues: If compatibility issues arise during the trial upgrade, take steps to resolve them. This may involve contacting software vendors for updates or patches, adjusting configurations, or finding alternative solutions.
- Performance Testing: Assess the performance of your workloads on Windows Server 2022. Ensure that they meet your performance expectations and that there are no unexpected performance bottlenecks.
- Rollback Testing: As part of your trial upgrade, practice rolling back to your Windows Server 2016 environment in case the upgrade process encounters insurmountable issues. Verify that your rollback procedures are effective.
- Validation and Verification: Confirm that all your workloads, applications, and services are functioning correctly in the Windows Server 2022 test environment. Validate that data integrity is maintained.
- Reiterate as Necessary: If you encounter issues during the trial upgrade, address them and repeat the testing process until you achieve a successful trial upgrade with no critical issues.
Performing a trial upgrade allows you to mitigate risks, identify and resolve compatibility problems, and gain confidence in your upgrade plan before applying it to your production environment. Once you’ve successfully completed the trial upgrade and resolved any issues, you’ll be well-prepared for the production upgrade to Windows Server 2022.
Planning the Production Upgrade
Planning the production upgrade from Windows Server 2016 to Windows Server 2022 is a critical phase that requires careful consideration and documentation. Here’s a guide to creating a detailed upgrade plan and timeline while minimizing the migration of unnecessary data:
- Evaluate and Document Your Environment: Perform a thorough assessment of your existing Windows Server 2016 environment. Document all server roles, applications, services, configurations, and settings.
- Identify What to Migrate and What to Minimize: Analyze your data and resources to determine what needs to be migrated and what can be minimized or archived. Consider reducing the migration of old files, users who are no longer active in your network, and unnecessary data.
- Data Cleanup and Archiving: Before migration, conduct data cleanup. Archive or delete obsolete files and data. Identify inactive users and deactivate or archive their profiles.
- Backup Critical Data: Ensure that critical data, including user profiles, application configurations, and settings, are backed up. This data is essential in case you need to roll back or restore during or after the upgrade.
- Create a Detailed Upgrade Plan: Develop a comprehensive upgrade plan that includes a step-by-step timeline for the migration. Define roles and responsibilities for each phase of the upgrade.
- Select the Upgrade Path: Decide whether you will perform an in-place upgrade or a migration to Windows Server 2022. Ensure your chosen approach aligns with your organization’s goals and risk tolerance.
- Hardware and Software Requirements: Confirm that your hardware meets the requirements for Windows Server 2022. Ensure all necessary drivers and firmware are up-to-date for compatibility.
- Licensing and Activation: Review your licensing requirements for Windows Server 2022 and ensure that you have the appropriate licenses and activation keys.
- Testing: Validate your upgrade plan in a controlled test environment if you haven’t already done so. Ensure that all migration steps are well-documented and tested.
- Migration Schedule: Develop a migration schedule that minimizes disruptions to your organization. Plan for maintenance windows and communicate the schedule to relevant stakeholders.
- Backup and Recovery Plan: Create a detailed backup and recovery plan for the production upgrade. Outline steps for rollback in case of unexpected issues.
- Documentation: Document essential configurations, settings, and procedures for the migration. Include detailed instructions for recreating critical configurations on Windows Server 2022.
- User Communication: Communicate the upgrade plan and schedule to end-users and IT staff. Provide guidance on what to expect during the upgrade process.
- Execution and Monitoring: Execute the production upgrade according to your plan. Monitor the process closely, addressing any issues promptly.
- Post-Upgrade Validation: After the upgrade, validate the functionality of all server roles, applications, and services. Confirm that data integrity is maintained.
- Archiving and Cleanup: Complete the data cleanup and archiving process after the migration, removing unnecessary files and data.
- User Training: Provide user training and support for any changes or new features introduced with Windows Server 2022.
- Documentation and Reporting: Maintain detailed records of the production upgrade process, including any issues encountered and their resolutions. Generate a final report for reference.
By creating a well-documented upgrade plan, you can ensure a smooth transition to Windows Server 2022 while minimizing the migration of unnecessary data and optimizing your environment for improved efficiency and security.
Performing the Upgrade
The upgrade process from Windows Server 2016 to Windows Server 2022 involves several key stages. Here’s a step-by-step guide to performing the upgrade, highlighting the critical stages, including data migration and settings transfer:
1. Backup and Preparation
Ensure that you have up-to-date backups of critical data and configurations from your Windows Server 2016 environment. Confirm that your hardware and software meet the requirements for Windows Server 2022.
2. Installation of Windows Server 2022
Begin by installing Windows Server 2022 on a separate, clean system. This will serve as your target server for the upgrade.
3. Choose the Upgrade Path
Decide whether you are performing an in-place upgrade or a migration. Your choice should align with your organization’s goals and requirements.
4. Data Migration and Settings Transfer
In-Place Upgrade
If you choose an in-place upgrade, follow these steps:
- Launch the Windows Server 2022 installation media from within your existing Windows Server 2016 environment.
- Choose the “Upgrade” option.
- Follow the on-screen instructions to complete the upgrade. This process retains your existing data, settings, and configurations.
Migration
If you opt for migration, follow these steps:
- Prepare your source Windows Server 2016 environment by documenting configurations and settings.
- Install Windows Server 2022 on the target server.
- Identify the data and configurations you intend to migrate. Use tools like Windows Server Migration Tools (WSMT) or other third-party migration solutions.
- Migrate the selected data and configurations to the target server. This can include files, user profiles, and application settings.
- Reconfigure server roles and features on the Windows Server 2022 target to match your source server.
- Validate the migration by testing the functionality of your applications and services.
5. Validation and Testing
After the upgrade or migration is complete, thoroughly test your server roles, applications, and services to ensure they function correctly on Windows Server 2022.
6. Settings and Configurations
Recreate any necessary settings and configurations on the Windows Server 2022 environment. Ensure that they match your documented configurations from the Windows Server 2016 environment.
7. Data Cleanup and Archiving
As part of your upgrade, perform data cleanup and archiving to remove unnecessary files and data. This helps optimize storage and improve system performance.
8. User Communication
Communicate the successful upgrade to end-users and provide guidance on any changes or new features introduced with Windows Server 2022.
9. Documentation
Maintain detailed documentation of the upgrade process, including any issues encountered and their resolutions. This documentation is essential for reference and troubleshooting.
10. Monitoring and Performance Optimization
Continuously monitor the performance and stability of your Windows Server 2022 environment. Implement performance optimization measures as needed.
11. Backup and Recovery Testing
Periodically test your backup and recovery procedures to ensure data integrity and the ability to roll back if necessary.
By following these steps and paying close attention to data migration, settings transfer, and thorough testing, you can successfully upgrade from Windows Server 2016 to Windows Server 2022 while maintaining the integrity of your server roles, applications, and services.
Post-Upgrade Validation
After completing the upgrade from Windows Server 2016 to Windows Server 2022, it’s crucial to perform post-upgrade validation to ensure that the process was successful and that your critical applications and services are functioning as expected. Here are the key steps for post-upgrade validation:
- System Verification: Confirm that the Windows Server 2022 system is up and running without errors. Ensure that the server boots successfully and reaches the desktop or command-line interface.
- User Accessibility: Verify that users can access the server and its resources without any issues. Test user logins, network shares, and remote access (if applicable).
- Service Availability: Check the availability of essential server services and roles. Ensure that services such as Active Directory, DNS, DHCP, and others are functioning correctly.
- Network Connectivity: Confirm that network connectivity is established. Test network communication between the upgraded server and other devices on the network.
- File and Data Integrity: Validate the integrity of data and files on the server. Ensure that files weren’t corrupted during the upgrade process.
- Application Testing: Test all critical applications and services to verify their functionality. Pay close attention to any applications that are essential for your organization’s operations.
- Database and Datastores: If you have databases or datastores, confirm that they are accessible and operational. Test database connections and perform basic operations to ensure data integrity.
- Security and Permissions: Verify that security settings, permissions, and access control lists (ACLs) remain intact. Ensure that user permissions and security policies are enforced correctly.
- Hardware and Driver Checks: Test hardware components and drivers to ensure compatibility and functionality. Address any hardware-related issues promptly.
- Backup Validation: Test your backup and recovery procedures to ensure that you can restore data and configurations if needed.
- User Acceptance Testing: Engage end-users or stakeholders to conduct user acceptance testing (UAT). Gather feedback on any issues or changes they encounter.
- Performance Monitoring: Implement performance monitoring tools to assess the server’s performance post-upgrade. Address any performance bottlenecks or issues that may arise.
- Documentation: Document the results of your post-upgrade validation, including any issues encountered and their resolutions. Maintain this documentation for future reference.
- Rollback Plan Review: Revisit your rollback plan to ensure that you can revert to the previous state if necessary. Confirm that it is up-to-date and functional.
- User Training and Support: Provide user training and support to help users adapt to any changes or new features introduced with Windows Server 2022.
Post-upgrade validation is a critical step in ensuring the success of the upgrade process and the continued smooth operation of your server environment. By thoroughly testing and verifying the functionality of your server roles, applications, and services, you can identify and address any issues promptly, minimizing disruptions to your organization.
Upgrade Windows Server 2016 to 2022: Addressing Compatibility Issues
After upgrading from Windows Server 2016 to Windows Server 2022, you may encounter compatibility issues with certain applications, services, or configurations. Here’s a guide on how to troubleshoot and resolve these issues and, if necessary, how to restore data and configurations:
- Identify Compatibility Issues: Begin by identifying any compatibility issues that have surfaced post-upgrade. These may manifest as error messages, application crashes, or unexpected behavior.
- Documentation Review: Refer to your documentation to cross-reference configurations and settings from the Windows Server 2016 environment with those on Windows Server 2022. This can help pinpoint the source of compatibility issues.
- Check Event Logs: Inspect the Windows Event Viewer and application-specific logs for error messages or warnings related to compatibility issues. These logs can provide valuable information about the root cause.
- Software Vendor Support: If compatibility issues are related to third-party software or applications, contact the respective software vendors or developers for assistance. They may provide updates, patches, or workarounds to resolve the issues.
- Compatibility Modes: Some older applications may run in compatibility mode on Windows Server 2022. Experiment with compatibility settings, such as running the software in a compatibility mode for an earlier Windows version, and assess if this resolves the issue.
- Application Updates: Check for available updates or patches for problematic applications or services. Many software vendors release updates to ensure compatibility with new operating systems. Apply any updates as recommended.
- Driver Updates: Ensure that hardware drivers are up-to-date. Incompatible or outdated drivers can lead to compatibility issues. Check the manufacturer’s website for the latest driver versions and updates.
- Configuration Adjustments: Review application and service configurations on Windows Server 2022. Compare them to the configurations on Windows Server 2016, and make any necessary adjustments to align them with compatibility requirements.
- Testing and Validation: After making adjustments, thoroughly test the affected applications or services to verify that the compatibility issues have been resolved. Engage end-users or stakeholders to participate in user acceptance testing (UAT).
- Rollback Plan Review: If resolving compatibility issues becomes overly complex or time-consuming, revisit your rollback plan. Ensure that it is ready to be executed in case a rollback to the previous environment becomes necessary.
- Data and Configuration Restoration: If compatibility issues persist and cannot be resolved, you may need to consider rolling back to your previous Windows Server 2016 environment. Restore the backed-up data and configurations as per your documented recovery procedures.
- Documentation and Reporting: Maintain detailed records of the troubleshooting process, including any issues encountered, their resolutions, and any changes made to configurations. This documentation aids in future reference and troubleshooting.
Addressing compatibility issues post-upgrade requires patience, careful investigation, and collaboration with software vendors and stakeholders. By following a systematic troubleshooting approach and maintaining thorough documentation, you can effectively resolve compatibility issues and ensure the smooth operation of your upgraded Windows Server environment.
Updating Drivers and Firmware
Keeping hardware components up to date with compatible drivers and firmware is essential for maintaining optimal server performance and resolving compatibility issues, especially after an upgrade. Here’s a step-by-step guide on how to ensure that your hardware components have the latest drivers and firmware:
- Identify Hardware Components: Begin by identifying the hardware components in your server that may require driver and firmware updates. Common components include network adapters, storage controllers, graphics cards, and system BIOS.
- Check the Manufacturer’s Website: Visit the official websites of the hardware component manufacturers. Look for the support or downloads section, where you can find the latest drivers and firmware updates specific to your hardware.
- Hardware Inventory: Create an inventory of your server’s hardware components, including make and model details. This information will help you locate the correct updates.
- Determine Current Versions: Check the current driver and firmware versions installed on your hardware components. You can often find this information in the device manager or within the BIOS settings.
- Download the Updates: Download the latest driver and firmware updates from the manufacturer’s website. Ensure that you are downloading the correct updates for your hardware’s make and model.
- Backup Critical Data: Before performing any updates, ensure that you have backed up critical data and configurations. While driver and firmware updates are generally safe, unexpected issues can sometimes occur.
- Driver Installation: Install the updated drivers for your hardware components one by one. Follow the manufacturer’s instructions for driver installation. It’s typically recommended to uninstall the old driver before installing the new one.
- Firmware Update: For firmware updates (e.g., BIOS updates), carefully follow the manufacturer’s instructions. Firmware updates often require a system reboot, so schedule these updates during a maintenance window if possible.
- Testing: After updating drivers and firmware, thoroughly test the server’s performance and functionality. Ensure that there are no compatibility issues or unexpected errors.
- Monitoring: Implement performance monitoring tools to assess the impact of driver and firmware updates on server performance. Monitor for any signs of hardware-related issues.
- Documentation: Maintain a record of the driver and firmware updates performed, including dates and versions. This documentation is crucial for future reference and troubleshooting.
- Regular Maintenance: Make updating drivers and firmware a part of your regular server maintenance schedule. Check for updates periodically to ensure that your hardware remains up to date.
- Vendor Support: In case you encounter difficulties during the update process or experience unexpected issues, consider reaching out to the hardware component manufacturer’s support for assistance.
Updating drivers and firmware is a proactive measure to optimize server performance, enhance compatibility, and resolve hardware-related issues. By following a systematic approach and staying current with updates, you can ensure that your server hardware operates at its best.
Applying Security Updates
Installing the latest security updates and patches on your upgraded Windows Server 2022 environment is essential for strengthening its security posture. Here’s a step-by-step guide on how to apply security updates:
- Access Windows Update: To begin, access the Windows Update feature on your Windows Server 2022 system. You can do this through the Server Manager or by searching for “Windows Update” in the Start menu.
- Check for Updates: Click on “Check for updates” to initiate the process. Windows will connect to Microsoft’s update servers to determine which updates are available for your system.
- Review Available Updates: After the scan is complete, a list of available updates will be displayed. This includes security updates, quality updates, and optional updates.
- Select Security Updates: Focus on the security updates first. These updates address vulnerabilities and potential security risks. Select all available security updates for installation.
- Install Updates: Click “Install updates” to begin the installation process. Windows will download and install the selected updates. The server may require a restart to complete the installation.
- Restart If Necessary: If prompted, restart the server to finalize the update installation. Ensure that you schedule this restart during a maintenance window to minimize disruption.
- Check for Additional Updates: After the initial security updates are installed, revisit the Windows Update section and check for any additional updates, including quality updates and optional updates. Install these as needed.
- Automate Updates (Optional): Consider configuring automatic updates to ensure that your server regularly checks for and installs updates. Configure this through the Windows Update settings.
- Verify Security Update Status: After the updates are installed, verify the update status to ensure that no pending updates are left. Windows Update should indicate that your system is up to date.
- Monitoring and Testing: Continuously monitor your server’s performance and stability after applying security updates. Ensure that no issues or compatibility problems arise as a result of the updates.
- Documentation: Maintain records of the security updates applied, including dates and descriptions. This documentation is crucial for tracking your server’s security history.
- Regular Update Cadence: Establish a regular update cadence for your server environment. Plan to apply security updates as soon as they are released to stay protected against emerging threats.
- Security Policies and Best Practices: Implement security policies and best practices to complement your security updates. This includes practices like user access control, firewall configurations, and intrusion detection.
Applying security updates is a fundamental aspect of maintaining a secure server environment. By regularly installing the latest patches and updates, you can significantly reduce the risk of security vulnerabilities and enhance the overall security posture of your Windows Server 2022 system.
Microsoft Documentation on Windows Server Upgrades
Post-Upgrade Testing
After upgrading your server to Windows Server 2022, conducting thorough testing of all services and applications is crucial to ensure they function correctly and to address any performance or compatibility issues that may arise. Here’s a step-by-step guide on how to perform post-upgrade testing:
- Create a Testing Plan: Develop a comprehensive testing plan that outlines the services, applications, and configurations you need to test. Identify specific test cases and criteria for success.
- Testing Environment: Set up a controlled testing environment that mirrors your production environment as closely as possible. This environment should include virtual machines, test servers, and network segments.
- Test Critical Services: Begin by testing critical server roles and services, such as Active Directory, DNS, DHCP, and file sharing. Verify that these services are functioning correctly.
- Application Testing: Test all applications hosted on the server. Ensure that they launch without errors and perform their functions as expected. Pay attention to compatibility issues.
- Database Testing: If your server hosts databases, conduct tests to ensure that database operations, queries, and transactions are functioning properly.
- User Acceptance Testing (UAT): Engage end-users or stakeholders to participate in user acceptance testing (UAT). Gather feedback on any issues or changes they encounter.
- Compatibility Testing: Test for compatibility with third-party software and hardware. Verify that any integrations or dependencies are working as intended.
- Performance Testing: Assess the server’s performance under different workloads. Monitor CPU, memory, disk, and network utilization. Identify and address any performance bottlenecks.
- Load Testing: If applicable, perform load testing to evaluate how the server handles increased loads and concurrent users. Ensure that it remains stable under stress.
- Backup and Recovery Testing: Test your backup and recovery procedures to ensure that you can restore data and configurations if needed. Verify data integrity during restoration.
- Security Testing: Verify that security measures, such as firewall rules, access controls, and security policies, are in place and effective.
- Documentation: Maintain detailed records of the testing process, including test cases, test results, and any issues encountered. Document any resolutions or workarounds.
- Issue Resolution: Address any issues or anomalies discovered during testing promptly. Investigate the root causes and implement necessary fixes or adjustments.
- User Training and Support: Provide user training and support to help users adapt to any changes or new features introduced with Windows Server 2022.
- Final Validation: After addressing issues and conducting retesting, perform a final validation to ensure that all services, applications, and configurations are functioning correctly.
- Rollback Plan Review: Confirm that your rollback plan is still valid and up-to-date. It should be ready to be executed in case a rollback to the previous environment becomes necessary.
Post-upgrade testing is essential for ensuring the stability and functionality of your server environment. By systematically testing services, applications, and configurations, you can identify and address issues early, minimizing disruptions and ensuring a smooth transition to Windows Server 2022.
How Pillar Support Can Help!
We’re here to make your Windows Server upgrade as smooth as possible. By following the steps outlined in this guide, you’re well on your way to a successful upgrade experience. However, sometimes you need a helping hand, and that’s where Pillar Support comes in. Here’s how we can assist you:
- Expert Guidance: Our team of experienced professionals knows Windows Server inside and out. We can provide expert guidance tailored to your specific needs.
- Customized Solutions: Every upgrade is unique. We can work with you to develop a customized plan that fits your organization’s requirements and resources.
- Troubleshooting Support: If you encounter challenges during the upgrade process, we’re just a message or a call away. We’ll help you troubleshoot issues and find solutions quickly.
- Optimization Assistance: We can help you fine-tune your server environment for optimal performance and security, ensuring you get the most out of Windows Server 2022.
- Peace of Mind: With Pillar Support by your side, you can proceed with confidence, knowing that you have a dedicated team ready to assist you at any stage of your upgrade journey.
Ready to Get Started?
Don’t hesitate to reach out to Pillar Support if you need assistance with your Windows Server upgrade. Whether it’s answering questions, providing hands-on help, or offering expert advice, we’re here to support you every step of the way.
Contact Pillar Support Now!
Your successful Windows Server upgrade is just a message away. Let’s make it happen together!
Microsoft Documentation on Windows Server Upgrades
Frequently Asked Questions
Can Windows Server 2016 Be Upgraded to 2022?
Yes, you can upgrade Windows Server 2016 to Windows Server 2022. The upgrade process involves several steps, including checking system requirements, selecting the appropriate upgrade path, and performing the upgrade. It’s essential to follow a carefully planned procedure to ensure a successful transition.
How Do I Upgrade Windows Server 2016 to the Latest Build?
To upgrade Windows Server 2016 to the latest build, you typically use Windows Update or the Windows Server Update Services (WSUS) if your organization uses it. Ensure that your server is configured to receive updates, check for available updates, and install the latest ones. You may need to schedule a restart for the updates to take effect.
Can I Upgrade Server 2016 Essentials to 2022 Essentials?
Yes, you can upgrade Windows Server 2016 Essentials to Windows Server 2022 Essentials. The process is similar to upgrading other editions. However, it’s crucial to review Microsoft’s documentation for any specific considerations or requirements related to Essentials editions.
Can You Upgrade Windows Server 2016?
Yes, Windows Server 2016 can be upgraded to a newer version, such as Windows Server 2019 or Windows Server 2022, depending on your requirements and compatibility. Upgrading allows you to access new features, security updates, and improved performance. Be sure to follow the recommended upgrade path and backup critical data before proceeding.
Windows Server plays a crucial role in the IT infrastructure of many organizations, and keeping it up-to-date is crucial for security and performance. With extended support for Windows Server 2016 ending on January 12, 2027, and mainstream support already concluded, it’s time to consider upgrading to Windows Server 2022. This latest version offers dozens of new features and improvements critical for your organization’s technological growth.
To help you get started, this article guides you on how to upgrade Windows Server 2016 to 2022. We’ll also delve into the essential reasons for upgrading best practices and offer solutions to common troubleshooting issues that may come up during the transition.
Read on.
Reasons for Windows Server 2016 Upgrade
It’s essential to understand why a Windows 2016 Server upgrade is necessary. Here are several compelling reasons to justify the move to the 2022 version:
1. Enhanced Security
Upgrading to Windows Server 2022 offers enhanced security with features like Microsoft Defender Threat Protection and Windows Defender Exploit Guard, providing robust defense against various threats and vulnerabilities. It also includes virtualization security features to fortify your virtualized environments, making it an essential upgrade for data and infrastructure security.
2. Advanced Analytics
Windows Server 2022 empowers better decision-making and insights with advanced analytics capabilities, which is particularly beneficial if your organization relies on data-driven strategies.
3. Streamlined IT Management
Simplifying server management is a focus of Windows Server 2022, offering tools like the Windows Admin Center, Server Manager, and an improved Microsoft Server Console. These tools streamline IT administration, reducing administrative complexity.
4. Accelerated Digital Transformation
Windows Server 2022 facilitates secure hybrid cloud integration, enabling seamless on-premises infrastructure integration with Microsoft Azure and other cloud services. This accelerates digital transformation efforts, empowering your organization to leverage cloud resources, scale on demand, and adopt modern cloud-based applications and services.
5. Enhanced Scalability and Agility
Leveraging software-defined compute, storage, and networking, Windows Server 2022 enhances scalability and agility. This results in improved performance, reduced costs, and greater flexibility to adapt to changing business requirements while efficiently managing resources and accommodating growing workloads.
In some cases, it may be more practical to create a new server installation instead of upgrading from Windows Server 2016 to 2022. Here are some scenarios where a new operating system is the way to go:
- Clean Slate: Sometimes, a fresh start is the best approach. If your server has accumulated unnecessary files, software, or configurations over the years, a clean installation can lead to a cleaner and more efficient system.
- Insufficient Hardware: If your current hardware lacks the necessary resources for Windows Server 2022, such as adequate RAM, disk space, or modern processors, it’s wise to invest in new hardware and perform a clean installation.
- Legacy Incompatibility: If your Windows Server 2016 setup is tightly integrated with legacy applications or configurations incompatible with Windows Server 2022, starting anew with a fresh server is more efficient.
Step-by-Step Guide to Upgrade Windows Server 2016 to 2022
Ready to get on with the transition? Here’s our upgrade Windows Server 2016 to 2022 step-by-step guide to help you navigate the process and make things seamless.
Step 1: Evaluate Compatibility
Before beginning the upgrade, first, check that your Windows Server 2016 is up to date. Next, assess your existing hardware and software for compatibility with Windows Server 2022.
These requirements include:
- Minimum of 1.4GHz 64-Bit processor
- 2GB RAM (for GUI-based installation).
- At least 32GB of free space on the hard drive.
- Network adapter(s) compliant with PCIe architecture.
Refer to Microsoft’s official documentation to confirm these specifications.
Step 2: Backup Your Data
Data loss is a significant risk during any upgrade. Perform a full backup of your server’s data and configurations to prevent potential data loss or system instability. Use a reliable solution for data transfer and backup to ensure the safety of your critical information.
Step 3: Download Windows Server 2022
Visit the official Microsoft website and find the Windows Server 2022 ISO file in the download section. Download the correct edition that suits your needs. Also, ensure you have a valid product key and an appropriate activation method.
Step 4: Start the Installation
After downloading, locate the setup file on your computer and open it. This will kick off the in-place Windows Server 2022 upgrade process. Click on the “Setup” option to begin.
Step 5: Choose the Right Edition
During installation, you’ll be asked to select the edition of Windows Server 2022, such as Server Standard or (Desktop Experience). Choose the one that matches your requirements.
Step 6: Retain Your Data
To upgrade without losing data, select the “Keep personal files and apps” option during the installation process. This ensures that your files and applications remain intact after the upgrade to Windows Server 2022. Carefully review the on-screen instructions before proceeding.
Step 7: Point of No Return
Confirm that everything checks. This is the point of no return. Once you’ve verified this, click on the “Install” button to initiate the upgrade process.
Step 8: Confirm Success and Activate
After installation, verify the operating system upgrade was successful. Confirm that your server is running the new version and that all components, existing files, and apps function correctly. Activate using your product key and method.
Handling Incompatibility Issues
Upgrading to Windows Server 2022 may pose compatibility challenges for your existing applications and hardware, especially if you rely on third-party software with legacy components or older Windows Server-compatible applications. While one solution is to uninstall problematic applications, this may not be feasible if they are crucial to your business operations.
This scenario highlights the importance of working with a qualified migration team like ModLogix.
At ModLogix, our software modernization team will plan every aspect of the migration from beginning to end, drawing up a roadmap that suits your business needs while minimizing downtime. We will carry out a virtualized migration of the incompatible applications, moving them to a virtual version of Windows Server 2016 so you can work without any problem.
Once done, we’ll upgrade from Windows Server 2016 to 2022 safely and seamlessly. Then, we’ll then work with you to modernize the legacy applications, making them compatible with your new operating system.
Best Practices for Windows Server 2016 to 2022 Upgrade
While the steps above are simple, issues may still arise during the Windows Server 2016 to 2022 in-place upgrading. Here are common issues and their solutions:
- Hardware Compatibility: If your hardware is incompatible or doesn’t meet the minimum requirements, consult your hardware vendor to find compatible components or systems. You might need to upgrade or replace hardware.
- Incompatible Software: Identify incompatible software before upgrading. Check for updates or newer versions and contact the software vendor for patches. You may need to reconfigure or reinstall the applications if they don’t work as expected. The software code may need to be optimized to help improve compatibility.
- Data Corruption: Data corruption is a rare possibility. Ensure you have a backup created earlier to easily restore your data if this happens. Regular backups are vital for such scenarios.
To reduce the chances of things going wrong, Here are some best practices to keep in mind:
- Create an Upgrade Roadmap: Plan your upgrade thoroughly, considering your organization’s specific needs. Choose the optimal upgrade time, ensure compatibility, and have a rollback plan for unexpected problems.
- Backup Everything: Backup critical data, configurations, and settings to prevent data loss during the upgrade. These backups are crucial for unforeseen issues.
- Keep Documentation: Maintain detailed documentation of server configurations, settings, and applications. This documentation will help during the upgrade and when troubleshooting issues.
- Implement a Rollback Plan: Even with good planning, issues can arise. Create a comprehensive rollback plan to revert to the previous Windows Server 2016 configuration if needed. This will require a Windows Server 2016 system image, so you may need to create one during the backup stage.
Again, it is important to emphasize the need to work with experts when doing any migration or OS upgrade. A qualified migration team like ModLogix will ensure a rigorous checklist is followed to guarantee a successful migration.
Consider ModLogix Your Trusted Partner for Windows Server 2016 to 2022 Upgrade
Upgrading from Windows Server 2016 to Windows Server 2022 is a crucial task. Even a minor mistake can lead to data loss, disrupting your business. It’s vital to work with a dependable IT expert. ModLogix, an experienced software modernization company, specializes in turning old systems into efficient, current solutions. We’ll devise a practical, minimal-downtime plan and guarantee seamless operation for all your files and applications during the upgrade.
In a recent project, we worked with a global insurance services provider in the healthcare industry to upgrade their databases. We helped them transition from Microsoft SQL Server 14 to Microsoft SQL Server 17 and also assisted in centralizing all of their data into a single source. This process, known as data unification, involves organizing raw data from various sources, including incomplete or isolated datasets. The result was:
- Doubled system performance
- Reduced ownership costs
- Increased return on investment (ROI)
- Enhanced business continuity
- Expanded market share acquisition.
You, too, can rely on ModLogix’s proven track record for a trouble-free transition.
Want to enjoy the difference between Windows Server 2016 and 2022?
Contact us.
Conclusion
Still trying to decide whether to upgrade from Windows Server 2016 to 2022? The improved security, enhanced performance, extended support, and added features make it a wise decision, especially considering that support for Windows Server 2016 has ended, with only extended support available until 2027.
By following our straightforward upgrade Windows Server 2016 to 2022 guide, you can ensure a successful and trouble-free upgrade. More importantly, though, working with a reliable partner like ModLogix is vital for maintaining the health and security of your server infrastructure.
In this article I will guide you how to upgrade Windows Server 2016 to 2022 without losing data.
You can upgrade to a newer version of Windows Server by up to two versions at a time. For example, Windows Server 2016 can be upgraded to Windows Server 2019 or Windows Server 2022: https://learn.microsoft.com/en-us/windows-server/get-started/upgrade-overview#which-version-of-windows-server-should-i-upgrade-to
Before you upgrade Windows Server 2016 to 2022, you read Windows Server 2022 systyem requires.
System requirements of Windows Server 2022
- At least 1.4GHz 64-Bit processor.
- 2GB RAM (for GUI-based installation).
- A minimum of 32GB of free space on the hard drive.
- Network adapter(s) compliant with PCIe architecture.
Note: This method only upgrades upgrade Windows Server 2016 to Windows Server 2022. After you do it, you need to buy Windows Server 2022 Standard product key to activate it. You can buy Windows Server 2022 Standard product key for $80/key here: https://taloshop.xyz/ban/product/windows-server-2022-standard-product-key-lifetime/
I add tutorial video below.
Step 1: If you want to keep your files and apps you convert Windows Server 2016 Evaluation to Windows Server 2016 non Evaluation
(If your Windows Server 2016 is Standard/Datacenter version, you can skip step 1)
Step 2: You download Windows Server 2022 iso file non Evaluation here: https://www.mediafire.com/file/i7n7egfzd7ec660/en-us_windows_server_version_2022_updated_nov_2021_x64_dvd_e9a58f14.iso/file
Note: You also can use Windows Server 2022 Evaluation from Microsoft, but when you do to step 6, you can’t select “Keep personal files and apps”. So if you want to save your data, you must download Windows Server 2022 iso non Evaluation file.
Step 3: You open this file you download. Then you click setup
Step 4: You copy and paste Windows Server 2022 setup key:
- Windows Server 2022 Standard setup key: VDYBN-27WPP-V4HQT-9VMD4-VMK7H
- Windows Server 2022 Datacenter setup key: WX4NM-KYWYW-QJJR4-XV3QB-6VM33
Step 5: You select “Windows Server 2022 Standard/Datacenter (Destop Experience)
Step 6: You select “Keep personal files and apps”
Step 7: You confirm your pc meets requirements of Windows Server 2022. Then you click install
Done. You wait for a moment.
After you upgrade Windows Server 2016 to 2022, you need buy Windows Server 2022 Standard/Datacenter product key to activate it.
You can buy Windows Server 2022 Standard product key for $80/key here: https://taloshop.xyz/ban/product/windows-server-2022-standard-product-key-lifetime/
You can buy Windows Server 2022 Datacenter product key for $150/key here: https://taloshop.xyz/ban/product/windows-server-2022-datacenter-product-key-lifetime/
You can watch this video to know how to upgrade Windows Server 2016 to 2022
Tag: how to upgrade Windows Server 2016 to 2022, windows server 2016 to 2022 upgrade, windows server 2016 upgrade to 2022
Read more:
- Download Windows Server 2012 R2
- Download Windows Server 2016
- Download Windows Server 2019
- Download Windows Server 2022