
BIOS компьютера (базовая система ввода и вывода) записан в чип на материнской плате. В нем содержится информация, которая нужна для запуска ноутбука или настольной машины. Подобно любому софту, его необходимо периодически обновлять. В современных компьютерах используется UEFI, интерфейс которого отличается соответствующей сегодняшнему дню графикой.
Предосторожности
Содержание
- Предосторожности
- Нужно ли вам это
- Как обновить
- Перед тем, как начинать
- Точность при определении марки и модели
- Текущая версия
- Как искать
- Как обновлять
- Обновление в Windows 10
- Если все хорошо
- В случае неудачи
В отличие от любого софта и даже ОС, которые в случае сбоя в процессе инсталляции можно будет инсталлировать повторно, если в ходе обновления BIOS что-то пойдет не так, ваш компьютер может стать бесполезным.
Наиболее частой причиной подобной нерадостной ситуации является отключение питания во время инсталляции BIOS. Это случается редко, но забывать об этой вероятности не рекомендую. И если возможно отключение электроэнергии, воздержитесь от обновления.
Во время обновления не должно быть никаких случайных касаний клавиатуры.
Нужно ли вам это
Перед тем как обновлять, прочтите на сайте производителя вашего ноутбука или материнской платы настольного компьютера все примечания к выпуску последней версии для вашей модели, а также к предшествующим, чтобы убедиться, что в новой прошивке присутствуют необходимые вам функции и она исправляет какие-то проблемы или уязвимости. Если этого нет, то лучше не рисковать.

Зачастую обновление Биоса требуется для того, чтобы материнская плата поддерживала новый процессор или другие аппаратные компоненты. Вторая причина — исправление ошибок, улучшение стабильности и производительности.
Как обновить
Необходимые действия в общих чертах одинаковы, вне зависимости от того, предусмотрен ли вашей моделью UEFI или устаревший BIOS:
- Загрузите свежую версию BIOS или UEFI с сайта производителя материнской платы или ноутбука. Необходимо брать только предназначенную именно для вашей модели, а не подобной.
- Распакуйте архив и скопируйте его содержимое на работоспособную флэшку.
- Перезагрузите компьютер и войдите в UEFI или BIOS так, как это предусмотрено в вашей модели.
- Используйте меню для обновления UEFI или BIOS.

Перед тем, как начинать
Сохраните все важные файлы с вашего компьютера на дополнительном накопителе. Неудачное обновление не повреждает напрямую данные на жестком диске, но получить к ним доступ вы не сможете. Если же данные помещены на съемный диск, вы сможете продолжить с ними работу на другой машине.
Желательно создать резервную копию BIOS. В некоторых случаях это выполняется автоматически, но если действие необходимо произвести вручную, вам будет предложено это сделать. Не пропустите этот шаг.
Точность при определении марки и модели
Полное название модели (к примеру, Z170A Gaming Pro) обычно нанесено на саму материнскую плату. Важно знать именно его, поскольку обычно существует несколько модификаций подобных (но не одинаковых) плат. И для каждой из них может быть предусмотрена своя версия BIOS.

Необходимо также записать номер ревизии (допустим, REV 1.03G), поскольку от этого также зависит, какой файл новой прошивки вам необходим.
Текущая версия
Для определения установленной на вашем компьютере версии нажмите клавиши Win и R. В появившейся строке введите «msinfo32». В окне информации о системе ищите пункт о версии о дате Биоса.
Как искать
На сайте производителя оборудования найдите раздел поддержки. Выберите там свою модель и вы увидите перечень доступных для нее файлов. В их числе — инструкции, драйвера и файлы UEFI и BIOS.
Когда вы нашли обновление, сверьте цифры и даты. Скачивать ее имеет смысл лишь в том случае, если она является более новой, чем та, которая установлена у вас.
Как обновлять
Старые версии представляли собою программу, которая запускалась с флэшки после ввода команды в командной строке. Современные платы обычно характеризуются наличием встроенной утилиты в самом BIOS. Таким образом, загружаемый вами архив содержит лишь файл самого обновления и текстовый файл, в котором присутствуют подробные примечания к выпуску.
Дать универсальные рекомендации по обновлению невозможно, поскольку на сайте производителя содержатся подробности, касающиеся точного процесса обновления именно для вашей модели. Могу лишь отметить, что в ряде случаев перед началом обновления вам придется произвести некоторые установки. К примеру, отключить режимы безопасной и быстрой загрузки.
Обновление в Windows 10
Биос многих материнских плат не обновляется из операционной системы. Вам надо будет войти в BIOS и поискать в меню опцию, которая может называться «Q Flash», «EZ Flash» или «M Flash». Далее выберите файл на подключенном USB-накопителе и следуйте появляющимся на экране инструкциям. Недавно я рассматривал утилиты, которые пригодятся для обновления Биоса обладателям материнских плат разных производителей.

Если все хорошо
После успешного обновления вы можете сразу же перезагрузить компьютер и работать с ним, как обычно, но я рекомендовал бы сначала проверить некоторые моменты. Неправильные настройки могут оказаться причиной, по которой система отказывается загружаться, даже в том случае, когда обновление прошло успешно.
Убедитесь, что дата и время указаны правильно, а диск, с которого загружается система, является приоритетным в списке загрузки. Если вы записали свои предыдущие настройки, касающиеся частоты процессора и памяти, вы сможете их установить и в новой версии. Но это применение в основном для пользователей, которые предпочитают настраивать под себя каждую деталь.
В случае неудачи
Если несмотря на все предосторожности обновление закончилось крахом, кое-что можно попробовать сделать. Не выключайте компьютер. Закройте инструмент обновления и перезапустите процесс, чтобы увидеть, работает ли он.
Если вами была сделана резервная копия, вы можете попытаться выбрать для установки этот файл, а не более новый. В некоторых материнских платах предусмотрена опция резервной копии, что дает вам возможность восстановить информацию из нее. Воспользуйтесь инструкцией к своей модели или подсказками, которые даются в интернете.
К сожалению, в случае провала обновления BIOS, самым простым и дешевым решением зачастую становится замена материнской платы, так как не все сервисные центры имеют программатор, способный исправить ситуацию.
3.5
4
голоса
Рейтинг статьи
How to Update UEFI BIOS in Windows: A Step-By-Step Guide
Updating your BIOS can be beneficial but isn’t always required. This delicate process can provide security enhancements, new functionalities, support for advanced processors, and solutions to underlying system issues. It is considered a final approach to tackling stubborn problems that persist despite OS reinstallation or component replacement.
Preparation for Update
First, ensure that your system supports UEFI firmware updates. This is usually the case for systems running Windows 8 or later, including all desktop editions of Windows 10. Before initiating the update, verify your BIOS version to check if an update is indeed necessary.
Updating Your BIOS
- Use the Command Prompt to determine your motherboard model.
- Check your current BIOS version and visit the manufacturer’s website for any available updates.
- Download and unpack the BIOS update files into a desktop folder. You should find two key files: an .exe and a .cap file.
- Ensure a constant power supply to avoid potential disruptions during the update, as any interruption could leave your PC inoperable.
- Move the BIOS files to a USB drive.
- With the USB drive inserted, restart your computer, boot into your BIOS, and commence the BIOS update. Make certain your system maintains power throughout this process.
Upon completing the update, which may involve several restarts, you can verify the BIOS version using the Command Prompt.
Accessing UEFI BIOS in Windows
If you need to change the UEFI BIOS settings, access the motherboard firmware by going to Settings in Windows 10, clicking on “Update & Security,” then “Recovery,” and then “Restart now” under the Advanced startup section. Your computer will restart following by the “Choose an option” screen. Click on “Troubleshoot,” then “Advanced option,” and finally “UEFI Firmware Settings.” Restart your PC to save changes.
Note of Caution
The BIOS update involves some risk and should be performed with caution. Wrong firmware settings can prevent your computer from starting correctly. If you’re unsure or uncomfortable with the process, it’s best to seek professional help.
To switch from legacy BIOS to UEFI in Windows 10, use the ‘MBR2GPT’ tool. Ensure your device supports UEFI firmware settings before attempting to convert, as failing to adhere to prerequisites can lead to system errors or hardware failure.
In summary, while updating or switching your BIOS can offer benefits such as improved stability and new feature support, it requires careful handling. Consider creating a backup of your current BIOS before initiating the process.
Give us some love and rate our post!
Let us talk about the best software to update BIOS for Windows 10 and 11 to help you perform BIOS updates automatically and hassle-freely.
Do you know which is the first software that works as soon as you boot your computer? Well, it is BIOS, i.e., Basic Input/Output System. Not many users know about it, but BIOS is the software that initializes the hardware and supports your PC when it gets started.
BIOS is pre-installed software in your computer’s ROM. However, like every other software, it may also get outdated with time. And an out-of-date BIOS does no good to your PC. Hence, it is crucial to update BIOS.
You can perform BIOS updates manually or automatically and hassle-freely using the best BIOS update software. We prefer automatic BIOS updates since they are more convenient, quick, and safe.
If you are looking for simple ways to update BIOS, you can check out the specifically designed BIOS update utilities shared in this article. They make BIOS updates a cakewalk. Hence, let us look at them in the following section without further ado.
Well-Researched List of the Best BIOS Update Software
Below are some of the best software to update BIOS for Windows 10 and 11 to help you upgrade your computer’s BIOS.
1. UEFI BIOS Updater

We believe there is no better way to kickstart the best BIOS update software list than introducing the UEFI BIOS Updater. It is a BIOS modding suite allowing you to update OROM or UEFI modules of an AMI UEFI BIOS without any advanced knowledge of modding methods.
Moreover, it is an easy-to-use tool with the following features that make it one of the best UEFI BIOS updaters.
Key features of UEFI BIOS Updater
- Prevents the occurrence of further problems after updating BIOS
- Compatibility with all Windows versions
- Free and lightweight, the file size is only 18 MB
- Helps you update the CPU microcode
Download Now
Also Read: Must-Have Software For Windows
2. BIOSAgentPlus

Here comes BIOSAgentPlus. It is another great free software to update BIOS with a plethora of features to ensure your BIOS software runs smoothly.
For instance, before updating the BIOS, this software checks whether or not your computer needs a BIOS update. Additionally, the following are some impressive BIOSAgentPlus features that brought it to this list of the best BIOS update software for Windows 10.
Key features of BIOSAgentPlus
- Also checks for driver updates
- Fetches BIOS firmware’s report
- Helps you track all BIOS updates
- Seeks your permission to install BIOS updates
Download Now
3. ASUS Live Update Utility

ASUS, as you may know, is a renowned PC, software, and smartphone manufacturer. This world-famous manufacturer also delights users with one of the best BIOS firmware update utilities.
ASUS Live Update Utility is a feature-rich software with features like a convenient scheduler to check for updates. Moreover, below are the other noteworthy features of this software.
Key features of ASUS Live Update Utility
- Automatic BIOS updates
- Detects new driver versions
- Finds and updates programs available from ASUS’s official website
- Lets you check BIOS information prior to updates
- Allows you to save the presently installed BIOS file
Download Now
Also Read: Best USB Bootable Software for Windows
4. Biostar BIOS Update Utility

Next, we have Biostar BIOS Update Utility in the fourth position on our post dedicated to the best BIOS update software for Windows 11/10. The most attractive thing about this software is its simple installation. You can install and use this program without being a computer expert.
Additionally, the following features are also a reason we included Biostar BIOS Update Utility on our list.
Key features of Biostar BIOS Update Utility
- Downloads the latest BIOS for your computer
- Step-by-step guides you to update BIOS correctly
- Finds a compatible package from a given location or the web
Download Now
5. Gigabyte @BIOS LIVE Update
Let us now introduce you to Gigabyte @BIOS LIVE Update. It is a smart BIOS update solution for your computer. This software eliminates the need to wander on the manufacturer’s website in search of BIOS updates. This program provides updates with just a few simple clicks.
Talking about the features, below is what we found the most fascinating about this software.
Key features of Gigabyte @BIOS LIVE Update
- A plethora of options to get the BIOS update downloaded
- Internet update to help you download the BIOS and update it directly
- Lets you keep a backup of your currently installed BIOS
- There is a wizard to help you understand the BIOS update process
Download Now
6. ASRock Live Update

We cannot skip ASRock Live Update when discussing the best BIOS update software for Windows 10, 8, and 7. It boasts a straightforward interface so that you can hassle-freely update system drivers and BIOS.
Moreover, it lets you download and update popular PC games and other software. Furthermore, the following are its other notable features.
Key features of ASRock Live Update
- An all-in-one utility for software downloading and system update
- Integrated with many applications and support software
- Free and easy-to-use
Download Now
Also Read: How to Fix or Bypass This PC Can’t Run Windows 11 Issue
7. SMBIOS Explorer

The last spot on our post sharing the best BIOS update software goes to SMBIOS Explorer. It is third-party software that changes original data to the user-readable format or structures that preserve the SMBIOS versions before showing it in hexadecimal mode.
Additionally, you should also take a look at the following SMBIOS Explorer features.
Key features of SMBIOS Explorer
- In-depth data analysis with an advanced data interpreter
- Lets you store System Management BIOS information as a plain or a zipped file
- Imports data from various sources like WMI, the system’s registry, ROM memory, or through API functions
- Easy to use and useful tool for experienced users who understand a Windows PC’s architecture
Download Now
8. Intel BIOS Update

The last tool on this list of the best BIOS update software is Intel BIOS Update. This is a free tool that you can use on your device if you are using an Intel processor on the system. The interface of the software may look a bit outdated but works for high and low-end Windows devices.
Key features of Intel BIOS Update
- The software is quite easy to use for all kinds of users, professional and otherwise.
- The interface of the software is quite simple and multilingual.
- You can update the BIOS with the help of this software as necessary.
Download Now
FAQs Related to the BIOS Update Software for Windows
If you have any doubts related to the best BIOS update software for Windows, then you can take the help of the below frequently asked questions to quench your curiosity.
Q1. Which BIOS update should I choose?
The BIOS update that you should use depends on the type of processor you are using. For example, if you are using a processor from Asus, then you need to use the Asus BIOS update for ease.
Q2. Is it recommended to update BIOS?
Yes, it is recommended to update BIOS as it allows the system to run smoothly and allows you to fix any issue arising because of BIOS.
Q3. Can BIOS update improve performance?
Yes, BIOS update can improve performance as it allows you to get new features to modify BIOS and thus, in turn, allows you to take the performance of the device to the next step.
Q4. Are BIOS updates safe?
Yes, BIOS update is completely safe to execute and use, provided that you know how to use it for your benefit.
Q5. How to update BIOS safely?
To update the BIOS safely, try using the official website of the manufacturer to download the latest versions of the BIOS and then install it on your system.
Summing Up
These were some of the best BIOS update software for Windows 10 and 11. These utilities can help you save a lot of time and effort in updating your computer’s BIOS. You can go through each of them, compare their features, and then choose the most suitable tool for your requirements.
In case of any questions or confusion, feel free to contact us in the comments section. We will be glad to help you.
Most PC users go without ever updating their BIOS. After all, PC performance is often unaffected by your BIOS version. So why would you? Two words: continued stability.
An outdated BIOS may limit PC performance, lower PC stability, debilitate overclock settings, and remain incompatible with certain devices. When confronted with issues, most PC users will try everything in the book without realizing their issues stem from an outdated BIOS. The general recommendation is: you’re fine, until you start noticing hardware compatibility issues.
Here we’ll show you how to safely update your UEFI BIOS.
What Is a UEFI BIOS?
The BIOS (Basic Input/Output System) acts as a trigger of sorts, checking for and activating your hardware. It also dictates boot devices, CPU boost software, overclock settings, and several other parameters.
It’s also responsible for testing your hardware components, like the hard drive and GPU, through a sequence called POST (Power-On Self-Test). Most are familiar with the BIOS through issues associated with hardware connection. For example, your BIOS will submit an error to your screen if the hard drive SATA connection is unplugged.
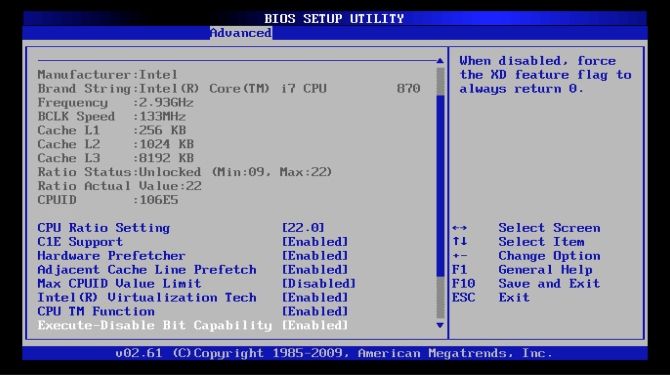
A UEFI (United Extensible Firmware Interface) BIOS is the more modern version of the BIOS. UEFI BIOS shares many similar features with old-school — often called legacy — BIOS versions. The biggest innovation in the UEFI BIOS is its clickable and more accessible user interface (UI).
The UEFI BIOS also allows for great added features like hardware monitoring, more convenient overclocking accessibility, overclock profiles, and easier flashing capabilities. Note the difference between the BIOS above with the newer MSI Click BIOS 4 below.

The advent of UEFI BIOS versions gave way to massive (> 2.2 TB) storage systems which wouldn’t function on the legacy BIOS. It also allows for pre-boot environments which can be used when needed to move files, diagnose issues, and even browse the internet without the need for an operating system (OS).
Every BIOS version depends on the make and model of the motherboard. Some older motherboards will not allow for a UEFI BIOS, while newer motherboards will. The process to update your BIOS, however, is generally the same.
Finding Your UEFI BIOS Version
BIOS versions can differ from one to the other, though rarely by much. Upgrading your BIOS version, or installing a previous version, can allow for different capabilities. It is recommended you install the latest versions of all software, including your BIOS, to ensure maximum compatibility and protection.
You can access your available BIOS versions by searching under your motherboard model. You can find the model name and number of your motherboard through the Command Prompt. To open your command prompt, press Win + R, which brings up the Run window. Here, type cmd and click OK. Now, enter the following into your Command Prompt:
wmic baseboard get product,Manufacturer
Your motherboard’s make and model should appear in your Command Prompt. Google this information with the added bios tag to find your BIOS versions available for download. You may have to search for BIOS downloads under a Support category.
Carefully consider which version of your BIOS you’d like to use. If you’d like to check your BIOS version, open your Command Prompt again and type in the following:
systeminfo
The BIOS Version appears next to the respective parameter in the list.

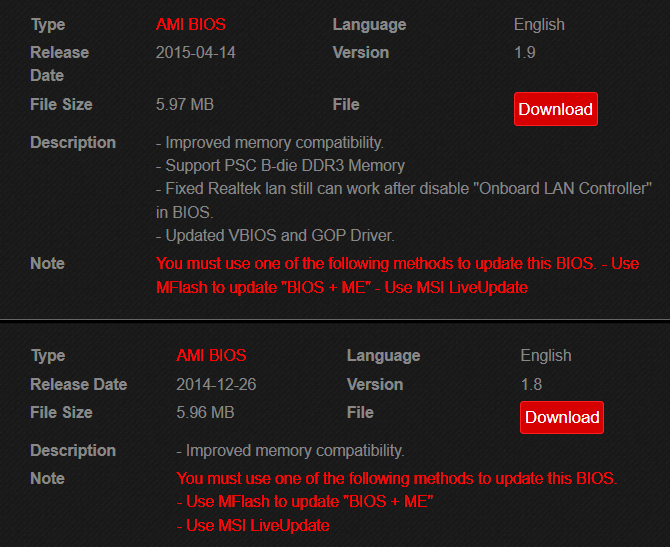
We currently have version 1.8 installed on this PC. After checking the motherboard manufacturer’s website, we found that the latest version available is 1.9. This is the BIOS version we will upgrade to.
Downloading the New BIOS Files
Download the BIOS files using the link provided by the manufacturer, and extract them to a desktop folder. UEFI BIOS updates are comprised of two main files:
- A TXT file detailing the specific upgrades made to this BIOS version.
- The actual EXE file for your BIOS upgrade. Read the text file before updating.
You’ll note that you can’t open the EXE file like a regular executable file. Rather than installing it, the file must be flashed. Flashing a device means wiping the software from a drive to install another version of that same software. The process derives its name from the BIOS’ use of flash memory, rather than mechanical.
Since you are flashing your BIOS rather than updating it, an unexpected shutdown can lead to serious consequences and may render your PC unusable. Ensure that your USB and power supply are safe before proceeding. If the process is disturbed, the BIOS cannot revert to a previous version by the nature of its process. That’s why many users are intimidated by BIOS updates, even though it’s a simple process.
Flashing Your UEFI BIOS
It’s best not to install your BIOS within the normal OS environment. You will need to unzip and move your files from your BIOS folder into the root (outermost) directory of a storage device, like a flash drive. Once you’ve saved your files to your USB drive’s root folder, plug it into your computer and restart the PC. Afterward, boot into your BIOS and locate the flash option.
Navigate to M-Flash (or your BIOS’ equivalent).
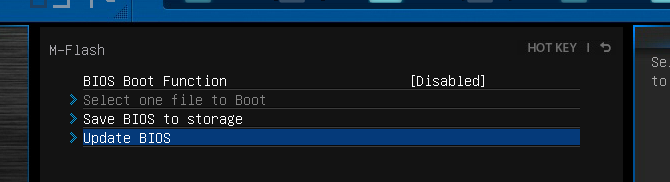
There are two categories in the above case: BIOS and BIOS + ME. The ME stands for «Management Engine» and this—specifically, Intel’s Management Engine—controls the hardware monitor and clickable environment you see within your UEFI BIOS.
Oftentimes, your BIOS download will include both your BIOS and ME files, so you don’t need to install both manually. In fact, most BIOS versions will require that you install it as BIOS and ME to ensure that the management engine is compatible with the BIOS.

M-Flash will prompt you to load your BIOS file. Locate your file in the root USB folder and begin the process.
Ensure that you do not lose power to your PC during this process. Since your BIOS is responsible for managing the boot order, an unexpected shutdown during a BIOS flash may leave your PC unusable. Ensure that your PC is plugged into its energy supply firmly before carrying out your BIOS update.
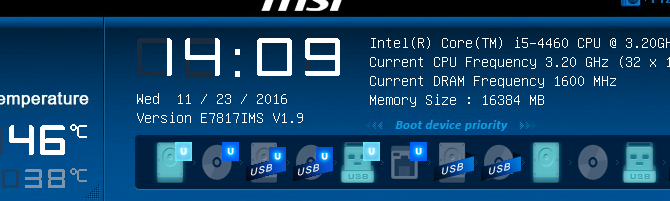
Re-Checking the BIOS Version
Your BIOS update may require several restarts for the BIOS and ME, so wait until the total process has finished. Then, enter your BIOS again or check your BIOS version using the command prompt method. You should be able to see your newly updated BIOS version at the top of the screen.
There is a fair amount of taboo behind upgrading your BIOS unless absolutely necessary, but the process really is simple, painless, and can prevent several PC issues from arising in the future. And besides, there are plenty of reasons why you should update your BIOS.
Out With the Old, In With the New BIOS
Updating the UEFI BIOS can feel daunting, and even die-hard PC users often go years without flashing their motherboard firmware. That’s fine until something goes wrong, or you’re experiencing compatibility issues due to an outdated BIOS. You can help to prevent those problems by learning how to update the BIOS quickly and safely.
Содержание статьи:
- Прошивка / обновление UEFI: что делать по шагам
- Способ 1
- Способ 2
- Вопросы и ответы: 0
Доброго времени!
Сегодня на повестке довольно узкая тема (// обновление BIOS/UEFI), и касается это только пользователей ноутбуков Asus (хотя, сам процесс на др. устройствах идет аналогично).
Вообще, данную операцию (в основном) приходится проводить относительно редко (если и приходится — то обычно не более 1-2 раз за все время использования устройством). Например, когда производитель в новой версии исправил какие-то серьезные ошибки или добавил новые функции.
На сегодняшний день есть 2 способа, как произвести обновление (прошивку) UEFI/BIOS: 1. через спец. утилиту прямо из-под Windows (удобный вариант, но не всегда доступен); 2. с помощью заранее подготовленной USB-флешки (с которой нам вручную нужно будет указать файл-прошивку в UEFI/BIOS).
Ниже рассмотрю оба варианта чуть подробнее… 😉
*
📌 Примечание:
- имейте ввиду, что процедура обновления UEFI (BIOS) иногда может закончиться походом в ремонтную мастерскую (например, некоторые пользователи ошибаются и загружают не те версии прошивок…). Поэтому, обновлять его нужно только по необходимости!
- далеко не всегда самая новая прошивка — самая стабильная!
- самостоятельная прошивка устройства может стать причиной отказа в гарантийном обслуживании (см. условия гарантии).
*
Прошивка / обновление UEFI: что делать по шагам
Способ 1
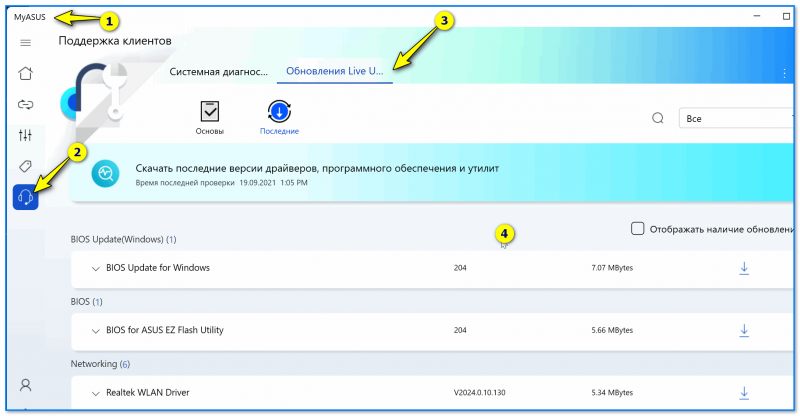
Если у вас на ноутбуке предустановлено «родное» ПО — то в утилите MyASUS (проверьте меню ПУСК) есть спец. раздел «Поддержка клиентов / Обновления Live…» (см. скрин ниже). 👇
С ее помощью можно быстро найти последние версии программ, драйверов и BIOS.
👉 Далеко не все устройства поддерживают утилиту MyASUS (если у вас оной нет — перейдите ко второму варианту, см. ниже).
👉 Стоит отметить, что процесс обновления BIOS (UEFI) я бы все же рекомендовал выполнять с загрузочной флешки (на мой взгляд это безопаснее // По крайней мере создайте такую флешку, записав на нее несколько версий прошивок, чтобы в случае чего — вы могли ей воспользоваться!).
MyAsus — устройство обновлено!
*
Способ 2
ШАГ 1
Сначала необходимо определить модель своего ноутбука. Сделать это можно разными способами…
*
📌 Вариант 1: запустить 👉 командную строку, ввести systeminfo и нажать Enter.
Далее среди большого списка свойств и характеристик найти строку «Модель системы» (собственно, нам нужна лишь аббревиатура вида «TP420UA», см. пример ниже 👇).
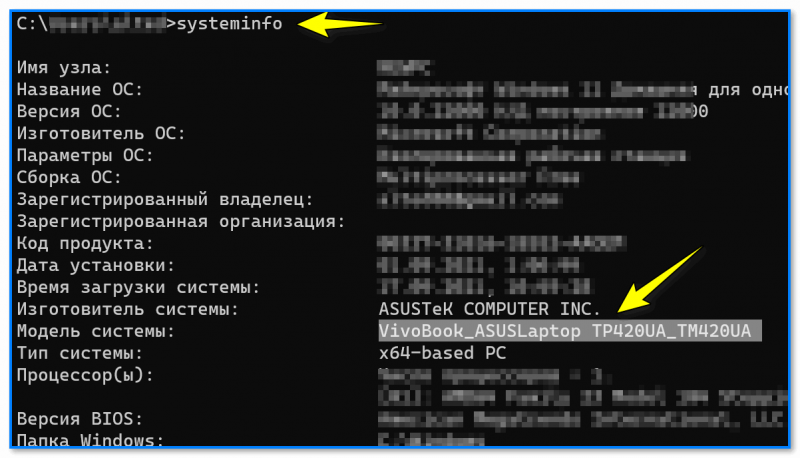
CMD — модель системы
*
📌 Вариант 2: если у вас предустановлено все «заводское» ПО от Asus — найдите в меню ПУСК утилиту «MyASUS» и запустите ее. Далее откройте в ней вкладку «Информация о системе» — там должна присутствовать модель устройства…
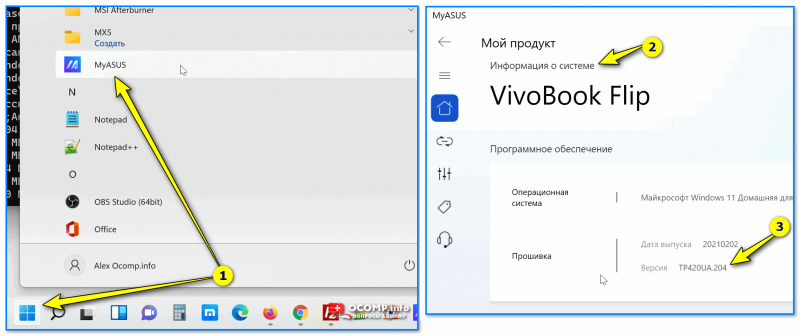
Приложение MyASUS — информация о системе
*
📌 Вариант 3: можно просто посмотреть документы, которые шли вместе с ноутбуком. 😉 Также см. в помощь одну мою старую заметку по этой теме.
*
ШАГ 2
Офиц. сайт Asus (центр загрузок драйверов и ПО): https://www.asus.com/ru/support/Download-Center/
*
Далее нужно перейти на офиц. сайт Asus и ввести модель в строку поиска (ссылку на центр загрузок я привел, куда вводить аббревиатуру тоже — см. скриншот ниже 👇).

Поиск на сайте Asus (скрин с офиц. сайта)
После перед вами должен появиться список прошивок UEFI (BIOS) — загрузите самые новые из них (рекомендую загружать сразу несколько версий, если оные будут)!
📌 Важно: не загружайте прошивки не для своего устройства! Если перепрошить неподходящей прошивкой — ноутбук после может не включиться… (само собой без мастерской уже будет не обойтись…).
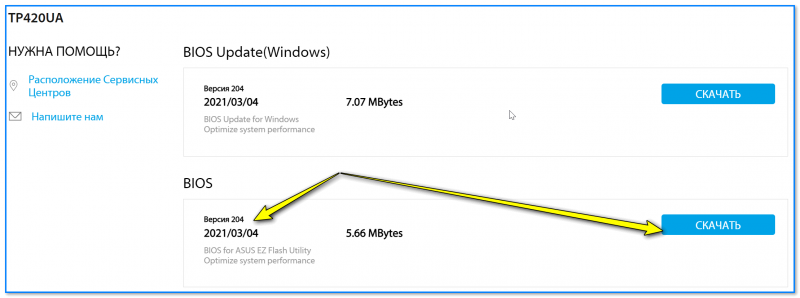
Смотрим дату и загружаем
📌 Важный момент: как правило, прошивка требуется более новая, чем у вас установлена на устройстве. Чтобы узнать текущую версию прошивки на устройстве — попробуйте в командной строке набрать wmic bios get SMBIOSBIOSVersion (см. пример ниже). 👇
Если войти в UEFI (BIOS) — в меню тоже можно узнать их версию.
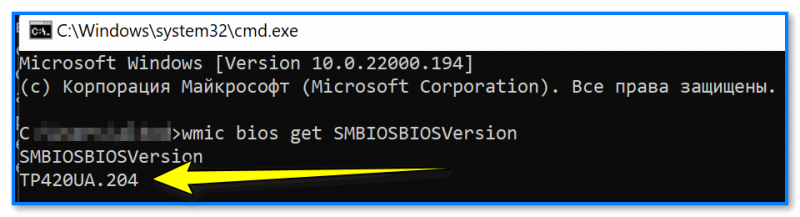
wmic bios get SMBIOSBIOSVersion
*
ШАГ 3
Затем нужно извлечь файл прошивки из архива и записать на обычную USB-флешку. (В помощь: как распаковать архив RAR, 7Z, ZIP и др. архивы)
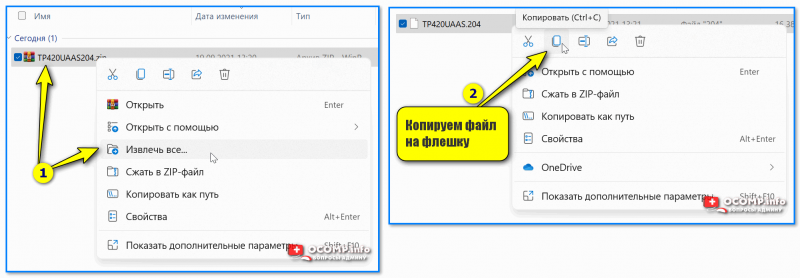
Копируем файл прошивки на флешку
*
ШАГ 4
Следующий момент: нужно проверить насколько заряжена батарея ноутбука (процедуру желательно проводить при зарядке не менее 30% и подключенном кабелем питания).
Прим.: дело в том, что на некоторых устройствах есть ограничение, которое не позволит обновить BIOS, если батарея разряжена!
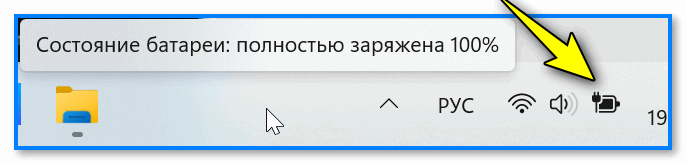
Зарядить батарею
*
📌 Собственно, далее:
- отключаем от ноутбука всё, кроме адаптера питания и «нашей подготовленной» флешки;
- выключаем/перезагружаем устройство;
- заходим в UEFI (BIOS): на ноутбуках Asus для этого достаточно зажать кнопку Esc перед включением устройства. Также см. инструкцию, ссылку на которую привожу чуть ниже. 👇
*
👉 В помощь!
Как зайти в BIOS (UEFI) на ноутбуке ASUS — [см. инструкцию]
*
ШАГ 5
В UEFI (BIOS) нужно открыть расширенный режим — Advanced Mode (клавиша F7).
После перейти во вкладку «Advanced» и запустить утилиту «ASUS EZ Flash 3 Utility».

EZ Flash Utility — режим Advanced Mode
Утилита отобразит все подключенные съемные диски: нужно открыть нашу подготовленную флешку, указать на ней файл-прошивки и нажать Enter. Далее утилита попросит подтвердить операцию… 👌
📌 Важно: при непосредственно процессе обновления BIOS — рекомендую абсолютно ничего не делать с ноутбуком: не подключать к нему никаких устройств, не нажимать клавиш, не отключать питание и т.д.
Если вы правильно выбрали прошивку и «не мешали» устройству — то через 3-4 мин. процесс будет завершён, ноутбук перезагрузится и будет готов к работе! 👌
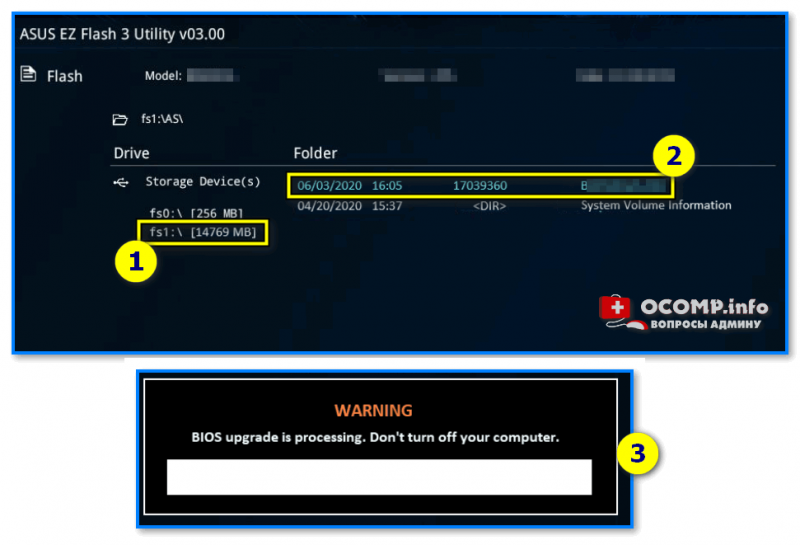
Выбираем прошивку с флешки и подтверждаем операцию прошивки
*
Дополнения по теме — будут весьма кстати (комментарии открыты!)
Всех благ!
👋