
Python is a programming language with standard libraries and a great ecosystem of third-party packages. On the other side, Pip is the default package manager for Python that installs, upgrades and manages Python, including its dependencies. Pip simplifies the process of installing external libraries and tools which are written in Python. Pip allows developers to add functionalities to their Python projects. It can be easier for you to install and handle Python packages with Pip.
That’s why installing and updating Pip is essential to maintain the functionalities of Python. So if you also want to know the simple methods to update Pip and Python, don’t worry. This tutorial has everything you need to know about ways to update Pip and Python in Linux, Windows, and Mac.
Table of Content
- How to Update Pip and Python?
- A. How to Update Pip and Python in Linux?
- B. How to Update Pip and Python in Windows?
- C. How to Update Pip and Python On Mac?
How to Update Pip and Python?
«Pip» stands for «Pip Installed Packages,» which installs Python packages. These packages are the collection of modules, resources, and libraries created by the Python community. The process of upgrading Pip and Python is similar in Linux, Mac, and Windows, so let’s take a look at them:
A. How to Update and Upgrade Python in Linux?
Updating and Upgrading Python on Debian/Ubuntu-based Systems:
Update the Package List:
Start by updating the package list to ensure you have the latest information on available packages:
sudo apt update
Upgrade Python:
To upgrade Python, use the apt package manager. You can specify the Python version you want to upgrade to, such as Python 3.10:
sudo apt install python3.10
Replace `python3.10` with your desired Python version.
Verify the Upgraded Python Version:
After the installation is complete, verify the upgraded Python version:
python3 --version
Updating and Upgrading Python on Red Hat/Fedora-based Systems:
Update the Package List:
Begin by updating the package list using the dnf package manager:
sudo dnf update
Upgrade Python:
To upgrade Python, you can use the dnf package manager. Specify the Python version you want to install, such as Python 3.10:
sudo dnf install python3.10
Replace python310 with your desired Python version.
Verify the Upgraded Python Version:
After the installation is complete, verify the upgraded Python version:
python3 --version
B. How to Update and Upgrade Pip in Linux?
To update and upgrade Pip on a Linux system, you can use the `pip` tool itself to update to the latest version. Follow these steps:

If Python and Pip are not available in your system, you can install them by running the following commands:
For Ubuntu:
sudo apt install python3
sudo apt install python3-pip
For Fedora:
sudo dnf install python3
sudo dnf install python3-pip
For CentOS:
sudo yum install python3
sudo yum install python3-pip

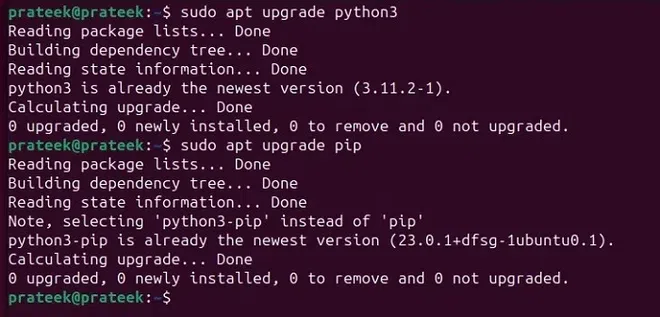
After installing Pip and Python, you will automatically get their latest version. However, if you want to upgrade the Pip and Python manually, then please run the following commands one by one:
sudo apt upgrade python3
sudo apt upgrade python3-pip
B. How to Update Pip and Python in Windows?
Before going to the updating process of Pip and Python in Windows, we recommend you check the currently installed version of Python and Pip from the Command Prompt:
Python --version

Note: Before running any command, please run the Command Prompt as an administrator.
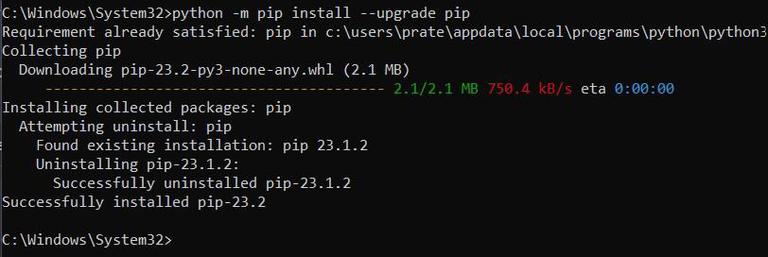
In case your system needs to provide a clear result about Python’s version, then you can follow our guides to install Python and Pip on Windows. Now, please run the following command in the command prompt:
python -m pip install --upgrade pip
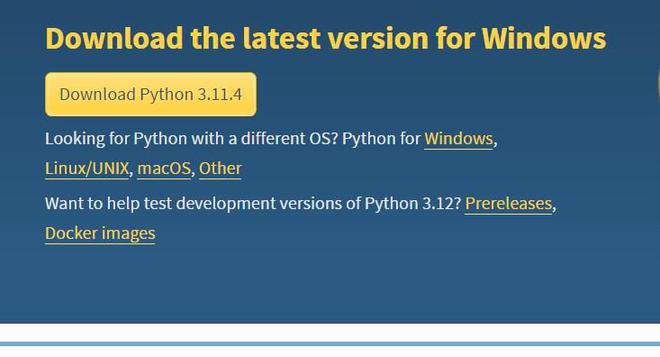
For upgrading Python, please visit the official website of Python and download its latest version.
After downloading the setup, please install it in your system and check its version from the Command Prompt.
C. How to Update Pip and Python On Mac?
Updating Pip and Python on Mac is almost similar to Windows, so first open the terminal and check the current version of Python and Pip:
pip3 --version
Or
python3 --version

Now, run the following commands one by one to update Pip and Python:
pip3 install --upgrade pip

Also, Read
- Python PIP
- Python Tutorial
- pip Commands For Python Developers
Conclusion
So this was all about the commands you can use to upgrade Pip and Python in Linux and Windows. Upgrading the utilities provide new features and removes the bugs from the current one. By keeping your Pip and Python installations up-to-date, you gain access to the latest features, bug fixes and increase the efficiency of your project. Also, the latest version of Pip and Python will provide compatibility with the latest libraries and frameworks. You can visit the official website and download the Python package for your Linux system. It will help you verify and install the latest version of Python and Pip without hassles.
Download Article
Keep your Python environment up-to-date with this simple guide
Download Article
- Using Python
- Using Install Script
- Using Python Installer
- Using Apt & DNF
- Using Homebrew
- Video
- Tips
|
|
|
|
|
|
If you haven’t updated Pip, the Python package manager, in a while, you might be using an outdated version. The easiest way to update Pip is to do so from within Python. If you also need to upgrade Python, installing the latest version of Python will also get the most up-to-date version of Pip. Whether you use Terminal/Command Prompt commands, the Python installer, or a package manager, it’s easy to update Pip on Windows, macOS, and Linux. We’ll show you how, plus give you helpful troubleshooting tips along the way.
Things You Should Know
- If you’re using Python 3.4 or later, you can update Pip using the command python -m pip install --upgrade pip.
- To check your Pip version, use pip3 -V (Python 3) or pip2 -V (Python 2).
- If you want to update Python in addition to Pip, you can do so by downloading the installer, using Homebrew, or your Linux distribution’s package manager.
-

The most straightforward way to update Pip is from the command line. Because Python 3.4 and later comes with Pip, you can easily update it without downloading a new package.[1]
-
Mac: Type Terminal in Launchpad and select Terminal.[2]
- Linux: Press Ctrl + Alt + T or click Terminal in your app list.
-
Windows: Type command prompt into the Windows search bar and click Command Prompt.[3]
-
Mac: Type Terminal in Launchpad and select Terminal.[2]
-
Run the command pip -V to see which version of Pip is installed. This command will print the version number to the terminal.
- If you have both Python 2 and Python 3 installed, the pip command may evoke Python 2 instead of the latest version. Use pip3 -V to check the version of Pip for Python 3, and pip2 -V to check for Python 2.
- If you’re using Python 3.4 or earlier, Pip may not be installed. In this case, use python -m ensurepip --upgrade to install it now.
- If you’re using Windows and get the error «pip is not recognized as an internal or external command,» make sure you’ve installed Python. If you have installed Python and get this error, you’ll need to add Python to your Windows path and then relaunch Command Prompt. To learn how, see Adding the Python Path to Windows.
Advertisement
-
If this command doesn’t work on Windows, use py -m pip install --upgrade pip instead.
- If you get permissions errors in Linux, run sudo python -m pip install --upgrade pip.
- If you have both Python 2 and Python 3, update Pip for each version separately:[4]
- python3 -m pip install --upgrade pip
- python2 -m pip install --upgrade pip


Advertisement
-
If you’re using a version of Python 3 older than Python 3.4, you can use a script to install the latest version of Pip. This method will not work for deprecated versions of Python, including Python 2.[5]
- Mac: Type Terminal into Spotlight search and select Terminal.
- Linux: Press Ctrl + Alt + T or click Terminal in your app list.[6]
-
Windows: Type command prompt into the Windows search bar and click Command Prompt.[7]
-
You can do this easily using curl on any operating system, as it’s preinstalled. Just run the command curl https://bootstrap.pypa.io/get-pip.py -o get-pip.py at the prompt and wait for the script to download.[8]
-
To do so, run the downloaded script using the command python3 get-pip.py. This installs the latest version of Pip for Python 3.
-
In the Terminal or Command Prompt window, run the command pip3 -v


Advertisement
-
If you want to update both Python and Pip, you can download and install the latest version of Python. Before you do this, make sure you’re not already using the latest version. To check, open Command Prompt or Terminal and run python --version.[9]
- Only use this method if you want to update Python as well as Pip. If Python is already up to date on your PC or Mac, update pip via Python instead.
- If the version number starts with 2 instead of 3, run python3 --version to see if Python 3 is also installed and find the version number.
-
Find the latest version at https://www.python.org/downloads. Compare your version of Python to the version in the yellow «Download Python» button at the top of the page.
-
If you’re using an older Python version than the latest release, click the yellow Download button to download the latest installer.
-
Double-click the downloaded file and follow the on-screen instructions to install. Once Python is installed, you’ll have the latest version of Pip.
- On Windows, make sure to check the box next to «Add python.exe to PATH» at the bottom of the installer to ensure you can run Python and Pip commands from any location.
-
In a new Command Prompt or Terminal window, run the command pip -v to check the Pip version.
- If you have both Python 2 and Python 3, run pip3 -v to check the Pip version of Python 3.


Advertisement
-
You can do so on most Linux distributions by pressing Ctrl + Alt + T.[10]
- Use this method if you want to update both Python and Pip at the same time.
-
If you’re already using the latest version of Python, there’s no need to use this method. Run the command python3 --version to check. Then, compare your version to the latest stable release at https://www.python.org/downloads.
-
- Ubuntu and Debian: sudo apt update
- CentOS, Fedora, Redhat: sudo dnf upgrade
-
Once you run the command to install the latest version of Python 3, Pip will also be upgraded.
- Ubuntu and Debian: sudo apt install python3
- CentOS, Fedora, Redhat: sudo dnf install python3.


Advertisement
-
You can update both Python and Pip using Homebrew if you prefer. You should only use this method if you need to upgrade Python as well as Pip.
- Before you continue, make sure Homebrew is installed. To check, type brew -v and press Return. If the command is not found, you’ll need to install Homebrew using this command: /bin/bash -c "$(curl -fsSL https://raw.githubusercontent.com/Homebrew/install/HEAD/install.sh)"[11]
- To check your Python version, run the command python3 --version. Compare your version to the latest stable release available from https://www.python.org/downloads/macos/.
- If the command is not found, Python 3 is not installed. Continue with this method to install it.
- Before you continue, make sure Homebrew is installed. To check, type brew -v and press Return. If the command is not found, you’ll need to install Homebrew using this command: /bin/bash -c "$(curl -fsSL https://raw.githubusercontent.com/Homebrew/install/HEAD/install.sh)"[11]
-
This command installs a library that can help you manage your Python versions.
-
To make sure you’re getting the latest version of Python (and the latest version of pip), you can run this command to find the most recent version number.
-
For example, to install Python 3.11.5, you’d type pyenv install 3.11.5 and press Return. This installs the latest version of Python 3 and pip.[12]
- Now that you have the latest pip version, you can update it in the future using the command python3 -m pip install --upgrade pip.


Advertisement
Ask a Question
200 characters left
Include your email address to get a message when this question is answered.
Submit
Advertisement
Video
-
If you’re using Linux, avoid using sudo to install Python packages. If you install a package that contains malicious code with root permissions, you risk giving the attacker unrestricted access to your system.
Thanks for submitting a tip for review!
Advertisement
About This Article
Thanks to all authors for creating a page that has been read 150,456 times.
Is this article up to date?
Зачастую возникает необходимость обновления PIP. В данном руководстве будет дана поэтапная инструкция для обновления PIP в Windows.
Содержание статьи
- План обновления PIP в Windows
- Проверка текущей версии PIP
- Инструмент для обновления PIP в Windows
- Как вернуться к предыдущей версии PIP
Столкнуться с необходимостью обновления PIP можно при установке любого пакета, используя PIP.
Выводится следующее сообщение:

Вы используете версию pip 19.3.1; однако, доступна версия 20.1.1. Вам стоит сделать обновление через команду ‘python -m pip install –upgrade pip’.
Есть вопросы по Python?
На нашем форуме вы можете задать любой вопрос и получить ответ от всего нашего сообщества!
Telegram Чат & Канал
Вступите в наш дружный чат по Python и начните общение с единомышленниками! Станьте частью большого сообщества!
Паблик VK
Одно из самых больших сообществ по Python в социальной сети ВК. Видео уроки и книги для вас!
Для обновления PIP в Windows нужно открыть Windows Command Prompt, а затем набрать/скопировать туда указанную команду. Обратите внимание, что данный метод сработает только если у вас уже добавлен Python в Windows PATH. Ничего страшного, если вы не знаете, что это такое. Далее мы подробно разберем все шаги обновления PIP.
|
python —m pip install —upgrade pip |
В поисковике Windows наберите Command Prompt (Командная строка):
Затем откройте Command Prompt (Командную строку). Во избежание проблем с уровнем доступа сделайте это от имени администратора. Для этого кликлинте правой кнопкой мыши и выберите пункт Run as administrator (Запустить от имени администратора):
В командной строке наберите cd \, чтобы удостовериться, что в начальной точке только название диска:

Нажмите Enter. Вы увидите название диска C:\>

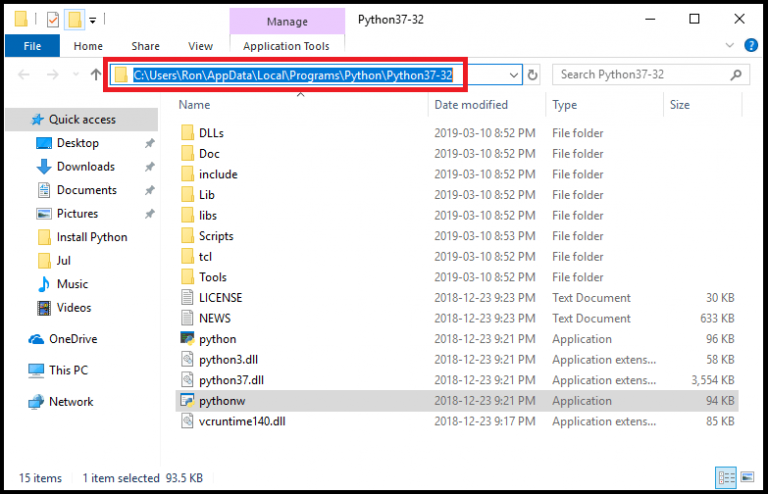
Найдите путь к Python, что является папкой, куда установлен Python.
В нашем случае путь приложения Python следующий:
C:\Users\Ron\AppData\Local\Programs\Python\Python37-32
После получения пути к Python наберите следующую команду в командной строке: cd, за которым следует путь к приложению Python.
В нашем случае это выглядит следующим образом:

Нажмите Enter, вы увидите:

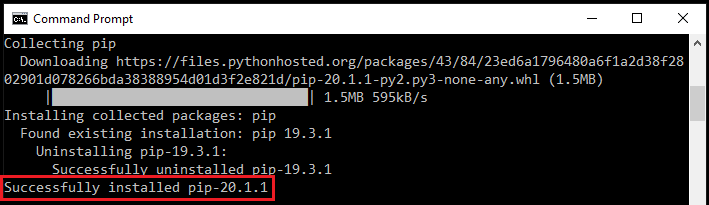
Обновите PIP, использовав данную команду, затем нажмите Enter:
|
python —m pip install —upgrade pip |
В командной строке команда будет выглядеть следующим образом:

Обратите внимание, что будет установлена последняя версия PIP:
Проверка текущей версии PIP
Для проверки текущей версии PIP нужно использовать путь скриптов Python вместо пути приложения.
Наберите cd\, чтобы убедиться, что стартовой точкой является только название диска:

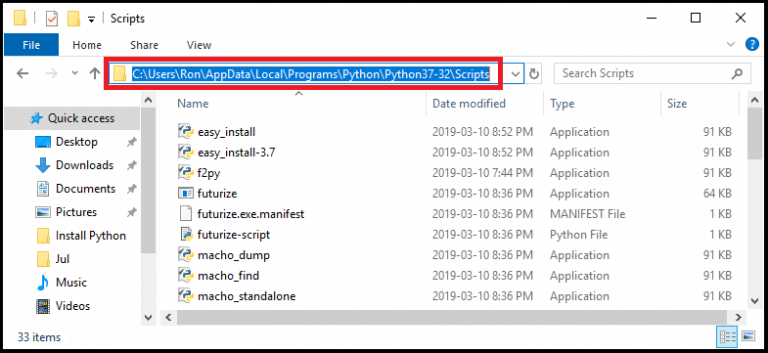
Затем найдите путь к Python скриптов. Папка скриптов должна находиться внутри пути приложения Pythоn.
В нашем случае путь Python скриптов следующий:
C:\Users\Ron\AppData\Local\Programs\Python\Python37-32\Scripts
Затем наберите cd, после которой следует путь к Python скриптам, и нажмите Enter.

В конечном итоге наберите следующую команду для проверки версии PIP:

Нажмите Enter, после этого будет показана версия PIP.

Разберем простой инструмент для обновления PIP.
Обратите внимание, что вам нужно добавить Python к Windows PATH для использования данного инструмента.
Далее дан полный код Python для инструмента обновления PIP используя Tkinter:
|
1 2 3 4 5 6 7 8 9 10 11 12 13 14 15 16 17 18 19 |
import os import tkinter as tk root= tk.Tk() canvas1 = tk.Canvas(root, width = 300, height = 350, bg = ‘lightsteelblue2’, relief = ‘raised’) canvas1.pack() label1 = tk.Label(root, text=‘Upgrade PIP’, bg = ‘lightsteelblue2’) label1.config(font=(‘helvetica’, 20)) canvas1.create_window(150, 80, window=label1) def upgradePIP (): os.system(‘start cmd /k python.exe -m pip install —upgrade pip’) button1 = tk.Button(text=‘ Upgrade PIP ‘, command=upgradePIP, bg=‘green’, fg=‘white’, font=(‘helvetica’, 12, ‘bold’)) canvas1.create_window(150, 180, window=button1) root.mainloop() |
Просто запустите код и затем нажмите на кнопку Upgrade PIP, после чего команда выполнится.
Что, если нужно откатиться к предыдущей версии PIP?
Выполнив следующие шаги, вернуться к предыдущей версии PIP не составит особого труда.
Как вернуться к предыдущей версии PIP
Перейдите в папку где установлен Python. Если сейчас настроен путь к скриптам, тогда просто наберите cd .. (и затем нажмите Enter), и вы вернетесь к папке с установленным Python.

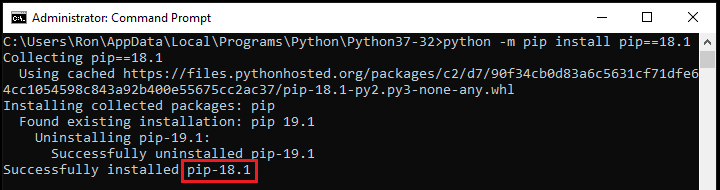
Предположим, нам нужно вернуться к версии 18.1.
Для этого просто наберите следующую команду и затем нажмите Enter:
|
python —m pip install pip==18.1 |
Вы должны увидеть указанную версию PIP:
Являюсь администратором нескольких порталов по обучению языков программирования Python, Golang и Kotlin. В составе небольшой команды единомышленников, мы занимаемся популяризацией языков программирования на русскоязычную аудиторию. Большая часть статей была адаптирована нами на русский язык и распространяется бесплатно.
E-mail: vasile.buldumac@ati.utm.md
Образование
Universitatea Tehnică a Moldovei (utm.md)
- 2014 — 2018 Технический Университет Молдовы, ИТ-Инженер. Тема дипломной работы «Автоматизация покупки и продажи криптовалюты используя технический анализ»
- 2018 — 2020 Технический Университет Молдовы, Магистр, Магистерская диссертация «Идентификация человека в киберпространстве по фотографии лица»
Уровень сложностиПростой
Время на прочтение8 мин
Количество просмотров45K
Обзор
Recovery Mode
Перевод

Pip, система управления пакетами для Python, является незаменимым инструментом для каждого программиста на этом языке. Работаете ли вы над веб-разработкой, машинным обучением, Data Science или любым другим проектом на Python, pip позволит вам легко получить доступ к обширному репозиторию библиотек и фреймворков.
Используя pip, вы можете быстро устанавливать и обновлять пакеты и управлять зависимостями с минимальными усилиями. Это не только экономит время, но и гарантирует, что вы имеете дело с самыми последними и безопасными версиями библиотек. Кроме того, pip поддерживает создание и управление виртуальными средами, что помогает изолировать зависимости конкретного проекта и поддерживать чистую среду разработки.
Установка и обновление Pip
Pip обычно поставляется в комплекте с Python версии 3.4 и выше. Тем не менее, важно убедиться, что pip установлен и обновлен, чтобы использовать последние функции и обновления безопасности.
-
Проверка установки pip: откройте терминал или командную строку и выполните команду:
pip --versionЭта команда отобразит версию pip, установленную на вашей системе.
-
Установка pip: вы можете загрузить скрипт get-pip.py и запустить его с помощью Python:
curl https://bootstrap.pypa.io/get-pip.py -o get-pip.py
python get-pip.py-
Обновление pip: чтобы обновить pip до последней версии, выполните следующую команду:
pip install --upgrade pipУбедившись, что pip установлен и обновлен, вы сможете избежать потенциальных проблем с совместимостью и получить более плавный опыт разработки.
Установка пакетов
Когда pip установлен и обновлен, вы можете начать установку пакетов Python из индекса пакетов Python (PyPI).
-
Базовая установка пакетов: чтобы установить пакет, выполните следующую команду:
pip install package_nameНапример, чтобы установить популярную библиотеку requests, нужно выполнить команду:
pip install requests-
Установка определенных версий: вы можете указать версию пакета, добавив ==, за которым следует номер версии:
pip install package_name==1.0.0-
Установка нескольких пакетов из файла требований: вы можете создать файл требований и установить все пакеты, перечисленные в нем, за один раз.
-
Создайте файл requirements.txt с именами и версиями пакетов.
-
Установите пакеты с помощью следующей команды:
pip install -r requirements.txtЭтот метод особенно полезен для быстрой настройки окружений и обеспечения согласованности различных установок.
-
Установка пакетов из URL или локальной директории: pip также позволяет устанавливать пакеты из URL или из локальных каталогов.
Из URL-адреса:
pip install https://example.com/package_name.tar.gzИз локальной директории:
pip install /path/to/package_name-
Установка предварительных версий: если вам нужна предварительная версия пакета, используйте флаг —pre:
pip install package_name --preЭто может быть полезно для тестирования новых функций или обновлений до их официального релиза.
Освоив эти команды установки, вы сможете эффективно управлять библиотеками и инструментами, необходимыми для ваших проектов, обеспечивая плавный и продуктивный процесс разработки.
Деинсталляция пакетов
В pip есть несколько команд, которые помогут вам удалить ненужные пакеты из среды Python.
-
Простая деинсталляция: чтобы удалить пакет, используйте следующую команду:
pip uninstall package_nameНапример, чтобы удалить библиотеку requests, нужно выполнить команду:
pip uninstall requests-
Удаление нескольких пакетов: вы можете удалить несколько пакетов, перечислив их один за другим:
pip uninstall package1 package2 package3Эта команда попросит вас подтвердить удаление каждого пакета.
-
Принудительная деинсталляция: использование флага -y поможет принудительно удалить пакет, не запрашивая подтверждения:
pip uninstall package_name -y-
Удаление всех пакетов: если вам нужно удалить все пакеты из вашей среды, вы можете воспользоваться следующей командой:
pip freeze | xargs pip uninstall -yЭта команда выводит список всех установленных пакетов и передает их команде удаления.
Эффективное управление пакетами, которые вам больше не нужны, позволяет поддерживать чистоту среды и избегать потенциальных конфликтов. Регулярный просмотр и удаление ненужных пакетов поможет поддерживать комфортную систему разработки.
Списки установленных пакетов
Pip предлагает несколько команд для составления списков и просмотра установленных пакетов.
-
Простой список: чтобы перечислить все установленные пакеты, используйте команду:
pip listЭта команда выводит простой список всех установленных пакетов вместе с их версиями.
-
Подробный список с версиями: для получения более подробного списка, включающего номера версий каждого пакета в удобном формате:
pip list --format=columnsЭто обеспечивает табличный формат, который легче читать и интерпретировать.
-
Использование Freeze для создания файла требований: команда freeze полезна для создания списка всех установленных пакетов с указанием их версий. Этот список можно сохранить в файле требований, что полезно для копирования среды в другие места:
pip freeze > requirements.txtЭта команда создает файл requirements.txt, содержащий все установленные пакеты и их соответствующие версии. Этот файл можно использовать для воссоздания окружения, выполнив команду:
pip install -r requirements.txt-
Список устаревших пакетов: чтобы узнать, какие пакеты имеют доступные обновления, используйте команду list —outdated:
pip list --outdatedЭта команда показывает, какие установленные пакеты устарели, и предоставляет последнюю доступную версию.
-
Список пакетов с конкретной информацией: вы можете получить информацию об установленных пакетах, используя команду show, за которой следует имя пакета:
pip show package_nameЭта команда предоставляет подробную информацию об указанном пакете, включая его зависимости, версию и место установки.
Регулярно просматривая и перечисляя установленные пакеты, вы сможете поддерживать четкое понимание состояния вашей среды и более эффективно управлять зависимостями.
Поиск пакетов
Pip предоставляет команды для поиска пакетов, доступных в индексе пакетов Python (PyPI).
-
Основные команды поиска: чтобы найти пакет, используйте следующую команду:
pip search search_termНапример, для поиска пакетов, связанных с визуализацией данных, вы можете использовать:
pip search visualizationЭта команда возвращает список пакетов, соответствующих поисковому запросу, вместе с их описаниями.
-
Фильтрация результатов поиска: хотя функциональность поиска в pip является несколько базовой, вы можете использовать более конкретные условия поиска или комбинировать их с поиском на сайте PyPI для более глубокой фильтрации.
-
Поиск пакетов с определенными метаданными: вы можете использовать веб-интерфейс PyPI для поиска пакетов с определенными метаданными, такими как классификаторы, которые классифицируют пакеты на основе таких критериев, как статус разработки, целевая аудитория и поддерживаемые версии Python.
-
Использование сторонних инструментов: воспользуйтесь сторонними инструментами и веб-сайтами, которые интегрируются с PyPI. Инструменты вроде pip-tools или веб-интерфейсы вроде Libraries.io могут предоставить более продвинутые функции поиска.
Используя поисковые возможности pip и внешние инструменты, вы сможете эффективно найти и оценить пакеты, которые наилучшим образом отвечают потребностям вашего проекта.
Управление зависимостями
Управление зависимостями — важнейший аспект поддержания стабильной и функциональной среды Python. Pip предлагает несколько команд, которые помогут вам эффективно работать с зависимостями пакетов.
-
Проверка зависимостей пакетов: чтобы посмотреть зависимости конкретного пакета, вы можете использовать команду show:
pip show package_nameЭта команда предоставляет подробную информацию о пакете, включая его зависимости. Например:
pip show requests-
Устранение конфликтов зависимостей: pip пытается разрешить эти конфликты автоматически, но если это не удается, вы можете вручную указать совместимые версии или использовать виртуальные среды для изоляции зависимостей.
-
Установка пакетов в виртуальной среде: виртуальные среды позволяют создавать изолированные среды Python для разных проектов, гарантируя, что зависимости не будут мешать друг другу.
Чтобы создать и активировать виртуальную среду, выполните следующие команды:
# Create a virtual environment
python -m venv env_name

# Activate the virtual environment (Windows)
env_name\Scripts\activate

# Activate the virtual environment (Linux/macOS)
source env_name/bin/activate
После активации вы можете устанавливать пакеты с помощью pip, и они будут находиться внутри виртуальной среды.
-
Обновление зависимостей: чтобы обновить пакет до последней версии, используйте флаг —upgrade:
pip install --upgrade package_nameВы также можете обновить все пакеты, перечисленные в файле требований, выполнив команду:
pip install --upgrade -r requirements.txt-
Замораживание зависимостей: после установки и управления зависимостями полезно заморозить их в файле требований. Это гарантирует, что точные версии пакетов задокументированы и могут быть воспроизведены:
pip freeze > requirements.txtЭффективное управление зависимостями позволяет поддерживать стабильную и предсказуемую среду Python, что делает разработку более надежной.
Расширенные команды
Pip предлагает несколько дополнительных команд, которые обеспечивают больший контроль и предоставляют информацию об установленных пакетах и зависимостях.
-
Команда Show для получения подробной информации о пакете: show предоставляет подробную информацию о конкретном пакете, включая его зависимости, версию и место установки:
pip show package_nameНапример:
pip show numpyЭта команда выводит подробные метаданные о пакете numpy, помогая понять его зависимости и другую необходимую информацию.
-
Команда Check для проверки целостности пакета: check используется для проверки совместимости зависимостей установленных пакетов:
pip checkЭта команда проверяет наличие конфликтов зависимостей и сообщает о найденных проблемах, позволяя оперативно их решить.
-
Загрузка пакетов без установки: вы можете загружать пакеты без их установки с помощью команды download. Это может быть полезно для автономной установки или для проверки содержимого пакета перед установкой:
pip download package_nameНапример, чтобы загрузить пакет requests:
pip download requests-
Установка пакетов из локальных архивов: если вы загрузили пакеты в виде архивов (например, whl-файлов), вы можете установить их локально с помощью команды install:
pip install /path/to/package_name.whl-
Установка из системы управления исходными текстами: pip позволяет устанавливать пакеты непосредственно из репозиториев контроля исходного кода, что полезно для тестирования последних версий кода или отдельных веток проекта:
pip install git+https://github.com/username/repo_name.gitВы также можете указать ветки, теги или коммиты:
pip install git+https://github.com/username/repo_name.git@branch_name-
Использование кэша Pip: pip поддерживает кэш загруженных пакетов для ускорения установки. Вы можете управлять этим кэшем с помощью команды cache.
Список записей кэша:
pip cache listУдалить записи кэша:
pip cache purgeИспользуя эти расширенные команды, вы сможете получить больший контроль над средой Python, улучшить рабочий процесс и эффективнее устранять неполадки.
Pip — невероятно мощный и универсальный инструмент для управления пакетами Python, и освоение его различных команд может значительно улучшить ваш рабочий процесс разработки. От установки и обновления пакетов до управления зависимостями и настройки конфигураций, pip предоставляет все функции, необходимые для поддержания надежной и эффективной среды Python.
Скрытый текст
ProductStar — онлайн-школа IT-профессий, часть холдинга РБК с 2023 года. Спасибо, что растете вместе с нами!
Вы можете подписаться на нас в Telegram, посмотреть на все наши статьи на Хабре и познакомиться с нашим расширенным курсом «Python-разработчик».
А еще мы запустили интерактивную игру «Lead Game», которая позволит прокачать лидерские навыки на реальных кейсах. Хотите занять руководящую должность или уже занимаете? Пришло время оценить ваши soft skills.
View this page
Toggle table of contents sidebar
Usually, pip is automatically installed if you are:
-
working in a
virtual environment -
using Python downloaded from python.org
-
using Python that has not been modified by a redistributor to remove
ensurepip
Supported Methods
If your Python environment does not have pip installed, there are 2 mechanisms
to install pip supported directly by pip’s maintainers:
-
ensurepip -
get-pip.py
ensurepip
Python comes with an ensurepip module[1], which can install pip in
a Python environment.
Linux
$ python -m ensurepip --upgrade
MacOS
$ python -m ensurepip --upgrade
Windows
C:> py -m ensurepip --upgrade
More details about how ensurepip works and how it can be used, is
available in the standard library documentation.
get-pip.py
This is a Python script that uses some bootstrapping logic to install
pip.
-
Download the script, from https://bootstrap.pypa.io/get-pip.py.
-
Open a terminal/command prompt,
cdto the folder containing the
get-pip.pyfile and run:
More details about this script can be found in pypa/get-pip’s README.
Standalone zip application
Note
The zip application is currently experimental. We test that pip runs correctly
in this form, but it is possible that there could be issues in some situations.
We will accept bug reports in such cases, but for now the zip application should
not be used in production environments.
In addition to installing pip in your environment, pip is available as a
standalone zip application.
This can be downloaded from https://bootstrap.pypa.io/pip/pip.pyz. There are
also zip applications for specific pip versions, named pip-X.Y.Z.pyz.
The zip application can be run using any supported version of Python:
If run directly:
Linux
$ chmod +x ./pip.pyz
$ ./pip.pyz
then the currently active Python interpreter will be used.
MacOS
$ chmod +x ./pip.pyz
$ ./pip.pyz
then the currently active Python interpreter will be used.
Windows
then the currently active Python interpreter will be used.
You may need to configure your system to recognise the .pyz extension
before this will work.
Alternative Methods
Depending on how you installed Python, there might be other mechanisms
available to you for installing pip such as
using Linux package managers.
These mechanisms are provided by redistributors of pip, who may have modified
pip to change its behaviour. This has been a frequent source of user confusion,
since it causes a mismatch between documented behaviour in this documentation
and how pip works after those modifications.
If you face issues when using Python and pip installed using these mechanisms,
it is recommended to request for support from the relevant provider (eg: Linux
distro community, cloud provider support channels, etc).
Upgrading pip
Upgrade your pip by running:
Linux
$ python -m pip install --upgrade pip
MacOS
$ python -m pip install --upgrade pip
Windows
C:> py -m pip install --upgrade pip
Compatibility
The current version of pip works on:
-
Windows, Linux and macOS.
-
CPython 3.9, 3.10, 3.11, 3.12, 3.13, and latest PyPy3.
pip is tested to work on the latest patch version of the Python interpreter,
for each of the minor versions listed above. Previous patch versions are
supported on a best effort approach.
Other operating systems and Python versions are not supported by pip’s
maintainers.
Users who are on unsupported platforms should be aware that if they hit issues, they may have to resolve them for themselves. If they received pip from a source which provides support for their platform, they should request pip support from that source.