
В данной статье мы обсудим, что делать, если при обновлении операционной системы Windows вы столкнулись с ошибкой 0x80070490 и как её исправить.
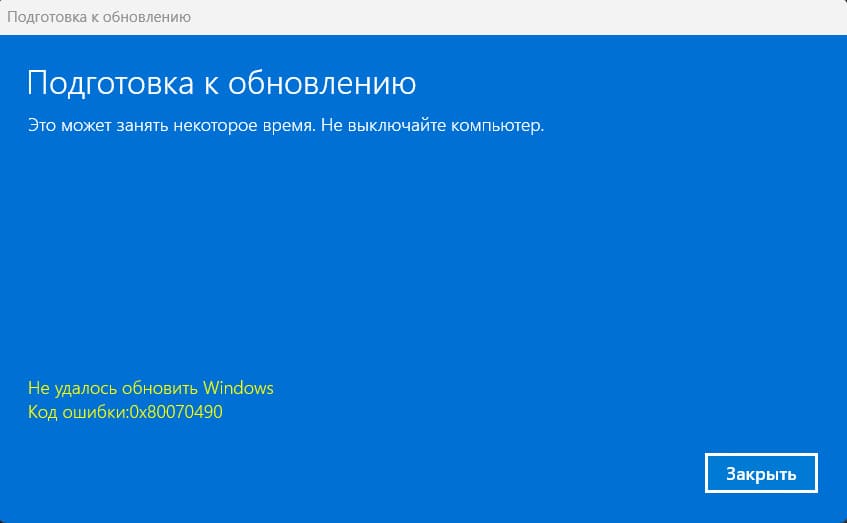
Эта ошибка часто возникает у пользователей, которые пытаются обновить Windows до последней версии с помощью Центра обновления Windows. Основной причиной ошибки является повреждение компонентов менеджера пакетов Component-Based Servicing. В результате установщик не сможет завершить обновление без дополнительных действий со стороны пользователя.
Эта проблема может возникать не только на Windows 10, но и на Windows 11, 8 и 7.
Если у вас Windows 10, попробуйте активировать систему через терминал, следуя нашей инструкции.
Для активации Windows 11, воспользуйтесь другой инструкцией.
Способы исправления
Вариант 1. С помощью инструмента System File Checker
1. Откройте командную строку от имени администратора: введите в строке поиска cmd, щёлкните правой кнопкой мыши и выберите «Запуск от имени администратора».
2. В командной строке введите команду:
sfc /scannow
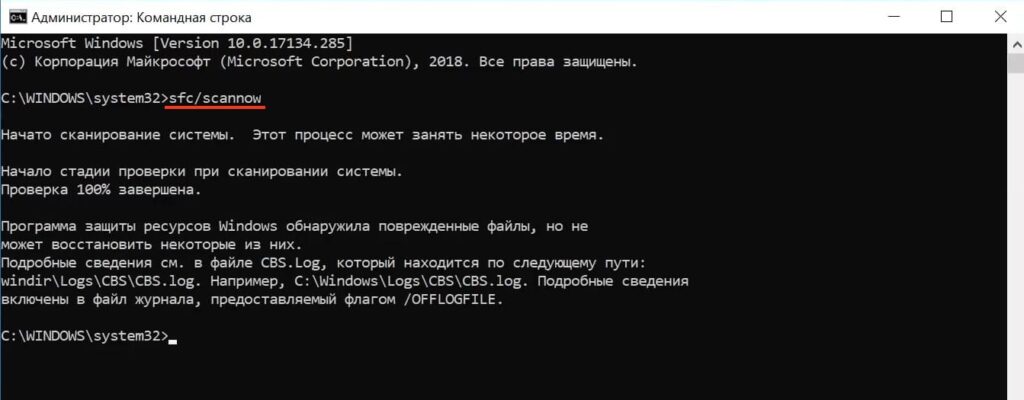
3. Подождите завершения сканирования и перезапустите систему.
Вариант 2. Перезапуск службы Центра обновления Windows
1. Введите в поиске «Службы» и откройте их.
2. Найдите «Центр обновления Windows» и откройте его.
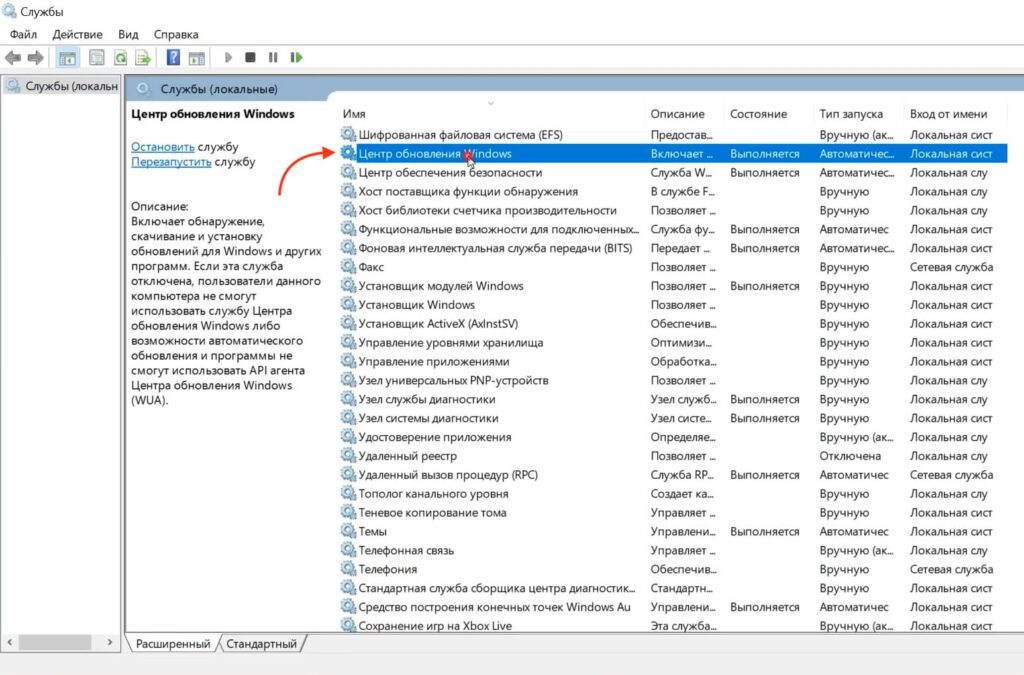
3. Установите тип запуска на «Автоматически», после чего «Остановите» и снова «Запустите службу».
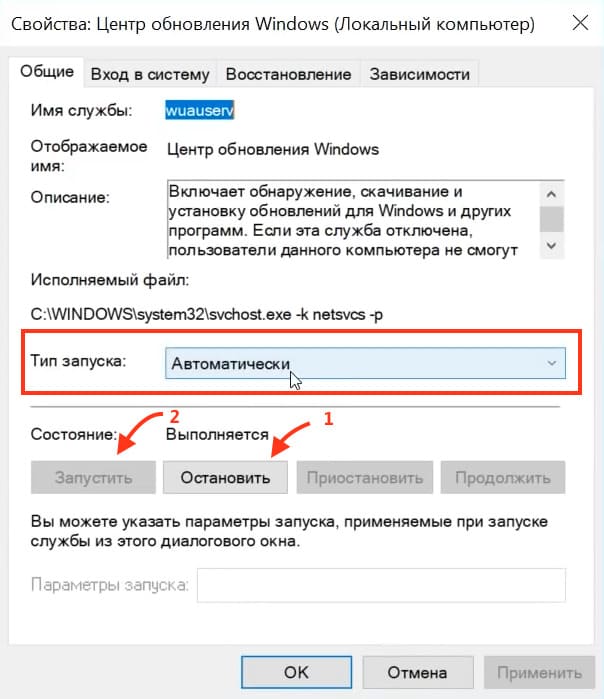
или выберите «Перезапустить».

Вариант 3. Восстановление исходного состояния компонентов Центра обновления Windows
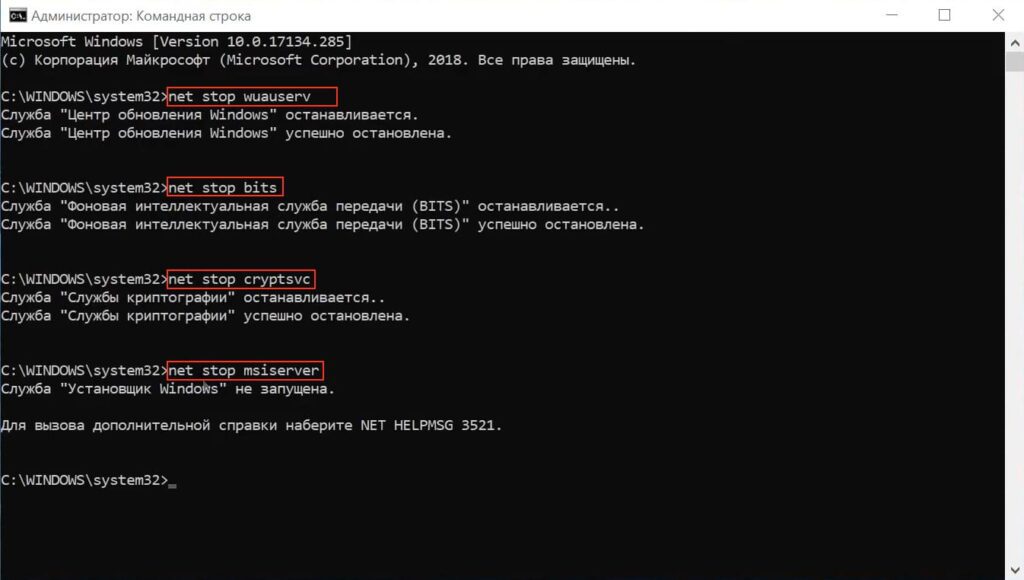
1. Запустите командную строку от имени Администратора.
2. Остановите службы BITS и Центра обновления Windows, вводя следующие команды:
net stop wuauserv
net stop bits
net stop cryptsvc
net stop msiserver
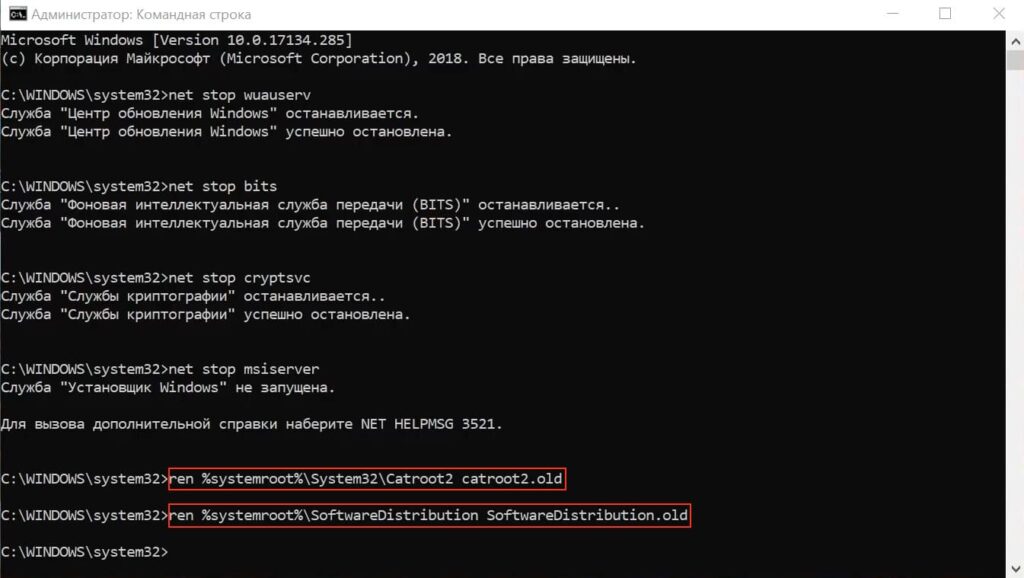
3. Переименовываем резервных копий папок и распространяемого ПО, вводя следующие команды:
ren %systemroot%\System32\Catroot2 catroot2.old
ren %systemroot%\SoftwareDistribution SoftwareDistribution.old
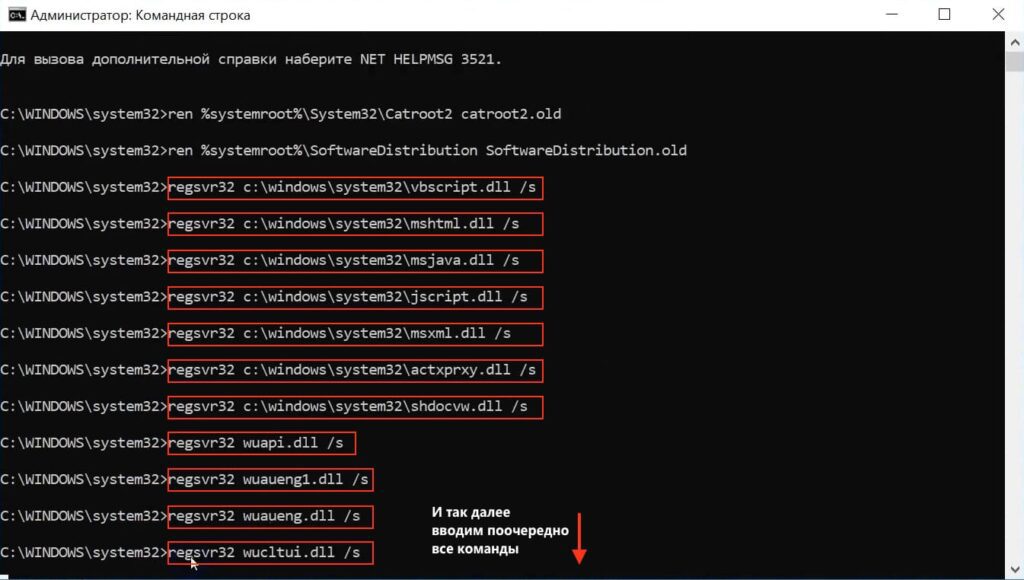
4. Повторно зарегистрируйте все службы BITS и Центра обновления Windows, вводя следующие команды поочередно:
regsvr32 c:\windows\system32\vbscript.dll /s
regsvr32 c:\windows\system32\mshtml.dll /s
regsvr32 c:\windows\system32\msjava.dll /s
regsvr32 c:\windows\system32\jscript.dll /s
regsvr32 c:\windows\system32\msxml.dll /s
regsvr32 c:\windows\system32\actxprxy.dll /s
regsvr32 c:\windows\system32\shdocvw.dll /s
regsvr32 wuapi.dll /s
regsvr32 wuaueng1.dll /s
regsvr32 wuaueng.dll /s
regsvr32 wucltui.dll /s
regsvr32 wups2.dll /s
regsvr32 wups.dll /s
regsvr32 wuweb.dll /s
regsvr32 Softpub.dll /s
regsvr32 Mssip32.dll /s
regsvr32 Initpki.dll /s
regsvr32 softpub.dll /s
regsvr32 wintrust.dll /s
regsvr32 initpki.dll /s
regsvr32 dssenh.dll /s
regsvr32 rsaenh.dll /s
regsvr32 gpkcsp.dll /s
regsvr32 sccbase.dll /s
regsvr32 slbcsp.dll /s
regsvr32 cryptdlg.dll /s
regsvr32 Urlmon.dll /s
regsvr32 Shdocvw.dll /s
regsvr32 Msjava.dll /s
regsvr32 Actxprxy.dll /s
regsvr32 Oleaut32.dll /s
regsvr32 Mshtml.dll /s
regsvr32 msxml.dll /s
regsvr32 msxml2.dll /s
regsvr32 msxml3.dll /s
regsvr32 Browseui.dll /s
regsvr32 shell32.dll /s
regsvr32 wuapi.dll /s
regsvr32 wuaueng.dll /s
regsvr32 wuaueng1.dll /s
regsvr32 wucltui.dll /s
regsvr32 wups.dll /s
regsvr32 wuweb.dll /s
regsvr32 jscript.dll /s
regsvr32 atl.dll /s
regsvr32 Mssip32.dll /s
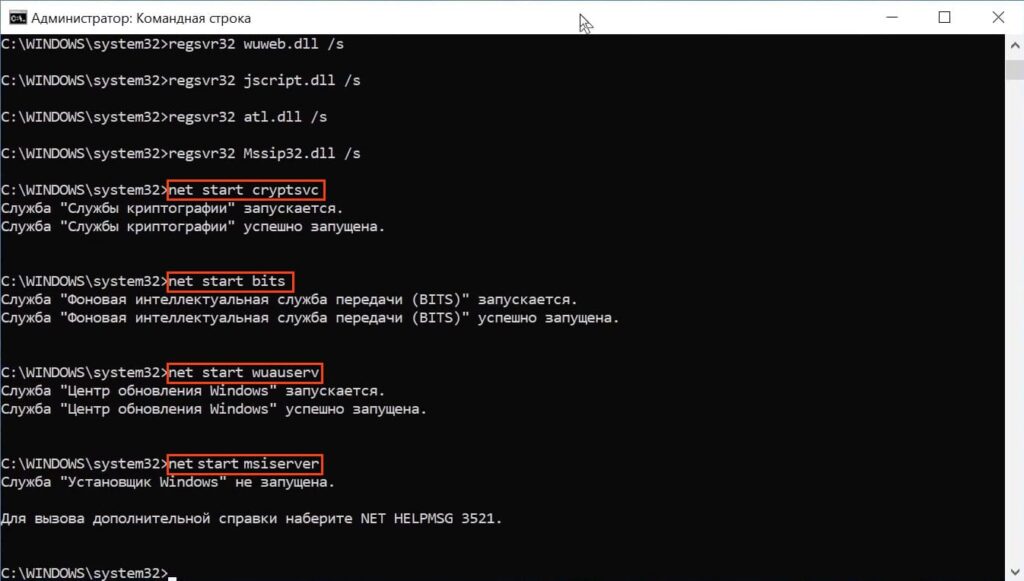
5. После перерегистрации запустите установленные раннее службы:
net start cryptsvc
net start bits
net start wuauserv
net start msiserver
Вариант 4. Восстановление системы
Примечание: Этот способ доступен, только если вы заранее создали точку восстановления в системе Windows.
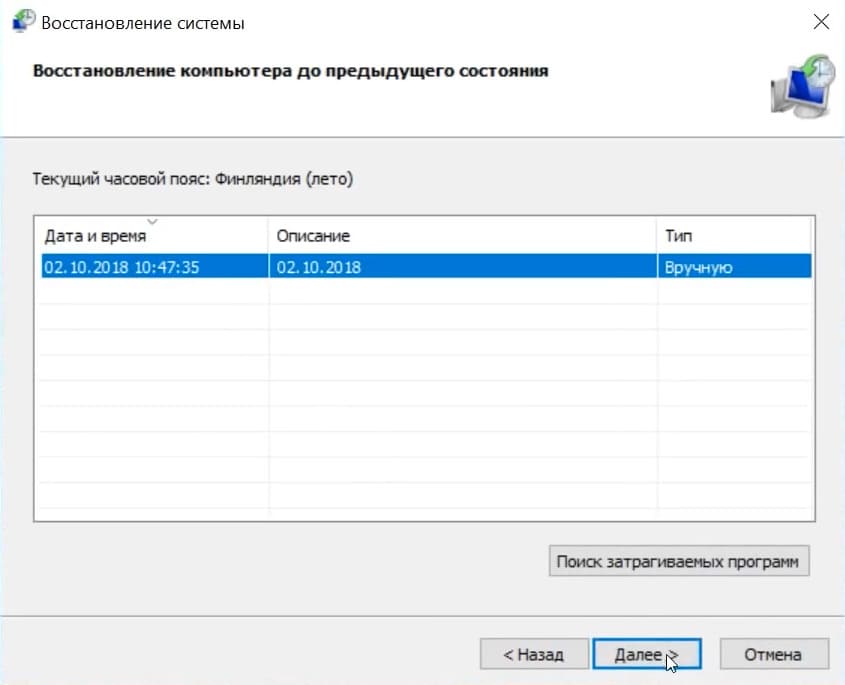
1. Введите в поиске rstrui, запустите и следуйте инструкциям для выбора точки восстановления системы.
2. Нажимаем «Далее»

3. Выберите точку восстановления, после нажмите «Далее».
4. Нажимаем «Готово»
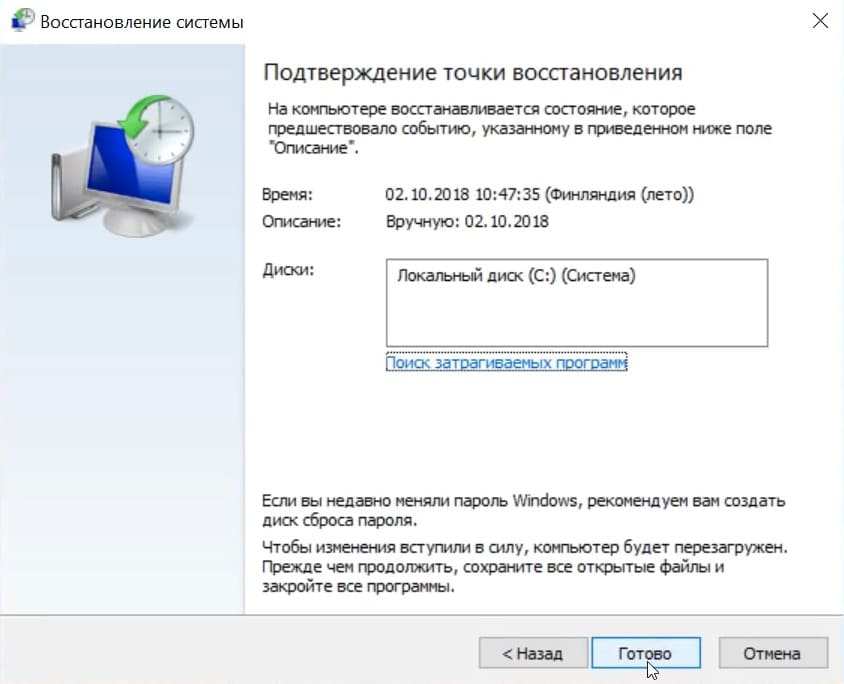
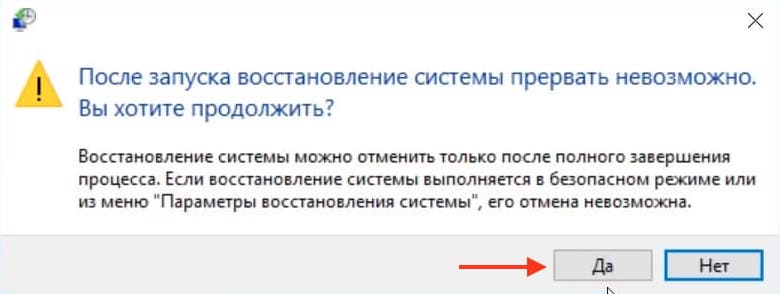
5. После чего появится предупреждение системы, что восстановление невозможно будет прервать. Нажимаем «Да».
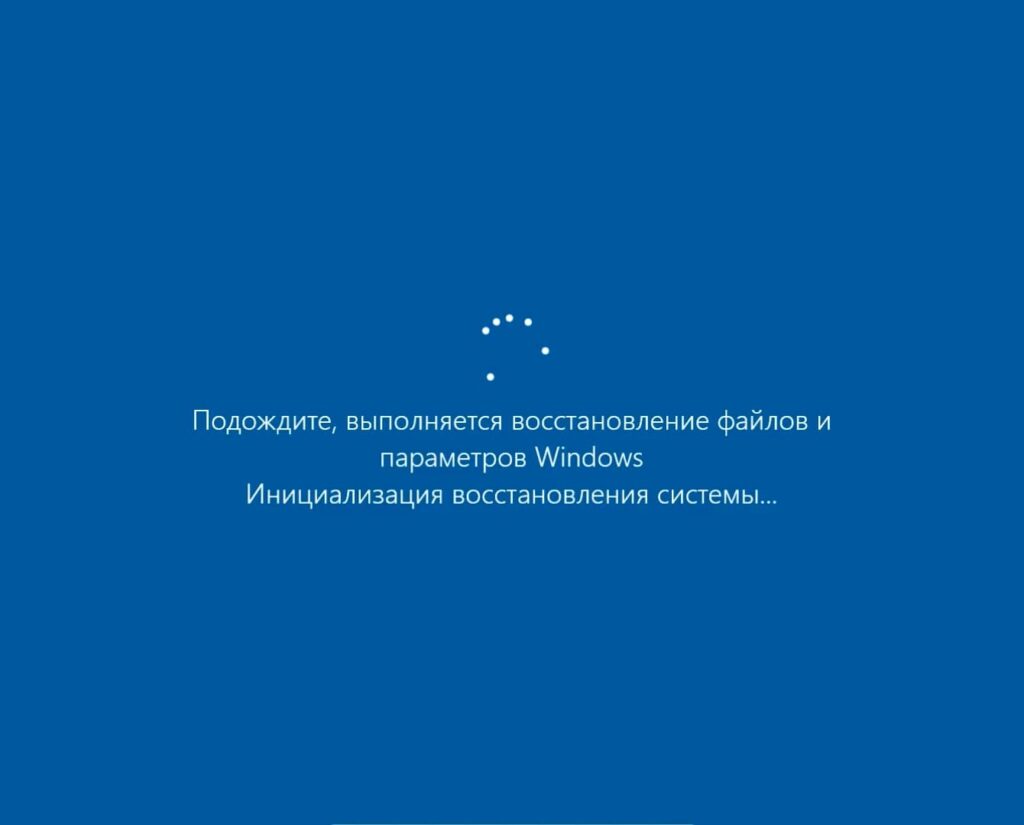
Далее компьютер автоматически перезагрузится, и начнется восстановление системы. Дождитесь окончания процесса.
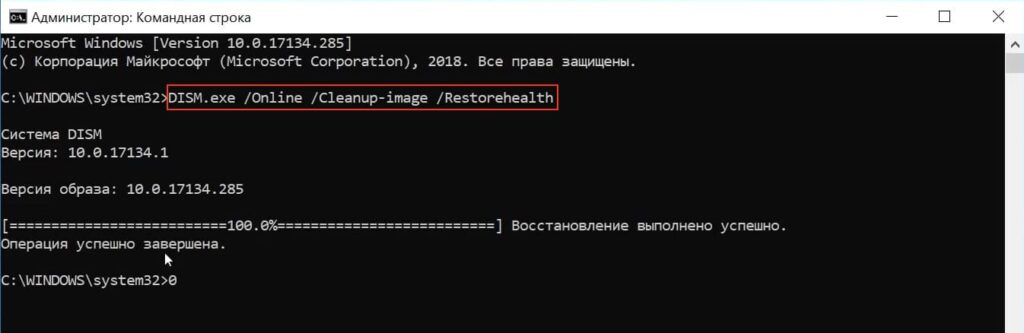
Вариант 5. Использование инструмента DISM
Примечание: Для правильной работы этого инструмента, компьютер должен быть подключен к Интернету.
1. Откройте командную строку от имени администратора и выполните команду:
DISM.exe /Online /Cleanup-image /Restorehealth
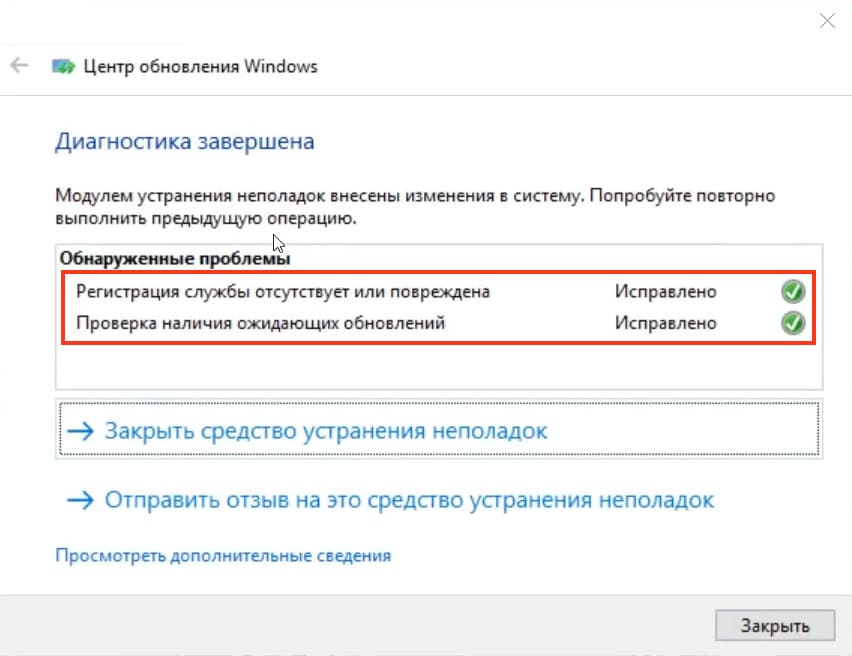
Вариант 6. Использование функции устранения неполадок
1. Откройте «Параметры» => «Обновление и безопасность» => «Устранение неполадок».

2. Найдите «Центр обновления Windows» и запустите средство устранения неполадок.
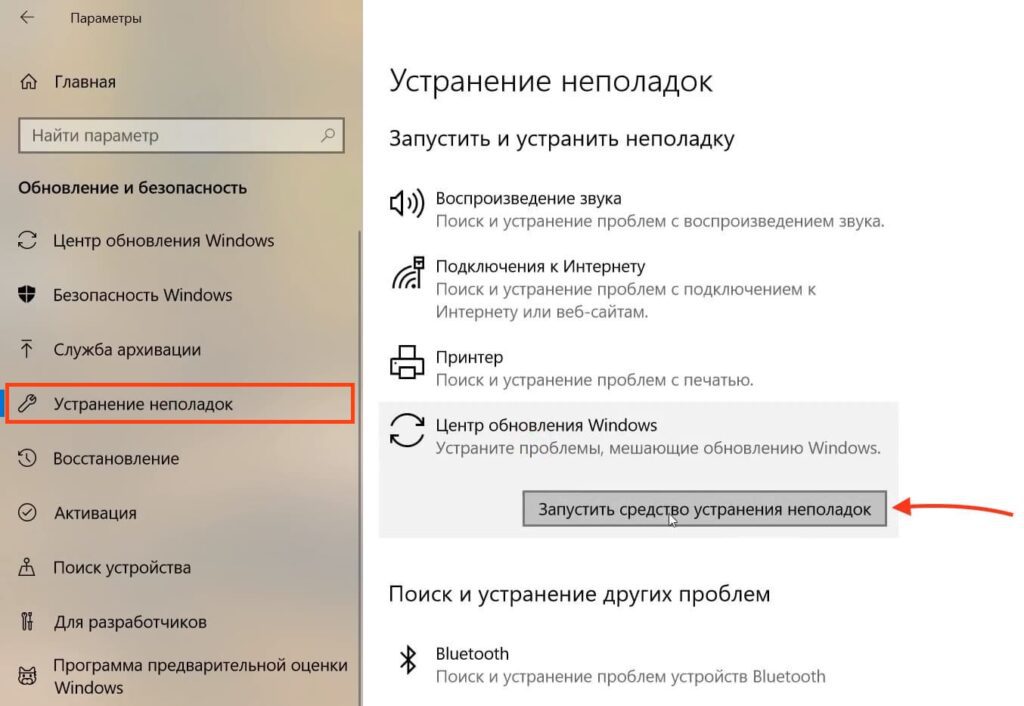
3. Начнется поиск проблем и при их наличии, нажмите «Применить это исправление»


После чего все проблемы должны быть исправлены
Вариант 7. Сторонняя утилита Windows Repair
Если встроенные утилиты не помогли, можно использовать бесплатную утилиту Windows Repair. Скачать её можно с официального сайта, либо по прямой ссылке.
1. Установите и запустите приложение
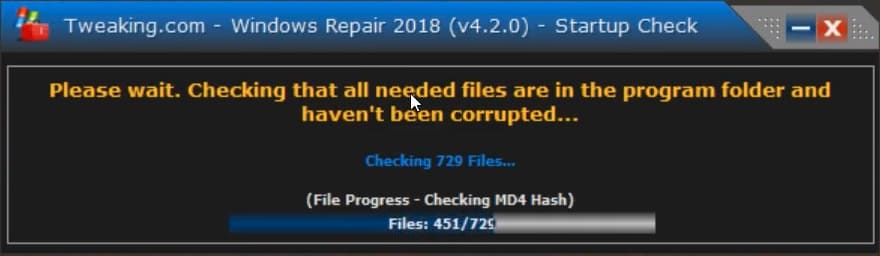
2. Перейдите на вкладку «Repairs», после нажмите «Open Repairs»

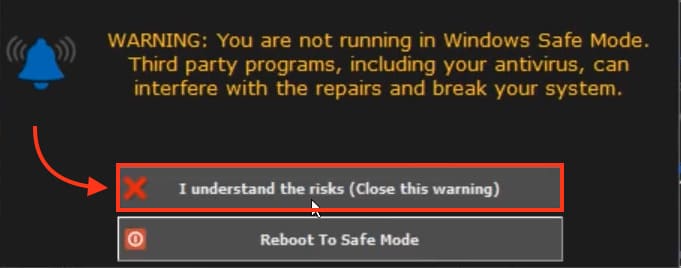
3. Далее вы увидите предупреждение, что вы запустили программу не в безопасном режиме и в таком случае сторонние приложения, включая ваш антивирус, могут помешать исправлению ошибок
Предупреждение можно закрыть, кликнув на «I understand this risks».
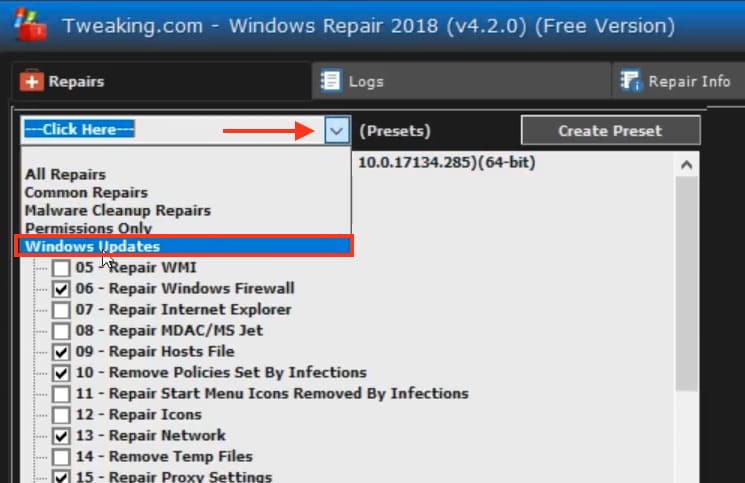
4. Из всплывающего меню, выбираете «Windows Updates»
5. Теперь нажимаете «Start Repairs»
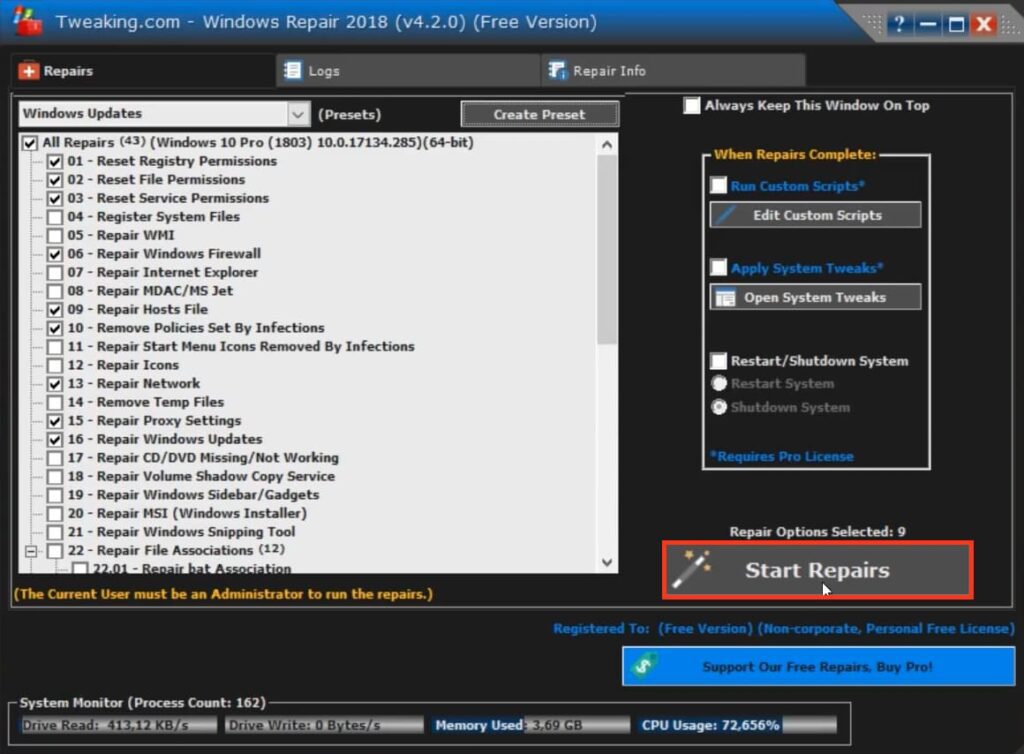
После чего начнется процесс исправление ошибок системы
По завершению, вас попросят перезагрузить систему, для того чтобы изменения вступили в силу.
Дополнительные меры
Проверьте компьютер на наличие вирусов и вредоносных приложений, так как они также могут быть причиной возникновения ошибки.
Если все перечисленные способы не помогли, остаётся только переустановка системы или сброс настроек.
Напишите в комментариях, какой из способов вам помог решить проблему и какие ещё способы вы знаете.
Способ 1: Использование средства устранения неполадок
Код ошибки 0x80070490 появляется в Windows 10 при проверке или установке обновлений и означает, что соответствующий инструмент не работает должным образом по определенным причинам. Рекомендуем для начала использовать автоматическое устранение неполадок, чтобы сэкономить время и силы на поиск решения проблемы самостоятельно.
— Для этого откройте «Пуск» и перейдите в «Параметры».
— Нас интересует категория «Обновление и безопасность».

— С помощью меню слева перейдите к пункту «Устранение неполадок».

— Нажмите «Центр обновления Windows» и запустите это.

— Дождитесь завершения сканирования и следуйте инструкциям на экране.

Способ 2: Перезапуск службы
Второй вариант — перезапустить службу, отвечающую за запуск Центра обновления Windows. Делается это вручную путем доступа к специальному системному меню, а именно:
— Запустите «Службы» с помощью поиска в «Пуске».

— Оттуда прокрутите список вниз и дважды щелкните строку «Центр обновления Windows».

— Остановите службу вручную, а затем запустите ее, нажав кнопку в окне.

После этого проверьте наличие обновлений или перезагрузите ПК, чтобы обнуления запустились автоматически. Если ошибка опять отобразится на экране, продолжите исправление ошибки с помощью приведенных ниже способов.
Способ 3: Сброс параметров Центра обновления Windows
Данный метод заключается в том, чтобы сбросить настройки обновления Windows 10 вручную из консоли, введя специальные команды. Вам нужно запустить «Командную строку» от администратора, найдя ее в меню «Пуск», а затем вставить следующие команды одну за другой.
net stop wuauserv
net stop cryptSvc
net stop bits
net stop msiserver
ren C:\Windows\SoftwareDistribution SoftwareDistribution.old
ren C:\Windows\System32\catroot2 catroot2.old
net start wuauserv
net start cryptSvc
net start bits
net start msiserver

Когда вы закончите, перезагрузите ПК, чтобы исправления могли запуститься, и проверьте, насколько эффективными были шаги.
Способ 4: Чистка ключей реестра
Периодически в «Редакторе реестра» могут наблюдаться дополнительные ключи, мешающие правильной работе Центра обновления Windows, из-за чего возникает ошибка с кодом 0x80070490. Требуется несколько шагов, чтобы вручную проверить и удалить ненужные настройки.
— Откройте утилиту «Выполнить» через клавиши Win + R. Затем введите regedit и нажмите Enter для подтверждения.

— Следуйте по пути HKEY_LOCAL_MACHINE\SOFTWARE\Microsoft\Windows\CurrentVersion\Appx\AppxAllUserStore.

— Найдите там настройки с примерным названием «S-1-7-21-1505974246-3813539684-4277612129-1026» и удалите их все.

— При появлении уведомления нажмите «Да».

Способ 5: Очистка папки с обновлениями
В некоторых случаях ошибка 0x80070490 возникает из-за проблемных файлов обновления, оставшихся в системной папке. Рекомендуется очистить ее вручную, чтобы устранить все проблемы.
— Откройте системный раздел жесткого диска, откройте папку «Windows», щелкните ПКМ каталог «SoftwareDistribution» и в появившемся всплывающем меню выберите «Переименовать».

— Добавьте .old в конце, чтобы указать отметить старую версию каталога, а далее подтвердите изменения и нажмите Enter.

Снова запустите поиск обновлений, после чего будет создана еще одна папка того же типа. Если все прошло удачно, ее старую версию можно удалить. В противном случае лучше переименовать обратно.
Способ 6: Проверка компьютера на наличие вирусов
Рассматриваемая проблема могла возникнуть из-за заражения ПК вирусом, блокирующим доступ к службе обновлений или затрагивающим определенные системные файлы. Если ничего из вышеперечисленного не подошло, проверьте ОС на вирусы, используя для этого нужный софт.

Способ 7: Проверка целостности системных файлов
Последний метод решения является проверка целостности системных файлов. Такое повреждение встречается редко, но ситуация все же возможна. Такой анализ выполняется с помощью системных утилит SFC и DISM. Сначала запускается первая, и, если сканирование заканчивается с ошибкой, нужно дополнительно подключить вторую, а после этого снова вернуться в SFC.

0
4 Ways to Fix Windows Update Error Code 0x80070490
Error code 0x80070490 occurs when a process in the System Component Store or Component-based Servicing (CBS) becomes corrupted. In this article, we will discuss the causes and effects of Error 0x80070490 and provide verified fixes.
This error may occur during a system update via Windows Update (WU) or by installing an update using the KB file. There have been confirmed cases of this error occurring when installing Windows cumulative updates in particular.
It’s also worth mentioning that this error will prevent you from installing InPlace upgrades, including the Media Creation Tool, mounted ISO, and bootable USB drive.
It can also occur while updating an app downloaded from the Microsoft Store. In addition, you may get this error when trying to buy an app from the Microsoft Store.
What Causes Error 0x80070490?
This error can occur if files belonging to Component-Based Servicing (CBS) or System Component Store become corrupt. Other reasons for this error include corrupted Windows Registry files and disabled services required by Windows Update.
Third-party antivirus programs may also cause this error by preventing Windows Update from performing its tasks. So, before you attempt to use any of the provided fixes, you should temporarily disable your antivirus software and try installing updates.
The error code 0x80070490 stands for E_ELEMENT_NOT_FOUND, which means that an item required to install the update could not be found in the package. This, in turn, means that the update package has been corrupted.
We’ve included several methods that could help you fix this error. The fixes were composed with Windows 10 in mind, but some might apply to Windows 8.1 and Windows 7.
Video Guide on How to Fix Windows Update Error 0x80070490
Table of Contents:
- Introduction
- Method 1. Run the Windows Update Troubleshooter
- Method 2. Run a System File Checker (SFC) Scan
- Method 3. Run Deployment Image & Servicing Management (DISM)
- Method 4. Reset Windows Update Components Manually
- Video Guide on How to Fix Windows Update Error 0x80070490
Download Computer Malware Repair Tool
It is recommended to run a free scan with Combo Cleaner — a tool to detect viruses and malware on your device. You will need to purchase the full version to remove infections. Free trial available. Combo Cleaner is owned and operated by Rcs Lt, the parent company of PCRisk.com read more.
Method 1. Run the Windows Update Troubleshooter
If your PC is running Windows 10, you can run its built-in Windows Update troubleshooter. The troubleshooter is dedicated to resolving various problems, including Windows Update-related issues.
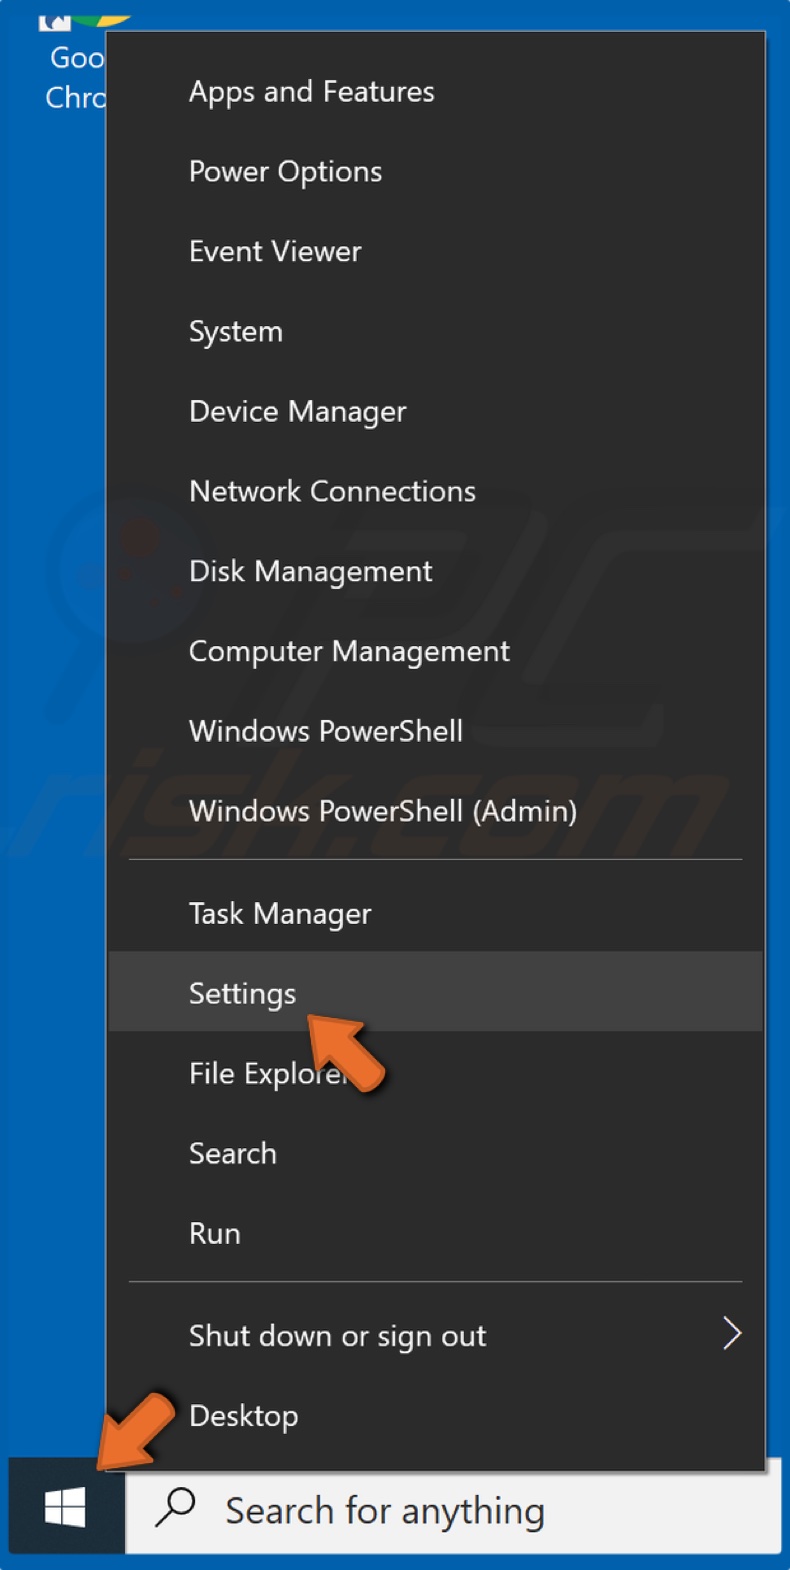
1. Right-click the Start Menu and click Settings.
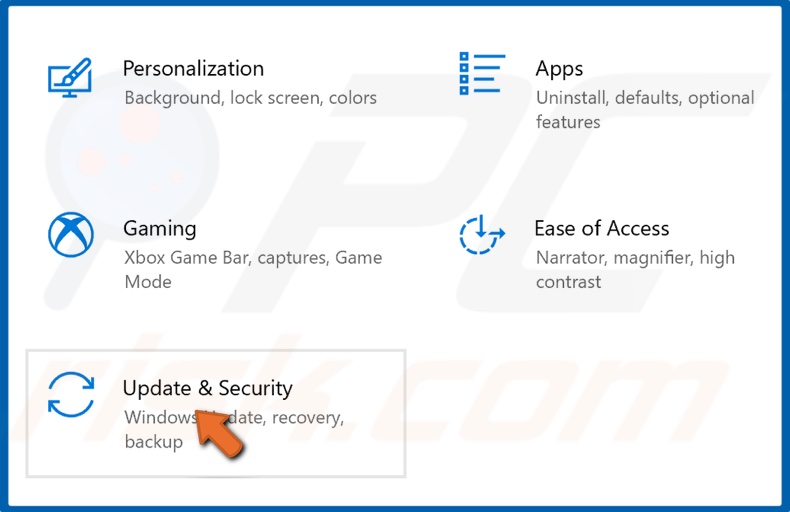
2. Select Update & Security.
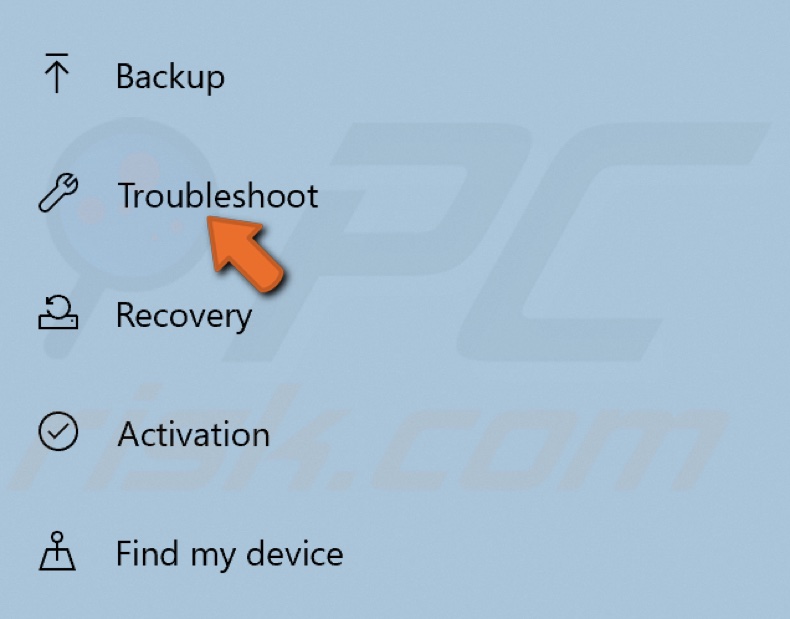
3. Click Troubleshoot.
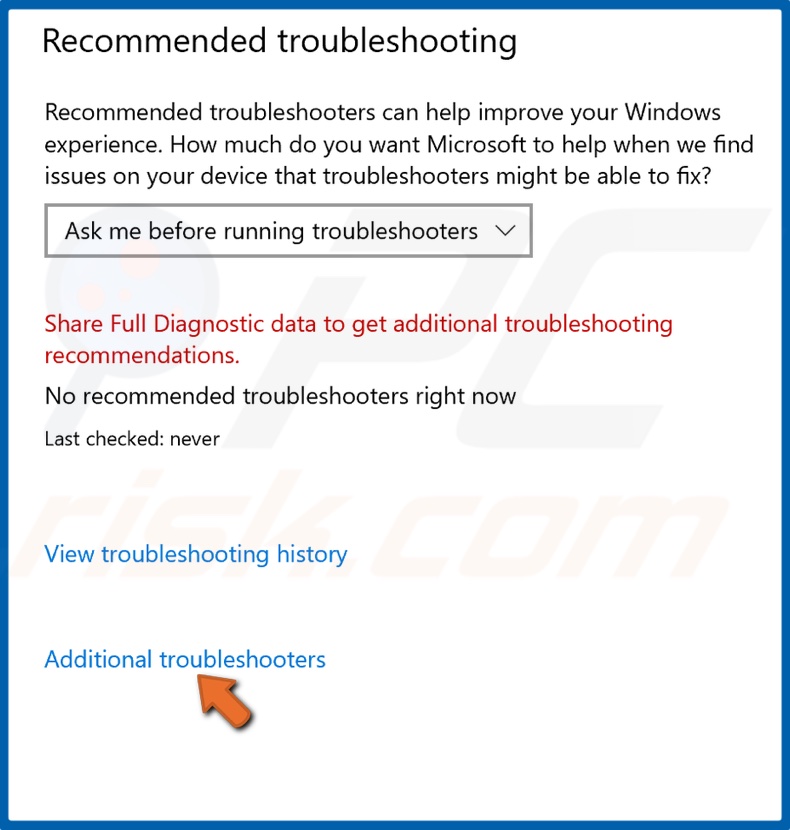
4. Click Additional troubleshooters.
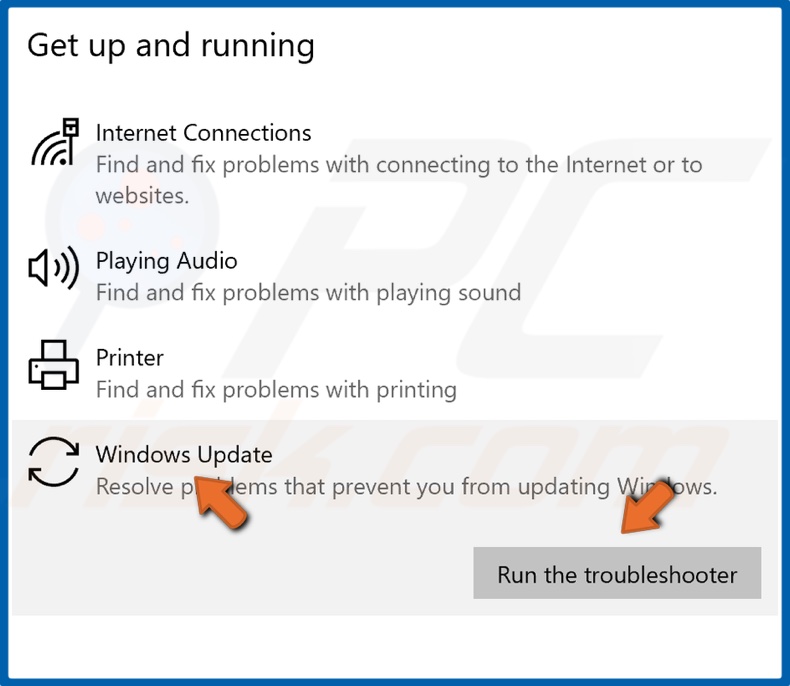
5. Select Windows Update and click Run the troubleshooter.
6. If the troubleshooter detects an issue, it will select and apply a fix automatically.
[Back to Table of Contents]
Method 2. Run a System File Checker (SFC) Scan
The Windows System File Checker is a built-in tool ideal for resolving issues regarding corrupted files. The System File Checker scans the registry and then attempts to repair corrupted registry files if it finds any. You can perform the scan by opening the Command Prompt with administrative privileges and executing the «sfc /scannow» command.
1. Hold down Windows+R keys to open the Run dialog box.

2. Type in CMD in the dialog box and simultaneously hold down Shift+Ctrl+Enter keys to open Command Prompt with administrative privileges.
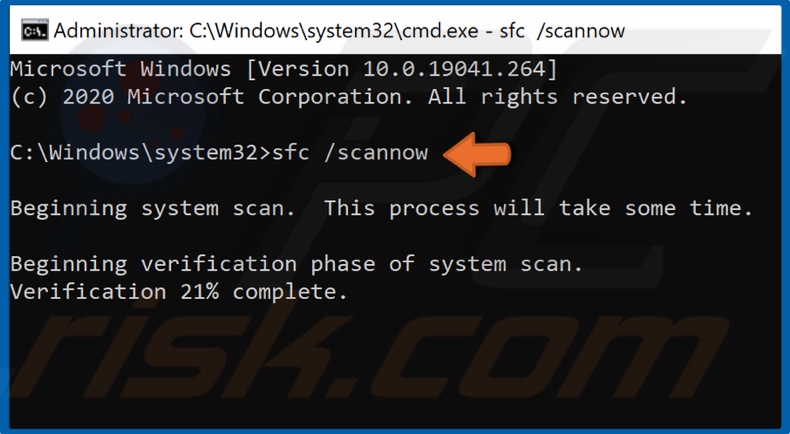
3. Type in the sfc /scannow command in the Command Prompt and hit the Enter key to start the scan.
4. Once the scan has been completed, restart your PC and try updating Windows.
If you still get Error 0x80070490, move to the next method.
[Back to Table of Contents]
Method 3. Run Deployment Image & Servicing Management (DISM)
If the Component-Based Servicing (CBS) has been corrupted, executing the DISM command might fix it.
1. Hold down Windows+R keys to open the Run dialog box.
2. Type in CMD in the dialog box and then simultaneously hold down Shift+Ctrl+Enter keys to open Command Prompt with administrative privileges.
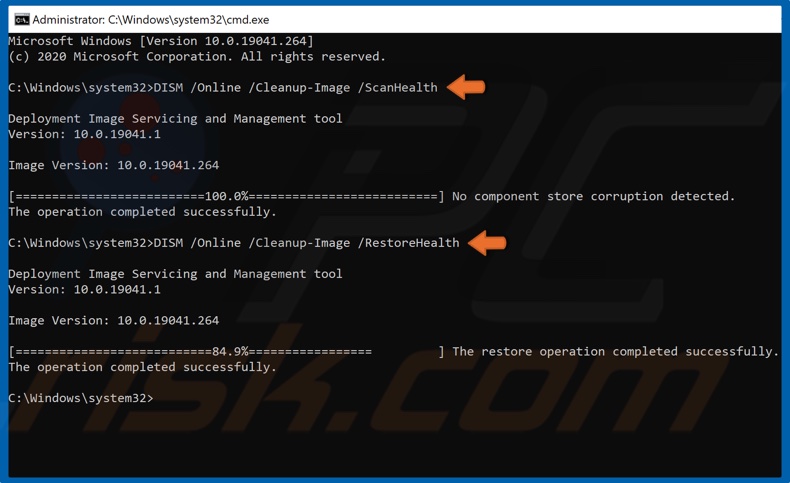
3. Type in DISM /Online /Cleanup-Image /ScanHealth and hit Enter. This parameter will scan the component store for corruption.
4. Type in the DISM /Online /Cleanup-Image /RestoreHealth command and hit Enter.
5. Once the process has been completed, try updating Windows 10.
[Back to Table of Contents]
Method 4. Reset Windows Update Components Manually
By resetting the Windows Update Components, you may successfully remove damaged files, preventing Windows from installing updates. The reset process involves disabling key Windows Update services (BITS, Cryptographic, MSI Installer, and Windows Update services) via Command Prompt.
After disabling the services, you have to rename SoftwareDistribution and Catroot2 folders to trigger Windows to recreate necessary update components.
The SoftwareDistribution and Catroot2 folders are essential for Windows Update processes as Catroot2 stores Windows update package signatures. Renaming Catroot2 will trigger Windows to create a new folder, thus eliminating corrupted files from the update process.
1. Hold down Windows+R keys to open the Run dialog box.
2. Type in CMD in the dialog box and simultaneously hold down Shift+Ctrl+Enter keys to open Command Prompt with administrative privileges.
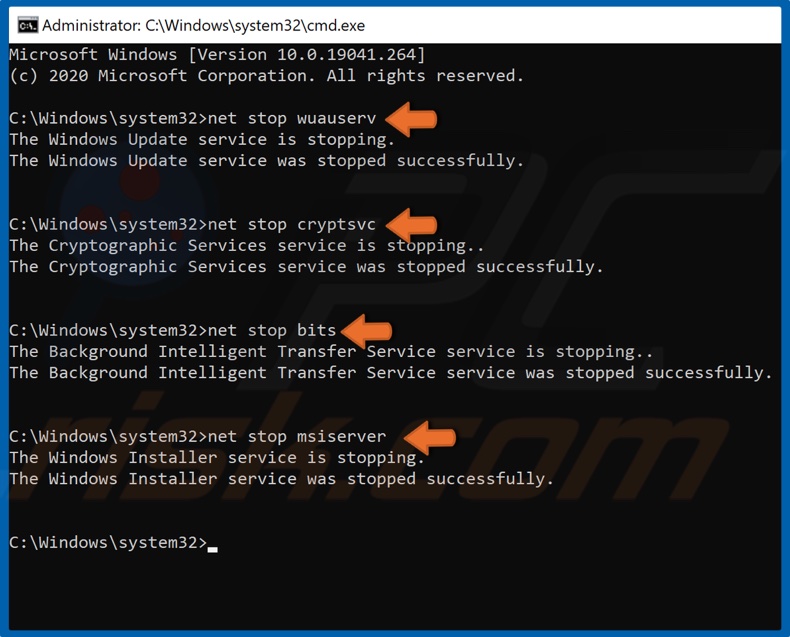
3. Here, you will have to stop BITS, Cryptographic, MSI Installer, and Windows Update services. Type in the following commands and hit Enter after entering each command:
- net stop wuauserv
- net stop cryptSvc
- net stop bits
- net stop msiserver
Once the services have been disabled, you can rename the SoftwareDistribution and Catroot2 via Command Prompt.

4. Type in ren C:\Windows\SoftwareDistribution SoftwareDistribution.old and hit Enter.
5. Then, type in ren C:\Windows\System32\catroot2 Catroot2.old and hit Enter.
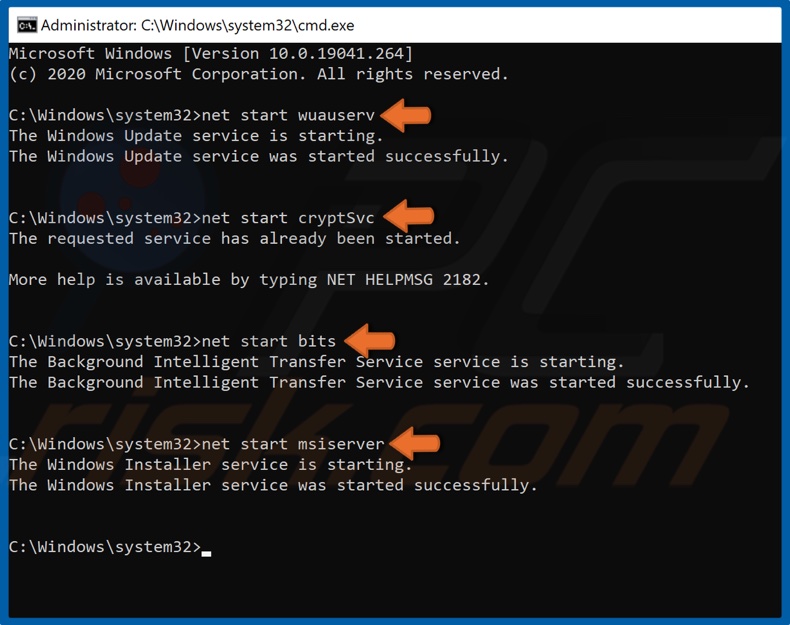
6. Lastly, restart BITS, Cryptographic, MSI Installer, and Windows Update services. Type in the following commands and hit Enter after entering each command:
- net start wuauserv
- net start cryptSvc
- net start bits
- net start msiserver
7. Close the Command Prompt, and try updating windows 10.
[Back to Top]
This post will discuss the possible culprits causing the update error 0x80070490 along with seven proper ways to address them. This bug typically occurs when you are signed in using a corrupted user profile. To fix this, create a new user account and delete the existing ones via the registry.

Note: Before proceeding to the solutions listed below, disable third-party antivirus software, and check whether this solves the error 0x80070490. If the issue gets resolved, remove this program on your computer and instead start using the default security application i.e. Microsoft Defender. If not, try the following suggestions sequentially –
1] Create a New User Account
The update error 0x80070490 typically occurs when corruption is associated with the signed-in user profile. To fix this, you should create a new user account using the following steps –
- First of all, navigate to the below path –
Settings (Win + I) > Accounts > Your Info
- Switch to the right side and click “Sign in with a local account instead“.

- Follow the on-screen instructions and sign in using the newly created user ID and password.
Now that you have logged in using a new user account, there should not appear any error while updating Windows.
2] Delete User Profiles via Registry
If the error prevails even after logging in with a new user account, delete the old user profiles via the registry. Here’s how to perform this task –
- Press Win + R to open the Run dialog.
- Type “
regedit” and click OK. - On the registry, navigate to the below path –
HKEY_LOCAL_MACHINE\SOFTWARE\Microsoft\Windows\CurrentVersion\Appx\AppxAllUserStore
- Look for the folder that resembles “S-1-5-21” like –
S-1-5-21-3105168380-3071851799-381973337-1001.

- Right-click on this folder and choose Delete. If there are more than one key identical to the above format, delete all of them.
- Once over, close the registry and restart Windows.
From the next logon, try updating your operating system again.
3] Run the Update Troubleshooter
If creating a new user profile and deleting the existing ones don’t solve the 0x80070490 issue, update the troubleshooter. This tool will tackle the reasons leading to update-related bugs and errors. Here’s how to troubleshoot Windows update –
- Press Win + I to open the Settings menu.
- Navigate Update & Security > Troubleshoot > Additional troubleshooters.
- Click Windows Update, then Run the troubleshooter.

- Follow the on-screen instructions to complete the remaining process.
- When the troubleshooting finishes, Restart your computer.
While on Windows 11 PC, you will not get the troubleshooter setting by following the above steps. You need to follow an alternate path which is as follows –
Settings (Win + I) > System > Troubleshooter > Other Troubleshooters
After reaching the path above, you may find Windows updates under the section – Most frequent. Click the Run button available beside Windows update.

4] Perform SFC/DISM scans
The presence of corrupted system files may also cause the 0x80070490 error during the Windows update. To fix this, you should fully scan your PC using the System File Checker utility program. Here are the essential steps to work on –
- Launch Command Prompt having administrative privileges.
- Type “
sfc/scannow” near the blinking cursor and press Enter.

- Usually, this takes 15-20 minutes to finish the scanning/repairing process.
Note: In certain cases, this may take even more time depending upon the level of corruption.
- Once over, restart your computer so that the changes made come into effect.
Now that you have successfully repaired the damaged core files, use the DISM tool to find any corruption inside the Windows 10 image. All you require is to execute the below code on an elevated console with Admin rights –
DISM.exe /Online /Cleanup-image /Restorehealth

5] Reset Windows Update Services
Many a time, you may address this issue simply by resetting the Windows Update Services. To do so, use these steps –
- Press WinKey + S to launch the Search window.
- Type services in the text bar and hit Enter. Doing so will invoke the Services window.
- Here, scroll down and check if the following services are running or not.
- Background Intelligent Transfer Service
- Cryptographic Services
- MSI Installer
- Windows Update
- The above services should be running for an error-free update process. However, if you find any of these services not running, make a right-click, and hit Start using the context menu.

- Reboot your PC to incorporate the recent changes.
When Windows reloads, check if the error 0x80070490 still occurs or has been resolved.
6] Rename the SoftwareDistribution Folder
The update process may also fail when the SoftwareDistribution folder gets corrupted somehow. So, if you are still struggling with the 0x80070490 error, try renaming this folder to something SD.old.
However, as this folder contains all the information that a Windows update requires, make sure to disable the update services first. To do so, use these steps –
- Use Win + R shortcut to open Run.
- Type
services.mscin the text field and hit OK. - On the Services window, locate and right-click on Windows Update and click “Stop“.
- Now, go to the below location and rename the folder –
SoftwareDistribution.
C:\Windows

- Next, go to the location
C:\Windows\System32and look for the catroot2 folder. Once found, right-click on the same and rename this to catroot2.old. - After renaming folders, go back to the Services window and restart the services you stopped earlier.
- Restart your computer after completing the above steps.
7] Manually Install the Latest Cumulative Update
If you are still getting the 0x80070490 error while updating Windows 10 OS, better attempt this manually. Here’s how to manually download and install the Standalone package on your computer –
- Visit the Windows 10 Update History website and click the specific Build version that you currently have on your PC. If you are getting this error code on Windows 11, navigate to the Windows 11 Update history page instead.
- Scroll down to “In this release” and select the top link. Head over to the right pane and copy the number that starts with “KB” like – KB4577063.

- Now that you have copied the cumulative update number, go to the Update Catalog page, and type this number accurately. Press Enter to view a list of well-matching results.
- If you do know your system architecture, click the Download button next to it. You may get this information by reaching out to the path –
Settings > Update & Security > Windows Update > OS Build Info. - After the download completes, click twice on the setup file to start the installation. Windows may reboot several times during this process, so wait patiently.
- Once over, you won’t get this 0x80070490 error anymore during the Windows Update process.
I hope this article resolves the issue that you were looking for. Please let us know in the comments section what was your issue and which solution worked for you so that it could be useful for other users as well.