
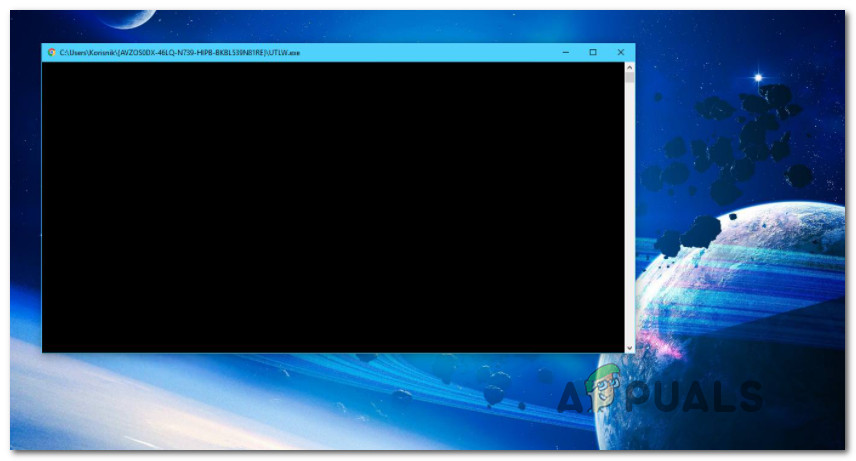
Некоторые пользователи Windows 11, Windows 10 и других версий ОС могут заметить, что при входе в систему или при обычной работе иногда может сама запускаться, а затем — закрываться командная строка, иногда — несколько окон подряд.
В этой инструкции подробно о том, что делать, если происходит автоматическое открытие окна командной строки, о чём это может говорить, в каких случаях имеет смысл предпринять действия, а когда — это нормальная работа системы. Если вы искали решение для ситуации, когда командная строка закрывается после введенной вами целенаправленно команды, об этом в отдельной инструкции: Что делать, если командная строка закрывается сразу после выполнения команды.
Возможные причины открытия окна командной строки

Среди возможных причин, по которым вы можете наблюдать автоматическое открытие командной строки:
- Задачи обслуживания и обновления Windows — иногда система сама может завершать некоторые процедуры, выполняя действия через командную строку. В этом случае это явление не будет регулярным, но иногда при входе в систему вы будете наблюдать одно или несколько подряд открывающихся окон командной строки, которые быстро закрываются.
- Иногда появление командной строки может происходить при фоновом обновлении драйвера, например видеокарты — это также нормальная ситуация, но при этом наблюдается сравнительно редко.
- Вирусы и вредоносное ПО — причина может быть и в работе вирусов или нежелательного ПО на компьютере, которое запускает те или иные процессы через bat-файлы, команды командной строки или иным образом.
- Сторонние программы в автозагрузке — некоторые обычные прикладные программы при запуске также кратковременно открывают окно командной строки: если такие программы есть в автозагрузке, вы будете видеть такое окно при каждом входе в систему. Некоторые другие программы могут вызывать появление окна командной строки лишь иногда: например, OneDrive или браузеры для завершения установки обновлений.
- Сетевые инструменты — серверное ПО и софт для VPN, прокси и синхронизации также может кратковременно открывать окно командной строки при запуске.
- Обычные программа — если окно командной строки появляется только в момент запуска какой-то определенной игры или программы, здесь, как правило, беспокоиться не о чем — просто у этого конкретного ПО запуск устроен именно таким образом.
Подводя итог: если появление командной строки — не регулярное явление, а происходит раз в несколько дней при входе в Windows, либо при запуске строго определенных программ, беспокоиться, вероятнее всего не о чем.
В ситуации, когда командная строка случайным открывается постоянно в произвольные моменты времени, имеет смысл попробовать решить проблему, в том числе выяснить, не является ли это результатом работы вирусов или другого вредоносного ПО на вашем компьютере.
Как исправить автоматическое открытие и закрытие командной строки
Если есть основания полагать, что самопроизвольно открывающаяся командная строка — не результат обычной работы Windows, выполните следующие шаги:
- Проверьте ваш компьютер на наличие вредоносных программ с помощью специальных средств для их обнаружения, например, AdwCleaner. Также может иметь смысл использовать антивирусные утилиты, не требующие установки, такие как Kaspersky Virus Removal Tool.

- Проверьте, будет ли появляться командная строка, если выполнить чистую загрузку Windows (без сторонних служб и элементов автозагрузки), подробнее: Чистая загрузка Windows. Если в этом случае никаких окон нет, попробуйте убрать ненужные элементы автозагрузки и посмотреть, решит ли это проблему. Подробнее: Как удалить программы из автозагрузки Windows 11, Автозагрузка Windows 10. Для изучения элементов автозагрузки также можно использовать Sysinternals Autoruns. Особое внимание обратите на элементы автозагрузки в реестре, запускающие cmd.exe с набором параметров.

- После появления командной строки и её закрытия откройте Терминал Windows или Windows PowerShell от имени администратора (правый клик по кнопке «Пуск» и выбор соответствующего пункта), введите команду
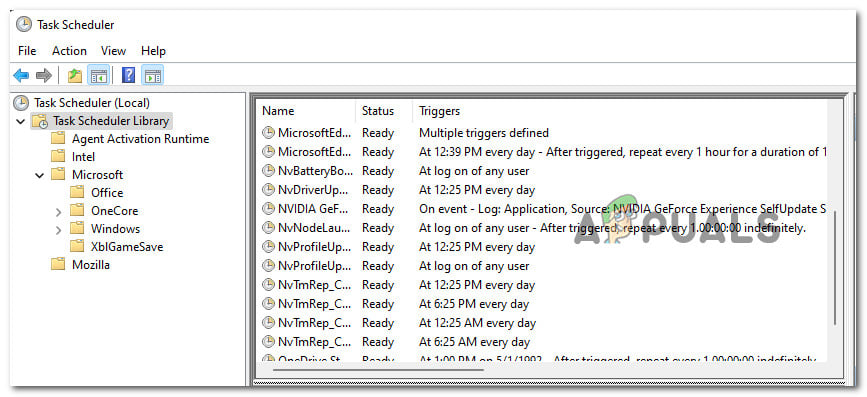
Get-ScheduledTask | Get-ScheduledTaskInfo | select TaskName, TaskPath, LastRunTime | out-gridview
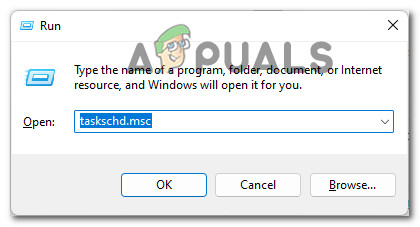
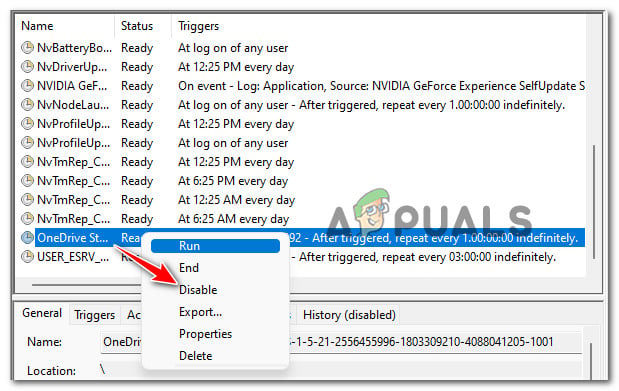
в результате откроется новое окно со списком задач планировщика, отсортируйте его по времени последнего запуска (нажмите по заголовку столбца LastRunTime) и проверьте, не было ли выполнено какое-либо задание в момент появления окна командной строки. Если такое задание было, откройте планировщик заданий (Win+R — taskschd.msc) и посмотрите, какие команды выполняет это задание (путь к нему можно увидеть в столбце TaskPath), есть ли смысл о них переживать или это обычные системные задачи. При сомнениях можно нажать правой кнопкой мыши по заданию и отключить его.

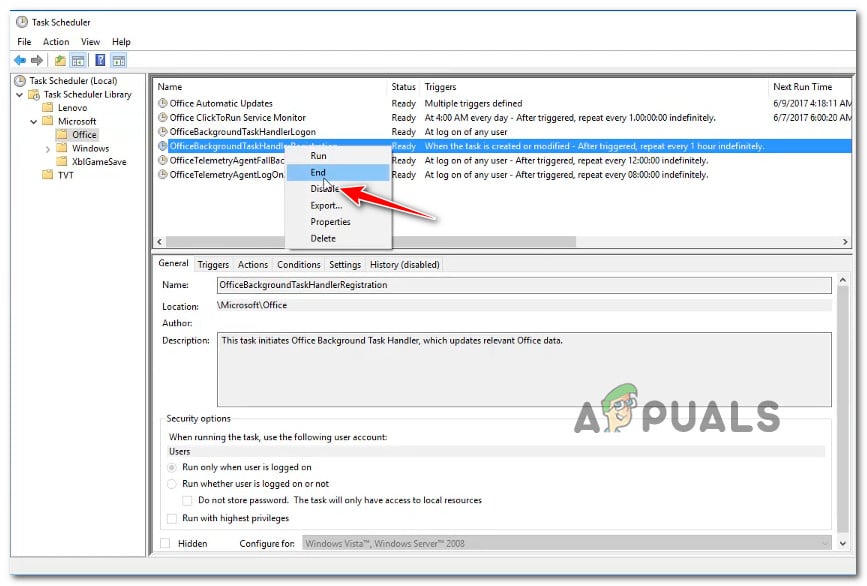
- Если в планировщике заданий в разделе Microsoft — Office присутствует задание OfficeBackgroundTaskHandlerRegistration отключите его.
- Если проблема регулярная, окно появляется каждый раз при входе в систему и дольше чем на долю секунды, можно попробовать поймать момент и нажать клавишу Print Screen, чтобы сделать скриншот, а затем посмотреть, что именно выполняется в командной строке для последующих выводов и действий.
- Попробуйте выполнить проверку целостности и восстановление системных файлов: запустите командную строку от имени администратора, введите команды sfc /scannow и нажмите Enter.
- В случае, если проблема появилась недавно и у вас есть точки восстановления системы, попробуйте использовать их, чтобы откатить Windows к предыдущему состоянию: Точки восстановления Windows 11, Точки восстановления Windows 10.
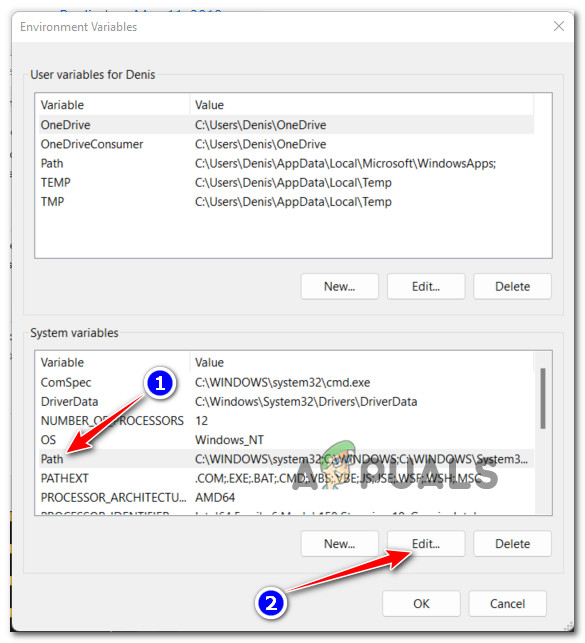
- Есть сообщения, что проблема может возникать при отсутствующем пути C:\Windows\SysWow64\ в системной переменной PATH. Мне кажется не очень правдоподобным, поскольку его и не должно быть по умолчанию в последних версиях Windows 11 и Windows 10, но можно попробовать добавить этот путь в системную переменную среды PATH.


Если ваша ситуация отличается от предложенных сценариев появления проблемы, опишите в деталях, что именно происходит, какие при этом существуют закономерности: не исключено, что решение удастся подобрать.
Здравствуйте.
Запустите AVZ из папки Autologger от имени Администратора по правой кнопке мыши.
Выполните скрипт в AVZ (Файл – Выполнить скрипт – вставить текст скрипта из окна Код)
begin
ShowMessage('Внимание! Перед выполнением скрипта AVZ автоматически закроет все сетевые подключения.' + #13#10 + 'После перезагрузки компьютера подключения к сети будут восстановлены в автоматическом режиме.');
ExecuteFile('net.exe', 'stop tcpip /y', 0, 15000, true);
if not IsWOW64
 then
  begin
   SearchRootkit(true, true);
   SetAVZGuardStatus(True);
  end;
 QuarantineFile('C:\Users\IGOR\AppData\Roaming\utorrent\pro\utorrent.exe','');
 QuarantineFile('C:\ProgramData\Microsoft\wext.vbs','');
 DeleteFile('C:\ProgramData\Microsoft\wext.vbs','64');
 DeleteSchedulerTask('EdgeUpdateTaskUser');
 DeleteSchedulerTask('EdgeUpdate');
 DeleteFile('C:\Users\IGOR\AppData\Roaming\utorrent\pro\utorrent.exe','64');
 DeleteSchedulerTask('UtorrentUpdate');
BC_ImportAll;
ExecuteSysClean;
BC_Activate;
RebootWindows(false);
end.
- Обратите внимание: будет выполнена перезагрузка компьютера.
Выполните скрипт в AVZ
begin
DeleteFile(GetAVZDirectory+'quarantine.7z');
ExecuteFile(GetAVZDirectory+'7za.exe', 'a -mx9 -pmalware quarantine ./Quarantine/', 1, 0, true);
end.
Отправьте quarantine.7z из папки с распакованной утилитой AVZ с помощью формы отправки карантина или на этот почтовый ящик: quarantine <at> safezone.cc (замените <at> на @) с указанием ссылки на тему в теме (заголовке) сообщения и с указанием пароля: malware в теле письма.
Пожалуйста, ЕЩЕ РАЗ запустите Autologger; прикрепите к следующему сообщению НОВЫЕ логи.
There’s a weird issue right now on Windows 11 where users are reporting that they constantly see a Command Prompt window briefly flashing on screen before closing again. Other users are reporting that the same behavior occurs when attempting to use the Command Prompt utility – the CMD window opens for a second or so before closing again.
After investigating this issue thoroughly on Windows 11, it turns out that there are multiple causes that are known to trigger this behavior. Here’s a list of potential culprits that you’ll need to investigate:
- Badly Migrated task – If you recently upgraded to Windows 11 from an older Windows version, chances are you’re experiencing this issue due to a badly migrated task that no longer serves a purpose on the new OS. To fix the issue in this case, you’ll need to run a deep DISM repair procedure and make sure that you’re also using the component cleanup feature to resolve the problem.
- Missing Environment Variable Path – Another issue that’s specific to users that upgraded instead of clean installed Windows 11 is a situation in which a key environment variable is missing and you see the CMD prompt every time the system looks to use the environment variable. In this case, you can fix the issue by adding the environment variable via the System Properties screen.
- Corrupted Background task belonging to the Office suite – If you have the Office suite installed (not individual Office Programs), another potential culprit that might cause this behavior on Windows 11 is a corrupted background task that is programmed to run every 10 minutes. Since it’s in no way essential to the Office suite, you can simply disable it via Task Scheduler to take care of the issue in this case.
- Malware infection – There are certain variants of the browser hijacker (mainly present on Chrome and Firefox) that are known to cause this behavior while your browser is open. If you notice that this behavior is occurring only when you have your browser open, you should deploy a deep Malwarebytes scan to ensure that your Windows 11 computer is not infected.
- Crypto-mining AUTORUN key – Keep in mind that there is a certain pseudo-virus called Soundmixer that is known to cause this behavior. Since this pseudo-virus lives in a grey legal area, most AV suites won’t pick up on it, so you’ll need to get rid of it yourself by searching for the main AUTORUN key via Registry Editor.
- Different 3rd party processes – New ‘crypto-mining scams’ are created daily, so you should expect to deal with a new kind of virus that is not yet recognized by AV suites. In this case, you can identify the culprit and deal with it by using Task Scheduler in combination with Process Monitor to identify and deal with the threat causing the CMD window.
Now that you are aware of every potential cause of this issue, start following the instructions below for a series of fixes that other affected users have successfully used to get to the bottom of this issue and prevent the CMD window from popping up randomly on the screen.
Run a Deep DISM Repair procedure
If you recently migrated over to Windows 11 from an older Windows version, it’s not uncommon to face this issue due to a migrated background task that has no utility on the new OS.
Most likely, your computer keeps running it as it’s configured to be, but there’s no utility for it anymore so you’re just seeing a brief flash of a CMD window before the task is terminated.
In case this is the source behind your issue, you can resolve the issue entirely by running a specialized DISM scan that’s also capable of doing a component cleanup (on top of replacing file corruption).
However, you’ll need to deploy a DISM scan from a Windows Terminal window (since the CMD window might terminate before you get the chance to use it).
Follow the instructions below for a step-by-step of running a DISM scan with a component cleanup attribute on Windows 11:
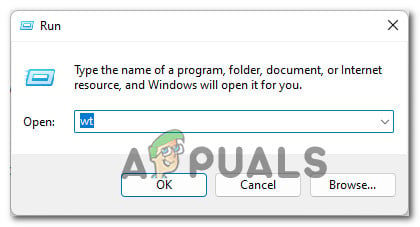
- Press Windows key + R to open up a Run dialog box. Next, type ‘wt’ inside the text box and press Ctrl + Shift + Enter to open up a Windows Terminal window with administrative privileges.

Windows 11 Command Prompt pops up - When you’re prompted by the User Account Control window, click Yes to grant administrative privileges.
- Once you’re inside the elevated Windows Terminal prompt, type the following commands in order and press Enter after each one to initiate a DISM scan with restore health and component cleanup attributes:
DISM.exe /Online /Cleanup-image /Scanhealth
DISM.exe /Online /Cleanup-image /Restorehealth
DISM.exe /online /cleanup-image /startcomponentcleanup
- After the operation is complete, reboot your Windows 11 PC one final time and see if the problem is fixed once the next startup is complete.
In case you’re still noticing the CMD window popping up during random intervals, move down to the next fix below.
Add the missing Environment Variable path
As it turns out, another fairly common reason that will prompt your Windows 11 installation to trigger blank CMD prompts during random intervals is a situation in which the ENvironment variable is missing a PATH (C:\Windows\SysWow64\).
If you find yourself in this particular scenario, you should be able to resolve the issue by accessing the System Properties screen and ensure that the Environment Variable path is present and correctly configured.
For instructions on how to do this on Windows 11, follow the instructions below:
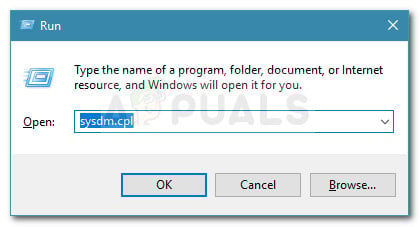
- Open up a Run dialog box by pressing Windows key + R. When prompted by the Run box, type ‘sysdm.cpl’ and press Enter to open up the System Properties screen.
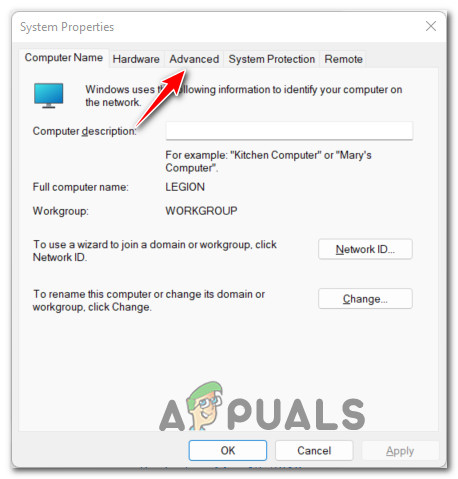
Opening up the System Properties screen - Once you’re inside the System Properties window, click on Advanced using the ribbon menu at the top.

Accessing the Advanced menu of System Properties - Inside the Advanced tab, go to the bottom of the screen and click on Environment Variables button.
- Once you’re inside the Environment Variables window, go under System variables and click on Path to select it, then click on Edit from below.

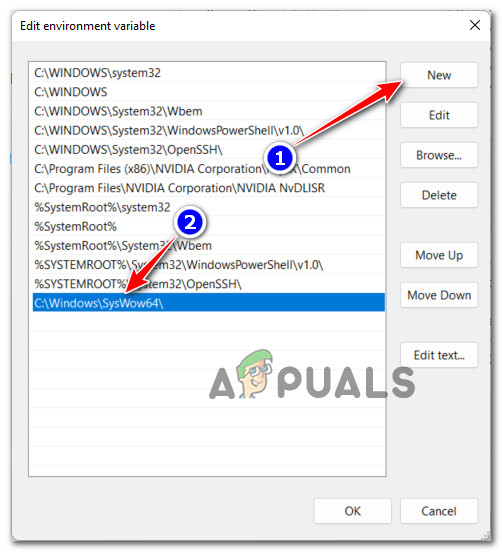
Editing the variable path - Inside the Edit environment variable window, click on the New button to create a new entry, then add C:\Windows\SysWow64\ as the new environment variable and click Ok to save the changes.

Adding a new Environment Variable on Windows 11 - Once this change has been enforced, you can reboot your Windows 11 PC and see if the problem is fixed once the next startup is complete.
In case you’re still noticing the same kind of brief appearances of the CMD prompts, move down to the next method below for a more thorough way of investigating and figuring out which component is causing the issue.
Disable Office Background Task (if applicable)
Another fairly common culprit that might cause these annoying brief CMD pop-ups is a background task scheduler task belonging to the Office installation (OfficeBackgroundTaskHandlerRegistration).
This is actually an issue that was carried over to Windows 11 from previous Windows versions. Fortunately, the fix on Windows 11 is still the same – you’ll need to take a trip into Task Scheduler and disable the OfficeBackgroundTaskHandlerRegistration task from the cluster of tasks under Office.
If you’re looking for instructions on how to take care of this Office-induced issue, follow the steps below:
- Press Windows key + R to open up a Run dialog box. Next, type ‘taskschd.msc’ inside the text box and press Enter to open up the Task Scheduler utility.
Opening up Task Scheduler Note: If you’re prompted by the User Account Control window, click Yes to grant admin access.
- Once you’re inside the Task Scheduler utility, use the menu on the left to navigate to the following location:
Task Scheduler (Local) > Microsoft > Office
- With the Office folder selected, move over to the right-hand section and look for the task named OfficeBackgroundTaskHandlerRegistration.
- Next, right-click on OfficeBackgroundTaskHandlerRegistration and click on Disable from the context menu that just appeared.

Disable the Office Background Task Scheduler task - Once this modification has been enforced, reboot your PC and see if the problem is now fixed.
If this scenario is not applicable in your case or you already tried this fix with no success, move down to the next potential fix below.
Deploy a Malware Scan
In case the potential fixes above didn’t work in your case, you should start considering the possibility of some kind of malware that tried to utilize your system resources without your permission.
This is a known behavior exhibited by some browser hijackers – some of them even manage to escape regular scans performed by Windows Defender.
With this in mind, our recommendation is to perform a deep Malwarebytes scan to ensure that your system is not getting exploited by an outside attacker.
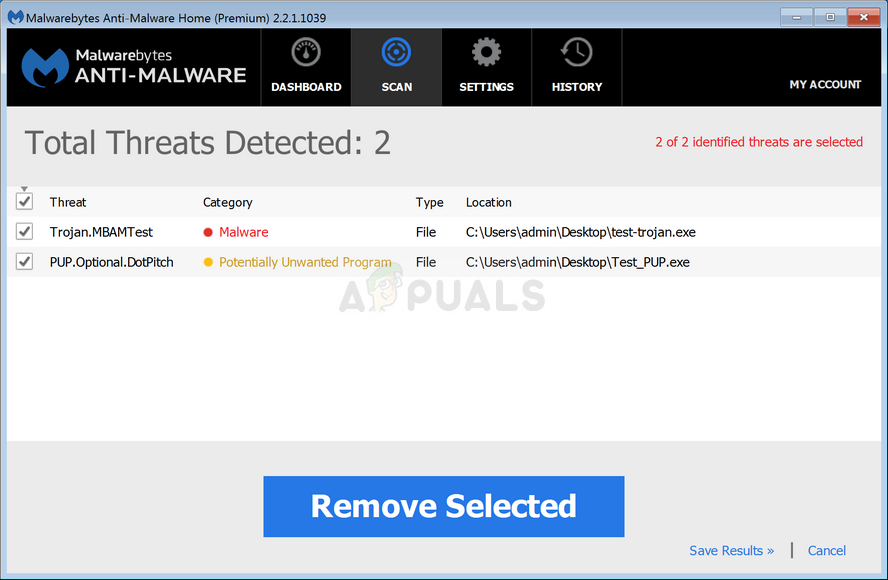
Note: There are other alternatives that will help you do this, the vast majority of them are paid (or include a free alternative that is not as efficient).
Upon completing the Malwarebytes scan, reboot your computer and monitor the situation closely to see if the same random occurrences of CMD windows are still appearing.
If the problem is still not fixed on Windows 11, move down to the next potential fix below.
Delete the Crypto-Mining AutorRun key (if applicable)
Keep in mind that there’s one particular security threat that still manages to escape the vast majority of regular AV scans. It manages to do this because it lives in a gray area where most antivirus suites won’t label it as a security threat.
It’s called SoundMixer and it’s essentially a collection of reg keys that will trick your computer into mining crypto-currencies for an external user without your knowing.
In this case, the brief CMD display that you see from time to time is actually a CMD task that calls the mining process into action. This particular issue is often associated with a higher than usual usage of the CPU and GPU.
If this scenario is applicable, you should be able to fix the issue by using Registry Editor to find every registry value of SoundMixer and remove it from your computer in order to prevent your Windows 11 PC from being used for cryptocurrency mining (without your consent)
Follow the instructions below for step-by-step instructions to make sure that’s not the case:
Note: Keep in mind that this method is also effective in those situations where the CMD doesn’t open at all.
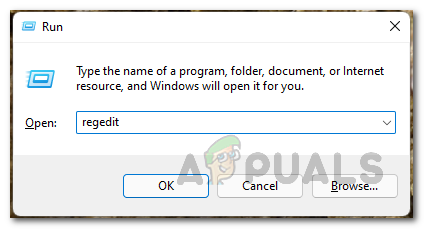
- Press Windows key + R to open up a Run dialog box. Next, type ‘regedit’ inside the text box and press Ctrl + Shift + Enter to open up Registry Editor with admin access.

Opening up the Registry Editor - When you’re prompted by the User Account Control (UAC), click Yes to grant admin access.
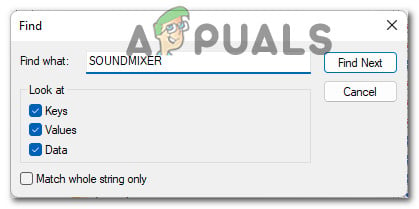
- Once you’re inside the Registry Editor, use the ribbon menu at the top to click on Edit, then click on Find from the context menu that just appeared.
Using the search functionality on Registry Editor Note: This ‘virus’ doesn’t have a fixed location – this is why it’s necessary to find it using the search functionality on Registry Editor.
- Inside the Find window, type ‘SOUNDMIXER’ inside the Find What box, then check the boxes associated with Keys, Values, and Data are all checked before unchecking the Match whole string only box before clicking Fine Next.

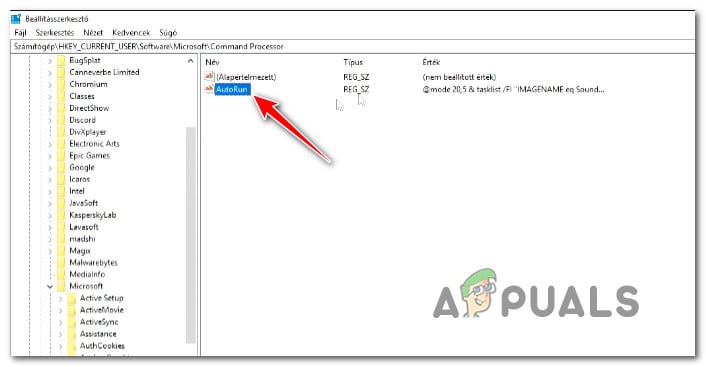
Finding the Sound Mixer - Wait until your Registry is searched. If you get a hit, move over to the right-hand section of the screen, right-click on AutoRun and choose Delete from the context menu.

Delete Autorun key from the list of results - Next, click on Find Next once again and see if the AutoRun file is found somewhere else.
- If any AUTORUN mentions of the SoundMixer have been removed, reboot your computer and monitor the situation to see if you still see the same CMD prompt on Windows 11.
In case this method has not resolved the issue in your case, move down to the next potential fix below.
Investigate in Task Scheduler or Process Monitor
If none of the methods so far have allowed you to resolve the instances where CMD briefly appears on screen, you should start by performing an investigation among your tasks and processes that have the potential of causing this issue.
Potential causes that might cause this issue range from remnants of a browser hijacker to a previously established recurring task that no longer has a utility.
To cover all potential scenarios, our recommendation is to check bot Task Scheduler and run Process Monitor to rule out any potential culprit from your list.
Follow the next sub-guides below in whichever order to check either any item is currently configured to run during fixed intervals and it causes the CMD screen flash:
Check using Task Scheduler
Task Scheduler already comes pre-installed with Windows 11 (on every available version), so all you need to do is open it and follow the instructions below to check if any of the previously configured tasks are actually causing this issue:
- Press Windows key + R to open up a Run dialog box. Next, type ‘taskschd.msc’ inside the text box and press Enter to open up Task Scheduler.
Opening up Task Scheduler - If you’re prompted by the User Account Control (UAC), click Yes to grant admin access.
Note: If the UAC prompt doesn’t appear, skip this step altogether. - Next, use the menu on the left to select Task Scheduler Library, then move over to the right-hand section and see if any of the items are scheduled to run every 10 minutes or so by looking at the Triggers section.

Investigating for suspicious tasks Note: If no suspicious activity is found, you should also investigate the scheduled tasks related to Office, Mozilla, and other 3rd party services.
- If you discover any suspicious task with a recurring trigger that opens up a CMD prompt, right-click and choose Disable from the context menu.

Disable the Scheduled Task - Reboot your PC and see if the problem is now fixed.
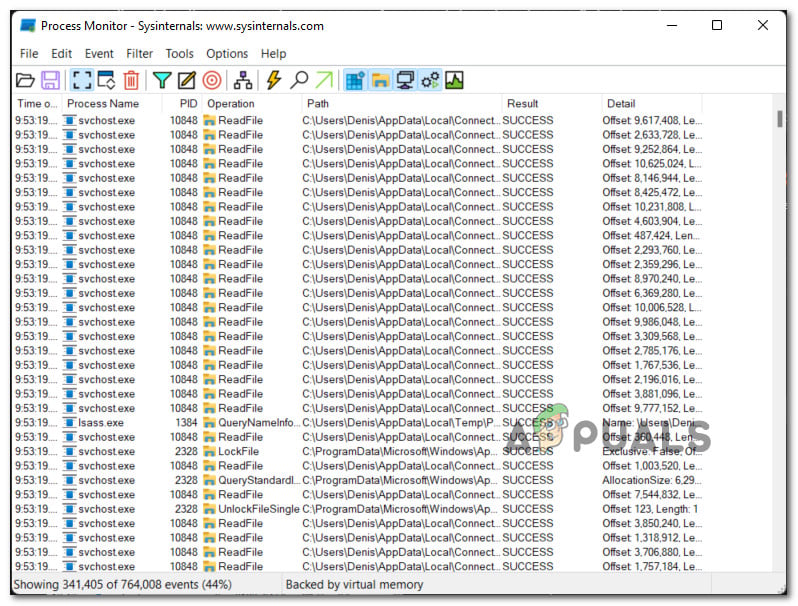
Check using Process Monitor
Process monitor is a free advanced monitoring tool for Windows computers that’s not built-in into Windows 11. It will allow you to filter all the system processes that are recurringly called into action – this will allow you to discover your culprit.
Follow the instructions below to download, install and use Process Monitor to discover which process is causing the blank CMD prompt to appear regularly:
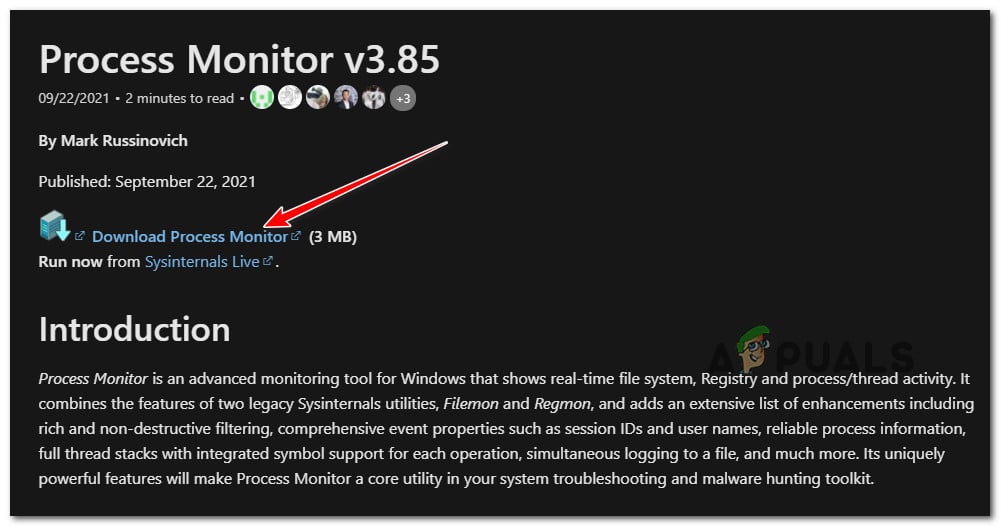
- First things first, access the download page of Process Monitor from any website and click on Download Process Monitor to download it locally.

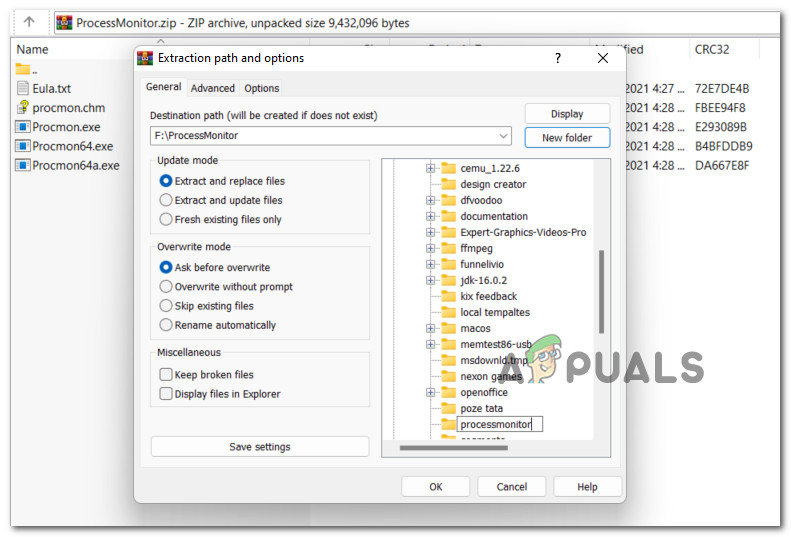
Downloading the Process Monitor utility - Once the ZIP archive is downloaded locally, extract its contents to a local folder and double-click on Procmon.exe to launch the utility.

Extracting the contents of Process Monitor - When you’re prompted by the User Account Control window, click on Agree to accept the terms of licensing.
- At the user Account Control, click Yes to grant admin access.
- Once the utility is finally opened, wait until all the processes and events are loaded – look at the bottom of the screen to check up on the process.

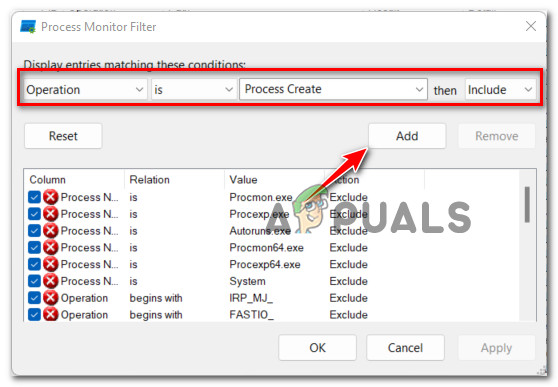
Waiting until Process Monitor does his thing - Next, click on Filter from the menu at the top, then click on Filter from the context menu that just appeared.
Accessing the Filter menu - Inside the Process Monitor Filter window, change the first drop-down menu to Operation, the second to ‘is’ the third to ‘Process Create’ , and the fourth to ‘include’ before clicking on Add to filter the processes accordingly.

Configuring the Process Monitor filters - Click Ok to enforce the current filtering then click YES at the next prompt.
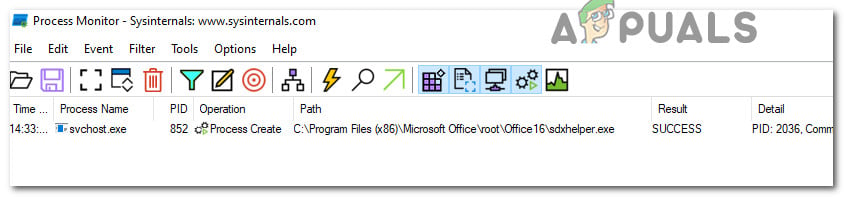
- Wait until the event is initialized and leave the utility open to scan for processes that are currently exhibiting this behavior.
- After a few minutes, return to this window and see if any culprits are discovered.

Checking for potential culprits that might cause the issue on Windows 11
You may be experiencing random sessions of Command Prompt automatically opening and closing on your new Windows 11 OS. Several users have reported this issue where occasionally several different CMD windows open and close simultaneously as soon as you log into your account, while others are reporting a random behavior of the command-line interface with no pattern.
Although your daily routine and tasks may not be greatly affected by this problem, it is still wise to resolve the issue so that you can enjoy the recently-released operating system to its fullest, especially if you have purchased a new device just for the sake of Windows 11.
This article lists down several reasons as well as its solutions to mitigate the Command Prompt flashing issue in Windows 11.
Table of Contents
Causes of Command Prompt Fluctuation in Windows 11
There is no single reason for the Command Prompt to behave this way. Although the CMD windows close by themselves after a few seconds, why did they open automatically in the first place? Regular users pay little to no attention to such behavior of the OS, but some users may get annoyed if the Command Prompt pops up out of nowhere ruining their streaming or gaming experience.
Irrelevant task
If you have upgraded your device from Windows 10 to Windows 11, there may be a chance that you have brought along a migrated task that no longer servers a purpose in the new OS. Such unnecessary tasks can often cause irregular behavior of the operating system.
Missing Environment Variable Paths
Command Prompt automatically opening and closing can also be caused by missing the Environment Variable Path. Users who have upgraded their devices to Windows 11 rather than performing a clean install usually come across missing paths.
Background Office tasks
One cause can also be background Office Suite tasks that may be malfunctioning. If you see that the Command Prompt popups are occurring after every fixed interval, an Office scheduled task is likely causing it to behave this way.
Virus/Malware
One of the more common reasons for the Command Prompt behaving irregularly is due to unwanted malware on your computer. This can also be brought in through certain notorious web browser extensions. If you see a Command Prompt popup while using a browser, it is likely due to a malicious extension.
Discreet Crypto Mining
Some hidden tasks are programmed to perform crypto mining on your devices. Such programs can cause the Command Prompt to behave erratically.
These are the reasons for the Command Prompt opening and closing automatically on Windows 11 that we are aware of so far. Let us now see how you can resolve the issue.
Fix Command Prompt randomly opens and closes in Windows 11
Repair Windows image
You can try repairing your Windows image in case you upgraded to Windows 11 from an older OS. This method will clear out any unwanted tasks that are of no use anymore.
To do so, launch Command Prompt with administrative privileges and enter the following 3 commands, one after the other:
DISM.exe /Online /Cleanup-image /Scanhealth
DISM.exe /Online /Cleanup-image /Checkhealth
DISM.exe /Online /Cleanup-image /Restorehealth

It can take a few minutes for the commands to execute completely. Do not close the Command Prompt and allow them ample time to run.
Once completed, spend some time on your computer to check if the Command Prompt still behaves the same. If it does, continue to perform the rest of the mitigation methods below.
Add missing Environment Variable path manually
As we mentioned earlier, users that have upgraded to Windows 11 can also experience missing Environment Variable paths. In this particular case, the path to “C:\Windows\SysWow64” is usually missing, which causes the Command Prompt to spontaneously open and close.
Here’s how to fix the issue:
- Open the System Properties window on your computer by typing in sysdm.cpl in Run.

- In the System Properties window, switch to the Advanced tab and then click the Environment Variables button at the bottom.

- Now click on Path under the System variables window, and then click Edit.

- Next, in the Edit environment variable window, click New, then paste the following in the text field:
C:\Windows\SysWow64\
Then click OK on all windows to save and close them.
- Now restart your computer for the changes to take effect.


After the computer reboots, check to see if the issue persists. If it does, then the missing Environment Variable path is not your issue. Continue to read further for more possible solutions.
Disable any Office Suite scheduled tasks
If you see that the Command Prompt is opening and closing after every fixed interval, it is likely because of the Office Suite scheduled task(s) running in the background.
This issue was reported to have been around for quite some time and was the same on Windows 10 as well. However, the fix for it on Windows 11 is the same: end the scheduled task causing CMD to behave this way. Here is how to do so:
- Open the Task Scheduler by typing in taskschd.msc in Run.

- Now navigate to the following location from the left pane inside the Task Scheduler:
Task Scheduler (local) >> Task Scheduler Library >> Microsoft >> Office - Now right-click the task OfficeBackgroundTaskHandlerRegistration in the right-hand pane, and then click End from the context menu.

- Once done, restart your computer so the changes can take effect.


The Command Prompt will no longer automatically open or close if it is caused by Microsoft Office’s scheduled task.
Scan computer for malware
Another likely cause for the Command Prompt to behave abnormally is due to malware or viruses in your computer. Therefore, it is recommended that you perform a deep system scan and get rid of any trojan horses or malware. Here is a list of the top antivirus software to use to perform the scan.
In case you are proceeding to purchase antivirus software, here are the 17 aspects you should always consider.
You can also use the built-in Windows Defender in Windows 11 to scan your computer for malware. If you want to, open the Windows Security page in the Settings app, and then click Virus & Threat Protection. Next, click the Quick Scan button to perform a scan. Alternatively, you can also click Scan options below it to select a deep scan of your OS.

Delete crypto mining Windows Registry
Certain programs and tasks running in the background disguise themselves as legitimate Windows programs, but are using your computer to mine cryptocurrency to someone else.
One of the most notorious programs for crypto mining was the SoundMixer.exe. This process kept running in the background while nobody batted an eye. As it turns out, this process is used to mine for cryptocurrency without the user of the device knowing anything about it.
Such programs may occasionally go undetected by even the best antimalware software as they lie in a gray area of Windows operations and are very well coded/developed.
You will need to manually remove the associated Windows Registry so that no crypto mining program can run on your device if that is the case. However, manipulating Windows Registry could turn fatal for your OS. Therefore, we recommend that you create a restore point so that you can recover your device if things go south.
- Open the Registry Editor by typing in regedit in Run

- Now click Edit from the top menu and then click Find.

- In the Find window, search for soundmixer and click Find Next.

Since there is no one location for such viruses, it needs to be searched within the Windows Registries.
- If the results bring something back, look for Autorun value in the right pane, right-click it, and click Delete from the context menu.
In case you do not find anything, you probably do not have a sound mixer on your computer. - If you found and deleted the Autorun value from Windows Registry, restart the computer.


Once the device restarts, check to see if the Command Prompt still opens and closes automatically.
Why did Command Prompt randomly open and close?
This issue has been detected in both Windows 10 and Windows 11. The most common cause for the Command Prompt to randomly open and close is a background task running for Microsoft Office. While another common cause for Windows 11 is when you upgrade from an older OS and migrate irrelevant tasks or miss Environment Variable paths.
How do I open Command Prompt in Windows 11?
Although there are several ways to open the Command Prompt in Windows 11, the most convenient way is to use the Windows Key + R shortcut keys to launch Run, and then type in CMD, and press Enter.
Is cmd.exe a virus?
Although cmd.exe is a legitimate Windows process that runs against the Command Prompt, attackers often disguise the malware with legitimate process names so they can hide in plain sight.
При выпуске оригинальной версии Windows 11 компания Microsoft установила весьма специфические системные требования, которые должны быть выполнены для установки или обновления до Windows 11 с любой предыдущей ОС. Эти требования включают TPM 2.0, Secure Boot, 4 ГБ оперативной памяти, минимум 2 ядра процессора и т.д. Однако не каждый компьютер может соответствовать этим требованиям, особенно если вы ограничены в бюджете.
Бывают случаи, когда вы хотите установить последнюю версию Windows 11, например Windows 11 23H2, но не можете ее установить, поскольку ваше оборудование не соответствует требованиям ОС. Если вы столкнулись с подобной дилеммой, то сообщаем вам, что существуют методы установки Windows 11 версии 23H2 в обход специфических аппаратных требований Windows 11.
При этом новые требования к Windows призваны повысить безопасность систем в связи с участившимися кибератаками. Однако не каждый ПК можно или нужно модернизировать в соответствии с этими требованиями.
Интересно: До конца поддержки Windows 10 осталось всего 2 года
Системные требования Windows 11 23H2
Windows 11 23H2 имеет те же системные требования, что и оригинальный выпуск. Прежде чем планировать обновление текущей ОС до Windows 11 23H2, рекомендуется проверить, поддерживает ли оборудование эту ОС по умолчанию, или необходимо обойти требования.
Ниже приведен список основных системных требований Windows 11 23H2:
- Процессор: 1 ГГц или более быстрый CPU или система на кристалле (SoC) с двумя и более ядрами.
- ОЗУ: Не менее 4 ГБ.
- Жесткий диск: 64 ГБ или более.
- Прошивка системы: UEFI, с поддержкой Secure Boot.
- ТПМ: Модуль доверенной платформы (TPM) версии 2.0.
- Графика: Совместимость с DirectX 12 или более поздней версией с драйвером WDDM 2.0.
- Разрешение экрана: Дисплей высокой четкости (720p) с диагональю более 9″, 8 бит на цветовой канал.
- Сеть: Учетная запись Microsoft и подключение к Интернету.
Эти спецификации означают, что не все компьютеры смогут установить Windows 11 23H2 в исходном виде. Придется либо перепрошивать ее, либо обновлять аппаратное обеспечение, либо обходить эти требования. Последний вариант представляется более предпочтительным, если у вас нет бюджета на модернизацию оборудования, а безопасность системы не является вашей главной заботой.
Проверка наличия TPM 2.0
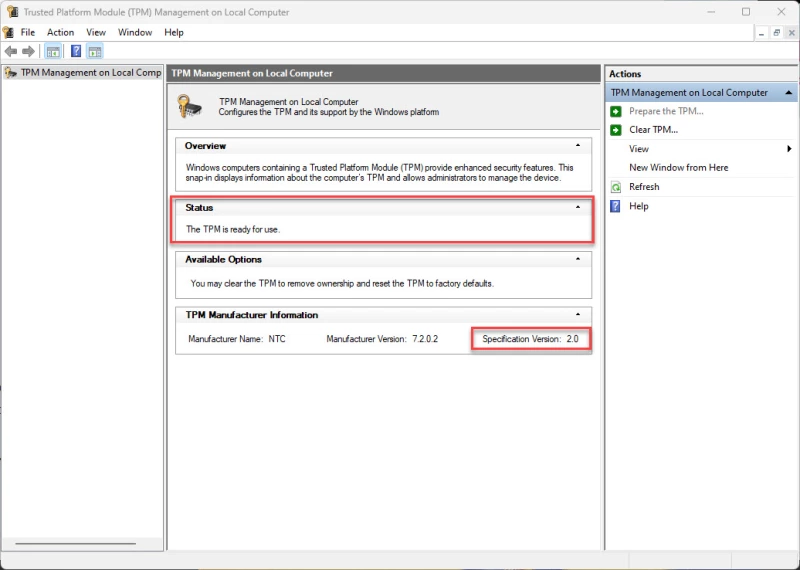
Начните с проверки наличия или отсутствия в компьютере чипсета TPM 2.0, выполнив следующие действия:
- Нажмите Win + R, чтобы открыть окно Run Command.
- Введите «tpm.msc» и нажмите Enter чтобы открыть консоль управления TPM.
- Здесь найдите статус TPM в разделе Status _. Вы также найдете его версию в разделе _TPM Manufacturer Information.

Если в Status написано «TPM готов к использованию», это означает, что он доступен и включен. Если же в Status написано «Compatible TPM cannot be found», это означает, что либо TPM недоступен, либо присутствует, но отключен в настройках BIOS/прошивки UEFI.
Узнайте другие способы проверк TPM.
Включить TPM
Если TPM отключен, необходимо включить его в настройках UEFI. Вот как это делается:
- Нажмите клавишу Win + i, чтобы открыть приложение настроек Windows.
- Перейдите к следующему:
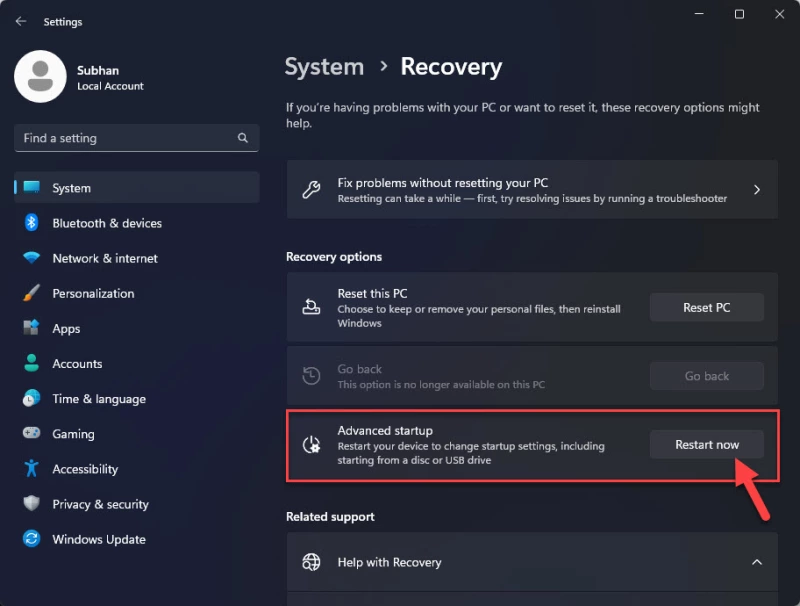
System >> Recovery
- Нажмите «Перезагрузить сейчас» перед «Дополнительный запуск».

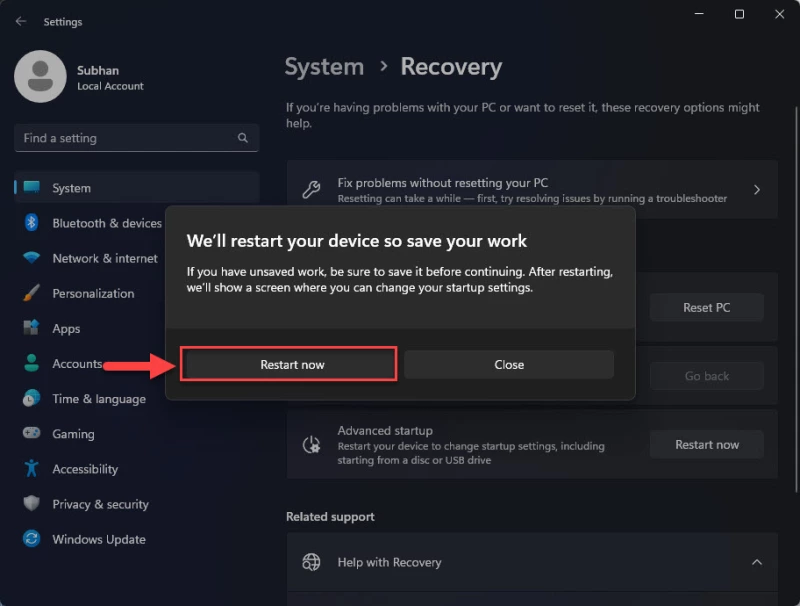
- Во всплывающем окне подтверждения снова нажмите «Перезагрузить сейчас».
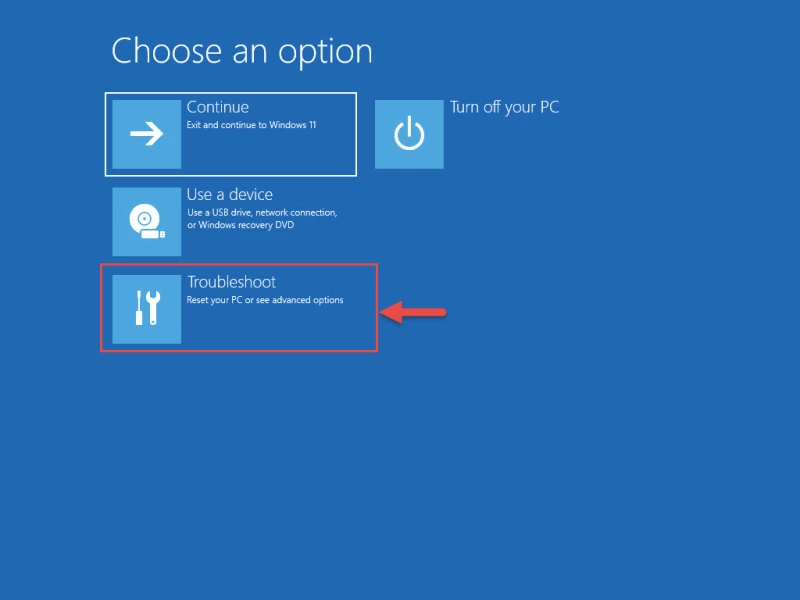
Компьютер включится и загрузится в среду восстановления Windows (WinRE).
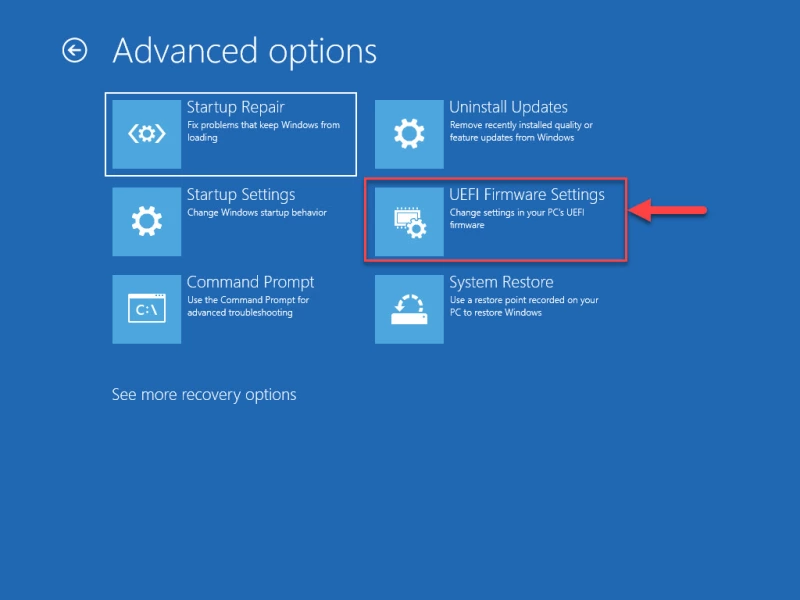
- Нажмите Troubleshoot.

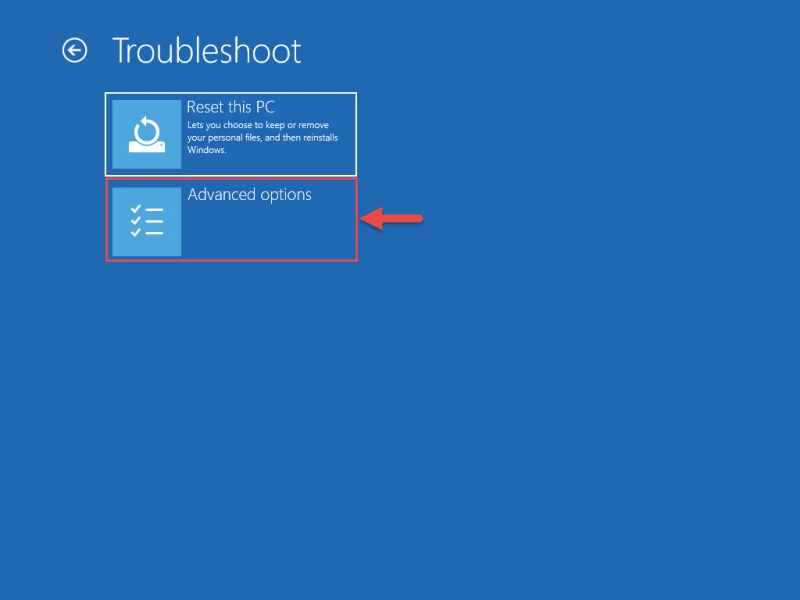
- Затем нажмите «Advanced options.»
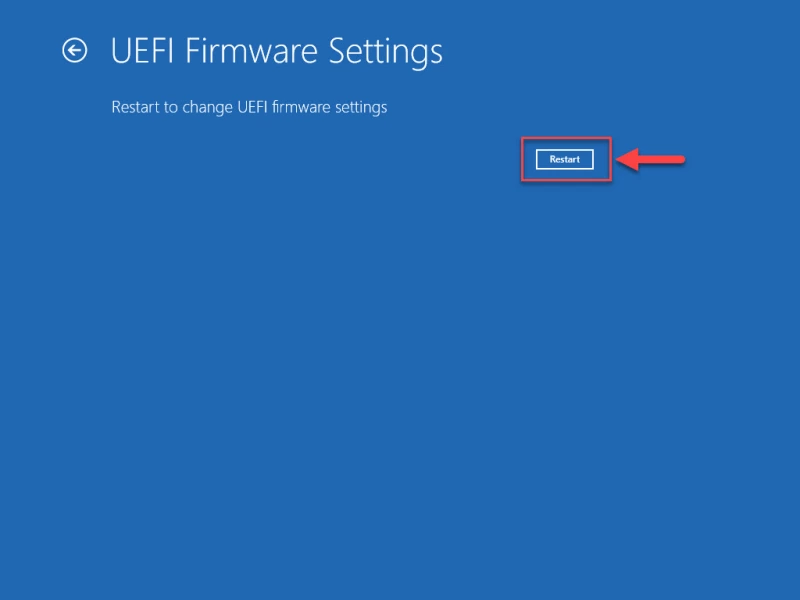
- Нажмите «UEFI Firmware Settings.»
- Теперь нажмите Restart.
Компьютер снова перезагрузится.
- Теперь перейдите к настройкам Advanced, Security или Boot. Они зависят от типа материнской платы.
- Выберите опцию TPM 2.0 и выберите опции «Enabled» и «TPM On».

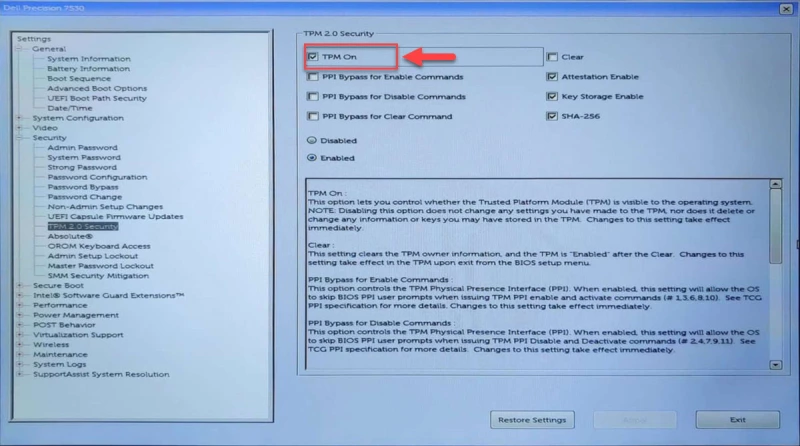
Если вы обнаружили, что опция TPM 2.0 отсутствует или не может быть включена, то, скорее всего, она недоступна на вашей материнской плате. Однако если проблема заключается в чем-то другом, попробуйте воспользоваться следующими методами устранения неисправностей TPM.
Проверка наличия Secure Boot
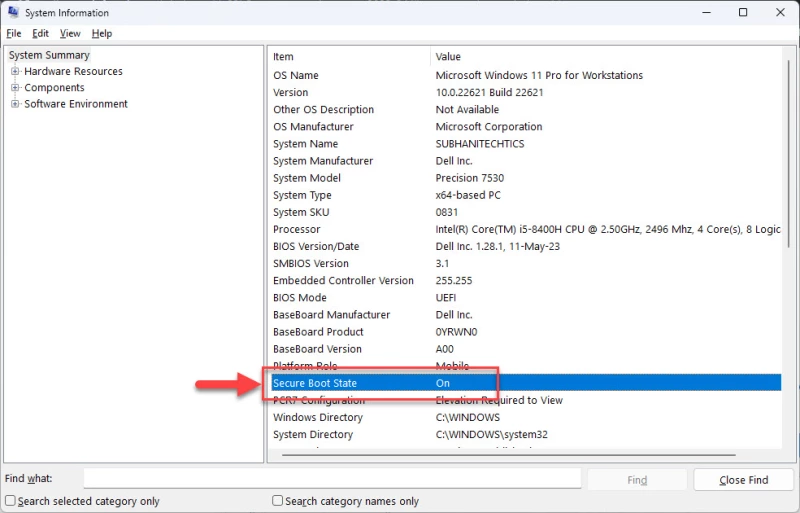
Другим обязательным требованием является Secure Boot. Проверьте, включена ли Secure Boot, выполнив следующие действия:
- Нажмите Win + R, чтобы открыть окно Run Command.
- Введите «msinfo23» и нажмите Enter.
- На вкладке System Summary проверьте наличие информации перед строкой «Secure Boot State».

Если Secure Boot выключен или отключен, его можно включить в настройках UEFI Firmware так же, как и TPM 2.0, описанным выше способом.
Если вы убедились, что и TPM 2.0, и Secure Boot доступны и включены, только тогда можно переходить к установке Windows 11 23H2 обычными методами. Если же ни одна из опций не доступна или не включена, то необходимо установить Windows 11 23H2 в обход системных требований, используя описанные ниже методы.
Установка Windows 11 23H2 на неподдерживаемое оборудование
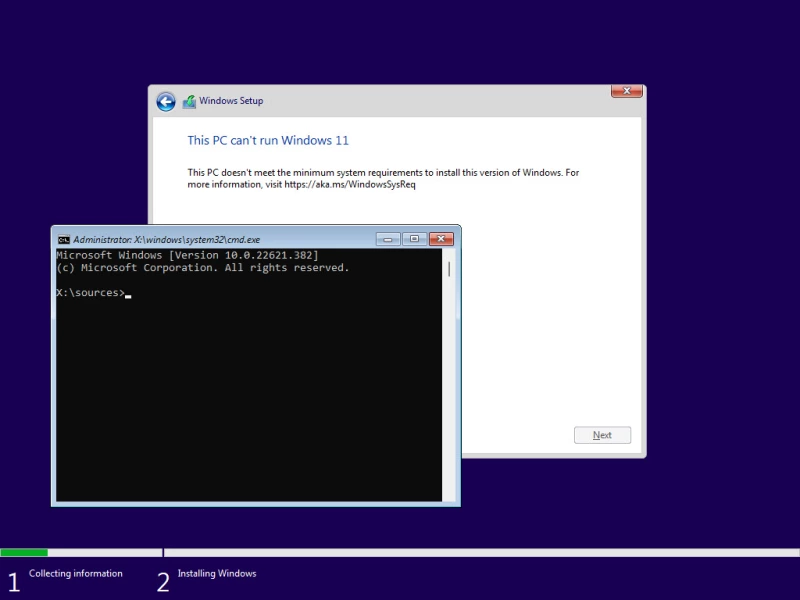
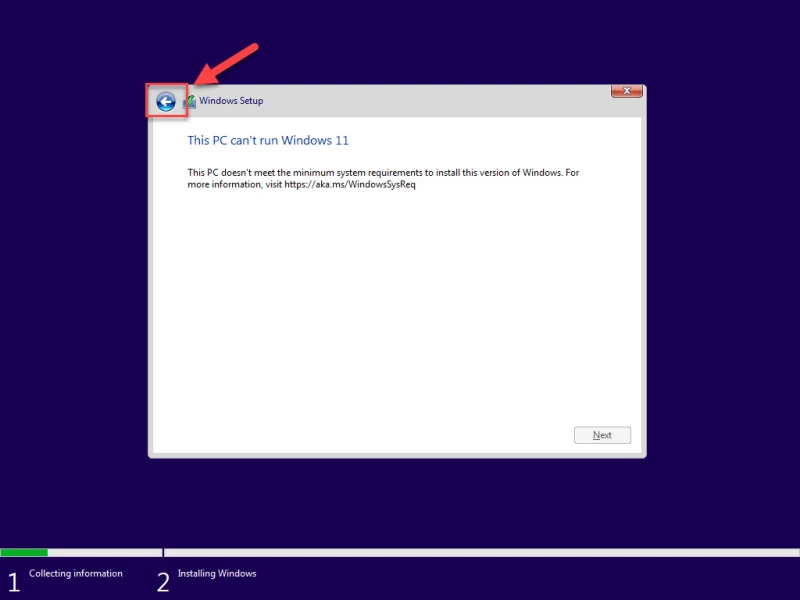
Если попытаться установить Windows 11 23H2 или любую другую версию Windows 11 на компьютер, не соответствующий системным требованиям, то установить или перейти на нее обычными методами не удастся. Вместо этого при попытке установки появится сообщение об ошибке, подобное следующему:
This PC can't run Windows 11 This PC doesn't meet the minimum system requirments to install this version of Windows.
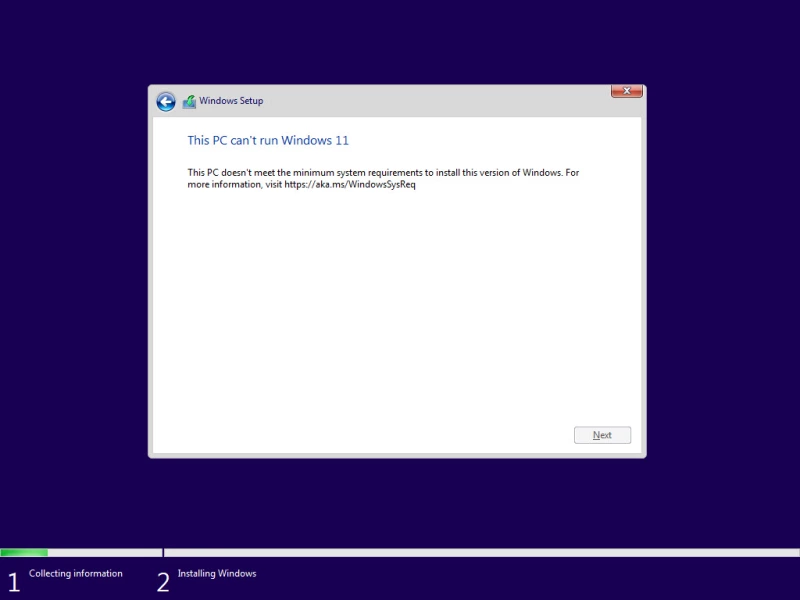
В этом случае можно выполнить одно из следующих решений, чтобы обойти эти системные требования и продолжить установку Windows 11 23H2 без обновления оборудования
Обход ограничений на установку Windows 11 23H2
Обход требований TPM и Secure Boot из реестра Windows
Чтобы обойти системные требования TPM 2.0 и Secure Boot при установке Windows 11 23H2, выполните следующие действия:
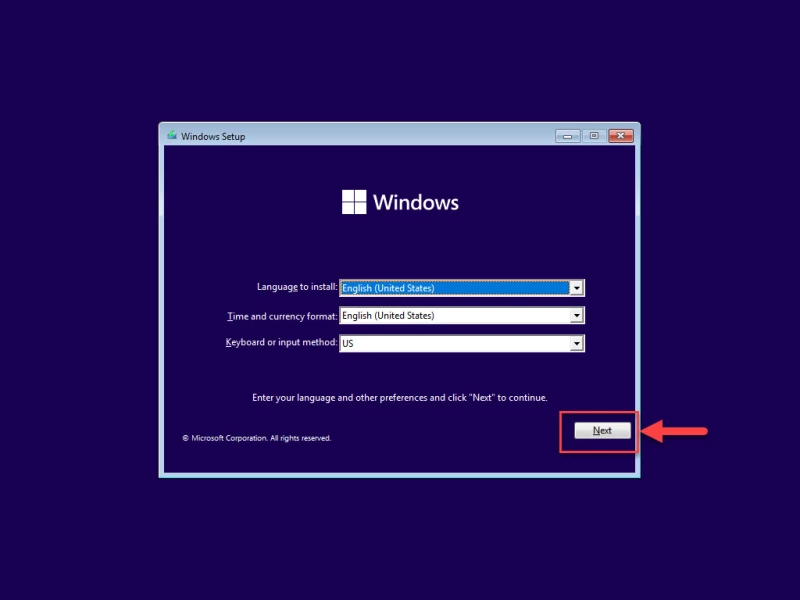
- Начните с загрузки Windows 11 23H2 ISO.
- Продолжите создание загрузочного USB-накопителя или используйте Ventoy для создания мультизагрузочного USB-накопителя.
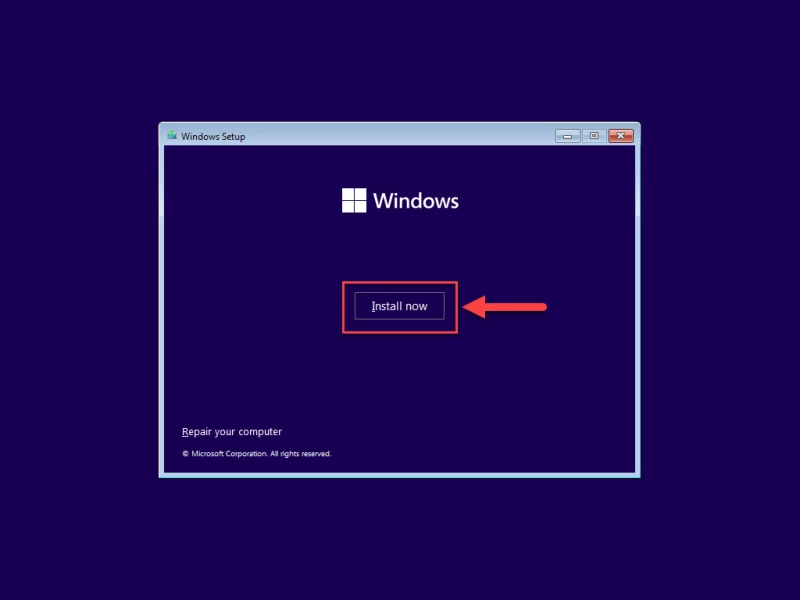
- Загрузитесь с загрузочного USB-накопителя и нажмите кнопку Next на первом экране установки Windows.
- Нажмите «Установить сейчас.»
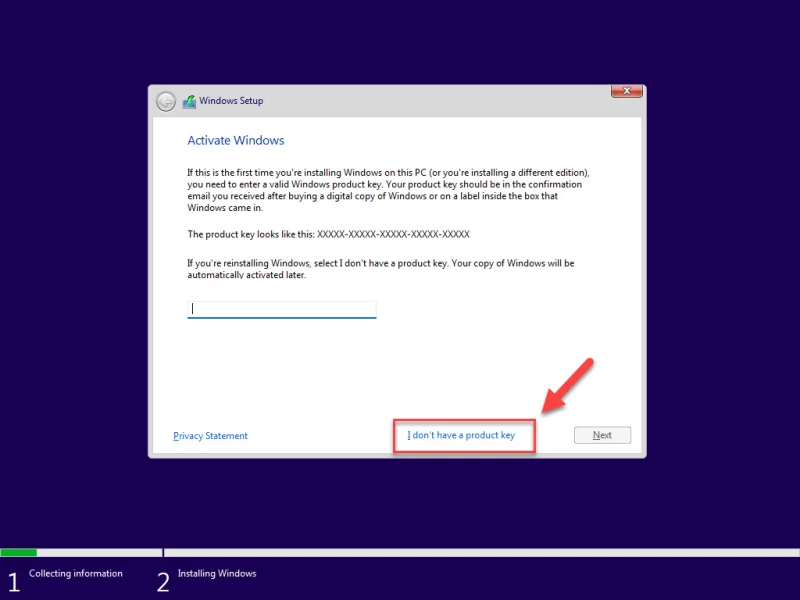
- Нажмите «У меня нет ключа продукта.«Даже если у вас есть ключ продукта, вы можете использовать его для активации Windows позже.
- Выберите одну из редакций Windows и нажмите Next.
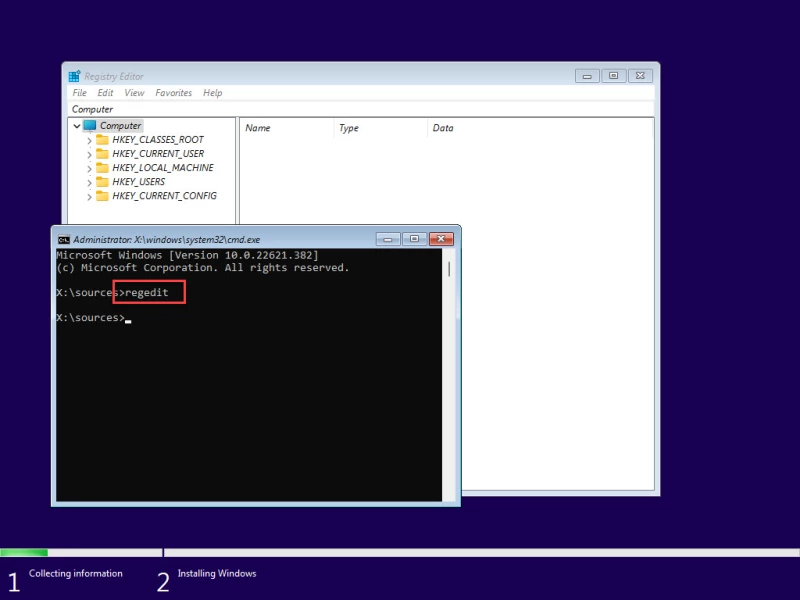
- На экране ошибок одновременно нажмите клавиши Shift + F10, чтобы открыть Командную строку.
- Введите «regedit» и нажмите Enter, чтобы открыть редактор реестра.
- В редакторе реестра перейдите к следующему пути из левой панели:
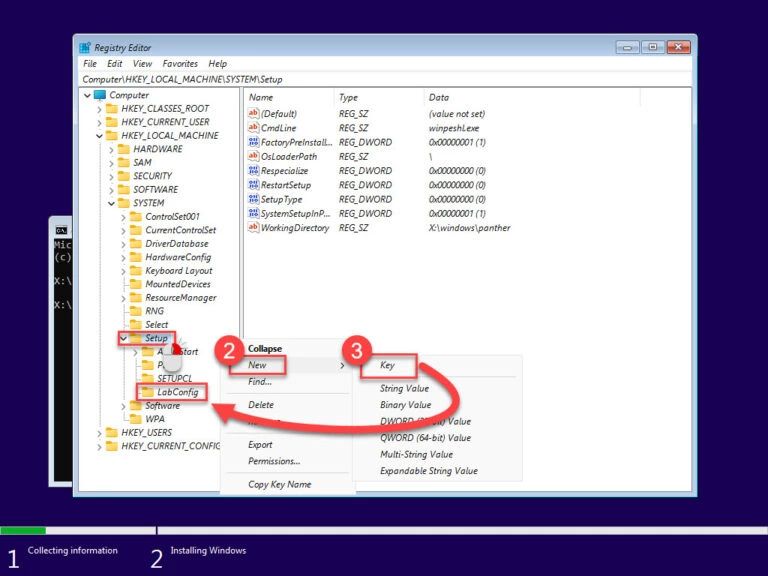
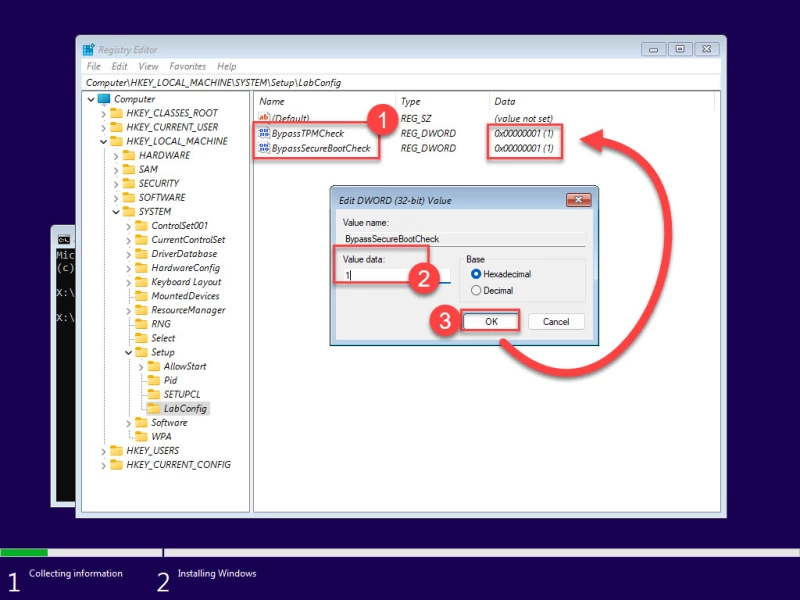
Computer\HKEY_LOCAL_MACHINE\SYSTEM\Setup
- Щелкните правой кнопкой мыши «Setup», разверните New и выберите Key. Назовите этот ключ «LabConfig.»

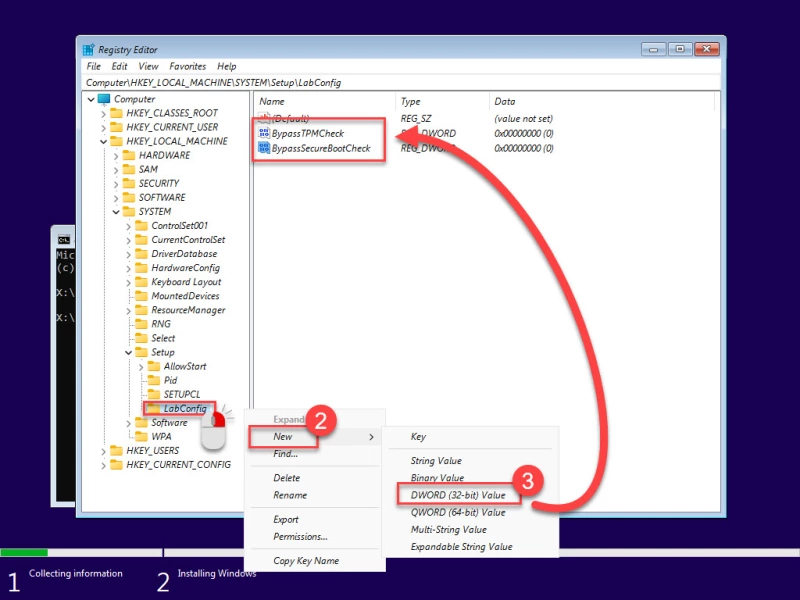
- Щелкните правой кнопкой мыши «LabConfig», разверните New и выберите «DWORD (32-bit) Value». Назовите этот DWORD «BypassTPMCheck».
- Повторите все действия еще раз и создайте еще один DWORD в ключе LabConfig с именем «BypassSecureBootCheck».
- Дважды щелкните оба этих DWORD и измените их Value Data на «1».
- Закройте редактор реестра и окно командной строки.
- Нажмите кнопку «Назад» в мастере установки Windows.
- Теперь снова выберите редакцию Windows и нажмите кнопку Next.

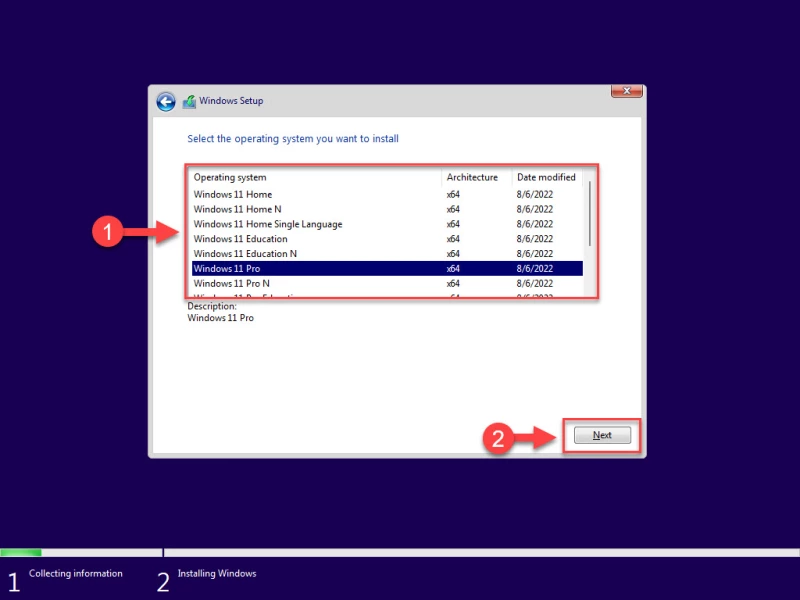
Теперь вы заметите, что подсказка об ошибке исчезла, а на ее месте появились правила и условия. Продолжайте выполнять оставшиеся шаги для успешной установки Windows 11 23H2 без соблюдения системных требований.
*Примечание: *Остальные шаги типичны для всех современных установок Windows.
Обход требований TPM и Secure Boot с помощью Rufus
Rufus, полное название которого «The *R*eliable *U*SB *F*ormatting *U*tility, with *S*ource», – это утилита с открытым исходным кодом для операционной системы Windows, позволяющая изменять и создавать ISO-файлы операционной системы Windows. Теперь эта утилита также включает в себя опции, которые можно выбрать, что позволит создать загрузочный USB-накопитель, на котором системные требования Windows 11 23H2 уже обойдены.
Для обхода требований TPMm Secure to и RAM с помощью Rufus выполните следующие действия:
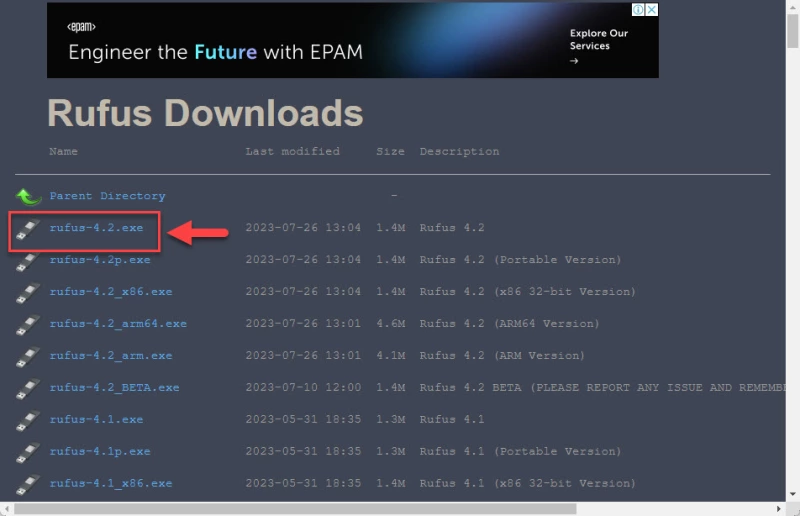
- Откройте Сайт Руфус и нажмите на последнюю версию Rufus, чтобы загрузить ее.

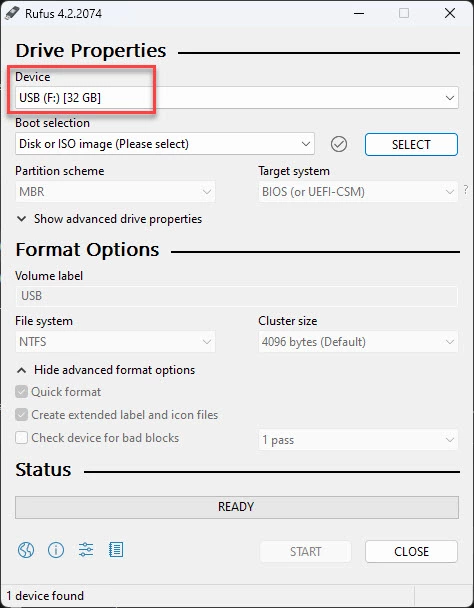
- Подключите USB-накопитель к компьютеру и запустите Rufus.
- В Rufus убедитесь, что USB-накопитель выбран в выпадающем меню Device.

- Нажмите Select и выберите ISO-файл Windows 11 23H2.

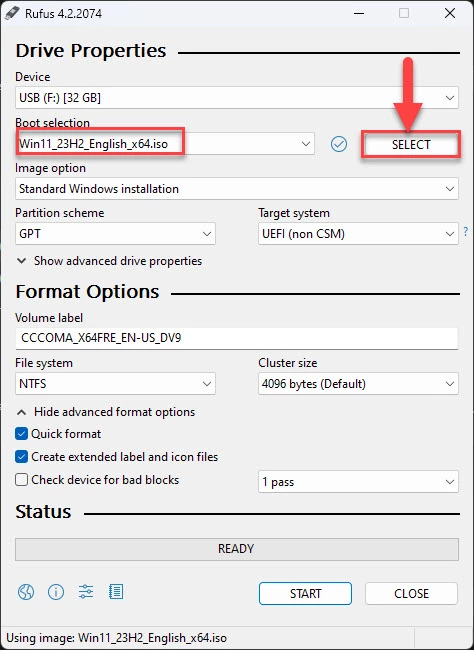
- Убедитесь, что остальные настройки соответствуют следующим:
- Опция образа: Стандартная установка Windows
- Схема разделов: GPT
- Целевая система: UEFI (не CSM)
- Филевая система: NTFS
- Размер кластера: значение по умолчанию
- Выберите: «Быстрое форматирование» и «Создать расширенные файлы меток и значков»
- Нажмите Старт.
- Во всплыающем окне выберите следующие опции и снимите все остальные:
- Снять требования к 4 Гб RAM, Secure Boot, и TPM 2.0
- Убрать требование к учетной записи Microsoft в Интернете
Выбрав эти опции, нажмите Ok.
- Во всплывающем окне с предупреждением нажмите Ok.
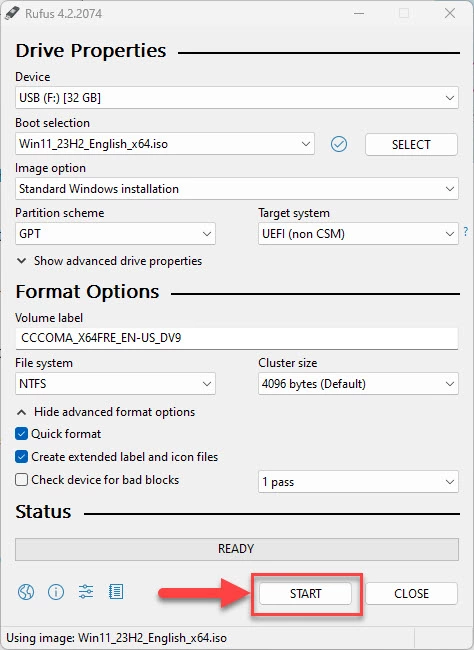

Rufus отформатирует USB-накопитель и создаст загрузочный диск Windows 11 23H2, который будет автоматически обходить требования к TPM 2.0, Secure Boot и RAM. При установке Windows с этого накопителя никаких дополнительных действий не потребуется.
Заключение
Хотя для нашего же блага мы гарантируем, что наши системы соответствуют минимальным требованиям к версиям Windows 11, это не всегда необходимо. Например, если у вас есть отдельный компьютер для тестирования, не подключенный к Интернету и не содержащий конфиденциальной информации, то нет необходимости вкладывать средства в модернизацию его аппаратного обеспечения только для тестирования под Windows 11.
Таким образом, вы можете спокойно обойти требования TPM 2.0 и Secure Boot, используя любой из двух рассмотренных выше методов. Обход минимальных требований Windows 11 с помощью реестра Windows позволяет обойти только требования Secure Boot и TPM, тогда как с помощью Rufus можно обойти оба этих требования, а также ограничения по минимальному объему оперативной памяти.