
Технология NIC Teaming (или Load Balancing/Failover – LBFO, или NIC bonding) позволяет объединить несколько физических сетевых адаптеров (NIC) в одну логическую сетевую карту. В этой статье мы рассмотрим, как настроить NIC Teaming в Windows Server 2019/2016/2012R2 и в десктопых версиях Windows 10 и 11.
Содержание:
- Настройка NIC Teaming в Windows Server 2019
- Используем PowerShell для настройки NIC Teaming в Windows Server
- Создаем группу сетевых адаптеров NIC Teaming в Windows 10 и 11
Для чего может понадобится объединять сетевые адаптеры в группу NIC Teaming?
- Увеличение пропускной способности. Например, объединив две сетевые 1 Гб сетевые карты в одну группу NIC Teaming, вы получите общую полосу пропускания на логическом адаптере 2 Гбит/с;
- Управление балансировкой нагрузки на сетевые карты – можно управлять распределением трафика между NIC сервера;
- Отказоустойчивость – при выходе из строя любой из сетевых карт, добавленных в группу NIC teaming, остальные подхватывают ее функции, и связь с сервером не прерывается. Для критически важных серверов этот механизм может защитить от простоя сервиса во время выхода из строя сетевого коммутатора или Ethernet порта на нем, сетевого кабеля (которым ваш хост подключен к коммутатору). Для реализации такой возможности, достаточно подключить сетевые карты в разные физические коммутаторы.
В Windows Server 2012R2/2016/2019/2022 технология NIC Teaming не совместима с Single-root I/O virtualization (SR-IOV), TCP Chimney и Remote Direct Memory Access (RDMA).
Настройка NIC Teaming в Windows Server 2019
Вы можете настроить NIC Teaming в Windows Server начиная с версии 2012. Рассмотрим, как объединить несколько сетевых адаптеров в Windows Server 2019 в одну группу NIC Teaming. Режим NIC Teaming по умолчанию отключен в Windows Server.
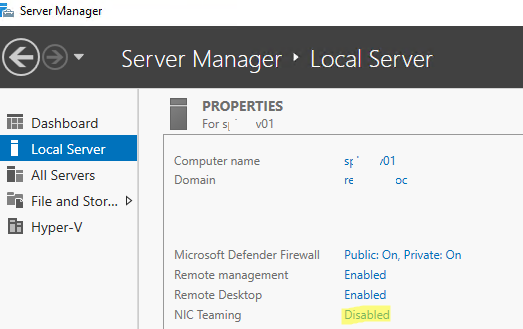
Чтобы включить его, откройте консоль Server Manager, выберите локальный сервер (Local Server) и в его свойствах выберите пункт “NIC Teaming: Disabled“.
В появившемся окне в левой нижней панели выберите пункт Tasks -> New Team (Создать группу).
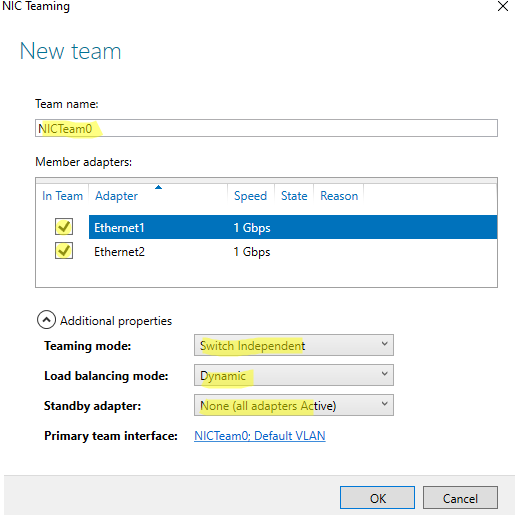
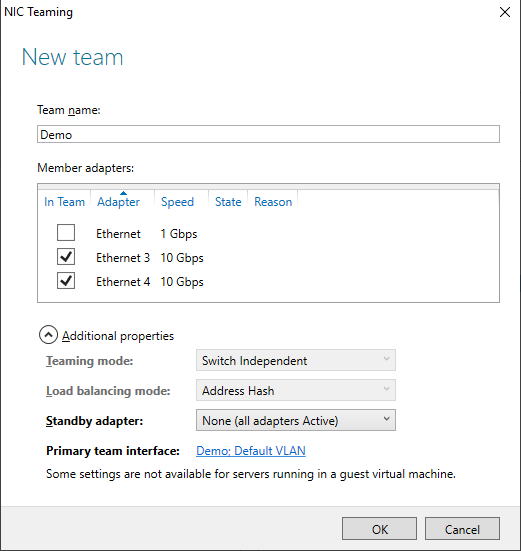
Далее нужно указать имя группы (Team Name) и выбрать сетевые адаптеры, которые будут входить в эту группу.
В Windows Server 2019 в одну NIC Teaming групп можно объединить до 32 физических сетевых адаптеров, главное, чтобы они работали на одной скорости.
Ниже можно настроить специальные параметры группы. От данных параметров зависит правила и эффективность NIC Teaming. Рассмотрим эти настройки подробнее.
Режим поддержки групп (Teaming Mode). Данный параметр определяет способ взаимодействия группы с сетевым оборудованием (коммутатором)
- Static Teaming (IEEE 802.3ad)— статический режим работы с зависимостью от сетевого оборудования. Все адаптеры группы должны быть подключены к одному коммутатору, Ethernet порты которого настроены на использование статической агрегации каналов (требуется настройка на коммутаторе);
- Switch Independent (режим по-умолчанию) – группа работает независимо от коммутатора, для реализации не нужно дополнительно настраивать сетевое оборудование. В этом режиме разные сетевые адаптеры группы можно подключить к разным коммутаторам для повышения отказоустойчивости (защита от сбоев в коммутаторах);
- LACP (Link Aggregation Control Protocol, LACP, IEEE 802.1ax) – режим также зависит от сетевого оборудования. Нужно включить и настроить на коммутаторе динамическую агрегацию каналов по протоколу LACP.
Режим балансировки нагрузки (Load Balancing mode) – задает как распределяется сетевой трафик по NIC в группе.
- Address Hash — для каждого из адаптеров вычисляется специальный хэш (на основании MAC или IP-адресов отправителя и получателя) и привязывается определенному физическому адаптеру. Весь трафик от данного отправителя будет идти через этот NIC;
- Hyper-V Port — режим можно использовать для сервера с ролью Hyper-V. Позволяет привязать конкретный адаптер группу NIC teaming к конкретному порту на виртуальном коммутаторе Hyper-V;
- Dynamic – опция по умолчанию, совмещает оба типа балансировки нагрузки.
Один из адаптеров в группе можно назначить резервным (Standby adapter). В обычном режиме работы данная NIC не используется для передачи трафика. При неполадке на любом другом адаптере в группе NIC Teaming, он тут-же занимает его место. В общем случае и без данной функции при выходе из строя любой сетевой карты, не будет простоя сервиса, т.к. ее нагрузка автоматически распределится между оставшимися картами в группе.
Выберите нужные параметры, нажмите ОК и новая группа Nic Teaming будет создана.
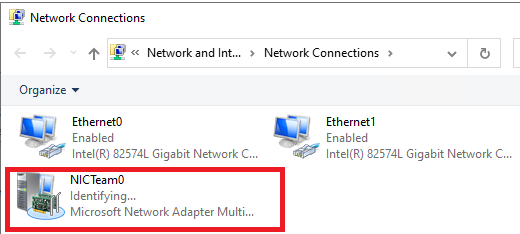
Откройте список сетевых подключения в панели управления Windows. Убедитесь, что в Windows Server появился новый сетевой адаптер Microsoft Network Adapter Multiplexor Driver (его иконка немного отличается). Это и есть виртуальный адаптер группы NIC Teaming.
Дальнейшая настройка параметров сетевой карты (протоколы, IPv4/v6 адрес) осуществляется теперь в свойствах этого адаптера.
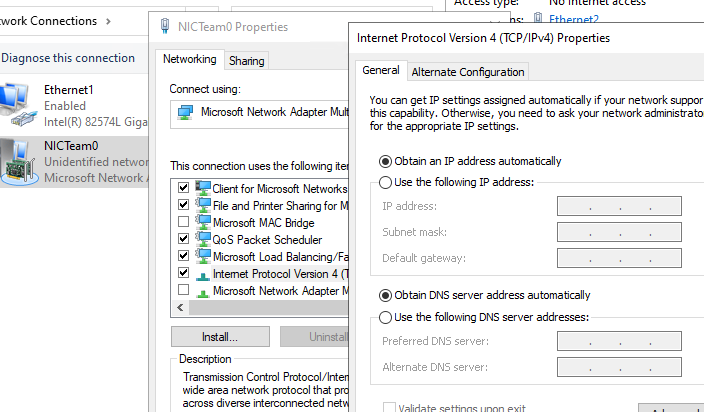
У всех остальных сетевых адаптеров, которые вы добавили в группу NIC Teaming уже не будет собственных IP адресов.
При удалении группы NIC Teaming предыдущие настройки сетевых адаптеров восстанавливаются.
В дальнейшем вы можете добавить или удалить сетевые адаптеры в группу NIC Teaming.
Вы можете использовать группу NIC Teaming для настройки нескольких VLAN интерфейсов в Windows Server. Для этого можно даже создать группу NIC Teaming из одного сетевого адаптера.
Используем PowerShell для настройки NIC Teaming в Windows Server
Вы можете создавать и управлять группами NIC Teaming не только из графического интерфейса Windows, но и с помощью PowerShell. Вы можете использовать PowerShell для настройки NIC Teaming в Windows Server Core
В Windows Server для управления MIC Teaming есть встроенный модуль NetLbfo. Выведите список сетевых адаптеров на сервере:
Get-NetAdapter

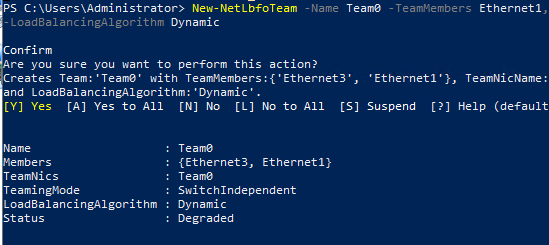
Создайте новую группу с Team0 из адаптеров с именами Ethernet1 и Ethernet3. Выберите режим работы NIC Teaming: Switch Independent с динамической балансировкой.
New-NetLbfoTeam -Name Team0 -TeamMembers Ethernet1,Ethernet3 -TeamingMode SwitchIndependent -LoadBalancingAlgorithm Dynamic
Доступные параметры:
- TeamingMode:
Static
,
SwitchIndependent
,
Lacp - LoadBalansingAlgorithm:
TransportPorts
,
IPAddresses
,
MacAddresses
,
HyperVPort
,
Dynamic
Информацию о группах NIC Teaming на сервере можно вывести с помощью команды:
Get-NetLbfoTeam
Name : Team0
Members : {Ethernet3, Ethernet1}
TeamNics : Team0
TeamingMode : SwitchIndependent
LoadBalancingAlgorithm : Dynamic
Status : Up
Можно настроить IP адрес интерфейса NIC Teaming с помощью PowerShell:
New-NetIPAddress -InterfaceAlias team0 -IPAddress 192.168.13.100 -PrefixLength 24 -DefaultGateway 192.168.13.1
Set-DnsClientServerAddress -InterfaceAlias team0 -ServerAddresses 192.168.13.10
Выполните команду
Get-NetAdapter
. Обратите внимание, что LinkSpeed сетевого адаптера группу NIC Teaming — 2 Гбит/с.

Чтобы изменить настройки группы NIC Teaming используется командлет Set-NetLbfoTeam:
Set-NetLbfoTeam -Name team0 -TeamingMode LACP
Если выполнить эту команду в ВМ, появится ошибка
Set-NetLbfoTeam : 'SwitchIndependent' is the only TeamingMode value supported in a Virtual Machine
Чтобы через NIC Teaming добавить отдельный VLAN интерфейс, используйте команду:
Add-NetLbfoTeamNIC -Team Team0 -VlanID 10
Удалить группу NIC Team можно командой:
Remove-NetLbfoTeam -Name Team0
Создаем группу сетевых адаптеров NIC Teaming в Windows 10 и 11
Вы можете использовать NIC Teaming для объединения сетевых карт не только в Windows Server, но и в клиентских версиях Windows 10 и 11. Главное, чтобы производитель вашей сетевой карты поддерживал для нее режим Link aggregation / NIC teaming/ LBFO.
Например, NIC Teaming работает из коробки с драйверами картами Realtek PCIe GbE Family Controller ( 10.35.510.2019) или Intel(R) 82574L Gigabit Network Connection.
Чтобы собрать группу NIC Teaming в Windows 10 (в этом примере это Windows 10 20H2), откройте консоль PowerShell и выведите список сетевых адаптеров:
Get-NetAdapter
Соберем группу NIC Team из адаптеров Ethernet0 и Ethernet1.
New-NetSwitchTeam -Name "MyNICTeam" -TeamMembers "Ethernet0","Ethernet1"

Проверьте, что в системе появился новый интерфейс NIC Teaming.
Get-NetSwitchTeam
Не забудьте задать для него сетевые настройки. Теперь у вас появился новый интерфейс с пропускной способностью 2 Гбит/с.

Для удаления созданной группы NIC Team, также нужно использовать PowerShell:
Remove-NetSwitchTeam -Name "MyNICTeam"
MicrosoftPowershellWindows 10
Muhammad FaizanDecember 24, 2019 — Last Updated: March 19, 2024
23 35,154 2 minutes read
Muhammad Faizan
Hi, My name is Muhammad Faizan and i have spent last 15 years working as System Administrator mainly with Microsoft Technologies. I am MCSE, MCTP, MCITP, certified professional. I love scripting and Powershell is the scripting language i am in love with.
-
Website
-
Facebook
Related Articles
When you are working in a small home or office networks, the exchange of data and sharing of information amongst all the machines on those networks becomes quite a tedious task. Bridge Connection is a significant solution for these circumstances.
In Windows 10, bridging an internet connection is done so that you can connect two or more networks and make it workable for the machines under those networks to exchange data with one and all. For example, let us consider you have two networks – in one, the machines A, B, and C are connected with cables whereas, in the other one, machines D, E, and F are operating on wireless. So, by building a bridge connection you make it possible for all the five machines A, B, C, D, and E to work on the same network channel. So let us now head towards the steps and see How to Setup Bridge Connections on Windows 10 to attach the PCs functioning on multiple unassociated home or office networks for inter-exchanging information.
How to Setup Bridge Connections on Windows 10
- First of all, on the right end of the taskbar look for the Network symbol and move on with a right click on it and thereon opt for Network and Sharing Center.
- In the next window, pick up the link that is described as Change adapter options in right flank.
- In the emerged window, press and hold the Ctrl key and hit those two or more networks simultaneously that you would wish to Setup in the Bridge connections.
- Perform a right click on either of the networks and hit Bridge Connections option.
- A pop up will inform about the progress in the bridge connections.
- Bridge connection will thus be set up.
There are many other users who confront yellow warning signal with a note that is written as “To create a network bridge, you must select at least two LAN or High-Speed Internet connections that are not being used by Internet Connection Sharing”. Pursue the below steps to get a proper connection –
- Be in the window where you can see all the adapters (see the below screenshot), do a right-click on the wireless adapter and from the arrived contextual menu, select Properties.
- Shift yourself to the Sharing tab and untick the first square cell that is expressed as “Allow other network users to connect through this computer’s Internet Connection” and thereupon click Ok button.
- Attempt the steps mentioned above and the bridge connection will be done.
Microsoft clearly stated that the bridge between internet and network connection should never be attempted as it will generate an unsafe link between the internet and your network and anyone can get through your network which is definitely not a great thing in terms of security.
Would you like servers to seamlessly stay available even when a core switch dies at work? Do you want to have your server access multiple VLANs without depending on a specific vendor’s particular drivers? Want to simplify your networking configuration for physical and virtual hosts in your environment? If you answered yes to any of these questions, then this article is for you. Let NIC Teaming do that.
Not a reader? Watch this related video tutorial!
Not seeing the video? Make sure your ad blocker is disabled.
NIC Teaming can improve fault tolerance for your machines, better utilize network resources (load balancing), configure VLANs for the machine to use, and simplify your networking configuration.
In this article, you will learn what NIC teaming is, special considerations that exist for using NIC Teaming in Virtual Machines, and how to deploy it in your organization.
Prerequisites
You don’t need to be an expert in Windows or Network Administration to understand NIC teaming. But, you do need a few technical and knowledge prerequisites to understand and apply this article. These items are:
- Understanding of how networks function (mac addresses, IP addresses, VLANs)
- Access to Windows Server 2016 (or 2019) with two or more network adapters available – almost everything you see also equally applies to Windows Server 2016, 2012R2, and Windows Server 2012
Understanding NIC Teaming
In a traditional networking setup for a physical server, you provide fault tolerance by plugging multiple network cables from the server into multiple physical switches (possibly part of a single switch stack). Thus, the server has multiple IP addresses active at all times, and load balancing is non-existent.
By deploying a NIC team on your server, you can maintain a connection to multiple physical switches but only use a single IP address. Load balancing becomes readily available. Fault tolerance becomes instant instead of waiting for DNS records to timeout/update and management becomes simpler.
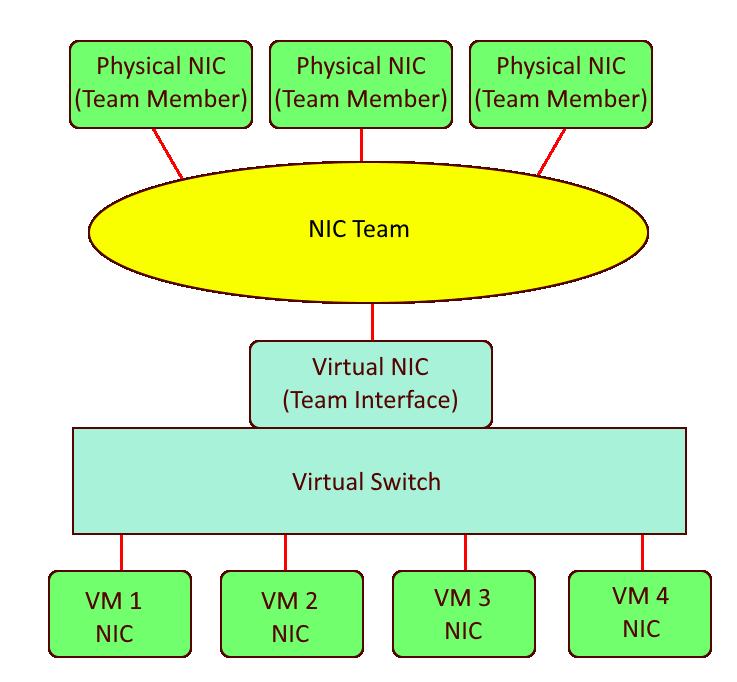
NIC Teaming is a capability in Windows Server that allows you to group NICs into “teams”. Each team consists of one or more team members (NICs that are in the team) and one or more virtual NICs that are available for use.
Team members are the network adapters that the team uses to communicate with the switch. Team interfaces are the virtual network adapters that are created when you make the team. It can be hard to remember which is which since the team interfaces receive an IP address.
What is the difference between NIC teaming and bonding?
NIC Teaming is synonymous with NIC Bonding.
NIC Teaming is available in all editions of Windows Server starting with Windows Server 2012. This capability is extremely flexible and gives administrators a much simpler solution for Link Aggregation/Load Balancing, Failover, and Software Defined Networking (VLANs).
There are similar solutions on certain hardware from certain vendors, however, Microsoft’s implementation of NIC teaming aims to provide these features in a hardware and vendor-agnostic manner.
What is the difference between NIC teaming and bridging?
NIC Teaming allows you to create a NIC interface that spans one or more NIC adapters that are all on the same subnet. NIC Bridging allows you to pair NIC adapters from different subnets to enable communication between the two subnets.
When configuring a NIC Team, you will set the Teaming mode, Load balancing mode, Standby adapter, and Team interface VLAN. Each of these components is explained below.
Teaming Mode
When you create a NIC Team, you must select what Teaming Mode to use. The Teaming Mode determines how the server and switch(es) will split traffic between the multiple links. There are three types of Teaming modes: Switch independent, LACP, and Static.
Switch Independent
Switch independent teaming allows you to connect team members to multiple, non-stack switches. The Switch independent mode is the only teaming mode that uses no configuration changes on the switches that you connect it to. This mode only uses MAC addresses to control what interface incoming data should be sent to.
There are a few situations where you may choose to use Switch Independent Teaming Mode like. This could be when:
- you won’t make configuration changes on your connected switches
- using multiple non-stack switches for the team members
- making a NIC Team inside a VM (more on that in the Considerations for Use in Virtual Machines section below)
If you prefer to use one adapter for traffic and only fail-over to a standby adapter during physical link failure, you must use Switch independent teaming mode and configure a Standby adapter.
A standby adapter is not used often because it reduces the total bandwidth that is available for communicating with the server. The default setting is “None (all adapters Active)”.
Static
Static teaming requires that you manually configure ports on the switch that connect with the NIC team into a Link Aggregation Group (LAG). The server and switch will split traffic between all links that are up.
If a port on either end is connected to some other device, traffic will be split down this link that isn’t expecting it. Thus, it provides no help to isolate errors like incorrectly plugged cables.
You should only use the Static teaming mode when your switches cannot support LACP.
Link Aggregation Control Protocol (LACP)
LACP teaming is similar to Static teaming but it also tracks that each active cable in the link is actually connected to the intended LAG. LACP will not send data through links that are not connected to the expected LAG.
You should use LACP when you want to make the switch aware of the NIC team in order to load balance data that the switch sends to the NIC team.
Important: Static and LACP Teaming modes require you to connect the host to only a single switch or a single switch stack.
Load Balancing Mode
Load balancing mode determines how the team will present interfaces for incoming data and determine what adapters to use for outgoing data. The available options are Address Hash, Hyper-V Port, and Dynamic.
Unlike a “load balancing appliance”, incoming traffic is not going to be evenly split between each link in use by team members.
Address Hash
Address Hash mode will attempt to use the source and destination IP addresses and ports to create an effective balance between team members. If no ports are part of a connection, it will only use IP addresses to determine how to load balance. For cases that there’s no IP addresses are part of a connection, it will use MAC addresses.
When creating a NIC team, you can force the team to use IP+Port, IP only, or MAC address only. IP+Port is the default and provides the best balance among team members. To use IP only or MAC address only, you’ll have to create your NIC team via PowerShell.
While the Address Hash load balancing mode does a good job at splitting outbound traffic between team members, it is unable to adapt to over/under-utilized team members. Also, all inbound traffic uses the MAC address of the primary team interface. This though is limited to a single link if using the Switch Independent teaming mode.
You must use Address Hash when creating a team inside of a virtual machine.
Hyper-V Port
Hyper-V Port mode is intended only for use on Hyper-V virtual machine hosts. This mode will assign a MAC address to each machine on the virtual machine host and then assign a team member to each of the MAC addresses. This allows for a specific VM to have a predictable team member under normal operation.
Predictable team members for each VM means that a VM’s bandwidth is limited to the max of the single link that it operates over. When a Hyper-V host has few VMs on it, using the Hyper-V Port load balancing mode is likely to not be very well-balanced.
You normally don’t need to use Hyper-V Port mode, but may find it beneficial if you must make sure that each VM uses the same link at all times.
Dynamic
Dynamic mode uses the best features from Address Hash and Hyper-V port modes to balance the outbound and inbound network traffic. Like Hyper-V, inbound traffic is split by assigning team members to different MAC addresses. Like Address Hash, outbound traffic is split by a combination hash derived from IP/Port. This mixture provides better balancing compared to either of the above methods.
Dynamic balancing mode comes with one important improvement: dynamic monitoring of traffic. When the dynamic mode algorithm determines that certain team members are over/under-utilized, it will re-balance outbound traffic to other team members as needed.
TCP streams have a natural cadence that makes it possible to predict future traffic amounts/breaks in the TCP; Microsoft calls these flowlets. Dynamic load balancing mode can also anticipate, through flowlets, what team members will become over/under-utilized and re-balance outbound traffic to prepare.
Dynamic mode is almost always the best load balancing option to use.
The Team Interface VLAN
When you create a team, by default, it will create a single team interface. The team interface has a VLAN setting to tag traffic on an interface to a specific VLAN. Setting the team interface VLAN to a tagged VLAN is typically only done when the team members that the NIC Team is made from use the ‘trunk’ mode.
After you create the team, you can create additional team interfaces on different VLANs.
Warning: Microsoft recommends that you never set the VLAN for an interface inside a VM. Instead, use the Hyper-V switch advanced option “VLAN ID” to define VLANs for a VM.
NIC Teaming in Virtual Machines
Setting up NIC teams in a VM comes with some limitations. Microsoft specifically calls out that using “Teams on Teams” (host level teams and VM level teams) can be very unpredictable and cause connection loss.
Traditionally providing fault tolerance for a VM required that the VM must be connected to multiple external virtual switches. You had to plan which VMs would share each virtual switch to ensure none became too congested. Load balancing issues were further complicated with the possibility of congestion from the other VM’s on the host.
Nowadays, you can deploy an NIC team on the VM host with a single network adapter to each VM. All VMs gain full fault tolerance from a physical port or switch failures. All VM’s can have their traffic balanced across team members for much better overall throughput and congestion handling. Your configuration now can look like this:
NIC teaming in a VM is sometimes used to enable SR-IOV for reducing CPU overhead of the networking stack. You also need BIOS support and NIC support for SR-IOV to be functional.
Requirements
Using NIC teaming within a VM includes these requirements to be a “supported configuration”:
- You must be using multiple adapters in the VM.
- The adapters must connect to two virtual switches that are both “external” type.
- If connecting to physical switches, switches must be on the same L2 subnet.
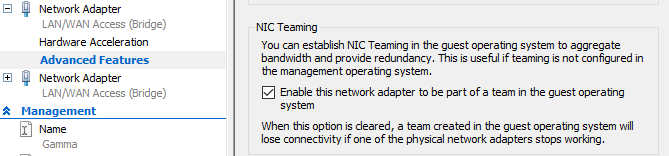
- The VM NIC Team mode must be set to Switch Independent and the load balancing mode must be set to *Address Hash.*
In Hyper-V, you also need to enable NIC Teaming for the VM from each network adapters’ Advanced Features tab that will be part of a team. You can see an example below of what this setting looks like.
Maximizing Performance
While NIC Teaming has good performance out of the box, there are various scenarios where you may need to focus on improving performance. The specifics of these scenarios are out of the scope of this article but if you’d like to learn more about how to performance, focus on the following terms:
- Remote Direct Memory Access (RDMA)
- Switch Embedded Teaming (SET)
- Receive Side Scaling (RSS)
- Single-Root I/O Virtualization (SR-IOV)
Generally, these additional settings reduce some CPU overhead for the networking stack and latency between connections. You can learn more about improving performance in the Software and Hardware technologies explained and Higher performance through RDMA with SET articles.
Creating a NIC Team on Windows Server
Armed with a knowledge of how NIC teaming works and a vision for simplifying your networking, you should now prepared to create a NIC team!
For this demonstration, a NIC team will be created on a VM due to demo environment constraints. Setting up a NIC team on a physical server is the same but if any VM-specific steps are needed, they will be called out.
How do you check if NIC teaming is enabled?
NIC Teaming is enabled in all versions of Windows Server since 2012 (Server 2012, 2012R2, 2016, and 2019).
Deploying NIC Teaming via GUI
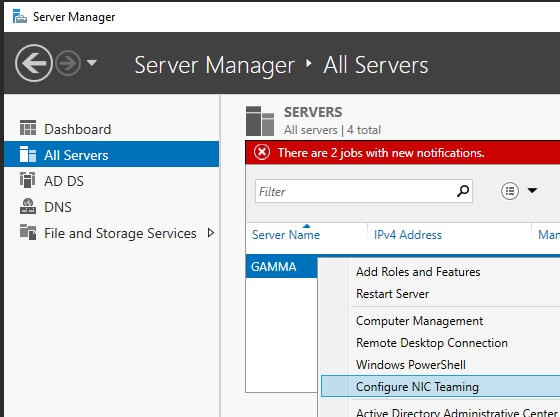
To get started, bring up Server Manager on a Windows Server machine. Ensure you are connected to the machine you’d like to configure the NIC team on.
- First, right-click the server name to create the NIC team on and select Configure NIC Teaming.
2. From the Adapters and Interfaces panel, select the NICs to add to the new team. Next, right-click on the selected adapters and select Add to New Team.
Note: You can configure NIC Teaming with any combination of one or many adapters (max: 32) and one or more team interfaces.
3. Type a descriptive Team name and configure Additional Properties as needed and click OK to create the team.
In this example, the NIC team is being set up on a VM. As a result, the Teaming mode or the Load balancing mode cannot be used. If this demo were on a physical server, you’d probably use Switch Independent or LACP if using a LAG on the switch.
The NIC team should now be created on the Windows Server.
Adding More NICs or Interfaces to the NIC Team
Once created, you can add NICs to a configured team from the same NIC Teaming window. To do so, right-click on an available NIC and select Add to Team “<Team name>”.
You can also add more interfaces to a team by selecting the Team Interfaces tab and then click TASKS —> Add Interface as shown below.
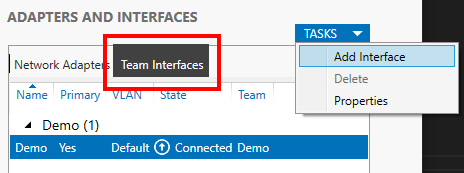
Once the input comes up, type in the VLAN to use and optionally, a name as shown below.

Deploying NIC Teaming via Windows PowerShell
Now that you know how to set up a NIC team the GUI, let’s now check out how to do this via PowerShell.
Finding NIC Names
First, you must decide which NICs you will add to the team. More specifically, you will need to figure out the NIC names.
To find the NIC names, use the Get-Adapter cmdlet. Run this cmdlet and notice your options as shown below.

Once you have noted the names, you can now create the team with PowerShell! For this demo, we’ll be using the NICs Ethernet 3 and 4 for the new NIC Team.
Creating the NIC Team
Now that you have the adapter names in hand, you only have one more cmdlet (New-NetLbfoTeam) to run. You can see an example of running the New-NetLbfoTeam cmdlet and it’s output below.
For the TeamMembers parameter, you’ll use the names of the NICs gathered earlier.
In this example, the TeamingMode is set to SwitchIndependent. If you are configuring the switch ports into a LAG, you’ll probably want to use the LACP value. If you aren’t using a LAG on the switch, you would probably choose to use SwitchIndependent.
The LoadBalancingAlgorithm parameter value of Dynamic is used because this mode provides the most even load balancing across team members.
New-NetLbfoTeam -TeamMembers <NIC Names> -Name "<Desciptive Name>" -TeamingMode SwitchIndependent -LoadBalancingAlgorithm TransportPorts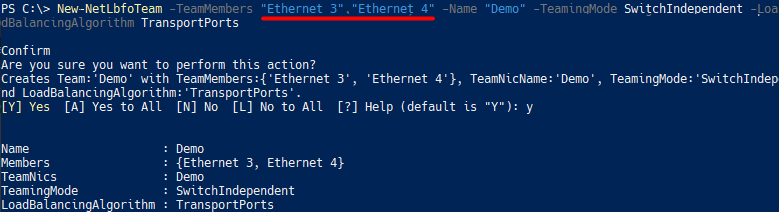
Once completed, you’ll now see a new virtual NIC appear in the adapter list from Get-NetAdapter:

NIC Team on a VM Notes:
– You must use the ‘SwitchIndependent’ TeamingMode.
– You must use one of the Address Hash types for the LoadBalancingAlgorithm (TransportPorts).
– Dynamic load balancing would be used on a physical server instead of TransportPorts.*
Adding More NICs or Interfaces to the NIC Team
Once you have the NIC team build, you can then add NICs and interface to it just like the GUI. To add more NICs to the team, use the Add-NetLbfoTeamMember cmdlet*.*
Add-NetLbfoTeamMember -Name NIC1 -Team Team1You can also add more team interfaces with the cmdlet Add-NetLbfoteamNIC.
Add-NetLbfoTeamNIC -Team Team1 -VlanID 42Summary
You have now learned what NIC Teaming is, how it relates to performance/VM use/simplifying your networking, and how to deploy it via GUI or PowerShell.
In 2021, our lives are just as much dependent on the internet as we are on food, clothing, and shelter. Okay, that’s an exaggeration! But my point is, the internet has become an essential requirement too for most people. Our work, studies, businesses, money transfer, communications, etc., is happening on our computers all the time. Therefore, there is a huge requirement for unlimited bandwidth in all sectors and for all professionals.
However, that can become a hindrance in our jobs or daily tasks when our ISP provider puts a stringent limit on the amount of bandwidth we can use. And this also means that we have to choose between downloading a game that we have been waiting to play for a long time or go on a long office video call. And you know how tough that decision is, but we don’t want you to sacrifice one for the other.
In Windows 10, you can combine two or more internet connections from different devices and sources to get the best of it.
Also Read: How To Manage Albums In Photos For MacOs?
How To Use System Resources To Combine Multiple Internet Connections?
It can be beneficial to combine two or sources of the internet from different ISPs in one device. To do that:
Step 1: Go to Control Panel and select Network and Internet.
Step 2: Under this section, choose Network and Sharing Center. Find Change Adapter settings.
Step 3: On the active internet connection, right-click on the button and open Properties.
Step 4: Hover on the Internet Protocol TCP/IP version and tap on Properties.
Step 5: Tap on Advanced and disable the Automatic metric box, and type fifteen.
Step 6: In the Interface Metric Field, tap for confirmation and repeat the same process for all your internet connections.
Step 7: Once you have completed the process, shut down and restart your PC.
Step 8: Add all the internet connections to see if they are all connected and working fine.
Also Read: How To Fix A Stuck Pixel On Your Computer Screen?
How To Connect Multiple Internet Connections Through A Dedicated Hotspot Program?
Often, users cannot use the above method due to faults in their system. In that case, you can use a third-party application to aid the process.
Step 1: Download and Install a third-party app.
Step 2: Click on the Run button and add your internet connections.
Step 3: Go to Network Access and choose Bridge Mode. A third-party app works as a bridge between your system and the multiple internet connections making them one.
Also Read: How To Use SOS Emergency Feature On Your iPhone, Android And Smartwatch
How To Use A Load Balancing Router To Combine Multiple Internet Connections?
A load-balancing router will only work using a WAN/LAN. It works to build a stable and strong connection for which you need to buy a load balancing router. You will be able to merge these connections using your WAN/LAN easily. Most ISPs provide load-balancing routers, so you can check yours if they have too. In case they don’t, there are companies like TP-Link and Cisco that offer budget-friendly load-balancing routers. To set it up with a LAN/WAN network, follow these steps:
Step 1: Go to Control Panel and choose Network and Settings from the list of options.
Step 2: Once again, click on Network and Sharing Center and tap on Adapter Settings.
Step 3: From your keyboard, long press CTRL and select both the connections or more if you want.
Step 4: Choose one of the connections and right-click on it. From multiple options, choose Bridge Connections.
Read: Forgot Your Android Passcode? 4 Ways to Get Back In
Conclusion
These are how you can combine more than one internet network on Windows 10. Moreover, you also use the in-built bridge network on your computer. To do this, together with press Windows + R. When the dialog box opens, type cpl. It will open the dialog box Network and Sharing Center. From here, tap on as many network connections you want and right-click on them. Finally, choose Bridge Connections to combine them.
Furthermore, it is always beneficial to combine more than one network connection. For example, when you’re working on a deadline and the networks fail suddenly, the other one will pick up. Thus, saving you time and trouble.
Also Read: How To Self-Publish And Market Your Book On Amazon: Step By Step Guide
How To Expand Your Brand/Business On Instagram?- An In-Depth Detailed Guide