
Updated May 2025: Stop these error messages and fix common problems with this tool. Get it now at this link
- Download and install the software.
- It will scan your computer for problems.
- The tool will then fix the issues that were found.
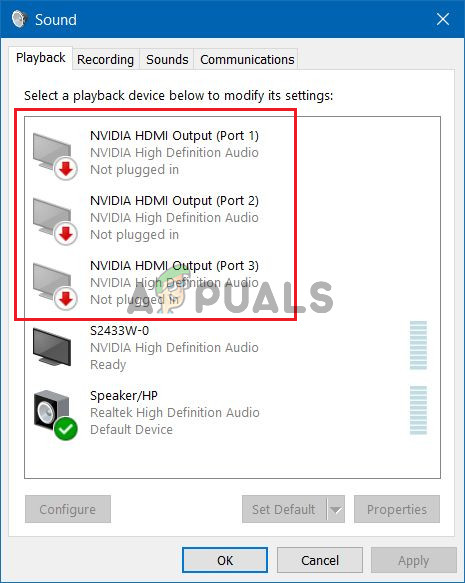
Are your NVIDIA outputs grayed out and listed as “Not connected”? Can’t get HDMI audio to work? No need to panic. You’re certainly not alone. Many Windows users report the exact same problem. But most importantly, you can quickly and easily fix the situation.
NVIDIA is one of the leading suppliers of excellent graphics cards for your high-end games. While the company makes great products, there can be some problems, which we’ll cover today on IR Cache. In this final installment of our troubleshooting series, we’ll take a look at the “Nvidia Output Not Plugged In” error on your Windows PC.
Table of Contents:
What causes the “NVIDIA Output Not Plugged In” error on Windows 10

Even if this problem appears in the “Sounds” section of your computer settings, the root cause is the NVIDIA graphics driver and you should consider replacing it. Some users have been able to solve the problem by installing the latest version of the driver, while others have reinstalled the driver. Either way, this should solve the problem with the NVIDIA sound.
You can also check in the NVIDIA control panel to make sure all the settings are correct. There is an option that prevents HDMI audio, and you should make sure it is disabled. Good luck with solving your problem.
Updated: May 2025
This tool is highly recommended to help you fix your error. Plus, this tool offers protection against file loss, malware, and hardware failures, and optimizes your device for maximum performance. If you already have a problem with your computer, this software can help you fix it and prevent other problems from recurring:
- Step 1 : Install the PC Repair and Optimizer Tool. (Windows 10, 8, 7, XP, Vista).
- Step 2 : Click Start Scan to determine what problems you are experiencing with your computer.
- Step 3 : Click Repair Allto resolve all problems.

Update the NVIDIA graphics driver
This error may be caused by outdated drivers that don’t work well with your device, or by the latest drivers. You can try updating the NVIDIA graphics driver to fix this error.
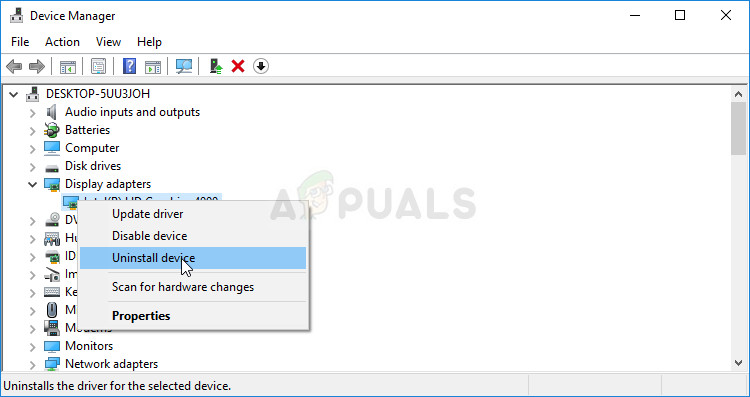
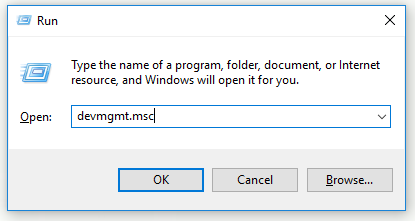
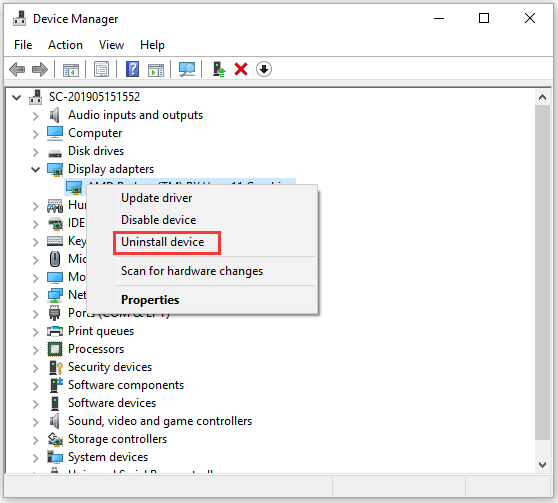
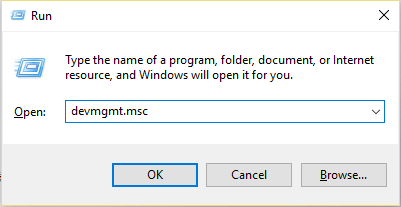
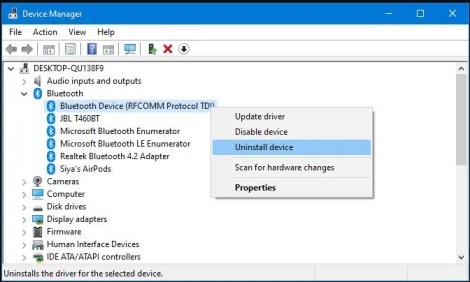
- Press the Windows + R key combination to open the Run dialog box. Type devmgmt.msc and click OK to start the Device Manager.
- Expand the Display Adapters panel, right-click on the graphics card, and select Uninstall Device to uninstall the graphics card.
- Look for any dialog boxes or prompts that might ask you to confirm the removal of the current graphics device driver, and wait for the process to complete.
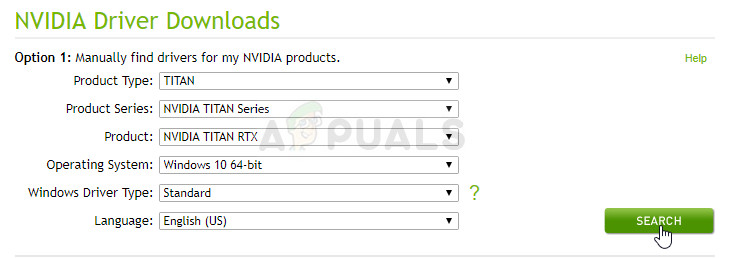
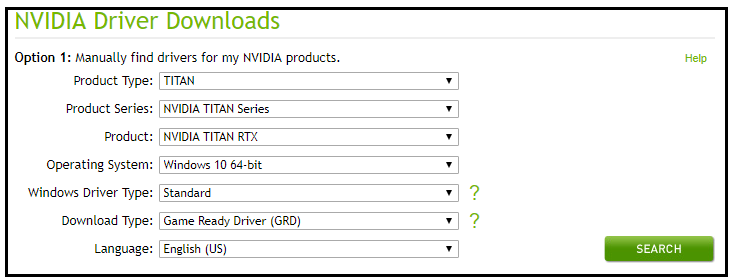
- Find the drivers for your NVIDIA products in the NVIDIA driver download section. Enter all the necessary information and click SEARCH.
- Click the entry you want and click Download. Save the file to your computer, open it and follow the instructions.
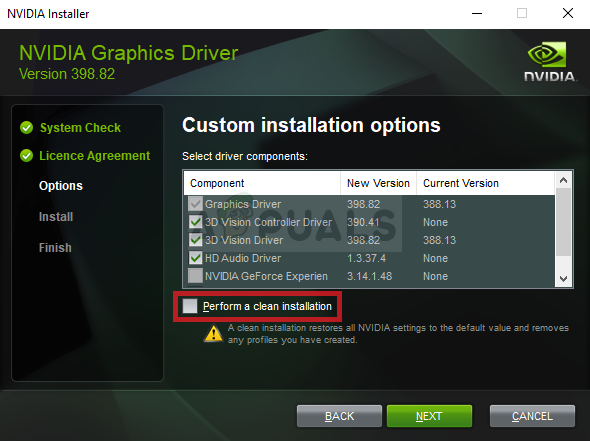
- In the Installation Options window, select Selective (advanced), check the Perform a clean installation checkbox, and click NEXT to install the driver.
Now make sure that the “NVIDIA output not connected” error is resolved.
Resetting the driver
If the “NVIDIA Output Not Connected” error occurs after installing the latest video card drivers, you can try to reset the video card driver.
- Uninstall the driver that is currently installed on your computer.
- Press the Windows + R key combination to open the “Run” dialog box.
- Type devmgmt.msc and click OK to open the Device Manager.
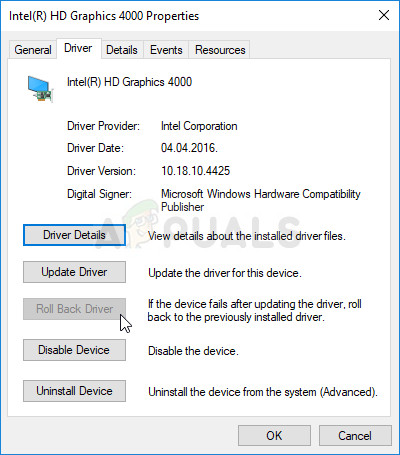
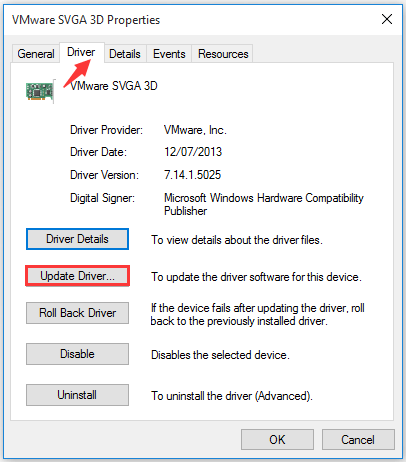
- Expand Display Adapters, right-click the display adapter you want to reset, and select Properties.
- Click the “Drivers” tab and look for “Rollback Driver”.
- If this option is grayed out, it means that the device has not been updated recently or that there are no backup files storing the old driver.
- If the option is not grayed out, follow the instructions to continue the process.
Enable the NVIDIA output port in the NVIDIA control panel
If you have not set the correct settings in the NVIDIA control panel, the HDMI port may not be configured to transmit audio. When viewing playback devices connected to your computer, you will see an “NVIDIA output not connected” error.
You can try enabling the NVIDIA output port in the NVIDIA Control Panel to resolve this issue.
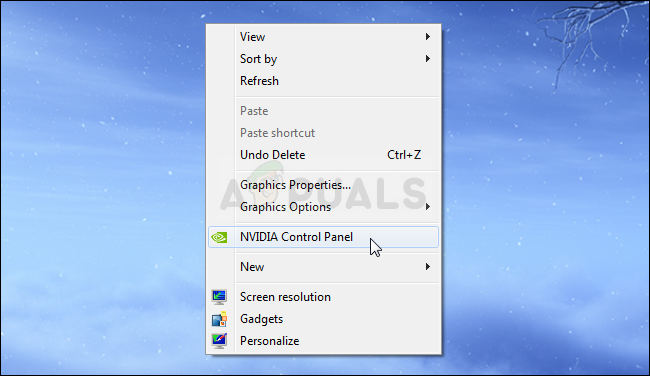
- Right-click on a blank desktop with no icon and select NVIDIA Control Panel.
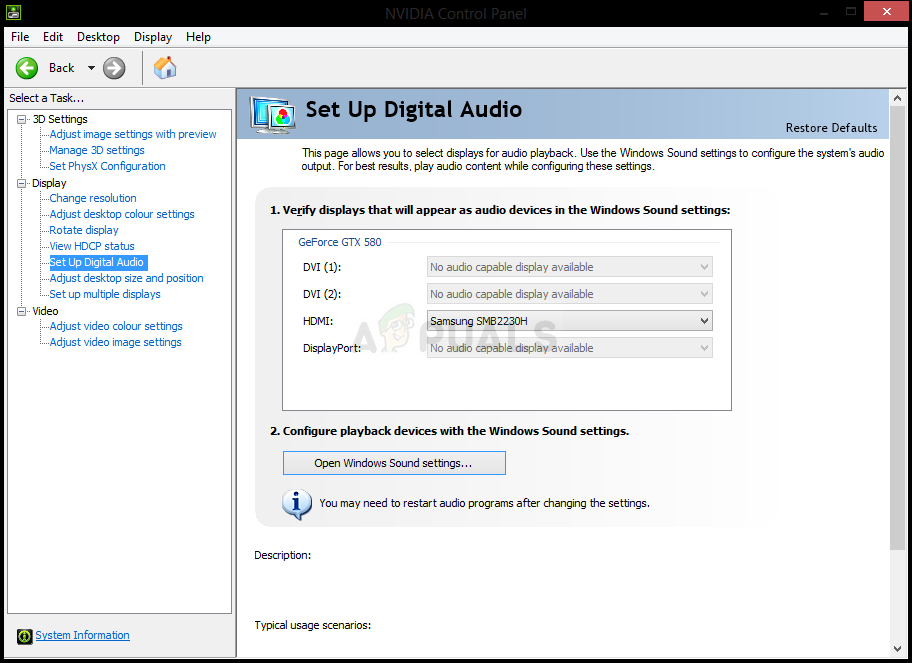
- Expand the Display section and select Configure Digital Audio.
- Find the name of your video card and look for HDMI in the list. Select the device you are connected to.
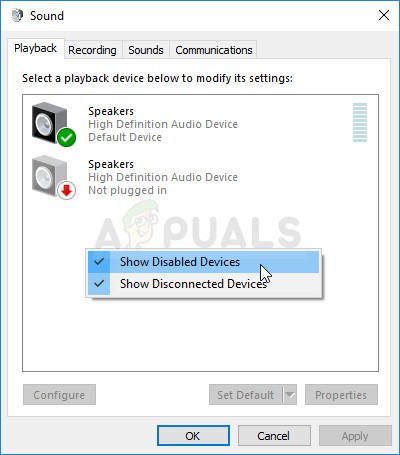
- Right-click the volume icon in the lower right corner of the screen, select Sounds, and then click the Playback tab.
- The NVIDIA output device that you want to use by default will appear.
- If it does not appear, right-click on an empty area and check the Show Disconnected Devices and Show Unconnected Devices boxes. Your device should appear on the screen. Left-click on the newly appearing device and click Set Default.
- Make sure that the “NVIDIA Output is not connected” error has disappeared.
APPROVED: To fix Windows errors, click here.
Frequently Asked Questions
- Right-click on your desktop and select NVIDIA Control Panel.
- Go to View -> Configure Digital Audio.
- Click the Open Windows Audio Settings button.
- On the Playback tab, right-click an empty area and select Show Disconnected
- Devices and Show Unconnected Devices.
- Select your device and set it as the default.
If the correct settings have not been made in the NVIDIA control panel, your HDMI port may not be configured for audio transmission. If this is the case, the NVIDIA audio output will appear disabled when you view playback devices connected to your computer.
- Change the audio output device.
- Reset the audio driver settings.
- Update or reinstall the audio drivers.
- Reinstall the GPU drivers.
- Enable the built-in audio device in the BIOS.
- Perform a clean installation of the Nvidia drivers.
- Disable the Nvidia HDMI sound adapter in the BIOS.
- Update your BIOS.
Right-click on your Windows desktop and select «NVIDIA Control Panel». Go to the Help menu and select Updates. The second way is through the new NVIDIA logo in the Windows system tray. Right-click on the logo and select Check for Updates or Update Settings.
The problem is related to the NVIDIA audio output which appears as unplugged when viewed in the Playback tab of the Sound settings inside Control Panel. Besides that, users are unable to enable sound for their HDMI output.
There aren’t many different methods to pull off when troubleshooting this problem but the ones we provided below were confirmed as successful by users online. Make sure you check it out below!
Even though this problem appears inside the Sounds section of your computer’s settings, its real cause is the NVIDIA graphics driver and you should consider replacing it. Some users managed to resolve the problem by installing the latest one and others rolled back their driver. Either way, it should resolve the NVIDIA audio output issue.
Alternatively, you can check the NVIDIA Control Panel to see whether all settings are set up properly. There is an option which prevents HDMI sound from being broadcast and you need to make sure to disable that. Good luck in resolving your problem!
Solution 1: Update Your NVIDIA Graphics Driver
This problem can be caused both by outdated drivers which can’t work well with your device or by the newest drivers, as reported by some users. Even though some users are skeptic about updating graphics drivers to resolve audio issues, you should check out this method as is has helped plenty of users resolve their problem.
- Click the Start menu button, type in “Device Manager” afterward, and select it from the list of available results by simply clicking the first one. You can also tap the Windows Key + R key combo to bring up the Run dialog box. Type in “devmgmt.msc” in the dialog box and click OK to run it.
- Since it’s the video card driver you want to update on your computer, expand the Display adapters section, right-click on your graphics card and choose the Uninstall Device
- Confirm any dialogues or prompts which may ask you to confirm the uninstallation of the current graphics device driver and wait for the process to complete.
- Look for your graphics card driver on NVIDIA’s Input the required information about the card and your operating system and click on Search.
- A list of all available drivers should appear. Make sure you scroll down until you reach the required entry, click on its name and the Download button afterward. Save it to your computer, open it, and follow the instructions on-screen.
- When you reach the Installation Options screen, choose the Custom (Advanced) option before clicking Next. You will be presented with a list of components which will be installed. Check the box next to the Perform a clean installation box and click Next and install the driver.
- Check to see if the problem has been resolved and if NVIDIA output still shows up as unplugged!
Alternative: Rollback the Driver
For the users for which the problem started to appear after they have installed the latest drivers for their graphics card, there is a different method they can use. It involves rolling back the graphics card driver.
This process will look for backup files of the driver which was installed before the most recent updates and that driver will be installed instead.
- First of all, you will need to uninstall the driver you currently have installed on your machine.
- Type “Device Manager” into the search field next to the Start menu button to open the device manager window. You can also use the Windows Key + R key combination to open the Run dialog box. Type devmgmt.msc in the box and click OK or Enter key.
- Expand the “Display Adapters” section. This will display all network adapters that the machine has installed at the moment.
- Right-click on the display adapter you want to rollback and select Properties. After the Properties window opens, navigate to the Driver tab and locate the Roll Back Driver
- If the option is grayed out, it means that the device wasn’t updated recently or it has no backup files remembering the old driver.
- If the option is available to click on, do so and follow the instructions on-screen to proceed with the process.
Solution 2: Enable it in the NVIDIA Control Panel
If correct settings have not been set up in NVIDIA Control Panel, your HDMI port may be set up to not broadcast audio which will display the NVIDIA audio output as unplugged when viewing playback devices connected to your computer. Follow the steps below to resolve the NVIDIA output not plugged in on Windows!
- Right-click your desktop at the blank side without icons and select the NVIDIA Control Panel entry from the context menu which will appear. You can also double-click the NVIDIA icon in the system tray if you see it. NVIDIA Control Panel can also be located in the Control Panel by switching to the Large icons view and locating it.
- From the navigation menu, click the + button next to the Display section to expand the dropdown list. Under that, choose the Set up digital audio option.
- Under the first screen, navigate under the name of your graphics card and look for the HDMI entry in the list. Make sure you choose the device you are connected to in the dropdown list.
- Right-click on the Volume icon located at the bottom right part of your screen and choose the Playback devices An alternative way would be to open the Control Panel on your PC and set the View by option to Large icons. After that, locate and click on the Sounds option to open the same window.
- Stay in the Playback tab of the Sound window which just opened up.

- You should now be able to see the NVIDIA output device you want to set as default. If that is not the case, right-click anywhere in the middle of the window and check the boxes next to the Show Disabled Devices and Show Disconnected Devices Your device should now appear.
- Left-click on the newly appeared device and click the Set Default button below which should switch the sound to them as soon as it’s connected. That should resolve the problem you have with NVIDIA output audio!
If none of these methods shown above helped you at all, double-check that you are using the correct port for your audio and your speakers are connected to the ports on Graphics Card, not on the ports of Motherboard.
Kevin Arrows
Kevin Arrows is a highly experienced and knowledgeable technology specialist with over a decade of industry experience. He holds a Microsoft Certified Technology Specialist (MCTS) certification and has a deep passion for staying up-to-date on the latest tech developments. Kevin has written extensively on a wide range of tech-related topics, showcasing his expertise and knowledge in areas such as software development, cybersecurity, and cloud computing. His contributions to the tech field have been widely recognized and respected by his peers, and he is highly regarded for his ability to explain complex technical concepts in a clear and concise manner.
-
Home
-
News
- Solutions to Fix the NVIDIA Output Not Plugged in Error
By Echo |
Last Updated
If you meet the NVIDIA Output not plugged in error on Windows, you need to read this post. It will show you two scenarios in which the problem occurs and the corresponding solution in each scenario. Right now, you can get these two useful solutions from the MiniTool website.
Solution 1: Update the NVIDIA Graphics Driver
This error may be due to outdated drivers that do not work well with your device or due to the latest drivers. You can try updating the NVIDIA graphics driver to resolve this error
Step 1: Press the Windows + R keys combination to open the Run dialog box. Type devmgmt.msc and click OK to run Device Manager.
Step 2: Expand the Display adapters part, right-click your graphics card and choose Uninstall device to uninstall your graphics adapter.
Step 3: Verify all dialogs or prompts that may require you to verify the uninstallation of the current graphical device driver and wait for the process to complete.
Step 4: Find drivers for your NVIDIA products in the NVIDIA Driver Downloads part. Type all required information and click SEARCH.
Step 5: Click the required entry and click the Download button. Save it to your computer, open it, and follow the instructions.
Step 6: In the Installation Options window, choose the Custom (Advanced) option, check Perform a clean installation and then click NEXT to install the driver.
Now check to see if the NVIDIA Output not plugged in error has been resolved.
Alternative: Roll Back the Driver
If the NVIDIA Output not plugged in error occurs after you have installed the latest drivers for the graphics card, you can try to roll back the graphics card driver.
Step 1: Uninstall the driver you currently have installed on your machine.
Step 2: Press the Windows + R keys combination to open the Run dialog box. Type devmgmt.msc and click OK to open Device Manager.
Step 3: Expand the Display adapters section, right-click on the display adapter you want to rollback and choose Properties.
Step 4: Switch to the Driver tab and find Roll Back Driver. If this option is grayed out, it means that the device has not been updated recently or has no backup files to remember the old driver. If the option is not gray, follow the instructions to proceed with the process.
Solution 2: Enable NVIDIA Output Port in the NVIDIA Control Panel
If you don’t set the correct settings in the NVIDIA Control Panel, the HDMI port could be set up to not broadcast audio. When you view playback devices connected to your computer, you will see the NVIDIA Output not plugged in error.
You can try enabling NVIDIA Output port in the NVIDIA Control Panel to fix this error.
Step 1: Right-click on the blank desktop with no icon and click NVIDIA Control Panel.
Step 2: Expand the Display section and choose the Set Up Digital Audio option.
Step 3: Find the name of your graphics card and find the HDMI entry in the list. Choose the device you are connected to.
Step 4: Right-click the volume icon in the bottom right corner of the screen, click Sounds and switch to the Playback tab.
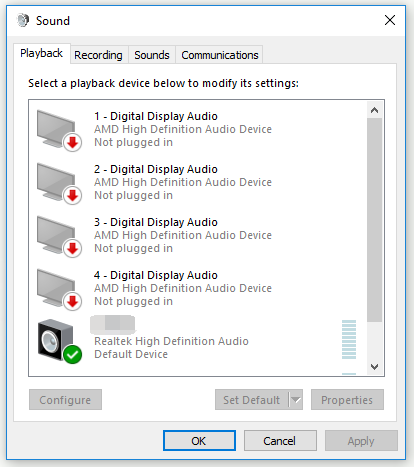
Step 5: The NVIDIA output device that you want to set as default will appear. If it does not show up, right-click a blank area and check Show Disabled Devices and Show Disconnected Devices. Right now, your device should appear.
Step 6: Left-click the newly appeared device and click the Set Default button.
Check if the NVIDIA Output not plugged in error disappears.
Further Reading: Update Your NVIDIA GPU Display Driver Now to Fix Five Vulnerabilities.
Bottom Line
In conclusion, this post has shown you how to fix the NVIDIA Output not plugged in error on Windows with 2 workable solutions. If you encounter the same error, you can try the methods in this post.
About The Author
Position: Columnist
Echo is a technology enthusiast, has published many professional technical articles. She previously specialized in backup and recovery of data, files, disk partition, and system. Now she writes mostly about YouTube expertise.
As an enthusiastic technical writer, Echo believes that technology makes our life better and she has been trying to make her technical articles easier to understand and help more people. You must benefit a lot from reading her article.
On her spare time, she likes listening to songs and hiking.
Many users are troubled by the NVIDIA High Definition audio no sound issue when using HDMI to stream audio or video to other screens. Don’t worry. This post of MiniTool summarizes several effective fixes to the problem.
What causes NVIDIA audio not working? According to a survey, the issue often occurs after the default audio output device was changed accidentally. Moreover, faulty or outdated audio drivers and the disabled Onboard sound device are responsible for the NVIDIA sound not working problem. Don’t worry. Here are several effective methods to fix it.
Fix 1. Set the Default Audio Output Device
Many users have proven that setting the default audio output device can fix the NVIDIA High Definition audio no sound problem. Let’s have a try.
Step 1. Right-click the Volume/Sound icon from the notification area and select Playback devices.
Tip: Also, you can open Control Panel, and then change View by type to Large icons and select Sounds to access the same window.
Step 2. Stay in the Playback tab, and then right-click the desired audio device and select Set as Default Device.
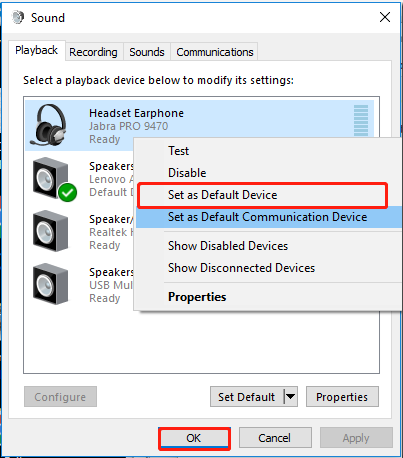
Step 3. Right-click the Digital Audio/Monitor/HDMI Output device and select Disable from the appeared menu.
Step 4. Click on OK to save changes.
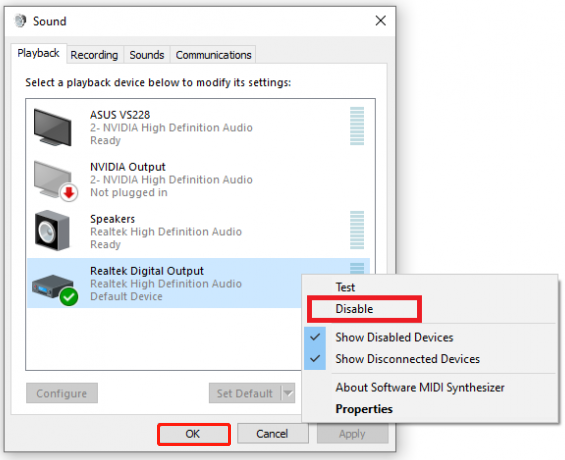
Now, you can check if the NVIDIA HDMI audio not working issue gets resolved.
Fix 2. Roll Back or Update or Reinstall the Audio Driver
The NVIDIA High Definition audio not working Windows 10 issue can be caused by corrupt or outdated audio device drivers. To fix it, you can try rolling back, or updating, or reinstalling the audio driver.
Step 1. Right-click the Start button and select Device Manager from the context menu.
Step 2. Expand the Sound, video and game controllers category, and then right-click Realtek HD Audio driver and select Properties.
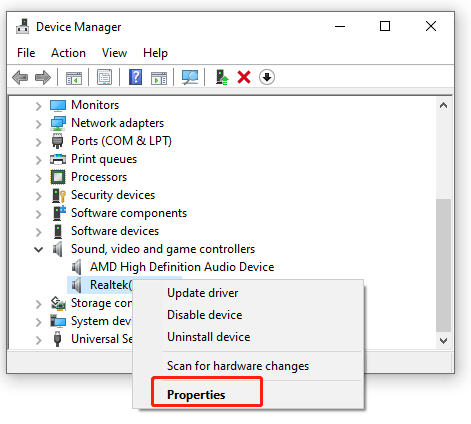
Step 3. Go to the Driver tab, and then click on Roll Back Driver and follow the on-screen prompts to complete the operation.
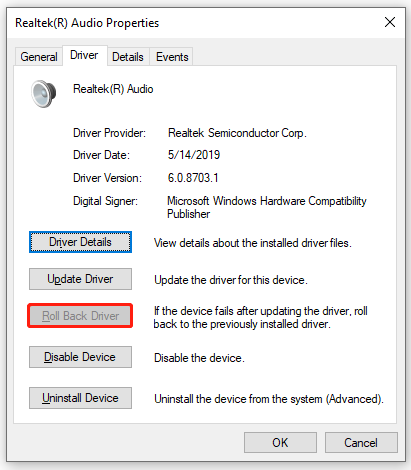
Step 4. If the NVIDIA audio not working problem still occurs, you can click on Update Driver and select Browse my computer for driver software. Then click on Let me pick from a list of available drivers on my computer in the pop-up window.
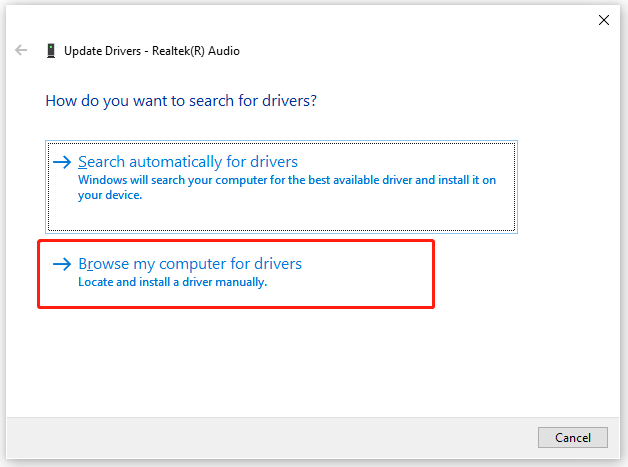
Step 5. After a while, tick the checkbox for Show compatible hardware and select a correct driver version from the list and click on Next. Then wait for the update to complete.

Step 6. Once done, restart your computer and check if the problem is solved. If not, you can try reinstalling the audio driver by selecting Uninstall Device in Step 3 and follow the on-screen prompts to complete it. Then Windows will install a default audio driver automatically next startup.
Fix 3. Reinstall NVIDIA GPU Driver
In addition to the audio driver, the outdated or corrupt GPU driver can trigger the NVIDIA sound not working issue. Here you can try reinstalling the NVIDIA GPU driver.
Step 1. Open the Device Manager window again and expand the Display adapters category.
Step 2. Right-click the graphics card driver and select Uninstall device. Then follow the on-screen prompt to complete this uninstallation.
Step 3. Restart your computer and then Windows will automatically install a default graphics card driver for you.
Once done, you can see if the NVIDIA HDMI audio not working issue is fixed.
Fix 4. Enable the Onboard Sound Device in BIOS
According to some user reported, the onboard sound device gets disabled automatically when an external sound device is connected or a new graphics card driver is installed. In this case, you can follow the steps below to enable the onboard sound device in BIOS:
Step 1. Restart your computer and press the Delete or F2 key when the startup screen appears to enter BIOS. This may vary from different configurations and it depends on your motherboard. So, make sure you press the correct BIOS key.
Step 2. Go to the Advanced > Onboard Sound Device tab and change its status to ON.
Step 3. Press F10 or Enter to save the change and exit BIOS.
Fix 5. Disable NVIDIA HDMI Sound Adapter in BIOS
If you encounter the NVIDIA High Definition audio no sound issue after installing NVIDIA HDMI sound adapter, then the issue could be related to your BISO and its settings. In this case, you can try disabling the NVIDIA HDMI sound adapter in BIOS.
Step 1. Enter BIOS by following Step 1 in the above fix.
Step 2 Navigate to the Advanced tab and then select Onboard Devices.
Step 3. Change the status of the NVIDIA HDMI Sound Adapter to Disabled, and then press F10 to save the change.
After that, exit BIOS and see if the “NVIDIA High Definition Audio driver Windows 10 no sound” problem is gone.
Fix 6. Perform a Clean Installation of NVIDIA Driver
If the NVIDIA High Definition audio no sound problem persists after trying all the above fixes, you may consider performing a clean installation of the NVIDIA driver. Here’s how:
Step 1. Open the installation of the NVIDIA installer and double-click the setup file to run it.
Step 2. Go to the Installation options menu, and then select the Custom (Advanced) option and click on Next.

Step 3. Select the checkbox for Perform a clean installation and click on Next. Then follow the on-screen instructions to complete the process.
Are you troubled with Nvidia high definition audio no sound problem? If yes, then no need to worry as here in this article you will find the most effective solutions to overcome this issue.
Well, talking about Nvidia, there is no doubt that it has the best graphics card with high definition audio and video quality. But sometimes users might face NVIDIA high definition audio problems that can be annoying sometimes. As it ruins the most important element of the video or game.
Therefore this issue must need to be resolved as soon as possible. But before going jumping to the solutions it is always important to examine the causes behind the problem to fix it effectively.
What Causes NVIDIA High Definition Audio Problem?
There can be numerous reasons behind NVIDIA high definition audio problem. Below are some stated causes:
- Default Output Audio Device: If your system’s default output audio device has been changed while installation of updated drivers or Windows then it might possible that you will be not able to hear the sound of the video or game. So, try checking the output audio device in case you face such an issue.
- Outdated or Corrupt Audio Drivers: If your system has an outdated or corrupt audio driver then you might encounter the Nvidia High Definition audio not working problem. So, try updating the drivers to the latest and repairing the corrupted drivers.
- Updated audio drivers not installed properly: In most instances, it has been reported that updating audio drivers also triggers such problems. It might be due to an interrupted installation process. So if this is the case with you then try reinstalling updated drivers.
- Disabled Onboard Sound device in BIOS: When your system is connected to an external audio device or you had installed the new graphic card driver, the Onboard sound automatically gets disabled. So, always make sure to enable the Onboard Sound device in BIOS whenever facing such audio issues.
Now that you are aware of some probable causes of this problem, you will be easily able to troubleshoot the issue with the most effective solutions mentioned below.
Solution 1: Change The Default Output Audio Device
If you have updated your Windows then it might be possible that the default output audio device setting has been changed at HDMI. In this case, you will not be able to hear the audio as the default audio output source has not been specified or identified.
So, try to change the default output audio device setting to fix the issue of Nvidia High Definition Audio not working. Follow the steps below to change the default audio settings:
- Search for the Sound icon on Taskbar and right-click on it.
- Now, select Playback devices
- Select the device you want to set as the default output audio device and right-click on it to set it as the default audio option.
- Then, right-click on the HDMI-Monitor-Digital Audio and go for Disable option in the menu.
Once the default audio device has been specified your audio issue will be resolved and you will be able to hear the video or game’s sound again.
Solution 2: Update or Downgrade the Graphics Drivers
Since the Graphics card is the source of High definition audio so it is important to have updated graphics drivers to avoid such sound not working. Or in case you already have the updated graphics drivers but it is not compatible with your system configuration then it might also cause an audio issue.
So on having either of these two cases, try to upgrade or downgrade the graphics drivers to fix Nvidia high definition audio no sound issue.
Updating Graphics Drivers:
- Go to the search bar or Win+R and type devmgmt.msc and hit enter to run Device Manager.
- Now select the Display Adapters option to expand the GPU drivers list under the Device Manager tab.
- Then search for your Nvidia driver and click twice on it to open.
- Now Go to the Driver tab and tap on the Update driver button to update.
- Lastly, follow the on-screen guidelines for a successful installation.
Moreover, you can also update the driver automatically using the professional recommended Driver Updater tool, this is an advanced tool that just by scanning once detects and updates the entire system drivers automatically.
Get the Driver Updater tool, to update drivers automatically
Downgrading Graphics Drivers:
If after updating the drivers you are still facing issues then try downgrading the drivers as there are ample chances the drivers are incompatible and causing conflict with may leads to the Nvidia high definition no sound problem.
- Launch Device Manager by typing devmgmt.msc in the Run box

- Go for the Display Adapter option under Device manager.
- Now on the Driver tab tap on the Roll Back driver button to have the previously installed version.
Solution 3: Update or Reinstall Audio Drivers
Having an outdated audio driver might sometimes result in audio cracking Windows 11. So, try using updated drivers or updating the outdated drivers.
Or if you are already using updated drivers but still facing the problem then it might be because of an incomplete or interrupted installation process.
In this case, you have to uninstall the drivers first and then reinstall them. You can download the updated audio driver from the official website of your motherboard manufacturer and then re-install them. For Re-installation follow the steps below:
- Visit Device Manager and click twice on the audio driver to open it.
- Now, tap on Uninstall option under the Driver tab.
- Once the driver is uninstalled, install the downloaded driver again.
- Restart your system and Windows will install the updated drivers automatically.
Once done with the installation process check for the audio issue is fixed or not.
Solution 4: Enable the Onboard Sound Device
Installing new Nvidia drivers might disable the Onboard audio device in the motherboard BIOS thereby causing NVIDIA High Definition vo sound issue on Windows 11/10.
Follow the quick steps below to enable the Onboard audio device:
- Restart your system and press the F10/ F12/ Del keys to open the BIOS window.
- Now, go to the Advanced tab
- Select the option Integrated Peripherals or Onboard Devices Configuration.
- Search for Audio Controller
- Now select sound settings and hit enter to enable.

- Finally, save the changes and exit.
Solution 5: Turn Off The Nvidea HDMI Sound Device in BIOS
Sometimes audio issues might occur due to some issue in BIOS. If this is the case then you can go for turning off Nvidia HDMI sound adapter.
To do so, follow the steps:
- Press the F10/F12/Del key to run BIOS.
- Navigate the Advanced > Onboard Devices Configuration > NVIDIA HDMI sound adapter path in the BIOS and hit enter on it to select.
- Now Disable the Nvidia HDMI sound adapter.

Solution 6: Perform a Clean Installation for Nvidia drivers
It has been reported in forums by many users that performing a clean installation for Nvidia drivers can actually fix the NVIDIA high definition audio problem.
Follow the steps to perform a clean installation:
- Download the latest version of Nvidia drivers from the Nvidia official website.
- Now install the downloaded drivers.
- Then, go for the Custom Installation option and tap on next.
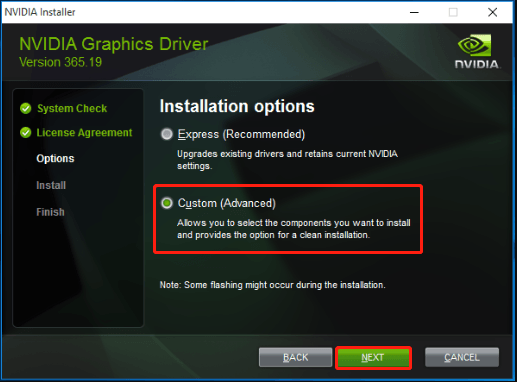
- And now select the option Perform the clean installation.
- Lastly, follow the screen guide for a successful installation.
Solution 7: Troubleshooting Audio
If applying the above fixes won’t solve your audio problem then go for troubleshooting audio. You can troubleshoot audio by following below simple steps:
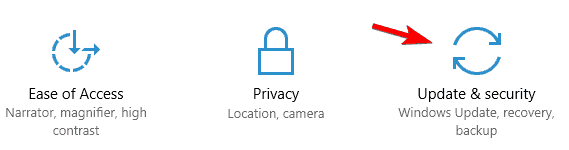
- Go to Windows settings.
- Tap on Update & Security and go for Troubleshoot tab on the left side.
- Now, tap on Additional Troubleshooters and select the option Playing audio under the section Get up and running.
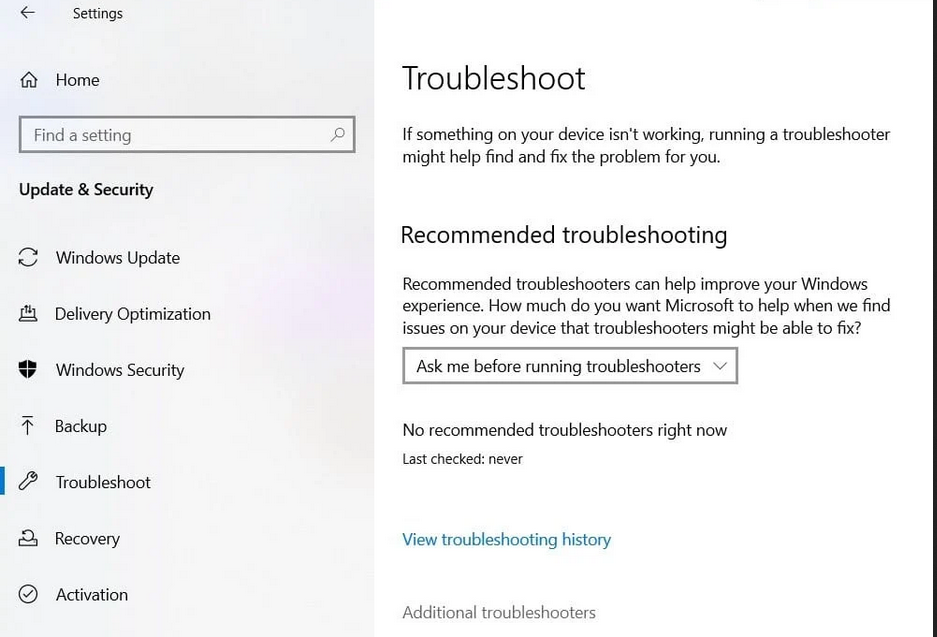
- Then click on the option Run the Troubleshooter.
- And select the audio device that is dis-functioned and follow the onscreen guide.
- Once the troubleshooting process is completed. Check for the issue is resolved or not.
Best Recommended Way to Fix Various Windows 11/10 Problems
If your audio problem still persists after applying all the above effective solutions then it might be because of your PC’s internal issues and errors. Then, here it is suggested to scan your system with the one and only PC Repair Tool.
This is an advanced repair tool that just by scanning once detects and fixes various Windows problems and stubborn computer errors. It not only fixes errors but also optimizes your Windows PC performance like a new one thereby resolving various Windows errors.
With this, you can fix various update errors, repair corrupted Windows system files, DLL errors, registry errors, prevent virus or malware infection, and much more.
Get PC Repair Tool, to Fix Nvidia Audio Not Working Problem
Conclusion
Most audio problems are temporary and do not take a long time to get resolved. And it saves more patience and time when you are aware of the root cause of the issue. So, here in this article, the probable cause of the error and their effective fixations have been covered.
I, hope the above-mentioned solutions will help you to solve the Nvidia high definition audio no sound problem and let you enjoy your games and movies with high-quality audio.
If in case you find any doubts or queries related to this particular article, you can get back to us on Twitter or Facebook page.
Hardeep has always been a Windows lover ever since she got her hands on her first Windows XP PC. She has always been enthusiastic about technological stuff, especially Artificial Intelligence (AI) computing. Before joining PC Error Fix, she worked as a freelancer and worked on numerous technical projects.