
Are you troubled with Nvidia high definition audio no sound problem? If yes, then no need to worry as here in this article you will find the most effective solutions to overcome this issue.
Well, talking about Nvidia, there is no doubt that it has the best graphics card with high definition audio and video quality. But sometimes users might face NVIDIA high definition audio problems that can be annoying sometimes. As it ruins the most important element of the video or game.
Therefore this issue must need to be resolved as soon as possible. But before going jumping to the solutions it is always important to examine the causes behind the problem to fix it effectively.
What Causes NVIDIA High Definition Audio Problem?
There can be numerous reasons behind NVIDIA high definition audio problem. Below are some stated causes:
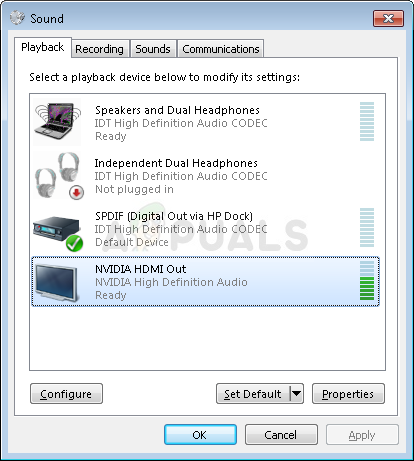
- Default Output Audio Device: If your system’s default output audio device has been changed while installation of updated drivers or Windows then it might possible that you will be not able to hear the sound of the video or game. So, try checking the output audio device in case you face such an issue.
- Outdated or Corrupt Audio Drivers: If your system has an outdated or corrupt audio driver then you might encounter the Nvidia High Definition audio not working problem. So, try updating the drivers to the latest and repairing the corrupted drivers.
- Updated audio drivers not installed properly: In most instances, it has been reported that updating audio drivers also triggers such problems. It might be due to an interrupted installation process. So if this is the case with you then try reinstalling updated drivers.
- Disabled Onboard Sound device in BIOS: When your system is connected to an external audio device or you had installed the new graphic card driver, the Onboard sound automatically gets disabled. So, always make sure to enable the Onboard Sound device in BIOS whenever facing such audio issues.
Now that you are aware of some probable causes of this problem, you will be easily able to troubleshoot the issue with the most effective solutions mentioned below.
Solution 1: Change The Default Output Audio Device
If you have updated your Windows then it might be possible that the default output audio device setting has been changed at HDMI. In this case, you will not be able to hear the audio as the default audio output source has not been specified or identified.
So, try to change the default output audio device setting to fix the issue of Nvidia High Definition Audio not working. Follow the steps below to change the default audio settings:
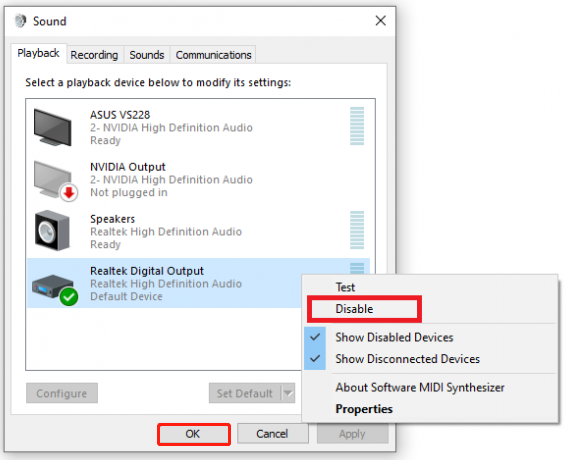
- Search for the Sound icon on Taskbar and right-click on it.
- Now, select Playback devices
- Select the device you want to set as the default output audio device and right-click on it to set it as the default audio option.
- Then, right-click on the HDMI-Monitor-Digital Audio and go for Disable option in the menu.
Once the default audio device has been specified your audio issue will be resolved and you will be able to hear the video or game’s sound again.
Solution 2: Update or Downgrade the Graphics Drivers
Since the Graphics card is the source of High definition audio so it is important to have updated graphics drivers to avoid such sound not working. Or in case you already have the updated graphics drivers but it is not compatible with your system configuration then it might also cause an audio issue.
So on having either of these two cases, try to upgrade or downgrade the graphics drivers to fix Nvidia high definition audio no sound issue.
Updating Graphics Drivers:
- Go to the search bar or Win+R and type devmgmt.msc and hit enter to run Device Manager.
- Now select the Display Adapters option to expand the GPU drivers list under the Device Manager tab.
- Then search for your Nvidia driver and click twice on it to open.
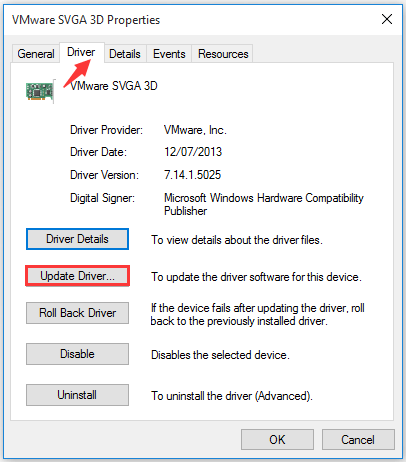
- Now Go to the Driver tab and tap on the Update driver button to update.
- Lastly, follow the on-screen guidelines for a successful installation.
Moreover, you can also update the driver automatically using the professional recommended Driver Updater tool, this is an advanced tool that just by scanning once detects and updates the entire system drivers automatically.
Get the Driver Updater tool, to update drivers automatically
Downgrading Graphics Drivers:
If after updating the drivers you are still facing issues then try downgrading the drivers as there are ample chances the drivers are incompatible and causing conflict with may leads to the Nvidia high definition no sound problem.
- Launch Device Manager by typing devmgmt.msc in the Run box

- Go for the Display Adapter option under Device manager.
- Now on the Driver tab tap on the Roll Back driver button to have the previously installed version.
Solution 3: Update or Reinstall Audio Drivers
Having an outdated audio driver might sometimes result in audio cracking Windows 11. So, try using updated drivers or updating the outdated drivers.
Or if you are already using updated drivers but still facing the problem then it might be because of an incomplete or interrupted installation process.
In this case, you have to uninstall the drivers first and then reinstall them. You can download the updated audio driver from the official website of your motherboard manufacturer and then re-install them. For Re-installation follow the steps below:
- Visit Device Manager and click twice on the audio driver to open it.
- Now, tap on Uninstall option under the Driver tab.
- Once the driver is uninstalled, install the downloaded driver again.
- Restart your system and Windows will install the updated drivers automatically.
Once done with the installation process check for the audio issue is fixed or not.
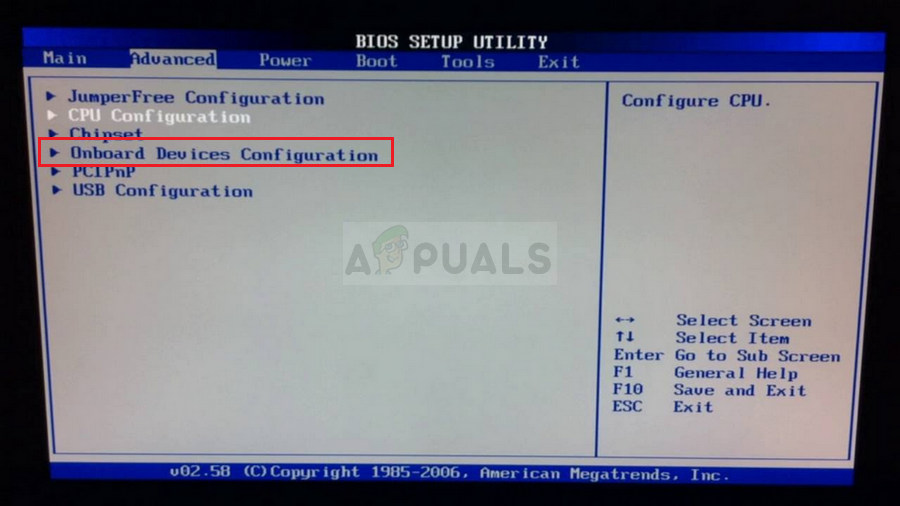
Solution 4: Enable the Onboard Sound Device
Installing new Nvidia drivers might disable the Onboard audio device in the motherboard BIOS thereby causing NVIDIA High Definition vo sound issue on Windows 11/10.
Follow the quick steps below to enable the Onboard audio device:
- Restart your system and press the F10/ F12/ Del keys to open the BIOS window.
- Now, go to the Advanced tab
- Select the option Integrated Peripherals or Onboard Devices Configuration.
- Search for Audio Controller
- Now select sound settings and hit enter to enable.

- Finally, save the changes and exit.
Solution 5: Turn Off The Nvidea HDMI Sound Device in BIOS
Sometimes audio issues might occur due to some issue in BIOS. If this is the case then you can go for turning off Nvidia HDMI sound adapter.
To do so, follow the steps:
- Press the F10/F12/Del key to run BIOS.
- Navigate the Advanced > Onboard Devices Configuration > NVIDIA HDMI sound adapter path in the BIOS and hit enter on it to select.
- Now Disable the Nvidia HDMI sound adapter.
Solution 6: Perform a Clean Installation for Nvidia drivers
It has been reported in forums by many users that performing a clean installation for Nvidia drivers can actually fix the NVIDIA high definition audio problem.
Follow the steps to perform a clean installation:
- Download the latest version of Nvidia drivers from the Nvidia official website.
- Now install the downloaded drivers.
- Then, go for the Custom Installation option and tap on next.
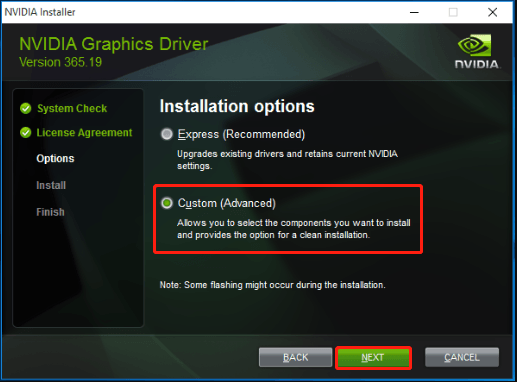
- And now select the option Perform the clean installation.
- Lastly, follow the screen guide for a successful installation.
Solution 7: Troubleshooting Audio
If applying the above fixes won’t solve your audio problem then go for troubleshooting audio. You can troubleshoot audio by following below simple steps:
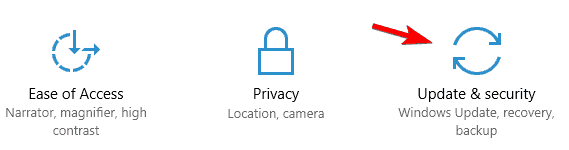
- Go to Windows settings.
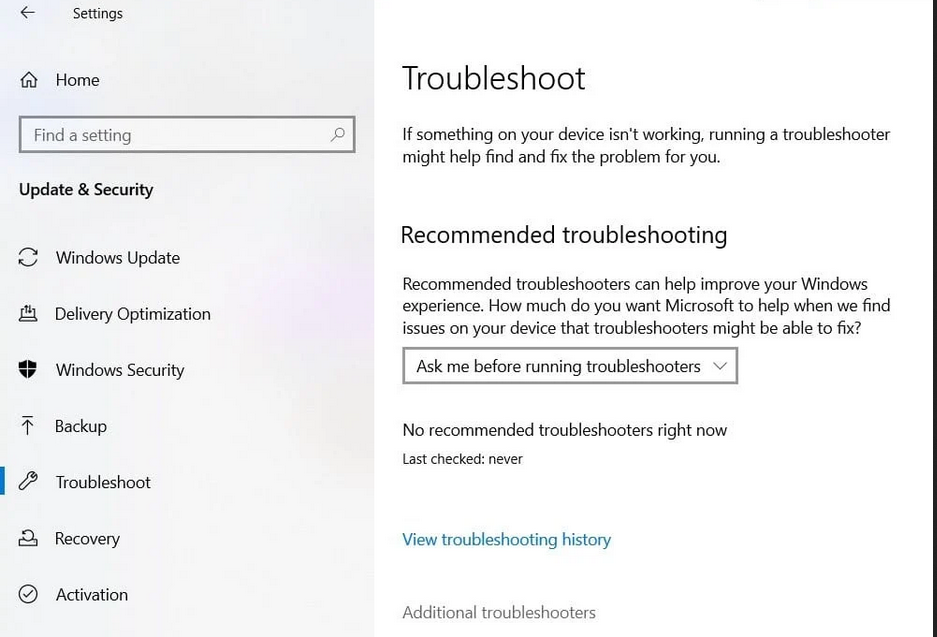
- Tap on Update & Security and go for Troubleshoot tab on the left side.
- Now, tap on Additional Troubleshooters and select the option Playing audio under the section Get up and running.
- Then click on the option Run the Troubleshooter.
- And select the audio device that is dis-functioned and follow the onscreen guide.
- Once the troubleshooting process is completed. Check for the issue is resolved or not.
Best Recommended Way to Fix Various Windows 11/10 Problems
If your audio problem still persists after applying all the above effective solutions then it might be because of your PC’s internal issues and errors. Then, here it is suggested to scan your system with the one and only PC Repair Tool.
This is an advanced repair tool that just by scanning once detects and fixes various Windows problems and stubborn computer errors. It not only fixes errors but also optimizes your Windows PC performance like a new one thereby resolving various Windows errors.
With this, you can fix various update errors, repair corrupted Windows system files, DLL errors, registry errors, prevent virus or malware infection, and much more.
Get PC Repair Tool, to Fix Nvidia Audio Not Working Problem
Conclusion
Most audio problems are temporary and do not take a long time to get resolved. And it saves more patience and time when you are aware of the root cause of the issue. So, here in this article, the probable cause of the error and their effective fixations have been covered.
I, hope the above-mentioned solutions will help you to solve the Nvidia high definition audio no sound problem and let you enjoy your games and movies with high-quality audio.
If in case you find any doubts or queries related to this particular article, you can get back to us on Twitter or Facebook page.
Hardeep has always been a Windows lover ever since she got her hands on her first Windows XP PC. She has always been enthusiastic about technological stuff, especially Artificial Intelligence (AI) computing. Before joining PC Error Fix, she worked as a freelancer and worked on numerous technical projects.
Readers help support Windows Report. We may get a commission if you buy through our links.
Read our disclosure page to find out how can you help Windows Report sustain the editorial team. Read more
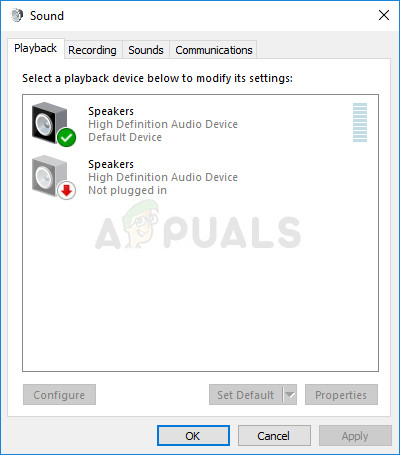
The NVIDIA output not plugged in Windows 10 message appears to plenty of users. The NVIDIA audio output is shown as unplugged if you check the Playback tab from the Sound settings, in the Control Panel.
Besides this error, many users could enable the sound of their HDMI output. Why is my Nvidia output not plugged in? That’s most likely a question that you have in mind as well.
Even though this error appears in the Sound section of the Control Panel, the real cause is the NVIDIA Graphics Driver that needs to be replaced. Here’s what one concerned user says:
My audio shows that is not plugged in. I can hear the sound in my headphones, but when I go to Sound, I do a right click and go to Playback, I receive the following error: NVIDIA high definition audio not plugged in.
I get zero sound and I need help.
We have prepared three solutions that will help you solve the NVIDIA output not plugged in Windows 10 error. Read our following section in this regard.
How do I fix NVIDIA not plugged in?
1. Update the NVIDIA graphics driver
- Press Windows key +R to open Run.
- Then, type in devmgmt.msc, and click OK.
- Navigate to Display adapters, click the graphic card and select Uninstall Device.
- Go through the uninstallation process, then visit the NVIDIA website.

- While here, type in your card and operating system information, and click Search.
- Verify the list with available drivers, click on your driver name, and select Download.
- Save the file on your computer, then open it, and install the driver.
- At the Installation Options screen, select Custom (Advanced), and click Next.
- Check the box from Perform a clean installation, click Next, and install your required driver.

After you have followed all steps mentioned above, verify if the NVIDIAhigh definition audio not plugged in Windows 10 error has been solved.
This solution is the answer to this error caused by outdated drivers or the newest ones that don’t function well with your computer.
You can also try using a third-party tool to automatically update all your drivers. This software will scan your PC for missing or outdated drivers and update all of them if possible.
Ensure your system performs smoothly and avoids all GPU driver errors by using a complete driver update assistant, namely Outbyte Driver Updater, that will do the job for you.
Here’s how to safely update your drivers:
- Download and install the Outbyte Driver Updater app.
- Launch the software and wait for the app to detect all incompatible drivers.
- Now, it will show you a list of all faulty drivers to select the ones to Update or Ignore.

- Click on Update & Apply Selected to download and install the newest versions.
- Restart your PC to ensure the applied changes.

OutByte
Keep your GPU in a flawless state without worrying about possible driver issues.
Disclaimer: You may need to upgrade the app from the free version to perform specific actions.
2. Use the Roll Back Driver option

- Uninstall your current driver.
- Press the Windows + R keyboard shortcut to open Run, then type in devmgmt.msc, and click OK.
- Navigate to Display Adapters and choose the adapter for rollback.
- Choose Properties, open the Driver tab, and click on Roll Back Driver.
- Follow the necessary steps to perform the rollback process.
This solution is ideal if you have installed the latest drivers for your graphics card. It is an alternative to the previous one, which was for updating your graphics driver.
It is a process that searches for the backup files of the driver you have installed before your latest updates. It will cause that driver to be installed instead.
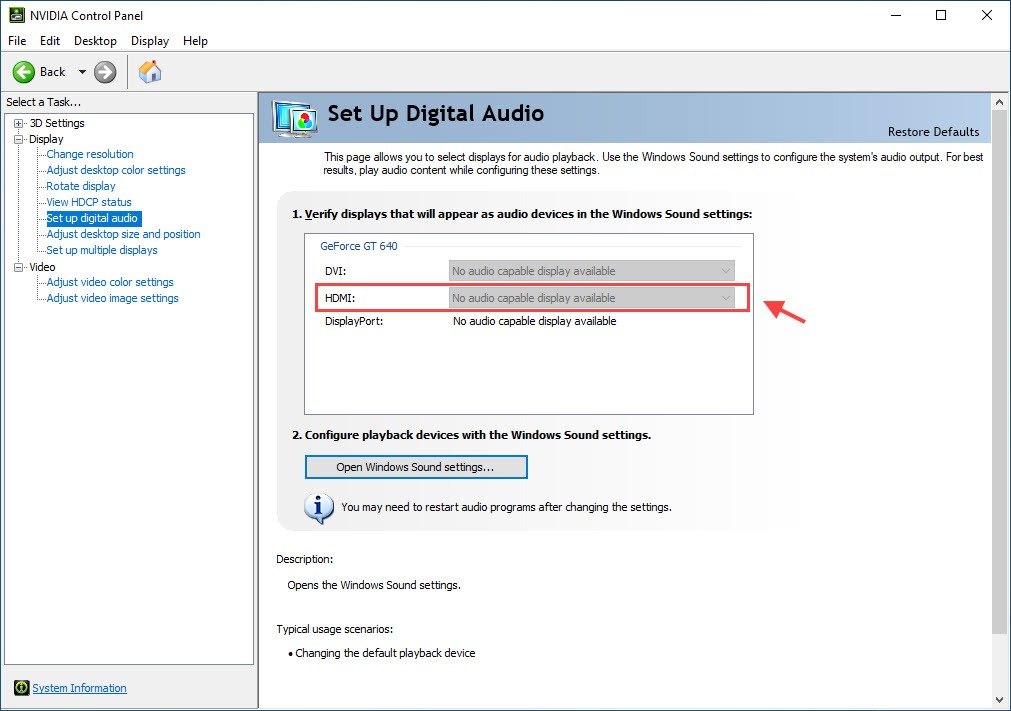
3. Enable the NVIDIA output device in Control Panel
- Right-click the desktop, choose NVIDIA Control Panel.
- Click the + button from the Display section.
- Select Set up digital audio.
- Navigate under your graphic card name section and search for HDMI.
- Right-click the Volume icon in the bottom right of your screen.
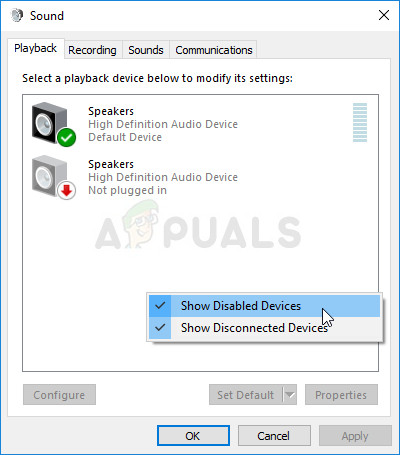
- Set View by to Large icons, then click the Sound tab, and Playback.
- In the Playback tab, right-click to check the boxes.
- Click on the new device and select Set Default.
If after using the fifth step of this solution you will find the NVIDIA output device, then you must set it as default. After that, steps 6 and 7 will not be necessary.
If the opposite case is true, then check the boxes near the Show Disabled Devices and Show Disconnected Devices options.
If incorrect settings were performed in the NVIDIAControl panel, that will cause your HDMI port to be set in the wrong manner. As a consequence, the port will not broadcast audio.
This will display the NVIDIA output not plugged in Windows 10 error when you want to check the playback devices that are connected to your computer.
Enable the NVIDIA output by using this solution and solve the error in no time.
The NVIDIA high definition audio not plugged error message is one that you and other users may encounter.
In this case, just use one of the following solutions: update the NVIDIA graphics drivers, perform a rollback driver operation, or navigate to Control Panel and enable output device.
Take your time to test them and leave us a comment to let us know how they worked in your situation.
Vladimir Popescu
Being an artist his entire life while also playing handball at a professional level, Vladimir has also developed a passion for all things computer-related.
With an innate fascination for research and analysis, and realizing many other people share his passion for this subject, he delved into writing Windows-related articles, so other people can also benefit from the acquired information.
When not writing kick-ass articles, Vladimir likes to spend his time doing Crossfit and creating art.
You are here: Home / Software / Nvidia High Definition Audio Driver Not Working – How To Fix?
Cannot hear any audio while using the Nvidia High Definition Audio driver? Well, you are not the only one. Nvidia audio drivers seem to not work for many users when streaming with an HDMI connection. Many have reported that the audio stops after a Windows or a driver update, while for some others the audio simply stops after playing for some time, without any warning or error.
This is a frustrating issue and has been around for a long time. In this article, I have discussed what to do when Nvidia High Definition Audio driver is not working.
Also checkout:
- Nvidia GeForce Experience Not Working – How To Fix?
- 5 Best Nvidia Shield Emulators For Playing Retro Games On Nvidia Shield TV
The Nvidia High Definition Audio no sound issue can be triggered by various things. Here are some of the potential causes of this issue:
- The Audio Playback Device Is Not Selected Correctly: The audio playback device can be selected incorrectly, which means that the audio device you use won’t play any sound.
- Outdated or corrupted driver: The most probable cause of this issue is faulty audio driver. If the Nvidia High Definition Audio driver is corrupted, then the user will face various sound-related issues, including sound not playing at all.
- Onboard sound is disabled in BIOS: If the onboard sound is disabled in BIOS, either by a driver update or done unknowingly, then audio won’t play on your PC.
- Faulty System update: Some users have reported that this issue was triggered after they updated Windows. If yours is a similar case, then the Windows update can be corrupted, which is likely the instigator of Nvidia audio not working
How To Fix The Nvidia High Definition Audio Driver Not Working Issue?
Now that you know the causes of this issue, it is time to troubleshoot it. Here I have provided the troubleshooting procedure that you should follow to fix this issue.
Solution 1: Select The Correct Audio Playback Device
One of the common mistakes that many make is selecting the wrong audio playback device. If the wrong audio playback device is selected, then sound won’t play on your PC. To select the correct audio playback device, follow the steps given below:
- Type Control Panel in the Windows search menu and select the top result.
- After the control panel opens, change the View by option to Large icons.
- Now, locate the Sound option and click on it. The Sound prompt will appear on your screen.
- Select the Playback tab and locate the Audio playback device.
- Right-click on it and select the Enable option. If the Disable option is available rather than the Enable option, then skip to step 6.
- Now, right-click on the playback device again and select the Set as Default Device and then Select as Default Communication Device.
- Click on Apply and OK to save the changes.
After you have selected the correct audio playback device, the audio should start playing again. If the correct audio device was already selected, then skip to the next solution.
Solution 2: Run Audio Troubleshooter
Whenever you face any issue with the playback audio in Windows 10, one of the first things you must do is run the audio troubleshooter tool. Windows 10 has an inbuilt audio troubleshooter that checks the system for any audio-related issues and then tries to fix it. To run the audio troubleshooter, follow the steps given below:
- Press the Windows + I keys to open the Settings app.
- Click on the Update & Security option and then select the Troubleshoot option.
- In the Get up and running section, select the Playing Audio option.
- Click on the Run the troubleshooter option.
- Follow the on-screen instructions to complete the process. Wait for the troubleshooter to finish checking for the issue.
- If the Apply Fix option appears after the troubleshooter finishes scanning, then click on it.
Running the Audio troubleshooter will at least give you more information on the cause of this no sound issue, if it is unable to fix it.
Solution 3: Troubleshoot The Nvidia High Definition Audio Driver
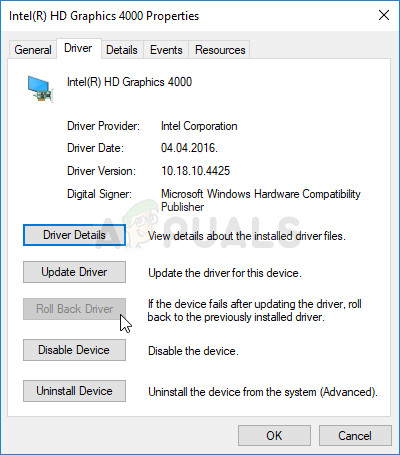
The next thing you can do is to troubleshoot the Nvidia audio driver manually. There is a big possibility that this issue stems from a corrupted or faulty driver. The first thing you can do is to update the driver. If you have recently updated the audio driver and since then this issue has started, then you can try rollbacking the driver version. Finally, if both updating and rollbacking don’t work, then reinstall the audio drivers.
To update the audio driver, follow the steps given below:
- Press the Windows + R keys to open the Run utility.
- Type devmgmt.msc and press Enter to open the Device Manager.
- Expand the Sound, video and game controllers option and right-click on the Nvidia audio driver.
- Select the Update Driver option from the right-click context menu.
- Click on the Search automatically for updated driver software option.
- Follow the on-screen instructions to complete the update.
- Restart your PC.
To roll back to a previous version of the Nvidia Audio driver, follow the steps given below:
- Press the Windows + R keys to open the Run utility.
- Type devmgmt.msc and press Enter to open the Device Manager.
- Expand the Sound, video and game controllers option and right-click on the Nvidia audio driver.
- Select the Properties option. The properties prompt will appear on the screen.
- Click on the Roll Back Driver option.
- Follow the on-screen instructions to complete the process.
- Restart your PC.
Now, if updating or rollbacking doesn’t work, then try reinstalling the driver. To reinstall the driver, follow the steps given below:
- Press the Windows + R keys to open the Run utility.
- Type devmgmt.msc and press Enter to open the Device Manager.
- Expand the Sound, video and game controllers option and right-click on the Nvidia audio driver.
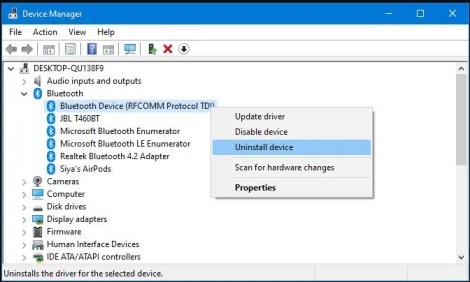
- Select the Uninstall Device option.
- Follow the on-screen instructions to complete the process.
- Visit Nvidia’s Official website and download the audio driver. You can also use the GeForce Experience application to download and install it.
After reinstalling the audio driver, Nvidia High Definition Audio no sound issue should get fixed. However, if still the Nvidia audio is not working, then try the next solution.
Solution 4: Enable Sound From BIOS
Many users have reported that they were unable to hear any sound as the BIOS onboard sound setting was disabled. This can happen after a Windows or driver update, or it may have been disabled unknowingly by the user. Whichever the case, here are the steps to enable it:
(As the BIOS is made differently by each manufacturer, the onboard sound settings will not be located exactly as the steps have mentioned below. However, the steps should guide you enough to reach it.)
- Restart your PC and on the Boot screen press the BIOS key to enter BIOS. The BIOS key should be displayed on the bottom part of the Boot screen.
- After you have entered BIOS, select the Advanced tab or something similar.
- Now, look for an option similar to Onboard Devices Configuration and select it using the arrow keys.
- After opening the Onboard Devices Configuration option, you should be able to locate the Sound settings. The Sound settings can be located under the Audio Controller section or something similar.
- Select the sound settings and Enable it.
- Save the changes and exit BIOS.
- Restart your PC.
After enabling the onboard sound settings from BIOS, the sound should start working again. If the onboard sound settings were already enabled, then skip this solution.
Solution 5: Roll Back To A Previous Windows Version
If you have recently updated your Windows and since then audio is not being played, then try roll backing to the previous Windows update. To do that, follow the steps given below:
- Type Change Advanced Startup Options in the Windows start menu and select the top result.
- Click on the Restart now option in the Advanced startup section. Windows will restart and boot into Repair Options.
- Click on the Troubleshoot option.
- Select the Advanced options.
- Click on the Go back to the previous version of Windows option.
- Follow the on-screen instructions to complete the process.
After the previous Windows version is installed, check if still Nvidia audio is not working.
Solution 6: Try Using Windows Generic Audio Driver
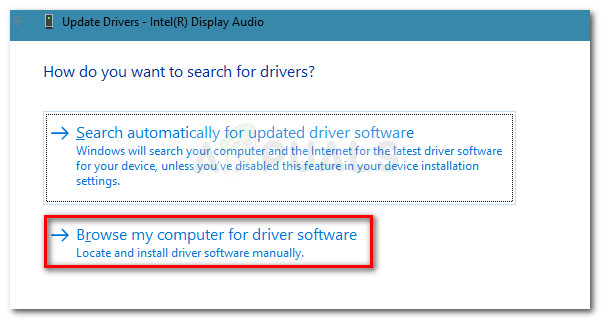
If the above solutions don’t work, try switching to the generic audio driver of Windows. Check if switching to Microsoft’s generic audio driver fixes the sound issue in your PC. To switch the Nvidia audio driver with the generic audio driver of Microsoft’s, follow the steps given below:
- Open Device Manager and expand the Sound, video and game controllers option.
- Right-click on the Nvidia audio driver and select the Update Driver option.
- Select the Browse my computer for driver software option.
- Click on the ‘Let me pick from a list of Available Software’ option.
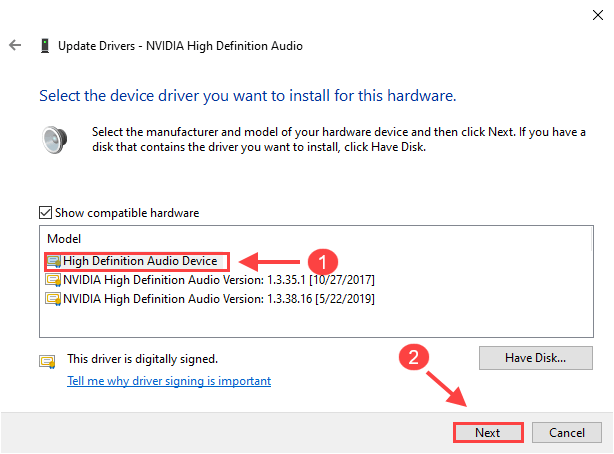
- Now, from the list of available software, select the High Definition Audio Device option, which is the generic audio driver of Microsoft.
- Click on next and follow the on-screen instructions to complete the process.
- After the switching process is complete, restart your PC.
Now, check if the generic audio driver of Microsoft is facing the same no sound issue as the Nvidia driver.
Wrapping Up
So, there you have it. Now you know what to do when Nvidia High Definition Audio driver no sound issue arises. The above troubleshooting solutions should help you fix this issue. If you have any questions regarding this topic, ask them in the comment section below.
The no sound problem occurs to users with NVIDIA High Definition Audio drivers installed and it often reflects itself when using HDMI to stream audio and video to other screens. Sometimes the problem appears when installing the latest drivers and sometimes the cause is more mysterious.
Either way, many users faced the same problem and they were able to come up with their own methods of resolving the problems. We have decided to include these methods and put them together in an article. Make sure you follow the solutions below carefully in order to resolve this issue!
This problem is caused by many different things which are often graphics-related and the troubleshooting steps often focus on graphics devices and drivers instead of audio ones. We have come up with a list you can visit to find out your own scenario and possibly resolve the problem. Check it out below!
- The default audio output device is changed – Some changes you make to your computers such as installing new Windows or driver updates can change the default audio output device and you will need to change it back.
- Faulty drivers – It’s possible that driver issues cause the problem when streaming video and sound over HDMI. The problem can be caused by both new or old drivers and you should resolve your problem accordingly.
- Onboard sound disabled in BIOS – Users have reported that installing new drivers disabled the onboard sound device in BIOS and you will have to turn it back on.
Solution 1: Change Your Audio Output Device
It’s quite possible that a recent change such as a new Windows update or new driver installed caused certain things to change. New updates can sometimes change the default audio output device to HDMI when it should be set to your speakers or headphones. Vice versa is also possible. Follow the steps below in order to change your default audio output device.
- Right-click on the Volume icon located at the bottom right part of your screen and choose the Playback devices An alternative way would be to open the Control Panel on your PC and set the View by option to Large icons. After that, locate and click on the Sounds option in order to open the same window.
- Stay in the Playback tab of the Sound window which just opened up.
- You should now be able to see the playback device you want to set as default. If that is not the case, right-click anywhere in the middle of the window and check the boxes next to the Show Disabled Devices and Show Disconnected Devices Your device should now appear.
- Left-click on the newly appeared device and click the Set Default button below which should switch the sound to them as soon as it’s connected.
Solution 2: Update or Rollback Graphics Drivers
This problem can be caused both by outdated drivers which can’t work well with your device or by the newest drivers, as reported by some users. Even though some users are skeptical about updating graphics drivers in order to resolve audio issues, you should definitely check out this method as is has helped plenty of users resolve their problems.
- Click the Start menu button, type in “Device Manager” afterward, and select it from the list of available results by simply clicking the first one. You can also tap the Windows Key + R key combo in order to bring up the Run dialog box. Type in “devmgmt.msc” in the dialog box and click OK in order to run it.
- Since it’s the video card driver you want to update on your computer, expand the Display adapters section, right-click on your graphics card and choose the Uninstall Device.
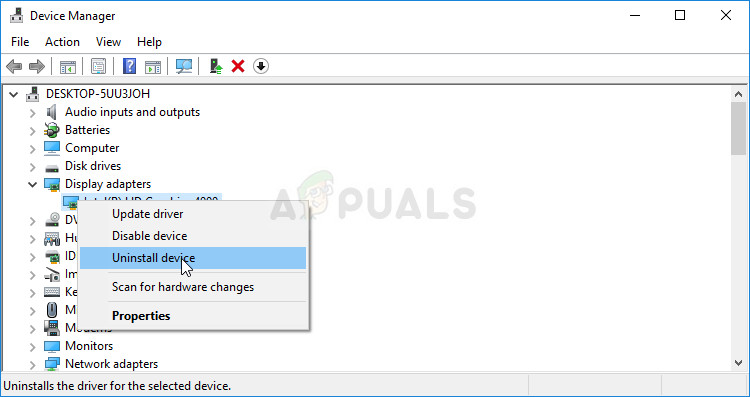
- Confirm any dialogues or prompts which may ask you to confirm the uninstallation of the current graphics device driver and wait for the process to complete.
- Look for your graphics card driver on NVIDIA’s website. Input the required information about the card and your operating system and click on Search.
- A list of all available drivers should appear. Make sure you scroll down until you reach the required entry, click on its name and the Download button afterward. Save it to your computer, open it, and follow the instructions on-screen.
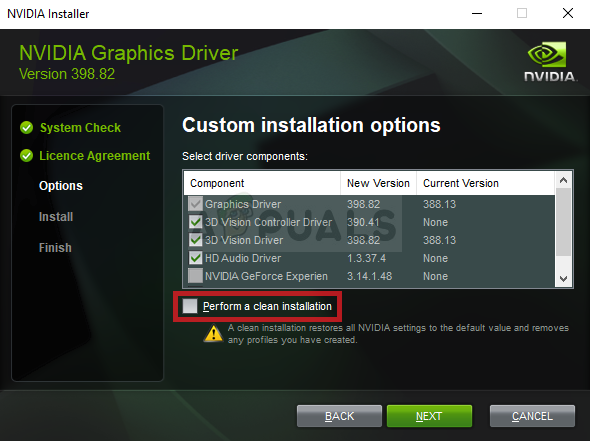
- When you reach the Installation Options screen, choose the Custom (Advanced) option before clicking Next. You will be presented with a list of components that will be installed. Check the box next to the Perform a clean installation box and click Next and install the driver.
- Check to see if the problem has been resolved and if NVIDIA Control Panel still displays the Access Denied message!
Alternative: Rollback the Driver
For the users for which the problem started to appear after they have installed the latest drivers for their graphics card, there is a different method they can use. It involves rolling back the graphics card driver.
This process will look for backup files of the driver which was installed before the most recent updates and that driver will be installed instead.
- First of all, you will need to uninstall the driver you currently have installed on your machine.
- Type “Device Manager” into the search field next to the Start menu button to open the device manager window. You can also use the Windows Key + R key combination in order to open the Run dialog box. Type devmgmt.msc in the box and click OK or Enter key.
- Expand the “Display Adapters” section. This will display all network adapters that the machine has installed at the moment.
- Right-click on the display adapter you want to rollback and select Properties. After the Properties window opens, navigate to the Driver tab and locate the Roll Back Driver
- If the option is grayed out, it means that the device wasn’t updated recently or it has no backup files remembering the old driver.
- If the option is available to click on, do so and follow the instructions on-screen to proceed with the process.
Solution 3: Enable Onboard Sound in BIOS
Sometimes the onboard sound device is automatically disabled when external sound devices are connected or when a new graphics card driver is installed. It’s a weird problem but enabling the sound device in BIOS is quite easy if you follow the steps below carefully.
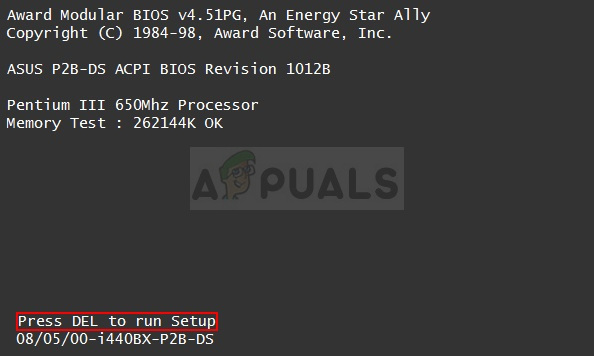
- Turn your PC on and try to enter BIOS settings by pressing the BIOS key as the system is about to start. The BIOS key is typically displayed on the boot screen, saying “Press ___ to enter Setup.” or something similar. There are other keys as well. The usual BIOS keys are F1, F2, Del, etc.
- Now it’s time to enable the onboard sound. The option which you will need to change is located under different tabs on BIOS firmware tools made by different manufacturers and there is no unique way to find it. It’s usually located under the Advanced tab but there are many names for the same option.
- Use the arrow keys to navigate to the Advanced tab or a similar sounding tab inside BIOS. Inside, select an option named Onboard, Device Configuration, Integrated Peripherals or something similar inside.
- After selecting the option, you will be able to locate sound settings under Audio Controller or something similar and you can enable it by tapping the Enter
- Navigate to the Exit section and choose to Exit Saving Changes. This will proceed with the computer’s boot. Check to see if the problem persists.
Solution 4: Using High Definition Audio Driver
For some users, the Nvidia High Definition Audio Driver doesn’t work so in this step, we will be changing the installation of this driver to just “High Definition Audio Driver”. It sounds weird but this fixes this issue for some people so it is good to give it a go. In order to do so:
- Press “Windows” + “R” to open the device manager.
- Type in “Devmgmt.msc” and press “Enter”.
Running the Device Manager - Expand the “Sound, video and game controllers” section and right-click on the “Nvidia High Definition Audio Device” option.
- Select the “Properties” button and then click on the “Driver” tab.
- Select the “Update Driver” option and select the “Browser my Computer for Driver Software” button.

Browser for the driver manually - After that, click on the “Let me pick from a list of Available Software” option.
- Select the “High Definition Audio Device” and click on “Next”.
- Follow the prompts to install this driver and check to see if the issue persists.
Solution 5: Disabling Other Drivers
In some cases, there might be certain drivers installed in the device manager that is preventing you from being able to use Nvidia Hight Definition driver. Therefore, it is recommended that you disable these drivers and then check if the issue is fixed. In order to do so:
- Press “Windows” + “R” to open the run prompt.
- Type in “devmgmt.msc” and press “Enter”.
Type devmgmt.msc and Press Enter to Open Device Manager - Expand the “System Devices” option and look for a driver that has “SST” in it (Particularly something like Intel Smart Sound Technology).
- Right-click on this driver and select “Update Driver”.
- Select the “Browser my Computer for Driver Software” button and click on the “Let me pick from a list of Available Software” option.

Click on Let me pick from a list of available drivers on my computer - Select the “High Definition Audio Device” and click on “Next”.
- Follow the prompts to install this driver and check to see if the issue persists.

Kevin Arrows
Kevin Arrows is a highly experienced and knowledgeable technology specialist with over a decade of industry experience. He holds a Microsoft Certified Technology Specialist (MCTS) certification and has a deep passion for staying up-to-date on the latest tech developments. Kevin has written extensively on a wide range of tech-related topics, showcasing his expertise and knowledge in areas such as software development, cybersecurity, and cloud computing. His contributions to the tech field have been widely recognized and respected by his peers, and he is highly regarded for his ability to explain complex technical concepts in a clear and concise manner.
Your NVIDIA outputs are grayed out and listed as Not plugged in? Fail to enable your HDMI sound? Don’t panic. You’re definitely not alone. Many Windows users are reporting exactly the same issue. But most important of all, you can fix it quickly and easily.
- Check NVIDIA Output Port Settings
- Update NVIDIA Graphics Driver
- Rollback your driver
- Use the generic high definition audio device driver
Fix 1: Check NVIDIA Output settings
If you can’t enable sound for HDMI output. First, you need to check if you’ve set the NVIDIA output correctly.
- Right-click your desktop and select NVIDIA Control Panel.
- Go to Display > Set up digital audio. Make sure you’ve selected your connected device for HDMI.

- Click Open Windows Sound Settings.
- Under the Playback tab, right-click the blank area and check Show Disabled Devices and Show Disconnected Devices. Your device should not be grayed out anymore.
- Select your device and Set Default.
If this simple method solved your connection problems, then congratulations! But if not, don’t worry, you can go ahead to the next fix.
Fix 2: Update NVIDIA graphics driver
In most cases, if this error persists, you may have faulty or outdated NVIDIA drivers installed. To fix it, you should update your NVIDIA graphics driver to the latest version. Although it seems like a sound card driver issue, many users solved the issue by updating their NVIDIA graphics driver.
There are two ways you can update your NVIDIA drivers: manually or automatically.
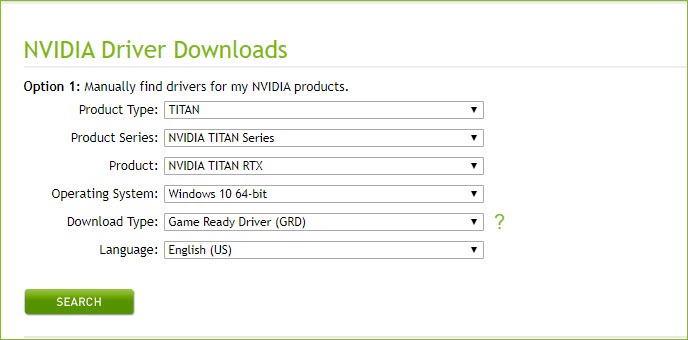
Option 1: Manually
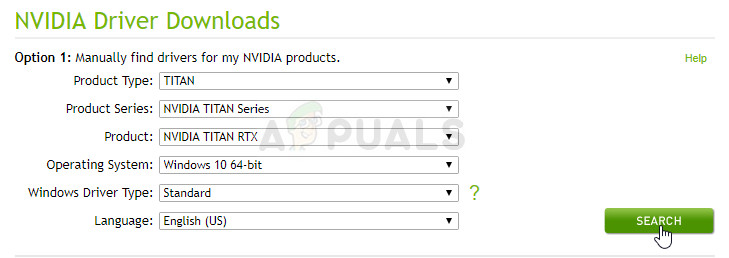
To update your NVIDIA graphics driver manually, you’ll need to go to NVIDIA Driver Downloads of NVIDIA official website to download the latest & correct driver and install it manually.
- After NVIDIA automatically detects your system and graphics card, click Search. (If not, you need to enter all required information.)

- Click the DOWNLOAD button.
- Double click the downloaded file and follow the onscreen instructions to extract it to your computer.
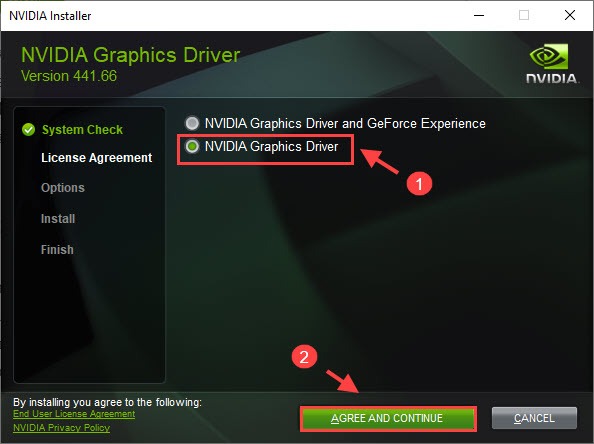
- After performing the system check, select only NVIDIA Graphics Driver. Then click AGREE AND CONTINUE.

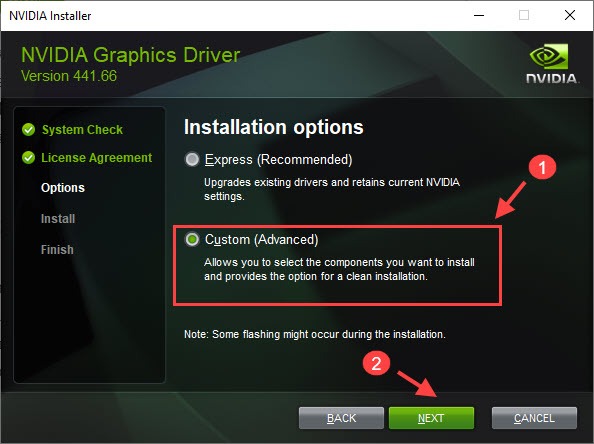
- Select Custom(Advanced) > NEXT.
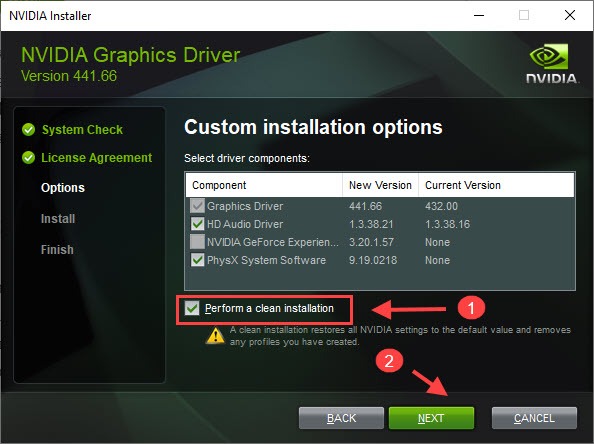
- Be sure to tick the box next to Perform a clean installation, then click NEXT.
(You can uncheck the software you don’t need.)
- Follow the on-screen instructions to complete the installation.
- Restart your computer for the changes to take effect.
NVIDIA outputs should be showing normally now. If not, you can try the next fix.
Option 2: Automatically
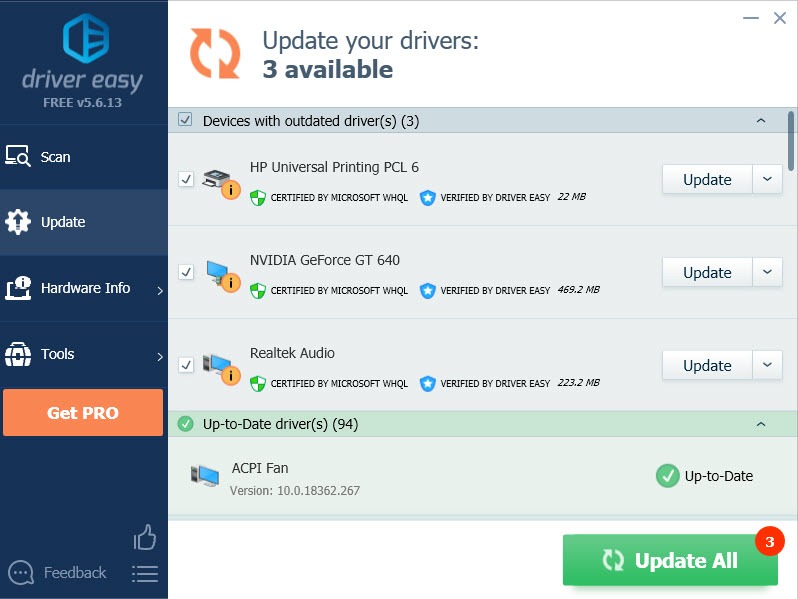
If you don’t have the time or patience to play with drivers manually, you can do it automatically with Driver Easy. Driver Easy will automatically recognize your system and find all the correct drivers for your device.
You don’t need to know exactly what system your computer is running, you don’t need to risk downloading and installing the wrong driver, and you don’t need to worry about making a mistake when installing. Driver Easy handles it all.
All the drivers in Driver Easy come straight from the manufacturer.
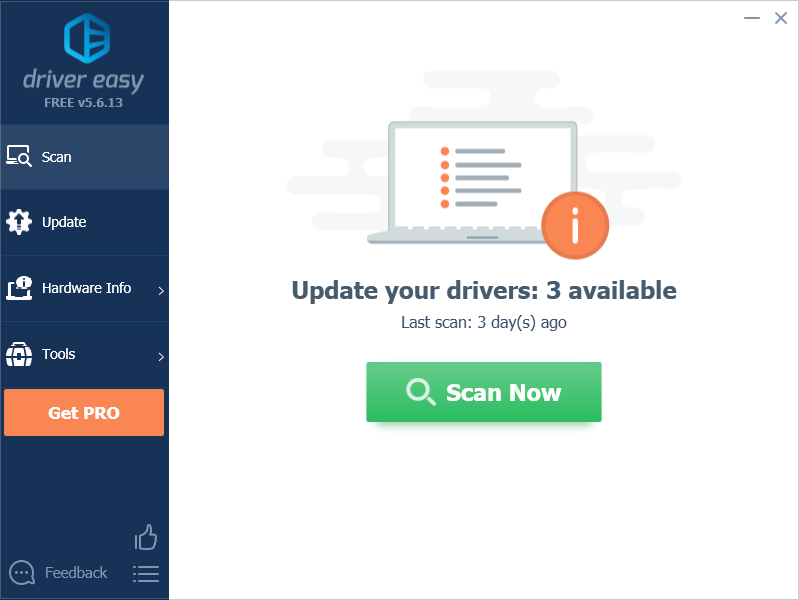
- Download and install Driver Easy.
- Run Driver Easy and click the Scan Now button. Driver Easy will then scan your computer and detect any problem drivers.

- Click the Update button next to your sound card driver to automatically download the correct version of that driver, then you can manually install it (you can do this with the FREE version).
Or click Update All to automatically download and install the correct version of all the drivers that are missing or out of date on your system. (This requires the Pro version. You will get full support and a 30-day money back guarantee. You’ll be prompted to upgrade when you click Update All.)

- Restart your computer for the changes to take effect.
- Go to Playback devices and see if the issue has been solved. Your audio output devices should be “ready” instead of “not plugged in” now.
If you need assistance, please contact Driver Easy’s support team at support@drivereasy.com.
Fix 3: Rollback your driver
If you have recently updated your driver or updating the graphics driver failed to solve your issue, you can roll back the graphics driver.
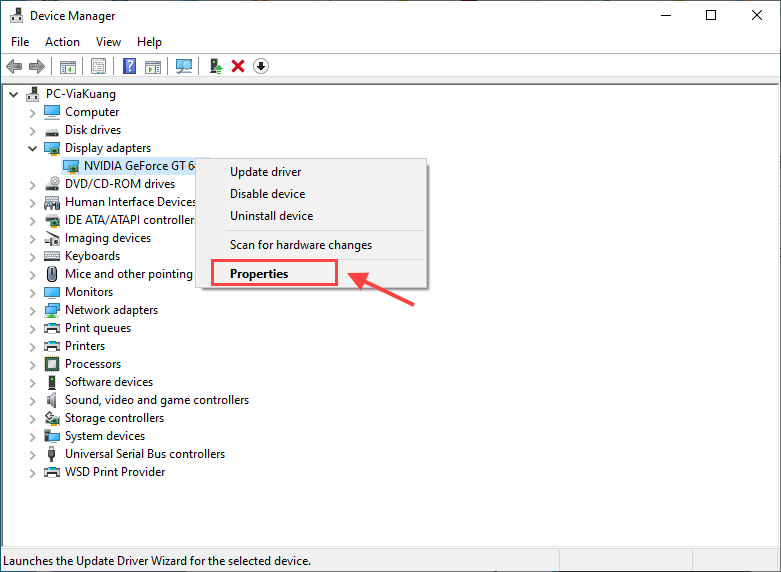
- Right click the Start menu and select Device Manager.
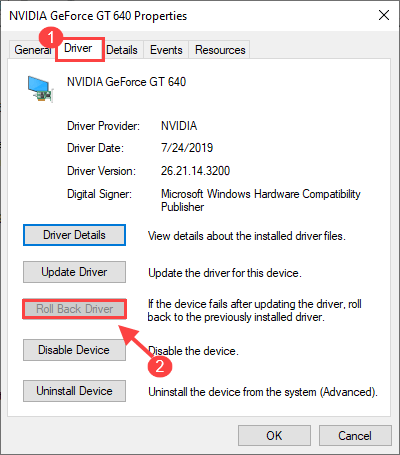
- Double click Display Adapters, then right click your graphics card driver and select Properties.

- Go to the Driver tab, and select Roll Back Driver if the option is not gray.

- Follow the on-screen instructions to proceed.
Fix 4: Use the generic high definition audio device driver
If working on your graphics card driver has no effect, you should try switching to the generic audio driver that Windows offers, especially for Intel-based computer users.
- Go to Device Manager.
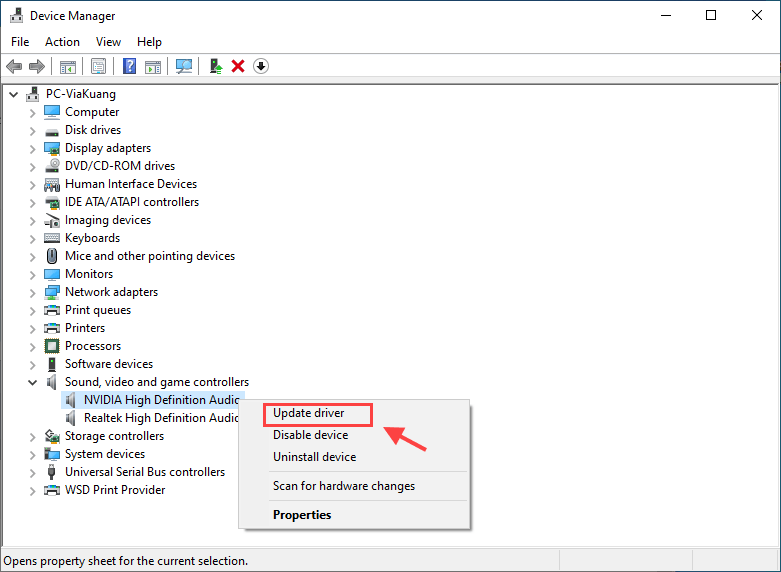
- Double click Sound, video and game controllers.
- Right-click your NVIDIA High Definition Audio and select Update driver.
- Click Browse my computer for driver software.
- Click Let me pick from a list of available driver on my computer.
- Select High Definition Audio Device. Then click Next.

- Click No if you’re prompted for a restart.
- Go back to Device Manager and click Action, then select Scan for hardware changes.
- Check if the issue still persists.
54
54 people found this helpful