Nvidia’s CUDA is a model for parallel computing platforms and application programming interfaces.[1] It stands for Compute Unified Device Architecture and enables developers to utilize the power of Nvidia GPUs for general-purpose processing. This technology has revolutionized fields such as deep learning, scientific simulations, and computational finance, significantly accelerating complex computations. However, sometimes uninstalling CUDA is necessary, like when your disk is getting full or if there are conflicts with other software, potentially leading to system instability. Additionally, in cases where the GPU is not actively used for parallel computing tasks, uninstalling CUDA can help streamline system resources and improve overall performance. Let’s go through how to uninstall CUDA on Windows, Mac, and Linux.
- Uninstall CUDA on Windows
- Uninstall CUDA on Mac
- Uninstall CUDA on Linux
To uninstall CUDA on Windows, you can follow these steps:[2][3]
- Search for “Control Panel” in the Windows search bar.
- Select “Uninstall a program” or “Programs and Features” depending on your Windows version, in the Control Panel.
- Look for “NVIDIA CUDA” or “NVIDIA CUDA Toolkit” in the list of installed programs.
- Select it and click the “Uninstall” button.
- Follow the instructions to complete the uninstallation.
If you want to remove all traces of CUDA from your system then you may want to also delete the folder where it was installed. By default, the CUDA Toolkit is installed in the C:\Program Files\NVIDIA GPU Computing Toolkit\CUDA. You might also consider removing any environment variables that you might have setup for CUDA. Typically these are defined in PATH or CUDA_PATH. To do this:
- Right-click on “This PC” or “My Computer” and select “Properties.”
- Click on “Advanced system settings” on the left.
- Click the “Environment Variables” button.
- In the “User variables” and “System variables” sections, look for any CUDA-related variables and delete them.
Once finished uninstalling CUDA it’s a good idea to restart your PC.
Uninstall CUDA on Mac
To uninstall CUDA on a Mac, you can follow these steps:[4]
- Open the Terminal application, which you can find in the Utilities folder within the Applications folder, or by searching for “Terminal” using Spotlight.
- Run the following command to uninstall the CUDA Toolkit:
sudo /usr/local/cuda-X.Y/bin/uninstall_cuda_X.Y.plReplace “X.Y” with the version of CUDA installed. You can find your version of CUDA by running:
For example, if you have CUDA 10.1 installed, you would use:
sudo /usr/local/cuda-10.1/bin/uninstall_cuda_10.1.pl- You will be prompted for your password since you are using the “sudo” command.
- Follow the on-screen instructions to complete the uninstallation process.
After uninstalling the CUDA Toolkit, you may still have some residual files on your system. The easiest way to remove them is by using the terminal. Be cautious when using the rm command to delete files or directories, as it can be irreversible if you delete the wrong files.
- Open Terminal again.
- Run the following commands to remove any remaining CUDA-related files:
sudo rm -rf /usr/local/cuda
sudo rm -rf /Library/Frameworks/CUDA.framework
sudo rm -rf /Library/LaunchDaemons/com.nvidia.CUDASoftwareUpdate.plist
Once CUDA is removed it’s a good idea to restart your Mac.
Uninstall CUDA on Linux
Removing CUDA on Linux depends on the method you used to install it. If you installed CUDA using a package manager like apt on Ubuntu or yum on CentOS, you can use the same package manager to remove it.
For example, on Ubuntu, you can uninstall CUDA using apt:[5][6]
sudo apt-get remove --purge cudaOn CentOS, you can use yum:
If you installed CUDA using the NVIDIA provided .run installer, you can uninstall it by running the .run file with the –uninstall flag. Navigate to the directory where the CUDA .run file is located and run:
sudo ./cuda_installer_file.run --uninstallAfter uninstalling the CUDA Toolkit, you may want to remove any residual files and directories. The CUDA Toolkit is typically installed in the /usr/local/cuda directory. You can remove it using:
sudo rm -r /usr/local/cudaTo ensure that all changes take effect, it’s a good practice to reboot your system.
References
- Heller, M. (2022, September 16). What is CUDA? Parallel programming for GPUs. InfoWorld. https://www.infoworld.com/article/3299703/what-is-cuda-parallel-programming-for-gpus.html ↩︎
- CUDA installation Guide for Microsoft Windows. (n.d.). https://docs.nvidia.com/cuda/cuda-installation-guide-microsoft-windows/index.html ↩︎
- Stella. (2023, November 3). How to uninstall NVIDIA drivers on Windows 10? (3 methods) – MiniTool. MiniTool. https://www.minitool.com/news/how-uninstall-nvidia-drivers.html ↩︎
- Degtiarenko, I. (2023, January 19). How to uninstall Cuda on your Mac. MacPaw. https://macpaw.com/how-to/uninstall-cuda-driver-mac ↩︎
- Neupane, N. P. (2023, October 27). How to remove CUDA completely from Linux? – Netra Prasad Neupane – Medium. Medium. https://netraneupane.medium.com/how-to-remove-cuda-completely-from-linux-72a9b0edca53 ↩︎
- Admin. (n.d.). How to uninstall nvidia-cuda-toolkit software package from Ubuntu. https://www.thegeekdiary.com/how-to-uninstall-nvidia-cuda-toolkit-software-package-from-ubuntu/ ↩︎
Have you been wondering how to uninstall CUDA on Windows 10? You’ve come to the right place! In this article, we’ll walk you through the process, step-by-step. We’ll also provide some tips on how to avoid common problems.
So whether you’re simply trying to free up some space on your hard drive or you’re having trouble with a CUDA-related program, read on for all the information you need.
| Step | Instructions | Screenshot |
|---|---|---|
| 1 | Open the **Settings** app. | |
| 2 | Go to **System** > **Apps & features**. | |
| 3 | Scroll down and find **NVIDIA CUDA Toolkit**. | |
| 4 | Click **Uninstall**. | |
| 5 | Click **Yes** to confirm the uninstall. | |
| 6 | The uninstall process will begin. | |
| 7 | Once the uninstall is complete, click **Close**. |
Prerequisites
What is CUDA?
CUDA (Compute Unified Device Architecture) is a parallel computing platform and programming model developed by NVIDIA for general-purpose computing on graphics processing units (GPUs). CUDA allows developers to use the power of GPUs to accelerate their applications.
What are the prerequisites for uninstalling CUDA on Windows 10?
To uninstall CUDA on Windows 10, you must have the following prerequisites:
- A Windows 10 computer
- The CUDA driver installed
- The CUDA toolkit installed
- The CUDA application programming interface (API) installed
Steps to uninstall CUDA
To uninstall CUDA on Windows 10, follow these steps:
1. **Uninstall the CUDA driver.**
1. Open the **Device Manager** by pressing **Windows**+**X** and selecting **Device Manager**.
2. Expand the **Display adapters** section.
3. Right-click on the NVIDIA CUDA driver and select **Uninstall device**.
4. Follow the on-screen instructions to uninstall the driver.
2. **Uninstall the CUDA toolkit.**
1. Open the **Control Panel** by pressing **Windows**+**R** and typing **control**.
2. Go to **Programs** > **Programs and Features**.
3. Find the NVIDIA CUDA toolkit and click **Uninstall**.
4. Follow the on-screen instructions to uninstall the toolkit.
3. **Uninstall the CUDA application programming interface (API).**
1. Open the **Control Panel** by pressing **Windows**+**R** and typing **control**.
2. Go to **Programs** > Programs and Features.
3. Find the NVIDIA CUDA API and click Uninstall.
4. Follow the on-screen instructions to uninstall the API.
Uninstalling CUDA on Windows 10 is a relatively straightforward process. By following the steps in this guide, you can quickly and easily remove CUDA from your system.
Note: If you are having trouble uninstalling CUDA, you can contact NVIDIA support for assistance.
This guide will show you how to uninstall CUDA on Windows 10. CUDA is a parallel computing platform and programming model developed by NVIDIA for general computing on graphical processing units (GPUs). It allows developers to use the power of GPUs to accelerate their applications.
Prerequisites:
- You must be logged in as an administrator on your computer.
- You must have the CUDA driver installed on your computer.
Steps:
1. Open the Control Panel.
2. Go to Programs and Features.
3. Find the NVIDIA CUDA Toolkit entry and click Uninstall.
4. Follow the on-screen instructions to uninstall CUDA.
Troubleshooting:
If you encounter errors during the uninstall process, you can try the following:
- Make sure that you are logged in as an administrator on your computer.
- Try uninstalling CUDA in Safe Mode.
- Uninstall any other NVIDIA software that you may have installed on your computer.
- Reinstall the CUDA driver.
How to Reinstall CUDA:
If you need to reinstall CUDA, you can follow these steps:
1. Download the latest CUDA driver from the NVIDIA website.
2. Install the CUDA driver on your computer.
3. Restart your computer.
4. Open the Control Panel.
5. Go to Programs and Features.
6. Find the NVIDIA CUDA Toolkit entry and click Install.
7. Follow the on-screen instructions to install CUDA.
Additional resources:
- [CUDA documentation](https://docs.nvidia.com/cuda/)
- [CUDA support articles](https://www.nvidia.com/cuda/support/)
Troubleshooting
If you encounter errors during the uninstall process, you can try the following:
- Make sure that you are logged in as an administrator on your computer.
- Try uninstalling CUDA in Safe Mode.
- Uninstall any other NVIDIA software that you may have installed on your computer.
- Reinstall the CUDA driver.
To uninstall CUDA in Safe Mode:
1. Restart your computer and press the F8 key repeatedly until you see the Safe Mode menu.
2. Select Safe Mode with Networking from the menu and press Enter.
3. Log in to your computer.
4. Open the Control Panel.
5. Go to Programs and Features.
6. Find the NVIDIA CUDA Toolkit entry and click Uninstall.
7. Follow the on-screen instructions to uninstall CUDA.
To uninstall other NVIDIA software:
1. Open the Control Panel.
2. Go to Programs and Features.
3. Find any NVIDIA software that you may have installed on your computer and click Uninstall.
4. Follow the on-screen instructions to uninstall the software.
To reinstall the CUDA driver:
1. Download the latest CUDA driver from the NVIDIA website.
2. Install the CUDA driver on your computer.
3. Restart your computer.
4. Open the Control Panel.
5. Go to Programs and Features.
6. Find the NVIDIA CUDA Toolkit entry and click Install.
7. Follow the on-screen instructions to install CUDA.
Additional resources
- [CUDA documentation](https://docs.nvidia.com/cuda/)
- [CUDA support articles](https://www.nvidia.com/cuda/support/)
Q: How do I uninstall CUDA on Windows 10?
A: To uninstall CUDA on Windows 10, follow these steps:
1. Open the Control Panel.
2. Go to Programs and Features.
3. Find the NVIDIA CUDA Toolkit and click Uninstall.
4. Follow the on-screen instructions to uninstall CUDA.
Q: What happens when I uninstall CUDA?
A: When you uninstall CUDA, the following things will happen:
- The CUDA driver will be removed from your system.
- Any CUDA-enabled applications that you have installed will no longer be able to use CUDA.
- Any CUDA-related files and folders will be deleted from your system.
Q: Can I uninstall CUDA if I have CUDA-enabled applications installed?
A: Yes, you can uninstall CUDA even if you have CUDA-enabled applications installed. However, if you do so, those applications will no longer be able to use CUDA. If you need to use CUDA-enabled applications, you can reinstall CUDA after uninstalling it.
Q: How do I reinstall CUDA if I uninstall it?
A: To reinstall CUDA, follow these steps:
1. Download the latest CUDA driver from the NVIDIA website.
2. Install the CUDA driver.
3. Restart your computer.
4. Open the NVIDIA Control Panel.
5. Go to Manage 3D Settings.
6. Click the Program Settings tab.
7. Select the CUDA-enabled application that you want to use.
8. Click the Select CUDA GPU drop-down menu and select the CUDA-enabled GPU that you want to use.
9. Click Apply.
Q: What if I have problems uninstalling CUDA?
A: If you have problems uninstalling CUDA, you can try the following:
- Uninstall CUDA in Safe Mode.
- Uninstall CUDA using a third-party uninstaller.
- Contact NVIDIA support for help.
In this comprehensive guide, you have learned how to uninstall CUDA on Windows 10. You have seen that the process is relatively straightforward, but there are a few important steps to take in order to ensure that the uninstall is successful. By following the steps in this guide, you can safely remove CUDA from your system and free up valuable disk space.
Here are the key takeaways from this guide:
- To uninstall CUDA, you must first open the Control Panel and navigate to Programs and Features.
- Next, find the NVIDIA CUDA Toolkit and click Uninstall.
- Follow the on-screen instructions to complete the uninstall process.
- Once the uninstall is complete, restart your computer.
By following these steps, you can safely remove CUDA from your system and free up valuable disk space.
Author Profile
-
Hatch, established in 2011 by Marcus Greenwood, has evolved significantly over the years. Marcus, a seasoned developer, brought a rich background in developing both B2B and consumer software for a diverse range of organizations, including hedge funds and web agencies.
Originally, Hatch was designed to seamlessly merge content management with social networking. We observed that social functionalities were often an afterthought in CMS-driven websites and set out to change that. Hatch was built to be inherently social, ensuring a fully integrated experience for users.
Now, Hatch embarks on a new chapter. While our past was rooted in bridging technical gaps and fostering open-source collaboration, our present and future are focused on unraveling mysteries and answering a myriad of questions. We have expanded our horizons to cover an extensive array of topics and inquiries, delving into the unknown and the unexplored.
Latest entries
Need Space in PC or only want to remove or uninstall Nvidia Cuda Toolkit On PC ( Windows 7, 8, 10, and Mac )? but how to, after it still having files in C: drive? If the application run on the pc, windows 7, 8, & 10 so you can uninstall using Control Panel or CMD Or If this applicaion run in Mac so you know that how to uninstall in MAC. With the help of this article, you will able to uninstall or remove or kick out all of those files also after uninstalling the Nvidia Cuda Toolkit.
Are you bored, or tired of using Nvidia Cuda Toolkit? Now, wanna remove this software from your PC ( Windows 7, 8, 10, and Mac )? There is no condition to follow up before installing, so, you can remove it without getting any confusion about it.
There are 10 methods that users can adapt if they want to uninstall Nvidia Cuda Toolkit :
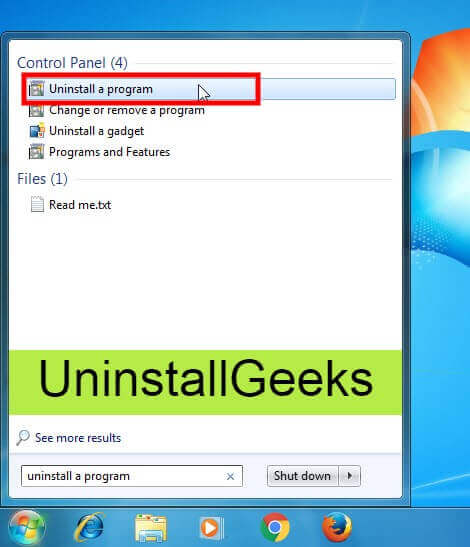
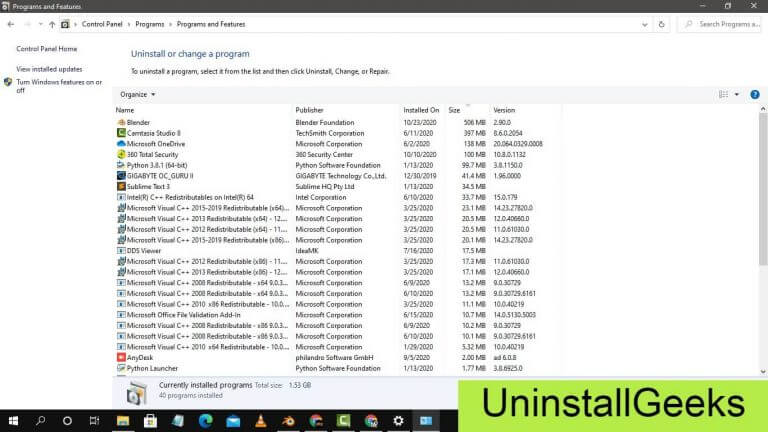
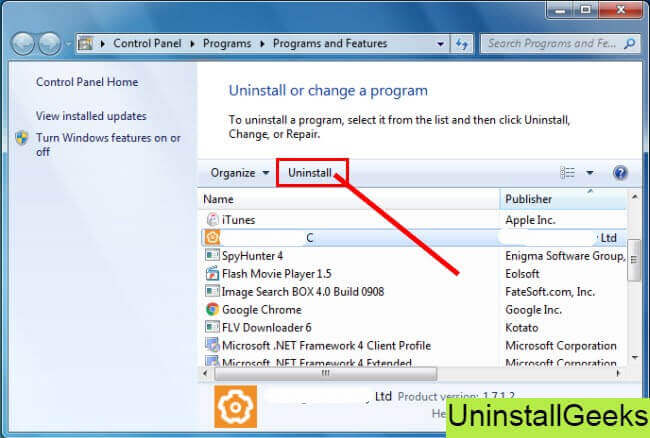
Method #1
- Go to Start Menu, then click on the Control Panel.
- In Control Panel, under programs, go through the list of the ones that are installed on your computer
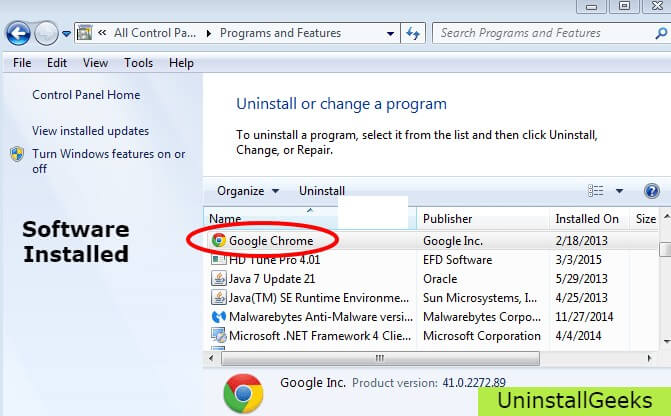
- Right-click on Nvidia Cuda Toolkit, and then click on uninstall a program
- Follow the prompt on the screen, and you will get to see a progress bar that will take you to remove the Nvidia Cuda Toolkit from the computer.
Method #2
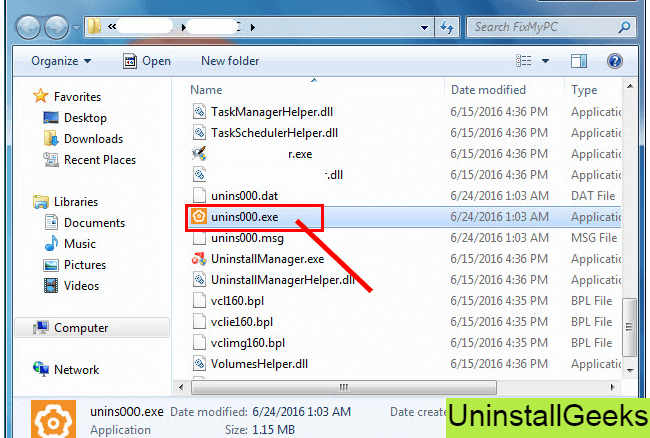
The second method involves uninstaller.exe, through which Nvidia Cuda Toolkit can be uninstalled. Just follow the instructions below to execute this step:
- Go to the installation folder of Nvidia Cuda Toolkit.
- Find a file that is named uninstall.exe or unins000.exe
- Double click on the file, and then follow the instructions that appear on the screen.
Method #3
The third method involves System Restore. For those who don’t know, System Restore is a utility, which helps the user restore their system to its previous state. System Restore removes all those programs, which interfere with the operation and performance of the computer.
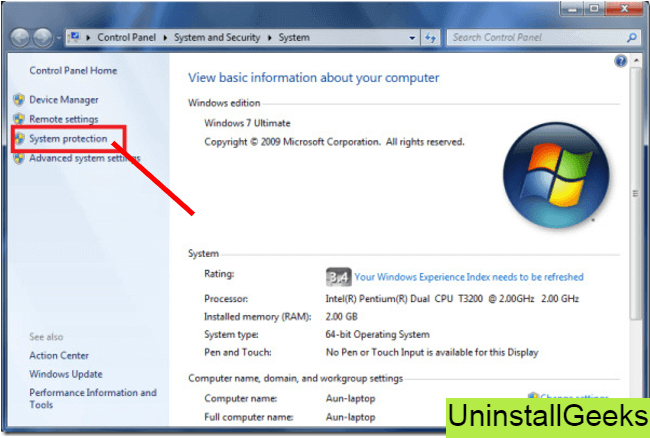
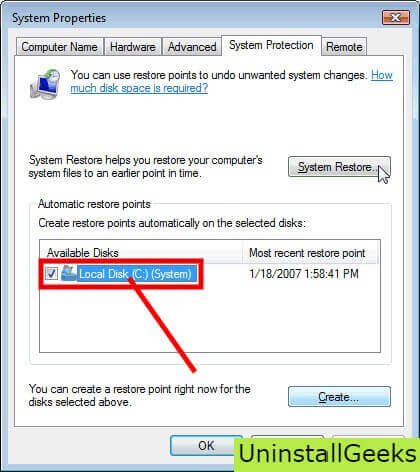
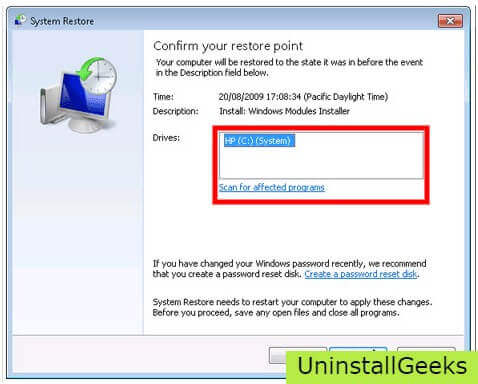
If you have created a system restore point before you installed Nvidia Cuda Toolkit, then you can use this software to restore the system, and remove such unwanted programs. However, before you do so, make sure that you save all the important data.Follow the steps below to know more from this method:
- Close all the files and programs, which are currently running on your PC
- Open Computer from the desktop, and then select Properties
- System Window will open
- On the left side and click on System Protection
- System Properties will open.
- Then do click on the option of System Restore, and a new window will again open.
- Now, choose the ‘different restore point’ option, and click on Next.
- You have to select a date and time from the given options; when you select a date, the drivers that you installed after the chosen date won’t work.
- Click on Finish and then Confirm the ‘Restore Point’ on the screen.
- When you click Yes to confirm, the Nvidia Cuda Toolkit would be uninstalled.
Method #4
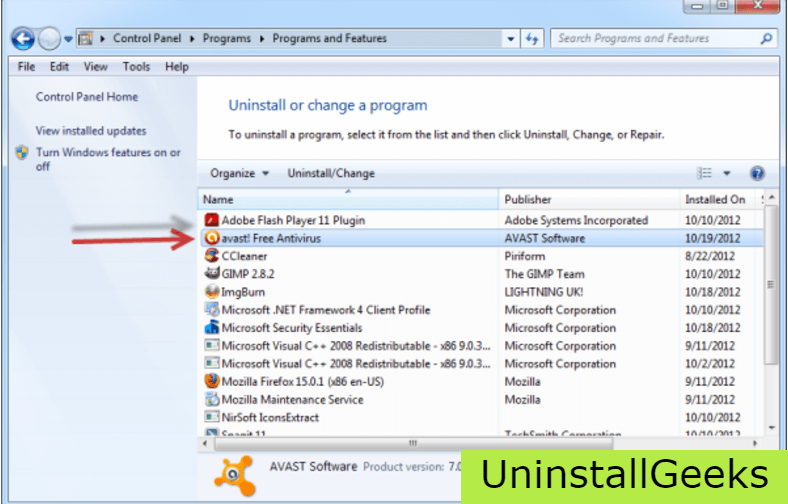
If you have an antivirus, then you can use it to uninstall Nvidia Cuda Toolkit.There is much malware or Nvidia Cuda Toolkit software in the computer applications that we download nowadays. They have become very difficult to remove from the system, like Trojan and spyware.
- If you cannot remove Nvidia Cuda Toolkit with the above methods.
- It means that there is malware or Nvidia Cuda Toolkit in it, and only a good antivirus can be used for removing it.
You can either download Norton Antivirus or AVG antivirus, as these are reputable software and will surely remove the malware, Nvidia Cuda Toolkit on the system.
Method #5
If you want to uninstall Nvidia Cuda Toolkit, then you can do so using Command Displayed in the Registry. A registry is a place where all the settings of Windows, along with information, are stored. This also includes the command to uninstall a software or program.
You can try this method with Nvidia Cuda Toolkit as well, but it is a very risky method. If you make any mistake and delete the wrong information, then the system is most likely to crash. It would become difficult for you to bring it back from deletion.
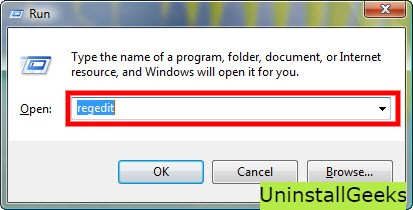
To execute this method, To follow the steps given below:
- Hold Windows + R together, and then Run command
- When the command box opens, type Regedit in the box and then click on OK
- You have to navigate and find the registry key for the Nvidia Cuda Toolkit
- You will see an uninstall string on the next window; double click on it, and also copy ‘Value Data’
- Again hold Windows + R keys, and run the Command; paste the value data that you just copy and click on OK
Follow what comes on the screen and then uninstall Nvidia Cuda Toolkit.
Method #6
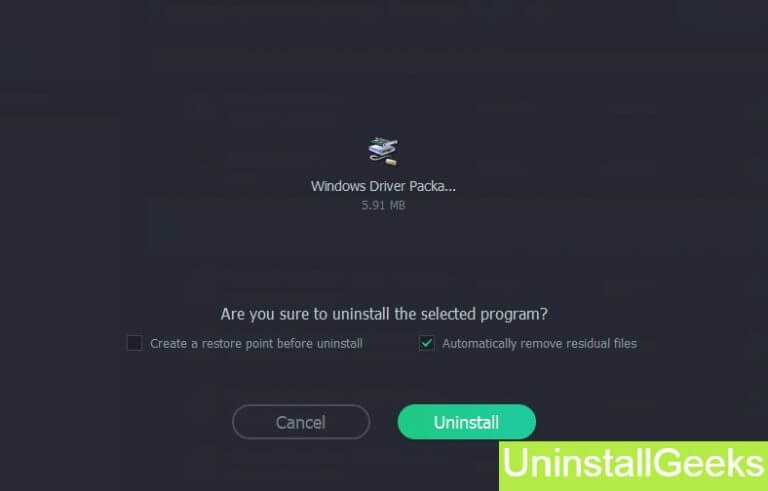
The seventh method is to uninstall the Nvidia Cuda Toolkit using a third-party uninstaller.
At times, those who don’t have any knowledge of computer language, won’t be able to manually uninstall the software fully.
Many files occupy the hard disk of the computer, so it is best to use third-party software to uninstall them.
Method #7
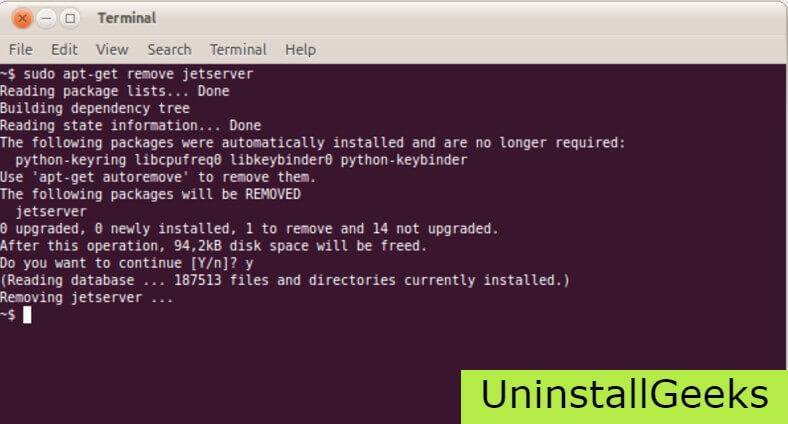
There are some codes that users can type into the command prompt, and they would be able to uninstall the Nvidia Cuda Toolkit. For example, if they want to remove the package, then just type.
sudo apt-get remove Nvidia Cuda Toolkit
If you want to uninstall Nvidia Cuda Toolkit and its dependencies as well, then type:
sudo apt-get remove –auto-remove Nvidia Cuda Toolkit
For those who don’t know, some of the dependencies of Nvidia Cuda Toolkit are GCC-5, libc6, libgcc1, Nvidia Cuda Toolkit dev, and gc++-5.
Method #8
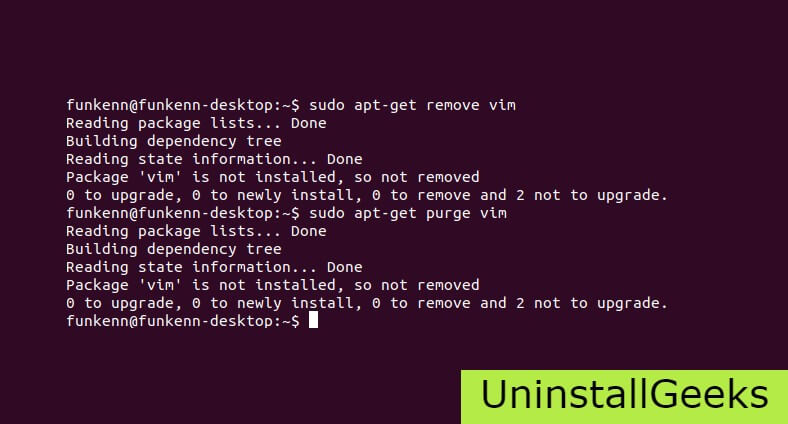
If the user wants to remove the configuration and data files of Nvidia Cuda Toolkit, then they need to run the following code on the Command Prompt:
sudo apt-get purge Nvidia Cuda Toolkit
Method # 9
It depends on you that are you willing to kick-out the data or you want to remove the configuration data or data files, along with the dependencies, then the following code is most likely to work for you:
sudo apt-get auto-remove -purge Nvidia Cuda Toolkit
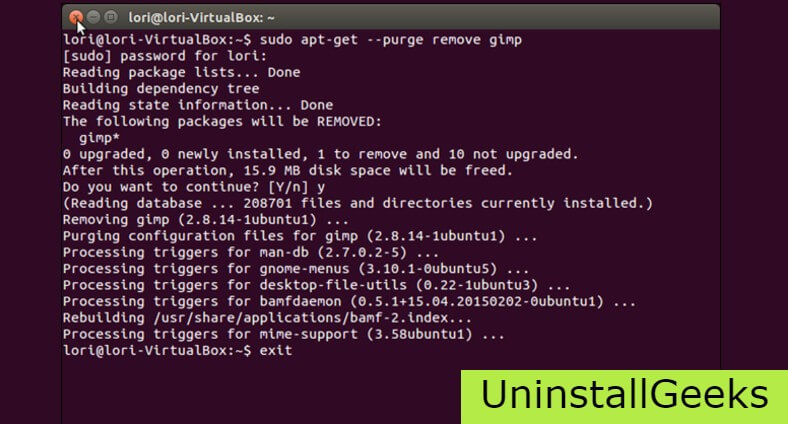
To uninstall Nvidia Cuda Toolkit on mac because anytime we need space or only want to remove from pc due to some viruses and also many problems which are needed to remove or uninstall from pc.
So I will show you some steps of uninstalling Nvidia Cuda Toolkit on the mac so follow my this step or method if you have still confusion so you may contact with us for uninstall of Nvidia Cuda Toolkit on pc or mac.
How to Uninstall Nvidia Cuda Toolkit on Mac?
For uninstalling Nvidia Cuda Toolkit on the mac so as I told you that there is a simple method to uninstall apps on mac. As there are installed some apps on your Mac and now you want to remove or uninstall from your pc successfully and want to install some other apps on my mac so follow my these steps to uninstall Nvidia Cuda Toolkit on mac.
Method #1
In method 1, you have to open mac on your pc as I’m showing in the image follow the images to uninstall Nvidia Cuda Toolkit on your mac.
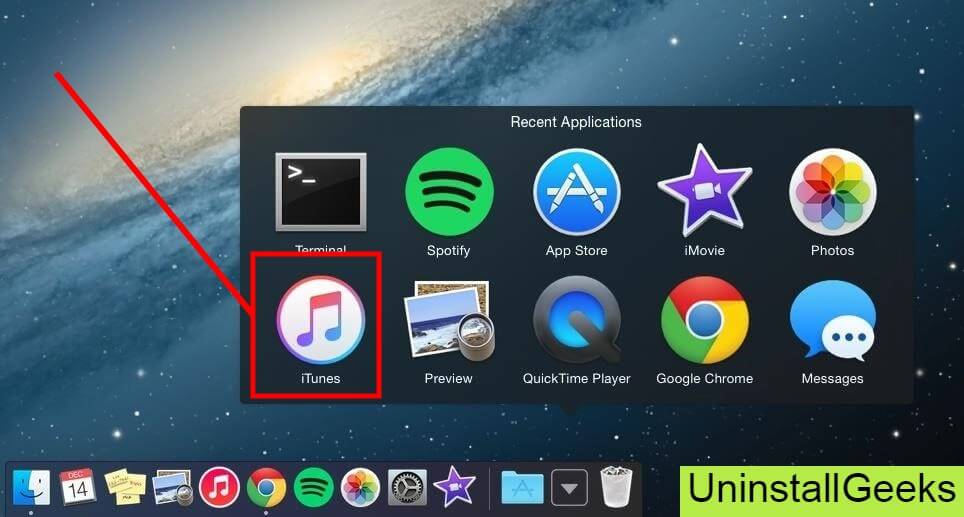
In the image, there is a Nvidia Cuda Toolkit app on your mac dashboard and now we have to uninstall it from our mac we will uninstall this app and will remove it in of mac now double-click-on-app showing in the image.
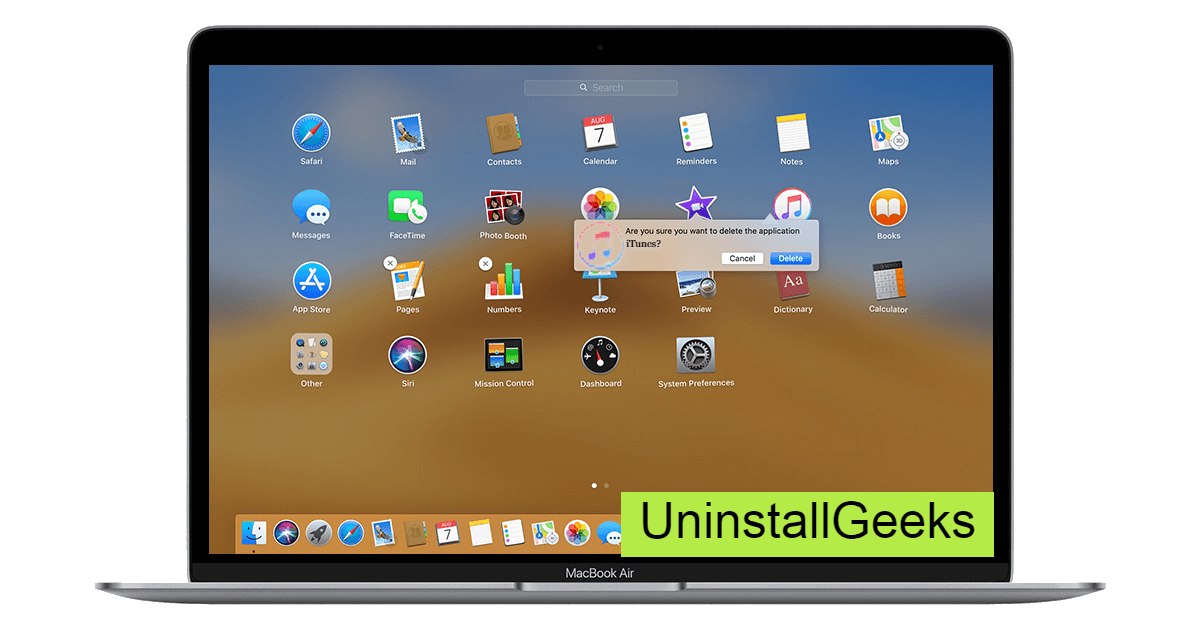
Now you double-clicked on the app mac will ask that are you sure to uninstall Nvidia Cuda Toolkit click on the Delete button so go to Trash of mac to uninstall completely from mac. Showing in image trash bin click on trash bin and go inside there will be Nvidia Cuda Toolkit which we had to delete before so have to uninstall completely from mac.
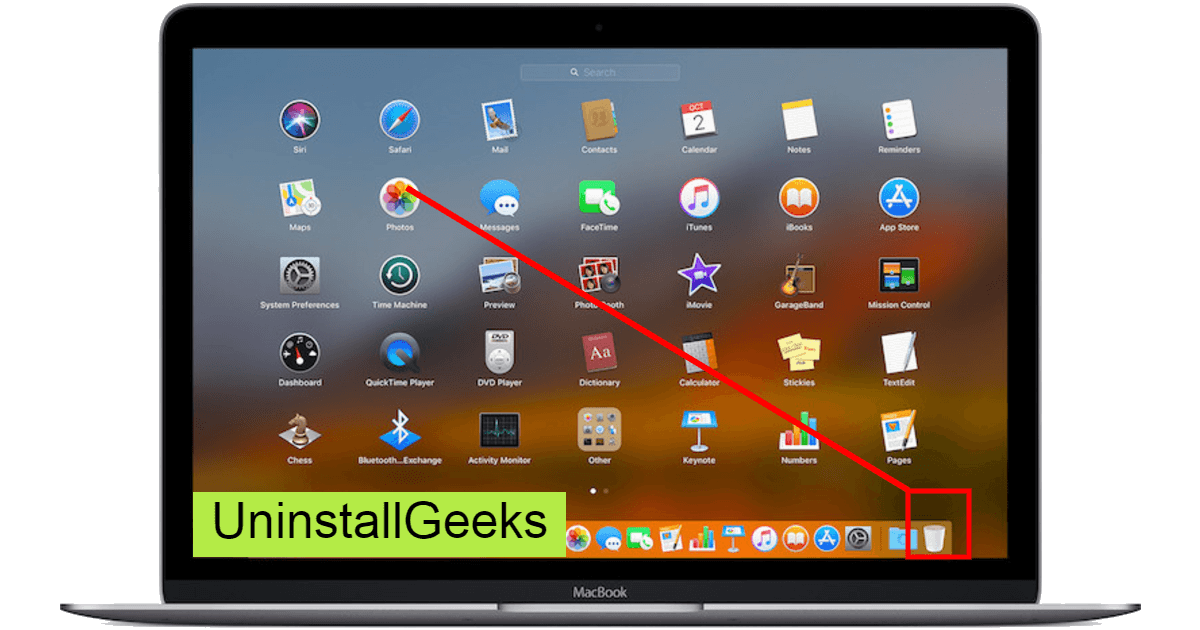
Not right-click on trash to remove all data or app which we had uninstalled before seeing in the image. Click on Empty Trash the whole data which is in the trash will auto remove successfully.
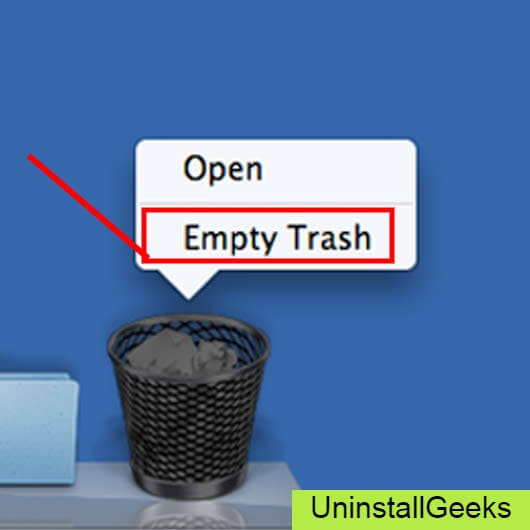
Now we uninstalled Nvidia Cuda Toolkit on the mac so as you see that how to uninstall or remove any app on the mac so if you liked this so share once. This method doesn’t require any antivirus or uninstaller software from them we are to uninstall.
I described only a simple method of uninstalling Nvidia Cuda Toolkit on mac. This method more people are using but some people take it is too hard uninstalling in mac but in this step, anyone can understand this simple method.
How To Install?
For those who don’t know much about Nvidia Cuda Toolkit, they might lean more towards uninstalling it. These Nvidia Cuda Toolkit create an environment, where users can create a high GPU-accelerated application. If you want to install this Nvidia Cuda Toolkit, then make sure that your system is compatible with it.
Firstly, verify that the system you are using has a Nvidia Cuda Toolkit capable GPU, and then download the Nvidia Cuda Toolkit. Install it, and then test that the software runs smoothly on the system. If it doesn’t run smoothly, then it could be because its communication with the hardware is corrupted.
Conclusion
There are other methods of uninstalling the Nvidia Cuda Toolkit as well as in pc or windows, but these could be difficult for those, who don’t have much technical expertise. Execute these methods, and they will surely work. These methods don’t require the user to have much knowledge of the technical side of an operating system. They can follow simple steps and uninstall Nvidia Cuda Toolkit.
Is it tough to uninstall Nvidia Cuda Toolkit? I do not think it is but in this post, I am glad to share a simple guide to remove it.
So, guys! From now you will be free totally and out of worrying about this one.
The NVIDIA CUDA® Toolkit provides a development environment for creating high-performance GPU-accelerated applications. With the CUDA Toolkit, you can develop, optimize, and deploy your applications on GPUs. The toolkit includes GPU-accelerated libraries, debugging and optimization tools, a compiler, and a runtime library.
In addition, the toolkit provides an integrated development environment (IDE) that includes a debugger and profiler. The CUDA Toolkit is available for free and can be downloaded from the NVIDIA website.
People also ask: How to Uninstall NVIDIA Drivers?, How to uninstall WPS Office on PC?, How to uninstall packages with Brew?, How to uninstall epic games launcher on Windows 10?, How to uninstall anaconda completely from Windows 10?, How to Uninstall YouTube App in Windows 10?
Nvidia Cuda Toolkit is a product of Nvidia company and it works for Nvidia Graphic cards in pc, laptops, and Linux.
It supplies to development of creating high-speed or performance GPU and runs fast apps and software which we use.
It provides also high speed to pc, laptops, and Linux so the Nvidia company started Cuda tools and made a package for users all tools in the package are usable and beneficial for users who have Nvidia graphic cards.
There you will find more advanced techniques and more improvement ideas.
Let’s have some important ways to uninstall Nvidia Cuda Toolkit.
Uninstall Nvidia Cuda Toolkit
There are many ways to remove the Cuda Toolkit on PC, laptops, and Linux it can also uninstall through CPL and also with CMD but I do not like this way because it is tough for newbies.
There is an alternative way that used to recommend to my friends always.
[ Recommended ] Tip #1:
This way is very hit and easy for both ( newbies and advanced ) so guys! let’s get started.
- Run this [ Windows + R].
- Then write down the control panel.
- Or an alternative way to open it like:
- Click the Windows button and write down there just a control panel and open it.
- Simple! it is available to uninstall it.
- Click on the Nvidia Cuda Toolkit icon and there will be an option to uninstall simple click there will automatically be uninstalled.
- Done!
Tip: The short way for the control panel is the Windows key + R then write appwiz.CPL control panel opens directly.
Tip #2
Most of the software and applications are easy to uninstall from the control panel but by the control panel, there still will have some files in your program files folders.
With the help of third-party software, we can use and uninstall Nvidia Cuda Toolkit.
Some third-party softwares are too high MB rather than the control panel but can’t we can not do the competition with CMD because the developer of CMD is Microsoft Corporation.
By using a third-party uninstall we can easily uninstall the Nvidia Cuda toolkit also with hidden files there is too such as third-party uninstallers. You can uninstall NVIDIA drivers.
How do I enable NVIDIA CUDA?
If you have an NVIDIA graphics card and you want to enable CUDA, you need to install the NVIDIA driver and the CUDA Toolkit. The CUDA Toolkit includes a compiler and other tools you need to develop applications that use CUDA.
To install the NVIDIA driver and the CUDA Toolkit, follow these steps:
- Go to an Official website.
- Download the latest version of the NVIDIA driver for your graphics card.
- Download the latest version of the CUDA Toolkit.
- Run the installer for both the driver and the CUDA Toolkit.
Where is CUDA Toolkit installed in Linux?
The CUDA Toolkit is installed in the /usr/local/cuda directory.
That’s all. I am done! Leave feedback for more updates.
How to Uninstall CUDA on Windows 11
CUDA, or Compute Unified Device Architecture, is NVIDIA’s parallel computing platform and application programming interface (API) model. It allows developers to leverage the power of NVIDIA GPUs for general-purpose processing. However, there may come a time when you need to uninstall CUDA from your system, whether due to compatibility issues, upgrading to a new version, or simply because it’s no longer necessary for your work.
In this article, we will provide a comprehensive guide on how to uninstall CUDA from Windows 11. We’ll address the preparation required before uninstallation, the different methods you can use, and the steps to follow for ensuring a clean removal.
Understanding Necessary Preparations Before Uninstallation
Prior to uninstalling CUDA, it’s important to consider why you’re removing it and ensure you have the correct information. Below are some essential preparation steps that you should follow:
-
Backup Important Data: If you’ve developed applications using CUDA, back them up to prevent any loss. Ensure that you store any critical files or configurations that you may need later.
-
Check Installed Versions: Note down the version of CUDA you have installed. Sometimes issues arise due to mismatches between versions of CUDA, NVIDIA drivers, and other dependent software. This will also help you determine whether you want to reinstall a different version afterward.
-
Check with Documentation: If you’re uninstalling CUDA to install a different version, consider checking NVIDIA’s official documentation. They often provide specific guidance on how to properly uninstall outdated versions to prevent conflicts.
-
Ensure Safe Mode Access: Familiarize yourself with how to boot into Safe Mode, just in case you run into issues that prevent normal uninstallation. Safe Mode can provide a cleaner environment to perform software removal.
How to Uninstall CUDA Using the Control Panel
One of the simplest methods to uninstall CUDA on Windows 11 is using the Control Panel. Here’s how to do it:
-
Access Control Panel:
- Press the Windows key or click on the Start menu.
- Type “Control Panel” and hit Enter.
-
Navigate to Programs:
- In the Control Panel window, select Programs or Programs and Features.
-
Find CUDA:
- In the list of installed programs, scroll through or use the search functionality at the top right to find the CUDA version you wish to uninstall (look for terms like “NVIDIA CUDA Toolkit” along with the version number).
-
Uninstall CUDA:
- Once you locate it, right-click on it and select Uninstall.
- Follow the on-screen prompts to complete the uninstallation process.
-
Restart Your System:
- After the uninstallation process, it is advisable to restart your computer to ensure all elements of the CUDA installation have been properly removed.
How to Use the Settings App to Uninstall CUDA
Windows 11 integrates settings into a more user-friendly application compared to the traditional Control Panel. Here’s how you can use it:
-
Open the Settings App:
- Click on the Start menu and choose Settings, or press Windows + I on your keyboard.
-
Go to Apps:
- In the Settings window, click on the Apps section in the sidebar.
-
Select Installed Apps:
- Look for the Installed apps option where all applications are listed.
-
Find and Uninstall CUDA:
- Scroll through or utilize the search bar to find “NVIDIA CUDA”. Click on it, and then you will see an Uninstall button. Click it and follow the prompts.
-
Complete the Process:
- Similar to the Control Panel method, once the uninstallation is complete, restarting your computer is recommended.
Use of Command Line Interface (CLI) for Uninstallation
Alternatively, you can uninstall CUDA through the Command Prompt. This method is more suited for advanced users comfortable with command-line operations.
-
Open Command Prompt as Administrator:
- Right-click on the Start menu and select Windows Terminal (Admin) or search for cmd in the Start menu, right-click on «Command Prompt,» and choose Run as Administrator.
-
Identify Installed Applications:
- Type the command:
wmic product get name - This will display all installed applications. Look for «NVIDIA CUDA».
- Type the command:
-
Uninstall CUDA:
- Execute the following command, replacing “NVIDIA CUDA” with the exact name as it appears:
wmic product where name="NVIDIA CUDA" call uninstall - Follow the on-screen prompts as directed.
- Execute the following command, replacing “NVIDIA CUDA” with the exact name as it appears:
-
Reboot Your System:
- As with other methods, restart your computer to finalize the removal of CUDA.
Removal Using the NVIDIA Installer
NVIDIA provides a method for users to modify installations using their installer. This can be useful, especially if you are focused on keeping a clean system.
-
Download the Latest NVIDIA CUDA Toolkit Installer (if needed):
- Go to the NVIDIA CUDA Toolkit website.
- Download the installer for your desired version.
-
Run the Installer:
- Launch the installer. During the initial setup, choose the ‘Modify’ option rather than Install.
-
Choose Components:
- In the component selection menu, deselect all components associated with CUDA to remove them from your system.
-
Complete the Process:
- Follow the prompts to uninstall the selected components.
-
Reboot:
- Again, a restart is recommended after using this method.
Manual Cleanup Post-Uninstallation
It is often crucial to ensure that no residual files or folders remain after CUDA has been uninstalled. Here’s how to perform a manual cleanup:
-
Check Common Installation Directories:
- Navigate to the default installation directory, usually found in:
C:Program FilesNVIDIA GPU Computing ToolkitCUDA - If this folder (or others related to CUDA) still exists, delete it.
- Navigate to the default installation directory, usually found in:
-
Inspect Environment Variables:
- Open System Properties by searching for «Environment Variables» in the Start menu.
- Under the Advanced tab, click on Environment Variables.
- Check both User Variables and System Variables for any references to CUDA and remove them as necessary.
-
Delete CUDA-related Registry Entries (Advanced Users):
- Warning: Editing the registry can cause serious system issues if not performed correctly. Proceed with caution.
- Open the Registry Editor by typing
regeditin the Start menu. - Use the search functionality (Ctrl + F) to locate any CUDA-related entries and delete them.
-
Check for Driver Instances:
- It’s also advisable to check if you still have NVIDIA driver components related to CUDA, as these remnants may cause issues later.
Reinstallation of an Alternative or New Version
Should you decide to reinstall a newer version of CUDA after uninstallation, or one that is more compatible with your setup, follow these steps:
-
Download the Desired Version:
- Go to the NVIDIA CUDA Toolkit Downloads page and select the version you wish to install.
-
Run the Installer:
- Execute the downloaded file and follow on-screen instructions.
-
Choose Installation Options:
- Opt for a custom installation if you want to choose specific components and ensure any previous files have been replaced or updated.
-
Restart Post Installation:
- Restart your system to complete the installation process.
Troubleshooting
In rare cases, users may encounter issues that hinder the uninstallation of CUDA. Here are a few troubleshooting tips:
-
Failed Uninstallations: If the uninstallation does not go smoothly, attempt Safe Mode. Boot your computer into Safe Mode and try the uninstallation process from there.
-
Error Messages: Any error messages associated with CUDA installations can often be looked up for specific fixes or solutions on NVIDIA’s forums and community pages.
-
Using Third-party Programs: If manual uninstallation proves too troublesome, consider using third-party uninstaller tools designed to remove stubborn software. Tools such as Revo Uninstaller can help in this regard.
-
Check Online Forums: The NVIDIA forums or tech support communities can be invaluable resources for troubleshooting any uncommon issues that arise.
Conclusion
Uninstalling CUDA from Windows 11 can be completed using various methods including Control Panel, Settings App, Command Line Interface, and the NVIDIA installer itself. Each method has its unique steps, and the choice largely depends on personal comfort level with technology.
In conclusion, thorough preparation, careful execution, and post-uninstallation cleanup are essential for a clean removal of CUDA. Whether you’re preparing for a new installation or simply freeing up system resources, following the steps outlined in this article should help you achieve a successful uninstallation. By ensuring a complete removal, you can avoid conflict between different versions and set your system up for optimum performance.
