
If you get NVIDIA Windows Kernel Mode driver stopped responding error, don’t worry. You can fix the problem with one of the methods below.
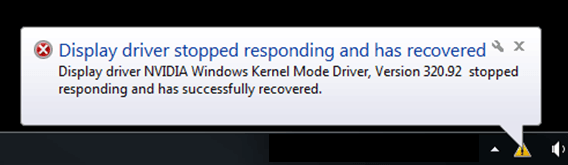
The full error message is as follows:
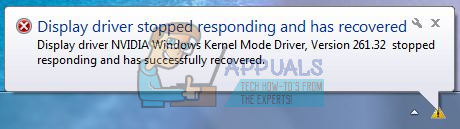
Display driver stopped responding and has recovered
Display driver NVIDIA Windows Kernel Mode Driver, Version xxx stopped responding and has successfully recovered.
We’ve put together three methods for you to fix the problem. You may not have to try them all; just work your way down until you find the one that works for you.
Method 1: Uninstall then reinstall the graphic driver
The problem can be caused by the faulty NVIDIA graphics driver. To resolve the problem, you can try to uninstall then reinstall the NVIDIA graphics driver.
You can follow these steps to uninstall and reinstall the NVIDIA graphics driver:
1) On your keyboard, press the Windows logo key and R at the same time to invoke the Run box.
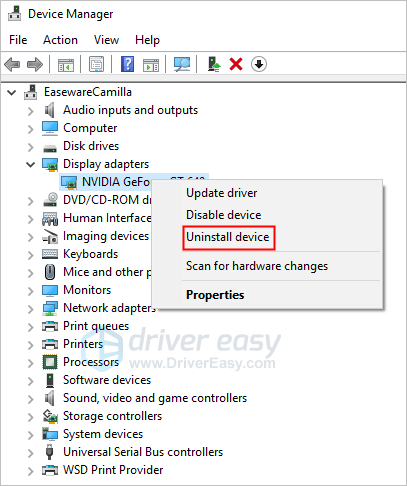
Type devmgmt.msc and click OK to open Device Manager window.
2) Expand the Display adapters branch. Right-click on the NVIDIA graphics card name and click Uninstall.
3) After uninstalling the driver, restart your PC to allow Windows to reinstall the driver automatically.
4) Check to see if the problem is resolved.
Method 2: Update the NVIDIA graphics driver
If Method 1 doesn’t work for you, you can try to update the NVIDIA graphics driver. If you don’t have the time, patience or computer skills to update the driver manually, you can do it automatically with Driver Easy.
Driver Easy will automatically recognize your system and find the correct drivers for it. You don’t need to know exactly what system your computer is running, you don’t need to risk downloading and installing the wrong driver, and you don’t need to worry about making a mistake when installing.
You can update your drivers automatically with either the FREE or the Pro version of Driver Easy. But with the Pro version it takes just 2 clicks (and you get full support and a 30-day money back guarantee):
1) Download and install Driver Easy.
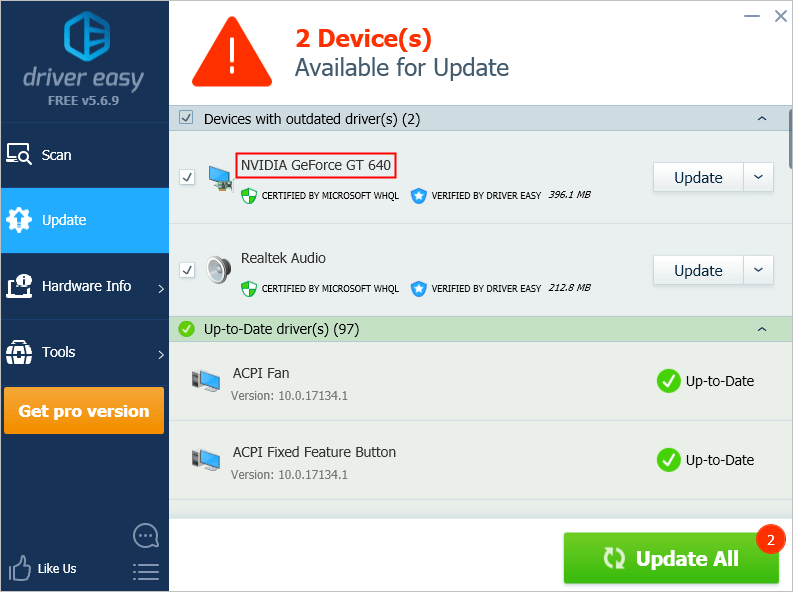
2) Run Driver Easy and click Scan Now. Driver Easy will then scan your computer and detect any problem drivers.

3) Click the Update button next to a flagged NVIDIA graphics driver to automatically download the correct version of this driver, then you can manually install it (you can do this with the FREE version).
Or click Update All to automatically download and install the correct version of all the drivers that are missing or out of date on your system (this requires the Pro version – you’ll be prompted to upgrade when you click Update All).
Method 3: Increase the GPU Processing Time
The last method you can try is to increase the GPU processing time by modifying the value of the related entry in registry.
Warning: Modifying registry incorrectly may cause serious system problems. Before you move on, we recommend you back up the registry first, then you can restore the registry if necessary. See How to Back Up and Restore Registry.
You can follow these steps to modify the registry to increase the GPU processing time:
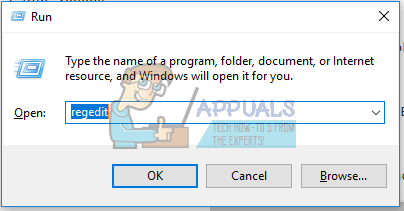
1) On your keyboard, press the Windows logo key and R key at the same time to invoke the Run box.
Type regedit and click OK to open Registry Editor.
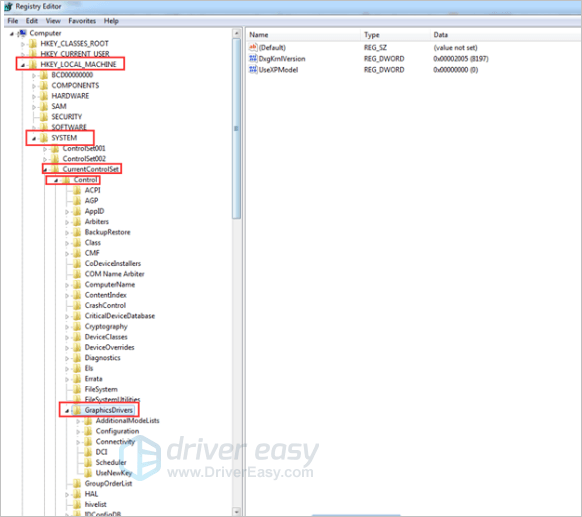
2) Browse to and then click the following registry subkey:
HKEY_LOCAL_MACHINE\SYSTEM\CurrentControlSet\Control\GraphicsDrivers
3) On the Edit menu in the right pane, right-click on the blank place. Click New, and then select the following registry value from the drop-down menu specific to your version of Windows.
If your PC is running 32-bit operating system, follow these steps:
a) Select DWORD (32-bit) Value.
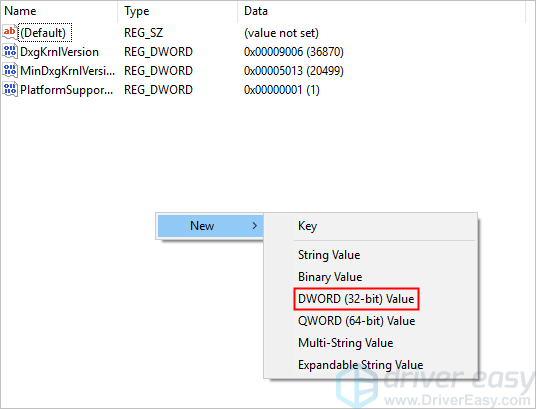
b) Type TdrDelay as the Name and click Enter.
c) Double-click TdrDelay and add “8” for the Value data and click OK.
If your PC is running 64-bit operating system, follow steps below:
a) Select QWORD (64-bit) Value.
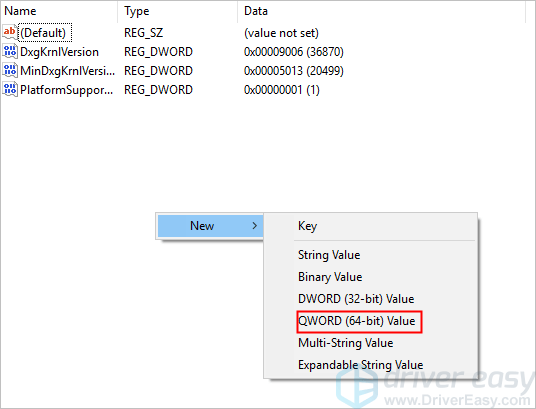
b) Type TdrDelay as the Name and click Enter.
c) Double-click TdrDelay and add “8” for the Value data and click OK.
4) Restart your PC and check to see if the problem is resolved.
After modifying the registry here, if a problem occurs and you are not sure how to restore the registry, you can delete the added TdrDelay Name and restart your PC.
Hopefully the methods above help you resolve the NVIDIA Windows Kernel Mode Driver Stopped Responding issue. If you have any questions, ideas or suggestion, feel free to leave your comments below.
39
39 people found this helpful
Available in other languages
4 Lösungen für »Der Anzeigetreiber NVIDIA Windows Kernel Mode Driver, Version xxx.xx reagiert nicht mehr und wurde wiederhergestellt«.
С недавних пор п��явилась такая проблема, что система фризится на несколько секунд и гаснет монитор, восстанавливаясь с пикрилейтид в шапке.
Гуглирование вопроса показывало, что в таких случаях в основном проблема в повреждённом ядре видеодрайвера т.е. криво обновилось.
Долго вообще не обновлял драйвер, юзал тот что с коробки. Потом где-то полгода назад одна игра поругалась, что нужно обновление. Я поставил полный фарш с Experience, даже ненужные 3D-свитстелки просто чтобы был весь актуальный пакет. Обновлял с «чистой установкой», но не так давно попробовал экспресс-установку. Подумал, мол, ну наверное производитель продумал уже нормальный алгоритмы обновления без полной переустановки ядра. Не могу точно сказать что проблема началась именно с того момента, но есть стойкие подозрения.
Но вроде проблема не велика. Использовал для полного удаления видеодров Display Driver Uninstaller, предварительно скачав с сайта NVIDIA рекомендованный дистрибутив дров (всё равно последний). Experience и прочее уже не ставил, только видео- и аудиодрова.
Однако, после полного удаления и свежей установки на чистую проблема осталась. Что примечательно, пока не замечал чтобы ошибка вылетала именно в играх. В основном в браузере Chrome при просмотре видео или в видеоплеере. Хотя может просто совпадение. Частота спорадическая, но вот за сегодняшние полдня уже была раза три.
Может быть Win7 уже слишком ретроградская и Win10 решила бы проблему. Может проблема производителя дров, но у меня вроде бы ещё вполне актуальная видеозаглушка чтобы какую-то определённую версию дров искать.
Прогонял ещё тест видеопамяти gpumemtest, тоже всё в порядке. Т.е. очень надеюсь что можно исключить физические повреждения платы.
Прошу, пожалуйста, совета у знающих людей.
Извините, если не в ту рубрику, в «Железо» или «Вопросы» подумал неуместным публиковать.
UPD:
По всей видимости, проблема конкретно данной версии драйвера 418.91, NVIDIA выпускала даже хотфикс 418.99 конкретно под исправление этой проблемы (пикрилейтид 1). На чистую поставил 419.17. На всякий случай поменял параметры энергопотребления (пикрилейтид 2). Пока всё нормально.
Certain NVIDIA graphics cards users have complained about an issue with the graphics while in excessive use. During use, the the screen blacks out for a while and comes back with a popup which says “Display driver Nvidia Windows Kernel Mode driver, has stopped responding and has successfully recovered”. This goes ahead to cause some instability in other applications.
This issue mainly stems from a faulty driver, though this hasn’t been the case for some others. Other causes of the issue has been from incompatible configurations as well as hardware issues.
We’ll first fix this issue by installing the latest (hotfix) NVIDIA drivers as a clean install, performing a registry fix, setting some configurations right in the NVIDIA control panel, and a possible hardware fix.
Method 1: Reinstall NVIDIA Drivers
A lot of users found out the issue came from the drivers and so updated to the latest one, which didn’t give any new problems. For some other users, they had to roll back to several versions back to get a working version. Follow the steps below to reinstall the drivers.
- Remove all existing NVIDIA Graphics drivers using the Display Driver Uninstall Utility. It’s recommended to perform this action in the safe mode.

- Visit the NVIDIA Driver page and search for your graphics card drivers under the Option 1: Manually find drivers. You have to provide your graphics card type, OS, and other relevant information and then click the Search After you are provided with the latest driver for your card, download it.

- Go to the download location of the driver and launch the installer. While installing, select Custom Options, and select Clean Install. This will further wipe previous installations and install the latest working version.

- Restart your PC and try to launch any games or video applications to confirm if the error has stopped. If it still persists, go back to the NVIDIA Driver page and download older versions and repeat the process till you find one which works.


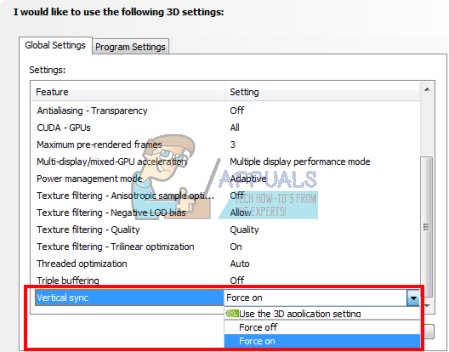
Method 2: Turning off Vertical Sync
Incompatible settings can cause NVIDIA to crash unexpectedly. Turning off the vertical sync option in the NVIDIA settings solved the issue for some people.
- Open NVIDIA Control Panel by pressing the Start button, typing NVIDIA Control Panel and pressing Enter.
- In the Control Panel, Click on Manage 3D settings under 3D Settings.
- Under “I would like to use the following 3D settings, scroll down until you see “Vertical sync”.
- Click on the Vertical sync line and choose Force Off from the drop down menu.

- Try to launch any games or video applications to confirm if the error has stopped.
Method 3: Registry Fix
With this registry fix, you should be able to get this error solved.
- Press the Windows key + R to open the Run prompt. Now type regedit and hit Enter to open the Registry Editor. If you’re asked to grant access via a UAC prompt, accept it.

- Navigate to HKEY_LOCAL_MACHINE > SYSTEM > Currentcontrolset > control > graphicsdrivers.
- Right-click on graphicsdrivers and select New > Dword (32-bit) value and set the value to 8. You can additionally reinstall the drivers by repeating the steps in method.
- Close regedit and reboot your PC. After the PC reboots, try to launch any games or video applications to confirm if the error has stopped.
Method 4: Hardware Fixes
For the rest of the users, you may have to perform some under the hood fixes to enable you use the graphics card run flawlessly. You should consider the following.
- Underclock your CPU. You can find more of this on your NVIDIA’s website and forums.
- Make sure cables and connectors are placed well.
Kevin Arrows
Kevin Arrows is a highly experienced and knowledgeable technology specialist with over a decade of industry experience. He holds a Microsoft Certified Technology Specialist (MCTS) certification and has a deep passion for staying up-to-date on the latest tech developments. Kevin has written extensively on a wide range of tech-related topics, showcasing his expertise and knowledge in areas such as software development, cybersecurity, and cloud computing. His contributions to the tech field have been widely recognized and respected by his peers, and he is highly regarded for his ability to explain complex technical concepts in a clear and concise manner.
Jun. 23, 2022 / Updated by
Bessie Shaw to
Windows Driver Solutions
“I keep facing the problem ‘Display driver NVIDIA Windows Kernel Mode Driver, Version 375.57 stopped responding and has successfully recovered’ How do I solve this?»

Do you encounter the same issue above? This problem usually occurs when viewing a video on YouTube or playing a game. It could be related to missing or damaged updates or drivers. If you’re struggling with this problem, this post could be your saver. Take your time following the methods below. They will assist you to fix the Display driver NVIDIA Windows Kernel Mode Driver stopped responding issue. You don’t have to try them all. If the previous method does not work, try the following ones. Once your issue is resolved, stop there. Let’s get started now.
Method 1. Restart the Computer and Check for Windows Updates
When you come across the Display driver NVIDIA Windows Kernel Mode Driver stopped responding issue, the first thing you can do is to restart your computer several times, and then check if there are Windows Updates. Sometimes this method may work.
Method 2. Uninstall and Reinstall the NVIDIA Graphics Driver
In most cases, the Display driver NVIDIA Windows Kernel Mode Driver stopped responding issue could be caused by the faulty NVIDIA graphics driver. To get rid of the issue in this case, try to uninstall and then reinstall the NVIDIA graphics driver. Follow these steps:
Step 1. Press Windows + R to launch the Run dialog box.
Step 2. Type “devmgmt.msc” into the box and hit Enter to open Device Manager.
Step 3. In the list of devices, expand the Display adapters to find the NVIDIA graphics driver.
Step 4. Right click on the NVIDIA graphics driver and select Uninstall device to uninstall it. Make sure that you check the option to delete the driver package from the system.
Step 5. After uninstalling the NVIDIA graphics driver successfully, restart your computer.
Then if you have enabled the Windows automatic update feature, Windows will automatically reinstall the NVIDIA graphics driver after the reboot. If not, click on the Action tab in Device Manager, and then select “Scan for hardware changes”. This step will help you reinstall the NVIDIA graphics driver. Remember to restart your computer once the driver is reinstalled successfully.
Method 3. Update the NVIDIA Graphics Driver
Outdated graphics driver may be partly to blame for the Display driver NVIDIA Windows Kernel Mode Driver stopped responding issue. Therefore, another viable method to resolve this issue is to update your NVIDIA graphics driver. You can follow the steps in this post: 2 Ways to Update Outdated Drivers in Windows 10.
If you are just a computer noob, a trustworthy driver update utility like Driver Talent would be your good helper. It will automatically find out all the outdated drivers on your computer and help you update them in a few minutes. It saves time and effort. Why not have a try? Click on the Download Now button below to get it directly. The following steps will show you how to update your NVIDIA graphics driver with Driver Talent.
Download Now
Step 1. Open Driver Talent and click on the Scan button to perform a full scan on your computer.

Step 2. If your NVIDIA graphics driver is detected as updatable, click on the Update button on its right to update it.

Step 3. After the update is completed, restart your computer to let the update take effect.
You may also like to check out:
-
How to Fix UNEXPECTED KERNEL MODE TRAP in Windows 10
-
Fix 0x000007A KERNEL_DATA_INPAGE_ERROR in Windows 10
-
Top 2 Solutions to Download and Update NVIDIA Drivers for Windows 10
-
Fix Unexpected Kernel Mode Trap BSoD after Windows 10 Fall Creators Update
If the methods above work for you, don’t hesitate to share them so that they can help more users who are also stuck in the Display driver NVIDIA Windows Kernel Mode Driver stopped responding issue. More solutions to other common computer issues can be accessed in the Resource section on this site. If you need further assistance, leave your comments below to let us know.
Recommended Download
|
ExplorerMax |
Driver Talent for Network Card | |||
| Smart and advanced file explorer tool for Windows platforms | Download & Install Network Drivers without Internet Connection | |||
|
30-day Free Trial |
Free Download |
If you’re facing screen flickers and display becoming dotted, then the display suddenly stopped saying “Windows Kernal Mode Driver Crash” then you’re at the right place as today we will discuss how to fix the issue. Now when you open Event Viewer to further investigate the issue you see an entry with the description “Display driver nvlddmkm stopped responding and has successfully recovered”, but the problem doesn’t seem to go away as it keeps on coming back.
The main issue for NVIDIA kernel-mode driver crash seems to be an outdated or corrupted driver which is conflicting with Windows and causing this whole issue. Sometime incorrupt configuration of Windows Visual Settings or Graphic Card Settings can also cause this error. So without wasting any time let’s see how actually to fix NVIDIA Kernel Mode Driver has stopped responding.
Table of Contents
Note: Make sure to create a restore point, just in case something goes wrong.
Method 1: Reinstall NVIDIA Drivers
1. Download Display Driver Uninstaller.
2. Boot your PC into Safe Mode using any of the listed methods.
3. Double-click on the .exe file to run the application and select NVIDIA.
4. Click on Clean and Restart button.
![Use Display Driver Uninstaller to uninstall NVIDIA Drivers | Nvidia Kernel Mode Driver has stopped responding [SOLVED]](https://techcult.com/wp-content/uploads/2017/11/Use-Display-Driver-Uninstaller-to-uninstall-NVIDIA-Drivers.png)
5. Once the computer restarts, open chrome and visit the NVIDIA website.
6. Select your product type, series, product and operating system to download the latest available drivers for your Graphic Card.

7. Once you download the setup, launch the installer, select Custom Install and then select Clean install.

8. Reboot your PC to save changes and see if you’re able to Fix NVIDIA Kernel Mode Driver has stopped responding error.
9. If the issue still occurs, remove the drivers following the above method and download older drivers from the NVIDIA website and see if this works.
Method 2: Disable Windows Visual Enhancements
1. Press Windows key + R then type sysdm.cpl and hit Enter to open System Properties.
2. Switch to the Advanced tab and under Performance click Settings.

3. Make sure to checkmark “Adjust for best performance.”

4. Now, under the list, everything will get unchecked, so you need to manually checkmark the following which items are mandatory:
- Smooth edges of screen fonts
- Smooth-scroll list boxes
- Use drop shadows for icon labels on the desktop
![checkmark smooth edges of scree fonts, smooth-scroll list boxes | Nvidia Kernel Mode Driver has stopped responding [SOLVED]](https://techcult.com/wp-content/uploads/2018/01/checkmark-smooth-edges-of-scree-fonts-smooth-scroll-list-boxes.png)
5. Click Apply, followed by OK.
6. Reboot your PC to save changes and see if you’re able to Fix NVIDIA Kernel Mode Driver has stopped responding error.
Also Read: Fix NVIDIA Container High CPU Usage on Windows 10
Method 3: Set PhysX configuration
1. Right-click on the desktop in an empty area and select the NVIDIA control panel.
2. Then expand 3D Settings and then click on Set PhysX configuration.
3. From PhysX Settings drop-down, select your Graphics Card instead of Auto-select.

4. Reboot your PC to save changes.
Method 4: Turn off Vertical Sync
1. Right-click on the desktop in an empty area and select the NVIDIA control panel.
2. Then expand 3D Settings and then click on Manage 3D settings.
3. Now under “I would like to use the following 3D settings” find Vertical sync settings.

4. Click on it and select “Off” or “Force Off” to disable Vertical Sync.
5. Restart your PC to save changes.
Method 5: Registry Fix
1. Press Windows Key + R then type regedit and hit Enter to open Registry Editor.
2. Navigate to the following registry key:
HKEY_LOCAL_MACHINE\SYSTEM\CurrentControlSet\Control\GraphicsDrivers
3. Right-click on GraphicsDrivers and select New > DWORD (32-bit) value.

4. Name this DWORD as TdrDelay then double-click on it and change it’s value to 8.
5. Click OK, and this will now allow the GPU 8 seconds to respond instead of the default 2 seconds.
6. Reboot your PC to save changes.
Recommended:
- Fix NVIDIA Control Panel Not Opening
- How To Fix Error 0x80004005 on Windows 10
- How to create a password reset disk in Windows 10
- Fix Windows Update Error 80070103
That’s it you have successfully Fix NVIDIA Kernel Mode Driver has stopped responding error but if you still have any queries regarding this post then feel free to ask them in the comment’s section.