
Java used to be a requirement for almost every PC, as so many applications, games, and pieces of software required it in order to run.
These days however, things are different, and Java isn’t quite as popular as it used to be.
So, this can lead you to wonder – is Java still even needed anymore, particularly if you’re running Windows 10 or 11? Or, can you get by just fine without keeping it installed?
In this article, I’ll cover everything that you need to know.
Is Java Necessary On Windows 10?
Java is only necessary if you are using software that relies on it in order to run.
If you aren’t using software, games or applications that require Java, then there is no need to download it to your computer.
While many people used to install Java straight away as soon as they setup a new PC, this isn’t really a requirement in the ‘Windows 10 era.’
Instead, you may simply leave it uninstalled until you actually end up using software that requires you to have it. When this happens, the software will likely notify you that you need to install Java, so you really don’t miss out on anything by waiting to install it until that point.
In a moment, I’ll be going over how you can check if you currently have it installed, what to do immediately if you wish to keep it, and how to uninstall it if you want to get rid of it.
How To Check If Java Is Currently Installed
Currently, there are a few ways to check if Java is installed on Windows 10, or Windows 11
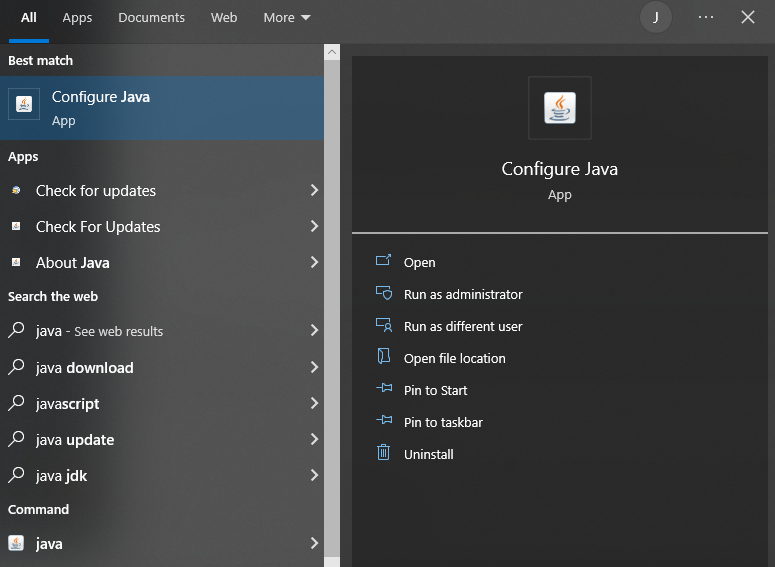
The first is to click on the Windows icon, at the bottom-left corner of your screen.
Then, type ‘Java’ into the search bar.
Under the ‘Best match’ section, you will see a Java app appear there. Additionally, you may see ‘java’ appear underneath the ‘Command’ section as well.
Alternatively, you can scroll down through your list of programs until you get to the ‘J’ section, and then see if a Java folder is there.
Another way to check that Java is installed, is to do it through the Windows command prompt.
To do this, follow these steps:
- Click the Windows icon in the bottom-left corner.
- Type ‘cmd’ into the search bar, and click on the result.
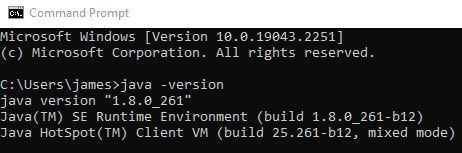
- Type java -version into the box, and press enter.
If Java is installed, you will see a picture similar to the one above, where it shows you your current Java installation and version number.
If you get a message stating, “‘java’ is not recognized as an internal or external command, operable program or batch file.” then you don’t currently have Java installed.
At this point, you have a choice to make – you can either uninstall Java immediately, or if you wish to keep Java, you should immediately check for updates to avoid security issues. Instructions for both will be found below!
How To Uninstall Java
If you no longer wish to have Java installed, uninstalling it is simple, and only takes a few moments.
To uninstall Java from your computer, follow these steps:
- Click the Windows icon in the bottom-left corner.
- Type ‘Control panel’ into the search bar, and click on the result.
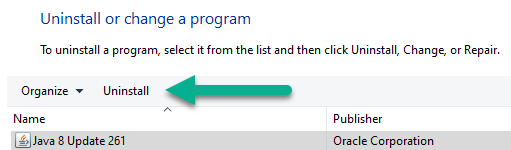
- On the window that pops up, click on ‘Uninstall a program’ underneath the ‘Programs’ section.
- Locate Java in your list of programs, and click on it.
- Click on the ‘Uninstall’ button located at the top of the window.
- Follow the on-screen instructions.
If you have multiple versions of Java listed here, you will need to uninstall each one of them before Java is completely removed from your system.
Can Java Be Safely Uninstalled?
When uninstalling a piece of software as large as Java, it can make you worry whether or not it’s safe.
So, what will actually happen if you remove Java from your system?
Truthfully, Java can be safely removed without any issues. The only thing that will happen is that any applications that required Java to run will no longer work, until you reinstall Java once again.
However, it only affects programs that require Java. The rest of your PC will continue to run normally without any issues, and it will not affect Windows at all.
Plus, you’ll stop getting those pesky requests for Java to update, which can constantly bother you if you ignore them!
Nothing about this process is irreversible, and you can always redownload Java from their website at any time.
How To Update Java On Your Windows Computer
If you do decide to keep Java, it’s important that you ensure that you’re keeping up with security updates.
Unfortunately, Java is prone to security issues, and Java is one attack vector used to infect PCs. While this has largely been taken care of (and isn’t nearly as prevalent as it was in the past), Java still pushes out important security updates when exploits become known.
So, by ensuring that your version of Java is up-to-date, you can protect yourself against threats.
To update Java, follow these steps:
- Click the Windows icon in the bottom-left corner.
- Scroll down through your programs until you reach ‘Java.’
- Open the folder, and click on ‘Check for updates.’ This will open the Java Control Panel.
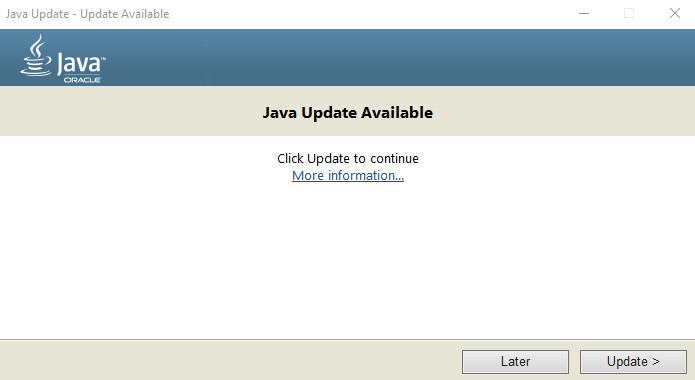
- On the ‘Update’ tab, click on the ‘Update Now’ button on the bottom of the window.
- On the box that pops up, click on ‘Update.’
- Follow the on-screen instructions.
The entire installation process only takes a few moments to complete. Once it’s done, congratulations! You’ll be running the latest, most secure version of Java available.
Conclusion
Because more applications are being developed that aren’t dependent on Java, it isn’t always necessary to keep around.
So, you can safely uninstall Java from your Windows 10 or Windows 11 computer should you wish to do so.
That being said, if you do decide to keep it, it’s important that you install updates as they become available to protect yourself against exploits.
I hope that you’ve found this article helpful, and that it’s answered all of your questions.
If you run into any issues or you have any other questions, please ask them below and I’ll be happy to help.
Wishing you the best,
– James McAllister
Title: Does Java Work on Windows 11?
Java, one of the most widely-used programming languages, has evolved significantly since its inception in 1995. As an operating system, Windows has transitioned through various iterations, with Windows 11 being the latest version released by Microsoft in October 2021. With the rise of Windows 11, many developers and users are concerned about the compatibility and functionality of Java on this new platform.
In this article, we’ll explore Java’s compatibility with Windows 11, its installation process, required system configurations, potential issues, and how these problems can be resolved. Furthermore, we will analyze the benefits of using Java on Windows 11 and discuss some relevant tips for developers and users.
Understanding Java
Java is an object-oriented programming language designed with a focus on portability and the ability to run on any device that supports the Java Virtual Machine (JVM). It enables developers to create applications across different platforms without needing to rewrite code for each specific operating system. This «write once, run anywhere» paradigm is one of the reasons for Java’s enduring popularity.
Windows 11: An Overview
Windows 11 was announced with numerous updates and new features aimed at enhancing user experience and productivity. It introduces a new aesthetic, an updated Start Menu, virtual desktops, Snap layouts, optimized gaming features, and improved security—elements that make it an attractive platform for users and developers alike.
Does Java Work on Windows 11?
Yes, Java works on Windows 11. As of its launch, Java Development Kit (JDK) and Java Runtime Environment (JRE) were compatible with Windows 11. Oracle and other JDK providers confirmed their support and readiness for the new operating system. The adaptation process for Java to new Windows environments has typically been smooth due to Java’s inherent nature of being platform-independent.
Required System Specifications for Running Java on Windows 11
To ensure Java runs smoothly on Windows 11, the system should meet the following minimum specifications:
- Processor: 1 GHz or faster with a compatible 64-bit processor.
- Memory: At least 4 GB of RAM (8 GB or more is recommended for optimal performance).
- Storage: Sufficient hard disk space for installation (the Java Development Kit can occupy several hundreds of megabytes).
- Graphics: DirectX 12 compatible graphics / WDDM 2.x.
- Operating System: A 64-bit version of Windows 11.
Installing Java on Windows 11
Installing Java on Windows 11 can be accomplished in a few straightforward steps. For both beginner and seasoned developers, it is essential to download the latest version of the JDK or JRE to leverage the latest features and functions. Here’s how you can do it:
-
Download Java:
- Head to the official Oracle website or an alternative JDK provider, such as AdoptOpenJDK or OpenJDK.
- Select the appropriate version for Windows 11, typically the latest release of the JDK.
-
Run the Installer:
- Once downloaded, double-click the installer (.exe) file.
- Follow the prompts in the installer’s wizard. You can choose the default installation path or customize it as needed.
-
Environment Variables Configuration:
- Post-installation, it is crucial to set up environment variables.
- Open the Start Menu, search for “Environment Variables”, select “Edit the system environment variables”, and click on “Environment Variables…”.
- Under “System variables”, find and select the “Path” variable, click “Edit,” and then “New”. Add the path to your JDK’s
bindirectory (e.g.,C:Program FilesJavajdk1.x.xbin).
-
Verify the Installation:
- Open Command Prompt by typing «cmd» in the Start Menu search bar.
- Check if Java is successfully installed by typing
java -versionandjavac -version. If installed correctly, the output should display the Java version.
Potential Issues Encountered While Using Java on Windows 11
While Java does function well on Windows 11, there could be some potential issues and incompatibilities that users may encounter:
-
Installation Errors: Similar to any software installation, users sometimes face issues during Java installation. Common errors include interrupted downloads or corrupted files. Checking internet connections and ensuring the installer file is intact usually helps rectify this.
-
Environment Variable Misconfiguration: Incorrectly set environment variables can lead to the inability to run Java commands in the command line. Ensuring that the Path variable in Environment Variables is set correctly is crucial.
-
IDE Compatibility: Integrated Development Environments (IDEs) such as Eclipse, IntelliJ IDEA, or NetBeans may require newer versions or updates to be fully compatible with Windows 11. Always check for the latest IDE versions.
-
Performance Issues: Users may experience performance hiccups when running Java applications on Windows 11, particularly without a sufficient amount of RAM or an adequate CPU. Upgrading hardware may be necessary in such cases.
-
Third-party Libraries: Some specific Java libraries or frameworks might not be immediately updated for Windows 11 compatibility. This situation is often temporary, as the developer community is quick to provide updates.
Benefits of Using Java on Windows 11
Java’s presence on Windows 11 offers various advantages:
-
Enhanced User Interface: Windows 11 provides a modern user interface with visual enhancements that improve the overall development experience.
-
Performance Improvements: Windows 11 is designed to utilize the latest hardware more effectively, resulting in faster application performance when running Java applications.
-
Integrated Development Tools: IDEs and development tools work seamlessly on Windows 11, ensuring an efficient workflow for developers coding in Java.
-
Updated Security Features: With a heightened focus on security, Windows 11 offers features like hardware-based isolation and secure booting, providing a safer environment for Java applications, especially those in production.
Tips for Developers Using Java on Windows 11
Here are some best practices and tips for Java developers working on Windows 11:
-
Regular Updates: Always keep Java and your IDE updated to the latest versions to benefit from security patches, bug fixes, and improvements.
-
Use Virtual Environments: Consider using containerization tools such as Docker to create isolated environments for Java applications, which can help avoid compatibility issues with libraries and dependencies.
-
Monitor Performance: Use Windows Task Manager or other performance monitoring tools to keep an eye on resource usage when running Java applications. Optimizing memory and CPU usage can mitigate any performance-related problems.
-
Backup your Work: Utilize version control systems like Git for your projects. This system provides a safety net when developing on new platforms like Windows 11 by allowing you to revert to previous versions if needed.
-
Explore New Features: Take advantage of new features in Java itself, such as a cleaner syntax with Java 17’s latest LTS (Long Term Support) version, to make your code more efficient and readable.
Conclusion
The arrival of Windows 11 marks a new chapter in the evolution of Microsoft’s operating systems, bringing several enhancements tailored for both casual users and developers. Java, being a robust and popular programming language, works seamlessly on Windows 11, allowing programmers to develop cross-platform applications without a hitch.
Despite a few potential challenges, understanding how to navigate them, coupled with the advantages provided by this new OS, enables developers to leverage the full potential of Java in their endeavors. With ongoing support from Java’s maintainers and a vibrant community, Java’s compatibility with newer operating systems will continue to flourish, ultimately benefiting the vast landscape of software development.
Embrace the opportunity that Windows 11 presents, prepare for potential challenges, and you’ll find that using Java in this new environment can lead to innovative and successful projects. Whether you are a seasoned pro or a beginner, Windows 11 offers an inviting platform to develop state-of-the-art Java applications.
-
Windows Support Forums
-
Apps and Software
You should upgrade or use an alternative browser.
Solved Do I really need java?
-
Thread starter
Thread starterrfhar
-
Start date
Start date
- Local time
- 2:09 PM
- Posts
- 93
- OS
- Win 11 home 23H2
-
-
#1
I have had Java on my computer for years but do not know why. With the latest update it will not; first it was error 1602 and now it is “Can not determine a valid Java home”. I do not game nor know any other reason for Java. As such if there is no reason for me to have it, I will be happy to rid of Java.
What say?
My Computer
-
- OS
- Win 11 home 23H2
- Computer type
- PC/Desktop
- Manufacturer/Model
- Custom
- CPU
- 3.6 Mhz Intel Core i7 Core i7-9700K
- Motherboard
- Asus Prime Z390-A Motherboard
- Memory
- GSKILL Ripjaws 16GB DDR4 Memory
- Graphics Card(s)
- Gigabyte GeForce GTX 1050i Graphics
- Sound Card
- MoBo
- Monitor(s) Displays
- HP M22fFHD monitor
- Screen Resolution
- 1920 x 1080
- Hard Drives
- SHGP-31-1000GM SSD
SAMSUNG 850 PRO 2.5″ 256GB SSD
1 Tetra Seagate ST1000DX001-1NS162
Exterior Gotega CD/DVD
- PSU
- 600 Watt power supply
- Case
- Fractal Design Meshify C case
- Cooling
- Cooler Master 120mm CPU Cooler
- Keyboard
- Iogi K540
- Mouse
- Logi 310Edge
- Internet Speed
- 7GB Down — — -IGB Up
- Browser
- Edge mostly lately
- Antivirus
- Windows
- Other Info
- Win11 ver 23H2 (OS Build 22361.3085
- Local time
- 2:09 PM
- Posts
- 1,343
- Location
-
Ohio, USA
- OS
- Windows 11 Pro 24H2
-
-
#2
My Computer
-
- OS
- Windows 11 Pro 24H2
- Computer type
- PC/Desktop
- Manufacturer/Model
- Intel NUC12WSHi7
- CPU
- 12th Gen Intel Core i7-1260P, 2100 MHz
- Motherboard
- NUC12WSBi7
- Memory
- 64 GB
- Graphics Card(s)
- Intel Iris Xe
- Sound Card
- built-in Realtek HD audio
- Monitor(s) Displays
- Dell U3219Q
- Screen Resolution
- 3840×2160 @ 60Hz
- Hard Drives
- Samsung SSD 990 PRO 1TB
- Keyboard
- CODE 104-Key Mechanical with Cherry MX Clears
- Antivirus
- Microsoft Defender
-
-
#3
My Computers
-
- OS
- Win11 Pro RTM
- Computer type
- Laptop
- Manufacturer/Model
- Dell Vostro 3400
- CPU
- Intel Core i5 11th Gen. 2.40GHz
- Memory
- 12GB
- Hard Drives
- 256GB SSD NVMe M.2
-
- Operating System
- Windows 11 Pro RTM x64
- Computer type
- PC/Desktop
- Manufacturer/Model
- Dell Vostro 5890
- CPU
- Intel Core i5 10th Gen. 2.90GHz
- Memory
- 16GB
- Graphics card(s)
- Onboard, no VGA, using a DisplayPort-to-VGA adapter
- Monitor(s) Displays
- 24″ Dell
- Hard Drives
- 512GB SSD NVMe, 4TB Seagate HDD
- Browser
- Firefox, Edge
- Antivirus
- Windows Defender/Microsoft Security
- Local time
- 12:09 PM
- Posts
- 655
- OS
- Linux Mint
-
-
#4
Get-ChildItem -Path C:\ -Recursive -Include *.jar -ErrorAction SilentlyContinueAlthough this isn’t going to cover Java apps with exe wrappers and also some Java apps will have their own copy of the java compiler pre-packaged
My Computer
-
- OS
- Linux Mint
- Computer type
- Laptop
- Manufacturer/Model
- System76 Lemur Pro
- Local time
- 2:09 PM
- Posts
- 93
- OS
- Win 11 home 23H2
-
-
#5
A quick and dirty check in PowershellGet-ChildItem -Path C:\ -Recursive -Include *.jar -ErrorAction SilentlyContinueAlthough this isn’t going to cover Java apps with exe wrappers and also some Java apps will have their own copy of the java compiler pre-packaged
this is what I get as an answer:
PS C:\Users\Ronz> Get-ChildItem -Path C:\ -Recursive -Include *.jar -ErrorAction SilentlyContinue
Get-ChildItem : A parameter cannot be found that matches parameter name ‘Recursive’.
At line:1 char:25
+ Get-ChildItem -Path C:\ -Recursive -Include *.jar -ErrorAction Silent …
+ ~~~~~~~~~~
+ CategoryInfo : InvalidArgument: (:) [Get-ChildItem], ParameterBindingException
+ FullyQualifiedErrorId : NamedParameterNotFound,Microsoft.PowerShell.Commands.GetChildItemCommand
What did I do wrong?
My Computer
-
- OS
- Win 11 home 23H2
- Computer type
- PC/Desktop
- Manufacturer/Model
- Custom
- CPU
- 3.6 Mhz Intel Core i7 Core i7-9700K
- Motherboard
- Asus Prime Z390-A Motherboard
- Memory
- GSKILL Ripjaws 16GB DDR4 Memory
- Graphics Card(s)
- Gigabyte GeForce GTX 1050i Graphics
- Sound Card
- MoBo
- Monitor(s) Displays
- HP M22fFHD monitor
- Screen Resolution
- 1920 x 1080
- Hard Drives
- SHGP-31-1000GM SSD
SAMSUNG 850 PRO 2.5″ 256GB SSD
1 Tetra Seagate ST1000DX001-1NS162
Exterior Gotega CD/DVD
- PSU
- 600 Watt power supply
- Case
- Fractal Design Meshify C case
- Cooling
- Cooler Master 120mm CPU Cooler
- Keyboard
- Iogi K540
- Mouse
- Logi 310Edge
- Internet Speed
- 7GB Down — — -IGB Up
- Browser
- Edge mostly lately
- Antivirus
- Windows
- Other Info
- Win11 ver 23H2 (OS Build 22361.3085
- Local time
- 2:09 PM
- Posts
- 1,343
- Location
-
Ohio, USA
- OS
- Windows 11 Pro 24H2
-
-
#6
My Computer
-
- OS
- Windows 11 Pro 24H2
- Computer type
- PC/Desktop
- Manufacturer/Model
- Intel NUC12WSHi7
- CPU
- 12th Gen Intel Core i7-1260P, 2100 MHz
- Motherboard
- NUC12WSBi7
- Memory
- 64 GB
- Graphics Card(s)
- Intel Iris Xe
- Sound Card
- built-in Realtek HD audio
- Monitor(s) Displays
- Dell U3219Q
- Screen Resolution
- 3840×2160 @ 60Hz
- Hard Drives
- Samsung SSD 990 PRO 1TB
- Keyboard
- CODE 104-Key Mechanical with Cherry MX Clears
- Antivirus
- Microsoft Defender
- Local time
- 2:09 PM
- Posts
- 252
-
-
#7
I’ve not installed Java for years, and none of my programs seem to require it.
TM
My Computer
- Local time
- 2:09 PM
- Posts
- 1,382
- Location
-
USA
- OS
- Windows 11 Pro
-
-
#8
The short, unhelpful, answer is that you only need it if you have an application that requires it. You can uninstall it, and if you run across an application that needs it, it will let you know. Then you can re-install it.
This.
Also its a huge security risk, so if a program does need it, try to find a more modern alternative.
Edit: I am talking about the java program itself, not the ones baked into other software.
Last edited:
My Computers
-
- OS
- Windows 11 Pro
- Computer type
- PC/Desktop
- Manufacturer/Model
- Custom Built
- CPU
- Ryzen 7 5700 X3D
- Motherboard
- MSI MPG B550 GAMING PLUS
- Memory
- 64 GB DDR4 3600mhz Gskill Ripjaws V
- Graphics Card(s)
- RTX 4070 Super , 12GB VRAM Asus EVO Overclock
- Monitor(s) Displays
- Gigabyte M27Q (rev. 2.0) 2560 x 1440 @ 170hz HDR
- Hard Drives
- 2TB Samsung nvme ssd
2TB XPG nvme ssd
- PSU
- CORSAIR RMx SHIFT Series™ RM750x 80 PLUS Gold Fully Modular ATX Power Supply
- Case
- CORSAIR 3500X ARGB Mid-Tower ATX PC Case – Black
- Cooling
- ID-COOLING FROSTFLOW X 240 CPU Water Cooler
- Internet Speed
- 900mbps DOWN, 100mbps UP
-
- Operating System
- Chrome OS
- Computer type
- Laptop
- Manufacturer/Model
- HP Chromebook
- CPU
- Intel Pentium Quad Core
- Memory
- 4GB LPDDR4
- Monitor(s) Displays
- 14 Inch HD SVA anti glare micro edge display
- Hard Drives
- 64 GB emmc
- Local time
- 7:09 PM
- Posts
- 4,539
- OS
- Win 11 Home & Pro
-
-
#9

My Computers
-
- OS
- Win 11 Home & Pro
- Computer type
- Laptop
- Manufacturer/Model
- ASUS Vivobook
- CPU
- AMD Ryzen™ 7 7730U
- Motherboard
- M1605YA
- Memory
- 15.0GB Dual-Channel DDR4 @ 1596MHz (22-22-22-52)
- Graphics Card(s)
- 512MB ATI AMD Radeon Graphics (ASUStek Computer Inc)
- Monitor(s) Displays
- Generic PnP Monitor (1920×1200@60Hz) — P1 PLUS (1920×1080@59Hz)
- Screen Resolution
- 1920 X 1200
- Hard Drives
- 953GB Western Digital WD
- PSU
- 45 Watts
- Mouse
- Lenovo Bluetooth.
- Internet Speed
- 500 Mbps
- Browser
- Edge
- Antivirus
- Defender
-
- Operating System
- Windows 11
- Computer type
- Laptop
- Manufacturer/Model
- ACER NITRO
- CPU
- AMD Ryzen 7 5800H / 3.2 GHz
- Motherboard
- CZ Scala_CAS (FP6)
- Memory
- 32 GB DDR4 SDRAM 3200 MHz
- Graphics card(s)
- NVIDIA GeForce RTX 3060 6 GB GDDR6 SDRAM
- Sound Card
- Realtek Audio. NVIDIA High Definition Audio
- Monitor(s) Displays
- 15.6″ LED backlight 1920 x 1080 (Full HD) 144 Hz
- Screen Resolution
- 1920 x 1080 (Full HD)
- Hard Drives
- Samsung 970 Evo Plus 2TB NVMe M.2
- PSU
- 180 Watt, 19.5 V
- Mouse
- Lenovo Bluetooth
- Internet Speed
- 500 Mbps
- Browser
- Edge
- Antivirus
- Defender
- Local time
- 2:09 PM
- Posts
- 93
- OS
- Win 11 home 23H2
-
-
#11
My Computer
-
- OS
- Win 11 home 23H2
- Computer type
- PC/Desktop
- Manufacturer/Model
- Custom
- CPU
- 3.6 Mhz Intel Core i7 Core i7-9700K
- Motherboard
- Asus Prime Z390-A Motherboard
- Memory
- GSKILL Ripjaws 16GB DDR4 Memory
- Graphics Card(s)
- Gigabyte GeForce GTX 1050i Graphics
- Sound Card
- MoBo
- Monitor(s) Displays
- HP M22fFHD monitor
- Screen Resolution
- 1920 x 1080
- Hard Drives
- SHGP-31-1000GM SSD
SAMSUNG 850 PRO 2.5″ 256GB SSD
1 Tetra Seagate ST1000DX001-1NS162
Exterior Gotega CD/DVD
- PSU
- 600 Watt power supply
- Case
- Fractal Design Meshify C case
- Cooling
- Cooler Master 120mm CPU Cooler
- Keyboard
- Iogi K540
- Mouse
- Logi 310Edge
- Internet Speed
- 7GB Down — — -IGB Up
- Browser
- Edge mostly lately
- Antivirus
- Windows
- Other Info
- Win11 ver 23H2 (OS Build 22361.3085
Similar threads
-
Windows Support Forums
-
Apps and Software
Java is one of the most-used programming languages to date. For that reason, many applications written in Java require the Java Runtime Environment (JRE) to be installed on your Windows 11 computer to be able to run.
This article illustrates how you can install Java on a Windows 11 computer, and how to remove it if and when required. Moreover, it also illustrates how to create the environmental variable for Java in Windows 11.
Table of Contents
How to check the Java version on Windows 11
Before we tell you how to install Java, we must first check whether Java is already installed on your computer or not. If so, what is its version?
Follow the steps below to check the installation or version of Java:
- Launch the Command Prompt with administrative privileges.
- Type in java -version to check whether java is installed on your computer or not.
If the command returns “java is not recognized as an internal or external command, operable program or batch file,” it means that Java is not installed on your system.

However, if it is installed, you will see its version written in the Command Prompt, as in the image below:

Install Java on Windows 11
Installing Java on your computer is not that difficult. We have discussed how you can install it on your Windows 11 device. However, the process is pretty much the same across all Windows versions.
Java can also be installed on Linux and MacOS platforms, but the packages/files to install it will be different for each platform.
Follow the steps below to install the latest version of Java on Windows 11:
- Open the Java downloads page for Windows and click on the download link for x64 Installer.

- A JDK file will now begin to download (which includes JRE). Once it does, click on it to execute. If prompted with a User Access Control (UAC), click Yes.
- The Java installation wizard will now run. Click Next on the first screen.

- On the next screen, click Next again. The installation will now begin at the default path set by the wizard.
- Java installation will be completed within a minute or two. Once it is done, click Close.


Java should now be successfully installed on your Windows 11 device. You can confirm this by running the java -version command in Command Prompt again, as discussed in the previous section of this post.
Create Environmental Variable for Java on Windows 11
Environmental paths in Windows allow a user for any file to be recognized anywhere within the system. This means you can then execute a .exe file (or any other file) from anywhere within the directory, rather than having to navigate to a directory and only then be able to use it.
Before we begin, you must first know the complete path to where Java’s latest version has been installed as it will be needed later when configuring the environmental variable. The installation path by default is C:\Program Files\Java\JavaVersion (where JavaVersion is a folder named with the Java version). Since we have installed JDK 17.0.1, the complete path for Java on our device is C:\Program Files\Java\jdk-17.0.1:

Now that you know the complete path, follow the guide below to create a Java environmental path:
- Open the System Properties window on your computer by typing in sysdm.cpl in Run.

- In the System Properties window, switch to the Advanced tab and then click the Environment Variables button at the bottom.

- Now click on New under the System variables window.

- In the New System Variable window, enter the following corresponding details:
Variable Name: JAVA_HOME
Variable Value: C:\Program Files\Java\jdk-17.0.1
Variable Name is the path to the installation folder determined earlier. Click OK when done.
- Click OK again on the Environmental Variables as well as the System Properties window to close them.


You have now successfully created the Java environmental variable on your Windows 11 device. You can further manipulate this variable by changing the Variable Value to run an older version of Java (if already installed).
Furthermore, you can also delete the variable by selecting it from under the System Variables list in the Environmental Variables window and then clicking Delete.

How to Uninstall Java on Windows 11
You can also remove Java from your Windows 11 device just as easily, if and when you no longer need it. Here’s how:
- Open the Programs and Features page in the Control Panel by typing in appwiz.cpl in Run.
- Now double-click the Java Development Kit that you want to remove from your device. If prompted for a confirmation, click Yes.


Java will now remove itself from your computer with no restart required.
FAQs
Can Java be installed on Windows 11?
Yes, Java is fully compatible with Windows 11.
Where is Java installed?
The default location for the Java installation is C:\Program Files\Java
Is it safe to uninstall Java?
Yes, removing Java from your device will have no negative effect. However, it is not recommended as most apps and programs need Java to run.
How to install Java without signing in to Oracle?
You can head directly to the Oracle download page on the following link and download Java without having to sign in:
https://www.oracle.com/java/technologies/downloads/
What is the difference between JDK and JRE?
JRE is a piece of software that is installed on your computer that allows you to run applications developed in Java on your device, whereas JDK is a development kit used by developers. JDK includes both JRE and JVM.
Step-by-step guide to installing JRE on Windows 11.
Published
6 min read
How to Install Java Runtime Environment on Windows 11
Java is one of the most widely-used programming languages and platforms, primarily known for its object-oriented capabilities and platform independence. To run Java applications, you need to install the Java Runtime Environment (JRE) on your system. This article provides a detailed guide on how to install JRE on Windows 11.
What is Java Runtime Environment (JRE)?
The Java Runtime Environment (JRE) is a set of software tools designed to allow the execution of Java applications. It includes the Java Virtual Machine (JVM), core libraries, and other components necessary to run Java programming but does not include development tools like a compiler. While the JRE allows users to run Java applications, the full Java Development Kit (JDK) is needed for developing applications.
System Requirements
Before diving into the installation process, ensure your system meets the following requirements:
- Operating System: Windows 11 or supported versions of Windows.
- Processor: Fast processor such as Intel 64-bit or AMD64.
- Memory: Minimum of 512 MB of RAM recommended, 1 GB or higher preferred.
- Disk Space: At least 300 MB of free disk space for the JRE installation.
Steps to Install JRE on Windows 11
Step 1: Download JRE
-
Visit the Official Java Website:
Navigate to the official Oracle website or an alternative trusted source where the JRE can be downloaded. The official link for Oracle’s JRE is:
Oracle JRE Download -
Select the Correct Version:
Choose the JRE version suitable for your applications. Keep in mind that newer versions may offer enhanced security features, performance improvements, and bug fixes. -
Download the JRE Installer:
On the download page, you will typically see links for different operating systems. Look for the Windows x64 Installer if your device is 64-bit, which is common for Windows 11. Click the download link. -
Accept License Agreement:
Before downloading, you may need to accept the Oracle License Agreement. Make sure to read the terms and conditions. Once accepted, proceed to download.
Step 2: Run the JRE Installer
-
Locate the Downloaded File:
After the download completes, find the installer file in your Downloads folder or the location where you saved it. The file name usually ends with.exe. -
Launch the Installer:
Double-click the installer file to start the installation process. If prompted by Windows Security, confirm that you want to run the file. -
User Account Control Prompt:
A User Account Control dialog may appear, asking if you want to allow this app to make changes to your device. Click “Yes” to proceed.
Step 3: Installation Process
-
Installation Wizard:
The Java installation wizard will appear. You will be greeted with a welcome screen. Click on the “Next” button. -
Select Installation Path:
The wizard will default to the installation directory for JRE, usuallyC:Program FilesJavajreX(where “X” represents the version number). You can either accept the recommended location or change it as desired. Click “Next” to continue. -
Choose Features to Install:
The installer may give you options to select specific features. By default, all necessary components are selected for installation. Proceed by clicking “Next.” -
Begin Installation:
The installation process will begin. Wait for the installer to copy and set up files on your system. This process usually takes a few minutes. -
Finish Installation:
Once the installation is completed, you will see a confirmation screen. You can choose to check for updates or install additional components like Microsoft Visual C++ Redistributable, but these are optional. Click “Close” to finish the installation.
Step 4: Set Up Environment Variables
Setting up environment variables is an essential step to ensure that the Java environment is correctly recognized and can be run from the command line.
-
Open System Properties:
Right-click on the Start button and select “System.” Alternatively, you can use Win + I to open Settings. -
Access Advanced System Settings:
Click on “Advanced system settings” located on the left sidebar. This will open the System Properties dialog. -
Environment Variables:
Click on the “Environment Variables” button found at the bottom of the System Properties dialog. -
Add New System Variable:
In the Environment Variables window, under the “System variables” section, click on “New.” Enter the following details:- Variable Name:
JAVA_HOME - Variable Value: The path to your JRE installation (e.g.,
C:Program FilesJavajreX)
Click “OK” to confirm.
- Variable Name:
-
Update the PATH Variable:
Still under the “System variables” section, scroll down to find thePathvariable and select it. Click on “Edit.” In the Edit Environment Variable dialog, click “New” and add%JAVA_HOME%binto the list. Click “OK” to save changes. -
Close All Settings:
Once done, continue to click “OK” on all open dialogs to close them and apply the changes.
Step 5: Verify the Installation
To confirm that the JRE installation was successful and that the environment variables are set correctly, you need to check via the Command Prompt.
-
Open Command Prompt:
PressWin + R, typecmd, and hit Enter to open the Command Prompt. -
Check Java Version:
In the Command Prompt, type the following command and press Enter:java -version -
Interpret the Output:
If installed correctly, you will see information about the installed JRE version. For example, the output may display:java version "1.8.0_291" Java(TM) SE Runtime Environment (build 1.8.0_291-b10) Java HotSpot(TM) 64-Bit Server VM (build 25.291-b10, mixed mode)If you receive an error message or a message indicating that the command is not recognized, revisit the previous steps, especially the environment variable configurations.
Common Installation Issues
In some cases, users may face issues during the installation process. Here are some common problems and their solutions:
-
Windows Security Exception:
You may encounter a warning from Windows Defender or a similar security feature when trying to run the installer. Ensure you downloaded the installer from a trusted source. If the warning persists, you can usually proceed by clicking “More info” and then “Run anyway.” -
Insufficient Permissions:
If you receive an error message about permissions, make sure you are logged in as an administrator or that you right-clicked the installer and selected ‘Run as administrator.’ -
Missing Environment Variables:
If Java commands do not work in the Command Prompt, double-check theJAVA_HOMEandPathvariable settings. It’s easy to miss a typo or to forget to include thebinat the end of thePathvariable. -
Java Version Conflicts:
If an older version of Java is installed on your system, it may conflict with the newly installed JRE. Consider uninstalling old versions from “Add or Remove Programs” in Windows Settings.
Conclusion
Installing Java Runtime Environment on Windows 11 is a straightforward process if you follow the steps outlined in this guide. With Java runtime set up correctly, you can now run Java applications seamlessly. Keeping your JRE updated is also crucial for ensuring that you have the latest features and security updates. Regularly check for updates on the official Oracle website or configure notifications to help keep your installation current.
Whether you’re a developer, a gamer, or simply someone who wants to run Java applications, having the JRE installed is essential. This guide serves as a foundation, enabling you to dive deeper into the world of Java programming and application use.
Feel free to reach out to communities and forums if you encounter difficulties or seek advanced topics related to Java and its vast ecosystem. Happy programming!