
О новых возможностях служб каталогов Windows Server 2008 говорят и пишут много, в том числе о контроллерах домена только для чтения (RODC), подробных политиках паролей (FGPP) и расширенном аудите. Но порой самые существенные улучшения в новой операционной системе происходят от изменений, кажущихся на первый взгляд незначительными. Хотя к каждому экземпляру Active Directory (AD) предъявляются некоторые общие требования (например, безопасность, администрирование, резервное копирование), для достижения этих целей используется почти столько способов, сколько существует экземпляров AD.
Улучшения, внесенные разработчиками Server 2008 в Ntdsutil, утилиту командной строки, используемую администраторами для обслуживания AD, не столь широко известны, но их ценность не меньше, чем многих активно рекламируемых функций. В Server 2008 появилось шесть новых функций Ntdsutil различной степени важности: Snapshot, Activate Instance, DS Behavior, Local Roles, Partition Management и Install from Media (IFM). В данной статье я подробно расскажу о каждом компоненте и о том, чем он может быть полезен в той или иной ситуации.
Snaphot
Snapshot (или Active Directory Database Mounting Tool) представляет собой команду Ntdsutil для получения моментального снимка базы данных AD вместе со всеми объектами и атрибутами. Моментальные снимки в сочетании с восстановлением «помеченных на удаление» можно использовать для быстрого восстановления удаленных объектов AD и их атрибутов. Раньше если важный объект AD, такой как организационная единица (OU), оказывался случайно удаленным, администратору приходилось выполнять принудительное восстановление. Для этого требовалось перевести производственный контроллер домена (DC) в автономный режим, подключить резервную копию на магнитной ленте или диске, выполнить непринудительное восстановление с резервной копии, выбрать восстанавливаемые объекты с помощью команды принудительного восстановления Ntdsutil и перезагрузить DC. Кроме того, иногда требовалось восстановить членство в группе. Весь процесс отнимал очень много времени.
Восстановление «помеченных на удаление» (tombstone), впервые примененное в Windows Server 2003, — способ вернуть удаленный объект из контейнера DeletedObjects в первоначальное местонахождение. Но удаленный объект (или «помеченный на удаление») лишается большинства значений атрибутов, поэтому восстановление не приносит особой пользы до тех пор, пока атрибутам не возвращены их значения. Например, если объект пользователя удален, а затем восстановлен, то атрибуты MemberOf и password окажутся пустыми.
Системные администраторы и поставщики реализовали различные методы сохранения этих данных и сопоставления их удаленному объекту, чтобы ускорить процесс восстановления. При удалении объектов пользователя пароль также отбрасывается, что может привести к серьезным затруднениям, если потребуется восстановить много пользовательских объектов и сформировать новые пароли. Можно использовать разряд 3 (0x00000008) атрибута SearchFlags объекта attributeSchema, чтобы указать атрибуты, сохраняемые в объекте «помеченный на удаление» (в том числе пароль). Дополнительные сведения о восстановлении объектов, помеченных на удаление, можно найти в статье TechNet «Reanimating Active Directory Tombstone Objects» по адресу www.microsoft.com/technet/technetmag/issues/2007/09/Tombstones/default.aspx. Моментальный снимок содержит все объекты и атрибуты каталога на момент выполнения снимка, поэтому, имея моментальный снимок каталога до удаления объекта, можно увидеть и извлечь все его атрибуты, а затем применить их к восстановленному объекту. Моментальный снимок могут сделать члены группы Enterprise Admins или Domain Admins.
Предположим, что администратор случайно удалил объект пользователя для генерального директора. Атрибут SearchFlags был предусмотрительно изменен, чтобы сохранить пароль удаленного объекта, поэтому с помощью бесплатной программы восстановления «помеченных на удаление», такой как AD Tombstone Reanimation компании SDM Software (www.sdmsoftware.com/freeware), можно вернуть удаленный объект в первоначальное местонахождение. Затем нужно подключить соответствующий моментальный снимок, следуя указаниям в статье TechNet «Active Directory Domain Services Database Mounting Tool (Snapshot Viewer or Snapshot Browser) Step-by-Step Guide» по адресу technet.microsoft.com/en-us/library/cc753609.aspx, и извлечь важные атрибуты объекта с помощью такой утилиты, как AdMod компании Joeware (www.joeware.net/freetools/tools/admod). Готово! Случайно удаленный объект удалось восстановить, не прибегая к принудительному восстановлению. Естественно, этот процесс можно автоматизировать. В блоге Даррена Мар-Элиа «PowerShell Script to leverage AD Tombstone cmdlets» содержится ссылка на сценарий PowerShell для этой задачи, подготовленный Гвидо Грилленмейером (sdmsoftware.com/blog/2008/06/10/powershell-script-toleverage-ad-tombstone-cmdlets).
Получить моментальный снимок просто. Пользователю с административными правами следует открыть командную строку на DC и запустить Ntdsutil. Введите команду
activate instance ntds
чтобы выбрать экземпляр каталога для моментального снимка. Введите команду
create
чтобы получить моментальный снимок, как показано на экране 1.

DS Behavior
DS Behavior обеспечивает дополнительный уровень безопасности в Server 2008. По умолчанию службы Server 2008 Active Directory Domain Services (AD DS) не позволяют выполнять операции с паролем через незащищенное соединение. Благодаря DS Behavior можно обойти это ограничение с помощью команды
allow passwd op on unsecured connection
Несмотря на доступность данного варианта, как правило, предпочтительнее сохранить обычный уровень безопасности.
Local Roles
Функция Local Roles используется для локального определения членства в группах на контроллерах домена только для чтения (RODC). Контроллеры RODC обеспечивают истинное отделение административной роли, так как пользователям можно предоставить частично повышенные права (например, Administrators, Server Operators) на RODC, но ни в каком ином месте домена. Например, чтобы добавить JaneBranchOfficeAdmin к локальной группе Administrators контроллера RODC, запустите Ntdsutil из командной строки на RODC. Введите
local roles
Из меню локальных ролей введите
add JaneBranchOfficeAdmin Administrators
чтобы добавить Jane к роли локальных администраторов.
Partition Management
С помощью Partition Management можно создавать, перечислять, удалять и назначать задержку уведомлений о репликации для разделов приложений в домене или лесе AD. Разделы приложений также именуются недоменными контекстами именования — NDNC. Можно также перечислить DC, которые являются репликами, поддерживающими раздел приложения. Наконец, с помощью Partition Management можно управлять разделами в AD LDS.
Install from Media
IFM — дополнительный режим мастера создания контроллера домена DCPROMO (хотя термины IFM и Install From Media не встречаются в мастере нигде). С помощью IFM администраторы могут ввести новый DC в домен, используя резервную копию состояния системы для загрузки необходимых разделов каталогов в базу данных DC вместо того, чтобы делать это по сети. Если база данных большая, таким образом можно сэкономить много времени по сравнению с традиционным созданием контроллера по сети. Дополнительные сведения об использовании IFM для создания контроллеров доменов можно найти в статье Microsoft «How to use the Install from Media feature to promote Windows 2003-based domain controllers» по адресу support.microsoft.com/kb/311078.
Функция IFM появилась в Windows 2003, но стала частью Ntdsutil лишь в Server 2008. Компания Microsoft добавила IFM в Ntdsutil, проектируя компонент Windows Server Backup для замены старой утилиты NTBackup, применявшейся еще в Windows NT 3.5. Однако набор функций Windows Server Backup иной, нежели в NTBackup; администраторы, которым приходилось выполнять резервное копирование состояния системы на дисках, обнаружат, что Windows Server Backup требуется для этого больше времени и места. Резервная копия состояния системы Server 2008 также содержит системные файлы, защищенные с использованием Windows File Protection (WFP), наряду с базой данных AD и SYSVOL.
Изменение функциональности в Windows Server Backup и дополнительные требования RODC вынудили группу разработчиков Directory Services обеспечить возможность резервного копирования достаточной части DC (собственно базы данных и двух кустов реестра) для установки нового DC Server 2008 с носителя, а не через сеть. IFM обеспечивает именно это. Кроме того, IFM проще и быстрее, чем метод Windows 2003, так как не требуется выполнять резервное копирование, а затем восстановление из полученной резервной копии, чтобы получить необходимые файлы. Я лично был свидетелем невероятного сокращения времени DCPROMO с 19 часов (репликация по сети) до 10 минут (IFM).
В IFM существует четыре варианта: create full <имя резервной копии>, create SYSVOL full <имя резервной копии>, create RODC <имя резервной копии> и create SYSVOL RODC backup <имя резервной копии>. Эти команды, логически разделенные на две пары, выполняют две функции. «Полные» (full) варианты создают установочные носители для развертывания полноценного DC, а варианты RODC создают носители для контроллеров домена только для чтения. Различие в том, что в целях безопасности в вариантах RODC база данных AD отмечается как доступная только для чтения и очищаются атрибуты пароля. Если носитель IFM попадет в руки злоумышленника, то опасность будет не меньше, чем при овладении всем DC. При использовании варианта RODC безопасность IFM-носителя такая же, как у самого RODC. Если используется режим SYSVOL, то в набор включается содержимое общей папки SYSVOL. При таком методе увеличивается размер набора файлов, перемещаемого на будущий DC, но SYSVOL не требуется реплицировать через сеть.
IFM легко использовать в сценариях; можно задавать последовательность команд Ntdsutil в командной строке или в сценарии. В следующем примере создается полная резервная копия IFM, без SYSVOL, в папке с именем backup:
ntdsutil "active instance ntds" ifm
"create full backup" quit quit
Результат выполнения команды приведен на экране 2. Заменить «test» на переменную несложно.
Использовать IFM для создания контроллеров домена удобно, но главное достоинство команды в быстром восстановлении DC после отказа в производственной обстановке. Чаще всего реальные отказы связаны с операционной системой, а не AD. В таком случае необходимо восстановить как операционную систему, так и базу данных AD. В Server 2008 применяется три метода для восстановления операционной системы и базы данных AD. Традиционный метод заключается в восстановлении системы с накопителей. В Server 2008 нет встроенной функции для этого метода, но можно задействовать сторонний продукт. Можно также использовать Windows Server Backup для восстановления с применением Windows Complete PC Backup. Из-за отказа ОС восстановить состояние системы не удастся. Наконец, можно пропустить процесс восстановления и просто перестроить и заново развернуть DC.
В случае отказа DC самое важное — как можно быстрее восстановить работоспособность DC. Вторая задача — определить причину отказа. Если требуется быстро восстановить работоспособность, восстановление с магнитной ленты может занять слишком много времени: необходимо повторно установить операционную систему, запустить программу резервного копирования, восстановить систему и перезагрузиться. Восстановление с помощью Windows Complete PC Backup гораздо быстрее: достаточно загрузиться с установочного компакт-диска Server 2008, выбрать режим Repair my computer и восстановить все тома, содержащие важные системные данные. Однако этот процесс может быть длительным, если база данных AD и файлы журналов распределены по разным разделам. Кроме того, набор резервных копий должен быть доступен на локальном разделе или жестком диске USB. Если набор находится на локальном разделе, этот раздел должен быть выделен для Windows Server Backup, так как программа переформатирует и полностью использует раздел. При обновлении контроллеров домена до уровня Server 2008 придется потратить некоторые усилия на планирование и изменение разделов, но в целом процесс несложен, так как размеры современных жестких дисков превышают любые потребности DC.
Рекомендуется третий подход: пропустите процесс восстановления и просто удалите и восстановите операционную систему на сервере, а затем присвойте ему статус DC с использованием метода IFM. Это самый быстрый способ восстановить DC после отказа. Процесс состоит из следующих этапов.
- Регулярно получайте резервные копии IFM локальной базы данных DC и направляйте их в раздел, не содержащий критических системных данных.
- В центре данных с DC держите наготове компакт-диск для автоматической установки. Дополнительные сведения об автоматической установке Windows 2003 и Server 2008 можно найти в статьях TechNet «How Unattended Installation Works» по адресу technet.microsoft.com/en-us/library/cc786944(WS.10).aspx и «Lite-Touch, High Volume Deployment» по адресу technet.microsoft.com/en-us/library/dd919179(WS.10).aspx.
- DC должен быть выделен для своей роли (за исключением службы DNS, интегрированной с AD).
-
Если происходит отказ или возникают иные проблемы с операционной системой на DC, устранение которых занимает более 15 минут, то:
a) Необходимо вставить компакт-диск и выполнить автоматическую установку операционной системы. Это может занять от 15 до 30 минут.
б) Пока идет переустановка, дежурный администратор DC должен выполнить чистку метаданных DC в AD. В процессе чистки метаданных удаляются данные AD, относящиеся к отказавшему DC, используемому в репликации. Когда роль DC понижается обычным способом, эта информация удаляется как часть процесса понижения. Но неисправный DC не проходит обычную процедуру, и эту информацию приходится удалять вручную. В Windows 2003 для очистки метаданных используется утилита Ntdsutil, как описано в статье TechNet «Clean up server metadata» по адресу technet.microsoft.com/en-us/library/cc736378(WS.10).aspx. В Server 2008 и Server 2008 R2 процедура упрощена; в статье TechNet «Clean Up Server Data (Windows Server 2008)» по адресу technet.microsoft.com/en-us/library/cc816907%28WS.10%29.aspx объясняется процесс использования оснасток Active Directory Users and Computers и Active Directory Sites and Services.
в) После завершения переустановки и настройки выполните развертывание IFM контроллера домена, указав резервные копии IFM в резервном разделе. Вся операция должна занимать не более 15 минут.
Новые возможности восстановления
Утилита Ntdsutil в составе Server 2008 дополнена несколькими новыми компонентами. Обратите внимание не только на их функции, но и на новые возможности восстановления, основу которых они обеспечивают. Даже небольшие улучшения AD могут принести огромную пользу.
Шон Дьюби (sdeuby@windowsitpro.com) — старший аналитик в компании Platform Vision с 25-летним стажем работы в области корпоративных информационных систем. Внештатный редактор Windows IT Pro, имеет звание MVP
Dig into the slew of Ntdsutil commands in Windows Server 2008 and R2 that provide admins with improved Active Directory management.
Part one reviewed the Ntdsutil utility in Windows Server 2008 and R2 and the changes made since Windows 2000. This article continues the discussion with a deeper look at some of the most useful Ntdsutil commands, with details on how they work and what they can do for administrators.
Let’s look at a more detailed breakdown of the Ntdsutil commands in Windows Server 2008 to help further your understanding of the tool’s capabilities.
Ntdsutil: Metadata cleanup
This option is easily the most commonly used of all Ntdsutil commands, at least in my experience. It has been around since Windows 2000 and provides operations to clean up Active Directory objects after a manual dcpromo operation. Ntdsutil metadata cleanup requires the use of the connections menu to connect to a domain controller.
Metadata cleanup also requires you to specify the site, domain, naming context and server to be defined in order to locate the object that is to be removed. This is specified in the Select operation target (SelOT) command in the metadata cleanup menu. For example, if I want to remove ATL-DC4 from the SelOT prompt, I can issue a “?” command and see the options, as shown in Figure 4.
Figure 4: Using the SelOT command (click to enlarge)
In order to select the site, domain and server, you must list each and get a “reference number” to use in the selected command. Here is how to do it:
- Use the List sites command:
select operation target: list sites
Found 6 site(s)
0 — CN=Alpharetta,CN=Sites,CN=Configuration,DC=Wtec, DC=adapps,DC=hp,DC=com
1 — CN=Brussels,CN=Sites,CN=Configuration,DC=Wtec,
DC=adapps,DC=hp,DC=com
2 — CN=Melbourne,CN=Sites,CN=Configuration,DC=Wtec,
DC=adapps,DC=hp,DC=com
3 — CN=Bracknell,CN=Sites,CN=Configuration,DC=Wtec,
DC=adapps,DC=hp,DC=com
4 — CN=Roseville,CN=Sites,CN=Configuration,DC=Wtec,
DC=adapps,DC=hp,DC=com
5 — CN=Site1,CN=Sites,CN=Configuration,DC=Wtec,
DC=adapps,DC=hp,DC=com
- Now issue the Select site command. The server we want is in site 1 – Brussels: select operation target: sel site 1 (Note that “1” is the reference number for Brussels in the List sites command.)The output shows:
Site —
CN=Brussels,CN=Sites,CN=Configuration,DC=Wtec,DC=adapps,DC=hp,DC=com
No current domain
No current server
No current Naming Context
- Repeat this process for the domain and server. Each time, use the list command (such as List domains), locate the reference number of the object you want to use and issue the Select domain (#) command. When you have completed this, you will see something like the example in Figure 5. It’s a bit hard to read, but in the end you will have the site, domain and server defined.
Figure 5: Sample outcome of SelOT command (click to enlarge)
-
To delete the selected server object, use Quit to move back to the Ntdsutil metadata cleanup menu. In that menu, issue the remove command:
Remove selected server
You will get a nice popup indicating the server you are about to remove, as shown in Figure 6. Be careful with this command, however, as you are manipulating objects in the Active Directory.
Figure 6: Server Remove Confirmation Dialog (click to enlarge)
Ntdsutil: Files
The Files command requires AD DS to be stopped. A few of the useful commands here include:
- Checksum — This performs a physical integrity check of the Jet database. Use this if you see database errors, especially in the event log. You’ll also see the semantic database checker in the main menu.
- Integrity — This is similar to Checksum, but runs different tests.
- Set default folder security — This command resets security on NTDS folders. This usually isn’t a problem unless you have accidentally messed with these folders and need to recover.
- Move logs to %S and Move DB to %S — These commands allow movement of a database and logs to a different path.
While these aren’t everyday commands, the Integrity and Checksum options are handy if you see database errors pop up in the event logs. You can combine these with the semantic database check, which tests database consistency.
Ntdsutil: Semantic database analysis
This very powerful command is actually quite simple to use. Anytime I see database errors reported in the event log, I run this check. There is really only one command I use with this option:
Semantic Checker: Go Fixup
This command does a full consistency check pretty quickly and, from my experience, has successfully repaired the database time after time. There are no guarantees that this will fix a given database problem, but it certainly won’t hurt anything. You can use it with the database repair options noted in the Ntdsutil: Files section above.
Ntdsutil: Group membership evaluation
This option dumps the security identifiers (SIDs) in the security token for a user or group. There are some old Resource Kit tools for this, but it’s nice to have it built into Ntdsutil. Using this requires the Set Global Catalog or Set Resource DC command to define the GC/DC to use for this operation.
Run Corp.com olseng
It will proceed through a five stage process and dump the results to C:\ olseng-20110217024622.tsv (for example) — a text file that contains all the security information.
Ntdsutil: Roles
This is the fastest way to view, seize and transfer Flexible Single Master Operations (FSMO) roles. Here are a few tips for using this command:
-
In the FSMO Maintenance (Roles) menu, go to the Connections menu to set the connection to the domain controller that you want to transfer the role to. This is important!
Connections: Connect to server Wtec-dc1
- Quit back to the FSMO Maintenance menu (see Figure 7)
Figure 7: FSMO Maintenance menu (click to enlarge)
- Figure 7 shows the options, which are pretty self explanatory.
-
To view all roles from Ntdsutil, go to the Select Operation Target menu and issue List Roles for Selected Server (see Figure 7). It’s not pretty but they are there. A cleaner way to see them is with the Netdom command:
Netdom Query Fsmo
-
To seize the PDC role to the currently connected domain controller, you can use:
Fsmo Maintenance: Seize PDC
Note that any seize operation will automatically try to do a transfer first. The nice thing about Ntdsutil is that you can manage all FSMO roles from one spot.
Ntdsutil: IFM
The Install From Media function is new in Windows Server 2008 and enables the building of a new domain controller with the dcpromo /ADV command much faster than in Windows 2003. Prior to this option, a backup of a DC was required, after which the restored files would be moved to the local media of the server to be promoted. The dcpromo /ADV command produces a prompt to use static restore files for initial promotion rather than going over the network. Figure 8 shows the IFM menu options, as well as an example of the creation of a full instance. Options included here are:
- Create Full AD instance with SYSVOL, Full instance without SYSVOL
- Create RODC instance with or without SYSVOL
Figure 8: Ntdsutil IFM snapshot (click to enlarge)
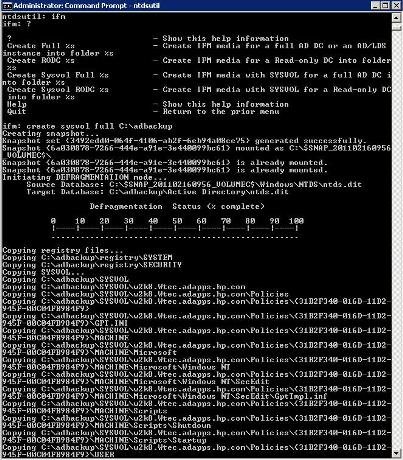
IFM creates a snapshot — defragging the database first — and stores it in a path of your choosing on the disk.
Create sysvol full c:\adbackup
In C:\adbackup, there will be three directories — Active Directory, Registry and SYSVOL — with the files to be used by dcpromo.
IFM makes it easy to get the Active Directory sources for installation from an existing DC as well as a simple copy to the server to be promoted (or re-promoted). This is very handy for promoting a server as a new or recovered DC. Once dcpromo finishes, replication will get it up to date. It is important to note that a read-only domain controller (RODC) instance can be created on a read/write DC, but only an RODC instance can be created from an RODC itself.
As you can see, Ntdsutil is very powerful. There are many more options available that I don’t have space here to discuss. Just remember that things like security, account management, partition management, LDAP policies and other options used for AD LDS partitions are all very handy commands, but Ntdsutil can also be very risky. It usually comes with warning messages to protect you from yourself. Just make sure you know what you are doing when you hit the Enter key.
Part one: Getting started with Ntdsutil
You can follow SearchWindowsServer.com on Twitter @WindowsTT.
ABOUT THE AUTHOR
Gary Olsen is a systems software engineer for Hewlett-Packard in Global Solutions Engineering. He authored Windows 2000: Active Directory Design and Deployment and co-authored Windows Server 2003 on HP ProLiant Servers. Gary is a Microsoft MVP for Directory Services and formerly for Windows File Systems.
Dig Deeper on IT operations and infrastructure management
-

How to work with the new Windows LAPS feature
By: Brien Posey
-
Directory Services Restore Mode (DSRM)
By: Rahul Awati
-
How to perform an AD group membership backup and restore
By: Mike Kanakos
-
Learn to adjust the AdminCount attribute in protected accounts
By: Mike Kanakos


Rumor has it that Microsoft is planning to do away with Ntdsutil.exe, a tool that has provided command-line access to a variety of Active Directory functions since Windows 2000. Ntdsutil has been invaluable throughout my experience with troubleshooting AD problems, yet I‘ve found very few admins that use it. This is despite the fact that Windows Server 2008 and R2 include a number of new options that enhance the usefulness of Ntdsutil even further.
Ntdsutil is very powerful, but it’s also dangerous. The problem with some Ntdsutil commands is that they require Active Directory to be taken offline. In Windows 2000 and 2003, this was accomplished by rebooting the domain controller (DC) and starting up in Directory Services Restore Mode (DSRM). This was the only way to run operations like the semantic database checker.
Rebooting a DC (twice) is not a desirable option, however, and it usually requires the operation to be performed during a maintenance window. While not recommended, this is fairly common practice, as booting into DSRM (essentially Safe Mode) takes everything offline.
Fortunately, Windows Server 2008 shipped with a wonderful new option for installing Active Directory as a service that can be taken offline (see Figure 1). Once Active Directory Domain Services (AD DS) is turned off, Ntdsutil can run the semantic database analysis options without a reboot.
Figure 1: Active Directory Domain Services
An introduction to Ntdsutil commands
So let’s take a look at the Windows Server 2008 and R2 versions of Ntdsutil and a few of the powerful operations that could save you a support call someday:
- Metadata cleanup — permits the deletion of server, site, domain and naming context objects (This is very handy when you have to do a manual demotion of a DC or have some corrupt objects.)
- Files * — manages Active Directory database files (This isn’t a real common one, but there are some useful commands here)
- Group membership evaluation — dumps security info for a principal
- Roles — manages FSMO roles
- IFM (Install From Media) * — captures Active Directory snapshots to be used in the dcpromo IFM procedure
- Semantic database analysis * — finds and fixes database errors
- Snapshot — manages snapshots, including the listing, mounting and un-mounting of snapshots
- Authoritative restore — returns domain controllers to a specific point in time
* These operations require Active Directory Domain Services to be stopped.
NOTE: While Active Directory Lightweight Directory Services (AD LDS) has used the dsdbutil and dsmgmt utilities to manage AD LDS instances in the past, Microsoft has actually combined these tools into Ntdsutil. While I won’t discuss the AD LDS options in detail here, it’s important to be aware that all the admin functions are now in AD LDS.
There are several tips and tricks that can help admins navigate the Ntdsutil tool. For starters, the command names can be abbreviated, meaning you just need to enter enough characters to uniquely define the Ntdsutil command. For example, metadata cleanup can be entered as meta cl. Additionally, admins can recall commands using the arrow keys.
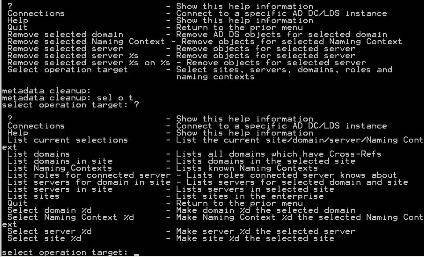
Ntdsutil options include Quit, which if selected at any menu level goes up one level, while ^C boots you out of Ntdsutil altogether. Connections will show up in various Ntdsutil commands such as metadata cleanup, as shown in Figure 2. It defines a connection to a specific domain controller. When this command shows up, simply go to the Connections menu and enter:
Connections: Con To Ser <enter DC’s name such as ATL-DC1 >
Operations will then take place on that DC’s copy of Active Directory. You can use the credentials of the logged-in user or specify alternate ones.
Figure 2: Ntdsutil metadata cleanup commands
tdsutil also has an online help component, as shown in Figure 3. I’ve used this tool many times over the years, and I always enter the question mark (?) at any menu level to get a quick display of the options.
There are also a few changes to the online help feature to note. For instance, the authoritative restore operation now requires a definition of the instance. This is due to how Ntdsutil is used to manage AD LDS partitions. If you receive an error indicating you need to specify the instance, you can use the following command:
Ntdsutil: Activate Partition ntds (or choose the appropriate AD LDS instance to manage).
Figure 3: Ntdsutil help component
Let’s look at a more detailed breakdown of the Ntdsutil commands in Windows Server 2008 to help further your understanding of the tool’s capabilities.
Ntdsutil: Metadata cleanup
This option is easily the most commonly used of all Ntdsutil commands, at least in my experience. It has been around since Windows 2000 and provides operations to clean up Active Directory objects after a manual dcpromo operation. Ntdsutil metadata cleanup requires the use of the connections menu to connect to a domain controller.
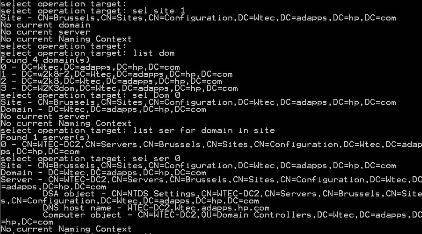
Metadata cleanup also requires you to specify the site, domain, naming context and server to be defined in order to locate the object that is to be removed. This is specified in the Select operation target (SelOT) command in the metadata cleanup menu. For example, if I want to remove ATL-DC4 from the SelOT prompt, I can issue a “?” command and see the options, as shown in Figure 4.
Figure 4: Using the SelOT command
In order to select the site, domain and server, you must list each and get a “reference number” to use in the selected command. Here is how to do it:
- Use the List sites command:
select operation target: list sites
Found 6 site(s)
0 — CN=Alpharetta,CN=Sites,CN=Configuration,DC=Wtec, DC=adapps,DC=hp,DC=com
1 — CN=Brussels,CN=Sites,CN=Configuration,DC=Wtec,
DC=adapps,DC=hp,DC=com
2 — CN=Melbourne,CN=Sites,CN=Configuration,DC=Wtec,
DC=adapps,DC=hp,DC=com
3 — CN=Bracknell,CN=Sites,CN=Configuration,DC=Wtec,
DC=adapps,DC=hp,DC=com
4 — CN=Roseville,CN=Sites,CN=Configuration,DC=Wtec,
DC=adapps,DC=hp,DC=com
5 — CN=Site1,CN=Sites,CN=Configuration,DC=Wtec,
DC=adapps,DC=hp,DC=com
- Now issue the Select site command. The server we want is in site 1 – Brussels: select operation target: sel site 1 (Note that “1” is the reference number for Brussels in the List sites command.)The output shows:
Site —
CN=Brussels,CN=Sites,CN=Configuration,DC=Wtec,DC=adapps,DC=hp,DC=com
No current domain
No current server
No current Naming Context
- Repeat this process for the domain and server. Each time, use the list command (such as List domains), locate the reference number of the object you want to use and issue the Select domain (#) command. When you have completed this, you will see something like the example in Figure 5. It’s a bit hard to read, but in the end you will have the site, domain and server defined.
Figure 5: Sample outcome of SelOT command
-
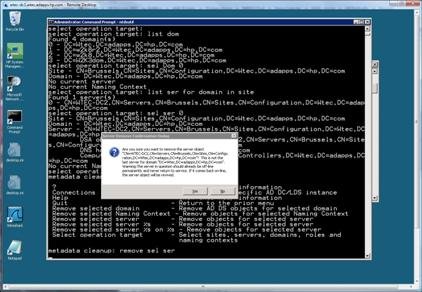
To delete the selected server object, use Quit to move back to the Ntdsutil metadata cleanup menu. In that menu, issue the remove command:
Remove selected server
You will get a nice popup indicating the server you are about to remove, as shown in Figure 6. Be careful with this command, however, as you are manipulating objects in the Active Directory.
Figure 6: Server Remove Confirmation Dialog
Ntdsutil: Files
The Files command requires AD DS to be stopped. A few of the useful commands here include:
- Checksum — This performs a physical integrity check of the Jet database. Use this if you see database errors, especially in the event log. You’ll also see the semantic database checker in the main menu.
- Integrity — This is similar to Checksum, but runs different tests.
- Set default folder security — This command resets security on NTDS folders. This usually isn’t a problem unless you have accidentally messed with these folders and need to recover.
- Move logs to %S and Move DB to %S — These commands allow movement of a database and logs to a different path.
While these aren’t everyday commands, the Integrity and Checksum options are handy if you see database errors pop up in the event logs. You can combine these with the semantic database check, which tests database consistency.
Ntdsutil: Semantic database analysis
This very powerful command is actually quite simple to use. Anytime I see database errors reported in the event log, I run this check. There is really only one command I use with this option:
Semantic Checker: Go Fixup
This command does a full consistency check pretty quickly and, from my experience, has successfully repaired the database time after time. There are no guarantees that this will fix a given database problem, but it certainly won’t hurt anything. You can use it with the database repair options noted in the Ntdsutil: Files section above.
Ntdsutil: Group membership evaluation
This option dumps the security identifiers (SIDs) in the security token for a user or group. There are some old Resource Kit tools for this, but it’s nice to have it built into Ntdsutil. Using this requires the Set Global Catalog or Set Resource DC command to define the GC/DC to use for this operation.
Run Corp.com olseng
It will proceed through a five stage process and dump the results to C: olseng-20110217024622.tsv (for example) — a text file that contains all the security information.
Ntdsutil: Roles
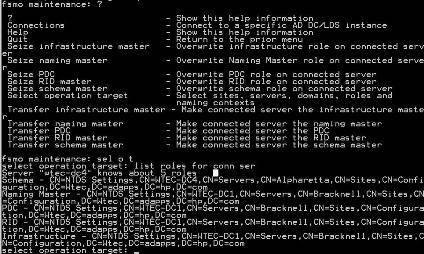
This is the fastest way to view, seize and transfer Flexible Single Master Operations (FSMO) roles. Here are a few tips for using this command:
-
In the FSMO Maintenance (Roles) menu, go to the Connections menu to set the connection to the domain controller that you want to transfer the role to. This is important!
Connections: Connect to server Wtec-dc1
- Quit back to the FSMO Maintenance menu (see Figure 7)
Figure 7: FSMO Maintenance menu
-
To view all roles from Ntdsutil, go to the Select Operation Target menu and issue List Roles for Selected Server (see Figure 7). It’s not pretty but they are there. A cleaner way to see them is with the Netdom command:
Netdom Query Fsmo
-
To seize the PDC role to the currently connected domain controller, you can use:
Fsmo Maintenance: Seize PDC
Note that any seize operation will automatically try to do a transfer first. The nice thing about Ntdsutil is that you can manage all FSMO roles from one spot.
Ntdsutil: IFM
The Install From Media function is new in Windows Server 2008 and enables the building of a new domain controller with the dcpromo /ADV command much faster than in Windows 2003. Prior to this option, a backup of a DC was required, after which the restored files would be moved to the local media of the server to be promoted. The dcpromo /ADV command produces a prompt to use static restore files for initial promotion rather than going over the network. Figure 8 shows the IFM menu options, as well as an example of the creation of a full instance. Options included here are:
- Create Full AD instance with SYSVOL, Full instance without SYSVOL
- Create RODC instance with or without SYSVOL
Figure 8: Ntdsutil IFM snapshot
IFM creates a snapshot — defragging the database first — and stores it in a path of your choosing on the disk.
Create sysvol full c:adbackup
In C:adbackup, there will be three directories — Active Directory, Registry and SYSVOL — with the files to be used by dcpromo.
IFM makes it easy to get the Active Directory sources for installation from an existing DC as well as a simple copy to the server to be promoted (or re-promoted). This is very handy for promoting a server as a new or recovered DC. Once dcpromo finishes, replication will get it up to date. It is important to note that a read-only domain controller (RODC) instance can be created on a read/write DC, but only an RODC instance can be created from an RODC itself.
As you can see, Ntdsutil is very powerful. There are many more options available that I don’t have space here to discuss. Just remember that things like security, account management, partition management, LDAP policies and other options used for AD LDS partitions are all very handy commands, but Ntdsutil can also be very risky. It usually comes with warning messages to protect you from yourself. Just make sure you know what you are doing when you hit the Enter key.
In the previous Active Directory article, we have seized an Operations Master Roles from the Offline Domain Controller to the New Domain Controller. After this, we have to clean out the offline domain controller data from the new domain controller. This process of removing data in AD DS is known as Metadata Cleanup. NTDSUTIL is used to clean up domain controller metadata. If a domain controller that is damaged and cannot be started from Active Directory service, we can then use NTDSUTIL to clean out the unsuccessful domain controller demotion, and it is very important that you do so. This will solve problems with slow login in domain controller, replication as well as knowledge Consistency Checker (KCC).
Here, KTM-DC01-2K8.msserverpro.com server is a failed domain controller, which we want to remove. To do this, we will use the NTDSUTIL command line tool.
Follow these steps to clean up the directory from a failed domain controller:
1. Open a command prompt, type ntdsutil and press Enter.
2. At the Ntdsutil prompt, type metadata cleanup and press Enter.
3. At the Metadata Cleanup prompt type connections and press Enter.
4. At the Server Connections prompt, type connect to server KTM-DC02-2K8
(where KTM-DC02-2K8 is the name of an available domain controller which holds Operations Masters Roles)
(If you have not logged on using an account that is a member of the Enterprise Admins group, you can set your credentials at this point by typing set creds domainname username password and then press Enter)
5. At the Server Connections prompt, type quit and press Enter.
6. At the Metadata Cleanup prompt, type select operation target and press Enter.
7. At the Selected Operations Target prompt, type list domains and press Enter. This list all the domains in the forest are listed with a number associated to each.
8. At the Select Operations Target prompt, type select domain 0, where number “0” is the failed domain controller, and press Enter.
9. At the Select Operations Target prompt, type list sites and press Enter. This list all the sites in the forest are listed with a number assigned to each.
10. At the Select Operations Target prompt, type select site 0, where number “0” is the site containing the failed domain controller, and press Enter.
11. At the Select Operations Target prompt, type list servers in site and press Enter.
12. At the Select Operations Target prompt, type select server 0, where number “0” is the failed domain controller, and press Enter.

13. At the Select Operations Target prompt, type quit and press Enter.
14. At the Metadata Cleanup prompt, type remove selected server and press Enter.
15. You will receive a warning message. Read it, and if you agree, Click Yes to confirm removal of the server.


16. Type quit at each prompt to exit Ntdsutil.
In addition to cleaning up the Active Directory object using Ntdsutil, we should clean up the DNS records for the failed domain controller. Remove all DNS records from DNS, including all domain controller records, GC server records, and PDC emulator records. (The last two will exit only if the domain controller was configured with these roles.) If you do not clean up the DNS records, clients will continue to receive the DNS information and try to connect to the domain controller. This can result in slower connections to Active Directory as clients fail over to use alternate domain controllers.
1. Open DNS Manager, expand Forward Lookup Zones, Right Click _msdcs.msserverpro.com, Click Properties.
2. On the _msdcs.msserverpro.com Properties dialog box, Click on Name Server Tab, select the offline domain controller and Click on Remove

3. Click Apply and Click OK.

4. Right Click on mssserverpro.com, and then click Properties.
5. On the msserverpro.com Properties dialog box, Click on Name Servers Tab, select the offline domain controller and Click on Remove.

6. Click Apply and then Click OK.

7. Do the same process on Reverse Lookup Zones.

8. Remove all DNS records (KTM-DC01-2K8.msserverpro.com) from DNS, including all domain controller records, GC server records and PDC records.


9. Open Active Directory Sites and Services; expand Default-First-Site-Name, Servers, Right Click on KTM-DC01-2K8, Click Delete.
10. On Active Directory Domain Services dialog box, Click Yes.
11. Close the Active Directory Sites and Services Console.
Summary:
Metadata Cleanup process is very important whenever the Domain Controller is non-functional for business continuity. The above article outlines how to carry out the Metadata cleanup process using NTDSUTIL in Windows Server 2008 R2 and this process also works in Windows Server 2003. I hope this helps.
- Home
- »
- Operating System
- »
- Command line references
This article explains Ntdsutil command in Windows Server 2008 operating system and also explain its syntax.
- 2932
Introduction
Ntdsutil Command in Windows Server 2008 is used to perform database maintenance of AD DS, manage and control single master operation, and remove metadata left behind by domain controllers that were removed from the network without being properly uninstalled. Syntax used for Ntdsutil command is given below.
Syntax
Ntdsutil [activate instance %s | authoritative restore | change service account %s1 %s2 | configurable settings | DS behavior | files | group membership evaluation | help | ifm | ldap policies | ldap port %d | list instance | local roles | metadata cleanup | popups on | popups off | quit | roles | security account management | semantic database analysis | set DSRM password | snapshot | SSL port %d]
Subcommands Of Ntdsutil
| Subcommand | Description |
| activate instance %s | Set NTDS or a specific AD LDS instance as the active instance. |
| authoritative restore | Authoritatively restores the Active Directory database or AD LDS instance. |
| change service account %s1 %s2 | Changes the AD LDS service account to user name %s1 and password %s2. |
| configurable setting | Manages configurable settings. |
| DS behavior | Views and modifies AD DS or AD LDS behavior. |
| files | Manages AD DS or AD LDS database files. |
| group membership evaluation | Evaluates security IDs (SIDs) in the token for a given user or group. |
| help | Shows this help information. |
| ifm | Creates installation media for writable and read-only domain controllers and instances of AD LDS. |
| ldap policies | Manages Lightweight Directory Access Protocol policies. |
| ldap port %d | Configures an LDAP port for an AD LDS instance. |
| list instance | Lists all AD LDS instances that are installed on a computer. |
| local roles | Manages local administrative roles on an RODC. |
| metadata cleanup | Cleans up objects of decommissioned servers. |
| partition management | Manages directory partitions. |
| popups off | Disables popups. |
| popups on | Enables popups. |
| quit | Quits the command. |
| roles | Transfers and seizes operations master roles. |
| security account management | Manages SIDs. |
| semantic database analysis | Verifies integrity of AD DS or AD LDS database files with respect to Active Directory semantics. |
| set DSRM password | Resets the Directory Services Restore Mode administrator password. |
| snapshot | Manages snapshots of the volumes that contain the Active Directory database and log files. |
| SSL port %d | Configures a Secure Sockets Layer port for an AD LDS instance. |
Ask Your Question
Got a programming related question? You may want to post your question here