
File Explorer is an important part of the Windows OS interface as it makes navigation and file access easy. Its simplicity and design makes it an ideal way to locate files and folders. However, many Windows users have recently faced a strange issue where File Explorer crashes unexpectedly and an error message on the screen stating the failure of the NTDLL.dll file.
There are numerous reasons leading to the file explorer NTDLL.dll crashing issue on Windows 10/11 PCs. From outdated graphics drivers or third-party antivirus to a buggy update, there is a list of reasons going around the internet.
Let’s move further and learn more about the file explorer crashing issue error and possible workarounds to fix it.
What is NTDLL.dll?
Before probing into the error, let’s get a brief on the NTDLL.dll. NTDLL.dll is a critical system file used by Windows NT. This file is created when Windows is installed and has a description of ‘NT layer DLL’. This file contains kernel functions and Native API. It exports the Native API, which provides an interface to user-mode components of the OS and other applications.
Reasons Behind File Explorer & NTDLL.Dll Crashing
Upon investigating the crash logs in the event viewer, it becomes quite evident that the event ID 1000 & the faulting module in most of the file explorer crashes is the NTDLL.dll file.
However, as the NTDLL.dll is rather an exporter of APIs, there could be something else triggering this crash. A buggy Windows update, outdated third-party antivirus or graphics driver or a faulty application could be behind the file explorer NTDLL.dll crashing error message.
From double-clicking a file or a folder to navigating to a directory or read/write errors, there are several actions leading to the NTDLL.dll crash.
In some instances, users reported encountering the file explorer NTDLL.dll crashing right after the computer boots Windows. Some users also reported getting this error message while their PC was connected to a network.
With such a wide range of triggers behind the NTDLL.dll crash, one thing is clear – there is no one certain reason causing the file explorer NTDLL.dll crash on a Windows PC.
Methods to Fix the Windows File Explorer NTDLL.dll Crash
With a better understanding of the issue at hand, let’s look at some methods explained below to fix unexpected NTDLL.dll crashes on a Windows computer.
Method 1: Update Applications
There are chances that outdated applications could be creating a conflict with the OS or the system files, leading to the file explorer crashing and the NTDLL.dll failing. This is the simplest way to try and fix the issue at hand. Check for any available application updates and install them. Some users reported fixing unexpected NTDLL.dll crashes by simply updating the antivirus software.
Method 2: Clear the File Explorer Cache and Restart it
A corrupted file explorer cache can cause problems with the file explorer, causing it to crash frequently or malfunction. Hence, to resolve the Windows File Explorer NTDLL.dll crashing, try clearing the File Explorer cache and restarting it from the task manager.
Follow the steps mentioned below to clear the File Explorer cache –
- Press WINDOWS + Q and type in Control Panel. Click on the relevant result to open the Control Panel.
- Click on File Explorer Options.
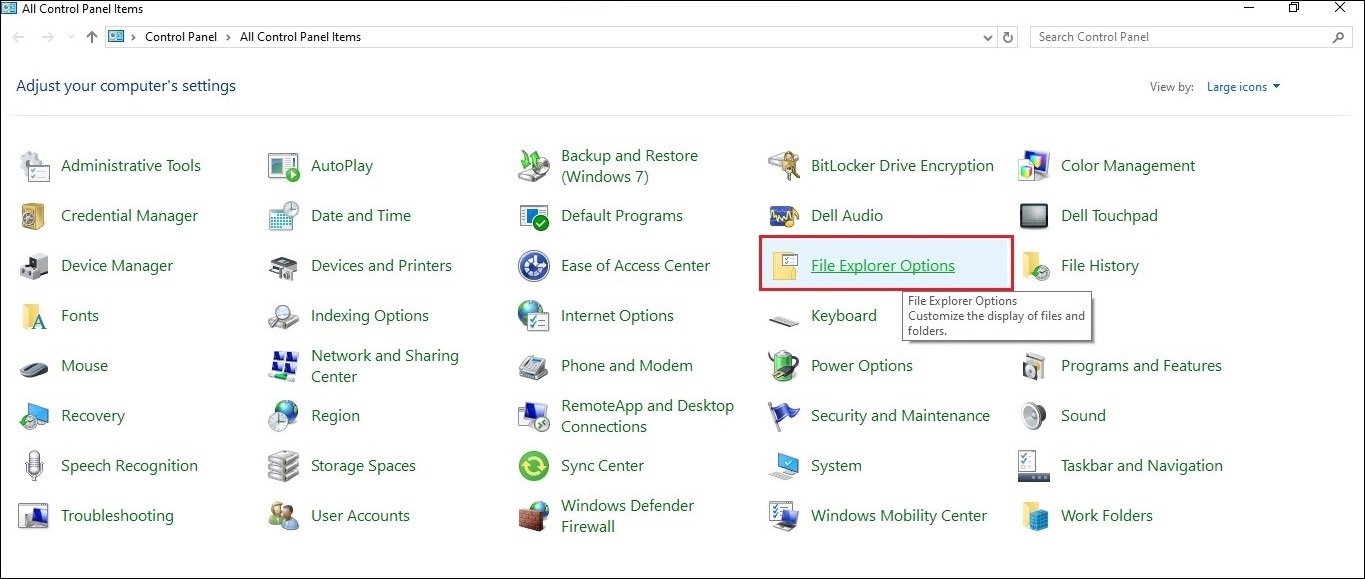
- In the pop-up window, click on the General tab.
- Go to the Privacy section and click on the Clear button in front of Clear File Explorer History.
- Confirm the changes by clicking on Apply and then OK.
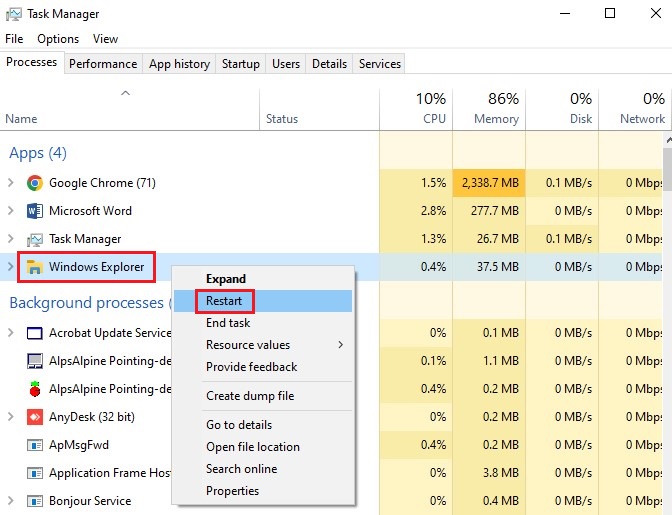
Once this is done, restart the file explorer from the task manager –
- Press CTRL + ALT + DEL to open the Security Options window.
- Select Task Manager from the list.
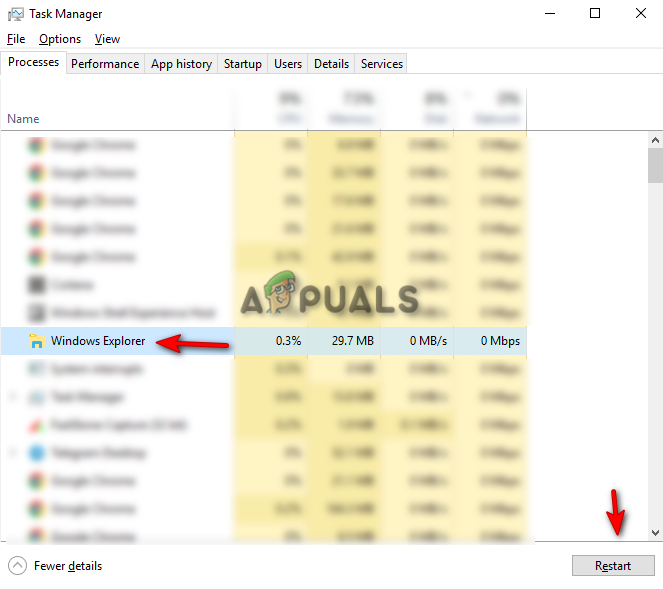
- Find Windows Explorer under the Processes tab.
- Select it and right-click on it.
- Click Restart.
This will restart the File Explorer and should fix the issue at hand on your Windows 11 computer.
Method 3: Disable Recently Opened Items Feature
A lot of users annoyed with File Explorer crashing unexpectedly were able to fix the underlying problem by disabling the Recently opened items in Jump Lists on Start or the Taskbar. This helped resolve the NTDLL.dll error in a swift and simple way. Here’s what to do –
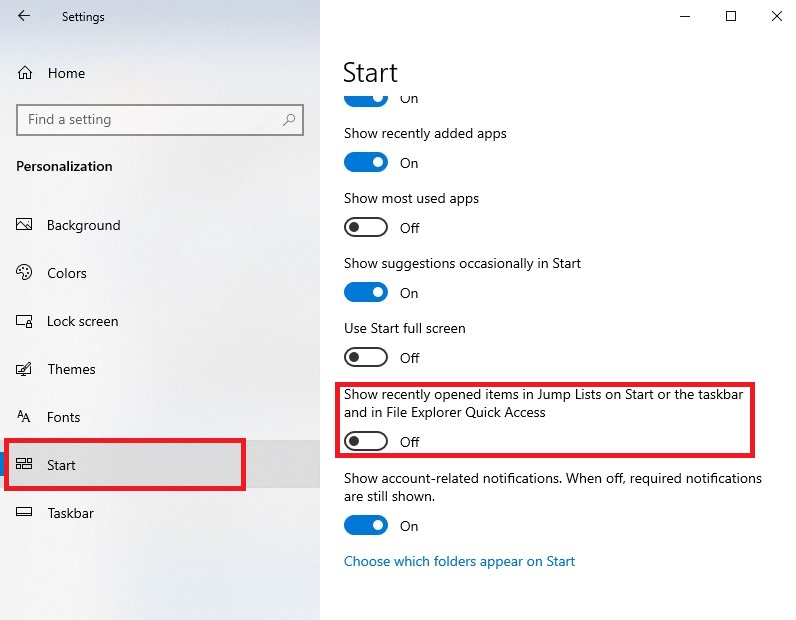
- Press WINDOWS + I to open Settings.
- Click on Personalization.
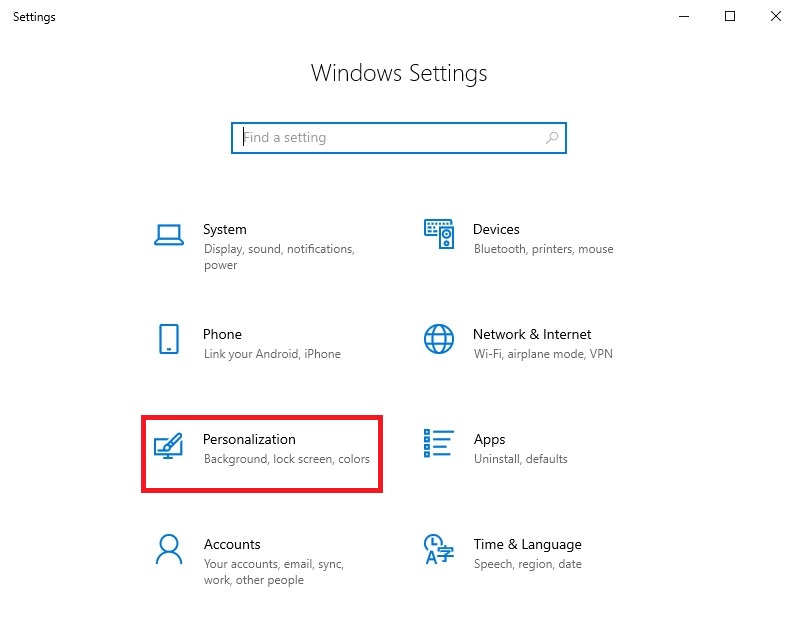
- Click on Start in the left pane.
- Disable the Show recently opened items in Jump Lists on Start or the Taskbar option.
Method 4: Reset Windows
The above methods, and especially Method 3, should help you fix the file explorer NTDLL.dll crashing issue on your Windows 10/11 computer. However, if none of them works, you can simply reset Windows.
There are high chances of data loss after resetting your Windows 10/11 computer. Hence, you should take a backup of your data and important files before doing that. However, if you are unable to take a backup of your data due to the frequent crashing of the file explorer, you can take help of a professional file recovery software like Stellar Data Recovery Professional.
This software allows you to create a bootable media drive that can help you recover data from your crashing or unbootable system without much hassle. Follow the steps shown in the video below to create a bootable data recovery media and use it to recover your files.
Once you have safely recovered your data, follow this guide to reset your Windows PC.
Resetting a Windows PC is similar to giving your PC a fresh start. This should help you fix the NTDLL.dll crash issue. But, if doing this doesn’t make it any better and the problem is still pestering you, then, as a last resort, perform a clean installation of Windows 10 or Windows 11. Doing this should definitely eliminate the underlying issues causing the file explorer NTDLL.dll error on your PC.
Wrapping it Up
The File Explorer NTDLL.dll crash is a very perplexing issue that seems simple on the surface but isn’t. A lot of Windows users are affected by this issue and are looking for the right solution to end this. As this issue is not related to a single cause, it has left many users wondering about the next step. However, you should not worry, as the methods mentioned above will surely help you resolve this issue in no time.
Related Reads
Fix Windows File Explorer Crashing on Windows 11 PC
The Windows File Explorer has been facing a major ntdll.dll Crash Error recently. This error may occur due to either the absence of an updated video driver, corrupted files, or a corrupted file explorer cache. These instances may interfere with the performance of the File Explorer program, causing it to crash. In this guide, we will show you the steps you can take to fix this error.
Workaround: Restart your Windows Explorer
Before you start performing the other methods, restart your Windows Explorer by ending it from the task manager and then reopening the File Explorer program. Usually, when such an error occurs on the system, you can restart Windows Explorer to recover the issues. Follow the steps below to restart your Windows Explorer from the task manager:
- Search for “Task Manager” in the Windows Search box and open the Windows Task Manager.
Opening Task Manager - Find the File Explorer program running in the “Processes” tab.
- Select the Windows Explorer program and close it by clicking on the “Restart” button at the bottom of the window.

Restarting Windows Explorer - Now, reopen the File Explorer and see if the workaround fixes the issue.
1. Run System Maintenance Troubleshooter
Another step you can perform is the System Maintenance Troubleshooter. Running this troubleshooter will detect any problem within the system and try to resolve it or send the report to the Action Center. Follow the steps below to see how to run a System Maintenance Troubleshooter:
- Open the Control Panel from the Windows Start Menu.
Opening the Control Panel - Click on the “Category” option on the right side of the panel and select Large Icons.

Viewing Category to Large Icons - Click on the Troubleshooting option on the “Adjust your computer’s settings” page.
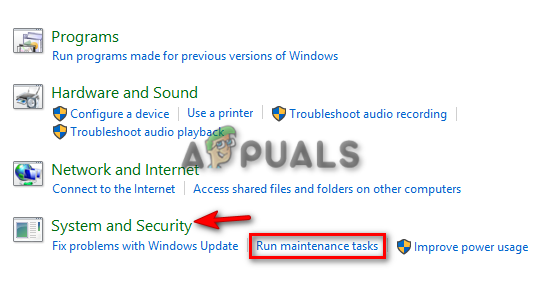
Opening the Troubleshooting page - Click on “Run Maintenance tasks ” in the System and Security Section.

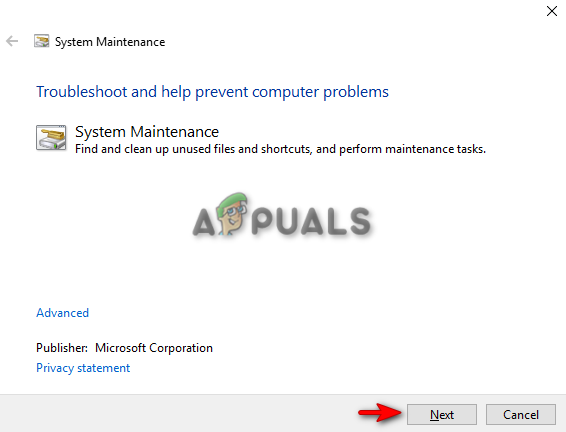
Running Maintenance tasks - To initiate the process, click the Next button and let the system detect the problem in the File Explorer.

Initiating the System Maintenance troubleshooting.
Note: You may have to troubleshoot as an administrator to detect the necessary issues.
2. Clear File Explorer History
Your File Explorer may contain corrupted history, which might have caused the explorer.exe ntdll.dll crash. You can try clearing the File Explorer History and see if this method helps fix the problem for you. Follow the methods below to learn how to clear file explorer history.
Disclaimer: Clearing your file explorer history will format any search you performed on it. If you still want to proceed, you may start the process.
- Open the File Explorer and click on the “View” option at the top of the screen, next to the Share option.
- Now Navigate to the Options > change folder and search options.

Opening Folder Options - Click on the General tab and clear the File Explorer History by navigating to Privacy > Clear Apply > OK.
Clearing File Explorer history - You can restart your computer to see if this has fixed the issue.

3. Update your Graphics Driver
An outdated graphics driver may cause this issue. You can try updating your existing graphics drive and see if you fix the File Explorer crashing issue. Following the steps below, you will learn how to update your Graphics driver.
- Open the Windows Search bar and search for “Device Manager.”
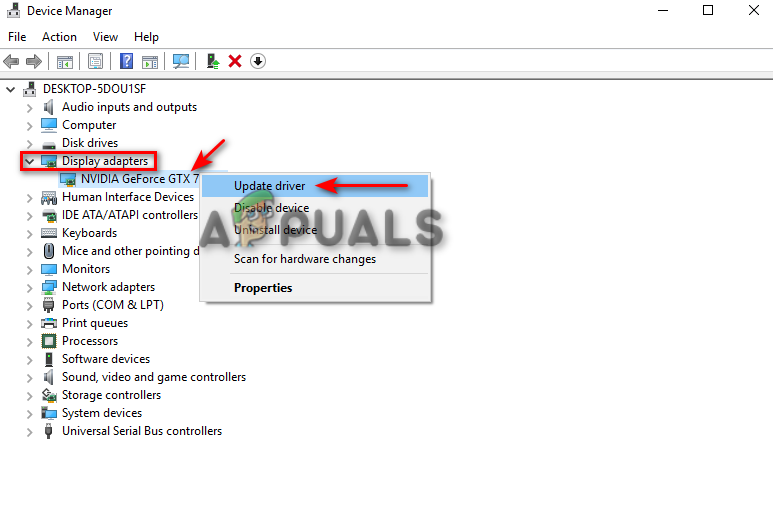
Opening Device Manager - Look for the “Display adapters” option on the Device Manager page and click on the option to view the installed graphics driver on your system.
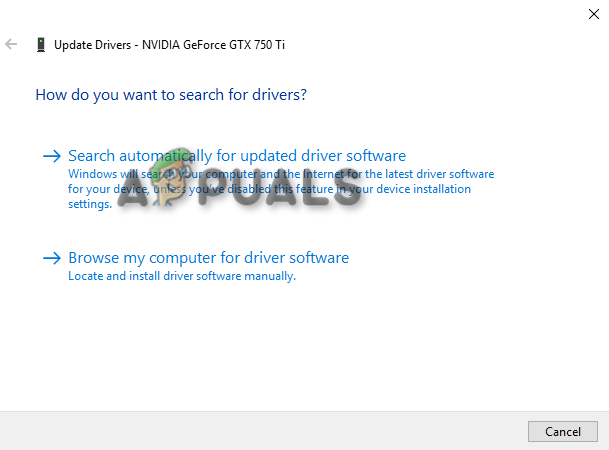
- Right-click on the driver installed on your system and select the “Update driver” option.

Updating Graphics Driver - You can manually choose the updating process as you wish.

Selecting the Driver Updating method - Restart your computer after the driver has been updated and see if this fixes the issue.
4. Run the System File Checker
Another reason you may be facing this issue is because of file corruption on your system. Using the System File Checker, you can scan through all the corrupted files on your system, and it will automatically repair the issues. If you are facing the File Explorer ntdll.dll Crash Error, this method may help you solve the issue. Follow the methods to perform a system file checker:
- On the Windows Search bar, type “cmd.”
- Right-click on the Command Prompt and run it as an administrator.
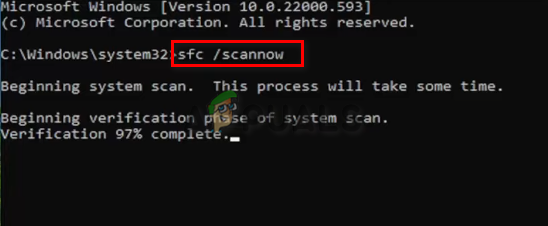
Running the Command Prompt as an administrator. - Type the following command in the Command Prompt while making sure to give a space between “sfc” and “/.”
sfc /scannow

Running system file checker on the command prompt. - The system file checker will repair the error if any problem is found.
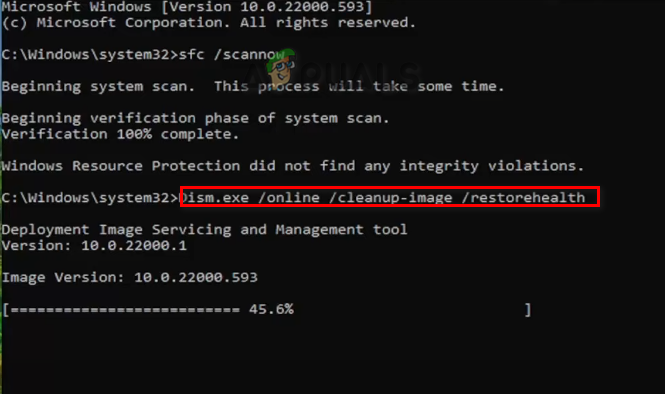
Note: You also can try using the DISM command to scan through the system to detect what is corrupting the File Explorer program. Paste the following command into the command prompt right after you have performed the system file checker, and then restart your computer and see if this fixes the issue:
Dism.exe /online /cleanup-image /restorehealth
5. Remove BagMRU and Bagsfrom the Registry
There are two main registry keys in the ShellBag; the BagMRU and Bag. While the BagMRU stores names, folders, records paths, and creates similar tree structures, the Bags key saves the locations, window size, view mode, etc. Deleting these kets may help you solve the issue.
Disclaimer: Deleting these keys can remove all the information stored in the keys. Therefore, if you want to delete them, create backup files. You can follow the steps below to delete the Shellbag keys if you are willing:
- Press the Win + R keys together to open the Run dialogue box.
- Open the Registry by typing “regedit” in the search box and clicking OK.
- Select “YES” on the User Account Control prompt and navigate to HKEY_CURRENT_USER > Software > Classes > Local Settings > Software > Microsoft > Windows > Shell.
Deleting BagMRU and Bags from Registry - Delete both the BagMRU and Bags folder.
- Restart your computer to see if this fixed the issue.
Muhammad Zubyan
Muhammad Zubyan is a certified Google IT Support Professional with over 7 years of extensive experience. He has worked on more than 1500 computers, gaining valuable insights that enable him to detect and troubleshoot any complicated root cause of Windows-related issues and errors. In addition to managing Appuals as a Senior Editor, he is currently developing his own Game Optimization program that caters to both gamers and casual users alike.
DLL files, also known as Dynamic Link Libraries are external parts of applications that run on Windows as well as other operating systems. Almost all applications are not complete in themselves and store code in different files. In this post, we will be discussing one DLL file called ntdll.dll. It is described as “NT Layer DLL” which means that it contains some Kernel functions that help in the normal functioning of the Windows operating system. It is created by Windows in the System32 folder when the OS gets installed. This file can serve different programs simultaneously by providing them with different Kernel functions which support the programs’ performance. However, if you encounter the ntdll.dll file error on your Windows 10 computer, read on as this post will guide you in fixing the problem.
Option 1 – Try to re-register the ntdll.dll file
You may have to re-register the ntdll.dll file using the regsvr32.exe before you can successfully install the program and fix ntdll.dll file crash error. The Regsvr32 tool is a command-line utility that can be used to register and un-register the OLE controls like DLL and ActiveX (OCX) control in the Windows operating system. Follow the steps below to use it.
- Open Command Prompt as admin from the WinX menu.
- Next, type the following commands in the elevated Command Prompt and hit Enter to execute the command. This will re-register the affected DLL file using the Windows operating system tool, regsvr32.exe.
- exe /u ntdll.dll
- exe ntdll.dll
- You should see a message saying, “DllRegisterServer in vbscript.dll succeeded” if the Regsvr32 tool was able to run successfully. After that, try to install the program again and see if it now works.
Option 2 – Disable problematic Internet Explorer add-ons
There are instances when some add-ons in the Internet Explorer browser can cause the ntdll.dll file crash error. Thus, you need to disable some add-ons in Internet Explorer and then check if it fixes the problem.
Option 3 – Try running the DISM tool
You might want to repair potentially corrupted files in your system as having them could also trigger the ntdll.dll file crash error. To repair these corrupted system files, you can run the DISM commands:
- Tap the Win + X keys and click on the “Command Prompt (Admin)” option.
- After that, input each one of the commands listed below sequentially to execute them:
- Dism /Online /Cleanup-Image /CheckHealth
- Dism /Online /Cleanup-Image /ScanHealth
- Dism /Online /Cleanup-Image /RestoreHealth
- Once you’ve executed the commands given above, restart your computer and check if the DCOM error is now fixed.
Option 4 – Try to run the Program Compatibility Troubleshooter
You might also want to run the Program Compatibility Troubleshooter. This built-in troubleshooter is available in the Windows Update & Security section. From there, select Troubleshoot. This will find a list of programs for you and since you have already downloaded the driver files, just click on Not Listed located at the top of the program list. After that, browse and select the driver files and then let the program do its job.
Option 5 – Try to replace the DLL file with a trusted source
- First, you need to get the new DLL file from another computer with preferably the same file version number.
- After that, you need to boot your PC into Safe Mode and navigate to the paths listed below and then replace the file using a USB drive or other external storage devices.
- x86: This PC > C:WindowsSystem32
- x64: This PC > C:WindowsSysWOW64
- Next, type “cmd” in the Cortana search box and right-click on Command Prompt, and select “Run as administrator” to open it with administrator privileges.
- Now type the “regsvr32 ntdll.dll” command and hit Enter.
- Restart your PC and check if the error is now fixed.
Option 6 – Try scanning your computer using Windows Defender
The ntdll.dll file crash error might also be infected with malware or virus and to eliminate it, you have to scan your computer using security programs like Windows Defender.
- Tap the Win + I keys to open Update & Security.
- Then click on the Windows Security option and open Windows Defender Security Center.
- Next, click on Virus & threat protection > Run a new advanced scan.
- Now make sure that Full Scan is selected from the menu and then click the Scan Now button to get started.
Do You Need Help with Your Device?
Our Team of Experts May Help
Troubleshoot.Tech Experts are There for You!
GET HELP
Troubleshoot.Tech experts work with all versions of Microsoft Windows including Windows 11, with Android, Mac, and more.
Share this article:
You might also like
A lot of Windows 10 users have reported recently that their computers are frequently crashing with a Blue Screen error with an error code “VIDEO_DXGKRNL_FATAL_ERROR”. This kind of Stop error appears not so often and its bug check value of 0x00000113 is an indication that there is some violation in the Microsoft DirectX graphics kernel subsystem. This error also occurs when there is a corrupted driver that interferes with the GPU’s normal functionality.
According to some security experts, this kind of error is reported to only occur in Windows 10 PCs. Users started getting this error right after a large Windows Update. The cause of this error might have something to do with a violation in the DirectX graphics kernel subsystem where there could be a bad DirectX install or some corrupted Dynamic Link Library or DLL. Aside from that, the error might also be caused by the Nvidia driver which might have crashed or it could also be that there is an intermittent power supply. Moreover, an outdated BIOS as well as a third-party security program might be the ones behind this Blue Screen error. Whichever the case may be, you need to fix the VIDEO_DXGKRNL_FATAL_ERROR BSOD error by following the instructions given below carefully.
Option 1 – Try checking if the NVIDIA graphics card is enabled and update it as well
Although the problem is quite massive, the fix could be as simple as enabling the NVIDIA graphics card if it turns out to be disabled. There might be some strange reason why your graphics card disables itself. Thus, the best and first option you can try is to check if the NVIDIA graphics card is enabled or not. To do so, follow these steps:
- Tap the Win + R keys to open the Run dialog box.
- Then type “devmgmt.msc” in the field and hit Enter to open the Device Manager.
- After opening the Device Manager, look for the Nvidia graphics card option among the list of device drivers. Once you found it, check if it is enabled or not. If it’s not enabled, you should see a gray arrow pointing downwards. Right-click on the card and select Enabled.
- Next, right-click on the graphics card once more and click on the Update Driver Software option and then click on the “Search automatically for updated driver software” option.
Option 2 – Update or uninstall third-party security program
As mentioned, the VIDEO_DXGKRNL_FATAL_ERROR Blue Screen error might be caused by a third-party security program that’s installed on your computer. So you have to either update it or uninstall it to resolve the issue.
Option 3 – Check the power supply for any inconsistency
The Blue Screen error might also be caused by an intermittent power supply. If there is any intermittent changes between the main supply and the battery power, it might lead to bad contact on your supply to the charger and thus, causes the VIDEO_DXGKRNL_FATAL_ERROR Stop error to appear. So to check if this scenario is applicable to you, you have to monitor your computer for any frequent changes between the power supply and the battery power. If you see that the supply is displaying power On and Off, see if the same goes when the power supply is disconnected. However, if it does not occur, you might have to purchase a new power adapter cable and replace the one that you have right now.
Option 4 – Reinstall the Graphics card drivers
- Tap Win + R to open Run then type “devmgmt.msc” in the field and hit Enter to open the Device Manager.
- From there, look for the Display adapters and uninstall each one of the graphics card drivers by right-clicking on them and selecting the Uninstall device option.
- After uninstalling the graphics card drivers, close the Device Manager and tap Win + R to open Run once again.
- After that, type “appwiz.cpl” in the field and hit Enter to open Programs & Features in the Control Panel.
- Next, look for any program that’s related to your GPU manufacturers like Nvidia, AMD, or Intel. Right-click on any GPU-related entry and click on Uninstall to uninstall them and then follow the next on-screen instructions that appear afterward.
- Now restart your computer.
- Once your computer has restarted, go to the GPU manufacturer’s website and download the latest driver version for your graphics card model and then install it.
- Restart your computer once again. That should fix the problem.
Option 5 – Try checking if there are any BIOS updates available for your PC
Updating the BIOS may help you resolve the BSOD error. You can just go to the OEM’s website as they offer utility software that can download BIOS firmware and update it without any problem. BIOS updates usually offer enhancements and fixes to some issues like this one.
Option 6 – Perform a System Restore
Performing a System Restore on your computer can also help you fix the VIDEO_DXGKRNL_FATAL_ERROR Blue Screen of Death error. You can do this option either by booting into Safe Mode or in System Restore. If you are already in the Advanced Startup Options, just directly select System Restore and proceed with the next steps. And if you have just booted your PC into Safe Mode, refer to the steps below.
- Tap the Win + R keys to open the Run dialog box.
- After that, type in “sysdm.cpl” in the field and tap Enter.
- Next, go to the System Protection tab then click the System Restore button. This will open a new window where you have to select your preferred System Restore point.
- After that, follow the on-screen instructions to finish the process and then restart your computer and check if the problem is fixed or not.
Read More
The Winload.efi file is an Extensible Firmware Interface or EFI file. EFI files are executable files for the firmware of the computers that are mainly based on UEFI and execute the tasks of loading the files to the bootloader of the computer. They are used for a specific set of tasks such as turning on the computer, installing Windows, restarting the computer or resetting it, and so on. This is why the Winload.efi file is a significant file so if it gets corrupted, lost, or damaged, it would be impossible for the Windows operating system to proceed.
Here are some errors you can encounter that are related to the Winload.efi file:
- efi is missing
- efi cannot be found
- efi is missing or contains errors
- This program can’t start because winload.efi is missing from your computer
- This application requires the file winload.efi, which was not found on this system.
- There was a problem starting [path]winload.efi. The specified module could not be found.
In addition, the 0xc0000225 , 0xc00000e and 0xc0000001error codes are also associated with the Winload.efi file.
Before you start troubleshooting the problem, you can try to perform System Restore first. This will help undo any changes you’ve made in your computer that might have triggered the Blue Screen error. To perform System Restore, here’s what you have to do:
- First, press the Win + R keys to open the Run dialog box.
- After that, type in “sysdm.cpl” in the field and tap Enter.
- Next, go to the System Protection tab then click the System Restore button. This will open a new window where you have to select your preferred System Restore point.
- After that, follow the on-screen instructions to finish the process and then restart your computer and check if the problem is fixed or not.
If System Restore didn’t help in fixing the Blue Screen error, now’s the time for you to resort to the troubleshooting tips provided below but before you get started, make sure that your create a System Restore point first.
Option 1 – Try rebuilding the Boot Configuration Data (BCD) and repairing MBR
- Once you get to the Welcome Screen part, click on Next.
- Afterwards, click on the Repair your computer option located on the bottom-left part of the window.
- Then click on Troubleshoot.
- Next, select the Advanced Options and then Command Prompt.
- Once Command Prompt has been pulled up, the following commands to rebuild BCD files and repair MBR. Don’t forget to hit Enter right after you type each command.
- bootrec /repairbcd
- bootrec /osscan
- bootrec /repairmbr
- Once the command line is successful in finding out a Windows installation, hit Y to let it boot from the list which will successfully rebuild BCD.
- Now type “exit” to close Command Prompt and then restart your computer to successfully apply the changes made.
Option 2 – Disable the Secure Boot in the BIOS
Disabling the Secure Boot in the BIOS settings is definitely recommended to resolve errors related to the Winload.efi file. To disable Secure Boot, here’s what you have to do:
- First, boot your computer into Windows 10.
- Next, go to Settings > Windows Update. From there, check if there is anything that you have to download and install if you see any available updates. Usually, OEMs send and update the list of trusted hardware, drivers, and operating systems for your computer.
- After that, go to the BIOS of your computer.
- Then go to Settings > Update & Security > Advanced Startup options. If you click on Restart Now, it will restart your computer and give you all the advanced options.
- Next, select Troubleshoot > Advanced Options. As you can see, this screen offers you further options including System restore, Startup repair, Go back to the previous version, Command Prompt, System Image Recovery and UEFI Firmware Settings.
- Select the UEFI Firmware Settings which will take you to the BIOS.
- From there, go to Security > Boot > Authentication tab where you should see Secure Boot. Note that every OEM has its own way of implementing the options so it varies.
- Next, set Secure Boot to Disabled and set Legacy Support to On or Enabled.
- Save the changes made and exit. Afterward, your computer will reboot.
Option 3 – Run System File Checker scan
You might also try running the System File Checker or SFC scan to fix the error. System File Checker is a command utility built into your computer that helps restore corrupted files and missing files. Refer to the following steps to run it:
- Hit the Win + R keys to launch Run.
- Type in cmd in the field and tap Enter.
- After opening Command Prompt, type in sfc /scannow
The command will start a system scan which will take a few whiles before it finishes. Once it’s done, you could get the following results:
- Windows Resource Protection did not find any integrity violations.
- Windows Resource Protection found corrupt files and successfully repaired them.
- Windows Resource Protection found corrupt files but was unable to fix some of them
- Reboot your computer.
Option 4 – Disable the Early Launch Anti-Malware Protection
- You need to restart your computer in the Start Menu first while holding down the Shift key on your keyboard.
- After that, it will restart your computer to Startup Settings.
- Now ensure that the 8th option is labeled as “Disable early launch anti-malware protection.
- Then tap the F8 key since the aforementioned option above is listed at number 8. This should launch and load Windows on your PC with the Early Anti-malware protection disabled for that session only when you try to carry out the same task and then check if the error related to the Winload.efi file is now fixed.
Read More
ListenToTheRadioNow is a Browser Extension that allegedly lets you listen to radio from your browser. However, all this extension does is add links to the popular radio stations on your home page.
This extension hijacks your home page and changes your default search provides to MyWay. While running it monitors browsing data from your browser, mining information such as website visits, clicked links, and sometimes even personal information. This information is later used to display targeted ads through your browser.
Several anti-virus scanners have marked this extension as a possible Browser Hijackers, and due to its data mining nature, it is not recommended to keep it on your computer.
About Browser Hijackers
Browser hijacking is a type of unwanted software, commonly a browser add-on or extension, which then causes modifications in the web browser’s settings. Browser hijackers could do more than just modifying homepages. In most cases, browser hijacking is used for earning ad revenue that comes from forced advert clicks and website visits. Even though it may seem naive, all browser hijackers are dangerous and therefore always regarded as security threats. They don’t just ruin your internet browsers, but browser hijackers could also modify the system registry to make your PC susceptible to other malicious programs.
How you can know whether the browser is hijacked?
There are several symptoms of browser hijacking:
1. home-page is changed
2. new bookmarks pointing to porn websites have been added to your bookmarks
3. the default internet search engine and/or the default web browser settings are altered
4. find new toolbars that you did not add
5. unstoppable flurries of popup ads show up on your PC screen
6. webpages load very slowly and often incomplete
7. you have prohibited entry to certain web pages, for example, the site of an anti-malware software firm like SafeBytes.
So how does a browser hijacker infect a PC
A browser hijacker could be installed on your computer or laptop if you visit an infected website, click on an e-mail attachment, or download something from a file-sharing website. They also come from add-on programs, also referred to as browser helper objects (BHO), browser plug-ins or toolbars. Also, some shareware and freeware can put the hijacker inside your computer through “bundling”. A good example of some popular browser hijackers includes Babylon, Anyprotect, Conduit, SweetPage, DefaultTab, Delta Search, and RocketTab, but the names are regularly changing.
Tips on how to get rid of a browser hijacker
Some hijackers can be removed by uninstalling the freeware they were included with or by eliminating any extension you’ve recently added to your computer. However, most hijacking codes are not very easy to eliminate manually, since they go deeper into your operating system. Furthermore, manual removal expects you to perform several time-consuming and tricky actions that are hard to do for new computer users.
Professionals always recommend users to get rid of any malicious software including browser hijacker with an automatic malware removal tool, which is simpler, safer, and faster than the manual removal technique. One of the top tools for correcting browser hijacker malware is SafeBytes Anti-Malware. It can help you eliminate any pre-existing malicious software in your computer and provides you real-time monitoring and protection from the latest internet threats. Employ a PC optimizer along with your anti-malware software to correct various registry problems, remove computer vulnerabilities, and improve your computer overall performance.
Help! Malware Preventing Antivirus Installation And Access To The Internet
All malware is bad, but certain kinds of malware do a lot more damage to your computer than others. Some malware sits in between the computer and the net connection and blocks some or all internet sites that you want to check out. It will also prevent you from installing anything on your system, especially anti-virus applications. If you’re reading this, chances are you’re stuck with a malware infection that is preventing you to download and install the Safebytes Anti-Malware program on your computer. Do as instructed below to get rid of the malware by alternate methods.
Install the anti-malware in Safe Mode
Safe Mode is actually a special, basic version of Windows in which just minimal services are loaded to counteract viruses and other troublesome programs from loading. In the event, the malicious software is set to load automatically when the computer boots, switching to this mode may well prevent it from doing so. To start the computer into Safe Mode, hit the “F8” key on your keyboard just before the Windows logo screen comes up; Or right after normal Windows boot up, run MSConfig, check Safe Boot under Boot tab, and click Apply. Once you’re in Safe Mode, you can attempt to download and install your antivirus software application without the hindrance of the virus. After installation, run the malware scanner to get rid of most standard infections.
Download the security program using an alternate web browser
Some malware mainly targets particular browsers. If this sounds like your case, use another web browser as it could circumvent the virus. If you appear to have a virus attached to Internet Explorer, then switch over to an alternate browser with built-in security features, such as Firefox or Chrome, to download your preferred anti-malware program – Safebytes.
Install and run anti-virus from the Thumb drive
Another solution is to store and operate an anti-malware program entirely from a Pen drive. Do these simple steps to clear up your affected PC using a portable antivirus.
1) Download the anti-malware on a virus-free PC.
2) Insert the USB drive onto the same system.
3) Run the setup program by double-clicking the executable file of the downloaded software, with a .exe file format.
4) Choose the drive letter of the pen drive as the place when the wizard asks you where you would like to install the antivirus. Follow the instructions on the computer screen to complete the installation process.
5) Unplug the pen drive. You may now utilize this portable anti-virus on the affected computer.
6) Double-click the EXE file to open the Safebytes software right from the pen drive.
7) Click the “Scan” button to run a full system scan and remove viruses automatically.
Protect Your PC and Privacy With SafeBytes Anti-Malware
To help protect your laptop or computer from many different internet-based threats, it’s important to install an anti-malware program on your laptop. However, with so many antimalware companies in the marketplace, nowadays it is hard to decide which one you should buy for your laptop. Some of them are great and some are scamware applications that pretend as genuine anti-malware software waiting to wreak havoc on your computer. While looking for an anti-malware tool, choose one that offers dependable, efficient, and complete protection against all known computer viruses and malware. On the list of recommended software by industry analysts is SafeBytes Anti-Malware, a popular security application for Windows computers.
SafeBytes anti-malware is really a powerful, highly effective protection software made to assist users of all levels of computer literacy in finding and removing harmful threats from their computer. Through its cutting-edge technology, this software protects your computer against infections caused by different kinds of malware and similar threats, including spyware, adware, viruses, worms, trojans, keyloggers, ransomware, and potentially unwanted program (PUPs).
SafeBytes anti-malware provides a myriad of advanced features that sets it apart from all others. Below are some of the great features included in the tool.
Robust Anti-malware Protection: Built on a highly acclaimed anti-virus engine, this malware removal application can find and get rid of many obstinate malware threats like browser hijackers, PUPs, and ransomware that other common antivirus applications will miss.
Live Protection: SafeBytes provides complete and real-time security for your computer. This software will continuously keep track of your computer for suspicious activity and updates itself continuously to keep current with the latest threats.
Web Filtering: Through its unique safety rating, SafeBytes informs you whether a site is safe or not to visit it. This will make sure that you’re always certain of your safety when browsing the web.
Faster Scanning: SafeBytes Anti-Malware possesses a multi-thread scan algorithm that works up to five times faster than any other antivirus software.
Lightweight Application: SafeBytes gives you complete protection from online threats at a fraction of the CPU load due to its enhanced detection engine and algorithms.
24/7 Live Expert Support: You will get 24/7 technical support to promptly resolve any issue with your security application.
SafeBytes can keep your PC safe from most advanced malware threats automatically, thus keeping your online experience secure and safe. Malware issues can become a thing of the past when you put this application to use. If you want sophisticated forms of protection features & threat detections, buying SafeBytes Anti-Malware will be worth the dollars!
Technical Details and Manual Removal (Advanced Users)
If you do not wish to use malware removal software and like to get rid of ListenToTheRadioNow manually, you might accomplish this by going to the Windows Add/Remove Programs menu in the control panel and deleting the offending software; in cases of web browser plug-ins, you could remove it by visiting the browser’s Add-on/Extension manager. You will likely also want to reset your web browser.
Finally, check your hard drive for all of the following and clean your Windows registry manually to get rid of leftover application entries after uninstalls. Please keep in mind that only experienced users should attempt to manually edit the system files because removing any single critical registry entry results in a serious problem or even a system crash. In addition, certain malware is capable of replicating or preventing removal. It is highly recommended that you carry out the removal process in Safe Mode.
Files:
%LOCALAPPDATA%\Google\Chrome\User Data\Default\Sync Extension Settings\mlpfmcjpkbijcpegdbkplcddgacjlgpf
%UserProfile%\Local Settings\Application Data\Google\Chrome\User Data\Default\Sync Extension Settings\mlpfmcjpkbijcpegdbkplcddgacjlgpf
%LOCALAPPDATA%\Google\Chrome\User Data\Default\Extensions\mlpfmcjpkbijcpegdbkplcddgacjlgpf
%UserProfile%\Local Settings\Application Data\Google\Chrome\User Data\Default\Extensions\nhpggpakfcgbidnmlheodkbccemlenag
%LOCALAPPDATA%\Google\Chrome\User Data\Default\Extensions\nhpggpakfcgbidnmlheodkbccemlenag
%USERPROFILE%\AppData\Local\Google
Registry:
HKEY_LOCAL_MACHINE\Software\ListenToTheRadioNow\Microsoft\Windows\CurrentVersion\Uninstall..Uninstaller
ListenToTheRadioNow
Read More
DRIVER_IRQL_NOT_LESS_OR_EQUAL will cause your computer to go to the blue screen of death but do not worry there are solutions around this and we are here to instruct you on how to solve this.
-
Uninstall and install network drivers
DRIVER_IRQL_NOT_LESS_OR_EQUAL is most commonly tied to bad network drivers, whatever that be a corruption of the driver files or their incompatibility. So first thing is to check if this is the case.
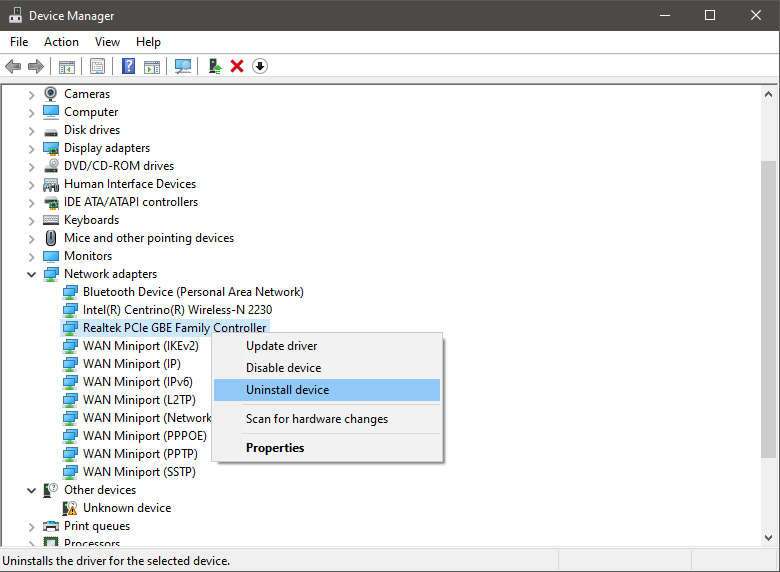
Press ⊞ WINDOWS + X to open the hidden menu in Windows and click on Device Manager.
In the Device Manager expand Network adapters, choose adapter, right-click on it and choose Uninstall.

Install latest driver or reboot so Windows will install the driver automatically
-
Update driver
If you do not want to reinstall the driver or you are unable to for whatever reason updating the driver might do the trick. To update driver:
Press ⊞ WINDOWS + X to open the hidden menu in Windows and click on Device Manager.
In the Device Manager expand Network adapters, choose adapter, right-click on it and choose Update Driver.

-
Fix via Command prompt
If both of the beforementioned solutions fail, try running the command prompt and fix the issue from there.
Press ⊞ WINDOWS + X to open the hidden menu in Windows and click on Command Prompt (administrator)
In command prompt type next line and press ENTERDEL /F /S /Q /A “C:\Windows\System32\drivers\mfewfpk.sys
Reboot the system -
Scan your PC for malware
Sometimes corruption in the system is caused by malware, Scan your system for malware, viruses, etc.
-
Check connections or other hardware issues
If all methods fail, open your PC case and check to see if connections everywhere are properly connected and tight. Clean your PC and turn it back ON
-
Use system restore
If anything fails, use Windows system restore and bring back computer into a state where everything was working fine.


Read More

Microsoft wants to escalate the situation from Australia to the EU, what a surprise.
Hello all and welcome to another news article, this time we are focusing on Microsoft pushing the EU to accept law proposition from Australia.
For all of you who are not familiar with the given situation let me quickly explain. The feud began when the Australian government proposed a new law that targeted Facebook and Google specifically. The government said that it believed that both of the tech giants were using content from news outlets without paying.
Have you ever seen the little news snippets that Google or Facebook sometimes show its users to keep them up to date? These are lifted directly from news websites, and the Australian government claimed that this practice meant that people didn’t bother visiting the news website. This then staved news websites of revenue.
As such, the government put forward a new law that would mean Google and Facebook would have to pay the source website for every time they displayed a news snippet. Facebook responded by removing its Australian news coverage in light of the law.
Google, however, put up a fight. It argued that its snippets encouraged people to click on it to read more, thus driving more traffic to the news website. It also said that such a law would be too expensive to maintain in the long run.
As such, Google threatened to remove itself from Australia if the law passed. This was likely a scare tactic, as 95 percent of Australian web users use Google; however, it actually opened the door for its rival, Microsoft.
Microsoft saw how it could push its own search engine BING to replace google. It of course went and reached the Australian government to assure them that BING is more than capable to fulfill its needs and fully abide by the proposed law.
Now Microsoft knows that if this law passes it could see a similar situation happening in Europe and it is pushing it. US News reported on how Microsoft plans to encourage EU countries to adopt this new law too. The company has teamed up with the European Publishers Council and News Media Europe to make the following statement:
Publishers might not have the economic strength to negotiate fair and balanced agreements with these gatekeeper tech companies, who might otherwise threaten to walk away from negotiations or exit markets entirely
Read More
If you are a gamer, you might have encountered either the CID HANDLE CREATION or VIDEO TDR ERROR errors with an error code of 0x00000016 as you play a game. These kinds of Stop errors have something to do with the Graphics card driver. It could be that your Graphics card driver needs to be updated or it may be corrupted. Whichever the case is, you can try fixing this error using the given solutions below but before you proceed, make sure to create a System Restore Point first so that you can easily roll back to the previous state of your computer in case something does not go as expected.
Option 1 – Try checking if your graphics card is enabled and update it as well
Although the problem is quite massive, the fix could be as simple as enabling the graphics card if it turns out to be disabled. There might be some strange reason why your graphics card disables itself. Thus, the best and first option you can try is to check if the graphics card is enabled or not. To do so, follow these steps:
- Tap the Win + R keys to open the Run dialog box.
- Then type “devmgmt.msc” in the field and hit Enter to open the Device Manager.
- After opening the Device Manager, look for your graphics card option among the list of device drivers. Once you found it, check if it is enabled or not. If it’s not enabled, you should see a gray arrow pointing downwards. Right-click on the card and select Enabled.
- Next, right-click on the graphics card once more and click on the Update Driver Software option and then click on the “Search automatically for updated driver software” option.
Option 2 – Reinstall the Graphics card drivers
- Tap Win + R to open Run then type “devmgmt.msc” in the field and hit Enter to open the Device Manager.
- From there, look for the Display adapters and uninstall each one of the graphics card drivers by right-clicking on them and selecting the Uninstall device option.
- After uninstalling the graphics card drivers, close the Device Manager and tap Win + R to open Run once again.
- After that, type “appwiz.cpl” in the field and hit Enter to open Programs & Features in the Control Panel.
- Next, look for any program that’s related to your GPU manufacturers like Nvidia, AMD, or Intel. Right-click on any GPU-related entry and click on Uninstall to uninstall them and then follow the next on-screen instructions that appear afterward.
- Now restart your computer.
- Once your computer has restarted, go to the GPU manufacturer’s website and download the latest driver version for your graphics card model and then install it.
- Restart your computer once again. That should fix the problem.
Option 3 – Try reinstalling the game
If updating and reinstalling your Graphics card driver didn’t help, then you can try to reinstall the game where you’re getting the CID HANDLE CREATION or VIDEO TDR ERRORS.
Option 4 – Uninstall the programs you installed recently
Chances are, some programs that you just installed might be the one that’s causing the BSOD error. Thus, you need to uninstall the program to resolve the problem.
- In the search box, type in “control” and then click on Control Panel (desktop app) among the search results.
- After that, select Programs and Features from the list which will give you a list of all the programs installed on your computer.
- From there, look for the concerned program and select it and then uninstall it.
Note: If you have downloaded the app from the Windows Store, you can simply right-click on it from the application list and then uninstall it. In addition, you might also want to check the hardware components of your computer that might not support the operating system itself. You can disconnect all the external devices like USB drives, scanners, printers, etc., and then reboot your PC. After that, add the devices again one after the other and check if the BSOD error is now fixed or not.
Option 5 – Try disabling your monitor’s Sleep functionality
There are times when the Sleep functionality of your monitor can also cause BSOD errors like CID HANDLE CREATION or VIDEO TDR errors. There are also times when the graphics card is running in the background and the display goes to sleep and then it’s turned back on but you encounter this kind of Blue Screen error. This is why you can try to disable your computer monitor’s Sleep mode.
Option 6 – Run the Blue Screen Troubleshooter
The Blue Screen troubleshooter is a built-in tool in Windows 10 that helps users in fixing BSOD errors like CID HANDLE CREATION or VIDEO TDR errors. It can be found on the Settings Troubleshooters page. To use it, refer to these steps:
- Tap the Win + I keys to open the Settings panel.
- Then go to Update & Security > Troubleshoot.
- From there, look for the option called “Blue Screen” on your right-hand side and then click the “Run the troubleshooter” button to run the Blue Screen Troubleshooter and then follow the next on-screen options. Note that you might have to boot your PC into Safe Mode.
Option 7 – Try to run the Chkdsk utility
Running the CHKDSK utility might also help you resolve the CID HANDLE CREATION or VIDEO TDR errors. If your hard drive has issues with integrity, the update will really fail as the system will think that it’s not healthy and that’s where the CHKDSK utility comes in. The CHKDSK utility repairs hard drive errors that might be causing the problem.
- Open Command Prompt with admin privileges.
- After opening Command Prompt, execute the following command and hit Enter:
chkdsk /f /r
- Wait for the process to be completed and then restart your computer.
Read More
This post will help you fix the ERR_CONNECTION_RESET error in Google Chrome. This error indicates that the Chrome browser wasn’t able to establish a stable connection or that there really is no connection at all with the website you are trying to open. This error does not occur on all websites though. When you encounter this kind of error message you will see the following message on your Google Chrome browser:
“This website is not available, The connection to example.com was interrupted, Error 101 (net:: ERR_CONNECTION_RESET): The Connection was reset.”
Note: You need to follow the options given below to fix the ERR_CONNECTION_RESET error and make sure to reload the webpage each time you complete following each one of the fixes.
Option 1 – Check the Network Cables and restart the router then reconnect
Of course, the first thing you can try is to check if the network cables connected to your computer or router are properly connected. And if your computer is connected via Wi-Fi, you need to make sure to restart your router once. In addition, you can also forget the Wi-Fi your computer is currently connected to and then try reconnecting again to see if it would work.
Option 2 – Try removing the Proxy
Removing the Proxy might also help you in fixing the ERR_CONNECTION_RESET error in Chrome. Here’s how you can do it:
- Tap the Win + R keys to open the Run dialog box.
- Then type “inetcpl.cpl” in the field and hit Enter to pull up the Internet Properties.
- After that, go to the Connections tab and select the LAN settings.
- From there. Uncheck the “Use a Proxy Server” option for your LAN and then make sure that the “Automatically detect settings” option is checked.
- Now click the OK and the Apply buttons.
- Restart your PC.
Note: If you are using a third-party proxy service, you have to disable it.
Option 3 – Try to increase the Maximum Transmission Unit (MTU)
You can also try increasing the Maximum Transmission Unit to fix the error. To do so, follow these steps:
- Open Settings and go to Network & Internet > Ethernet.
- From there, take off the Active Wireless / Wired Network Connection.
- Next, open Command Prompt as admin.
- Then type the “netsh interface IPv4 set subinterface “Ethernet 4” mtu=1472 store=persistent” command and hit Enter to execute it.
Option 4 – Flush the DNS and reset TCP/IP
Flushing the DNS and reset TCP/IP could also help in fixing the ERR_CONNECTION_RESET error in Chrome. To do so, refer to these steps:
- Click the Start button and type in “command prompt” in the field.
- From the search results that appear, right-click on Command Prompt and select the “Run as administrator” option.
- After opening Command Prompt, you have to type each one of the commands listed below. Just make sure that after you type each command, you hit Enter
- ipconfig /release
- ipconfig /all
- ipconfig /flushdns
- ipconfig /renew
- netsh int ip set dns
- netsh winsock reset
After you key in the commands listed above, the DNS cache will be flushed and the Winsock, as well as the TCP/IP, will reset.
Option 5 – Disable the AppEx Networks Accelerator feature
The AppEx Networks Accelerator is known to slow down network connections. Some users reported that it slows down the network speed by 70% up to 80% which is why you need to disable it. Here’s how you can do it:
- Go to Settings and select Network & Internet and from there select Ethernet > Change adapter options.
- Next, right-click on the network connection and select Properties.
- Then look for AppEx Networks Accelerator and uncheck its checkbox.
- Now click the OK button to save the changes and then check if the error is now fixed.
Option 6 – Delete the WLAN Profiles
Deleting the WLAN Profiles might be a good idea if you are not able to connect to the internet on your computer and if you’re using Wi-Fi. It could be that the networks that were connected previously have gone rogue which is why it is not connecting properly. And so deleting the WLAN profiles might help you in fixing the ERR_CONNECTION_RESET error.
Option 7 – Reinstall the Network Adapter Drivers
- Tap the Win + R keys to launch the Run window and then type in the “devmgmt.msc” command and hit Enter to open the Device Manager window.
- Under the Device Manager, you will see a list of drivers. From there, look for the Network Adapters and expand it.
- Then right-click on each one of the Network drivers and select “Uninstall device”.
- Restart your PC.
Option 8 – Try to disable the Wi-Fi Miniport
- In the Cortana Search box, type “command prompt” then right-click on the search result and select “Run as administrator”.
- After opening Command Prompt with admin privileges, type the commands listed below and hit Enter right after you key in each one of them.
- netsh wlan stop hostednetwork
- netsh wlan set hostednetwork mode=disallow
- Now exit Command Prompt and tap the Win + R keys to open the Run dialog box.
- Type “cpl” in the field and hit Enter to open Network Connections.
- From there, look for Microsoft Virtual Wi-Fi Miniport and right-click on it, and then select Disable.
Option 9 – Start Chrome in Safe Mode
The same with Windows Safe Mode, starting Chrome in Sage mode will open the browser but without all the user settings and extensions. And then try opening the website you were trying to open earlier.
Option 10 – Reset Google Chrome
- Open Google Chrome, then tap the Alt + F keys.
- After that, click on Settings.
- Next, scroll down until you see the Advanced option, once you see it, click on it.
- After clicking the Advanced option, go to the “Restore and clean up the option and click on the “Restore settings to their original defaults” option to reset Google Chrome.
- Now restart Google Chrome.
Read More
A newfound bug in Google docs is causing it to crush and upon reopening it will crush again making it very difficult to re-access your document. The bug is manifested when a series of the same word is typed into a document and Show grammar suggestion is turned on.

How was it found
A Google Docs user, Pat Needham brought up the issue on Google Docs Editors Help forum.
«I’ve only tried in Google Chrome, with documents from three separate Google accounts (personal, G Suite Basic, and work one which might be enterprise). All three experience this same issue».
«It’s case-sensitive. So trying with ‘and. and. And. and. And.’ doesn’t cause it to crash.»
While Needham publicly reported the bug, it appears that the issue was discovered by Eliza Callahan who was writing a poem novel for her novel using Google Docs.
Needham’s findings have also been confirmed by other users running Firefox 99.0.1
Another user, Sergii Dymchenko, said strings like «But. But. But. But. But.» triggered the same response. Some also noticed putting any of the terms like «Also, Therefore, And, Anyway, But, Who, Why, Besides, However,» in the same format achieved the outcome.
A YCombinator HackerNews reader suspected the cause to be the «Show grammar suggestion» option in Google Docs.
A Google spokesperson confirmed the presence of the issue adding, «we’re aware of this issue and the team is working on a fix.»
How to recover your document
First thing first, turn off Show grammar suggestions so you do not run into issue by accident. In order to turn it off go to Tools and then into Spelling and grammar and untick Show grammar suggestions.
Now, if you already have a document that has been crushed, fear not because there is a workaround to access it. For some strange reason this bug does not manifest on Google Docs mobile app, so you can open the crushed document in the mobile app, delete words that have caused the bug and reopen the document on your desktop.
Until Google comes up with the solution this is currently the only way to address the issue.
Read More
Internal Error 2753 — What is it?
Internal error 2753 is associated with Windows Installer failure. The Windows Installer is basically an in-built software program in Windows 7 and 8.
It installs all programs on the system smoothly, saves the program in the computer program files and in the Windows Registry.
Though this can be carried manually Windows Installer makes the installation process much easier.
However, internal error 2753 can cause a great deal of distress and frustration during program installation. This error prevents you from installing your desired program successfully.
Solution
Error Causes
The 2 known causes for Internal Error 2753 are:
- Viral infection
- Windows Installer not properly registered
Further Information and Manual Repair
To resolve internal error 2753 on your system, try the methods discussed below. These methods are easy and require no technical expertise.
Let’s get started:
Method 1 — Remove All Malicious Programs
Malicious programs like viruses, malware, adware, Trojan and spyware can corrupt programs on your PC like Windows Installer.
If this is the underlying cause of error code 2753, then simply download a powerful antivirus on your system. Run it to scan for all such malicious programs and remove them.
Once your PC is clean, try installing your desired program. This will hopefully resolve the issue. If the error still pops up then try method 2.
Method 2 — Register Windows Installer Properly
To do this, go to the start menu and then open Run and type ‘cmd’ in the box, and press OK. This will open the DOS command window.
In the command prompt type «regsvr32 vbscript.dll» and then press Enter to proceed. After that, you will see a message that will read as «DllRegisterServer in vbscript.dll succeeded.»
This means Window Installer files have been successfully registered on your PC. Now you can try installing your desired program again.
If the installation begins and completes successfully, then the error is resolved.
Method 3 — Undo Recent Changes
If nothing works, then use the Windows System Restore Utility tool to undo recent changes. This will bring back your PC in the former state before you experienced the error 2753 on your PC.
To access System Restore Utility, press Start and type System Restore in the search box. Now follow the steps in the Wizard to choose a restore point. Once you select the point, reboot your system to activate changes.
Read More
Code 33 — What is it?
Code 33 is a typical Device Manager error. This error code occurs when Windows is unable to start a device that you are trying to use on your PC. The error code 33 is usually displayed in the following format:
“Windows cannot determine which resources are required for this device. Code 33”
Solution
Error Causes
Error code 33 may be triggered due to two reasons. One reason can be the translator’s failure to find the correct resource for the device driver.
And since this error code is associated with the Device Manager, another reason can be an outdated or corrupted device driver. In most cases, the underlying problem for Device Manager error code is outdated/corrupted drivers.
The good news is that Device Manager error code 33 is not detrimental. However, if the error is not resolved timely, it can lower the functionality and the performance of your PC. You may not be able to use the hardware device.
Further Information and Manual Repair
To resolve code 33, you don’t need to be technically sound or hire a professional computer programmer. Just like any other Device Manager error code, code 33 is also easy to repair.
To help you fix this issue on your system, below are some of the best, easy, and effective DIY solutions.
Method 1 — Configure Hardware Device
Properly configure the problematic hardware device to fix error code 33. It is important to understand that when you install a device that is not plug-and-play, the resource settings are not configured automatically.
This means for such devices you will have to perform device configuration manually.
For device configuration, here’s what you should do:
- Go to the start menu
- Click Control Panel, then click Performance and Maintenance, and then System
- Now on the hardware tab, click on Device Manager and then double click the device you wish to configure
- Click the resources tab and then click on the check box next to the Use Automatic Setting
- After that click, the ‘Setting Based On’ and then click the hardware configuration you wish to change
- Press the ‘Resource Type’ you will like to configure in the ‘Resource Settings’ box
- Now go to the Change Settings tab and type a new value for the Resource Type
Method 2 — Update the Problematic Drivers
Code 33 can also be generated due to driver problems. In such a scenario, it is recommended to update the outdated or corrupted drivers.
Identifying all problematic drivers and updating them individually can be frustrating and time-consuming. Therefore to save time and avoid the hassle involved in updating drivers manually, it is advisable to download DriverFIX.
Method 3 — Download DriverFIX to Update Drivers Automatically
DriverFIX is a next-generation and user-friendly program compatible with all Windows versions.
This software is exclusively designed to repair and resolve device driver-related problems and error codes.
Once installed, its intelligent and intuitive programming system detects all outdated, corrupted, and misconfigured device drivers on your PC. It automatically updates all the problematic drivers in a few seconds. It makes sure that the driver versions are the latest and compatible with your operating system.
Furthermore, it also ensures that drivers are continuously updated whenever new versions are available. So, you don’t have to worry about keeping device drivers up to date.
Click here to download DriverFIX to resolve Device Manager error code 33 today!
Read More
Copyright © 2023, ErrorTools. All Rights Reserved
Trademark: Microsoft Windows logos are registered trademarks of Microsoft. Disclaimer: ErrorTools.com is not affiliated with Microsoft, nor claims direct affiliation.
The information on this page is provided for information purposes only.
File Explorer is a very important part of the Windows operating system. Not only in Windows but File Explorer or Manager is something you need to Fix File Explorer NTDLL.dll Crash in Windows. Users can access the saved files by opening the file explorer in Windows. However, many Windows users have recently faced problems with File Explorer.

Some users have reported that Windows file explorer crashes and displays the error message ‘NTDLL.DLL’. File Explorer crashes are accompanied by the message NTDLL.DLL, preventing users from using File Explorer.
If you are a Windows user and have recently faced the same problem, then continue reading this guide. TheFile Explorer NTDLL.dll crashingissue in Windows appears for various reasons. The reasons can range from compatibility issues to bugs in the operating system.
The good thing is that the NTDLL.dll File Explorer crash error message can be easily fixed by following some of the methods that we have shared below. Here’s how to fix Windows File explorer crashing issue.
1. Restart your computer
The first thing you should do if your File Explorer crashes out of nowhere is to restart your PC. Restarting your PC will stop all background applications processes, and services, which may fix file explorer problems.
To restart your Windows PC, click the Windows Start button and click the Power option. In the Power options, select ‘Restart’. After restart, start using your PC normally; You will not face Fix File Explorer NTDLL.dll Crash if it appears due to an application or background process.
2. Restart Windows Explorer
If restarting your PC doesn’t help, you need to restart your Windows Explorer. Many Windows users on Microsoft Forums claim to have resolved the File Explorer NTDLL.dll error message by restarting Windows explorer from Task Manager. Here’s what you need to do.
1. First, click Windows search and type Task Manager. Next, open the Task Manager app from the list.
2. In Task Manager, switch tothe Processestab.
3. Now file Windows Explorer. Right-click on it and select ‘Restart‘. Or, select Windows Explorer, and select ‘Restart Task‘ in the top right corner.
There he is! Your screen will go black for a moment. This confirms that File Explorer has restarted in Windows.
3. Update Your Graphics Driver
Ntdll.dll is a very important file and is responsible for timing, threading, messaging, and operating system synchronization. Outdated graphics drivers are often the reason for the ntdll.dll File Explorer crash error. Therefore, you need to update your graphics driver to fix the problem.
1. First, click Windows 11 search and typeDevice Manager. Next, open the Device Manager app from the list.
2. When device manager opens, expandDisplay adapters.
3. Now right-click on your graphics adapter and select ‘ Update driver‘.
4. At the Update driver prompt, select ‘Search for driver automatically‘.
There he is! You have to follow the on-screen instructions to complete the driver update process to resolve or Fix File Explorer NTDLL.dll Crash.
4. Run the System Maintenance Troubleshooter
System maintenance troubleshooter is a very important tool that can fix most Windows problems. It is part of the Windows OS, but only a few users know about it. Here’s how to run the System Maintenance troubleshooter in Windows.
1. Click the Windows search button and type “System Maintenance”. Select the ‘Perform recommended maintenance automatically‘ application from the list that appears.
2. This will openthe System Maintenance troubleshooter. Click the ”Next” button.
3. System maintenance problem solving will run and look for existing problems. You can also try running this workaround asadministrator.
Follow the instructions on the screen to complete thesystem maintenance troubleshooting process. Once finished, restart your Windows computer easily. This can easily Fix NTDLL.dll File Explorer Crash.
5. Delete File Explorer History
Corrupted file explorer history can be the main cause of the ntdll.dll file explorer error message appearing. Therefore, you can delete file explorer history to fix this problem. Here’s how:
1. Click the Windows search button and type “File Explorer Options”.
2. Open the “File Explorer Options” application from the list of matching results.
3. In the file explorer options, move to the “General” tab.
4. In the privacy section, click the “Clear” button. Once done, click the “Ok” button to close the file explorer options.
That’s an easy way to delete file explorer history on the Windows operating system so you can fix File Explorer NTDLL.dll Crash.
6. Performa Clean Boot
For the record, you have around 40-50 applications installed on your computer. Some of them may still be running in the background even if they are not actively used. In situations like this, it’s a good idea to do a clean boot.
Periodic restart means disabling all third-party software during startup. This way, when your PC restarts, only essential Microsoft services will run and can ensure PC performance. Here are the steps to perform a clean boot:
1. Click the Windows Search button and type “msconfig”. Then select the System Configuration application from the search results.
2. In System Configuration, go to the “Services” tab.
3. Check the “Hide all Microsoft services” option in the bottom left corner.
4. Click the “Disable all” button in the bottom right corner, then close the System Configuration window once the changes have been applied.
The above steps will Fix File Explorer NTDLL.dll Crash on Windows after restarting.
7. RunSFC Command
If you still experience NTDLL.dll File Explorer Crashing, the best way is to run the SFC command. SFC or System File Checker is an important tool in Windows that scans and repairs corrupted files on the system. Here are the steps to run it:
1. Click the Windows Search button and type “Command Prompt”. Then right click on Command Prompt and select “Run as administrator”.
2. When Command Prompt opens, enter the following command:
sfc /scannow
3. Wait patiently until the scanning process is complete. Once finished, restart your computer.
You can easily run the System File Checker tool on Windows. This will Fix File Explorer NTDLL.dll Crash problem on Windows..
8. Update your Windows Operating System
Updating the operating system is the best solution to solve various system problems. Problems Fixing File Explorer NTDLL.dll Crash may be caused by a bug or error in the version of Windows you are using.
While you can’t do much to determine whether this is a bug, failure, or other problem, what you can do is update your operating system.
An updated operating system has many advantages. You can enjoy new features, eliminate compatibility issues, and more. Go to Settings > Windows Update > Check for updates to Fix File Explorer NTDLL.dll Crash in windows. This will automatically check for and install the latest version of Windows on your computer.
That’s how to Fix File Explorer NTDLL.dll Crash .dll. If you need additional help to resolve this issue, feel free to let us know via comments. And if this article helps you, don’t forget to share it with your friends.
A troubleshooting guide for Ntdll.dll errors
Ntdll.dll error messages can apply to nearly any Windows-based software program, driver, or plugin on any of Microsoft’s operating systems from Windows NT up through Windows 10, Windows 8, Windows 7, Windows Vista, and Windows XP.
How to Fix Ntdll.dll Errors
-
Restart your computer. The ntdll.dll error you’re receiving could be due to a one-time, temporary issue and a simple reboot may resolve the problem completely.
-
Reinstall the program if the error only displays when you use a specific program.
If the software program has any updates or service packs available, install them, too. The software’s programmers may have identified an issue with the program that caused the DLL error and then issued a patch for it.
Third-party software programs that have been installed on your computer are almost always the cause of ntdll.dll errors. The remainder of these troubleshooting steps resolves the issue only rarely.
-
Check the Windows service pack level you’re running and then check this page to see if there’s a more recent service pack available for installation. Some issues that caused ntdll.dll errors have been corrected in these service packs from Microsoft.
The easiest way to update your Windows computer with the newest service pack and other patches is to use Windows Update. Follow our guide on How to Check for and Install Windows Updates if you need help.
-
Selectively disable Microsoft Edge extensions. If your error is displaying when you start, run, or close Edge, an extension may be causing the problem. Disabling each extension, one by one, will determine which one is the culprit (if any).
As a workaround, assuming the ntdll.dll error really is Edge-related, install and use a competing browser like Firefox.
-
Rename the NLSPATH system variable (from NLSPATH to NLSPATHOLD). If your Windows system doesn’t have this environment variable, skip this step.
This is a troubleshooting step for this issue only. Be sure to set this path back to its original name if it doesn’t resolve the issue.
-
Disable Data Execution Prevention for Explorer.exe. As in the previous step, this is for troubleshooting the ntdll.dll issue only. If this doesn’t resolve the problem, return the Data Execution Prevention settings to their previous settings.
-
Disable UAC. This is a workaround for some causes of ntdll.dll issues but could serve as a permanent solution if not using User Account Control is something you’re comfortable with on your computer.
-
Update drivers for any hardware in your computer where updated drivers are available. Outdated drivers sometimes cause these errors.
-
Test your memory for damage. If you’re receiving one of the above DLL messages, one possible cause could be a bad memory module in your system. Testing your memory will either identify a problem or clear your RAM of any responsibility.
Replace your memory if it fails any of your tests.
-
Ntdll.dll errors could occur if you have an Iomega Zip drive on the same IDE cable as the hard drive inside your computer. If so, move the Zip drive to a dedicated IDE controller.
-
Replace the IDE cable connecting the hard drive to the motherboard. If this cable is damaged or malfunctioning, one symptom could be the DLL error you’re seeing.
-
Repair your installation of Windows. If individual software reinstallations fail to resolve the problem, a repair installation of Windows will replace the ntdll.dll file.
-
Perform a clean installation of Windows. A clean installation will completely remove Windows from your PC and install it again from scratch. We don’t recommend this option unless you’ve exhausted all previous troubleshooting ideas and you’re comfortable that the error isn’t caused by a single program (Step 2).
If a single program or plugin is causing the ntdll.dll error, reinstalling Windows and then reinstalling all of the same software may lead you right back to the same error.
-
If everything else has failed, including the clean installation from the last step, you could be dealing with a hardware issue with your hard drive. However, this is extremely rare. If so, replace the hard drive and then perform a new installation of Windows.
Need More Help?
If you don’t want to fix this ntdll.dll problem yourself, see How Do I Get My Computer Fixed? for a full list of your support options, plus help with everything along the way like figuring out repair costs, getting your files off, choosing a repair service, and a whole lot more.
Ntdll.dll Errors
There are many different ways these errors might be displayed on your computer. They can be caused by a number of different things which result in many different error messages, but these are some of the most common:
- STOP: 0xC0000221 unknown hard error C:\Winnt\System32\Ntdll.dll
- STOP: C0000221 unknown hard error \SystemRoot\System32\ntdll.dll
- AppName: [PROGRAM NAME] ModName: ntdll.dll
- [PROGRAM NAME] caused a fault in module NTDLL.DLL at [ANY ADDRESS]
- Crash caused in ntdll.dll!
- NTDLL.DLL Error!
- Unhandled exception at [ANY ADDRESS] (NTDLL.DLL)
The message might appear before or after a program is used, while a program is running, when Windows is started or shut down, or even during a Windows installation.
Causes of Ntdll.dll Errors
The causes of ntdll.dll error messages can vary greatly. However, most of them result from a corrupt or damaged version of the ntdll DLL file itself, corrupt hardware drivers, or issues between Windows and other programs.
These errors can sometimes mean that a piece of hardware in your computer is malfunctioning, but this is rare.
FAQ
-
Boot up Windows in Safe Mode > press Win + R on your keyboard > enter eventvwr in the run bar > open Windows Logs > System. Look for system_thread_exception_not_handled and select it to locate the driver causing the error. Update or reinstall the affected driver.
-
Make sure the the file or folder you’re trying to install, start, or update has the necessary permissions. Right-click the file or folder > select Properties > Security > select your name under Group or user names > Edit. Find the boxes for the permissions you need and check them, then select OK.
Thanks for letting us know!
Get the Latest Tech News Delivered Every Day
Subscribe