

On Windows 10, when you’re having driver issues, you can enable the «Boot Log» option to create a special ntbtlog.txt file that includes a detailed list of the loaded and unloaded drivers during boot.
The option won’t fix any problems your device may be experiencing, but you can analyze this information to understand what might be preventing Windows 10 from loading correctly to find an appropriate fix.
In this Windows 10 guide, we walk you through the steps to enable «Boot Log» to collect information about the loaded and not loaded drivers during startup using System Configuration and Command Prompt.
- How to enable ‘Boot log’ using System Configuration
- How to enable ‘Boot log’ using Command Prompt
How to enable ‘Boot log’ using System Configuration
To log driver information during boot using System Configuration, use these steps:
- Open Start.
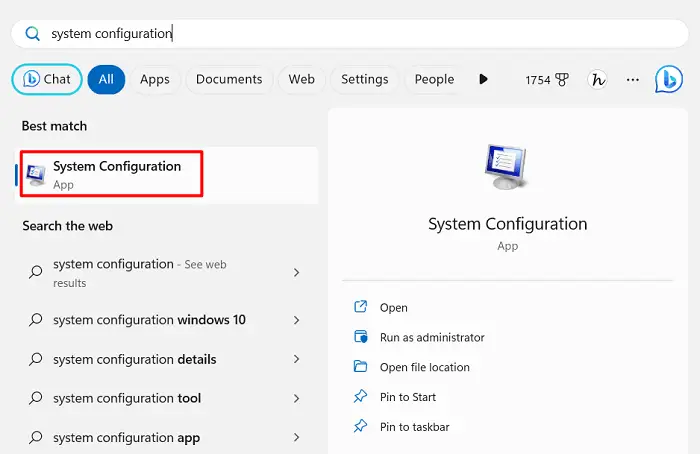
- Search for System Configuration and click the top result to open the experience.(Quick Tip: You can also use the Windows key + R keyboard shortcut to open the Run command, enter the msconfig command, and click OK to open System Information.)
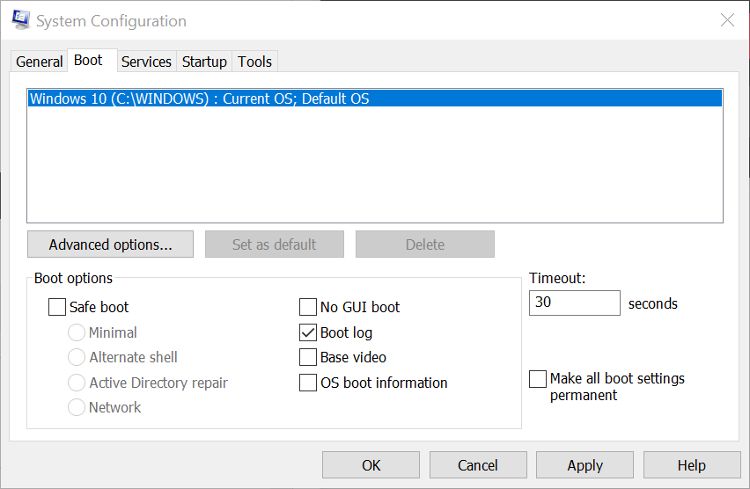
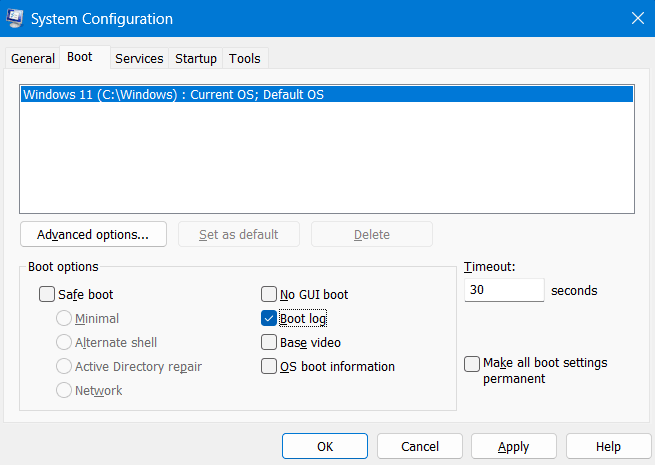
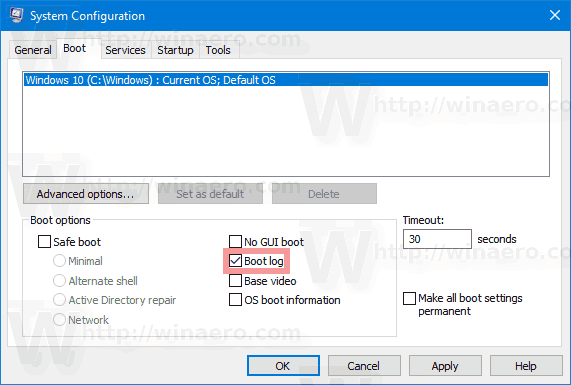
- Click on the Boot tab.
- Check the Boot log option.
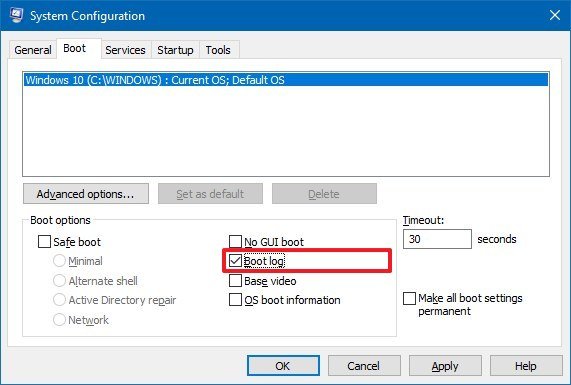
- Click the Apply button.
- Click the OK button.
- Click the Restart button.
Once you complete these steps, a special log file will be created with the drivers that were loaded, including those that were omitted.
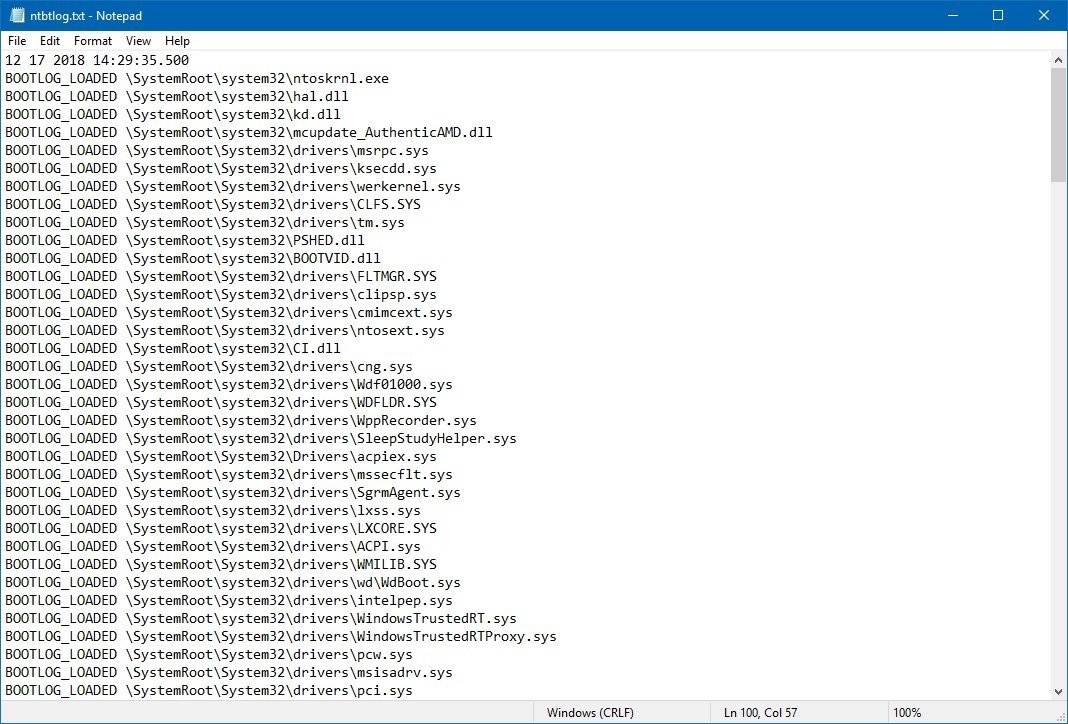
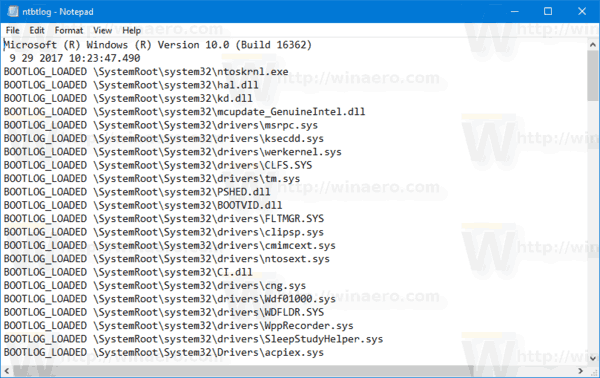
Viewing the ntbtlog text file
To find and view the ntbtlog.txt file, use these steps:
- Use the Windows key + R keyboard shortcut to open the Run command.
- Type the following file path:
c:\Windows\ntbtlog.txt - Click the OK button.
In the text file, you can see a list of loaded and unloaded drivers during boot, which you can now use in your troubleshooting process to fix a related issue.
All the latest news, reviews, and guides for Windows and Xbox diehards.
If you no longer need the «Boot Log,» you can disable the feature using the same instructions mentioned above, but on step No. 4, make sure to clear the option.
How to enable ‘Boot log’ using Command Prompt
To log driver information during boot using Command Prompt, use these steps:
- Open Start.
- Search for Command Prompt, right-click the top result, and select the Run as administrator option.
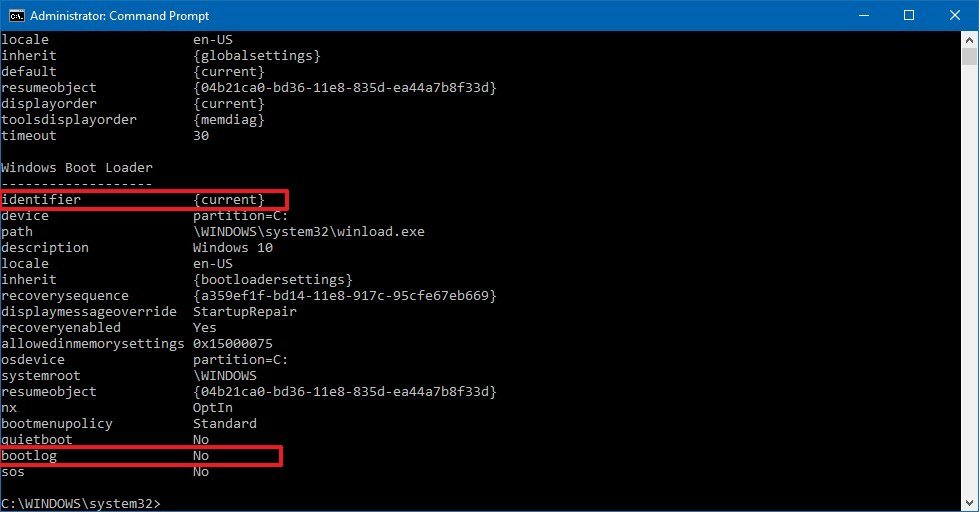
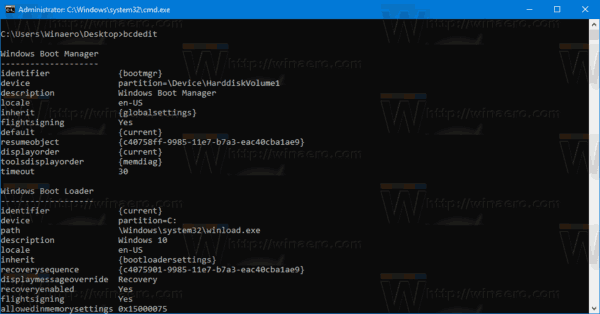
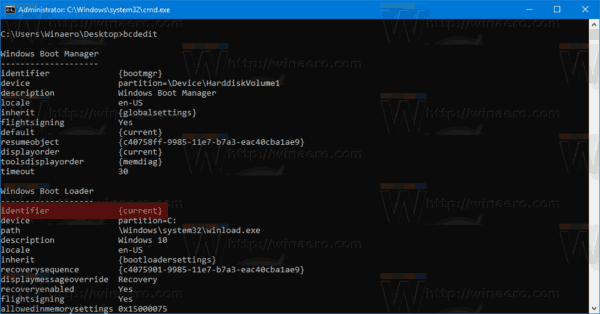
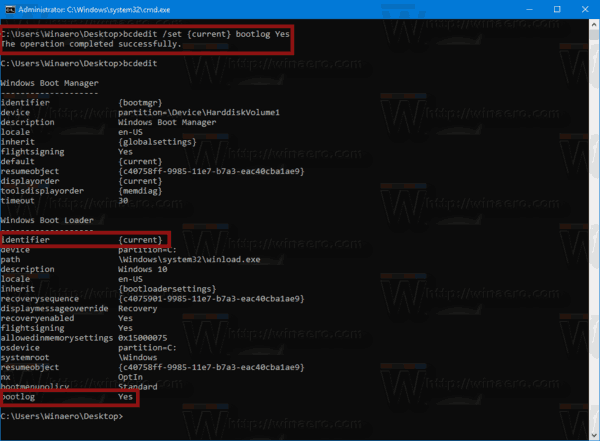
- Type the following command and press Enter:
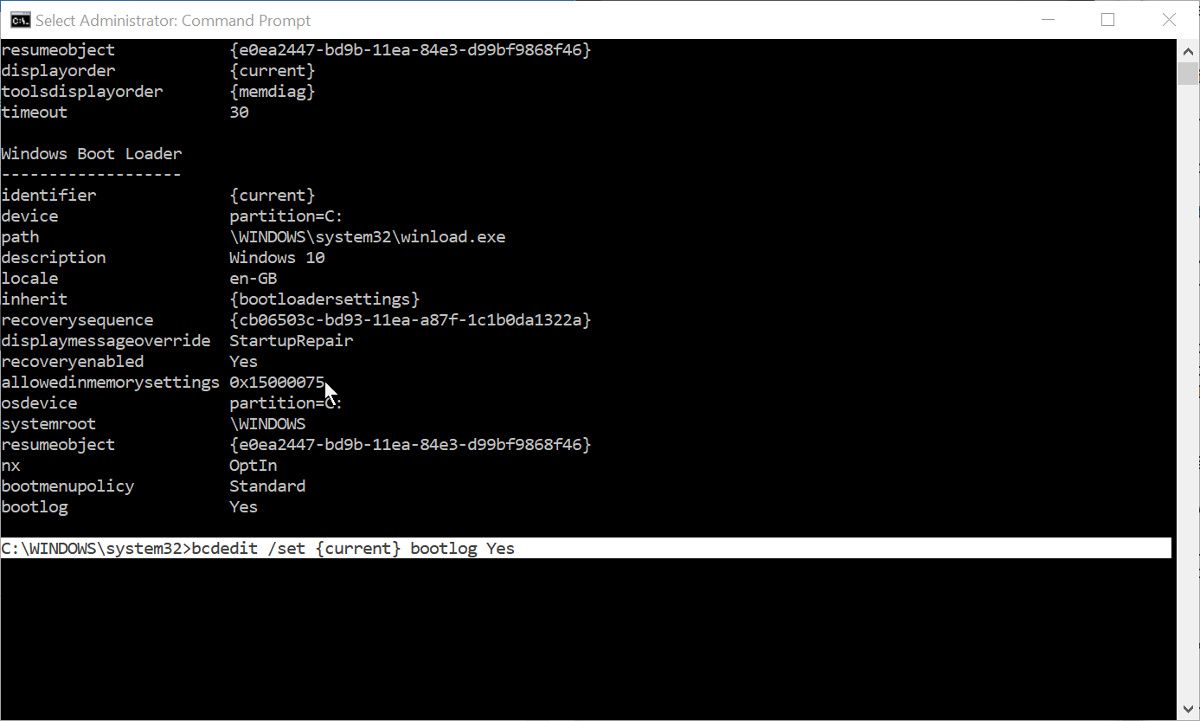
bcdedit - Under the «Windows Boot Loader» section, note the «identifier» and «bootlog» information. For example:
- identifier — {current}.
- bootlog — No.
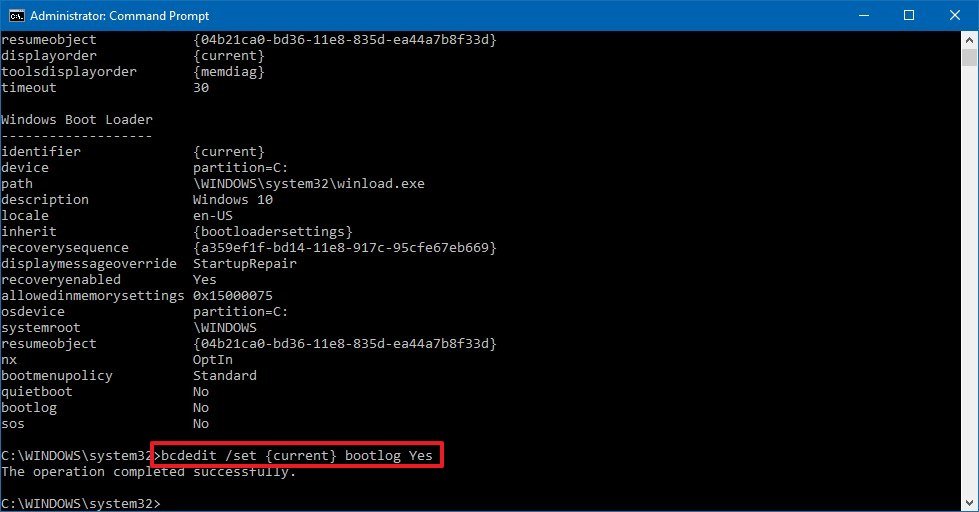
- Type the following command to enable logs during boot and press Enter:
bcdedit /set {current} bootlog YesIn the command, make sure to replace {current} with the information in your identifier.
After completing the steps, a log file will be created in the Windows folder with the drivers that were loaded, including those that were not loaded.
Viewing the ntbtlog text file
To find and view the «Boot Log» file, use these steps:
- Use the Windows key + R keyboard shortcut to open the Run command.
- Type the following file path:
c:\Windows\ntbtlog.txt - Click the OK button.
In the text file, you can see information about drivers that Windows 10 loaded and didn’t load during the boot process, which you can now use in your troubleshooting process to resolve a related problem.
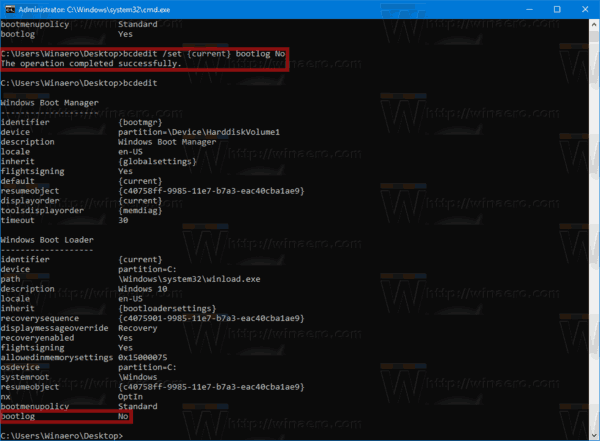
You can always revert the changes using the same instructions outlined above, but on step No. 5, make sure to use this command:
bcdedit /set {current} bootlog No.
Although this guide is focused on Windows 10, the «Boot Log» option has been available for years, and you can also use the same instructions on Windows 8.1 and Windows 7.
More Windows 10 resources
For more helpful articles, coverage, and answers to common questions about Windows 10, visit the following resources:
- Windows 10 on Windows Central – All you need to know
- Windows 10 help, tips, and tricks
- Windows 10 forums on Windows Central
Mauro Huculak has been a Windows How-To Expert contributor for WindowsCentral.com for nearly a decade and has over 15 years of experience writing comprehensive guides. He also has an IT background and has achieved different professional certifications from Microsoft, Cisco, VMware, and CompTIA. He has been recognized as a Microsoft MVP for many years.
При выполнении анализа процедуры загрузки иногда бывает очень важно получить полный список загружающихся и незагружающихся драйверов и библиотек. Использовать для этих целей специальные утилиты необязательно, получить список загружаемых программных компонентов можно средствами самой операционной системы. Список представляет собой обычный текстовый файл ntbtlog.tхt, сохраняемый в корневой системной папке Windows.
Как в Windows 10 включить лог загрузки
Есть два способа создания журнала загрузки Windows. Сначала самый простой. Нажатием Win + R вызовите диалоговое окошко запуска и выполните в нём команду msconfig. В открывшемся окне конфигурации системы переключитесь на вкладку «Загрузка» и установите птичку в чекбоксе «Журнал загрузки». Теперь нажмите «Применить» и «OK».

При этом появится окошко с предложением перезагрузить компьютер. Соглашаемся, выполняем перезагрузку,

после чего идём в расположение C:/Windows, находим там текстовый файл ntbtlog

и открываем его Блокнотом или иным редактором.

Второй способ чуть сложнее. Запустите от имени администратора командную строку и выполните в ней команду bcdedit. В консоли появится список всех ваших операционных систем и их загрузочных записей. У нас установлена только одна Windows 10, поэтому элементов списка будет два — диспетчер загрузки и загрузка Windows. Нам нужна вторая запись, а именно её идентификатор со значением {current}.

Тут же в командной строке выполните команду такого вида:
bcdedit /set {Идентификатор} bootlog Yes

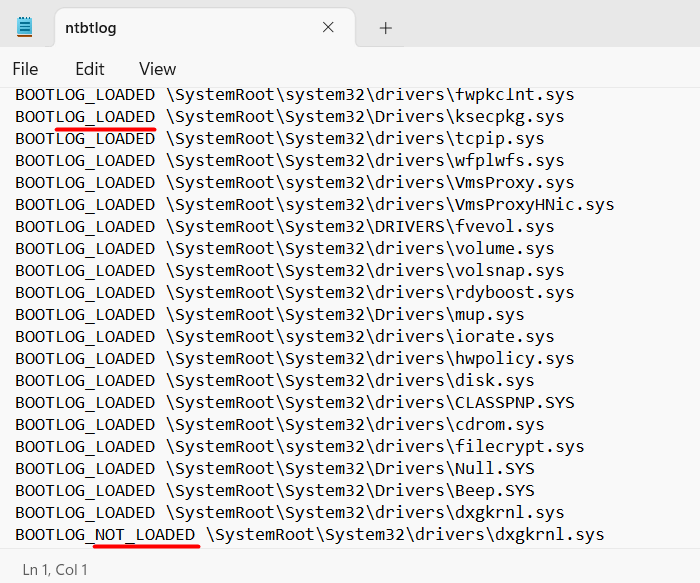
На место идентификатора подставьте его значение. В нашем примере это current (смотрите скриншот). Теперь выполните перезагрузку. Как и в предыдущем случае, журнал загрузки будет создан в папке Windows. Как понять из содержимого журнала, был ли загружен драйвер или нет? Очень просто. Запись BOOTLOG_LOADED указывает, что драйвер загрузился, запись BOOTLOG_NOT_LOADED будет указывать, что во время старта операционной системы загрузка драйвера была пропущена.
When troubleshooting problems with your Windows computer, it is useful to have as much system information as possible. There are several ways to generate information about what is going on underneath the hood of your PC. And if you are experiencing startup issues, one of the most useful things to check is the boot log.
Here’s how to enable the boot log and where to find it on your Windows computer.
What Is the Windows Boot Log?
The Boot Log or System Initialization Log is a text file that can be generated during your computer’s boot sequence. It contains a list of all the drivers that are loaded during boot, as well as any expected drivers that are not loaded.
The boot log feature is disabled by default. There are two ways to enable or disable the boot log, both of which are explored below. Because you are making changes to an important part of Windows, both methods require you to be signed in as an administrator. If you do not have elevated privileges, you won’t be permitted to enable the boot log.
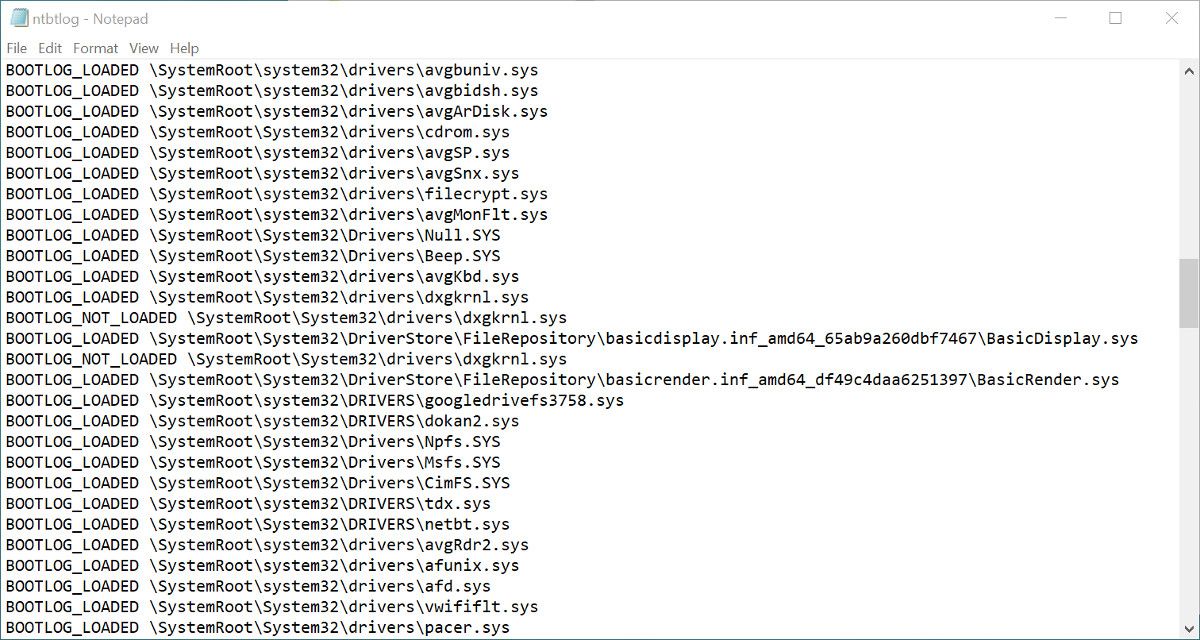
The text file generated after you enable boot logging can be opened and read in a text editor such as Notepad. Each driver is listed separately, and either labeled as LOADED or NOT_LOADED. The folder path to each driver is also shown.
How to Enable the Boot Log With MSConfig
Using the MSConfig tool, also known as the System Configuration tool, is probably the easiest of the two methods for enabling the boot log.
- Open the Run dialog by searching for Run in Windows Search, or by using the Win + R shortcut.
- In the Run app, type msconfig and press Return. If prompted, confirm your administrator privileges.
- Select the Boot tab in the System Configuration app. The default OS should already be selected.
- Check the box next to Boot log in the Boot options section, then click Apply.
You will be prompted to restart your computer. Doing so will immediately generate the boot log. You can also exit without restarting if you need to save and close any unfinished files. In this case, the boot log will be created the next time you restart the PC.
How to Modify Boot Settings With BitLocker Enabled
Enabling the boot log is seen by Windows as editing boot settings. This will be an issue if you have BitLocker Encryption turned on for the disk where the OS is installed. Enabling the boot log and then restarting will activate BitLocker protections.
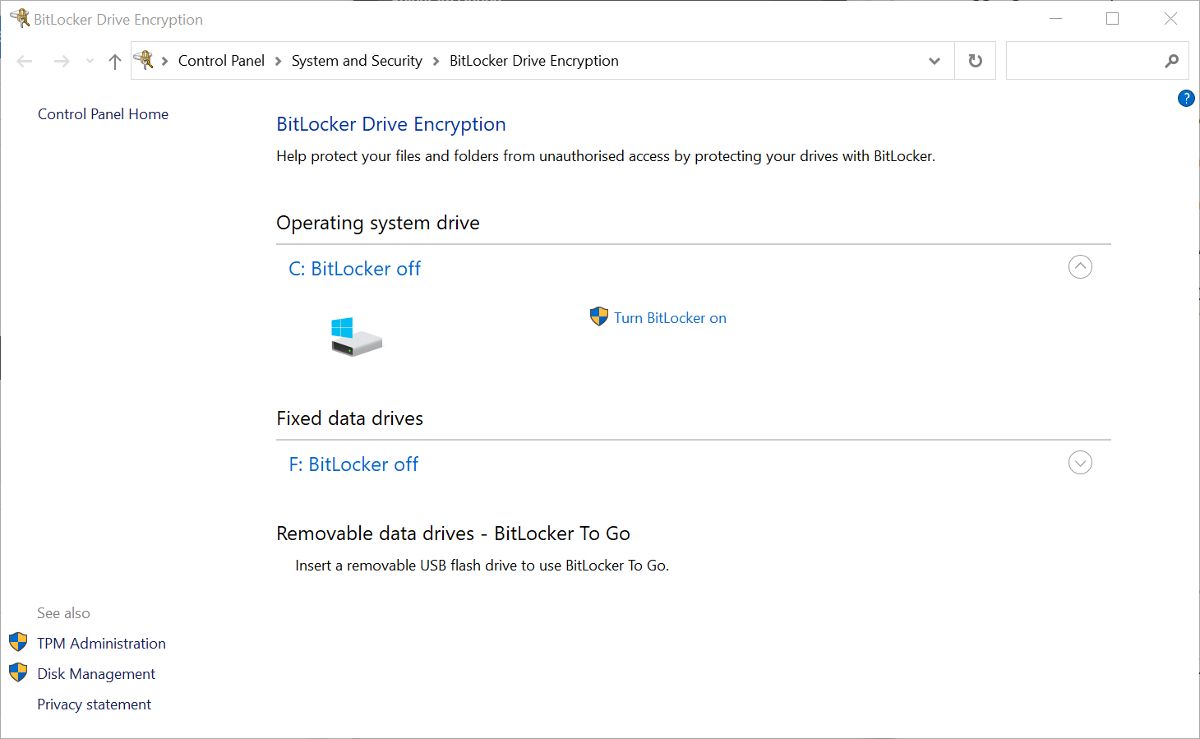
If BitLocker is enabled, you will see a message when you apply the boot settings changes in MSConfig. The message will remind you that when you restart after making changes to boot settings, your computer will enter recovery mode. You will be required to enter a BitLocker Recovery Key or Recovery Password to continue startup.
If you see the message and do not have a BitLocker recovery key or password, do not proceed with the changes to the boot options. If you don’t know where to find it, our guide will help you locate your BitLocker Recovery Key.
How to Enable the Boot Log With Command Prompt
If you cannot access MSConfig for some reason, you can enable the boot log using Command Prompt (Elevated). This method requires a bit more work but is still simple to do if you follow the steps here.
- In Windows Search, type Command Prompt. Right-click on it in the results and select Run as Administrator.
- In the Elevated Command Prompt, type bcdedit and press Return. This generates a list of boot details.
- Make a note of the Identifier in the Windows Boot Loader section. This will usually be {current}.
- To enable the boot log, type the following: bcdedit /set {identifier} bootlog Yes. Replace identifier with the value you noted in the previous step.
- Type bcdedit again to check if the boot log has been enabled. It will be shown at the bottom of the list of boot information.
- You can then close Command Prompt and restart your PC to generate the log.
Using the Command Prompt can be a little daunting for new Windows users, or if you have never used the tool before. It really isn’t anything to be scared of, as long as you follow the command instructions from a trusted information source like MakeUseOf. If you want to become more familiar with this useful Windows tool, check out our beginner’s guide to the Command Prompt.
Where Is the Windows Boot Log Saved?
The generated boot log file will be called ntbtlog.txt. You can find it at C:\Windows\ntbtlog.txt. If you don’t see the file at that location, ensure you have restarted the computer at least once since you enabled the boot log.
There will only be one version of the file, and each time you start up your computer with boot logging enabled, it will be overwritten. To prevent this, you can move a generated log to your desktop or elsewhere on your computer. This allows you to compare boot logs from different times. You will need to confirm administrator privileges before you can move the boot log out of the Windows folder.
How to Disable the Boot Log
After completing your troubleshooting with the boot log, there is no need to keep it enabled. You can disable the boot log by simply reversing the processes shown above.
- Run MSConfig and select the Boot tab. Uncheck the box next to Boot log in the Boot options section. Then click Apply.
- Open an Elevated Command Prompt, and then type: bcdedit /set {identifier} bootlog No. Replacing identifier with the one you used previously, e.g. {current}.
You can use either method to disable the boot log, even if it is a different method from the one you used to enable it.
Troubleshoot Startup Issues With the Windows Boot Log
Enabling the boot log in Windows allows you to see a text list of every driver that is loaded and not loaded during the boot process. This can be very useful for troubleshooting startup issues and also problems with apps and services not working properly after startup.
When you restart your computer, all system drivers and USB drives reboot as well. Only when the essential drivers are turned ON, one can use his/her computer to its fullest performance. The information like which drivers actually start and which ones don’t during Windows startup is stored inside a text file named “Boot Log“. If you are struggling with some error code or issue on your Windows PC, you may take the help of this file and check where the problem actually lies.
By default, the Boot Log is disabled in Windows. So, you need to first enable this process on your computer. After you enable Boot Log in Windows 11/10, you may open the same to see which drivers are actually failing to start on your PC.

MBR vs. GPT: Which one is better for your SSD?
What is Windows Boot Log and how do you find it?
The Boot Log is basically a text file in Windows 11/10 that stores your computer’s boot sequence. Apart from noting down your device’s boot sequence, it also stores the information related to a driver which does or doesn’t start during Windows startup.
By enabling this boot log, you can have a grasp on what actually is not starting during Windows startup. This includes all network drivers, hardware devices, and a few other pieces of information which are preventing Windows from loading properly. This aids to find and work on the problematic device drivers and thus get rid of the persisting issue by applying the appropriate fixes.
By default, this boot log process is disabled in Windows. To enable storing your computer’s boot sequence, you may either use the System Configuration tool or the Command Prompt. After you have turned on this boot log process, follow these steps to locate and open this file on Windows 11/10 –
- Make sure to sign in as an administrator on your PC and launch File Explorer (Win + E).
- Type the following in its address bar and press Enter –
C:\Windows\ntbtlog.txt
- The selected text file will open inside the notepad. If you have set any other application to open the text file, this boot log file will open into that.
In the text file, you will find all the drivers listed separately with labels like LOADED or NOT_LOADED. You can also see the path of each of these device drivers.
How to convert your hard disk from MBR to GPT
Enabling Windows Boot Log on your PC
You may enable the Boot Log in Windows 11/10 using either of the following two options –
1] Using the System Configuration Tool
The most effective way to turn on the boot log process in Windows is by using the system configuration tool. Follow the below instructions to enable the same –
- Press Windows + S to launch the Run dialog.
- Type “System Configuration” in the text field, and click on the top result.
- When the System Configuration tool opens up, head over to the Boot tab.
- Under Boot options, check the box available left of “Boot log” and hit Apply followed by the OK button.
Close this tool and other running windows and restart your Windows PC. Sign back into your device again and you may now find the Boot log process enabled on your computer.
2] Using the Command Prompt
Alternatively, one may also use Command Prompt to enable the Boot log process in Windows 11/10. Here’s what you need to perform on your PC –
- Press Windows + X and select Terminal (Admin).
- The UAC window will prompt next, click Yes to authorize accessing the terminal.
- Press Ctrl + Shift + 2 to open Command Prompt inside the terminal.
- Type the following code on the console, and press Enter –
bcdedit

- Under Windows Boot loader, check what’s there next to the identifier.
- Copy this identifier and run the following code on the terminal next.
bcdedit /set {identifier} bootlog Yes
- Make sure to replace the identifier in the above code with your actual identifier. In our case, this is set to “current”, so we run the following code on our PC.
bcdedit /set {current} bootlog Yes

That’s it, you have successfully enabled storing the Boot log process on your computer. Restart your PC so that the recent changes come into effect from the next login.
How do I check if Boot Log is enabled or disabled using CMD?
To check if the boot log is enabled or disabled on a computer, launch Command Prompt as administrator and run the below code on it –
bcdedit
Under Windows Boot Loader, scroll down to the last line and check if there’s an entry named “bootlog“. If indeed there is such an entry, you will find “Yes” written next to it. This means that the Boot Log process is enabled on your computer.
However, if the boot log is disabled, you will not see such an entry as”bootlog” at the end of Windows Boot Loader. To confirm the same, see the snapshot provided above.
How do I disable Windows Boot Log?
Every time you restart your computer, this boot log file updates automatically, and while doing so, it maintains a record of your computer’s boot sequence from all times. With new information added to this boot log file, the size of this Boot Log file also increases.
To easily locate the problematic drivers, and make troubleshooting a bit easier in Windows, we suggest keeping this file disabled. Enable this file only when the need arises. Else, keep the boot log disabled by using either of the following two options –
1] Using the System Configuration Tool
The System Configuration tool provides you with the easiest way to disable the Boot Log in Windows. Here’s how to use this tool to disable the same –
- Press Windows + R to launch the Run dialog.
- Type “
msconfig” without quotes on it and hit OK. - When the System Configuration tool opens up, go to the Boot tab, and uncheck the box left of the Boot Log. You may find this under the Boot options.
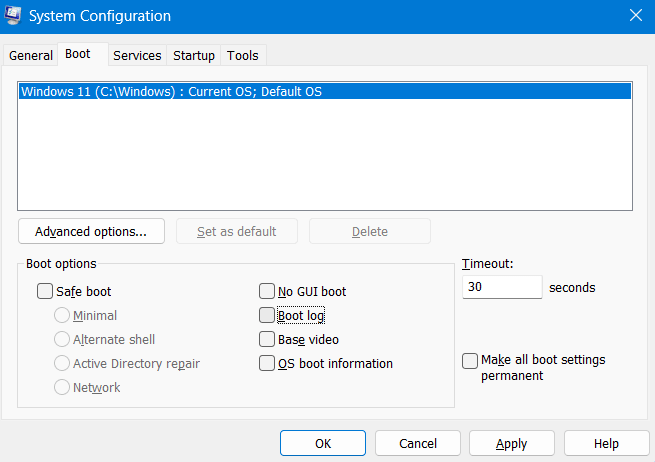
- Click Apply and then OK to confirm the recent changes.
Restart your PC and from the next login, you will not find any Boot log data on your computer.
2] Using Command Prompt
Just like enabling the Windows Boot Log using CMD, one can also use Command Prompt to disable the Boot Log as well. For this, you must follow these easy steps –
- Press Windows + R to launch the Run dialog.
- Type CMD and press Ctrl + Shift + Enter keys altogether to launch Command Prompt as administrator.
- On the elevated console, type the following code and press Enter –
bcdedit/ set {identifier} bootlog No
Make sure to replace the identifier in the above command with the one existing on your computer. If the same is set to current, run this code –
bcdedit /set {current} bootlog No
- That’s it, you have successfully forced your system not to store any boot log on your Windows PC.
Restart your PC next and the recent changes will come into effect from the subsequent login.
Whether should I keep enabling this Boot Log file in Windows?
Enable the Boot Log process only when you are facing troubles or issues accessing different drivers or services on your Windows PC. For the remaining time, when your operating system is functioning pretty well, keep this process disabled.
Read Next:
- How to Fix Dual Boot Option Not Showing In Windows
- How to Delete the EFI System Partition in Windows 11/10
Skip to content
It is possible to enable the boot log in Windows 10. The boot log is a special text file which contains a list of loaded and unloaded drivers during the boot process. It can be helpful when you are troubleshooting startup issues. Here is how it can be done.
Having the boot log enabled will allow you to analyze the internals of the boot process on your Windows 10 computer. The boot log is stored in the file C:\Windows\ntbtlog.txt and can be opened with your favorite text editor app like Notepad.
There are two ways to enable or disable this feature. The first method is msconfig, the GUI tool which can be used to configure various startup options of the OS. The second one is the console tool, bcdedit.exe. In this article, we will review both methods.
The boot log feature is disabled by default. In order to enable it, you must be signed in as administrator.
To enable boot log in Windows 10, do the following.
- Press Win + R keys together on the keyboard and type msconfig in the Run box. Press Enter.
- Confirm the UAC prompt if it appears and go to the boot tab.

- There, enable the option Boot log under the Boot options group.
- You might be prompted to restart Windows 10. If you click on Restart, the operating system will be rebooted.You can safely postpone this action if you have unfinished tasks opened.

How to Enable Boot Log using Bcdedit.exe
The same can be done with the built-in console utility bcdedit.exe. Here is how.
- Open an elevated command prompt.
- Type or copy-paste the following:
bcdedit
Once you press the Enter key, the tool will list all the installed operating systems and their boot records. You need to note the identifier of the OS for which you want to enable the boot log. See the following screenshot:

For the currently running instance, the identifier {current} can be used for quick reference.
- To enable the boot log, run the command
bcdedit /set {IDENTIFIER} bootlog YesReplace the {IDENTIFIER} with the actual value you noted, e.g. {current}.

- To disable the boot log, run the command
bcdedit /set {IDENTIFIER} bootlog NoThis will disable the boot log feature, which is the default option.
That’s it.
Support us
Winaero greatly relies on your support. You can help the site keep bringing you interesting and useful content and software by using these options:
If you like this article, please share it using the buttons below. It won’t take a lot from you, but it will help us grow. Thanks for your support!