
Все способы:
- Способ 1: Проверка компьютера на наличие вирусов
- Способ 2: Установка драйверов для последнего подключенного оборудования
- Способ 3: Откат установленного драйвера
- Способ 4: Очистка компьютера от мусора
- Способ 5: Проверка функционирования драйверов
- Шаг 1: Проверка нагрузки драйверов через KrView
- Шаг 2: Просмотр драйвера через Process Explorer
- Шаг 3: Обновление или переустановка драйверов
- Способ 6: Отключение ненужных служб
- Способ 7: Проверка целостности системных файлов
- Вопросы и ответы: 0
NT Kernel & System — один из стандартных системных процессов в Windows 10, который может начать загружать ЦП из-за определенных сбоев, связанных с работой драйверов, служб или стороннего программного обеспечения. Это вызывает надобность решения проблемы, поскольку использовать компьютер становится практически не реально. Именно об этом мы и поговорим далее, разобрав все доступные методы.
Способ 1: Проверка компьютера на наличие вирусов
Для начала хотим остановиться на возможной угрозе заражения операционной системы вирусами. Такие файлы часто функционируют в фоновом режиме, вклиниваясь в какие-либо службы или любые системные процессы, в том числе и в NT Kernel & System, что вызывает аномальную нагрузку на комплектующее. Проверить поведение процесса вручную у обычного пользователя вряд ли получится, поэтому придется обратиться за помощью к специальному программному обеспечению или онлайн-сервисам, которые сканируют систему на наличие угроз и удаляют их. Развернуто о борьбе с компьютерными вирусами читайте в другом материале на нашем сайте, кликнув по ссылке ниже.

Подробнее: Борьба с компьютерными вирусами
Способ 2: Установка драйверов для последнего подключенного оборудования
Обратить внимание на данный метод следует всем пользователям, кто только что подключил какое-либо новое оборудование к своему ПК и уже после этого столкнулся с повышением нагрузки на NT Kernel & System. Это может быть связано с тем, что установка соответствующих драйверов не была произведена и устройство функционирует неправильно. Мы рекомендуем в обязательном порядке отыскать подходящие файлы и добавить их в Windows.

Способ 3: Откат установленного драйвера
Этот вариант тоже относится только к определенным категориям пользователей, а именно к столкнувшимся с рассматриваемой проблемой после обновления конкретного драйвера. Чаще всего это связано с тем, что новая версия ПО не оптимизирована самими разработчиками и функционирует не совсем корректно в операционной системе. Исправить это можно путем отката до предыдущей версии драйвера, что осуществляется так:
- Щелкните по кнопке «Пуск» правой кнопкой мыши и в появившемся контекстном меню перейдите в «Диспетчер устройств».
- Разверните раздел, соответствующий недавно установленному драйверу.
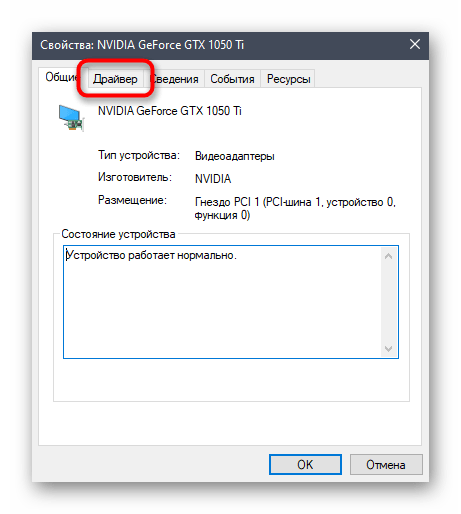
- Нажмите по строке ПКМ и выберите пункт «Свойства».
- Переместитесь на вкладку «Драйвер».
- Кликните по кнопке «Откатить» и подтвердите применение изменений.


После отката драйвера рекомендуется перезагрузить компьютер, чтобы все изменения вступили в силу. Теперь вы можете приступить к отслеживанию нагрузки на процессор службой NT Kernel & System. Если это не помогло, переходите к осуществлению следующих способов.
Способ 4: Очистка компьютера от мусора
Чем дольше функционирует операционная система без очистки временных файлов и различного мусора, тем больше это сказывается на быстродействии, а также могут возникать различные конфликты, приводя к различным неполадкам, включая и ту, о которой идет речь сегодня. Поэтому рекомендуется время от времени удалять такие элементы, очищая тем самым ПК. Для Виндовс 10 существует несколько вариантов реализации поставленной задачи. Прочесть о них мы рекомендуем в другой статье, кликнув по ссылке ниже.

Подробнее: Освобождаем место на диске C в Windows 10
Способ 5: Проверка функционирования драйверов
Этот метод является самым трудоемким из всех представленных в данном материале и мы рекомендуем переходить к нему только в той ситуации, когда рассмотренные ранее решения не принесли должного результата. Суть данного способа заключается в проверке активных драйверов и их нагрузки на процессор с дальнейшим исправлением этой ситуации. Для многих это покажется сложной задачей, поэтому мы разбили ее на этапы, детально расписав каждый из них.
Шаг 1: Проверка нагрузки драйверов через KrView
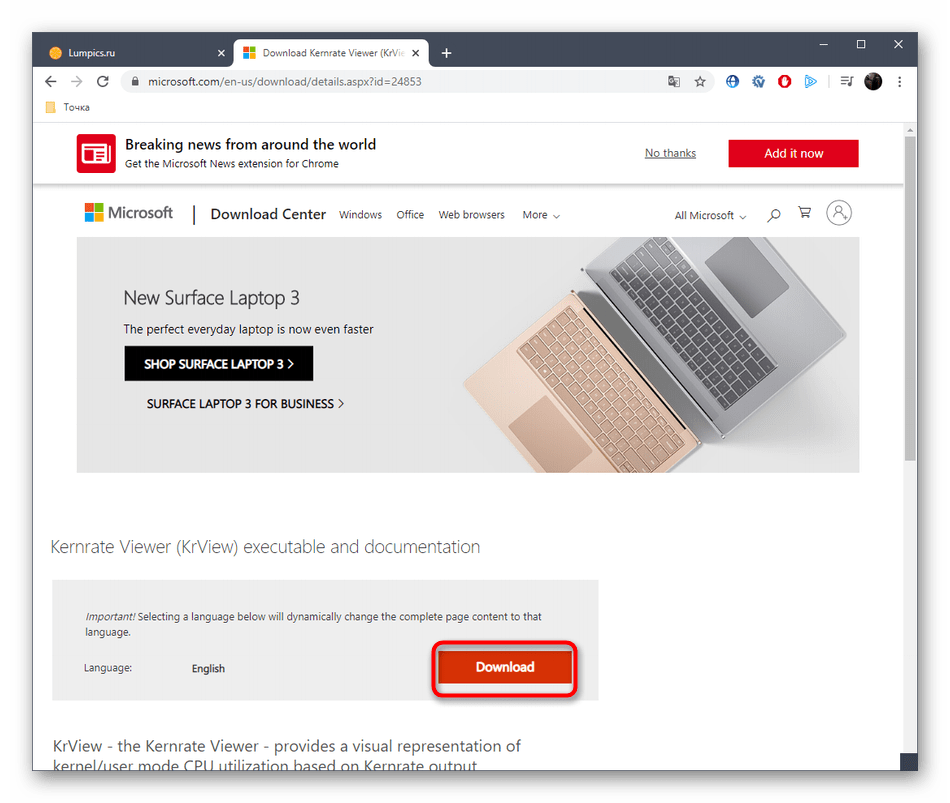
В первую очередь необходимо проверить, какой из драйверов больше всего нагружает процессор во время своего функционирования. Тем самым и определяется, от чего именно основная доля нагрузки приходится на процесс NT Kernel & System. Осуществить эту задачу можно при помощи специальной консольной утилиты KrView , которая загружается с официального сайта Microsoft.
- Перейдите по ссылке выше и начните скачивание KrView с сайта разработчика.
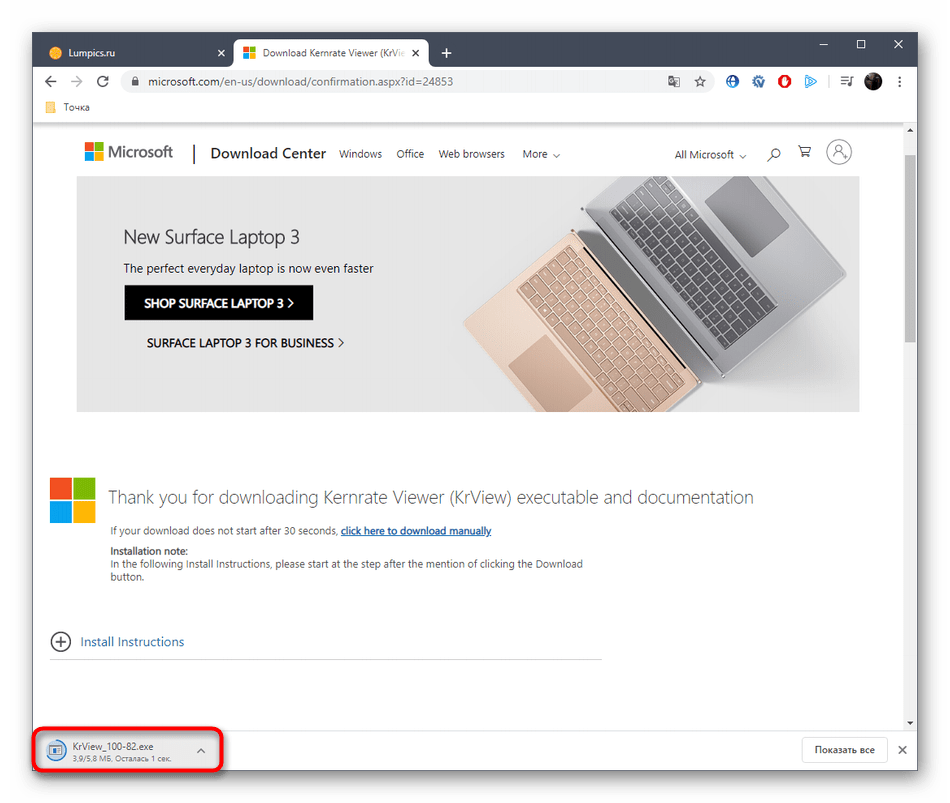
- Ожидайте завершения загрузки и запустите полученный исполняемый файл.
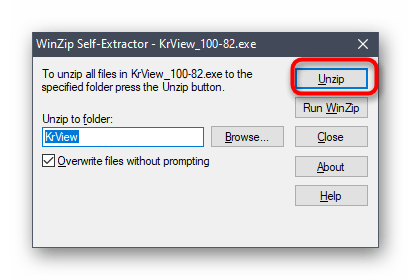
- Распакуйте его и запустите файл инсталляции из выбранного пути, чтобы произвести простейшую установку.
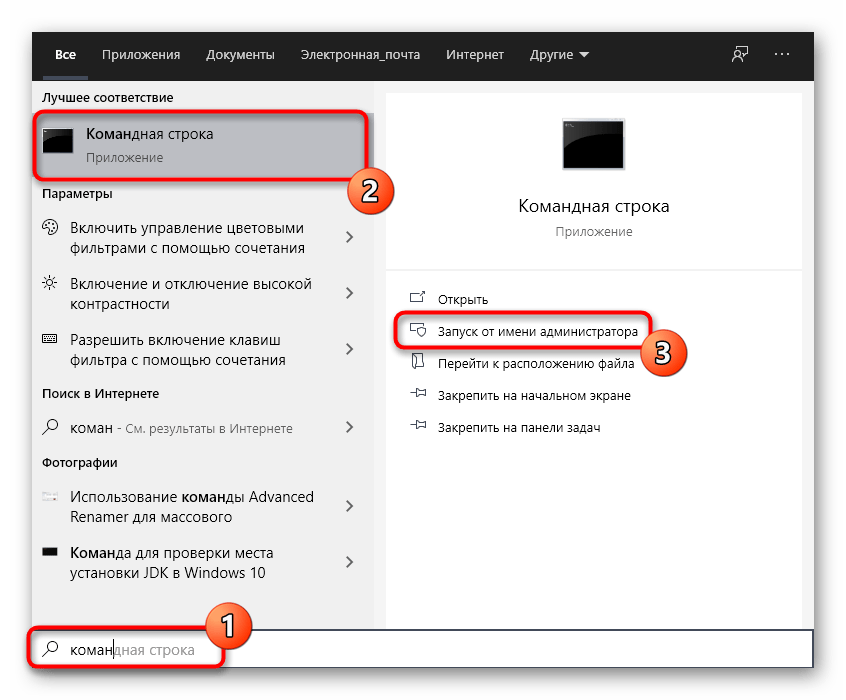
- После этого откройте «Пуск», отыщите там приложение «Командная строка» и запустите его от имени администратора.
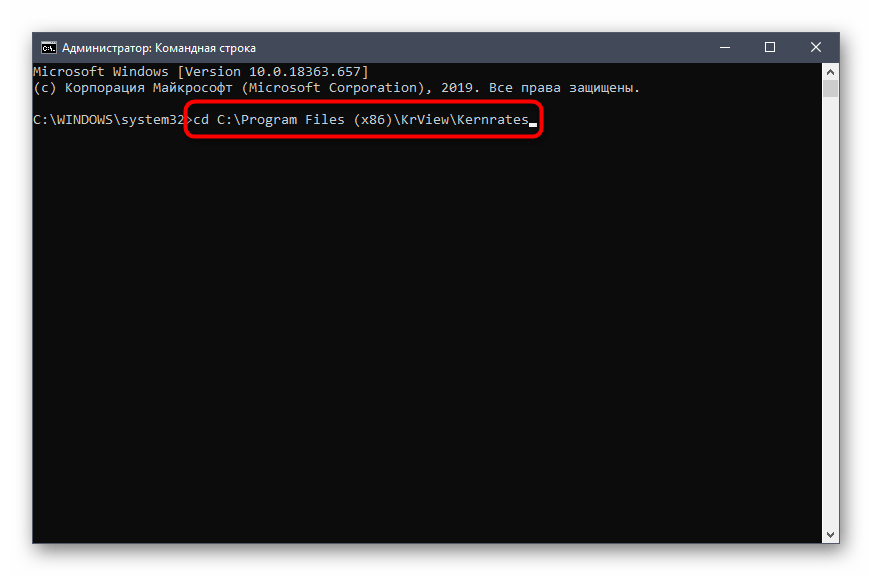
- Введите
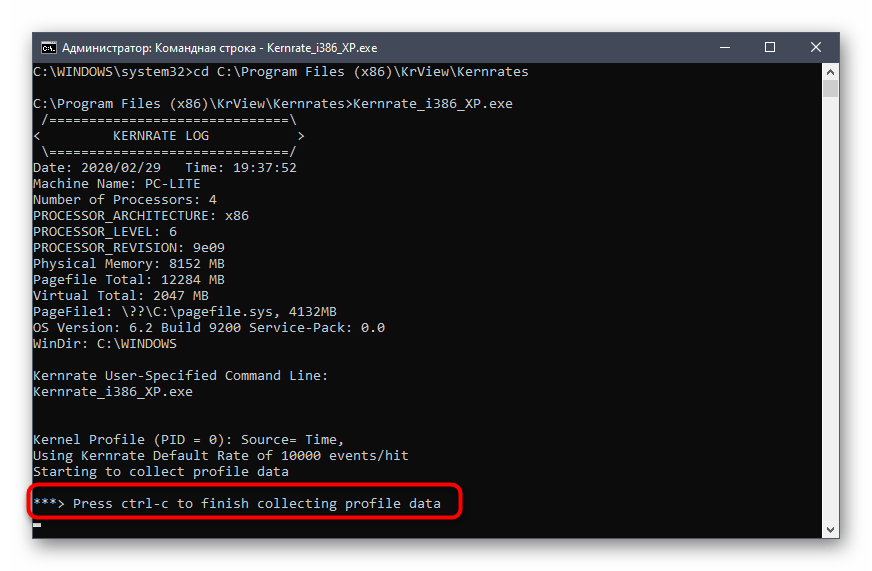
cd C:\Program Files (x86)\KrView\Kernrates, чтобы перейти по пути расположения исполняемых файлов загруженной утилиты. Поменяйте этот путь, если инсталляция происходила в другое расположение. - Остается только запустить утилиту, которая произведет сканирование системы. Для этого введите
Kernrate_i386_XP.exeи нажмите на Enter. - Зажмите комбинацию клавиш Ctrl + C, чтобы завершить сбор информации.
- Среди полученных строк отыщите список драйверов и посмотрите на самые первые строки. Оцените нагрузку на процессор, чтобы понять, какое именно ПО оказывает пагубное влияние на быстродействие системы.


Как видно, названия драйверов и устройств находятся в закодированном состоянии, в чем тоже предстоит разобраться самостоятельно. Для этого придется загрузить отдельное программное обеспечение, чему и будет посвящен следующий этап.
Шаг 2: Просмотр драйвера через Process Explorer
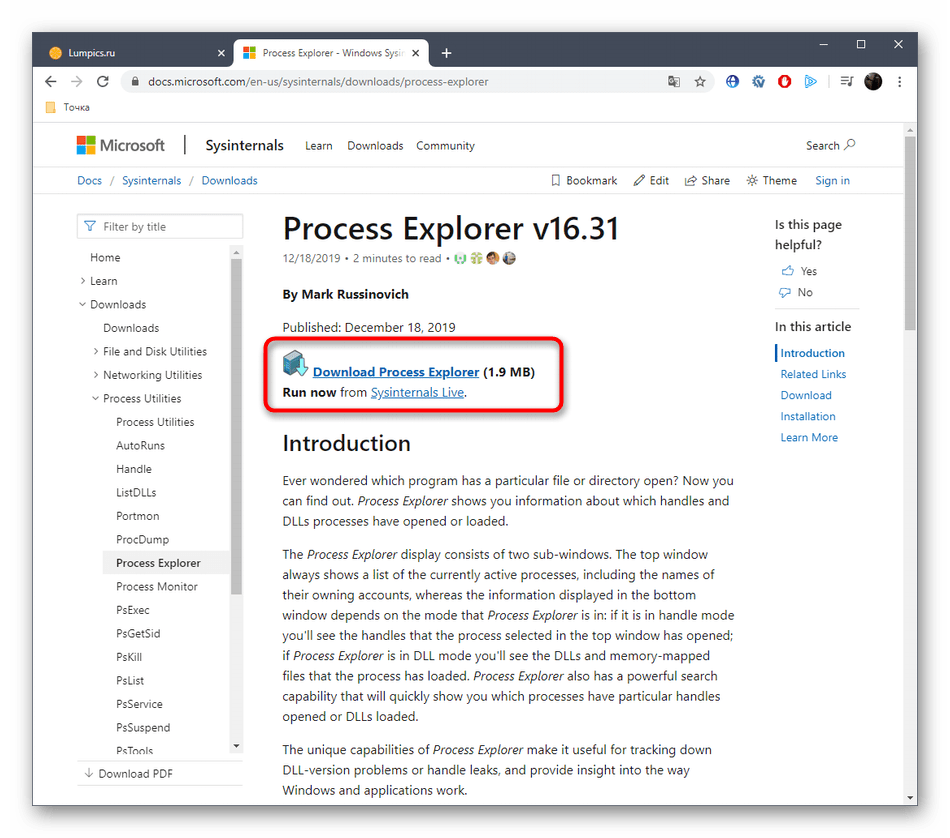
Process Explorer — утилита, приобретенная компанией Майкрософт и распространяющаяся на бесплатной основе. Она представляет собой более расширенную версию Диспетчера задач со многими полезными опциями. Мы задействуем это решение для расшифровки полученного кода драйвера.
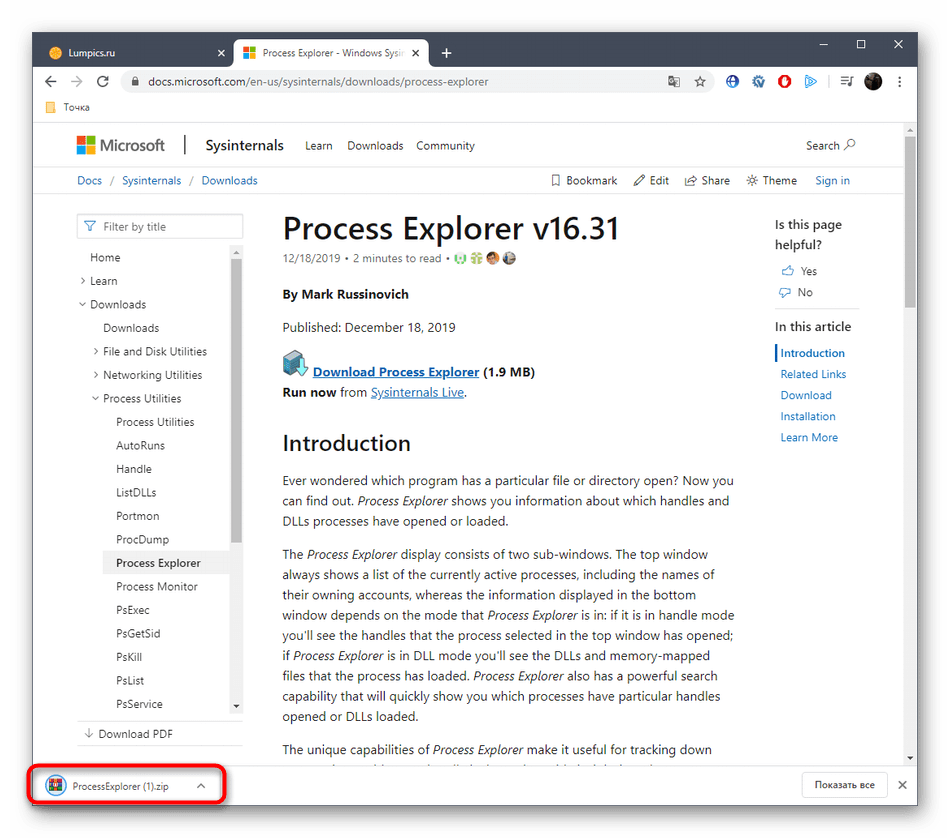
Скачать Process Explorer с официального сайта
- Кликните по ссылке выше и загрузите Process Explorer.
- Откройте полученный архив и запустите оттуда исполняемый файл, чтобы начать использование приложения.
- Обратите внимание на верхнюю панель. Там отыщите кнопку «View DLLs» и нажмите по ней левой кнопкой мыши. Вызвать это меню можно и через комбинацию клавиш Ctrl + D.
- Теперь просмотрите представленный блок. Здесь следует отыскать кодовое название драйвера и узнать его поставщика, чтобы разобраться, к какому именно комплектующему он относится.


Шаг 3: Обновление или переустановка драйверов
Только что мы определили, какой именно драйвер нагружает систему, оказывая негативное влияние на функционирование рассматриваемого процесса. Следует оперативно разобраться с этой ситуацией, что производится путем обновления или переустановки программного обеспечения. Для начала мы рекомендуем проверить, не имеется ли у этого драйвера новой версии. Если найти ее не удалось, следует удалить его и инсталлировать повторно. Более развернуто обо всем этом читайте в других наших статьях.
Подробнее:
Переустанавливаем драйвера в Windows
Как обновить драйверы на компьютере
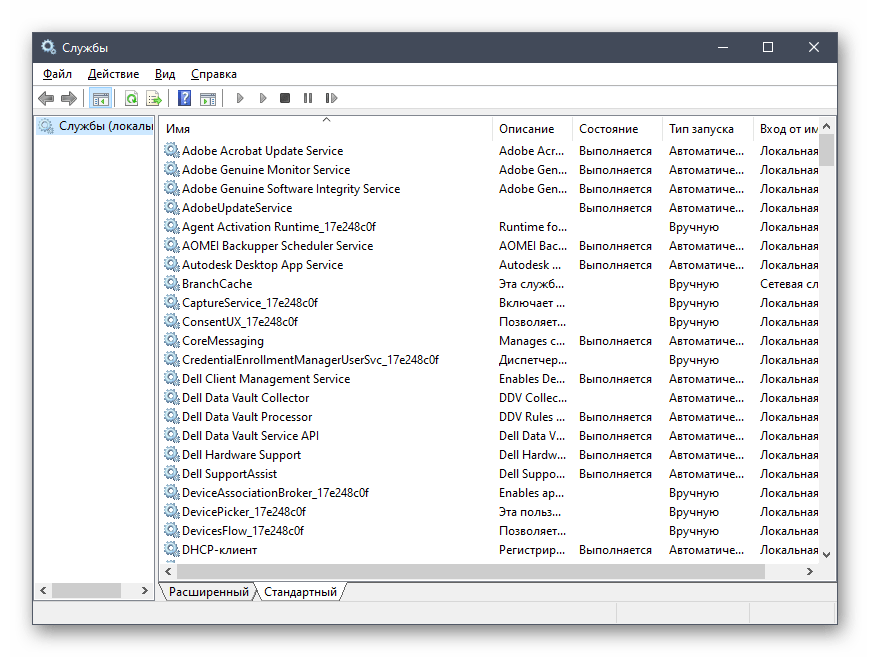
Способ 6: Отключение ненужных служб
При установке некоторого программного обеспечения на компьютер добавляются и службы, отвечающие за выполнение определенных действий. Не все из них необходимы обычному пользователю, а иногда они даже вызывают различные проблемы или значительно повышают нагрузку на комплектующие. Это может спровоцировать и появление трудности, о которой идет речь сегодня. Мы советуем проверить список сторонних служб и отключить все ненужные, чтобы проверить действенность этого способа. Помощь по реализации этой задачи вы найдете в отдельном материале на нашем сайте, кликнув по следующей ссылке.
Подробнее: Отключение ненужных служб в Windows 10
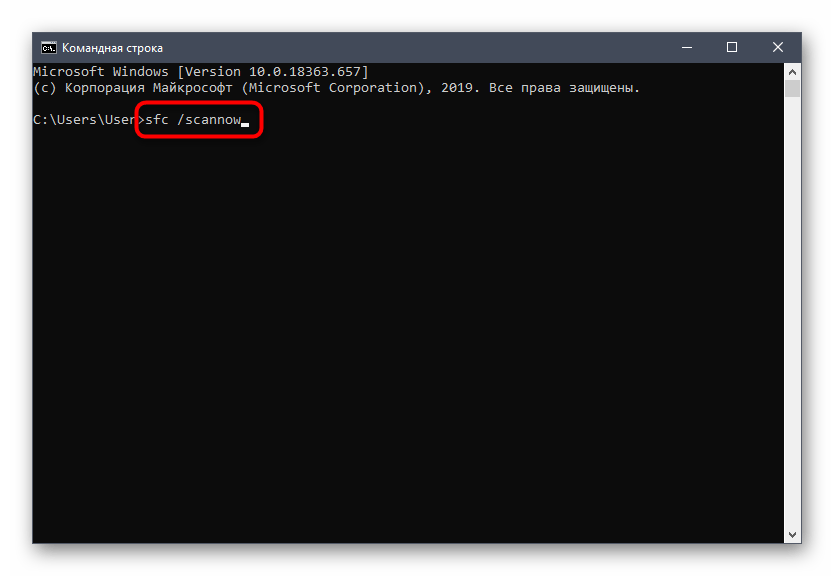
Способ 7: Проверка целостности системных файлов
Последний вариант, о котором мы хотим поговорить, заключается в проверке системных файлов на наличие ошибок. Производится это при помощи встроенной в Windows утилиты под названием SFC. Дополнительно может понадобиться и запуск DISM, если компонент SFC окажется поврежден. DISM исправляет неполадки этого хранилища, после чего пользователю в обязательном порядке требуется повторно запустить сканирование через SFC. В другом нашем руководстве, перейдя по ссылке ниже, вы найдете всю необходимую информацию по этой теме.
Подробнее: Использование и восстановление проверки целостности системных файлов в Windows 10
Теперь вы знаете о том, как исправить проблему с загрузкой процессора задачей NT Kernel & System в Windows 10, и остается только по очереди выполнять каждый способ, чтобы максимально быстро отыскать эффективный.
Наша группа в TelegramПолезные советы и помощь
Did you know that the Nt Kernel and System High CPU usage can often cause performance issues on your computer? This component of the Windows operating system is responsible for managing various aspects of your system, including memory, processes, and security. When the Nt Kernel and System process starts using a high amount of CPU, it can slow down your computer and make it less responsive.
The Nt Kernel and System, also known as «ntoskrnl.exe,» has been a fundamental part of the Windows operating system since its inception. It acts as the bridge between the hardware and software, allowing different applications to utilize the system’s resources efficiently. However, when the Nt Kernel and System process consumes a significant amount of CPU, it can indicate issues like outdated drivers, faulty hardware, or even malware infections. To resolve high CPU usage related to Nt Kernel and System, updating drivers, scanning for malware, or performing a clean boot can be effective solutions.
If you’re experiencing high CPU usage due to the «Nt Kernel and System,» there are a few steps you can take to address the issue:
1. Open the Task Manager by pressing Ctrl+Shift+Esc.
2. Click on the «Processes» tab and look for «Nt Kernel and System»
3. Right-click on it and select «End Task.»
4. If the high CPU usage persists, you can try updating drivers, performing a malware scan, or disabling unnecessary startup programs.
5. Finally, consider upgrading your hardware if the problem persists.
Please note that these steps may require advanced technical knowledge. If you’re not comfortable making these changes, consult a professional.
Understanding Nt Kernel and System High CPU
When it comes to optimizing computer performance, one crucial aspect to consider is the CPU usage of the Windows operating system. Within the Windows Task Manager, you may have noticed a process called «Nt Kernel and System» consuming a significant amount of CPU resources. This article aims to shed light on what Nt Kernel and System high CPU usage means, its potential causes, and possible solutions to mitigate its impact.
What is the Nt Kernel and System?
The Nt Kernel and System, commonly known as the System Idle Process, is a vital component of the Windows operating system. The System Idle Process represents the percentage of CPU resources not being utilized by any active process or program. It is responsible for handling various system functions, including memory management, process scheduling, and input/output operations.
Typically, the System Idle Process should consume a considerable amount of CPU resources, especially when the computer is idle or not running any resource-intensive tasks. However, if the Nt Kernel and System process starts to utilize an abnormally high percentage of CPU power, it can lead to system slowdowns and performance issues.
Nt Kernel and System high CPU usage can be symptomatic of underlying issues that need to be addressed to optimize system performance and improve overall responsiveness.
Potential Causes of Nt Kernel and System High CPU Usage
Several factors can contribute to Nt Kernel and System high CPU usage. It is essential to identify the potential causes to implement the appropriate solutions effectively. Here are some common causes:
- Driver Issues: Outdated or faulty device drivers can result in excessive CPU usage by the Nt Kernel and System process. It is crucial to keep the drivers up to date to ensure compatibility and stability.
- Malware or Virus Infections: Malicious software or virus infections can cause abnormal CPU usage. These infections may be designed to exploit system resources, leading to high CPU utilization by the Nt Kernel and System process.
- Incompatible Software: Certain software applications may be incompatible with the Windows operating system, resulting in excessive CPU usage. This can be due to conflicts in system resources or inefficient coding practices.
- Hardware Issues: Faulty hardware components, such as a malfunctioning fan or overheating CPU, can cause the Nt Kernel and System process to consume excessive CPU power.
- System Configuration: Incorrect system settings or misconfigurations can contribute to high CPU usage, including the Nt Kernel and System process. These can include power settings, background processes, or unnecessary startup programs.
Solutions for Nt Kernel and System High CPU Usage
Resolving Nt Kernel and System high CPU usage requires a systematic approach and targeted solutions tailored to address the underlying causes. Here are some potential solutions to consider:
- Update Device Drivers: Ensuring that all device drivers are up to date can help resolve any compatibility issues that may be causing excessive CPU usage. Visit the manufacturer’s website or use dedicated driver update software to automatically update drivers.
- Perform Malware Scan: Running a comprehensive scan using reputable antivirus or anti-malware software can help identify and remove any malicious software or viruses causing abnormal CPU usage. Make sure the antivirus software is up to date.
- Uninstall Incompatible Software: If certain software applications are known to cause high CPU usage, it is advisable to uninstall them or look for alternative solutions. Check the software developer’s website for any available updates or patches.
- Check Hardware Components: Inspect hardware components for any physical damage, overheating, or faulty fans. Ensure proper cooling and ventilation to prevent CPU overheating, which can cause Nt Kernel and System high CPU usage. Consider cleaning dust from the internal components or consulting a professional if necessary.
- Optimize System Configuration: Review and adjust system settings to optimize performance. Disable unnecessary startup programs, limit background processes, and adjust power settings to reduce CPU usage. Utilize the Windows Task Manager or third-party system optimization tools to manage system resources effectively.
Exploring Other Aspects of Nt Kernel and System High CPU Usage
In addition to the aforementioned causes and solutions, there are other aspects to consider when addressing Nt Kernel and System high CPU usage. Let’s explore some additional factors that might contribute to this issue:
Windows Updates
Windows updates play a vital role in maintaining system security, stability, and performance. Outdated Windows versions may contain bugs or vulnerabilities that can lead to increased CPU usage. Ensure that the Windows operating system is up to date by regularly installing the latest updates provided by Microsoft.
It is also worth mentioning that occasionally Windows updates themselves can cause high CPU usage, but these instances are generally resolved with subsequent patches or updates from Microsoft.
Background Processes
Background processes running on the system can contribute to high CPU usage by the Nt Kernel and System process. These processes can include scheduled tasks, system services, or third-party applications constantly running in the background. It is advisable to review and prioritize these processes, disabling or uninstalling any unnecessary ones to reduce CPU usage.
However, exercise caution when adjusting background processes to avoid interfering with essential system functions or required background applications.
Resource-Intensive Applications
Resource-intensive applications, such as video editing software, 3D modeling tools, or games, can significantly impact CPU usage. These applications often require more processing power and can push the Nt Kernel and System process to consume high CPU resources. Consider closing or minimizing these applications when not in use to reduce CPU usage and improve overall system performance.
In some cases, it may be necessary to upgrade hardware components, such as the CPU or RAM, to handle resource-intensive applications more efficiently.
Conclusion
Nt Kernel and System high CPU usage can be a frustrating issue impacting system performance. By identifying the potential causes and implementing the appropriate solutions, users can mitigate this problem and optimize their computer’s overall performance. Keeping device drivers up to date, performing malware scans, optimizing system configuration, and considering hardware inspections are essential steps to alleviate high CPU usage associated with the Nt Kernel and System process. Additionally, monitoring background processes, managing resource-intensive applications, and ensuring regular Windows updates can contribute to a more stable and efficient computing experience.

Understanding Nt Kernel and System High CPU
If you have noticed that your computer’s CPU usage is excessively high and you are wondering what is causing it, one common culprit could be the «Nt Kernel and System» process. Nt Kernel and System is an essential component of the Windows operating system that manages various low-level functions and operations.
When the Nt Kernel and System process starts to consume a significant amount of CPU resources, it can lead to performance issues, including slow system responsiveness, lagging applications, and overall system slowdown.
To tackle the high CPU usage caused by the Nt Kernel and System process, you can try several troubleshooting steps such as updating your device drivers, scanning for malware, and optimizing system settings. Additionally, disabling unnecessary background processes and applications can help reduce the CPU load.
It is important to note that the high CPU usage by the Nt Kernel and System process can also be caused by hardware issues or other software conflicts. In such cases, seeking professional help or contacting technical support may be necessary to diagnose and resolve the problem effectively.
Key Takeaways:
- Nt Kernel and System is a critical component of the Windows operating system.
- High CPU usage by Nt Kernel and System can indicate a system performance issue.
- Common causes of high CPU usage include malware, faulty drivers, and excessive background processes.
- It is important to identify and resolve the underlying cause of high CPU usage to optimize system performance.
- Regular maintenance, such as updating drivers and running malware scans, can help prevent high CPU usage by Nt Kernel and System.
Frequently Asked Questions
Nt Kernel and System is a crucial part of the Windows operating system that manages various system processes and resources. Sometimes, users may encounter high CPU usage caused by the Nt Kernel and System, which can slow down the system and affect overall performance. Here are some frequently asked questions about Nt Kernel and System high CPU usage.
1. What causes Nt Kernel and System to have high CPU usage?
Several factors can contribute to high CPU usage by Nt Kernel and System. The most common reasons include:
- Incompatible or outdated device drivers
- Malware or virus infections
- Background processes consuming excessive resources
- Hardware or software conflicts
- System overload due to numerous running applications
Identifying the underlying cause can help in resolving the issue effectively.
2. How can I diagnose Nt Kernel and System high CPU usage?
Diagnosing Nt Kernel and System high CPU usage involves several steps:
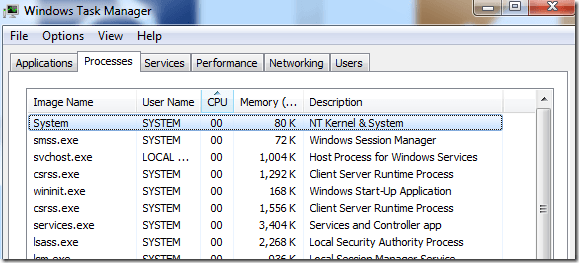
- Using Task Manager: Open the Task Manager and check the CPU usage of the Nt Kernel and System process. If it consistently shows high CPU usage, proceed with further troubleshooting.
- Scanning for malware: Run a comprehensive scan with reliable antivirus software to detect and remove any malware or viruses that might be causing the issue.
- Updating device drivers: Outdated or incompatible device drivers can also contribute to high CPU usage. Update all drivers, including graphics, network, and sound drivers, through the Device Manager or manufacturer’s website.
- Checking for software conflicts: Some software programs may conflict with Nt Kernel and System, leading to high CPU usage. Temporarily disable or uninstall recently installed applications to see if the issue resolves.
- Monitoring background processes: Use third-party software or the Windows built-in Resource Monitor to identify any background processes that are consuming excessive CPU resources. End or disable unnecessary processes to alleviate the CPU load.
If the issue persists, seeking professional assistance may be necessary.
3. Is it safe to disable or remove Nt Kernel and System?
No, it is not safe to disable or remove Nt Kernel and System. Nt Kernel and System, also known as «ntoskrnl.exe,» is a core component of the Windows operating system and plays a vital role in managing system resources and processes. Disabling or removing it can cause system instability, crashes, and even prevent the system from booting properly.
4. How can I optimize Nt Kernel and System’s CPU usage?
To optimize Nt Kernel and System’s CPU usage, you can try the following steps:
- Ensure your system is free from malware by regularly scanning with reputable antivirus software.
- Keep your device drivers up to date to prevent any compatibility issues.
- Clean up unnecessary files and programs from your system to free up resources.
- Disable unnecessary startup programs that consume CPU resources.
- Use a reliable system optimization tool to manage background processes and optimize system performance.
These steps can help minimize high CPU usage caused by Nt Kernel and System.
5. Should I consider upgrading my hardware to address Nt Kernel and System high CPU usage?
Upgrading hardware can be a viable solution if Nt Kernel and System high CPU usage persists despite other troubleshooting steps. Consider upgrading the following hardware components:
- CPU: Upgrading to a faster and more powerful CPU can help handle high CPU loads caused by Nt Kernel and System.
- RAM: Increasing the amount of RAM installed in your system can significantly improve overall performance and handle resource-intensive tasks.
- Storage: Switching to a solid-state drive (SSD) can enhance system responsiveness and reduce the load on the CPU.
Consult with a hardware expert or technician to determine the most suitable upgrades for your specific needs and compatibility with your system.
To summarize, the Nt Kernel and System High CPU issue occurs when the computer’s CPU usage is abnormally high due to the Nt Kernel and System process. This issue can lead to slow performance, system freezes, and excessive heat. Addressing this problem requires troubleshooting to identify the root cause and implementing appropriate solutions.
There are several potential causes for the Nt Kernel and System High CPU issue, including malware infections, outdated drivers, hardware issues, and excessive background processes. To resolve this issue, users can start by performing a comprehensive antivirus scan to eliminate any malware infections. Next, updating drivers and ensuring that all Windows updates are installed can help stabilize CPU usage. Additionally, reducing the number of unnecessary background processes and optimizing system settings can further alleviate the high CPU load caused by the Nt Kernel and System process.
Заметив, что компьютер или ноутбук постоянно нагружен или зависает, и изучая диспетчер задач, пользователи могут обнаружить, что виновник — процесс System, постоянно нагружающий ЦП или диск.
В этой инструкции подробно о том, как разобраться, чем именно вызвана повышенная нагрузка на процессор или диск со стороны процесса System в Windows 11, Windows 10 или предыдущих версиях системы и решить проблему.
Диагностика причин высокой нагрузки со стороны System в Windows
В большинстве случаев, проблема высокой нагрузки, источником которой является процесс System — какой-либо драйвер, поскольку именно этот процесс ядра Windows загружает большинство драйверов.
Разобраться в том, какой именно драйвер обычными средствами скорее всего не получится (но, если недавно проблема не наблюдалась, могут помочь точки восстановление системы): всё что мы сможем найти — указание на процесс System или ntoskrnl.exe, что не даёт полезной информации в нашем случае.
Однако, возможность выявить источник проблемы есть. Первая возможность анализа высокой нагрузки на процессор — использование Process Explorer. Этот способ проще, но не всегда позволяет отловить причину:
- Скачайте Process Explorer с сайта Майкрософт и распакуйте у себя на компьютере.
- Запустите Process Explorer от имени администратора (правый клик по исполняемому файлу в нужной разрядности — запуск от имени администратора).
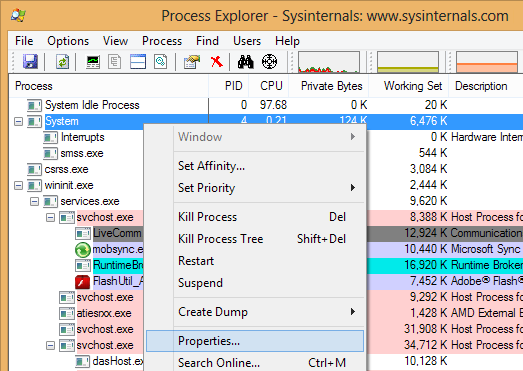
- Выберите процесс System, нажмите по нему правой кнопкой мыши и выберите пункт «Properties» в контекстном меню.
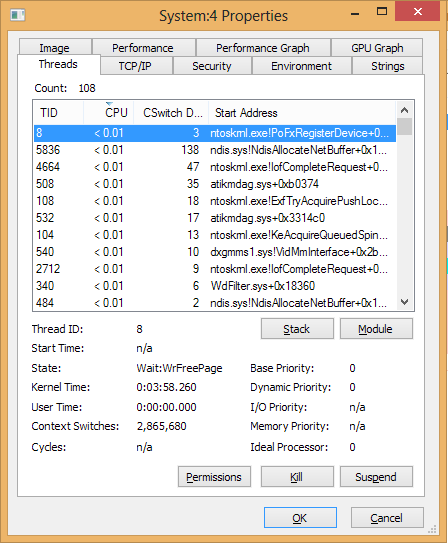
- Перейдите на вкладку «Threads» и отсортируйте её по столбцу «CPU», нажав по его заголовку.

- Обратите внимание, какие именно потоки вызывают повышенную самую высокую нагрузку на процессор в рамках процесса System (на скриншоте необычная нагрузка отсутствует, он дан лишь для примера). О том, что делать с этими данными — в описании второго способа и далее.

Второй способ, позволяющий использовать Windows Performance Toolkit. Сначала скачайте и установите Windows Performance Toolkit с помощью одного из следующих способов:
- Загрузите установщик пакета Windows SDK с официального сайта Майкрософт и отметив пункт «Windows Performance Toolkit» при установке.

- Найдите и скачайте Windows Performance Analyzer из Microsoft Store Windows 11/10.

После установки необходимых для дальнейших действий компонентов, выполните следующие шаги:
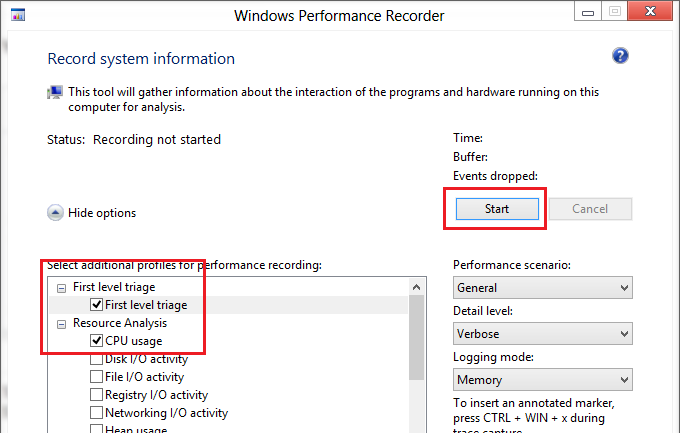
- Нажмите клавиши Win+R, введите wprui.exe и нажмите Ok или Enter
- В открывшемся окне нажмите «More options», затем отметьте пункт «CPU usage», если требуется диагностировать нагрузку на процессор или «Disk I/O Activity», если речь идёт о диске.

- Нажмите кнопку «Start» и подождите около 1 минуты, пока собираются данные (при этом требуется, чтобы проблема наблюдалась во время сбора данных).
- Нажмите кнопку «Save» и сохраните собранные данные в удобном расположении.
- Откройте Windows Performance Analyzer (после установки появится в меню Пуск), в меню «Файл» выберите «Открыть» и загрузите сохранённый на 4-м шаге файл. Внимание: если при открытии вы получили сообщение об ошибке, попробуйте установить Windows Performance Analyzer (Preview) из Microsoft Store, далее будет использоваться именно эта версия (интерфейс несколько отличается от текущей стабильной версии).
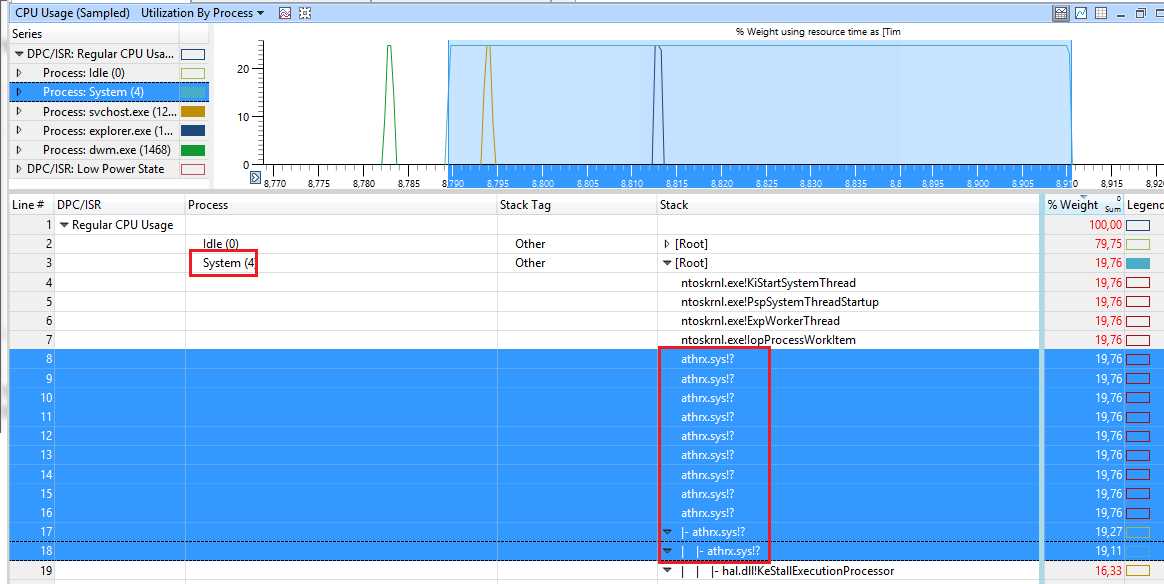
- Перетащите раздел «CPU Usage» (если требуется анализ нагрузки на процессор) или «Disk Usage» (для диска, соответственно) мышью на панель «Analysis».
- Раскрывая пункты, начиная с System, выявите те файлы драйверов (.sys) или другие элементы, которые вызывают самую высокую нагрузку в рамках процесса System. Например, на скриншоте ниже мы видим, что нагрузку вызывает файл nvlddmkm.sys (здесь нагрузка незначительна, но видны пики на графике, в вашем случае её вес в общей нагрузке может быть значительно выше). Поиск в Интернете по имени файла подскажет, что это драйвер NVIDIA. Аналогичным образом, увидев какой-либо файл .sys вверху в дереве процесса System, вы сможете найти по его имени, что это за драйвер и предпринять меры, о чём далее.

- Если высокая нагрузка исходит не от файла драйвера, а от самого процесса ntoskrnl.exe, в меню «Trace» отметьте пункт «Load Symbols» и дождитесь завершения загрузки (может занять продолжительное время).
- Если, после загрузки символов вы видите такие пункты как
ntoskrnl.exe!ViKeTrimWorkerThreadRoutine
ntoskrnl.exe!MmVerifierTrimMemory
ntoskrnl.exe!VerifierKeLeaveCriticalRegion
это может говорить о том, что включён диспетчер проверки драйверов, что может заметно нагружать систему, достаточно отключить его (подробно про использование диспетчера проверки драйверов) и перезагрузить компьютер.
- В случае, если нагрузка исходит от строки
ntoskrnl.exe!MiZeroWorkerPages
диагностика причин проблемы затрудняется — это сообщает нам лишь о том, что какой-то процесс постоянно очищает память прежде чем использовать снова (это будет вызывать высокую нагрузку на процессор). У некоторых пользователей причиной оказывается Google Chrome, а помогает отключение аппаратного ускорения, однако это не единственная возможная причина.
- Строки
ntoskrnl.exe!RtlpGenericRandomPatternWorker
ntoskrnl.exe!RtlpTestMemoryRandomUp
с большой вероятностью говорят о фоновой проверке памяти в рамках автоматического обслуживания системы при простое. Отключить такую проверку можно в Win+R — taskschd.msc — Библиотека планировщика заданий — Microsoft — Windows — MemoryDiagnostic — правый клик по заданию RunFullMemoryDiagnostic — отключить.
- Нагрузка со стороны
ntoskrnl.exe!MmGetPageFileInformation
с большой вероятностью говорит о проблемах в работе файла подкачки. Можно попробовать отключить его и перезагрузить компьютер. Если это сработало, снова включите файл подкачки и проверьте, была ли решена проблема.


Выяснив, чем именно вызвана высокая нагрузка со стороны процесса System, можно приступать к исправлению ситуации.
Возможные решения в зависимости от источника проблемы
Часть вариантов действий: для файла подкачки, диспетчера проверки драйверов или проверки памяти были описаны выше.
В случае, если нагрузка исходит от драйвера (файл .sys), что бывает чаще всего, и вы смогли его выявить, возможны следующие варианты действий:
- Для драйверов периферийных устройств — простое обновление или, наоборот, откат драйвера к предыдущей версии. Иногда может помочь ручная установка драйвера с сайта производителя вашей материнской платы или ноутбука, даже если там представлен не самый новый драйвер. Если устройство не используется вами, его можно просто отключить в диспетчере устройств — это также сработает.
- В случае драйверов видеокарт может помочь как предыдущий пункт (установка других версий драйверов), так, в некоторых случаях и поиск фонового ПО, активно использующего ресурсы видеокарты легитимного или не очень (в последнем случае может помочь MinerSearch).
- Для драйверов, связанных с USB, SATA, SCSI, Intel RST причиной может оказаться неисправность диска, недостаток мощности блока питания, плохое подключение или кабели дисков. Для USB устройств может помочь переподключение к другим разъемам (в том числе другой версии интерфейса).
- Для драйверов ACPI.sys — вручную установите все драйверы из раздела «Чипсет» производителя ноутбука или материнской платы для вашей модели устройства, а при наличии — отдельные драйверы электропитания. Иногда может помочь обновление БИОС.
- Если файл .sys, вызывающий повышенную нагрузку связан с каким-либо сторонним антивирусом, причиной может быть как его неправильная работа, так и наличие чего-то вредоносного на компьютере. Имеет смысл выполнить проверку дополнительными средствами, например, Kaspersky Rescue Disk.
В случае, если вам не удаётся самостоятельно разобраться с проблемой, подробно опишите ситуацию с процессом System в вашем случае, а также предоставьте сведения о том, что удалось выявить способами, описанными выше, возможно, я смогу помочь.
На одном их компьютеров с только что установленной Windows 10 пользователь стал жаловаться на постоянные зависания и медленную работу ОС. В диспетчере устройств видно, что более 50% ресурсов процессора используется процесс System (ntoskrnl.exe). В этой статье я постараюсь описать основные методики диагностики высокой загрузки CPU различными процессами и методы выявления проблемного компонента Windows.
Ситуация, когда процесс System потребляет более половины процессорных ресурсов системы — это не нормально. Сам по себе файл Ntoskrnl.exe представляет собой исполняемый файл ядра ОС. Это базовый процесс системы. В рамках ядра ОС выполняется запуск системных драйверов устройств, которые скорее всего и являются источником проблемы (далеко не все драйверы соответствующим образом тестируются разработчиками оборудования).
Как правило, проблема утечки в коде драйверов и высокая нагрузка на процессор, память или диск возникает после установки нового оборудования, установки новой версии драйвера (в том числе при автоматическом обновлении драйверов, которое можно отключить) или после апгрейда Windows.
Совет. В некоторых случаях высокую нагрузки на процессор и память может вызывать процесс Система и сжатая память
Чтобы понять, какой конкретно драйвер или модуль вызывает высокую загрузку процессора можно воспользоваться бесплатной утилитой Process Explorer. Скачайте и запустите ее с правами администратора.
В списке запушенных процессов найдите процесс System, щелкните по нему ПКМ и откройте его свойства Properties.
Перейдите на вкладку Threads. Отсортируйте список модулей, загруженных ядром по степени использования процессора (столбец CPU). В строке Start Address указано имя функции или драйвера, вызывающего высокую загрузку (скриншот не с проблемной системы).
Также, чтобы выявить драйвер, который вызывает высокую загрузку CPU, можно воспользоваться бесплатной утилитой Microsoft — kernrate.exe (Kernrate Viewer). Утилита входит в состав WDK (Windows Device Kit). После установки WDK, найти утилиту можно в каталоге …\Tools\Other\amd64.
Запустите утилиту kernrate.exe без аргументов и подождите некоторое время, пока идет сбор данных (10-15 минут), после чего прервите работу утилиты сочетанием клавиш Ctrl-C: Посмотрите на список модулей в секции Result for Kernel Mode.
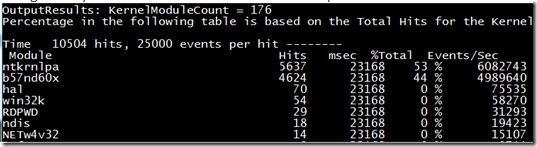
Как вы видите, в нашем примере высокую нагрузку на CPU вызывает модуль b57nd60x. С помощью Google или утилиты sigcheck (смотри пример) можно определить, что проблему вызывает драйвер сетевой карты Broadcom NetXtream Gigabit Ethernet NDIS6.0 Driver.
Кроме того, проанализировать использование CPU при загрузки системы можно с помощью Windows Performance Toolkit (WPT). Нужно установить компонент и запустить сбор данных с помощью графической консоли Windows Perfomance Recorder (First level triangle + CPU usage -> Start)
Либо так:
xperf -on latency -stackwalk profile -buffersize 1024 -MaxFile 256 -FileMode Circular && timeout -1 && xperf -d cpuusage.etl
Совет. Этот способ удобно использовать, если после загрузки система напрочь зависает и работать в ней просто невозможно. Скорее всего вам также будет полезна статья с методикой диагностики долгой загрузки Windows.
Полученный файл нужно сохранить и открыть в WPA. Разверните стек процесса System. В этом примере видно, что высокую нагрузку на процессор вызывает драйвер athrx.sys (Wi-Fi адаптер Atheros Wireless Network Adapter).
Итак, проблемный драйвер обнаружен. Что делать дальше?
Для решения проблемы нужно попробовать установить более новую (или старую) версию драйвера или же совсем отключить оборудование, если проблема наблюдается со всеми версиями драйвера. Обновленный драйвер можно дополнительно проверить стресс-тестом с помощью Driver Verifier.
If you can get the Process NT kernel and system error code, this user guide was written to help you.
Approved: Fortect
Speed up your computer’s performance now with this simple download.
g.When defining ntoskrnl. exe (short for Windows NT Operating System Kernel Executable), also known as Kernel Style, provides the kernel and execution level as well as the Microsoft Windows NT kernel space, and is also responsible for various system services including hardware abstraction, process monitors, and storage , make it one
In the computer ntoskrnl. exe (short for Windows NT Performing System Kernel Executable), also known as a single kernel image, provides the kernel and then the Microsoft Windows NT kernel run-space levels and is the source of various system services such as hardware abstraction, process and memory management, which makes his
g.

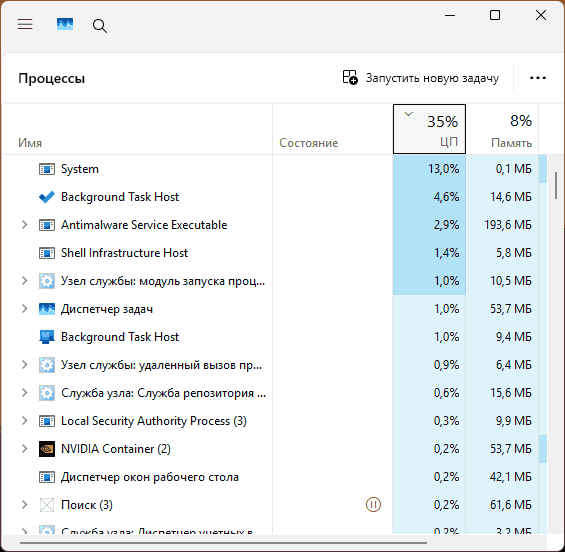
A long time ago I ran into a strange problem where a certain process called System (NT Kernel & System) constantly uses about 15-30 for each of the CPUs of my Windows device / p>
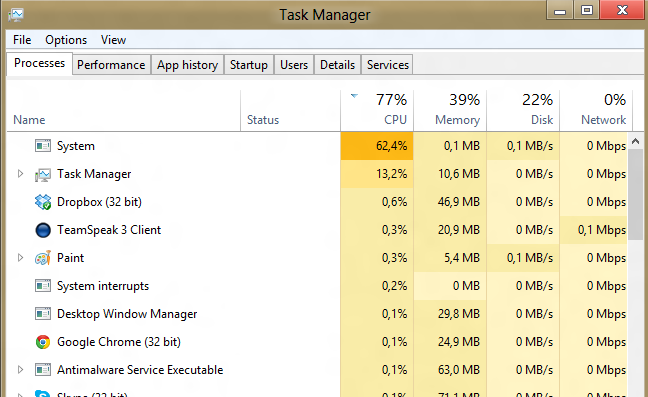
In the main screenshot above, the system is using 7% CPU as usual. The system process essentially assigns the kernel and driver to the code, as well as the scheduling threads, and is a critical step in Windows. Don’t try to kill the process or just delete it.
Before we get to the technical tips, this issue is usually caused by a bad outdated Windows driver or hardware. There are a few things your family will want to check right away:
New Hardware: Have you recently installed any new hardware on your Windows computer? Video card, tough motivation, TV sound card, tuner card, etc.? If so, you need to go to the website of these manufacturers and forload the latest drivers from there. If you only installed the driver from the CD that came with your new hardware, it might be a date on the Internet.
. act
Updated driver. Did you update your driver today and see the maximum CPU usage after the update? Even the most recent pilots can sometimes hang up. In this case, you should try resetting the driver and do so if the problem is resolved.
In my case, I installed a new graphics card on my computer and installed the driver on a CD. It was not the last owner, and since it was a kernel policy driver, it is an increase in the system process.
If you cannot determine which driver is causing the problem, there is probably a more technical procedure that you can follow to find the exact critical driver. First download KrView (Kernrate Viewer), which is a free gadget from Microsoft. A
This is a command line tool, so open a command prompt and then actually run the program with no arguments. Loading = “lazy” results should be inlook like this:

You can now see which driver device is receiving the most kernel calls. The first is usually called ntkrnlpa and can be ignored. You want to watch other pilots chasing you. In this case, b57nd60x. The driver and passengers ask what kind of material is it?
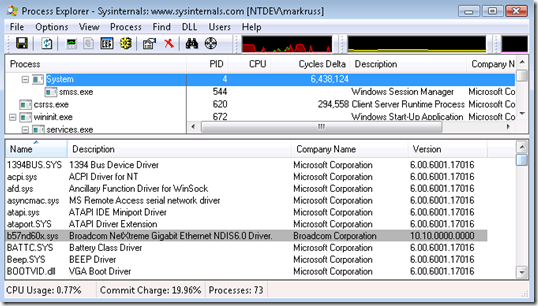
To find out, you need to download another free tool from Microsoft called Process Explorer. Install it, it will start and then go to DLL view to find the loaded drivers.

Approved: Fortect
Fortect is the world’s most popular and effective PC repair tool. It is trusted by millions of people to keep their systems running fast, smooth, and error-free. With its simple user interface and powerful scanning engine, Fortect quickly finds and fixes a broad range of Windows problems — from system instability and security issues to memory management and performance bottlenecks.

As anyone can see the b57nd60x.sys dll, the driver for the Broadcom NetXtreme Gigabit Ethernet adapter might be. Cute! Now all you have to do is find the updated driver on the card’s network and hopefully the spike in CPU performance will disappear.
Another solution of this kind, of course, is to simply turn off the hardware selection or completely remove it from the whole system when you don’t need this tool or can’t find it installed.th driver is up to date. Source: Technet.
What is NT kernel and system?
Ntoskrnl.exe (short for Windows NT operating system kernel), also known as a kernel image, is almost certainly a system application file that provides the kernel and runlevels that make up the Windows NT kernel space, as well as for variousx systems. vendors are responsible for, for example, hardware virtualization, a memory-managed process, so
I recently ran into a strange issue where a process called System (NT Kernel & System) was consuming about 30-30% of the CPU on my Windows machine.
In all the screenshots above, the system is using zero percent of the CPU properly. The system process essentially owns the kernel and driver of the code, as well as the threads of the application, and is an important Windows procedure. Don’t try to kill or even kill the process.
Before we get into technical information, this issue is usually caused by an unsafe or outdated hardware driver while using Windows. There are a few things people will want to check right away:
New Hardware: Have you recently installed any new hardware on your Windows computer? Video card, hard send, sound card, TV tuner, etc.? If so, then you should definitely visit the manufacturer’s website and download the latest version of Switch from there. If We usually only installed the driver from the CD that came with new hardware, this may be a clean date.
. to be
Does Windows 10 use the NT kernel?
Microsoft announced that the next version of Windows 10 will include a change that will downgrade this Windows NT kernel to version 10.0. It left software like Windows 1999 with version 5.0 after a long period of time from Windows 2.0, 3.0, 3.11 and 4.0, which were eventually merged with versions similar to Windows 95 and 98.
Driver updated. Have you updated your driver a long time ago and every time you update you see an increase in CPU usage? Sometimes the latest drivers can also cause symptoms. If so, try rolling back your driver and see what unfortunately fixes the problem.
What is NT kernel and system?
The NT kernel is arguably the most basic instruction set on a desktop PC. In short, it does everything related to the exchange of data between all computer programs and hardware in your system.
In my case, I installed a new graphics card on my computer and installed the driver from the CD. This was not the very last taxi driver and since it was the factory kernel driver it caused this spike during a system process.
If you cannot find any information about the driver causing the problem, at this stage it is a technical process that you can follow to find the exact recoil driver. First download KrView (Kernrate Viewer), which is a free yard maintenance tool from Microsoft.
This is a command line tool, essentially you open the command line and then run the program with no arguments. The result should lookeat like this:
Can I stop NT kernel & system?
The system process, in fact, contains this kernel and driver code, as well as program threads, and is a critical Windows process. Don’t try to kill or kill the process.
You can now see which device driver is picking the most kernel hits. The very first one is called ntkrnlpa and is most likely ignored. You want to study other pilots. In this particular case, b57nd60x. You ask, is this a driver specially designed for which hardware?
Well, to find out, you’ll need to download another free tool from Microsoft called Process Explorer. Install it, drag and drop, then go to DLL Detection to see the copied drivers.
As you can see, the b57nd60x.sys DLL is usually the driver for the Broadcom NetXtreme Gigabit Ethernet card. Cute! Now all you really need to do is find an updated car driver for the array of cards and hopefully the CPU performance spikes are gone.
Of course, in such cases, another solution is to simply deactivate the hardware or completely remove it from the system if you don’t need it or if you can’t find an updated authorized driver. Source: Technet.
Can I stop NT kernel & system?
The system process hosts kernel and driver code quite openly, does not forget about system threads, and is the central Windows process. Do not try to complete or delete procedures.
Speed up your computer’s performance now with this simple download.
Does Windows 10 use the NT kernel?
The operating system variable WINDOWSNT is fine if the Windows 10 kernel is NT-based.
How do I disable NT kernel in Windows 10?
Press the Windows Period key + the X key.Type msconfig in the Run box and press Enter.On the Services tab of the System Configuration dialog box, tap or select the Hide all Microsoft services check box, and then tap or click Disable All.