Table of contents
- What Is Ntoskrnl.exe?
- What Causes the Ntoskrnl.exe Error?
- How to Fix Windows 10 BSOD Caused by Ntoskrnl.Exe
- Fix 1: Update your drivers
- Fix 2: Run a scan with the Windows memory diagnostic tool
- Fix 3: Run the system file checker
- Fix 4: Reset overclocking settings for your devices
- Fix 5: Install Windows updates
- Fix 6: Perform a system restore
- Fix 7: Check your hardware
- Fix 8: Check for malware
- Conclusion
- FAQ
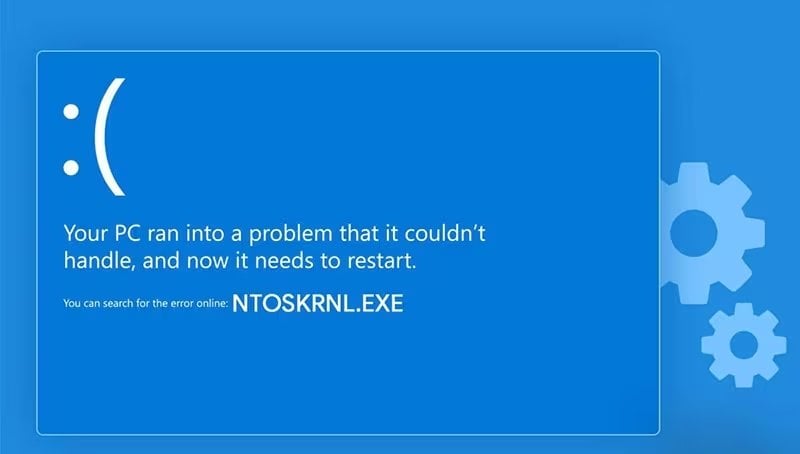
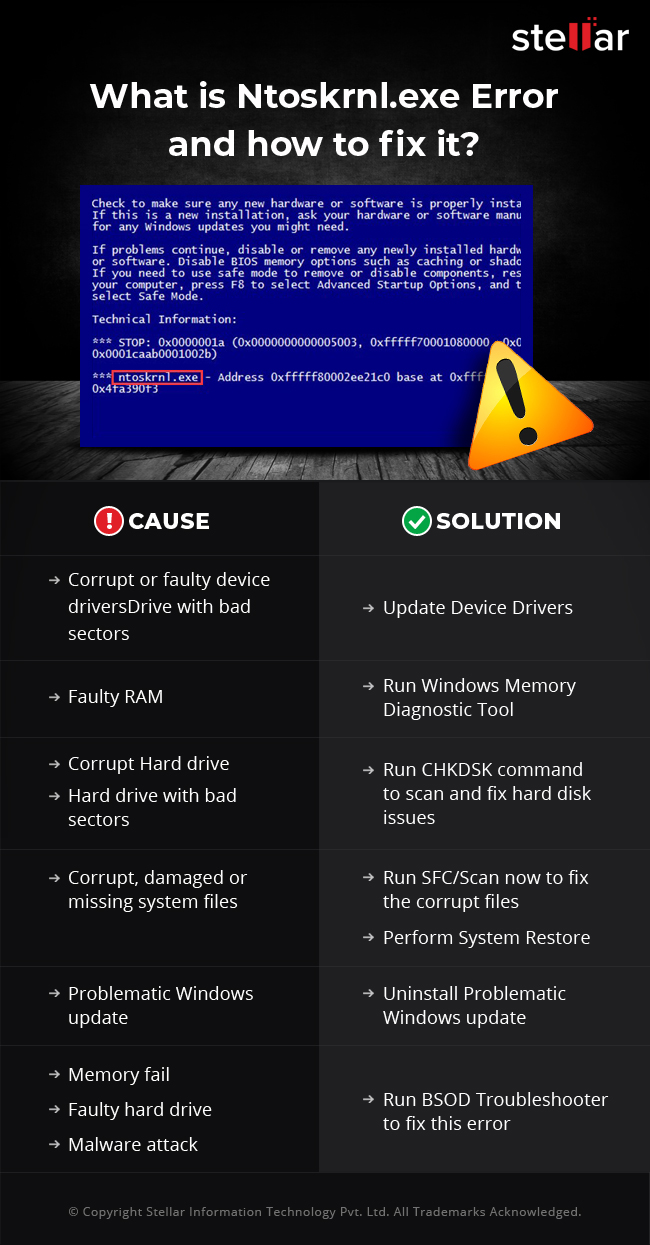
You’ve encountered a Blue Screen of Death that points towards Ntoskrnl.exe as the culprit. Before it got to this, you probably noticed the following symptoms:
- Slow PC performance.
- High CPU usage and subsequent overheating.
- Random system reboots.
Then, finally, during system boot, you receive an error message that says, “ntoskrnl.exe file is missing.”
Don’t get worried much. It’s not a problem that cannot be handled. Keep reading to find out how to get rid of the Ntoskrnl.exe BSOD.
If you don’t want to read the full article, you may simply watch a short video showing a quick fix here:
What Is Ntoskrnl.exe?
Ntoskrnl.exe (short for Windows NT operating system kernel) is an essential Windows component responsible for hardware abstraction, process and memory management, and various other system services.
It consists of:
- Cache manager
- Kernel
- Memory manager
- Executive
- Security reference monitor
- Scheduler (Dispatcher)
Since it’s a fundamental part of Windows, when it encounters a problem, your computer crashes and displays a BSOD. The issue could occur repeatedly. You might also get a ‘Memory management’ error code.
What Causes the Ntoskrnl.exe Error?
There’s no one thing that could be said to be the cause. The issue could be software- or hardware-related. But the possible factors include:
- Your device drivers are outdated, corrupt, or incompatible. This is why it is important to ensure you keep them regularly updated.
- Faulty RAM. Replacing the sticks should fix the issue.
- Your RAM and local storage may be inadequate to keep up with your computer’s activities. This leads to frequent freezing and, subsequently, the Ntoskrnl.exe error.
- You overclocked your devices.
- Some of your system files are corrupt.
How to Fix Windows 10 BSOD Caused by Ntoskrnl.Exe
Now that we’ve seen the possible causes let’s go ahead and present the solutions:
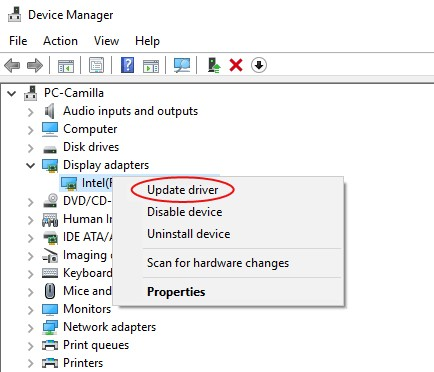
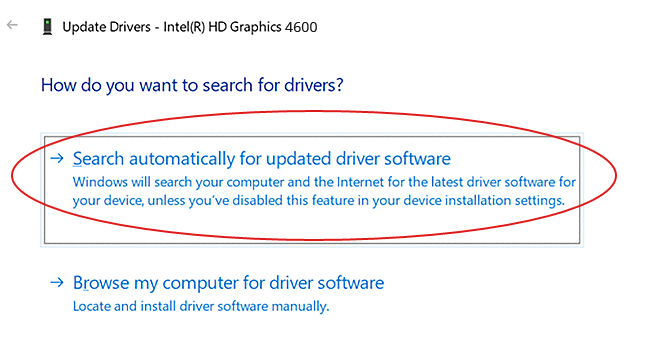
Fix 1: Update your drivers
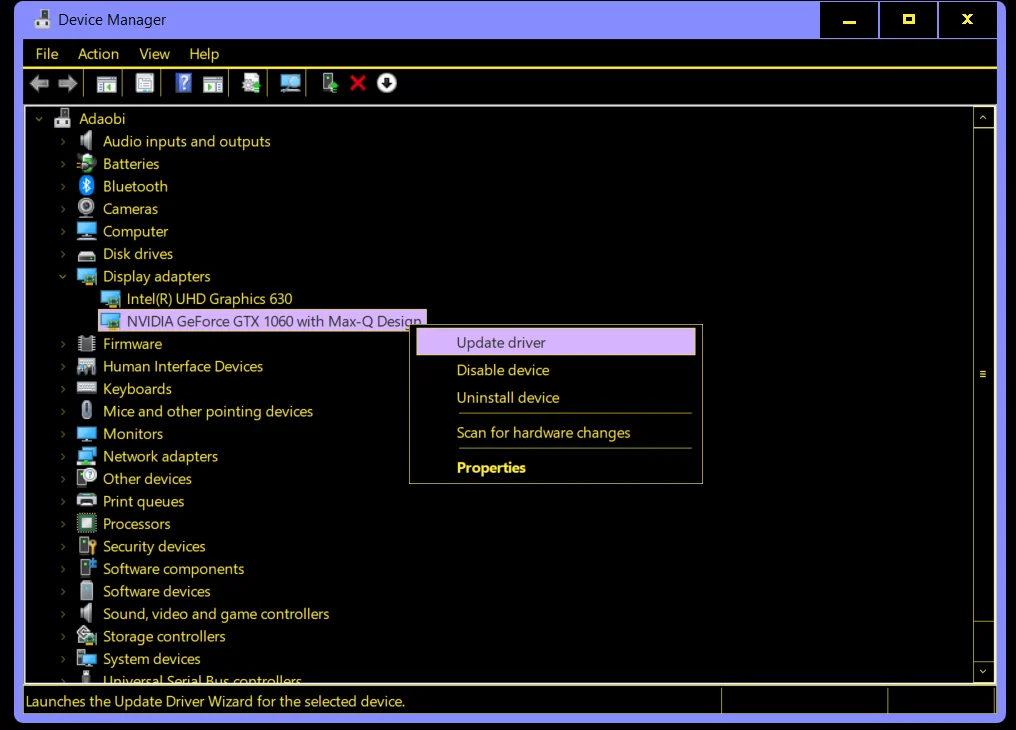
Here’s how to fix Ntoskrnl.exe blue screen error on Windows 11 with Device Manager:
- Hold down the Windows key and simultaneously press X to load the Power User Menu.
- Select Device Manager.
- Navigate to the problematic driver’s location. If you’re looking to update the graphics card driver, expand Display Drivers. If you wish to update the microphone driver, expand Audio Inputs and Outputs, and so on.
- Right-click the driver and select Update Driver.
- Select Search Automatically for Drivers.
Windows will download and install the driver update. Reboot the system so the affected device can start using the new driver.
Related: How to Check if My Drivers Are Up to Date on Windows 10 PC?
PRO TIP
We recommend you use Auslogics Driver Updater to scan your PC for outdated and faulty drivers. It will automatically install the latest manufacturer-recommended versions.
The tool recognizes your system specifications, so you don’t have to worry about downloading the wrong drivers.
You could also perform the update manually through Device Manager or by visiting the official website of your device manufacturer to search for each driver.
Ensure you get the versions that are compatible with your OS.
Learn More: Auslogics Driver Updater: Update Your Drivers in One Click!
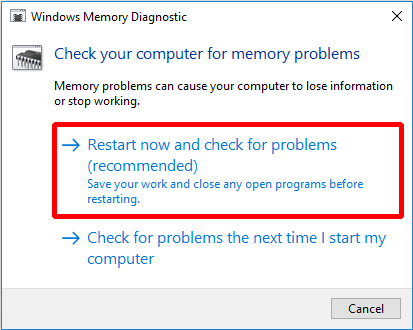
Fix 2: Run a scan with the Windows memory diagnostic tool
The BSOD could be related to a faulty memory (RAM) module. So, here’s how to run the Windows Memory Diagnostic tool on Windows 11:
- Close all open windows.
- Go to the Start menu.
- Type Windows Memory Diagnostic into the search bar and then click the option when it appears in the results list.
- Click on the option that says Restart now and check for problems (recommended).
- Your system will restart, and the scan will commence. Wait for it to complete. It may take a while (it could be up to an hour, depending on the size of your RAM).
- After the scan, you’ll get the results once you log into your computer.
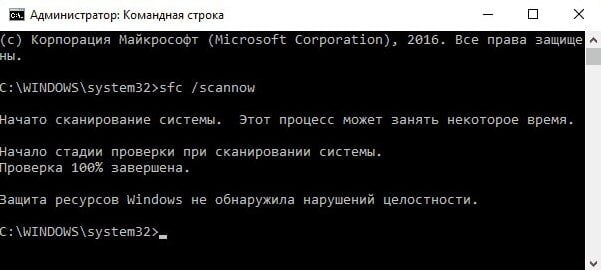
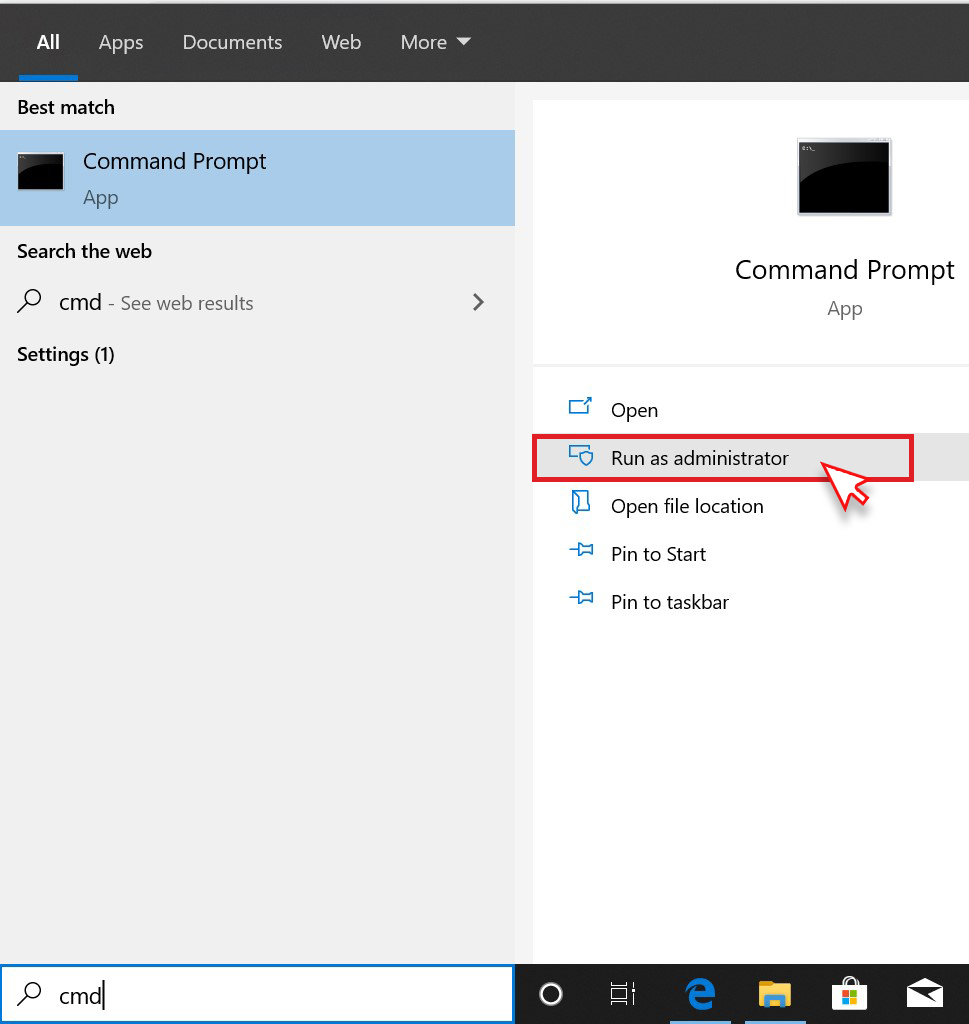
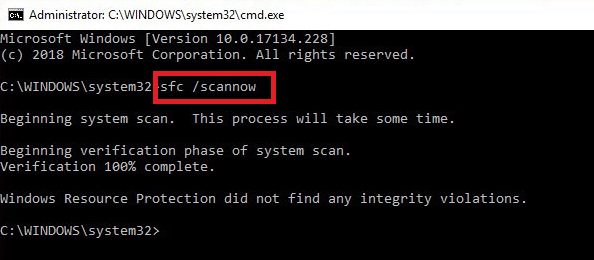
Fix 3: Run the system file checker
The problem could be due to corrupt system files. An SFC scan will detect and repair them.
Follow these easy steps:
- Go to the Start menu.
- Type CMD in the search bar and right-click on Command Prompt from the search results.
- Select Run as administrator to open an elevated Command Prompt window.
- You will receive a User Account Control (UAC) confirmation dialog. Click the Yes button.
- Copy and paste
sfc /scannow in the window (make sure you don’t include the inverted commas) and press Enter on your keyboard. If you choose to type the line, there should be a space between sfc and /scannow.
- Wait for the scan to complete. You will then get a report on the repairs that were achieved.
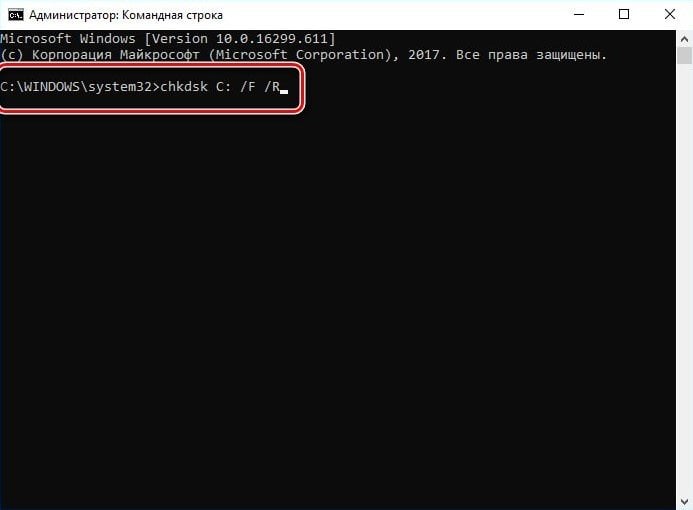
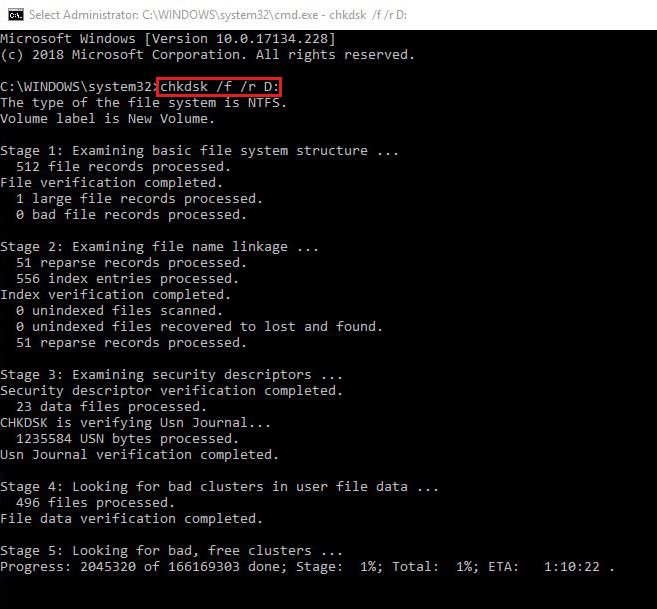
If the scan shows that some problems were unable to be fixed, run a CHKDSK scan. Here’s how:
- Press the
Windows key + X combination on your keyboard to open the WinX menu.
- Locate Command Prompt (Admin) in the list and click on it. This will open an elevated Command Prompt.
- Click the Yes button when presented with the User Account Control (UAC) confirmation dialog.
- In the window that opens, type (or copy and paste)
CHKDSK /f /r and press Enter.
- You may be asked whether you want the scan to be performed when your computer boots up. Type y and press enter.
- Wait for the scan to complete.
Afterwards, run the SFC scan once more.
Fix 4: Reset overclocking settings for your devices
Although overclocking is a smart way of exploiting the maximum capability of your hardware, it can also lead to overheating, hardware breakdowns, and system crashes.
Stop overclocking your devices if you are experiencing the Ntoskrnl.exe error.
You can use a trusted program to change the settings, but you can also do so through the BIOS/UEFI. The procedure will differ for each device, so look up the instructions on how to do it.
[adsbygoogle_content]
Related: What Is Overclocking a CPU? Explained in Detail
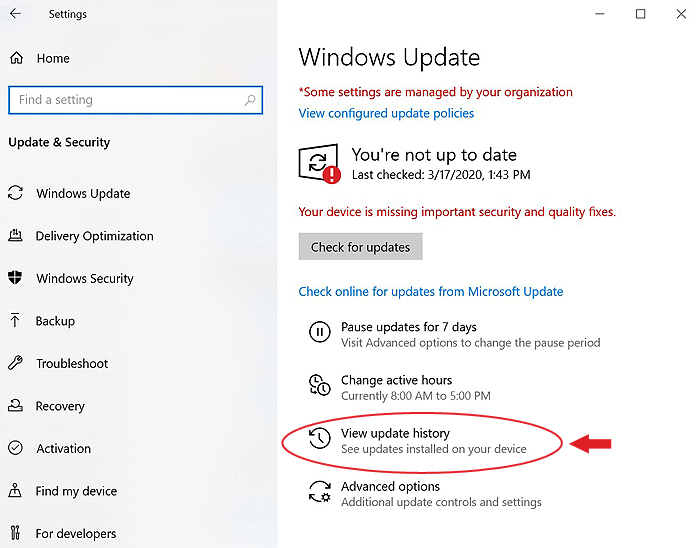
Fix 5: Install Windows updates
Follow these easy steps to update Windows so you can stop searching for ways to fix the Ntoskrnl.exe BSOD error on Windows 11:
- On Windows 11, use the
Windows key + X combo to open the Power User menu and select Settings to launch the app. You can also use the Windows key + I shortcut to quickly launch Settings.
- On the main Settings screen, hit Windows Update on the left navigation pane.
- Click Check for Updates.
Windows will search for and download available updates. You can reboot your PC immediately to install significant updates or wait until your next routine restart.
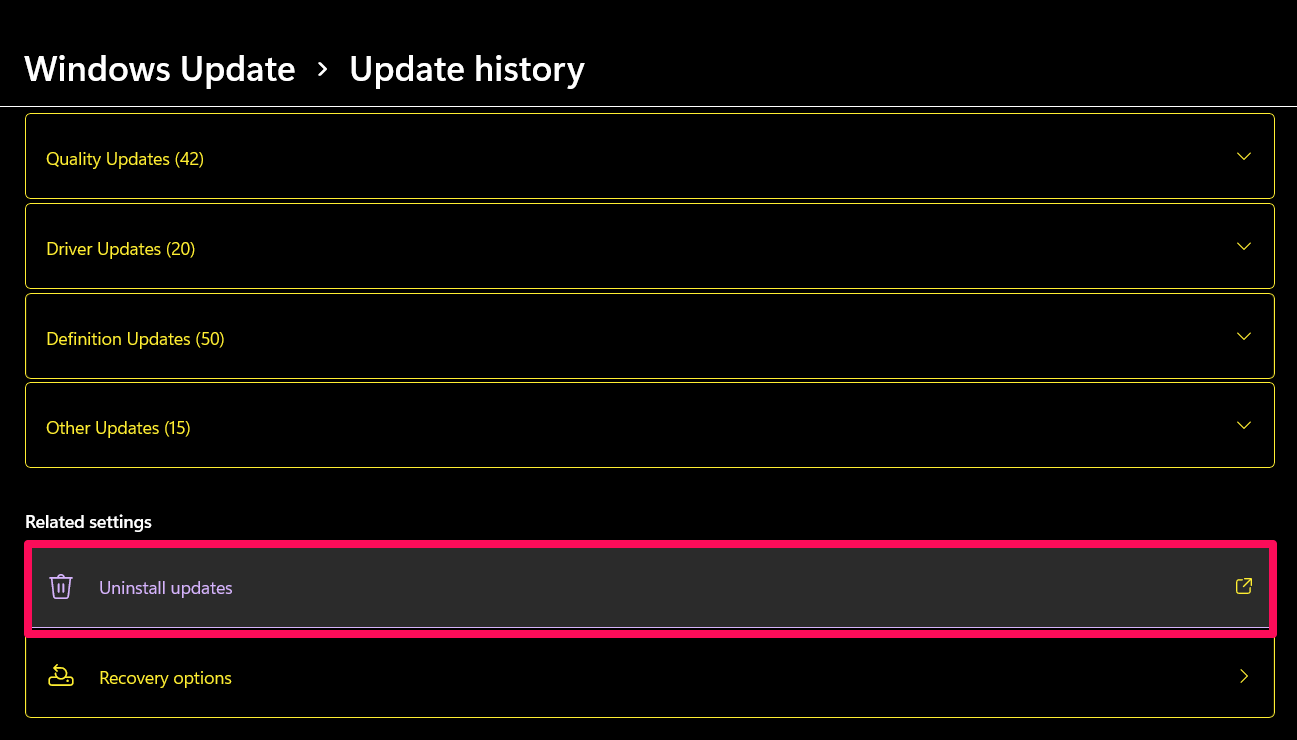
In some cases, a recent update might be the cause of the Ntoskrnl.exe BSOD. You can try uninstalling the most recent update and see if that solves the problem.
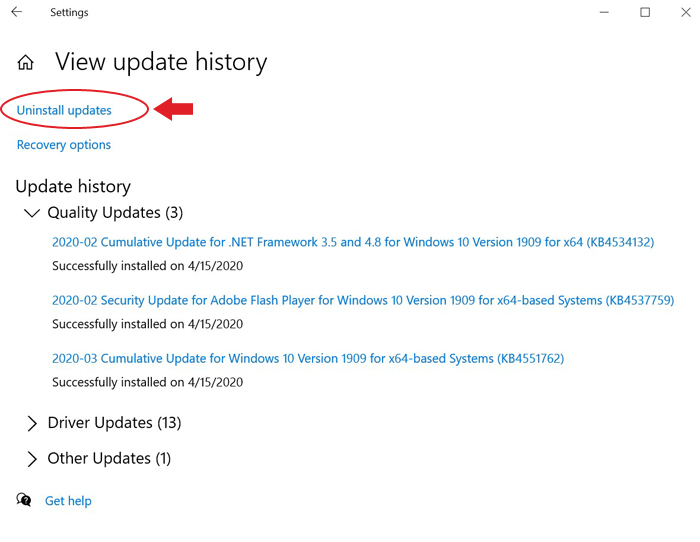
- On the Windows Update screen, select Update History.
- On the Update History page, click Uninstall Updates.
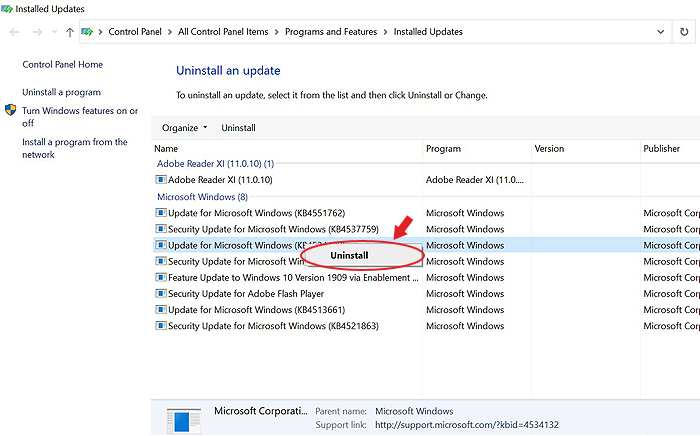
- We now go to the Uninstall an Update Page in Programs and Features. Locate the most recent update or the one you consider suspicious and uninstall it.
After uninstalling the update, reboot your system.
On Windows 10:
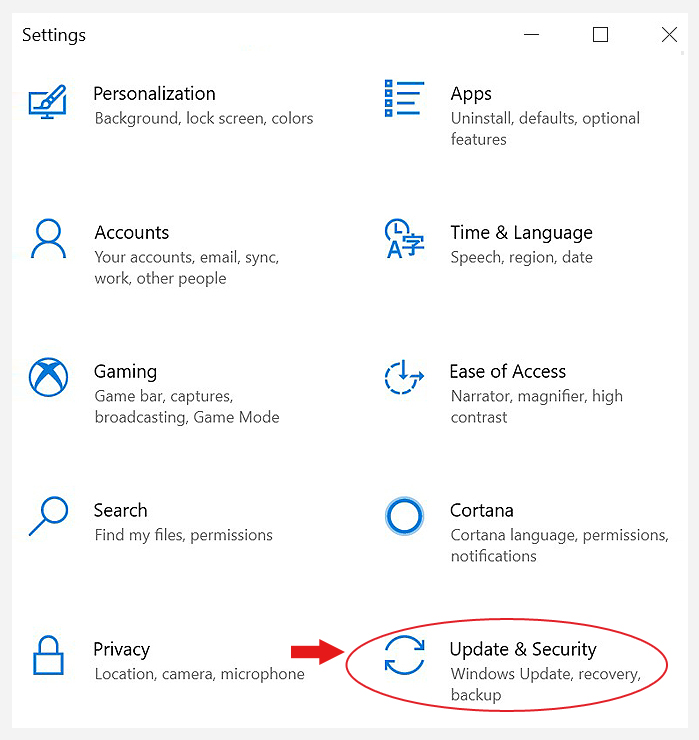
- Press the
Windows key + I combination on your keyboard to open the Settings app.
- Click on Update and Security.
- Select Windows Update and then click the Check for Updates button on the right side of the window. If any updates are available, Windows will download and install them automatically.
Restart your PC and then see if the problem has been resolved.
Related: Ultimate Guide: How to Manually Check and Install Windows Updates
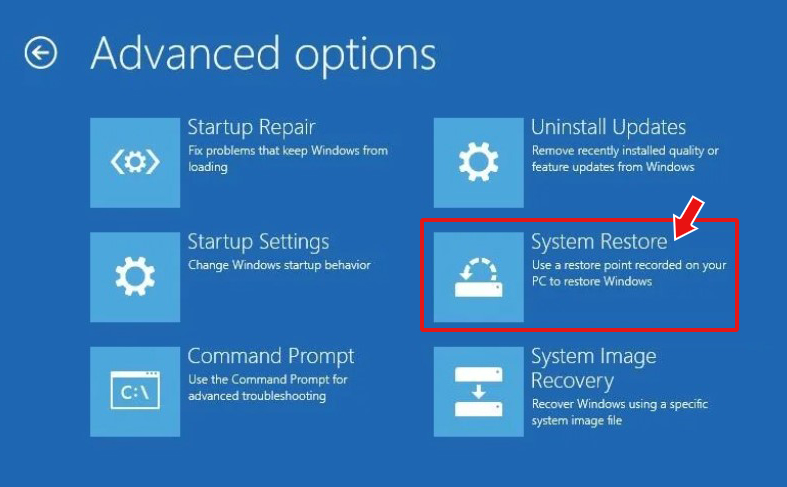
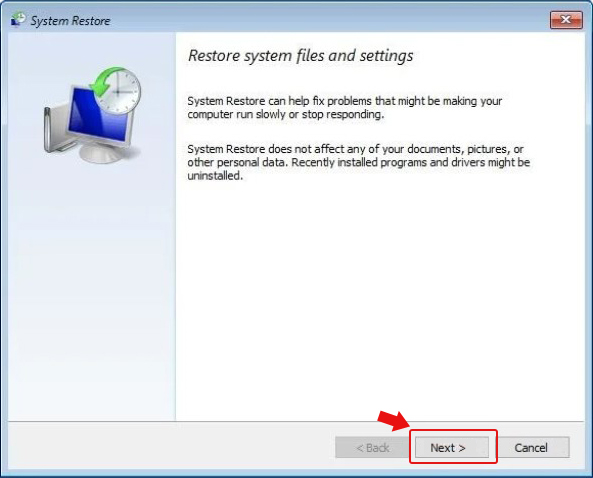
Fix 6: Perform a system restore
System restore will take your OS back to a time when no issues existed. Follow these easy steps to get it done:
- Use the
Windows key + I hotkey to launch Settings.
- Go to System > About.
- Select System Protection.
- On the System Properties window, click System Restore.
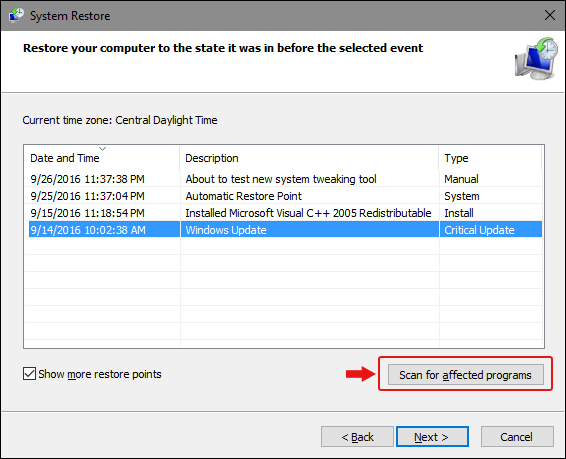
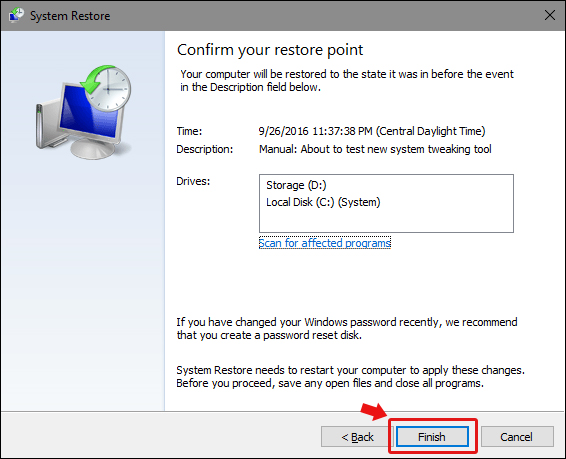
- When the System Restore window opens, click Next and select a restore point.
Follow the onscreen wizard to finish up the process.
Fix 7: Check your hardware
A failing RAM module or Solid-State Drive (SSD) could be the cause of the error you are experiencing. Replace your hard drives and see if the issue is resolved.
We suggest you visit an expert to help you perform this fix.
If you have two RAM slots, you can try removing both sticks. Clean the slots, and reinsert one stick. See if that fixes the issue. If no, reinsert the other stick and try again.
If your Windows OS is installed on your SSD, reinstalling it should resolve the issue.
Fix 8: Check for malware
A hidden virus or malware on your computer can contribute to the blue screen. Windows 11 ships with a native security app that checks for threats in real-time, but there is no 100% guarantee that the automatic function will catch everything every time.
To make sure, you can manually scan for threats yourself. Here’s how:
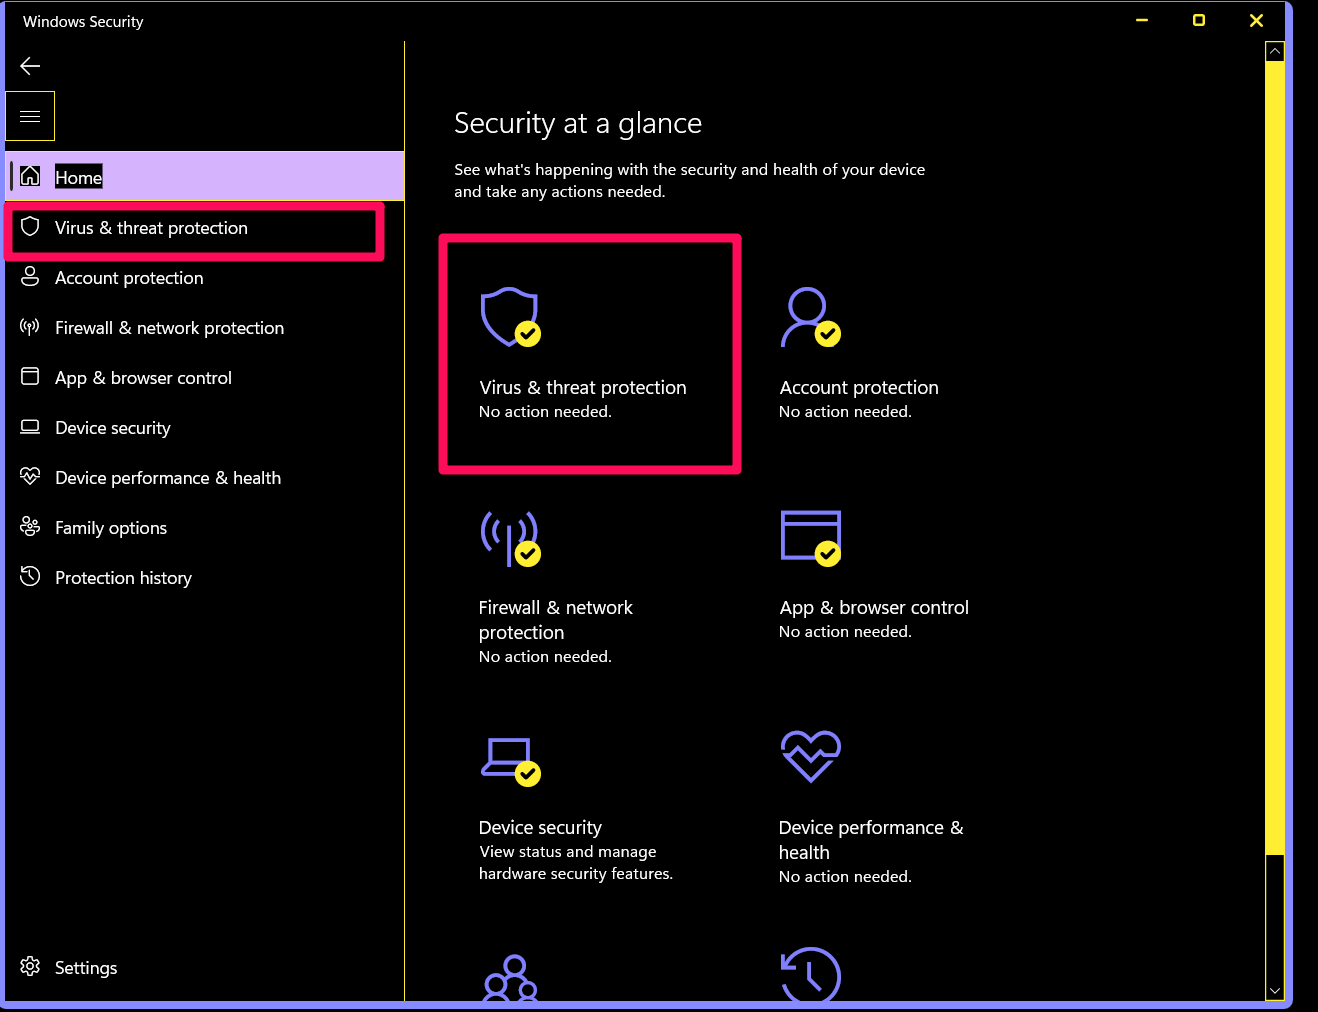
- Hit the Windows key to launch the Start menu.
- Type security and select Windows Security from the search results.
- Select Virus & Threat Protection on the left navigation pane or just select it from the main screen.
- Click the Quick Scan button to commence a quick check of your system.
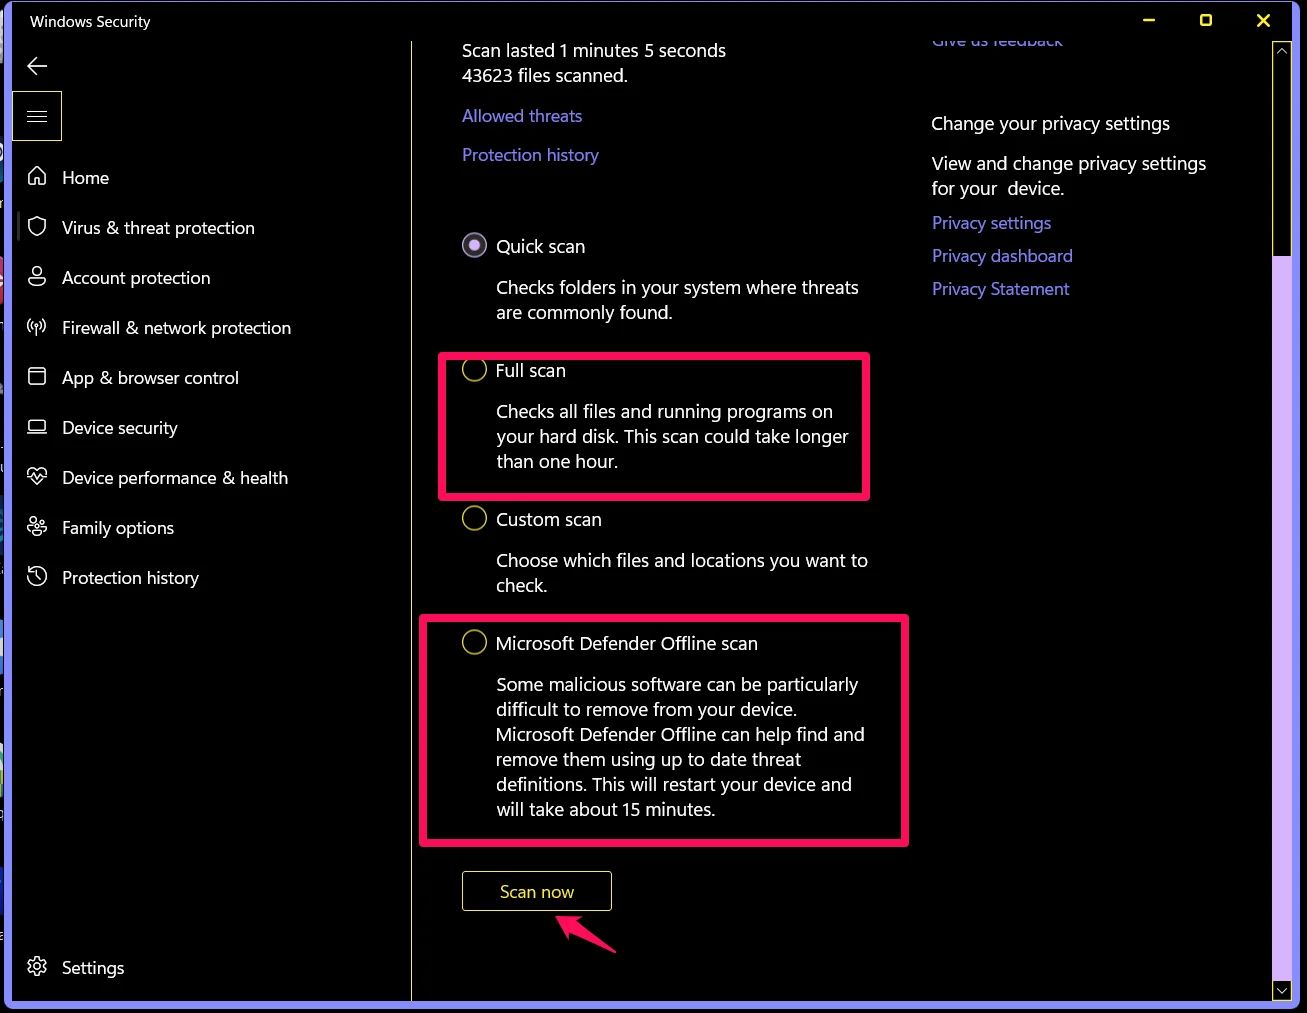
- If the Quick Scan doesn’t detect anything, you can run a deeper scan. Click the Scan Options link.
- On the next page, select Quick Scan or Microsoft Defender Offline Scan and click the Scan Now button.
The Microsoft Defender Offline Scan will take about 15 minutes, while the Full Scan may take longer depending on the volume of files on your system.
Download Auslogics Driver Updater
Prevent hardware errors and ensure problem-free device operation with this advanced tool that detects outdated drivers and safely gets them updated.
Conclusion
If you want to fix the Ntoskrnl.Exe BSOD error, check the solutions discussed in this guide. You can use the Auslogics Anti-Malware to update your drivers with a single click.
We hope these solutions have been helpful. If you have any questions, remarks, or further suggestions, please feel free to share them in the section below.
We’d like to hear from you.
Use Auslogics Driver Updater to resolve any driver-related problems in a Windows PC
FAQ
What is the quickest solution to fixing a corrupted Ntoskrnl.exe file?
The fastest way to fix a corrupted Ntoskrnl.exe file is to use the System File Checker (SFC) program, which scans and fixes corrupted system files like Ntoskrnl.exe.
Launch the command prompt as an administrator and type “sfc /scannow.”
This command will start your system file scan and automatically fix any problems it identifies. Restart your computer when the scan is finished to check if the Ntoskrnl.exe error has been fixed.
How to fix the blue screen error in Windows 11 using the command prompt?
Using Command Prompt, you can use the Deployment Image Servicing and Management (DISM) tool and then run the System File Checker (SFC) program to resolve a blue screen error in Windows 11.
Launch the command prompt as an administrator, type “DISM /Online /Cleanup-Image /RestoreHealth”, and press Enter. This command will examine the Windows image for problems and fix them.
After the DISM scan has finished, type “sfc /scannow” and hit Enter to launch the System File Checker.
Restart your computer to check if the blue screen error has been fixed when both scans are complete.
Why does Windows 11 keep crashing BSOD?
There are several reasons why Windows 11 can continually crash with the Blue Screen of Death (BSOD), such as driver conflicts, hardware problems, program compatibility problems, or corruption in system files.
You can resolve this issue by updating device drivers, running hardware diagnostics, scanning for malware, checking for system updates, and performing system file repairs using tools like SFC and DISM scans.
This can help you resolve the root cause of the BSOD crashes.
How do I fix the critical process died stop code on Windows 11?
Try a few troubleshooting procedures to find the root cause of the “critical process died” stop code on Windows 11.
If the problem still exists, try rebooting your computer and repeatedly pressing the F8 key during startup to enter Safe Mode.
You can troubleshoot possible causes, such as malfunctioning drivers or freshly installed applications, in Safe Mode.
You can also restore the system to its previous state before the issue occurs.
If these fixes don’t work, you should contact Microsoft Support or a professional specialist for more help to identify and address the root cause of the critical.