
Last Updated :
16 Apr, 2025
NPM (Node Package Manager) is an essential tool for managing JavaScript libraries and packages. It’s commonly used for NodeJS projects to install, update, and manage dependencies. Like other software, NPM also gets updated, which introduces new features, improvements, and bug fixes.
- NPM can install packages globally (for system-wide use) or locally (specific to a project).
- You can install packages with simple commands like npm install <package-name>.
- It helps you to easily manage and install JavaScript libraries and dependencies in your projects.
Why You Should Update NPM
Updating NPM brings several benefits:
- Security: Fixes vulnerabilities.
- Bug Fixes: Solves issues and improves stability.
- New Features: Adds tools that improve productivity.
- Compatibility: Ensures compatibility with NodeJS and other tools.
How NPM Versions Work
NPM uses a versioning system with three parts: Major.Minor.Patch.
- Major updates (e.g., 9.0.0) introduce changes that can break compatibility with previous versions.
- Minor updates (e.g., 8.1.0) add new features but keep everything else compatible.
- Patch updates (e.g., 8.0.1) fix bugs or minor issues without changing features.
Note: If NPM is not installed on your device check this article to install npm and NodeJS.
Check Your Current NPM Version
Run this command to check your current NPM version:
npm -v
Steps to Update NPM
Now, let’s look at how to update NPM on different systems:
1. Updating NPM on Windows
- Open Command Prompt as Administrator.
- Run the update command:
npm install npm@latest -g
This command will install the latest version of NPM globally, replacing the existing version.
- -g stands for “global” and ensures that the update applies to your entire system, not just the local project.
- After the installation completes, check the version again to confirm the update was successful:
npm -v
You should now see the latest version of NPM.
- After updating NPM, you should also update the packages in your project to make sure they are compatible with the new version of NPM. To update all packages in your project, run the following command in your project directory:
npm update
- This will update all the dependencies in your package.json file to their latest versions that are compatible with the defined version range.
- If you want to update a specific package, use:
npm update <package-name>
Common Issues:
- Permission Errors: Run as Administrator.
- Corrupted Install: Reinstall NodeJS and NPM if issues persist.


2. Updating NPM on macOS
On macOS, open Terminal and run:
npm install npm@latest -g
Best Practice: Use Homebrew for easy updates:
brew install node
3. Updating NPM on Linux
1. If using a PPA (Personal Package Archive), update NodeJS:
Write the following command to install NodeJS and npm.
sudo apt update
sudo apt install nodejs
2. If you have cached data issues, clear the cache:
npm cache clean -f
Then update NPM:
sudo npm install npm@latest -g

Using Pre-Release Versions of NPM
If you want to try the latest features, you can install the pre-release version with:
npm install -g npm@next

This command will install the next(pre-release) version of npm globally on your device.
Conclusion
Regularly updating NPM helps maintain security, stability, and compatibility in your NodeJS projects. Follow the simple steps for your operating system, and ensure you’re always using the latest version of NPM.
Node Package Manager (npm) is the default package manager for Node.js. It installs, manages, and shares JavaScript packages and comes bundled with Node.js.
Whether you use npm on Windows, macOS, Ubuntu, or another Linux distribution like Rocky, it’s important to check your current version and know how to update it. Keeping npm up to date ensures access to the latest features, performance enhancements, and critical security updates.
This guide will explain how to update npm using different methods.
Note: The methods below discuss updating the npm Command Line Interface (CLI), the package manager used to manage Node.js dependencies and packages globally. This differs from npm packages, the individual dependencies installed within a project.
Update npm with npm Install
This is the most direct and platform-independent method for updating the npm CLI. It works across all operating systems and is independent of how you installed Node.js, whether through a package manager, the official installer, or a version manager.
Before updating, check the version currently on your system:
npm -v
The output confirms the current npm version on the system is 10.9.2.
Next, check the latest available version published in the registry. Do that with the following command:
npm view npm version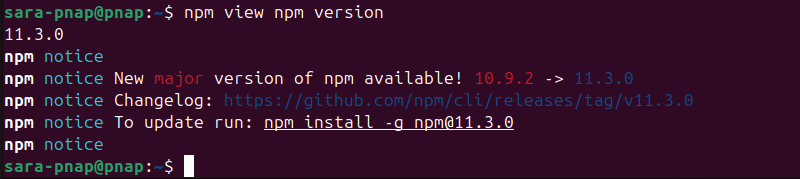
The latest available version is 11.3.0. This confirms the version is not up-to-date.
To install the latest stable version of npm, use:
npm install -g npm@latest
This command downloads and installs the newest available version of npm.
Note: In some cases, you need to prefix the install command with sudo if you encounter a permission error.
To confirm the update, run the following again:
npm -v
The output confirms the newly installed version is the same as the latest available version.
Note: An alternative command is npm i -g npm@latest. It works the same. The argument i is a shorthand for install.
You can also install a specific npm version, which is useful when a project requires a particular release. For example, install an older version, in this case 9.9.2:
npm install -g [email protected]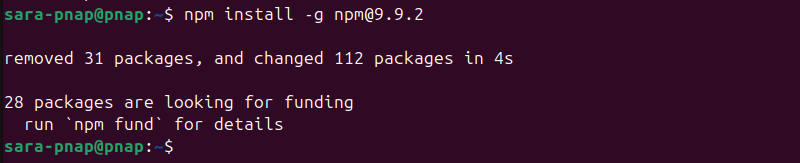
The following command confirms the change:
npm -v
Note: After updating, check both the npm and Node.js versions to ensure they’re compatible. To check the Node.js version, run node -v.
Compatibility issues cause errors with package installs or scripts. To avoid these issues, update Node.js to match your npm version.
Update npm with npm Update
Another option that works on all major operating systems (Linux, macOS, Windows) is npm update. While it sometimes updates the npm CLI, the command’s primary focus is to update global packages installed on the system, rather than the package manager itself.
This approach relies on npm trying to update itself using the npm update -g npm command. Therefore, this method often leads to inconsistent or failed updates, especially in newer versions of npm.
Note: Global packages are installed system-wide and accessible from anywhere in the terminal, while local packages are specific to a project. npm update updates global packages, while local packages are managed through a project’s package.json file.
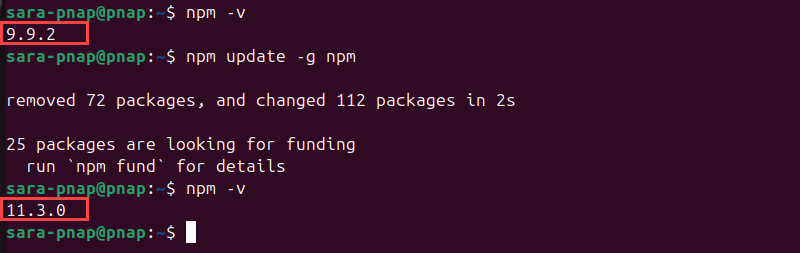
To attempt to update npm CLI, use the following command:
npm update -g npm
This command checks for updates to all globally installed packages, including the npm CLI. In this case, the command updates npm successfully as well, which you can confirm by comparing the versions before and after the update:
However, in some cases, the command is unreliable and causes multiple issues, especially with npm v7 and above (the current version is v11.3.0). Internal changes in how npm manages its own installation have made self-updating unpredictable. These problems make it an unsuitable method for updating the npm CLI.
The issues below explain why the command fails:
- Less predictable self-updating. Internal changes to how npm manages its own files made self-updating unreliable. The
npm update -g npmcommand might install npm in the wrong location, skip the update entirely, or confuse which version is actually installed. Even if it appears to have worked, the version may not have changed, making the process unpredictable and difficult to trust. - Fake positive results. The command sometimes shows a successful result, but when you check the npm version, it hasn’t changed. It appears to work, but the update never happened.
- Silent failures. The command runs without any errors, but npm fails to update. There’s no feedback or error message, so it’s hard to detect that something went wrong.
- No guarantee of the latest version. Even if npm updates, the command may install an outdated version, especially on systems managed by tools like
nvmor package managers.
Note: For more reliable npm updates, use npm install -g npm@latest or a version manager like n or nvm, depending on your setup.
Update npm Using nvm
Another reliable way to update npm is by using Node Version Manager (nvm). This method works only on Linux and macOS, as Windows does not officially support npm.
Note that nvm doesn’t come preinstalled (unless you used nvm to install it), so install it manually if it’s not already on your system:
Note: If you used nvm to install Node.js, you already have nvm installed. In that case, skip the installation steps and go straight to nvm use node to switch to the latest version. If you’re not sure whether you used nvm to install Node.js, run the following to verify it’s on the system: nvm --version.
If you don’t have nvm installed, install it by running curl:
curl -o- https://raw.githubusercontent.com/nvm-sh/nvm/v0.39.7/install.sh | bash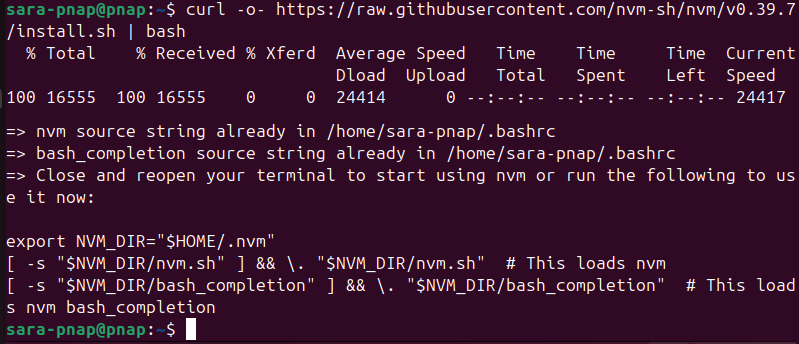
After the installation, install the latest Node.js version available (and with it, the latest npm version):
nvm install node
Once installed, switches your system to use the latest version:
nvm use node
This updates both Node.js and npm by switching to the most recently installed version. For example:
Update npm Using the n Module
The n module is a Node.js version manager for Linux and macOS that indirectly updates npm by replacing the entire Node.js installation. It doesn’t update the npm CLI directly, but updates it because newer Node.js versions come bundled with it.
This method is suitable for simple local setups, such as development environments or personal machines, where there’s no need for strict control over Node.js versions.
However, production environments managed by tools like nvm or installed via package managers like APT or Homebrew don’t work well with this method.
The reason is that n overwrites the existing Node.js installation, which breaks version managers and causes conflicts with system packages. We recommend to stick with one method to avoid version conflicts
Despite that, the method works regardless of how Node.js was originally installed. You can install n and use it to update both Node.js and npm, even if the current Node.js was installed via nvm, a package manager, or manually. However, note that this replaces the existing setup and may impact your environment.
To use n to upgrade Node.js and npm, follow these steps:
1. Check the current npm version with:
npm -v
The output shows the current version is 9.9.2.
2. Clean the npm cache. This optional step helps prevent conflicts or errors by removing potentially corrupted or outdated data, especially if you’ve had issues or used n before. Use the following:
npm cache clean -f
Note: You can also run this command with sudo, but if you get an error sudo: npm: command not found, it’s because sudo uses a restricted environment with its own $PATH and can’t access npm. This is common when Node.js and npm are installed via nvm, but doesn’t always happen when other methods are used.
To fix it, either remove sudo a or provide the full path to npm binary with sudo.
3. Install the n module globally with:
npm install -g n
4. Find the full path to n with the which command:
which n
The output shows the full path to n is /home/sara-pnap/.nvm/versions/node/v23.11.0/bin/n.
This confirms n is installed under your user account via nvm. Therefore, providing the full path was necessary, because n is only available in your user’s environment. sudo (used in the next step) runs in a different environment and can’t find n unless the full path is given.
Note: If you installed Node.js system-wide (e.g., with a package manager), skip the rest of the steps. Run sudo n latest to update both Node.js and npm.
5. Use the path from the previous step to update npm (and Node.js with it). This allows sudo to locate and run n, which is required to install the updated Node.js and npm versions system-wide.
Update npm with:
sudo /home/sara-pnap/.nvm/versions/node/v23.11.0/bin/n latest
We didn’t use sudo earlier because the commands ran in your user environment. But installing Node.js system-wide requires sudo to write to system directories like /usr/local/.
The output confirms that npm is updated and the newer version 10.9.2 is installed.
Note: The n module installs the latest version of Node.js, but it doesn’t always update npm to the latest version. Each Node.js version comes with a specific npm version bundled, and in this case, Node.js v23.11.0 includes npm 10.9.2. To get the latest npm version (like 11.3.0), update npm separately using npm install -g npm.
Update npm with Node.js Installer on Windows
Updating npm on Windows involves reinstalling the latest version of Node.js using the official installer from the Node.js website. The installer comes in the .msi format, which is a Microsoft Installer Package.
This approach is suited for users who prefer a graphical interface (GUI) over command-line tools. It’s stable, beginner-friendly, and upgrades both Node.js and npm together.
This method is straightforward:
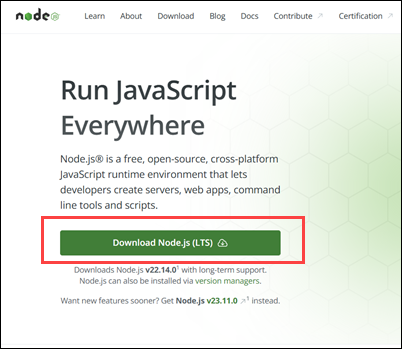
1. Download the latest LTS or Current Node.js .msi installer from the official site.
2. Run the installer.

3. Follow the on-screen instructions until the installation completes.
4. Access Command Prompt and run:
node -v
npm -v
These commands verify that both Node.js and npm were successfully updated.
This process ensures both Node.js and npm are up to date. However, some limitations exist:
- No standalone npm update. npm is bundled with the Node.js version and cannot be updated separately using this method.
- Overwrites custom setups. If you’ve changed the system PATH or installed Node.js/npm in a custom location, the installer may override those configurations.
- No version management. This method does not support installing or switching between multiple Node.js versions, unlike nvm-windows, a Node.js version manager for Windows.
- May override existing installations. If Node.js was installed using a version manager like nvm, this method can interfere with or replace that setup.
Moreover, when working on multiple Node.js projects with different version requirements, a version manager like nvm-windows may be more appropriate. It is a Node.js version manager for Windows that lets you install and switch between multiple Node.js versions without overwriting global settings or system paths.
Conclusion
This article explained different ways to update npm on various operating systems. It elaborated on direct methods like npm install, which work on every operating system, but also some like n module and nvm that have limited usage. Additionally, the article showed how to use a GUI method to get the latest npm version on Windows.
Next, learn about the differences between Yarn and NPM, two of the most popular Node.js package managers.
Was this article helpful?
YesNo
By Filip on 10/05/2024
Learn how to effortlessly update npm on your Windows machine to access the latest features and security enhancements.
Table of Contents
- Introduction
- Step-by-Step Guide
- Code Example
- Additional Notes
- Summary
- Conclusion
- References
Introduction
This guide provides a step-by-step approach to update npm on Windows, covering how to check your current version, the recommended method of updating through Node.js using package managers or the official website, and the less common method of directly updating npm. It also includes important notes on administrator privileges, global installs, and using nvm.
Step-by-Step Guide
Updating npm on Windows is generally straightforward. Here’s a breakdown of the process, combining the best practices from the resources you provided:
1. Check Your Current npm Version
Before updating, it’s helpful to know your current npm version. Open your command prompt or PowerShell and run:
2. The Recommended Approach: Update Node.js
Npm is bundled with Node.js. In most cases, the simplest way to update npm is to update Node.js itself. This ensures compatibility and often brings along the latest npm version.
-
Using Package Managers (winget or Chocolatey): If you installed Node.js using a package manager like
wingetorchocolatey, use the respective commands to update:winget upgrade -q NodeJS # For winget choco upgrade nodejs -y # For Chocolatey
-
Reinstalling from the Official Website: If you installed Node.js directly, download the latest version from the official Node.js website (https://nodejs.org/) and run the installer. It will usually handle updating both Node.js and npm.
3. Directly Updating npm (Less Common)
While updating Node.js is generally preferred, you can update npm directly if needed:
-
Using npm:
npm install -g npm@latest
This command tells npm to install the latest version of itself globally (
-g).
4. Verify the Update
After the update process, confirm the npm version again:
You should see the updated version number.
Important Notes:
- Administrator Privileges: You might need administrator privileges to update npm, especially if you installed Node.js globally. Run your command prompt or PowerShell as administrator.
-
Global Installs: If you previously installed npm packages globally (
-g), you might need to reinstall them after updating npm to ensure they work correctly with the new version. - nvm (Node Version Manager): If you use nvm to manage multiple Node.js versions, refer to nvm’s documentation for updating npm within specific Node.js versions.
By following these steps, you can keep your npm installation up-to-date on Windows, ensuring you have access to the latest features, bug fixes, and security improvements.
Code Example
This JavaScript code demonstrates how to check your npm version from within a Node.js environment using the ‘child_process’ module. It executes the ‘npm -v’ command in the system shell, retrieves the output, and logs the npm version to the console. However, it’s important to note that while you can execute update commands using this method, the recommended approach for updating npm is to update Node.js itself using package managers or the official website.
This article explains how to update npm on Windows, but it doesn’t involve JavaScript code itself. The code snippets provided are commands to be run in the command prompt or PowerShell, not within a JavaScript file.
However, you can execute these commands from within a Node.js environment using the child_process module. Here’s how you could check your npm version from a JavaScript file:
const { exec } = require('child_process');

exec('npm -v', (error, stdout, stderr) => {
  if (error) {
    console.error(`Error checking npm version: ${error}`);
    return;
  }
  console.log(`Your npm version is: ${stdout.trim()}`);
});
This code does the following:
-
Imports
exec: It imports theexecfunction from thechild_processmodule. This function allows you to execute shell commands. -
Executes
npm -v: It callsexecwith the commandnpm -vto get the npm version. - Handles Output: It provides a callback function to handle the output (stdout), errors (stderr), and potential execution errors.
- Logs the Version: If successful, it logs the npm version to the console.
Important:
- Running commands like
npm install -g npm@latestfrom within a script requires careful consideration. It’s generally safer to handle global package updates outside of your JavaScript code. - This example demonstrates how to interact with the system shell from Node.js. Use it cautiously and avoid running arbitrary commands from untrusted sources.
Remember, while you can execute these update commands using JavaScript and child_process, the recommended approach is to update npm by updating Node.js itself using the methods described in the article (package managers or the official website).
Additional Notes
Understanding the Relationship Between Node.js and npm:
- Bundled, but Separate: While npm comes bundled with Node.js, they are separate entities. Think of it like getting a phone with pre-installed apps – you can update the apps independently, but a phone update might also update those apps.
- Compatibility is Key: Updating Node.js usually updates npm to a compatible version, ensuring smoother operation. Direct npm updates might sometimes lead to compatibility issues if not done carefully.
Best Practices for a Smoother Update:
- Close and Reopen: After updating Node.js or npm, close your command prompt or PowerShell and reopen it. This ensures the changes are loaded correctly.
- Check for Errors: Pay attention to any error messages during the update process. These messages often provide clues about potential issues and how to resolve them.
-
Global Package Considerations: If you heavily rely on globally installed npm packages, consider using a virtual environment like
nvm(Node Version Manager). This allows you to have different Node.js and npm versions for different projects, preventing conflicts.
Troubleshooting Tips:
- Antivirus Interference: Sometimes, antivirus software might interfere with the update process. Temporarily disabling your antivirus (with caution!) during the update might help.
- Network Connectivity: Ensure a stable internet connection during the update, as npm needs to download files.
-
Cache Issues: If you encounter problems, try clearing the npm cache using
npm cache clean --force.
Beyond the Basics:
- Node.js Release Schedule: Node.js has a regular release cycle. Stay updated on the latest releases to benefit from new features and security patches.
-
npm Alternatives: While npm is the most popular package manager for Node.js, alternatives like
yarnandpnpmexist. Explore these options if you’re looking for different features or performance improvements.
Remember, keeping your development tools updated is crucial for security and optimal performance. By following these best practices and understanding the nuances of npm updates on Windows, you can ensure a smoother and more efficient development experience.
Summary
This table summarizes the key steps and considerations for updating npm on a Windows machine:
| Method | Description | Command | Notes |
|---|---|---|---|
| Check Current Version | Determine your current npm version. | npm -v |
|
| Recommended: Update Node.js | Updating Node.js usually updates npm automatically. | Ensures compatibility and is the simplest approach. | |
| Using Package Managers | Update Node.js (and npm) via package managers. |
winget upgrade -q NodeJS or choco upgrade nodejs -y
|
Use if Node.js was installed with winget or chocolatey. |
| Reinstalling Node.js | Download and install the latest Node.js version. | Download from https://nodejs.org/ | Usually handles both Node.js and npm updates. |
| Directly Updating npm (Less Common) | Update npm directly if necessary. | npm install -g npm@latest |
Installs the latest npm version globally. |
| Verify Update | Confirm the updated npm version. | npm -v |
Important Considerations:
- Administrator Privileges: May be required for global installations and updates.
- Global Installs: Reinstall global packages after updating npm for compatibility.
- nvm Users: Refer to nvm documentation for updating npm within specific Node.js versions.
Conclusion
Keeping your npm installation current is vital for a secure and efficient development environment on Windows. By prioritizing the update of Node.js itself, you ensure compatibility and often bring along the latest npm version. Whether using package managers like winget or chocolatey, or opting for a fresh installation from the official Node.js website, the process is generally straightforward. While directly updating npm is possible, it’s less common and potentially introduces compatibility issues. Always verify your npm version after any update and be mindful of administrator privileges and the potential need to reinstall global packages. For those managing multiple Node.js versions, tools like nvm offer tailored solutions. By following these guidelines and understanding the close relationship between Node.js and npm, you can confidently maintain an up-to-date toolkit for your Windows development projects.
References
- Npm is not being updated with node on windows 10 · Issue #31056 … | Version: 13.5.0 Platform: x64 Windows 10 1909 Problem: Npm is not being updated when you update node on windows 10. Most likely because I once ran npm -g install npm@ which installs a sepa…
- node.js — How do I update npm on Windows? — Stack Overflow | Nov 13, 2014 … Open cmd.exe as administrator, navigate to C:\Program Files (x86)\nodejs and then run the installation without -g: npm install npm@latest
- How To Update NPM Version – A Complete Guide | | Upgrade your npm version with this comprehensive guide from Ultahost. Learn step-by-step instructions to ensure your npm is up to date.
-
A way to update npm ? · Issue #13 · coreybutler/nvm-windows · GitHub | Oct 14, 2014 … You can just go and update the original global node modules manually. This doesn’t require neither admin permissions nor moving files around.
-
Try the latest stable version of npm | npm Docs | Documentation for the npm registry, website, and command-line interface
-
How To Update Node Versions Using Mac, Windows, and Linux | Learn how to update Node versions on Mac, Windows, and Linux to keep your development environment up-to-date and secure. Stay ahead with the latest features and bug fixes.
-
npm-windows-upgrade — npm | Upgrade npm on Windows, easily and automatically. Latest version: 6.0.1, last published: 6 years ago. Start using npm-windows-upgrade in your project by running
npm i npm-windows-upgrade. There are no other projects in the npm registry using npm-windows-upgrade. -
How to Update Node.js Version {Linux, Windows, & macOS} | This guide shows how to install the latest Node.js version on Linux, Windows, or macOS. Follow our step-by-step tutorial and upgrade now.
-
How to Update Node.js and NPM to the Latest Version … | 1. Use NPM to Update Your Node Version · Clear the NPM cache · Install n · Install a new version of Node · Remove previously installed versions. Stay current with Node.js and NPM – follow our guide on how to update Node.js and NPM to the latest version. Explore step-by-step instructions for ensuring your Node.js environment is up-to-date, providing access to new features and improvements.


Keeping your Node.js version up to date is essential for security, performance, and access to the latest features. New releases often include bug fixes, optimizations, and improvements that can enhance your development workflow.
If you’re using Windows, there are multiple ways to update Node.js, whether you prefer a simple installer, a package manager, or a version manager. In this guide, we’ll walk through different methods, so you can choose the one that best fits your needs.
Looking for instructions for macOS? Click here. Need help with Linux? Click here.
By the end of this article, you’ll have the latest version of Node.js running smoothly on your system—without breaking your existing projects. Let’s get started! 🚀
Check Your Current Node.js Version
Before updating Node.js, it’s important to check which version you currently have installed.. Open a Command Prompt or PowerShell window and run:
node -v
This command will return the installed version, e.g., v22.11.0.
Understanding Node.js Release Lines: LTS vs. Current
Node.js follows a predictable release schedule with two main tracks:
- LTS (Long-Term Support): Recommended for most users, especially for production environments. LTS versions receive security updates and bug fixes for an extended period. The LTS version at the moment is v22.
- Current: Includes the latest features and improvements but may introduce breaking changes. It’s ideal for developers who want early access to new capabilities. The current version at the moment and until April 2025, is v23.
To determine whether your installed version is still actively maintained, visit the Node.js release schedule.
Method 1: Using the Node.js Installer (Recommended for Beginners)
One of the easiest ways to update Node.js on Windows is by using the official Node.js installer.
Steps:
- Download the Latest Version:
- Go to the official Node.js website.
- Choose either the LTS (Long-Term Support) version for stability or the Current version for the latest features.
- Click the Windows Installer (.msi) download link.
- Run the Installer:
- Double-click the downloaded
.msifile. - Follow the installation wizard. It will detect and upgrade your existing Node.js installation.
- Double-click the downloaded
- Verify the Update:
- Once installed, reopen Command Prompt or PowerShell and run:
node -v - Ensure it displays the updated version.
- Once installed, reopen Command Prompt or PowerShell and run:
Method 2: Using Node Version Manager for Windows (nvm-windows)
For developers who frequently switch between Node.js versions, nvm-windows (Node Version Manager for Windows) is a more flexible solution.
Installing nvm-windows:
- Uninstall Existing Node.js (optional):
- Open Add or Remove Programs in Windows.
- Find Node.js, click Uninstall, and follow the steps.
- Install nvm-windows:
- Download the installer from the nvm-windows GitHub releases page.
- Run the
.exefile and follow the setup instructions.
- Verify Installation:
- Open a new Command Prompt and run:
nvm -v - If installed correctly, it will return the version of nvm-windows.
- Open a new Command Prompt and run:
Updating Node.js Using nvm-windows:
Once nvm-windows is installed, you can easily manage multiple Node.js versions.
- List Available Versions:
nvm list available
This command shows the latest Node.js versions available for installation. - Install a New Version:
nvm installv22.11.0«
(Replacev22.11.0with the latest stable version.) - Use the New Version or switch to a specific version:
nvm use<version>«
(Replace <version> with the version you installed) - To Install the latest version:
nvm install latest nvm use latest - To install the latest LTS version:
nvm install lts nvm use lts - Verify the Update:
node -v - Set a default version:
nvm alias default <version>
Method 3: Updating via Chocolatey (For Power Users)
Chocolatey is a package manager for Windows that allows you to install and manage software using the command line.
Installing Chocolatey:
If you don’t have Chocolatey installed, open PowerShell as an administrator and run:
Set-ExecutionPolicy Bypass -Scope Process -Force; [System.Net.ServicePointManager]::SecurityProtocol = [System.Net.ServicePointManager]::SecurityProtocol -bor 3072; iex ((New-Object System.Net.WebClient).DownloadString('[https://community.chocolatey.org/install.ps1](https://community.chocolatey.org/install.ps1)'))
Updating Node.js Using Chocolatey:
Once Chocolatey is installed, you can update Node.js with a single command:
choco upgrade nodejs
This command downloads and installs the latest stable version of Node.js. To verify the installation, run:
node -v
Method 4: Using Winget (Windows Package Manager)
Winget is a built-in package manager in Windows 10 and 11 that allows you to update software from the command line.
Updating Node.js with Winget:
- Open Command Prompt or PowerShell as an administrator.
- Run the following command to update Node.js:
winget upgrade --id OpenJS.NodeJS -e --source winget - Verify the update:
node -v
Updating npm Separately
When updating Node.js, npm is usually updated automatically. However, if you need to update npm separately, run:
npm install -g npm
Then, check the npm version:
npm -v
Choosing the Best Update Method
Updating Node.js on Windows is essential for maintaining security, performance, and compatibility with modern JavaScript features. You can update it using different methods:
- Node.js Installer – Easiest for beginners
- nvm-windows – Best for managing multiple versions
- Chocolatey – Ideal for power users
- Winget – Simple and built into Windows
Choose the method that best fits your workflow and enjoy the latest features of Node.js! If you’re managing multiple projects, nvm-windows is a fantastic choice, while Chocolatey and Winget are great for quick updates.
For developers and organizations seeking enhanced security, performance monitoring, and reliability, N|Solid is the best solution. N|Solid is an enterprise-grade platform built on Node.js, offering real-time insights, vulnerability scanning, and advanced diagnostics to ensure your applications run securely and efficiently. With features like built-in CVE monitoring and proactive alerts, N|Solid helps teams stay ahead of security risks, even as the Node.js ecosystem evolves. It’s an invaluable tool for teams navigating the challenges of upgrading and maintaining Node.js applications.
How to Update npm on Windows: A Quick and Easy Guide
So you want to update npm on Windows and you’ve tried the commands suggested in a popular Linux tutorial, but they didn’t work? Don’t worry, we’ve got you covered! In this guide, we’ll walk you through the steps to update npm on your Windows machine.
Common Issues and Troubleshooting
Before we dive into the solutions, let’s address some common issues you might encounter when trying to update npm on Windows:
1. Permission Errors ❌
Unlike Linux, Windows uses a different command structure and doesn’t require the use of sudo. If you’re encountering permission errors when running commands, try removing the sudo part from the commands.
2. Path Configuration ⚠️
Another common issue is the path configuration. Sometimes, running npm commands may fail due to incorrect path settings. In such cases, you might need to update your system’s environment variables.
3. Antivirus Software 🛡️
Believe it or not, some antivirus software can interfere with npm installations and updates. If you suspect that your antivirus is causing issues, try temporarily disabling it and then attempt the update again.
Step-by-Step Instructions
Now, let’s get to the good part! Here are the straightforward steps to update npm on Windows:
Step 1: Open Command Prompt as Administrator 🖥️
To ensure that you have sufficient privileges to update npm, right-click on the Command Prompt icon and select «Run as administrator.» This will give the necessary permissions to execute the required commands.
Step 2: Check the Currently Installed npm Version 📜
Before updating npm, it’s a good idea to check which version you currently have. To do this, simply enter the following command in the Command Prompt:
npm -vThis will display the version number, allowing you to compare it with the latest version.
Step 3: Clear npm Cache 🗑️
Clearing the npm cache helps avoid any conflicts that might occur during the update process. In the Command Prompt, enter the following command:
npm cache clean --forceStep 4: Update npm 🔄
To update npm to the latest version, use the following command:
npm install -g npm@latestThis command will download and install the latest version of npm on your Windows machine.
Step 5: Verify the Updated Version ✅
To verify that the update was successful, recheck the npm version by running:
npm -vThis should display the updated version number.
Call-to-Action: Share Your Success Story! 🚀
Congratulations, you’ve successfully updated npm on your Windows machine! Now it’s time to spread the word and let others know about your success. Share your experience and any additional tips in the comments below.
We hope this guide made the process of updating npm on Windows a breeze for you. If you have any further questions or run into any issues, feel free to ask for help in the comments section.
Happy coding! 💻✨