
When it comes to optimizing your workflow on Windows 11, one key feature that can make a significant difference is the ability to add a node to the path. Did you know that by adding a node to the path, you can easily access and run executables from any directory in the command prompt or PowerShell? It’s a small but powerful tweak that can save you valuable time and streamline your development process.
Add Node to Path Windows 11 gives you the flexibility to expand the capabilities of your command line interface. By adding directories to the system path, you can effortlessly navigate between different folders and run applications without having to specify their full paths. This feature has been a part of Windows for quite some time, allowing developers and power users to enhance their efficiency and productivity. With the latest iteration of Windows, Windows 11, the process of adding a node to the path has become even more seamless and user-friendly. Whether you’re a seasoned developer or just starting your coding journey, incorporating this technique can greatly enhance your command line experience.
Adding a Node to the Path on Windows 11 involves a few simple steps. First, open the Control Panel by clicking on the Start menu and selecting «Control Panel.» Next, navigate to the System and Security category and click on «System.» From there, click on «Advanced system settings» and go to the «Advanced» tab. Under the «System Variables» section, locate the «Path» variable and select «Edit.» Finally, add the desired Node path and click «OK» to save the changes. Following these steps, you’ll be able to successfully add a Node to the Path on Windows 11.

How to Add Node to Path in Windows 11
Windows 11 is the latest operating system developed by Microsoft, bringing new features and enhancements to the Windows experience. If you are a developer working with Node.js, you may need to add the Node.js executable path to the system’s PATH environment variable to easily run Node.js commands from any directory in the command prompt. In this article, we will guide you on how to add Node to the PATH in Windows 11, ensuring a seamless workflow for your Node.js development projects.
What is the PATH Environment Variable in Windows?
The PATH environment variable in Windows is a system variable that contains a list of directories where the operating system looks for executable files when you run a command in the command prompt or PowerShell. When you add a directory to the PATH variable, you allow the system to find and execute the programs located in that directory without specifying the full path every time.
By default, the PATH variable in Windows includes directories such as C:\Windows\System32 and C:\Program Files, among others. However, if you want to run a command or executable from a directory that is not on the default PATH, you need to add that directory to the PATH environment variable.
Adding Node.js to the PATH in Windows 11 allows you to access the Node.js command-line tool, npm, and other globally installed packages from any command prompt or PowerShell session, regardless of the current working directory.
Methods to Add Node to Path in Windows 11
Method 1: Using the Node.js Installer
The easiest and recommended way to add Node.js to the PATH in Windows 11 is by using the Node.js installer, which automatically sets up the environment variables during the installation process.
Follow these steps to add Node.js to the PATH using the installer:
- Download the latest Node.js installer from the official website (https://nodejs.org).
- Double-click the downloaded installer to launch it.
- Follow the on-screen instructions to install Node.js.
- Make sure to select the option «Automatically install the necessary tools» during the installation process.
Once the installation is complete, Node.js will be added to the PATH environment variable, and you can now run Node.js commands from any command prompt or PowerShell window.
Method 2: Manually Adding Node.js to the PATH
If you have already installed Node.js without selecting the option to add it to the PATH, or if you want to add a specific version of Node.js to the PATH, you can manually configure the environment variable.
Follow these steps to manually add Node.js to the PATH in Windows 11:
- Open the Start menu and search for «Environment Variables.»
- Click on the «Edit the system environment variables» option that appears.
- In the System Properties dialog, click on the «Environment Variables» button.
- In the Environment Variables dialog, locate the «Path» variable under the «System variables» section and click on the «Edit» button.
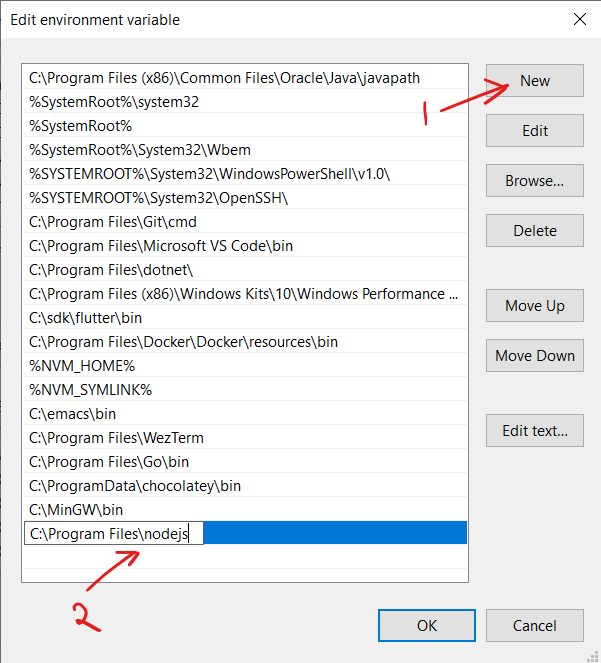
- In the Edit Environment Variable dialog, click on the «New» button to add a new entry.
- Enter the path to the Node.js executable. By default, it is located in the following directory:
C:\Program Files\nodejs. - Click «OK» on all the open dialogs to save the changes.
After adding Node.js to the PATH manually, open a new command prompt or PowerShell window, and you should be able to run Node.js commands without specifying the full path.
Verifying Node.js Installation
Once you have added Node.js to the PATH in Windows 11, you can verify the installation by running a few basic commands.
To check the Node.js version installed, open a command prompt or PowerShell window and type the following command:
node -v
If Node.js is correctly installed and added to the PATH, it will display the installed version number.
You can also check the npm version by running the following command:
npm -v
If npm is installed and configured correctly, it will display the installed version number.
Conclusion
Adding Node.js to the PATH in Windows 11 is essential for seamless development with Node.js projects. Whether you choose to use the Node.js installer or manually configure the PATH variable, you can now run Node.js commands from any directory in the command prompt or PowerShell, enhancing your productivity and workflow.

Adding Node to Path in Windows 11
When working with Node.js on Windows 11, it is essential to add Node to the system’s Path environment variable. This allows you to run Node commands from any directory in the command prompt. Here’s how you can add Node to the Path:
- Open the Start menu and search for «environment variables.»
- Click on «Edit the system environment variables.»
- In the System Properties window, click on the «Environment Variables» button.
- In the «System Variables» section, scroll down and find the «Path» variable.
- Click on «Edit.»
- In the «Edit Environment Variable» window, click on «New.»
- Enter the path to your Node.js installation folder (e.g., «C:\Program Files\nodejs») and click «OK.»
- Close all the windows and open a new command prompt.
- Type «node -v» to verify that Node is added to the Path successfully.
Add Node to Path Windows 11: Key Takeaways
- Adding a node to the path in Windows 11 allows you to run commands and access programs from anywhere in the system.
- You can add a node to the path by modifying the environment variables in Windows 11.
- Open the System Properties window and click on «Environment Variables» to add a node to the path.
- In the Environment Variables window, under the «System variables» section, select the «Path» variable and click «Edit.»
- Add the path of the desired node to the variable value list, separating it with a semicolon.
Frequently Asked Questions
Here are some frequently asked questions about adding Node to Path in Windows 11:
1. How can I add Node to Path in Windows 11?
To add Node to Path in Windows 11, you need to follow these steps:
1. Download and install Node.js on your Windows 11 computer. Make sure to select the appropriate version (32-bit or 64-bit) for your system.
2. Open the System Properties by searching for «System Properties» in the Start menu and selecting the corresponding option.
3. In the System Properties window, click on the «Advanced» tab and then click on the «Environment Variables» button.
4. In the Environment Variables window, locate the «Path» variable under the «System variables» section and click on the «Edit» button.
5. In the Edit Environment Variable window, click on the «New» button and enter the path to the Node.js installation directory. Typically, this will be something like «C:\Program Files\nodejs».
6. Click «OK» to save the changes and close all the windows. Node.js has now been added to the system’s PATH variable.
2. Why is it important to add Node to Path?
Adding Node to Path in Windows 11 is important because it allows you to run Node.js and npm (Node Package Manager) commands from any directory in the command prompt or PowerShell. Without adding Node to Path, you would need to navigate to the Node.js installation directory every time you want to run a Node.js or npm command.
By adding Node to Path, you can easily access Node.js and npm commands from any location on your computer, making your development workflow more efficient and streamlined.
3. Can I add multiple versions of Node to Path in Windows 11?
Yes, you can add multiple versions of Node to Path in Windows 11. Each version of Node.js will have its own installation directory, and you can add the paths to these directories to the system’s PATH variable following the steps mentioned earlier.
By adding multiple versions of Node to Path, you can easily switch between different versions of Node.js and use the desired version for your projects without having to modify the PATH variable every time.
4. Do I need to restart my computer after adding Node to Path in Windows 11?
No, you do not need to restart your computer after adding Node to Path in Windows 11. The changes to the system’s PATH variable take effect immediately, allowing you to use Node.js and npm commands without rebooting your system.
However, if you have any command prompt or PowerShell windows open, you may need to close and reopen them for the changes to take effect in those specific instances.
5. How do I verify if Node is correctly added to Path in Windows 11?
To verify if Node is correctly added to Path in Windows 11, follow these steps:
1. Open the command prompt or PowerShell.
2. Type the command «node -v» (without quotes) and press Enter. This command will display the installed version of Node.js if it is correctly added to the system’s PATH variable.
3. Type the command «npm -v» (without quotes) and press Enter. This command will display the installed version of npm if it is correctly added to the system’s PATH variable.
If both commands return the respective versions, then Node.js and npm are correctly added to Path in Windows 11.
So, to summarize, adding a node to the path in Windows 11 is a straightforward process that can greatly enhance your system’s functionality. By adding a node, you can easily access and run executables from anywhere on your computer without having to navigate through multiple folders. This can save you time and simplify your workflow.
To add a node to the path in Windows 11, you need to access the system’s environment variables and modify the «Path» variable to include the desired node. This can be done through the Control Panel or the Command Prompt. Remember to be cautious when modifying system settings and make sure to enter the correct node path to avoid any errors or issues.

|
| Nodejs, npm, Javascript Logo dark background |
JavaScript is really popular language for building web based frontend application, even before the presences of Nodejs. Now there’s Nodejs, with it not only you can just build front end application, now you can build any kind of application using Javascript with Node Js. With it’s package manager called NPM (node package manager), the biggest collections of libraries in programming world, you will build a robust application using Nodejs with its huge collections of libraries written in Javascript, you can just search whatever dependency you need, pick it, use it whichever for free.
Now if you are a beginner programmer who do not know how to get started doing Javascript programming with package manager. This is without further ado let’s just start on how to install Nodejs into your platform.
1. Install Nodejs
You need to install Nodejs to use NPM, to have Nodejs installed on your Windows computer. You can download Nodejs installer from nodejs.org, click on the installer and just follow the default configuration.
If you are using Linux or MacOS, you don’t need to download zip archive of Nodejs because usually for most Linux distributions already have Nodejs on their repositories. Using Linux especially for Ubuntu, just open a terminal and type in:
sudo apt-get install nodejs
For Mac Os, using brew instead:
brew install node
Just wait for the process to finish.
2. Add npm to path
After the installation process of Nodejs is finished, if you try typing npm on terminal or cmd, you will get an error telling you that npm is not in your path. You need to put npm to your path by following the below instructions.
a. For Windows
— On windows, by default npm will be installed under C:\Program Files\nodejs\
— Press windows button, search for edit system environment, open that program.
— Environment variables > system variables > edit Path > New, and then add C:\Program Files\nodejs\ > OK and Apply
— Then close the cmd and reopen it, now if you type npm, it is not valid command but at least now you have npm on your path. You’ve successfully installed nodejs.
b. Linux/Ubuntu/Mac OS users
To add NPM on your Ubuntu machine, simply by using apt package manager:
sudo apt-get install npm
If you are using Linux but not Ubuntu, I am so sorry because I’ve never used Linux other than Ubuntu, basically just replacing apt-get with yum if you are using Fedora for example.
For Mac OS you don’t have to install, npm is already included with Nodejs.
So that’s how simple it is to install Nodejs for you to begin your Journey developing application using Javascript. If you already have Nodejs and NPM on your terminal, you can do a simple test for example to test Nodejs, just type node and then follow by your Javascript example code:
node
console.log("Hello World!");
In the future you will use NPM as package manager, to add, remove, upgrade your Javascript dependencies. The syntax you need to remember that you will be using it frequently is for example installing and removing dependencies, the syntax is as follows:
npm install the-dependency-name
npm uninstall the-dependency-name
Node.js это кроссплатформенная среда исполнения, позволяющая запускать серверные (бэкенд) приложения JavaScript вне браузера. В этой статье мы рассмотрим, как установить фреймворк Node.js и его менеджер пакетов NPM в Windows.
Для установки Node.js и NPM можно скачать с официального сайта готовый установщик в виде MSI пакета (https://nodejs.org/en/download/prebuilt-installer). На сайте доступны MSI пакеты для x86 и x64 версий Windows. Если нет специальных требования, обычно рекомендуется устанавливать LTS версию Node.js (Long Term Support) .
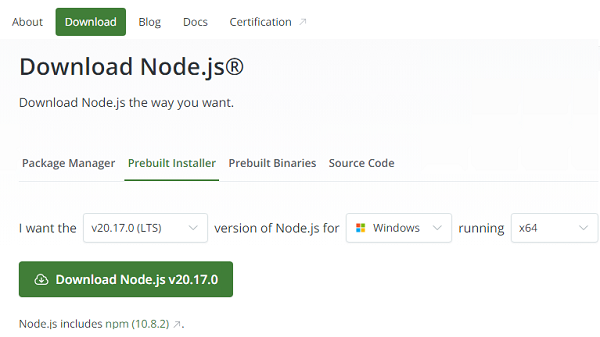
Запустите установку из MSI пакета с настройками по умолчанию.
MSI пакет содержит не только сам фреймоворк Node.js, но и также менеджер пакетов NPM, который устанадливается по-умолчанию. Установщик позволяет автоматически добавить пути к директориям node.js и npm в переменные окружения Windows.
Встроенный в node.js менеджер Node Package Manager (NPM), используется для загрузки и установки сторонних модулей из внешних репозиториев.
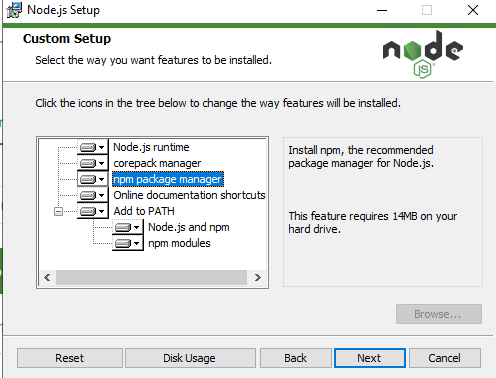
Для компиляции некоторых модулей, установленных через npm, могут потребоваться среды разработки python и Visual Studio. Вы можете разрешить NPM автоматически устанавливать необходимые инструменты, либо установить их в дальнейшем вручную через Chocolatey (https://github.com/nodejs/node-gyp#on-windows).

После окончания установки, проверьте что Node.js и npm установлены. Выполните следующие команды, чтобы вывести версии инструментов:
node -v
npm -v
Также для установки Node.js можно использовать менеджер пакетов WinGet, который установлен по-умолчанию в Windows 10 и 11.
winget install OpenJS.NodeJS.LTS

Эта команда автоматически скачает и в тихом режиме установит последнюю LTS версию Node.js.
Перезапустите консоль cmd/powershell, чтобы обновить пути в переменных окружения. Проверьте, что node.js и NPM успешно установлены и пути к ним прописаны в переменной окружения PATH:
(Get-ChildItem env:Path).value -split ";"

C:\Program Files\nodejs\
C:\Users\%username%\AppData\Roaming\npm
Также можно установить Node.js в Windows с помощью пакетного менеджера Chocolatey:
Choco install -y nodejs.install
Проверить работу Node.js можно с помощью простого JavaScript скрипта. Создайте текстовый файл hello.js с кодом:
console.log("Hello, world!")
Запустите скрипт с помощью node.js:
node hello.js
Для серверных развертываний Node.js, рекомендуется использовать менеджер версий NVM (Node Version Manager) для установки Node.js и npm.
NVM позволяет установить на компьютере несколько версию Node.js и переключаться между ними. Кроме того, в отличии от MSI установщика Node.js, NPM не использует профиль текущего пользователя для хранения данных. Это позволит исключить проблемы с путями и разрешениями при запуске сервисов.
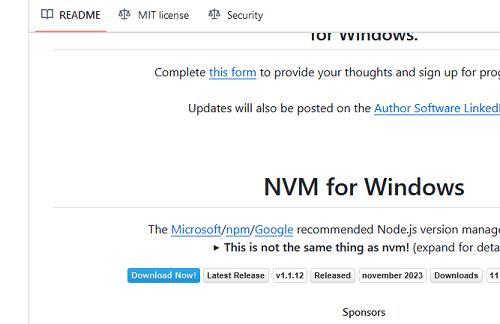
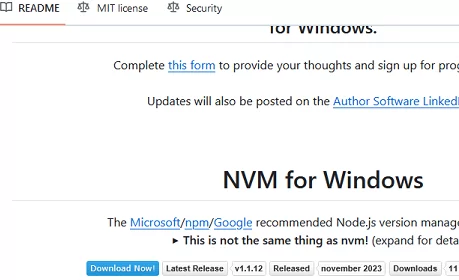
Для установки NVM в Windows воспользуетесь пакетом NVM for Windows ( https://github.com/coreybutler/nvm-windows). Скачайте файл nvm-setup.exe и запустите установку.
Для установки определенной версии Node.js через NVM, используется команда:
nvm install 21
Вывести список установленных версий Node:
nvm list
Чтобы переключиться между версиями:
nvm use 20.11.0
При переключении версий скрипт nvm подменяет путь до Node.js в переменной PATH.
Last Updated :
04 Apr, 2024
Node Package Manager (npm) is a package manager for managing dependencies and packages in Node.js projects. However, users often encounter issues with npm commands not being recognized in Windows 8 and 10 due to path configuration problems.
In this article, we’ll discuss the following approaches to fix the npm path issue.
Table of Content
- NodeJS not being installed
- PATH environment variable not set properly
Error:
Due to some error, it might show an error that it cannot find npm when it is run on the terminal.

Reason for error in NPM:
1. NodeJS not being installed.
2. PATH environment variable not set properly.
Approach 1: NodeJS not being installed
The error can be occour if you haven’t install node in your system.
- Make sure to install NodeJS from here.
- You can follow the step from this article.
After you installed the Node check it in the command prompt.
node -v
npm -vApproach 2: PATH environment variable not set properly
The PATH environment variable tells the command line where executable binaries are located.
To set the PATH for node.js and npm follow these steps:
Step 1: Get the installed location of your NodeJS runtime.
By default it is:
C:\Program Files\nodejs
Step 2: Search for environment variables in the global search.
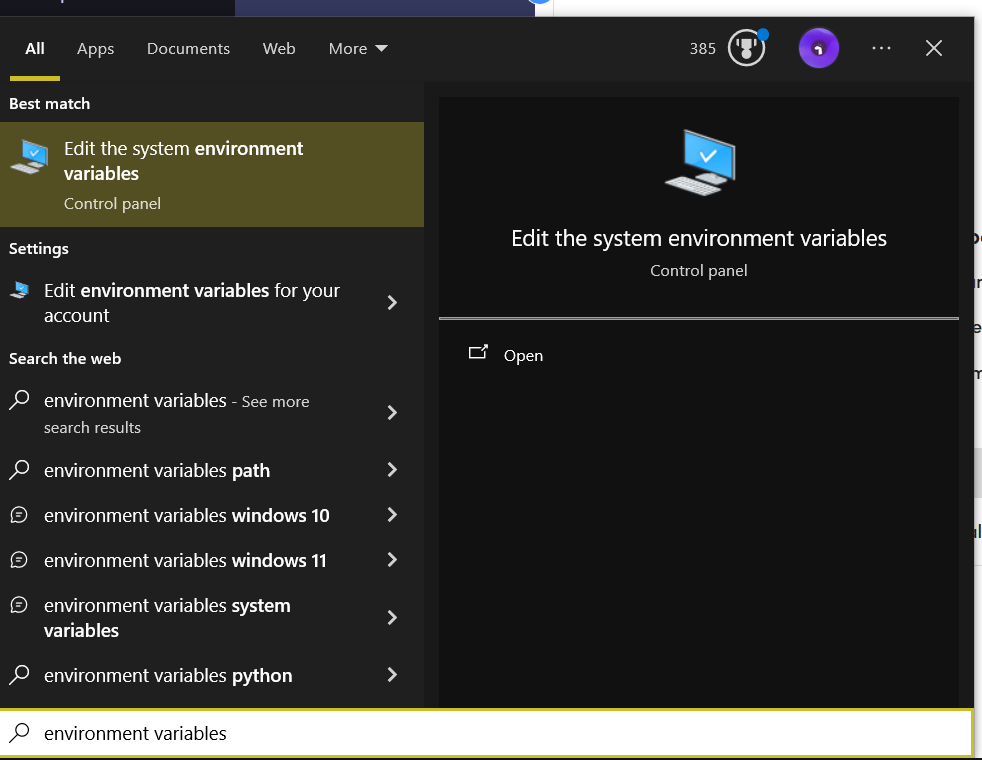
Step 3: Click Environment Variables

Step 4: On System Variables, select Path and click edit

Step 5: Click New and paste the location of your NodeJS runtime
Step 6: Reload your terminal window and now it should be fixed.
npm --version
To check if it is working properly.

Node.js is a cross-platform runtime for running server-side (back-end) JavaScript apps outside the browser. This guide describes how to install the Node.js framework and the Node Package Manager (NPM) on Windows.
The official website (https://nodejs.org/en/download/prebuilt-installer) provides an MSI installer for Node.js and NPM. If there are no specific requirements, it is usually recommended to install the LTS (Long Term Support) version of Node.js.
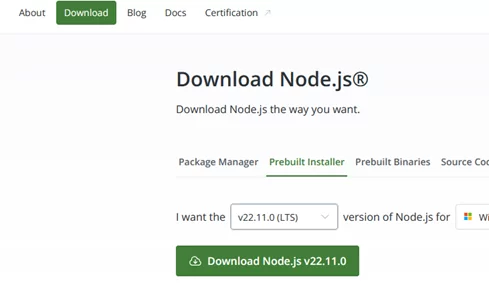
Run the installation from the MSI package with the default settings.
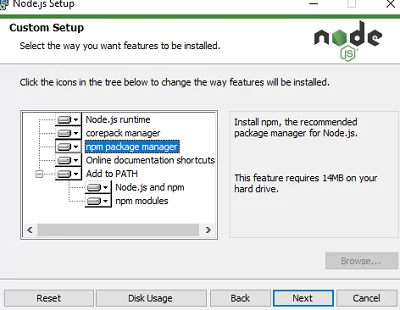
The MSI package contains not only the Node.js framework itself but also the NPM package manager, which is installed by default. The installer will automatically add the paths to the Node.js and NPM directories to the Windows environment variables.
The built-in Node Package Manager (NPM) is used to download, install, and manage the dependencies of third-party modules and projects from external repositories.
Compiling some of the modules installed via npm may require Python and Visual Studio. You can either let NPM install the required tools automatically via Chocolatey, or install them manually later (https://github.com/nodejs/node-gyp#on-windows).
Once the installation is complete, check that Node.js and npm are installed. Run the following commands to check the tool versions:
node -v
npm -v
It is also possible to install Node.js. using the WinGet package manager (installed by default on Windows 10/11).
winget install OpenJS.NodeJS.LTS
This command will automatically download the latest LTS version of Node.js and silently install it.
Restart the cmd/powershell console to update the paths in the environment variables. Check that node.js and NPM have been successfully installed and that the paths to them have been added to the PATH environment variable:
(Get-ChildItem env:Path).value -split ";"
C:\Program Files\nodejs\
C:\Users\%username%\AppData\Roaming\npm
Or install the Node.js on Windows using the Chocolatey package manager:
Choco install -y nodejs.install
You can use a simple JavaScript script to test how Node.js works. Create a text file hello.js containing the code:
console.log("Hello, world!")
Run the JS script using node.js:
node hello.js
For server deployments, it is recommended to use the NVM (Node Version Manager) to install Node.js and npm.
NVM allows developers to have multiple Node.js versions installed on a computer and to switch between them. NPM also doesn’t use the current user’s profile to store temp and app data, unlike the Node.js version in the MSI installer. This eliminates problems with paths and permissions when launching Node JS-based services.
The easiest way to install NPM is to use the NVM for Windows package ( https://github.com/coreybutler/nvm-windows). Download the nvm-setup.exe file and run the installation.
To install a specific version of Node.js using NVM, run:
nvm install 21
List installed Node versions:
nvm list
Switch between NodeJS versions:
nvm use 20.11.0
When switching versions, the nvm script replaces the path to the Node.js version in the PATH variable.