
Node.js это кроссплатформенная среда исполнения, позволяющая запускать серверные (бэкенд) приложения JavaScript вне браузера. В этой статье мы рассмотрим, как установить фреймворк Node.js и его менеджер пакетов NPM в Windows.
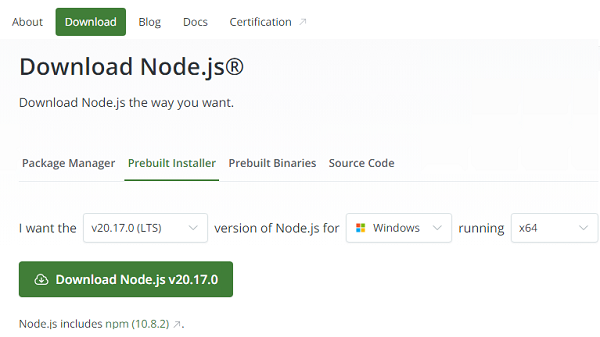
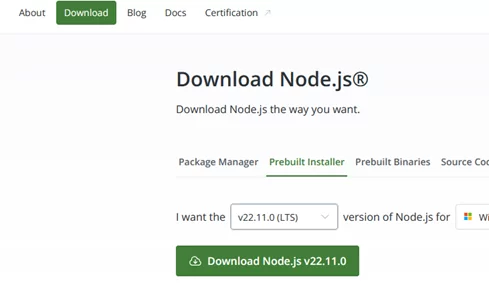
Для установки Node.js и NPM можно скачать с официального сайта готовый установщик в виде MSI пакета (https://nodejs.org/en/download/prebuilt-installer). На сайте доступны MSI пакеты для x86 и x64 версий Windows. Если нет специальных требования, обычно рекомендуется устанавливать LTS версию Node.js (Long Term Support) .
Запустите установку из MSI пакета с настройками по умолчанию.
MSI пакет содержит не только сам фреймоворк Node.js, но и также менеджер пакетов NPM, который устанадливается по-умолчанию. Установщик позволяет автоматически добавить пути к директориям node.js и npm в переменные окружения Windows.
Встроенный в node.js менеджер Node Package Manager (NPM), используется для загрузки и установки сторонних модулей из внешних репозиториев.
Для компиляции некоторых модулей, установленных через npm, могут потребоваться среды разработки python и Visual Studio. Вы можете разрешить NPM автоматически устанавливать необходимые инструменты, либо установить их в дальнейшем вручную через Chocolatey (https://github.com/nodejs/node-gyp#on-windows).

После окончания установки, проверьте что Node.js и npm установлены. Выполните следующие команды, чтобы вывести версии инструментов:
node -v
npm -v
Также для установки Node.js можно использовать менеджер пакетов WinGet, который установлен по-умолчанию в Windows 10 и 11.
winget install OpenJS.NodeJS.LTS

Эта команда автоматически скачает и в тихом режиме установит последнюю LTS версию Node.js.
Перезапустите консоль cmd/powershell, чтобы обновить пути в переменных окружения. Проверьте, что node.js и NPM успешно установлены и пути к ним прописаны в переменной окружения PATH:
(Get-ChildItem env:Path).value -split ";"

C:\Program Files\nodejs\
C:\Users\%username%\AppData\Roaming\npm
Также можно установить Node.js в Windows с помощью пакетного менеджера Chocolatey:
Choco install -y nodejs.install
Проверить работу Node.js можно с помощью простого JavaScript скрипта. Создайте текстовый файл hello.js с кодом:
console.log("Hello, world!")
Запустите скрипт с помощью node.js:
node hello.js
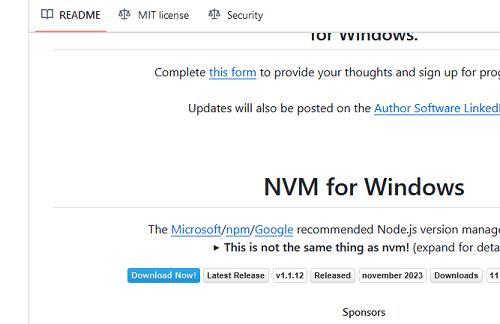
Для серверных развертываний Node.js, рекомендуется использовать менеджер версий NVM (Node Version Manager) для установки Node.js и npm.
NVM позволяет установить на компьютере несколько версию Node.js и переключаться между ними. Кроме того, в отличии от MSI установщика Node.js, NPM не использует профиль текущего пользователя для хранения данных. Это позволит исключить проблемы с путями и разрешениями при запуске сервисов.
Для установки NVM в Windows воспользуетесь пакетом NVM for Windows ( https://github.com/coreybutler/nvm-windows). Скачайте файл nvm-setup.exe и запустите установку.
Для установки определенной версии Node.js через NVM, используется команда:
nvm install 21
Вывести список установленных версий Node:
nvm list
Чтобы переключиться между версиями:
nvm use 20.11.0
При переключении версий скрипт nvm подменяет путь до Node.js в переменной PATH.
Last Updated :
23 Apr, 2025
NodeJS and NPM (Node Package Manager) are essential tools for modern web development. NodeJS is the runtime environment for JavaScript that allows you to run JavaScript outside the browser, while NPM is the package manager that helps manage libraries and code packages in your projects.
To run a Node.js project on your system, you first need to install Node.js and NPM. Once installed, you can use the Node.js runtime to execute JavaScript code and NPM to manage project dependencies and packages.
Note: We do not need to download NodeJS and NPM separately. When we install NodeJS, NPM (Node Package Manager) is installed automatically along with it.
How to download and install NodeJS and NPM
Follow the below given steps below to download and install NodeJS and npm on your system:
Step 1: Download the package from its Official Website
Go to the official NodeJS website.
You will see two main download options:
- LTS (Long-Term Support): This version is recommended for most users, especially for production environments, as it is stable and receives long-term updates.
- Current: This version includes the latest features but may not be as stable as the LTS version.
- Click on the version you wish to download. The website will automatically detect your operating system and recommend the appropriate version (Windows, macOS, or Linux).
Installing NodeJS is the first step towards building scalable web applications.
Step 2: Install NodeJS and NPM
Now you need to install the NodeJS installer on your system. You need to follow the following steps for NodeJS to be installed.
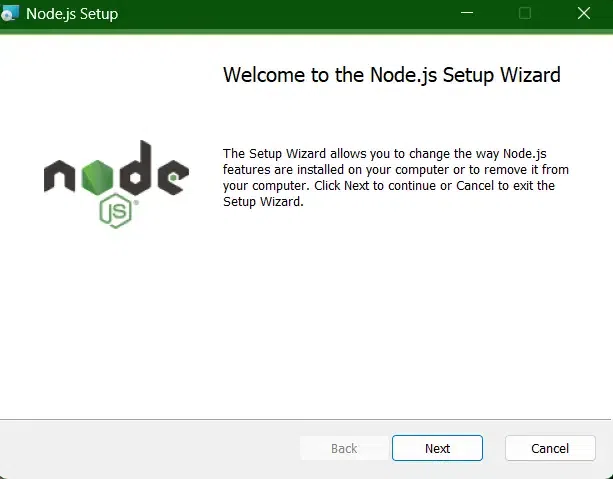
- Double-click on the .msi installer. The NodeJS Setup wizard will open.
- Welcome To NodeJS Setup Wizard.
- Now, select “Next” to proceed.
Step 3: Finish Setting up
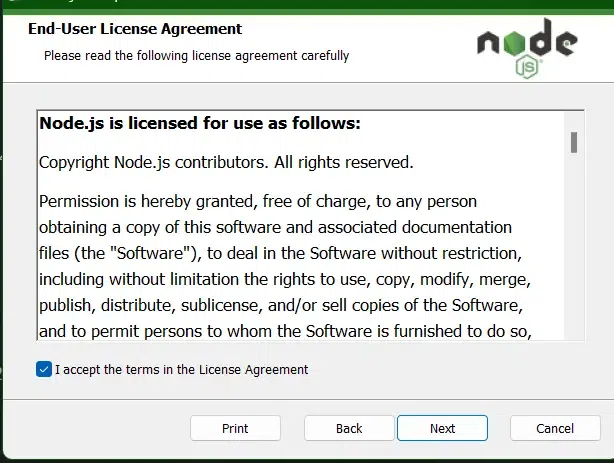
Go through the terms and license carefully before finishing up the setup.
- After clicking “Next”, the End-User License Agreement (EULA) will open.
- Check “I accept the terms in the License Agreement.”
- Select “Next.”
Step 4: Set Download Path
At last, it will ask for a «Destination Folder» where all the files and their utility will be saved, provide the path where you want to install NodeJS and then click on NEXT.
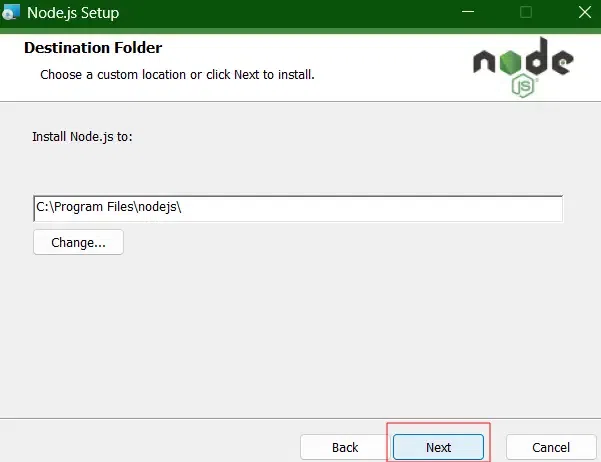
- Or, if you wish to perform «Custom Setup», click on Change and choose your desired path.
- Then, select “Next”
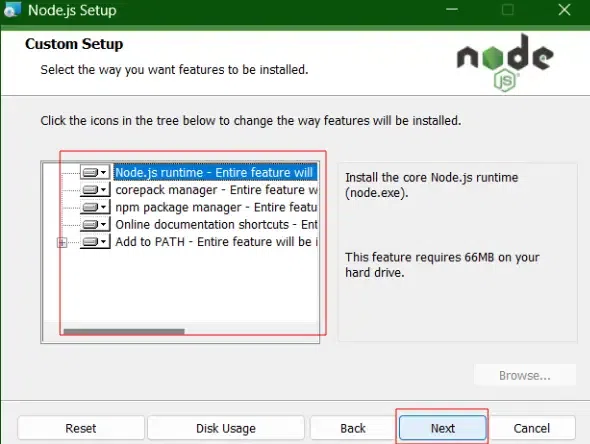
Step 5: Get the System Ready to Complete the Setup
The installer may prompt you to “install tools for native modules”.
- Select “Install”
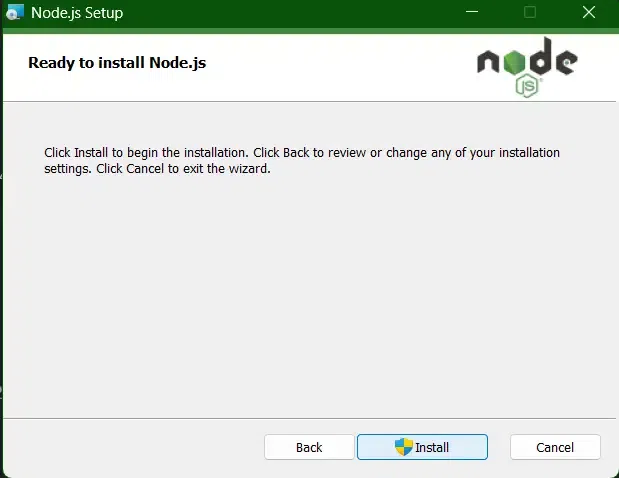
- Do not close or cancel the installer until the installation is complete.
- Complete the NodeJS Setup Wizard.
- Click “Finish.”
.png)
Step 6: Verify the Installation
Once the installation is complete, you can verify that both NodeJS and NPM are installed correctly by running the following commands in your terminal or command prompt:
- Verify NodeJS Installation:
node -v
This command will display the installed version of NodeJS.
- Verify NPM Installation:
npm -v
This command will display the installed version of NPM.
If both commands return the version numbers, it means that NodeJS and NPM are successfully installed on your system.
Start creating your NodeJS application.
Conclusion
That’s it! You’ve successfully installed NodeJS and NPM on your system, and you’re ready to start building and managing NodeJS projects. With NPM, you can easily install third-party libraries, manage dependencies, and work on large-scale JavaScript projects.
What’s Node.js® and NPM?
Node.js® is a JavaScript-based environment which you can use to create web-servers and networked applications. You can also use it to perform helpful tasks on your computer such as concatenating and minifying JavaScript files and compiling Sass files into CSS.
NPM is a “package manager” that makes installing Node “packages” fast and easy. A package is just a code library that extends Node by adding useful features. For example, the “request” package simplifies the process of making HTTP requests so you can easily get web resources from other sites.
NPM is installed when you install Node.js®
Prerequisites
- You should have some familiarity with an application that lets you issue command line instructions. For example, the Windows Command Prompt, PowerShell, Cygwin, or the Git shell (which you get when you install Github for Windows).
Installation Overview
Installing Node.js® and NPM is pretty straightforward using the installer package available from the Node.js web site.
Installation Steps
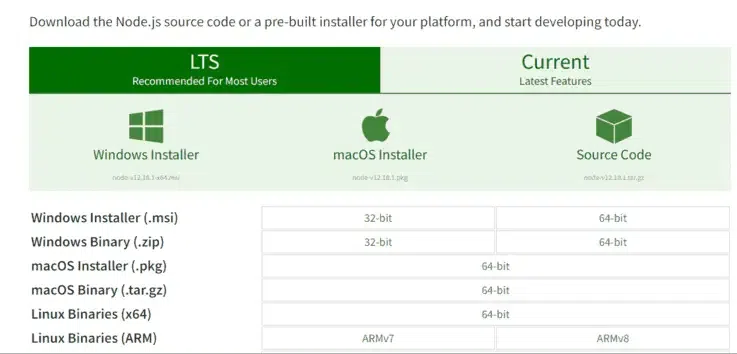
- Download the Windows installer from Nodejs.org.

- Run the installer (the .msi file you downloaded in the previous step.)
- Follow the prompts in the installer (Accept the license agreement, click the NEXT button a bunch of times and accept the default installation settings).
- Restart your computer. You won’t be able to run Node.js until you restart your computer.
Test it!
Make sure you have Node and NPM installed by running simple commands to see what version of each is installed:
- Test Node. To see if Node is installed, open the Windows Command Prompt, Powershell or a similar command line tool, and type
node -v. This should print the version number so you’ll see something like thisv0.10.35. - Test NPM. To see if NPM is installed, type
npm -vin Terminal. This should print the version number so you’ll see something like this1.4.28 - Create a test file and run it. A simple way to test that node.js works is to create a simple JavaScript file: name it hello.js, and just add the code
console.log('Node is installed!');. To run the code simply open your command line program, navigate to the folder where you save the file and typenode hello.js. This will start Node.js and run the code in thehello.jsfile. You should see the outputNode is installed!.
How to Update Node and NPM
New versions of Node and NPM come out frequently. To install the updates, just download the installer from the Nodejs.org site and run it again. The new version of Node.js and NPM will replace the older versions.
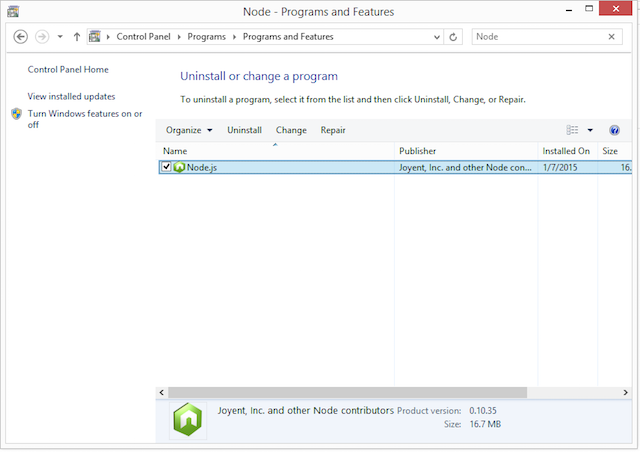
How to Uninstall Node and NPM
You uninstall Node.js and NPM the same as you would most all Windows software:
- Open the Windows Control Panel
- Choose the Programs and Features option
- Click the “Uninstall a program”
- Select Node.js, and click the Uninstall link.
Node.js is a cross-platform runtime for running server-side (back-end) JavaScript apps outside the browser. This guide describes how to install the Node.js framework and the Node Package Manager (NPM) on Windows.
The official website (https://nodejs.org/en/download/prebuilt-installer) provides an MSI installer for Node.js and NPM. If there are no specific requirements, it is usually recommended to install the LTS (Long Term Support) version of Node.js.
Run the installation from the MSI package with the default settings.
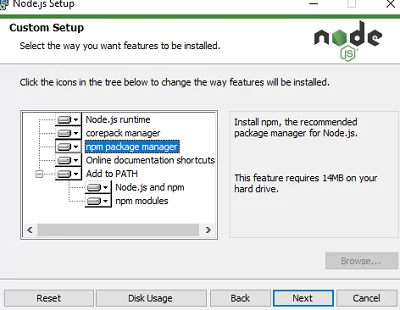
The MSI package contains not only the Node.js framework itself but also the NPM package manager, which is installed by default. The installer will automatically add the paths to the Node.js and NPM directories to the Windows environment variables.
The built-in Node Package Manager (NPM) is used to download, install, and manage the dependencies of third-party modules and projects from external repositories.
Compiling some of the modules installed via npm may require Python and Visual Studio. You can either let NPM install the required tools automatically via Chocolatey, or install them manually later (https://github.com/nodejs/node-gyp#on-windows).
Once the installation is complete, check that Node.js and npm are installed. Run the following commands to check the tool versions:
node -v
 npm -v
It is also possible to install Node.js. using the WinGet package manager (installed by default on Windows 10/11).
winget install OpenJS.NodeJS.LTS
This command will automatically download the latest LTS version of Node.js and silently install it.
Restart the cmd/powershell console to update the paths in the environment variables. Check that node.js and NPM have been successfully installed and that the paths to them have been added to the PATH environment variable:
(Get-ChildItem env:Path).value -split ";"
C:\Program Files\nodejs\
C:\Users\%username%\AppData\Roaming\npm
Or install the Node.js on Windows using the Chocolatey package manager:
Choco install -y nodejs.install
You can use a simple JavaScript script to test how Node.js works. Create a text file hello.js containing the code:
console.log("Hello, world!")
Run the JS script using node.js:
node hello.js
For server deployments, it is recommended to use the NVM (Node Version Manager) to install Node.js and npm.
NVM allows developers to have multiple Node.js versions installed on a computer and to switch between them. NPM also doesn’t use the current user’s profile to store temp and app data, unlike the Node.js version in the MSI installer. This eliminates problems with paths and permissions when launching Node JS-based services.
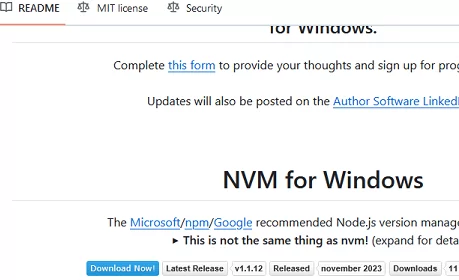
The easiest way to install NPM is to use the NVM for Windows package ( https://github.com/coreybutler/nvm-windows). Download the nvm-setup.exe file and run the installation.
To install a specific version of Node.js using NVM, run:
nvm install 21
List installed Node versions:
nvm list
Switch between NodeJS versions:
nvm use 20.11.0
When switching versions, the nvm script replaces the path to the Node.js version in the PATH variable.

In this article, you’ll learn how to work with JavaScript in the backend using Node on Windows.
When you start working with JavaScript and discover that you can not only work with it in the frontend but also in the backend, a new world of possibilities seems to open up before you.
To begin with, you realize that you don’t need to learn another language to have the backend of your applications up and running. Second, Node.js is simple to install and works in all development platforms we are used to: Mac, Linux, and Windows.
In this article, I’ll show you how to install Node on Windows with a step-by-step guide so you’re ready to use it.
You will also be happy to know that package management is made even easier, as npm (the Node Package Manager) comes with the installation of Node.
With it, you will be able to have access to an almost unending number of community-made dependencies. You can simply install these in your app so you don’t have to reinvent the wheel time and again.
So let’s install Node on Windows and start playing with it a bit.
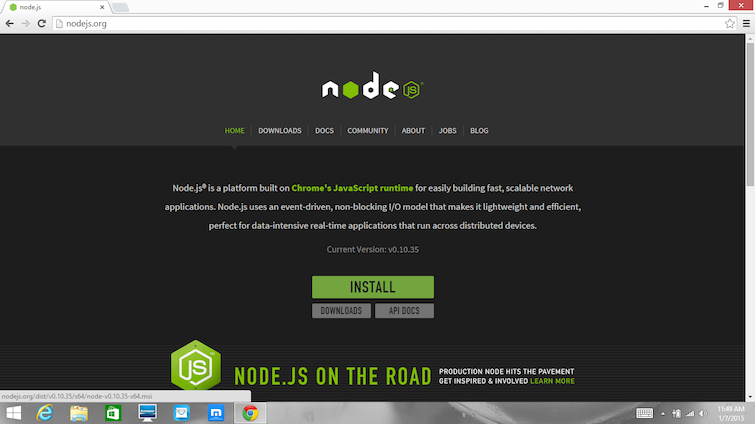
The first thing to do is to access Node’s official site.
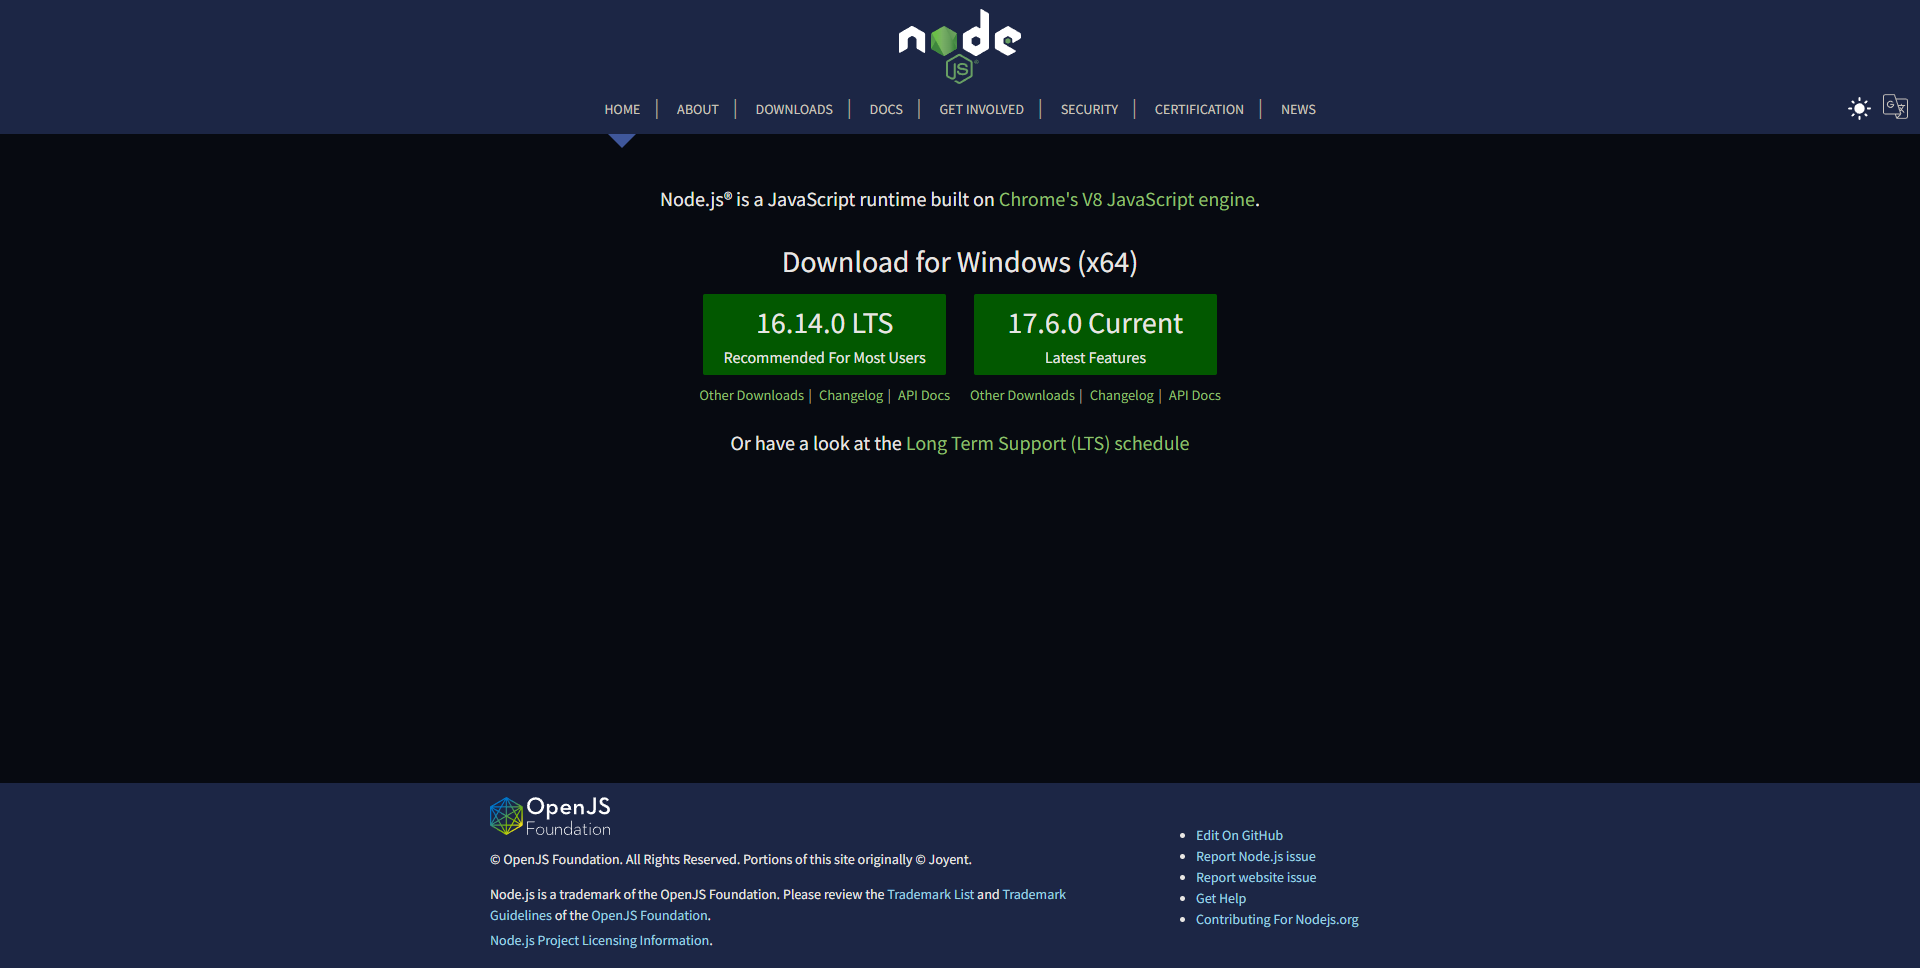
Node site front page
The website is intelligent enough to detect the system you are using, so if you are on Windows, you will most likely get a page like the one above. Right in the middle of it, two buttons show you the most common possibilities of download – also the latest ones.
If you are curious about all the most recent features Node has to offer, go with the button on the right. For most people, however, the site itself recommends using the Long-Term Support version, which leads you to the button on the left.
At the moment of writing this article, the LTS version is version 16.14.0.
When you click on any of them, an .msi file gets downloaded to your computer. The next step is to click on it and the installation will begin. The wizard opens and the following window appears:
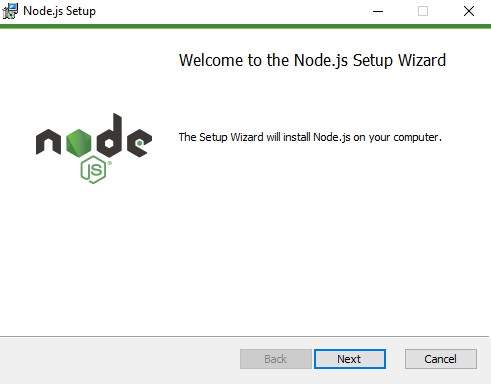
Node installation wizard’s initial page
Click Next. On the following window, you’ll read (you do read it, right?) Node’s EULA, accept its terms, and click Next again. The next window is the one where you select the destination folder for Node.
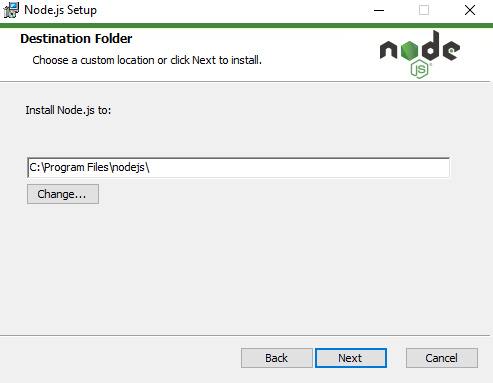
Windows normally recommends that the programs be installed in the Program Files folder, in a folder of their own (in our case, we are installing Node.js, so the nodejs folder is our go-to place).
For the sake of simplicity, let’s follow the wizard’s suggestions and use C:\Program Files\nodejs\ as the destination folder.
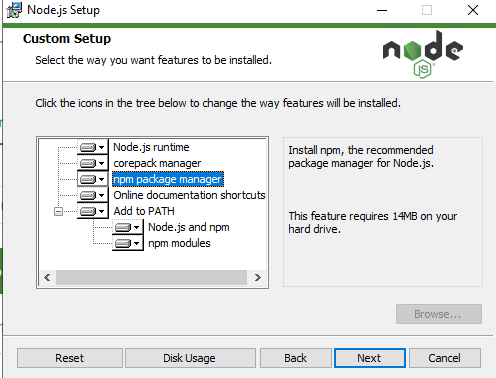
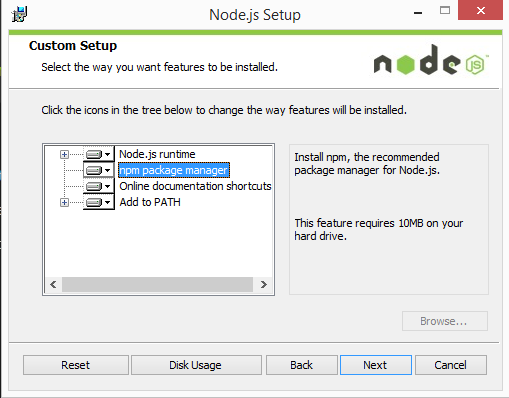
The following window is the one where you can customize your installation. Unless you have disk space problems or have a clear idea as to what you are doing, I recommend keeping the options as they are and just pressing Next again.
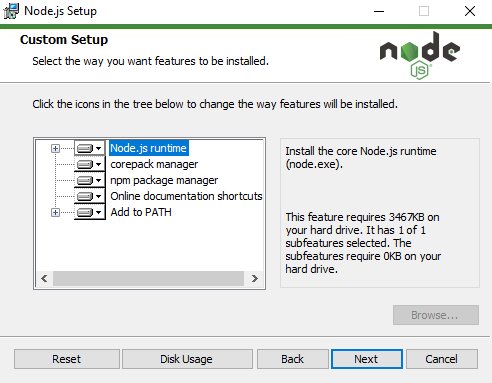
One thing I would like to point out on this window is the third option you see. That’s the option that allows you to have npm installed along with Node on your computer. This way, if you still intend to change the setup in this page somehow, keep that option as is and npm will be installed for you at the end of the process.
The next window deals with the automatic installation of “Tools for Native Modules”. Again, unless you are sure you need them, I recommend keeping this checkbox unmarked and just pressing Next once more.
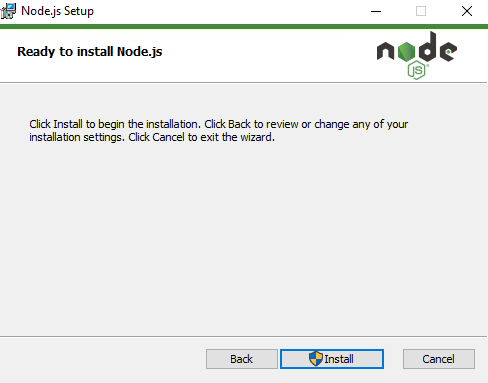
We’ve reached the final pre-install window. As it says, from here, you just have to click Install to begin the installation, so let’s do it.
Notice the shield beside the word Install? That means Windows will ask you to confirm if you really want to go through the installation process as soon as you click that button. Assuming this is the reason why you are reading this article, just click Yes and let the installer do its thing.
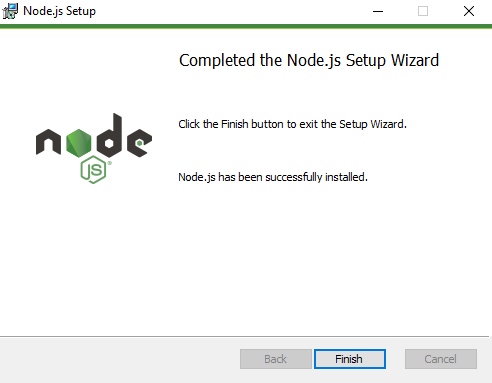
We finally got to the window we were hoping for, telling us that Node has successfully been installed on our Windows computer. Click Finish and let’s check if everything is ok.
How to Check Your Node Installation
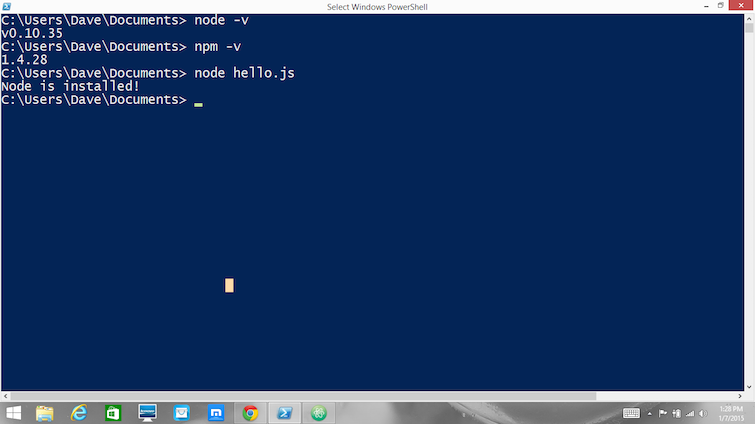
In order to check if Node (and npm) were properly installed on your computer, you can choose to open either Windows Powershell or the Command Prompt.
We’ll go with the first. Click on the search bar beside the Start Menu button and type powershell. Click Enter and Windows Powershell will open up in a window for you.
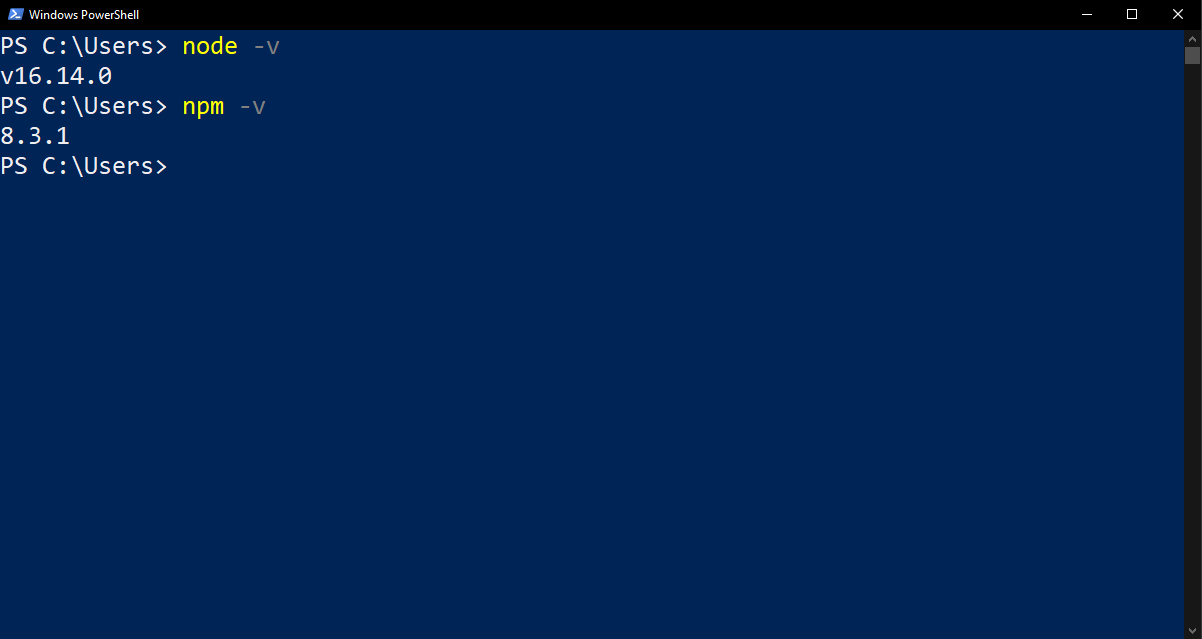
In any folder (like C:\Users, for instance), you can type node -v to check for the version of Node you are using. As I mentioned above, the latest version as I write this article is version 16.14.0 and that’s exactly what we see on Powershell above.
As a side note, you may be asking yourself why we can check this in any folder. One of the options in the custom setup (that we left as is) was to add Node to PATH. By doing so, we are able to access it from anywhere while navigating through the folders.
It is also possible to check for the npm version. To do so, type npm -v and press Enter. In our case, latest version is version 8.3.1, so we can pretty much say we are up to date.
How to Use npm
Ok, but you did not go all this way reading just to finish here after installing Node and npm, right? You want to see both in action. Let’s do it, then.
To learn how to start a project with Node and install packages with npm, we’ll use Visual Studio Code.
We’ll create a folder named Node_Test, where we’ll put both Node and npm to work a little.
Let’s start simple. Inside the Node_Test folder, right click inside the folder and click Open with Visual Studio Code. This will make VS Code open in this empty folder automatically.
Inside VS Code, if you haven’t yet, open a new terminal by pressing Ctrl+Shift+' (single quote).
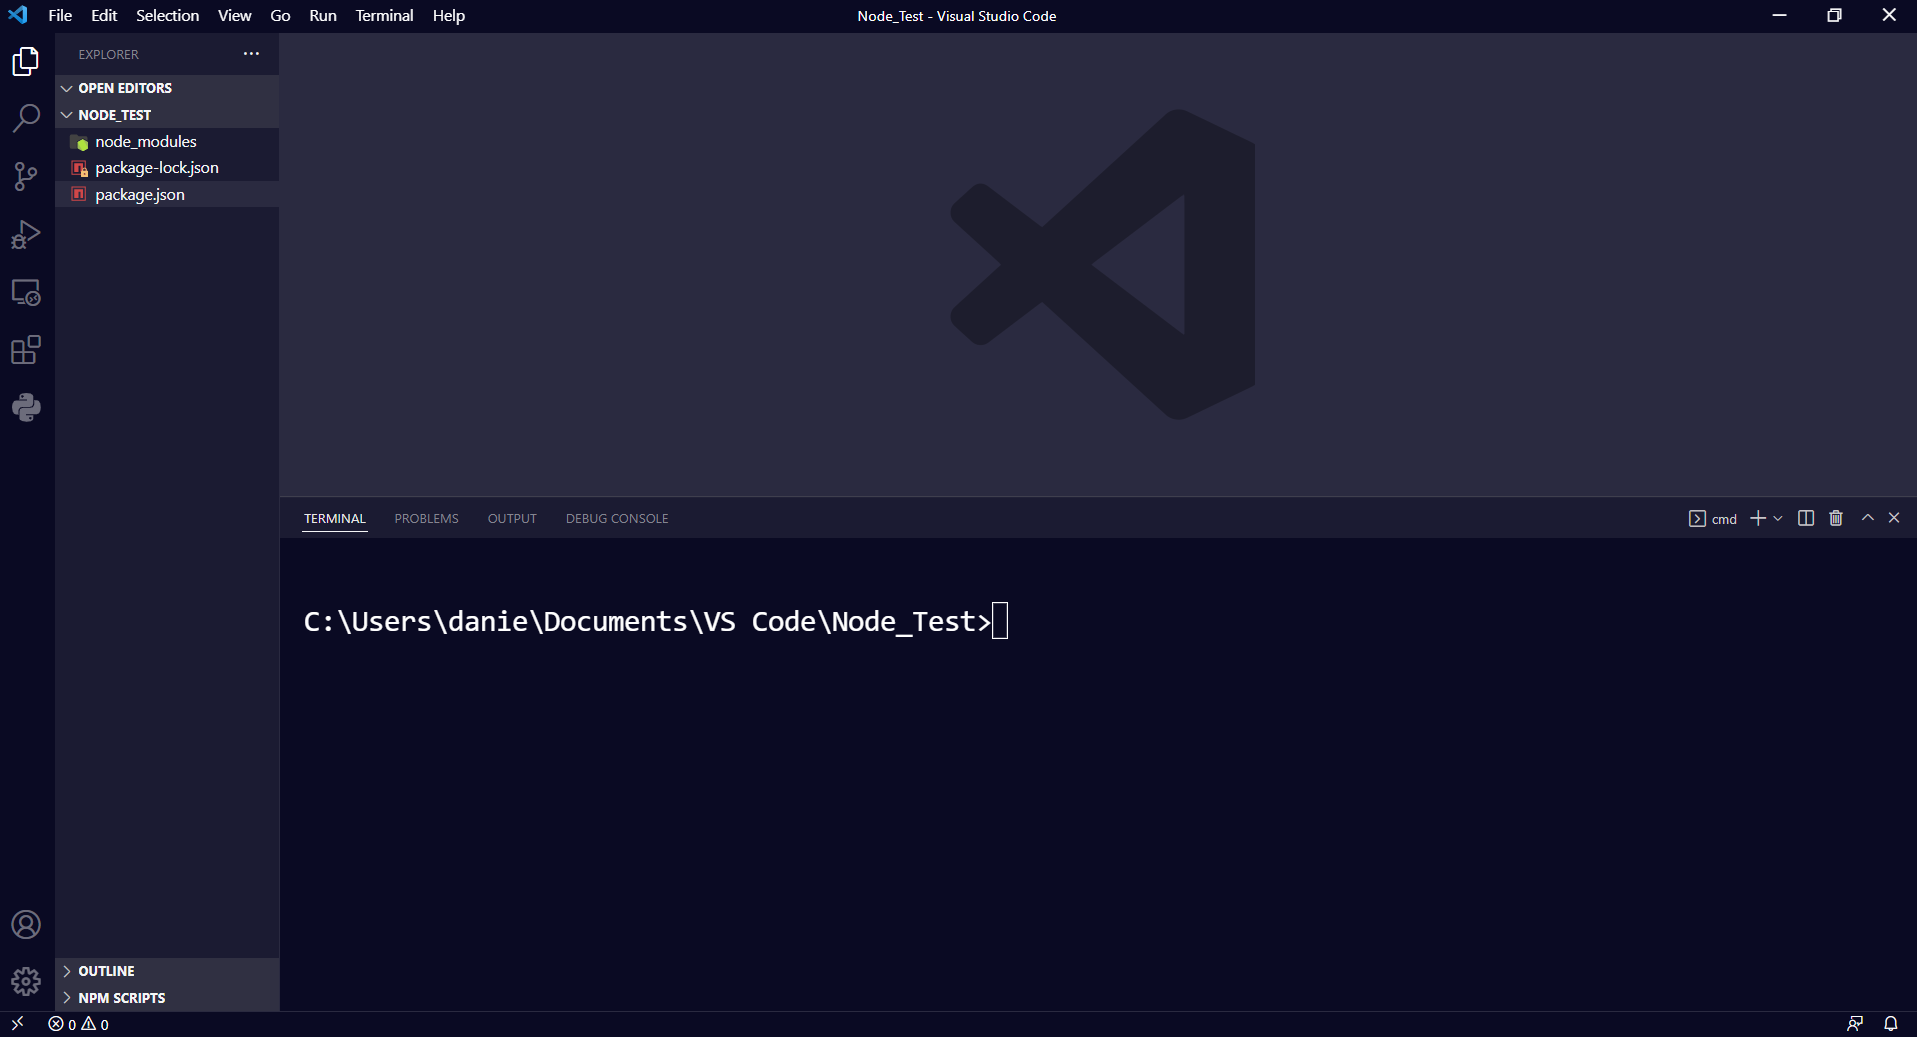
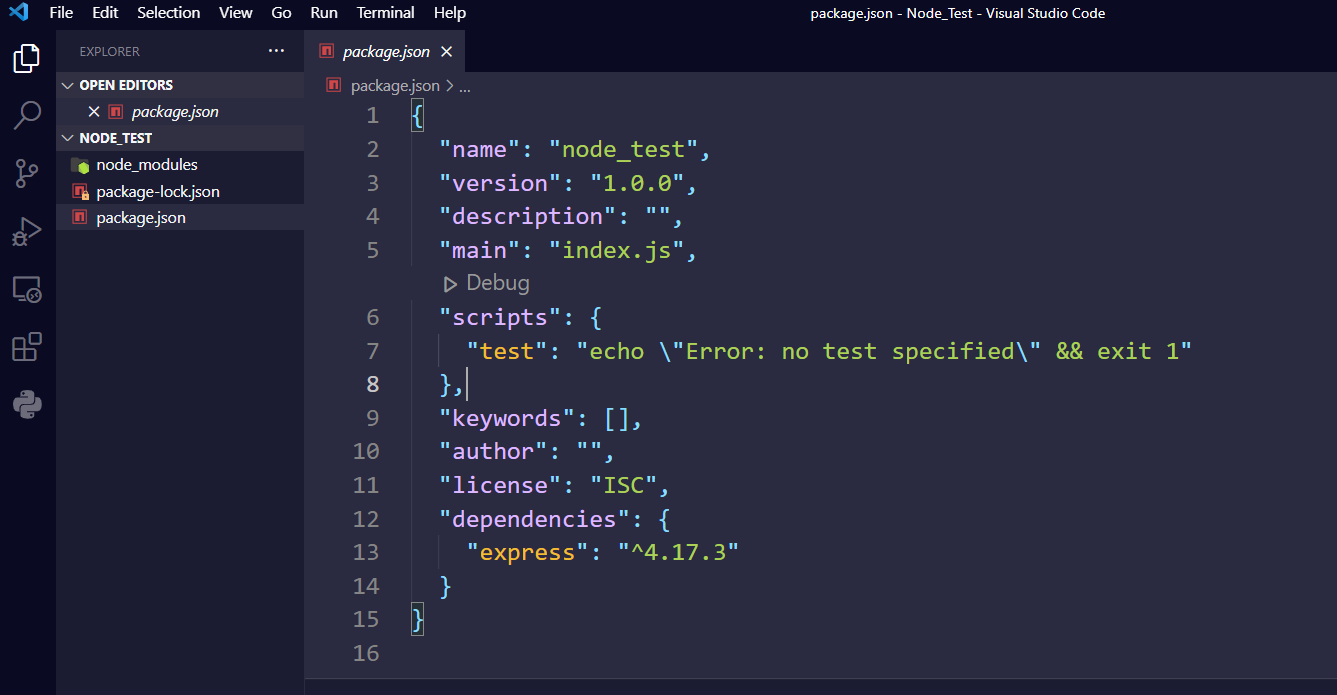
Click on the terminal and, on the command line, type npm init -y. This will start a Node project automatically for us without us needing to worry about the initial configuration (the -y flag will do that on its own). This creates a package.json file within the Node_Test folder.
Next, let’s install Express as a dependency. You can find it and a list of other possible dependencies of npm on https://www.npmjs.com/.
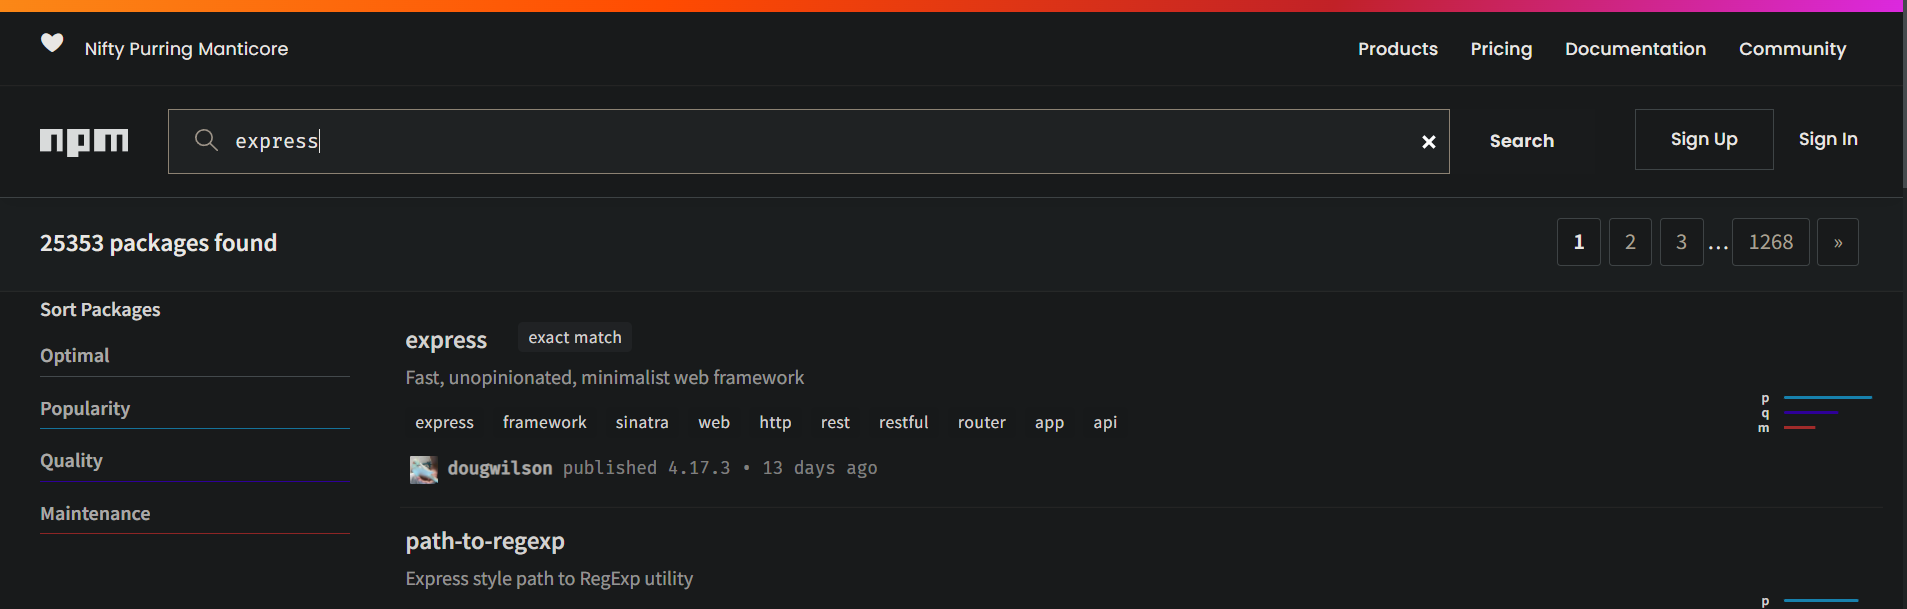
Another side note: every time you open npm’s web site, on the top left, you will see what appears to be a meaningless combination of three words. If you look at the initials, though, you will see that it is a brand-new sequence with the acronym npm.
Right, now let’s install Express with this Nifty Purring Manticore. Back on VS Code and the terminal, type npm i express and press Enter. Express will be installed. You can do the same with any other dependency you can think about.
To make sure that Express is installed, open package.json. Scroll up to the list of dependencies and you will see Express there.
Wrapping Up
That’s pretty much it. In this article, you saw how to install Node and npm on Windows.
I hope this has been useful to you. For more tutorials like this, check out freecodecamp.org/news and browse for the topic you would like to learn about.
Happy coding! 😊
Learn to code for free. freeCodeCamp’s open source curriculum has helped more than 40,000 people get jobs as developers. Get started