
Get snippingtool in Windows Server 2012
Snipping tool is very useful and handy tool for taking screenshots of the console. I used it very much when worked on Windows 7 and Windows Server 2008 R2. While playing with Windows Server 2012, I found it is missing. Without that, it is difficult for me to post any blog update(trust me, I rely so much on it).
After some struggle, I learned that it will come by default and this optional feature needs to be installed explicitly if you want to have it on Windows Server 2012. The below powershell commands will help you in enable this feature.
Enable-WindowsOptionalFeature -Online -FeatureName User-Interfaces-Infra
Similarly if you want to remove the feature, try below oneliner.
Disable-WindowsOptionalFeature -Online -FeatureName User-Interfaces-Infra
Hope this helps.
As we all know that the Snipping Tool isn’t enabled by default in the Windows Server 2012 R2. So we are here with the guide to let you know how to enable the Windows Server 2012 R2 Snipping Tool.
What is the Snipping Tool:
Take a snapshot to copy words or images from all or part of your PC screen. Use Snipping Tool to make changes or notes, then save, and share.
Windows 10 has another screenshot app you might also like to try, but the feature was not available in the previous Windows Server 2012 R2.
Snipping Tool is not enabled by default in Windows Server 2012 R2. To install the Snipping Tool, just follow the next instructions:
- Go to Server Manager.
- Click Manage in the upper right corner.
- Click Add Roles and Features.
- Click Next > Next > Next.
- At Server Selection select your server.
- Click Next > Next.
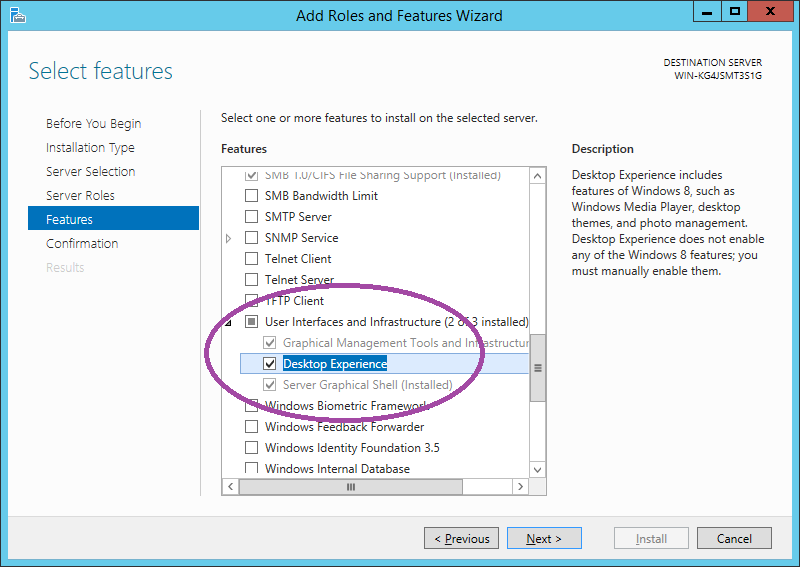
- At Features expand User Interfaces and Infrastructure.
- Check Desktop Experience.
- If an Add Roles and Features Wizard window pops up with a list of features required for Desktop Experience , just click Add Features.
- Click Next > Install.
- Restart your server.
Salam..
Snipping Tool is not enabled by default in Wndows Server 2012 R2. To install Snipping Tool, just follow the next instructions:
- Go to Server Manager
- Click Manage in the upper right corner.
- Click Add Roles and Features.
- Click Next > Next > Next.
- At Server Selection select your server.
- Click Next > Next.
- At Features expand User Interfaces and Infrastructure.
- Check Desktop Experience.
- If an Add Roles and Features Wizard window pops up with a list of features required for Desktop Experience , just click Add Features.
- Click Next > Install.
- Restart your server. (Restart?? WTF..Stupid Windows)
Wassalam..
I used the snipping tool often in Windows 7, Windows 8.1, and Server 2008 R2. I found it very convenient to use when creating a quick screenshot and for blogging. I recently Installed Windows Server 2012, and wanted to use the tool with it.
*Note — This will add Desktop Experience features which includes:
Windows Media Player
-
Desktop themes
-
Video for Windows
-
Windows SideShow
-
Windows Defender
-
Disk Cleanup
-
Sync Center
-
Sound Recorder
-
Character Map
-
*Snipping Tool
Two ways to add it PowerShell or Add Roles and Features Wizard
PowerShell is a lot faster in the command is:
Enable-WindowsoptionalFeature –Online –FeatureName User-Interface-Infra
You will need to restart the server.
The other option is to use the Add Roles and Features Wizard:
Navigate to the Server manager Dashboard
- Add Roles and Features Wizard
- Before You Begin – Skip by clicking Next
- Installation Type – Role-based or Feature-based installation
- Server Selection – Server Pool you want or just click Next
- Server Roles – Skip by clicking Next
- Features – User Interfaces and Infrastructure – Desktop Experience
- You will be prompted to install the required components or services “Ink and Handwriting Services” and Media Foundation”. Click Add Features
- You will need to restart
Are you annoyed that you cannot play videos or use some of the cool windows tools like snipping tool with windows server? Well, you can, they just have to be enabled before you can use them. Below are instructions for enabling these features in Windows Server 2008 and in Windows Server 2012 (slightly different instructions)
What does the Desktop Experience feature include?
Desktop Experience includes the following Windows components and features:
- Windows Media Player
- Desktop themes
- Video for Windows (AVI support)
- Windows SideShow
- Windows Defender
- Disk Cleanup
- Sync Center
- Sound Recorder
- Character Map
- Snipping Tool
Note
Installing Desktop Experience does not automatically turn on any of the features it installs. After installation, you must manually enable any features that require configuration changes. For example, to use a desktop theme, use the Services snap-in for Microsoft Management Console to enable and start the Themes service, and then select the theme.
Installing or uninstalling the Desktop Experience feature Windows Server 2008 & 2008 R2
You can install or uninstall Desktop Experience using the Initial Configuration Tasks Wizard or Server Manager.
To install Desktop Experience using the Initial Configuration Tasks Wizard
-
In the Customize This Server section, click Add features.
-
Select the Desktop Experience check box, and then click Next.
-
Complete the wizard by clicking Install.
To install Desktop Experience using Server Manager
-
Open Server Manager: click Start, point to Administrative Tools, and click Server Manager.
Note
You can also open Server Manager by typing the following at a command prompt:
servermanager.msc
-
In the Features Summary section, click Add features.
-
Select the Desktop Experience check box, and then click Next.
-
Complete the wizard by clicking Install.
You can uninstall Desktop Experience at any time by using either method above to start the Add Features Wizard. When the wizard opens, clear the Desktop Experience check box, click Next, and then click Remove to complete the wizard.
Installing or uninstalling the Desktop Experience feature Windows Server 20012 & 2012 R2
The Desktop Experience feature in Windows Server 2012 is under the User Interfaces and Infrastructure feature. In order to install Desktop Experience feature, do the following steps:
Open Server Manager > Manage > Add Roles and Features.
You can skip the Before you begin page by just clicking Next.
In the installation type page keep the default Role-based or feature-based installation then click Next
In the Server Selection Page, Your current server should already be selected, if not, select the server you want to work with under SERVER POOL then click Next
Skip the Server roles page by clicking Next
In the Features page, scroll down (close to the bottom as the list is in alpha order) expand User Interfaces and Infrastructure feature then turn on the checkbox for Desktop Experience. You will be prompted to install the required components or services “Ink and Handwriting Services” and “Media Foundation“. Click Add Features.
In the Confirm installation selections page, [optionally] select Restart the destination server automatically if required. You will likely need to restart your server after installing and before using some of the desktop experience features.