
Время на прочтение5 мин
Количество просмотров150K
Это руководство о том, как настроить noVNC для удалённого доступа к компьютерам на Windows.
Почему noVNC?
— У Windows есть «родное» средство для удалённого доступа — Remote Desktop Connection. Но оно есть не во всех версиях Windows — например нет в Home edition.
— Также существует множество VNC серверов и клиентов для любой версии Windows. Но для их использования нужно ставить VNC клиент. А бывают случаи, когда ставить ничего нельзя (ограничение прав), или нежелательно, чтобы не оставлять следов на чужом компьютере.
— Ещё есть Chrome Remote Desktop, которому на стороне клиента нужно только расширение в браузере. Но у меня был случай, когда протокол Хрома был заблокирован организацией (там почто всё было заблокировано), а noVNC использует обычный HTTP и поэтому работал.
Насколько я знаю, noVNC — единственное средство, которое позволяет подключиться к удалённому компьютеру без установки какого-либо клиента — используется лишь браузер.
Ещё есть SPICE, но для него я не нашёл сервера под Windows.
В результате этого руководства, мы сможем просто открыть линк в браузере, ввести пароль и пользоваться удалённой системой.
Необходимым условием является проброс портов, или белый IP удалённого компьютера. Также можно воспользоваться VNC repeater. Но это уже выходит за рамки этой статьи.
Общая схема

Сначала мы поставим обычный VNC сервер на порт 5900.
Затем поставим noVNC и WebSockify на порт 5901.
WebSockify — это своего рода прокси, который с одной стороны умеет разговаривать с VNC, который у нас на порту 5900, а с другой — умеет транслировать это браузеру через вебсокет, который у нас будет на порту 5901.
noVNC — это просто html-приложение, или как сегодня это называют Single Page Application, которое и будет работать в клиентском браузере и «говорить» с WebSockify на сервере.
Вообще-то в природе существуют VNC серверы, которые умееют сразу соединяться через вебсокеты:
— MobileVNC, но он платный (10 Евро за устройство)
— Есть библиотека LibVNCServer, которая поддерживает вебсокеты, и теоретически работает под Windows, но я не нашёл ни одного готового сервера под Windows с этой библиотекой.
В этом случае WebSockify уже не будет нужен.
Ставим VNC
Сам VNC протокол стандартизован, поэтому теоретически можно использовать любой VNC сервер.
Сначала я попробовал поставить TightVNC, но у noVNC были с ним какие-то проблемы с аутентификацией. Думаю, что можно было разобраться, но я поставил UltraVNC (осторожно, у них там тонны рекламы, реальные ссылки — внизу страницы) и всё заработало.
Скорее всего будут работать большинство VNC серверов, которые поддерживают Windows.
VNC сервер я поставил на порт 5900. Не забудьте установить пароль на VNC соединение. UltraVNC не даст подсоединиться до тех пор, пока вы не установите пароль.
Проверьте, что VNC сервер работает, подключившись к нему с помощью VNC клиента с другого компьютера или смартфона.
noVNC и WebSockify
Создаём папку в удобном для себя месте, и загружаем туда:
— распаковываем zip архив noVNC
— распаковываем zip архив WebSockify
Цель, чтобы получилось приблизительно вот так:

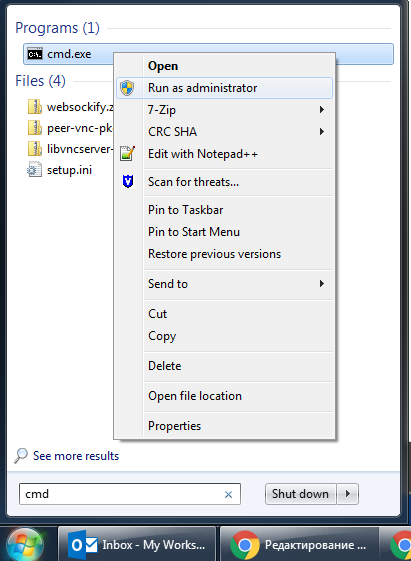
Теперь запускаем command prompt с администраторскими правами:
Запускаем WebSockify:
c:\> cd c:\noVNC\websockify
c:\noVNC\websockify> websockify.exe 5901 127.0.0.1:5900 --web c:\noVNC\noVNC-master
WARNING: no 'resource' module, daemonizing support disabled
WebSocket server settings:
  - Listen on :5901
  - Flash security policy server
  - Web server. Web root: c:\noVNC\noVNC-master
  - No SSL/TLS support (no cert file)
  - proxying from :5901 to 127.0.0.1:5900
Первый параметр выше — порт на котором noVNC будет слушать: 5901. Этот порт нужно сделать доступным для клиентов.
Второй параметр — IP и порт, где стоит VNC сервер: 127.0.0.1:5900
Третий параметр —web инструктирует noVNC, чтобы он отдавал содержимое директории c:\noVNC\noVNC-master по HTTP(s). По умолчанию noVNC отдаёт только VNC вебсокет, но этот параметр позволяет иметь и HTTP сервер на этом же порту.
В директории c:\noVNC\noVNC-master переименуйте файл vnc.html в index.html, чтобы он отдавался по умолчанию.
Теперь noVNC клиент должен быть доступен на порту 5901:
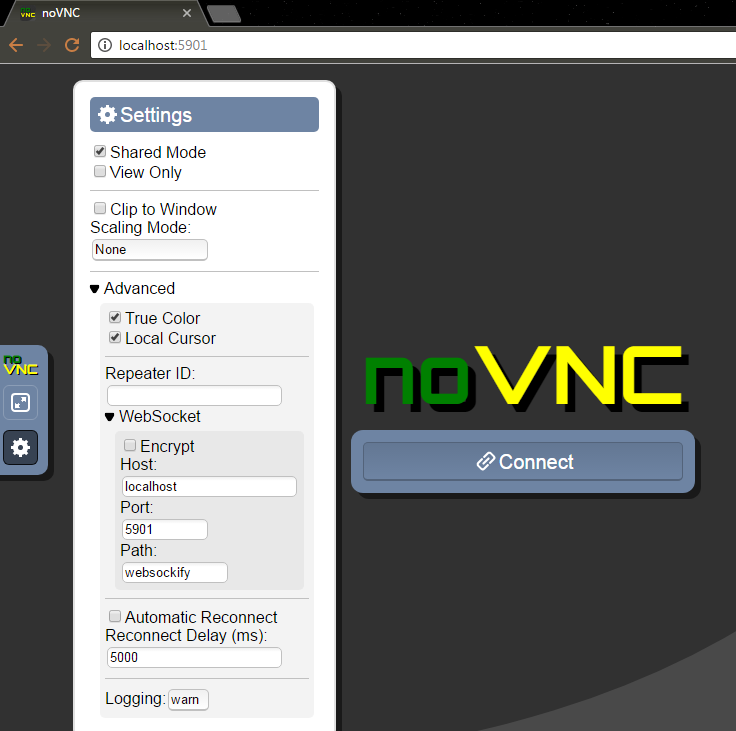
Попробуйте также открыть noVNC страницу с другого компьютера/смартфона, чтобы удостовериться, что она доступна снаружи. Если нет — то проверьте:
— что у вас Windows Firewall не блокирует внешние подключения на этот порт,
— что ваш роутер правильно перенаправляет запросы на этот порт на нужный компьютер; если надо гуглите «проброс портов».
Соединяемся (Connect), вводим VNC пароль и видим рабочий стол удалённого компьютера!
Если что-то пошло не так, то ошибки должны показаться в нашей консоли.
Остановить noVNC сервер можно нажав Ctrl-C в консоли. Описанная выше конфигурация работает по HTTP (и по WS).
Добавляем SSL с самоподписанным сертификатом
Добавлять SSL — необязательно. Создать самоподписанный сертификат можно вот так:
openssl req -new -x509 -days 365 -nodes -out self.pem -keyout self.pemДля Windows openssl можно взять здесь.
В результате получаем файл self.pem, на который надо указать при старте noVNC:
c:\noVNC\websockify> websockify.exe 5901 127.0.0.1:5900 --web c:\noVNC\noVNC-master --cert=c:\noVNC\self.pemТеперь у нас работает HTTPS и WSS (WebSocket Secure). Для WSS в настройках (Settings) нужно указать Encrypt. Интересно, что noVNC использует один и тот же порт для HTTP и HTTPS — он «умеет» различать запросы и правильно отвечать.
Так как сертификат самоподписанный, то в браузере нужно будет принять этот сертификат.
Let’s Encrypt
У меня нет инструкций о том, как настроить систему, чтобы Let’s Encrypt автоматически генерировал сертификат специально для нашей системы. Для этого потребовалось бы, чтобы noVNC работал на порту 80, что конечно же возможно, но может быть неудобно, и найти способ интегрировать certbot, чтобы эти файлы публиковались в нужную директорию. Думаю, что это возможно, но я этого не сделал. Если вы допилите — поделитесь в комментариях.
В моём случае, у меня уже есть домашний сервачок с NGINX и DDNS именем, который настроен автоматически получать сертификат от Lets Encrypt.
Вы можете запустить что-то похожее у себя. Здесь есть инструкции о настройке Let’s Encrypt для Linux и Windows.
Поэтому для noVNC я просто использую уже существующие pem-файлы, сгенерированные для nginx.
Let’s Encrypt создаёт следующие файлы:
cert.pem: Your domain's certificate
chain.pem: The Let's Encrypt chain certificate
fullchain.pem: cert.pem and chain.pem combined
privkey.pem: Your certificate's private key
На Ubuntu их можно найте по вот такому пути: /etc/letsencrypt/live/your_domain_name
Нужно скопировать (объединить) fullchain.pem и privkey.pem в один файл, например назовём его encrypt.pem, и этот файл мы будем использовать для noVNC.
Конечно, работать это будет только если nginx сервер и noVNC — на одном домене. Порты могут быть разными.
И нужно не забывать, что сертификаты годны только несколько месяцев, а потом надо копировать обновлённые файлы.
Добавляем noVNC, как Windows-сервис
Загружаем zip-архив, и распаковываем файлы оттуда так, чтобы они лежали в той же папке, где и файл websockify.exe, то есть в нашем случае в c:\noVNC\websockify.
При запуске, сервис будет использовать параметры из файла noVNCConfig.ini. Вот пример моего конфига:
5901 127.0.0.1:5900 --web C:\noVNC\noVNC-master --cert=c:\noVNC\encrypt.pemВ консоли, запущенной с администраторскими привилегиями создаём новый сервис:
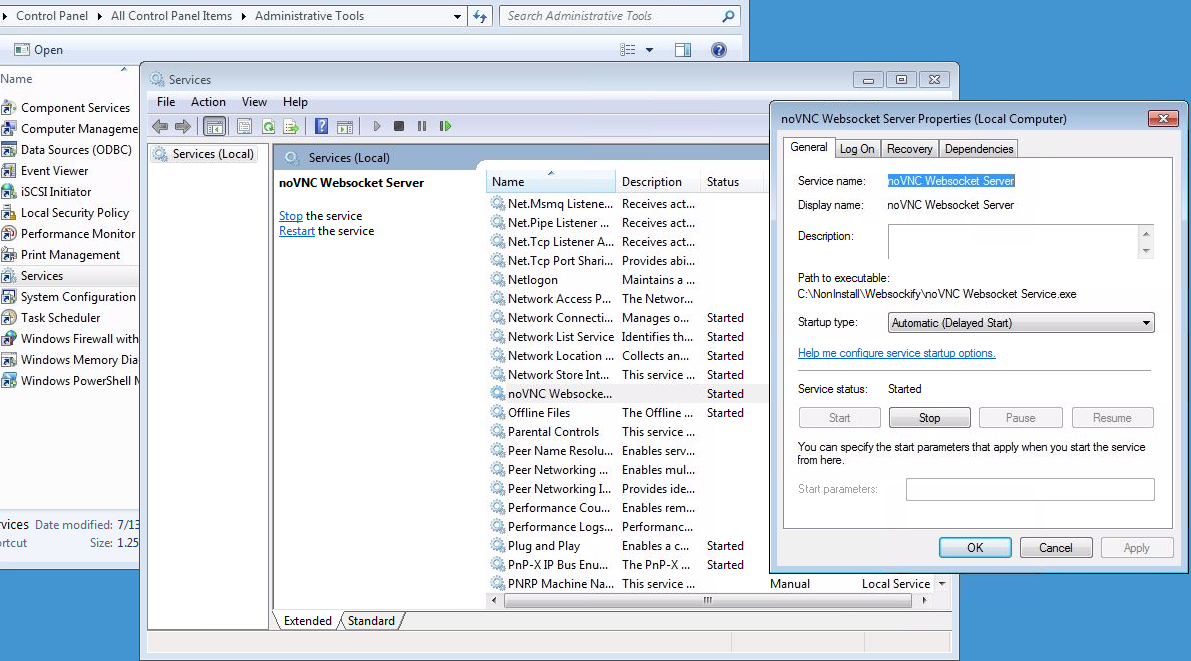
sc create "noVNC Websocket Server" binPath= "c:\noVNC\websockify\noVNC Websocket Service.exe" DisplayName= "noVNC Websocket Server"Если нужно будет удалить сервис, то вот так:
sc delete "noVNC Websocket Server"Открываем сервисы (Control Panel → Administrative Tools → Services) и запускаем noVNC Websocket Server. Также здесь можно настроить, чтобы сервис стартовал каждый раз вместе с Windows:
Известные недоработки
Раскладка клавиатуры
Я обнаружил, что русская раскладка клавиатуры работает довольно необычным образом:
Если у клиента выбран русский язык, то на удалённый компьютер нажатия клавиш не передаются вообще.
Поэтому, чтобы печатать по русски на удалённом компьютере:
— на клиенте должна быть выбрана английская раскладка
— на удалённой системе должна быть выбрана русская раскладка
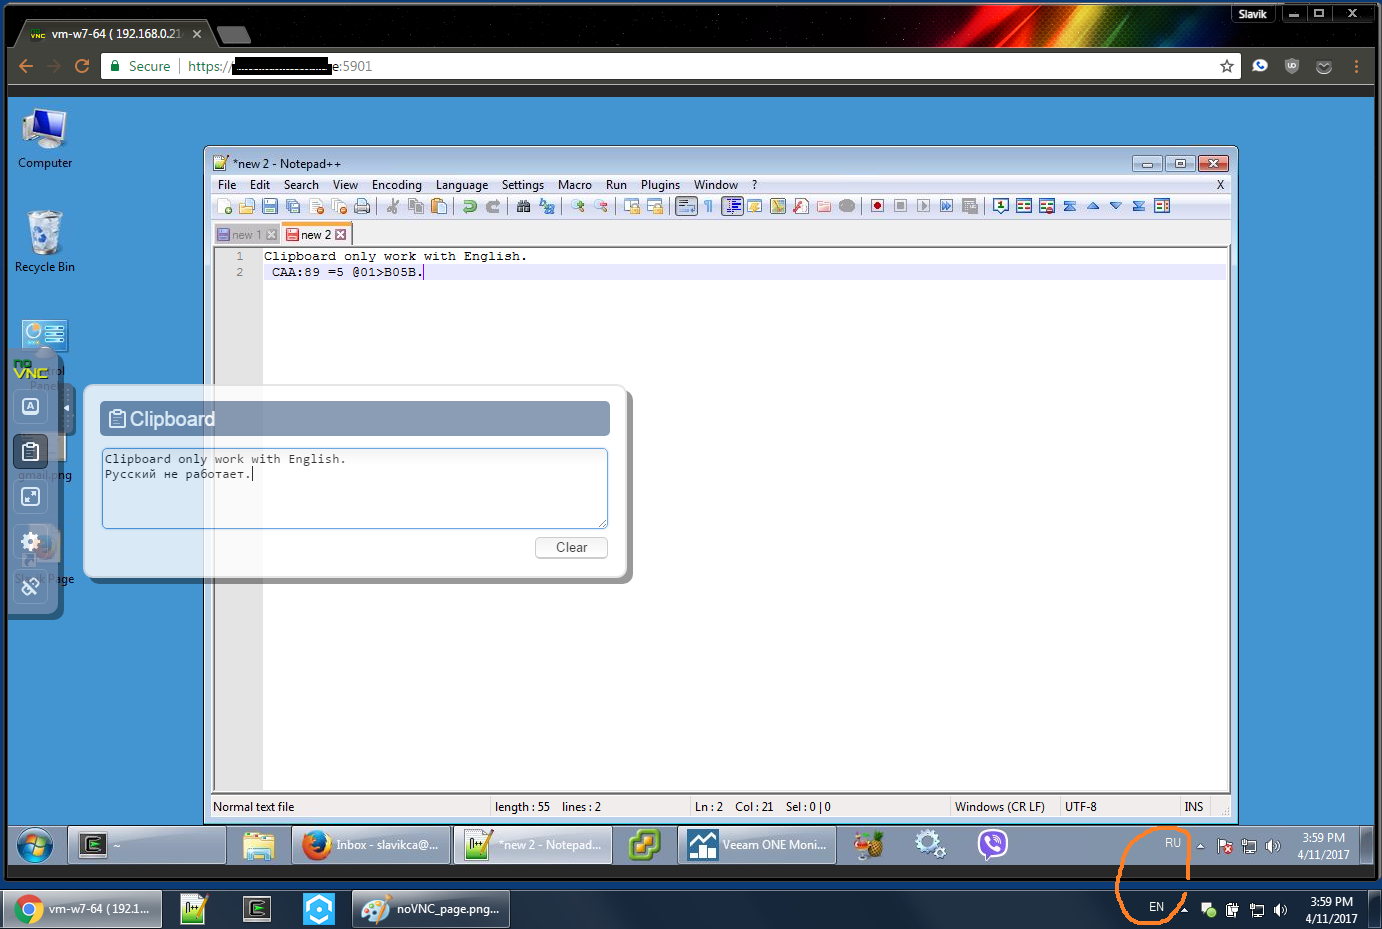
Буфер обмена
Буфер обмена (клипборд) работает через кнопку в браузере (на скриншоте выше), то есть вы можете туда что-то положить и забрать на удалённой системе, или наоборот. И оно (у меня) не умеет работать с русскими буквами.
Provide feedback
Saved searches
Use saved searches to filter your results more quickly
Sign up
Appearance settings

Novnc Videos And Screenshots Installing novnc on windows! everyone, there has been a new tutorial released. see it at watch?v=exbdupektfk or click the end card at. Learn how to set up and use novnc on windows, linux, and macos with this easy tutorial.

Novnc Videos And Screenshots In this video, i will be showing you how to get a remote desktop connection to your computer in a web browser using novnc!music credits:ward wills north ht. It runs novnc in a hidden window on windows login. web page addresses and e mail addresses turn into links automatically. lines and paragraphs break automatically. Install the api wrapper on our host system. add an api user and make sure this user has the proper permissions. create functions to preview your vnc on pages of your choice. Enter novnc, an innovative html vnc client library and application that allows you to control remote machines directly through your web browser, with no installations required. whether you’re on a mobile browser or a desktop, novnc ensures a seamless experience.

Novnc Videos And Screenshots Install the api wrapper on our host system. add an api user and make sure this user has the proper permissions. create functions to preview your vnc on pages of your choice. Enter novnc, an innovative html vnc client library and application that allows you to control remote machines directly through your web browser, with no installations required. whether you’re on a mobile browser or a desktop, novnc ensures a seamless experience. This document describes how to embed and deploy the novnc application, which includes settings and a full user interface. if you are looking for documentation on how to use the core novnc library in your own application, then please see our library documentation . Install. novnc requires a browser with support for modern features; it works on all major browsers. note that novnc doesn’t work in ie. see the readme for more details. get novnc by downloading one of the archives from the release page. First, install ultravnc and nodejs. adjust the settings of ultravnc during the installation process, pull the number of frames to 60 frames. after the installation is installed, open the cmd command window and enter the instruction to install the expansion package: npm install ws; npm install optimist; npm install mime types. Novnc is a web based vnc program that allows you to connect to the desktop of your quickbox pro server. you can use any device as long as you have an internet browser, and an internet connection. in this simple guide, we’ll go through how to install novnc and use it.
Novnc Videos And Screenshots Installing novnc on windows! everyone, there has been a new tutorial released. see it at watch?v=exbdupektfk or click the end card at. Learn how to set up and use novnc on windows, linux, and macos with this easy tutorial.
Novnc Videos And Screenshots In this video, i will be showing you how to get a remote desktop connection to your computer in a web browser using novnc!music credits:ward wills north ht. It runs novnc in a hidden window on windows login. web page addresses and e mail addresses turn into links automatically. lines and paragraphs break automatically. Install the api wrapper on our host system. add an api user and make sure this user has the proper permissions. create functions to preview your vnc on pages of your choice. Enter novnc, an innovative html vnc client library and application that allows you to control remote machines directly through your web browser, with no installations required. whether you’re on a mobile browser or a desktop, novnc ensures a seamless experience.
Novnc Videos And Screenshots Install the api wrapper on our host system. add an api user and make sure this user has the proper permissions. create functions to preview your vnc on pages of your choice. Enter novnc, an innovative html vnc client library and application that allows you to control remote machines directly through your web browser, with no installations required. whether you’re on a mobile browser or a desktop, novnc ensures a seamless experience. This document describes how to embed and deploy the novnc application, which includes settings and a full user interface. if you are looking for documentation on how to use the core novnc library in your own application, then please see our library documentation . Install. novnc requires a browser with support for modern features; it works on all major browsers. note that novnc doesn’t work in ie. see the readme for more details. get novnc by downloading one of the archives from the release page. First, install ultravnc and nodejs. adjust the settings of ultravnc during the installation process, pull the number of frames to 60 frames. after the installation is installed, open the cmd command window and enter the instruction to install the expansion package: npm install ws; npm install optimist; npm install mime types. Novnc is a web based vnc program that allows you to connect to the desktop of your quickbox pro server. you can use any device as long as you have an internet browser, and an internet connection. in this simple guide, we’ll go through how to install novnc and use it.
Github Novnc Novnc Vnc Client Web Application This document describes how to embed and deploy the novnc application, which includes settings and a full user interface. if you are looking for documentation on how to use the core novnc library in your own application, then please see our library documentation . Install. novnc requires a browser with support for modern features; it works on all major browsers. note that novnc doesn’t work in ie. see the readme for more details. get novnc by downloading one of the archives from the release page. First, install ultravnc and nodejs. adjust the settings of ultravnc during the installation process, pull the number of frames to 60 frames. after the installation is installed, open the cmd command window and enter the instruction to install the expansion package: npm install ws; npm install optimist; npm install mime types. Novnc is a web based vnc program that allows you to connect to the desktop of your quickbox pro server. you can use any device as long as you have an internet browser, and an internet connection. in this simple guide, we’ll go through how to install novnc and use it.
Novnc Videos And Screenshots First, install ultravnc and nodejs. adjust the settings of ultravnc during the installation process, pull the number of frames to 60 frames. after the installation is installed, open the cmd command window and enter the instruction to install the expansion package: npm install ws; npm install optimist; npm install mime types. Novnc is a web based vnc program that allows you to connect to the desktop of your quickbox pro server. you can use any device as long as you have an internet browser, and an internet connection. in this simple guide, we’ll go through how to install novnc and use it.
Novnc Videos And Screenshots
noVNC: HTML VNC client library and application
Description
noVNC is both a HTML VNC client JavaScript library and an application built on
top of that library. noVNC runs well in any modern browser including mobile
browsers (iOS and Android).
Many companies, projects and products have integrated noVNC including
OpenStack,
OpenNebula,
LibVNCServer, and
ThinLinc. See
the Projects and companies wiki page
for a more complete list with additional info and links.
Table of contents
- News/help/contact
- Features
- Screenshots
- Browser requirements
- Server requirements
- Quick start
- Installation from snap package
- Integration and deployment
- Authors/Contributors
News/help/contact
The project website is found at novnc.com.
If you are a noVNC developer/integrator/user (or want to be) please join the
noVNC discussion group.
Bugs and feature requests can be submitted via
github issues. If you have questions
about using noVNC then please first use the
discussion group.
We also have a wiki with lots of
helpful information.
If you are looking for a place to start contributing to noVNC, a good place to
start would be the issues that are marked as
“patchwelcome”.
Please check our
contribution guide though.
If you want to show appreciation for noVNC you could donate to a great non-
profits such as:
Compassion International,
SIL,
Habitat for Humanity,
Electronic Frontier Foundation,
Against Malaria Foundation,
Nothing But Nets, etc.
Features
- Supports all modern browsers including mobile (iOS, Android)
- Supported authentication methods: none, classical VNC, RealVNC’s
RSA-AES, Tight, VeNCrypt Plain, XVP, Apple’s Diffie-Hellman,
UltraVNC’s MSLogonII - Supported VNC encodings: raw, copyrect, rre, hextile, tight, tightPNG,
ZRLE, JPEG, Zlib, H.264 - Supports scaling, clipping and resizing the desktop
- Supports back & forward mouse buttons
- Local cursor rendering
- Clipboard copy/paste with full Unicode support
- Translations
- Touch gestures for emulating common mouse actions
- Licensed mainly under the MPL 2.0, see
the license document for details
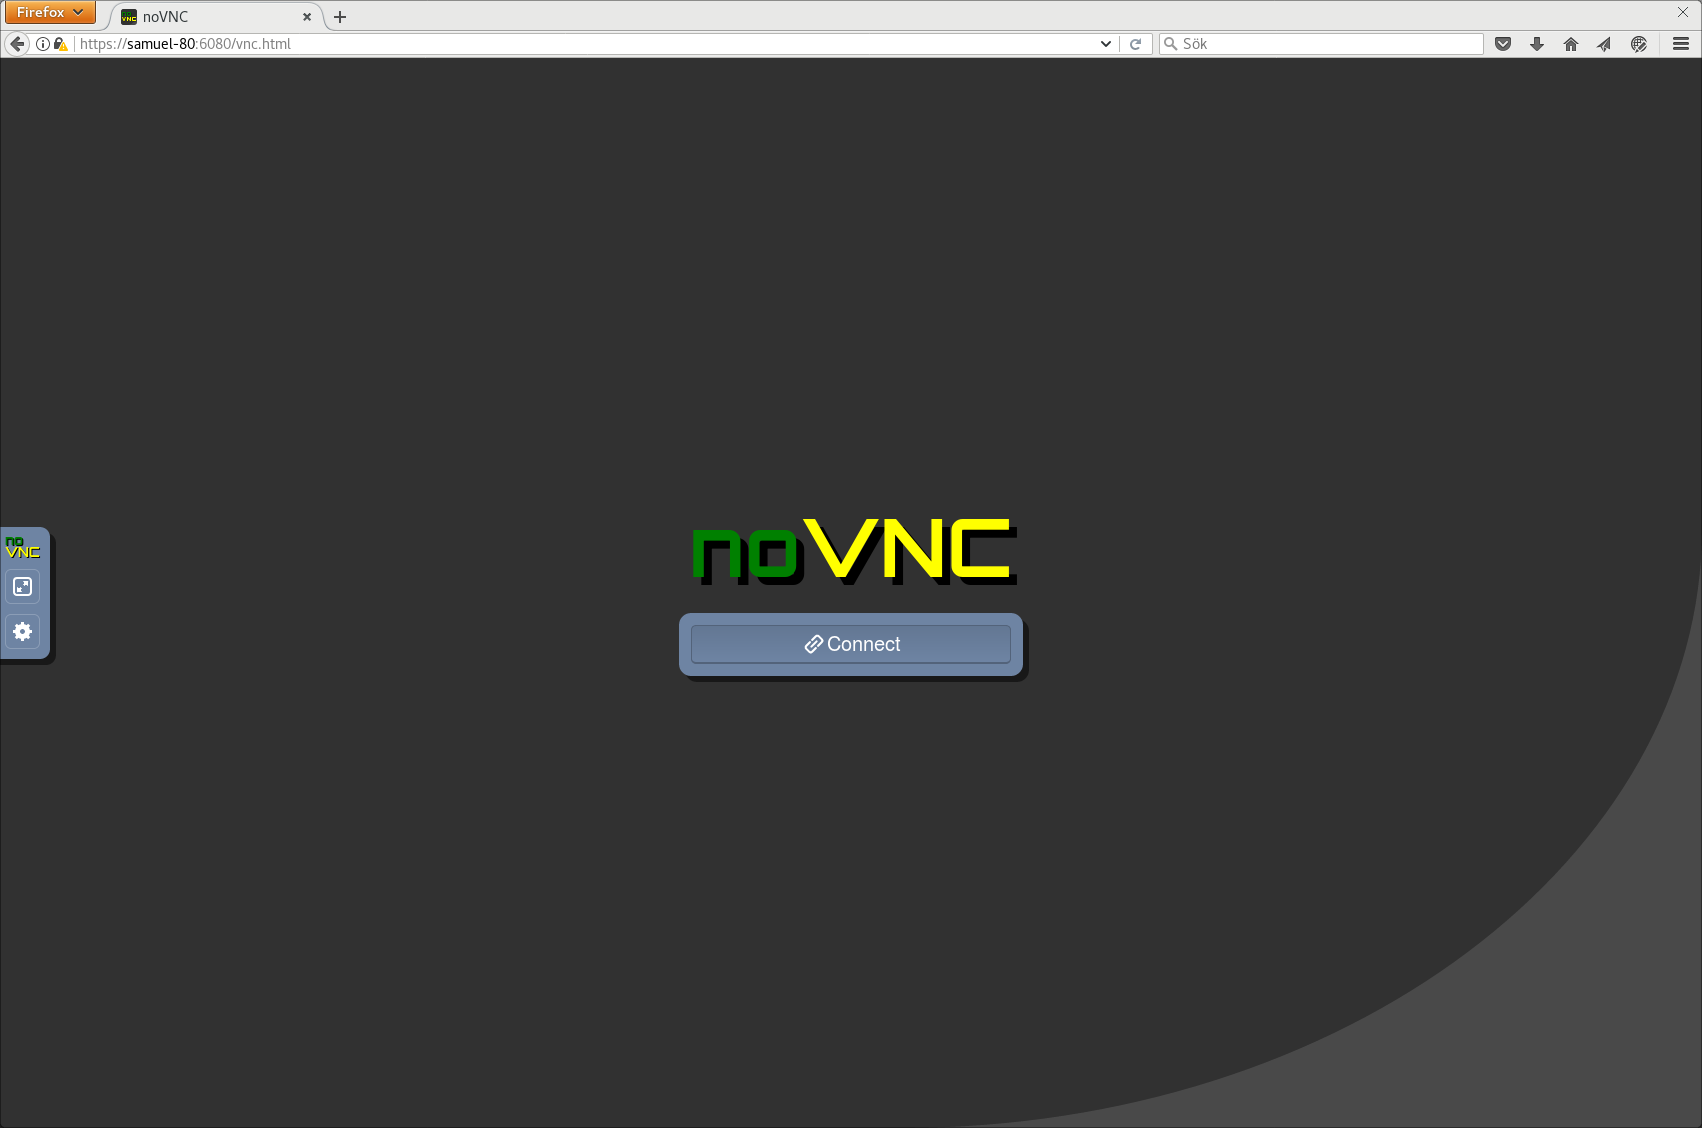
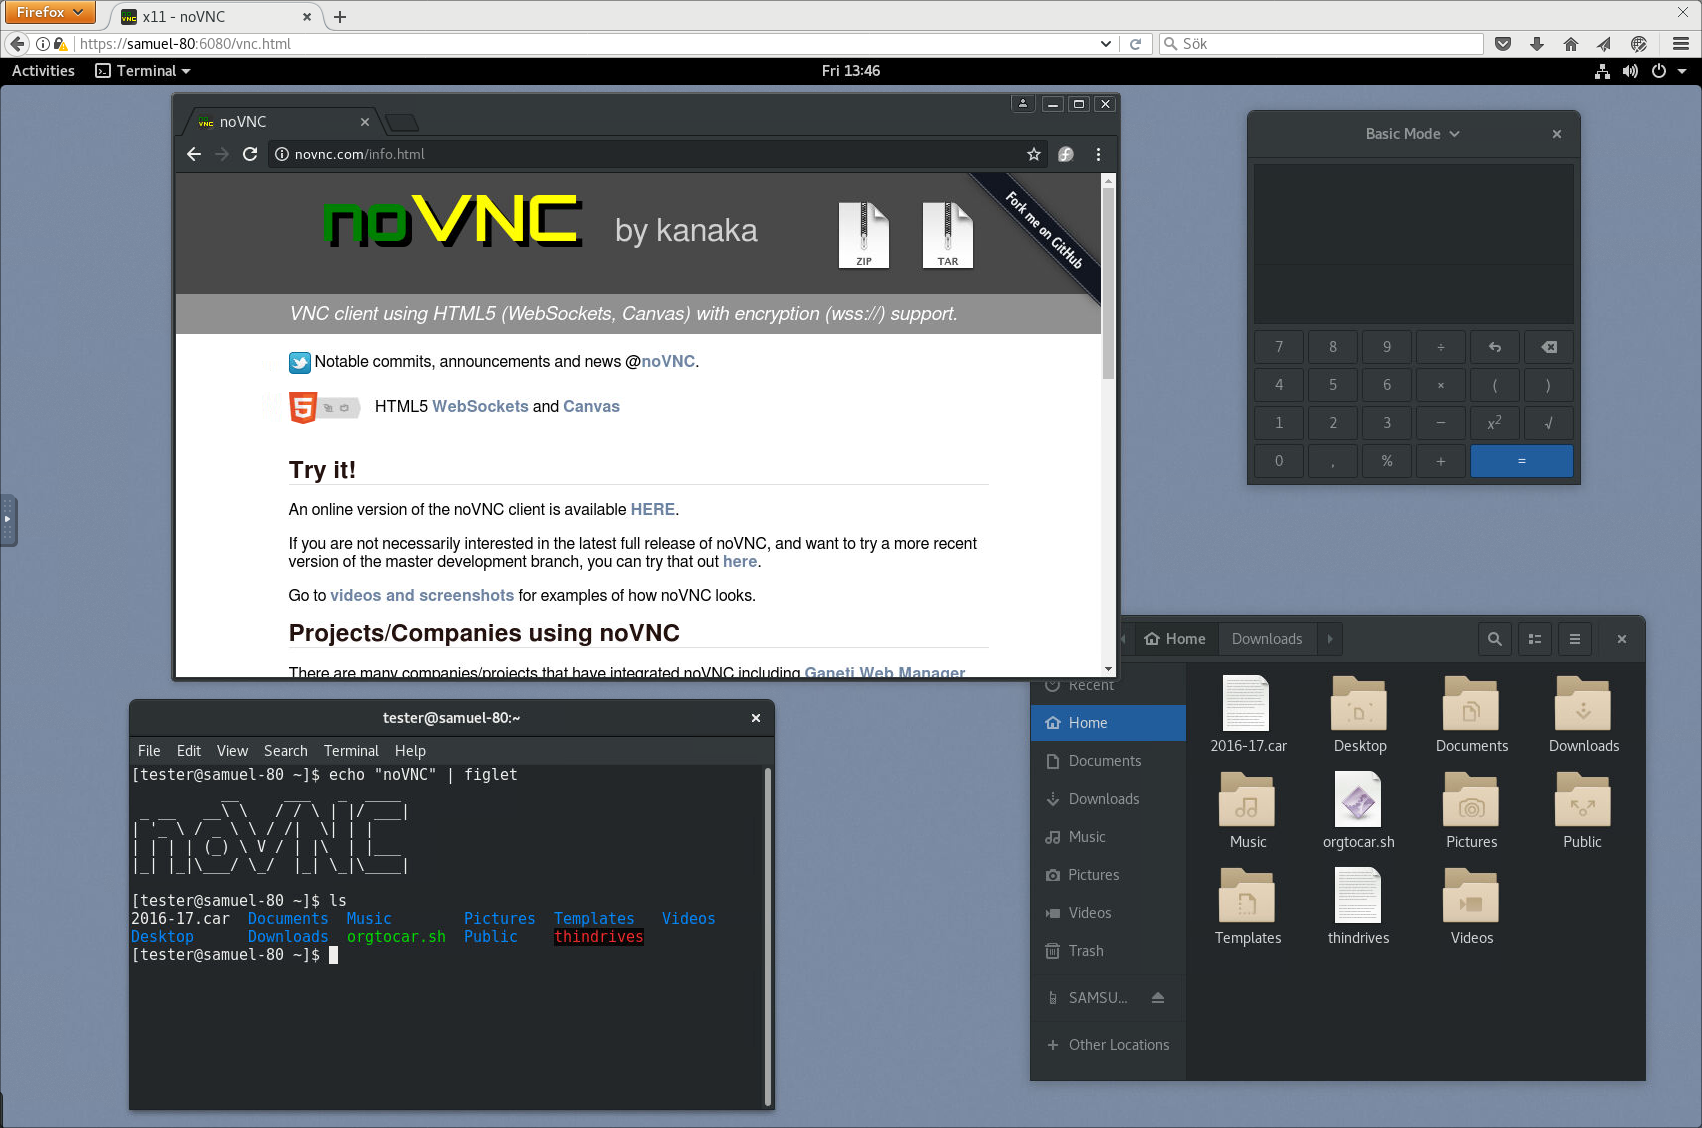
Screenshots
Running in Firefox before and after connecting:
See more screenshots
here.
Browser requirements
noVNC uses many modern web technologies so a formal requirement list is
not available. However these are the minimum versions we are currently
aware of:
- Chrome 89, Firefox 89, Safari 15, Opera 75, Edge 89
Server requirements
noVNC follows the standard VNC protocol, but unlike other VNC clients it does
require WebSockets support. Many servers include support (e.g.
x11vnc/libvncserver,
QEMU, and
MobileVNC), but for the others you need to
use a WebSockets to TCP socket proxy. noVNC has a sister project
websockify that provides a simple such
proxy.
Quick start
-
Use the
novnc_proxyscript to automatically download and start websockify, which
includes a mini-webserver and the WebSockets proxy. The--vncoption is
used to specify the location of a running VNC server:./utils/novnc_proxy --vnc localhost:5901 -
If you don’t need to expose the web server to public internet, you can
bind to localhost:./utils/novnc_proxy --vnc localhost:5901 --listen localhost:6081 -
Point your browser to the cut-and-paste URL that is output by the
novnc_proxy
script. Hit the Connect button, enter a password if the VNC server has one
configured, and enjoy!
Installation from snap package
Running the command below will install the latest release of noVNC from snap:
sudo snap install novnc
Running noVNC from snap directly
You can run the snap package installed novnc directly with, for example:
novnc --listen 6081 --vnc localhost:5901 # /snap/bin/novnc if /snap/bin is not in your PATH
If you want to use certificate files, due to standard snap confinement restrictions you need to have them in the /home/<user>/snap/novnc/current/ directory. If your username is jsmith an example command would be:
novnc --listen 8443 --cert ~jsmith/snap/novnc/current/self.crt --key ~jsmith/snap/novnc/current/self.key --vnc ubuntu.example.com:5901
Running noVNC from snap as a service (daemon)
The snap package also has the capability to run a ‘novnc’ service which can be
configured to listen on multiple ports connecting to multiple VNC servers
(effectively a service running multiple instances of novnc).
Instructions (with example values):
List current services (out-of-box this will be blank):
sudo snap get novnc services
Key             Value
services.n6080  {...}
services.n6081  {...}
Create a new service that listens on port 6082 and connects to the VNC server
running on port 5902 on localhost:
sudo snap set novnc services.n6082.listen=6082 services.n6082.vnc=localhost:5902
(Any services you define with ‘snap set’ will be automatically started)
Note that the name of the service, ‘n6082’ in this example, can be anything
as long as it doesn’t start with a number or contain spaces/special characters.
View the configuration of the service just created:
sudo snap get novnc services.n6082
Key                    Value
services.n6082.listen  6082
services.n6082.vnc     localhost:5902
Disable a service (note that because of a limitation in snap it’s currently not
possible to unset config variables, setting them to blank values is the way
to disable a service):
sudo snap set novnc services.n6082.listen='' services.n6082.vnc=''
(Any services you set to blank with ‘snap set’ like this will be automatically stopped)
Verify that the service is disabled (blank values):
sudo snap get novnc services.n6082
Key                    Value
services.n6082.listen
services.n6082.vnc
Integration and deployment
Please see our other documents for how to integrate noVNC in your own software,
or deploying the noVNC application in production environments:
- Embedding — For the noVNC application
- Library — For the noVNC JavaScript library
See AUTHORS for a (full-ish) list of authors. If you’re not on
that list and you think you should be, feel free to send a PR to fix that.
- Core team:
- Samuel Mannehed (Cendio)
- Pierre Ossman (Cendio)
- Previous core contributors:
- Joel Martin (Project founder)
- Solly Ross (Red Hat / OpenStack)
- Notable contributions:
- UI and icons : Pierre Ossman, Chris Gordon
- Original logo : Michael Sersen
- tight encoding : Michael Tinglof (Mercuri.ca)
- RealVNC RSA AES authentication : USTC Vlab Team
- Included libraries:
- base64 : Martijn Pieters (Digital Creations 2), Samuel Sieb (sieb.net)
- DES : Dave Zimmerman (Widget Workshop), Jef Poskanzer (ACME Labs)
- Pako : Vitaly Puzrin (https://github.com/nodeca/pako)
Do you want to be on this list? Check out our
contribution guide and
start hacking!