
Is your Windows 11 not detecting second monitor and you are looking for a solution to the issue?
Due to its enormous benefits in terms of multitasking for people who work with many programs at once, using multiple displays has become increasingly popular.
In general, it boosts productivity while also improving a workspace’s appearance. This is the reason why many Youtubers, Programmers, and Video editors prefer a dual monitor setup nowadays
Setting up a second monitor is quite easy and can be done in a short period of time. On the other hand, there have been several online complaints about Windows 11 not detecting second monitor.
This is a very frustrating issue for many users as they struggle with finding ways to resolve the issue but result in none.
Fortunately, there are some tried-and-true methods you may use to resolve this problem, and we will go over them in detail in this article.
Let’s first discuss some factors that cause Windows 11 not to detect second monitor.
Table Of Contents
- Fix Windows 11 not detecting second monitor
- Fix 1: Make sure the monitor and HDMI cable is in proper condition
- Fix 2: Update Display Driver
- Use INF file from manufacturer’s site and install it to update display driver
- Use Windows Update to update the display driver
- Use Driver Installer
- Fix 3: Uninstall and reinstall the display driver
- Fix 4: Roll back Display Driver
- Fix 5: Set the same refresh rate on both screens
- Fix 6: Check Display Preferences
- Fix 7: Force your computer to detect the monitor
- Frequently Asked Questions
- Why is my second monitor not detected on Windows 11?
- Can my HDMI cable be the reason for Windows 11 not detecting second monitor issue?
- How can I connect with a second monitor wirelessly?
Fix Windows 11 not detecting second monitor
Here are some fixes you should attempt if you get Windows 11 not detecting second monitor issue.
Before your issue is solved, you might need to attempt more than one of these solutions. Also, we recommend restarting your computer and doing Fix 1 before attempting the other alternatives.
Fix 1: Make sure the monitor and HDMI cable is in proper condition
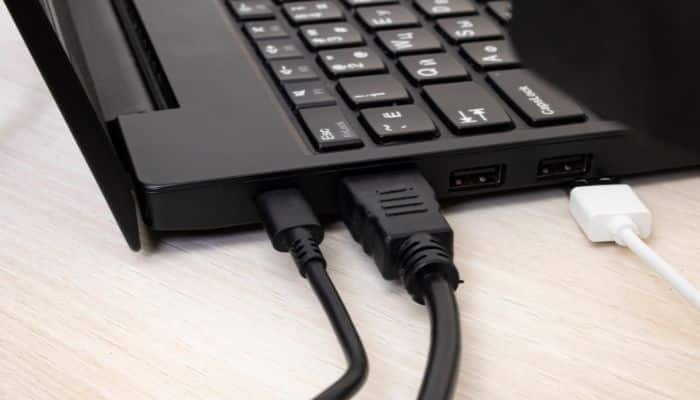
Your monitor must be turned on and properly connected to the Windows 11 computer before it can be detected. In some instances, the HDMI cable you are using or the ports on either of the screens are to blame for Windows 11’s failure to detect the second monitor.
Hence, you should check that everything is in order. The following are the key actions you should take and verify before exploring other solutions:
- Make sure the second monitor is turned on
- Try to use another HDMI cable
- Try another HDMI port
- Choose the correct input on your monitor
- Check for dirt or debris in the HDMI port and cable and remove it
Fix 2: Update Display Driver
The display drivers, also known as graphics drivers, are in charge of communicating commands to the Windows OS and display hardware on a computer. You will undoubtedly start experiencing problems with some of your display functionalities if this is a display driver issue.
Using an outdated display driver is one of the major causes of driver issues, and it may be the reason for Windows 11’s failure to discover the second monitor. If that is the case, updating the driver would be the only solution.
You must manually download the driver or use one of the alternative options described below as the Device Manager option to “Search automatically for device driver software” doesn’t actually function to update your driver.
- Download the driver’s INF file from the manufacturer’s site and install it.
- Use Windows Update
- Use Driver Installer
Use INF file from manufacturer’s site and install it to update display driver
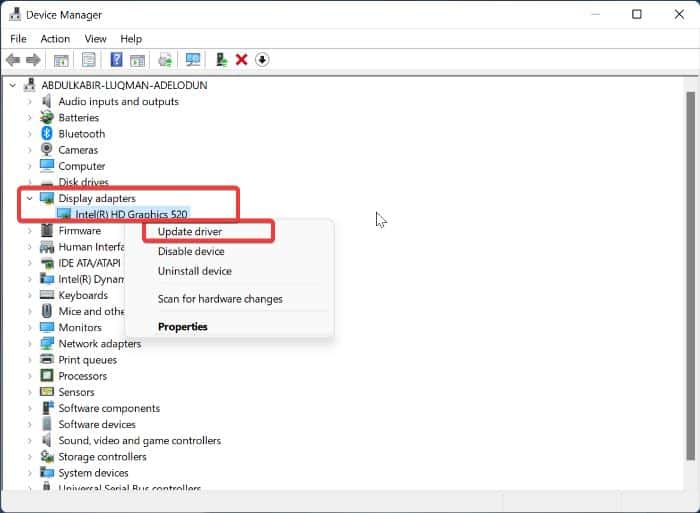
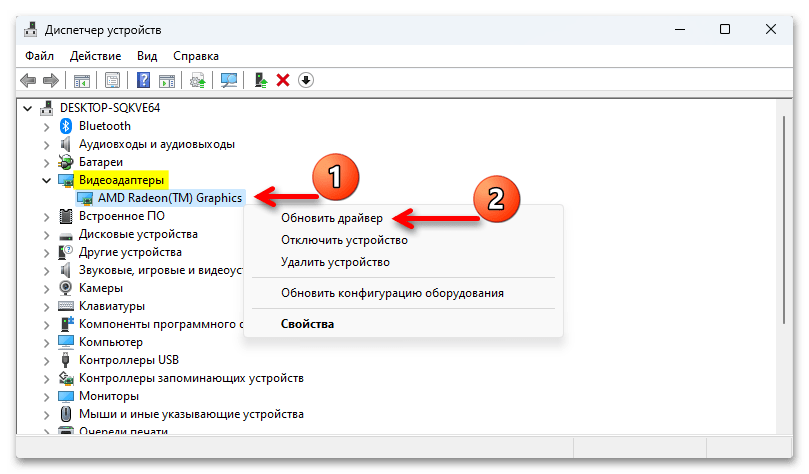
1. Right-click on the Start menu and tap on Device Manager.
2. Double-click the Display adapters option on the Device Manager window and note the display driver you have on your computer.
3. Go to the display driver’s website and download an updated driver version.
4. Now, go back to Device Manager and right-click your display driver under Display adapters.
5. On the resulting drop-down menu, tap on the Update driver option.
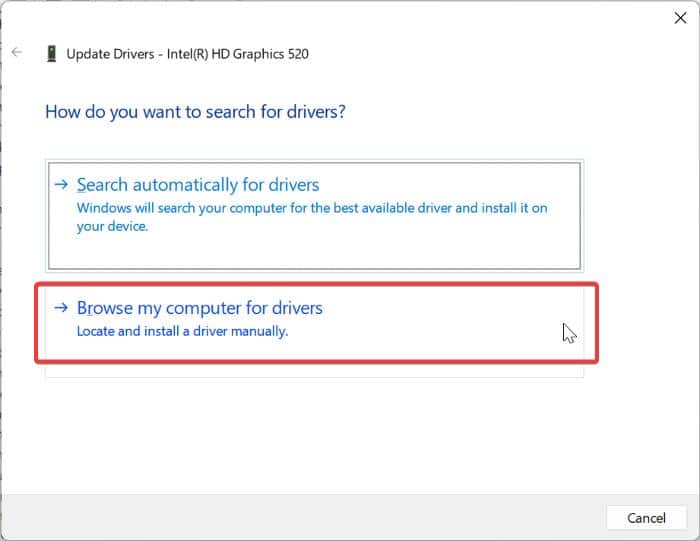
6. Select Browse my computer for drivers and follow other on-screen prompts to select the driver package you downloaded earlier.
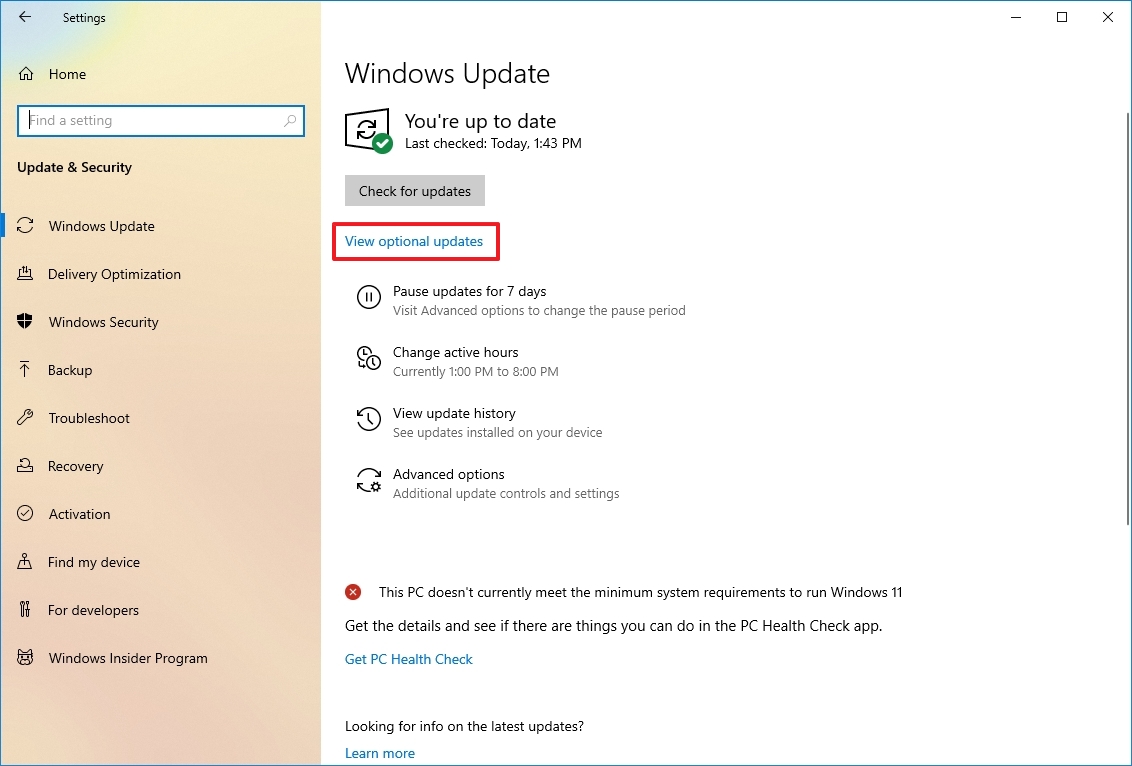
Use Windows Update to update the display driver
1. Press Windows + I to open Settings on your computer.
2. Click on Windows Updates on the left-hand pane.
3. Navigate to Advanced options and click on it.
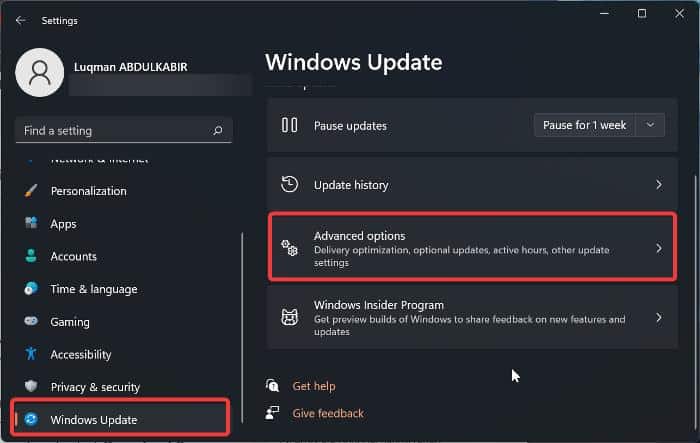
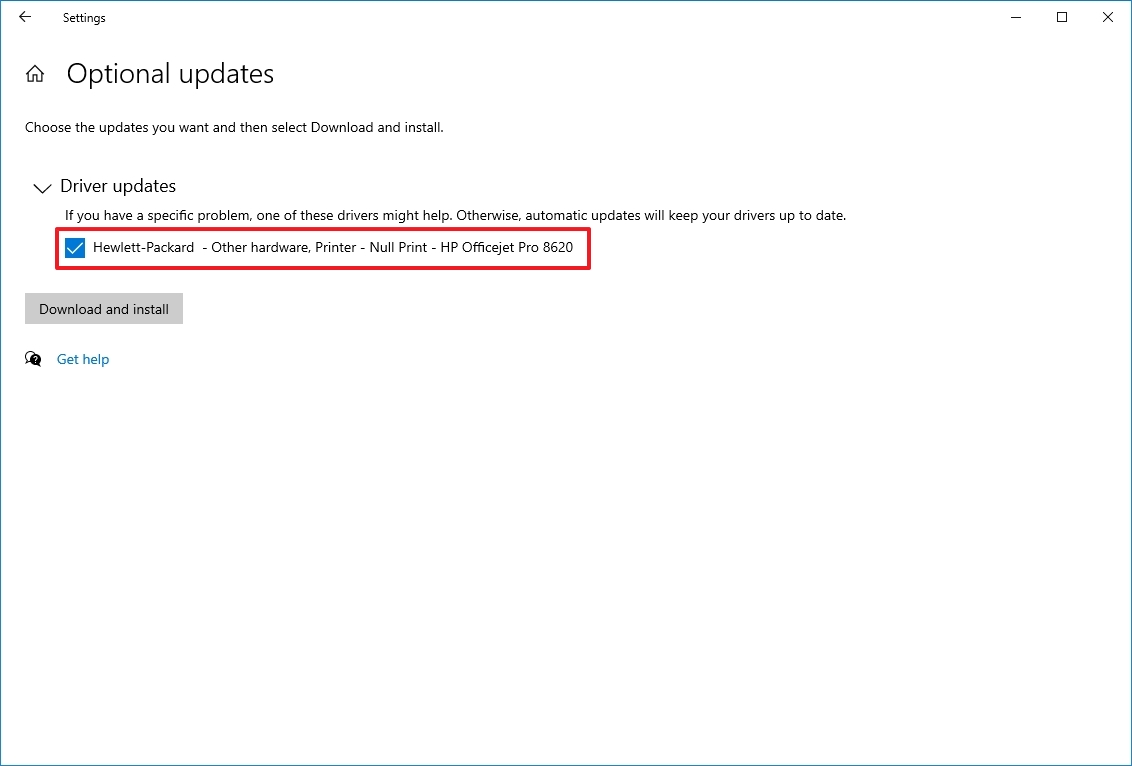
4. Select Optional updates under Additional options.
5. Click on Driver updates.
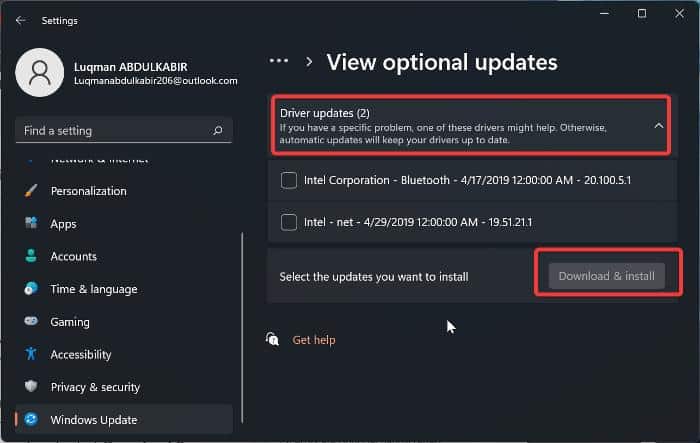
6. Look for your Graphics driver. If any update is available, tap on it and select Download & Install at the bottom of the section.
Use Driver Installer
You may also use the appropriate driver installer provided by the manufacturer of your GPU to upgrade your display driver. Here are the download links for the graphics card drivers for NVIDIA, Intel, and AMD.
- NVIDIA GeForce Experience
- Intel Driver & Support Assistant
- AMD Radeon Software Adrenalin Edition
After updating your display driver, it is recommended that you restart your computer and then connect your second monitor.
Fix 3: Uninstall and reinstall the display driver
Reinstalling the display driver has also effectively resolved the Windows 11 not detecting second monitor issue. You can try it, and perhaps it will help you resolve the problem. Here is how to do it:
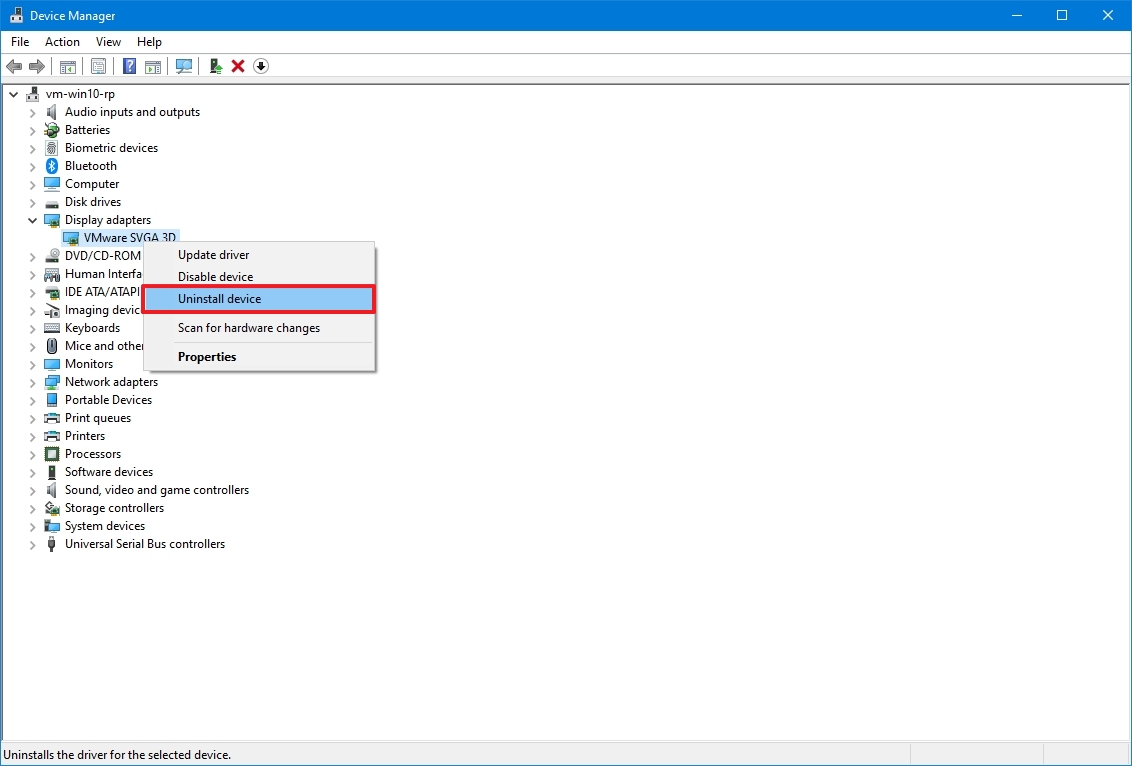
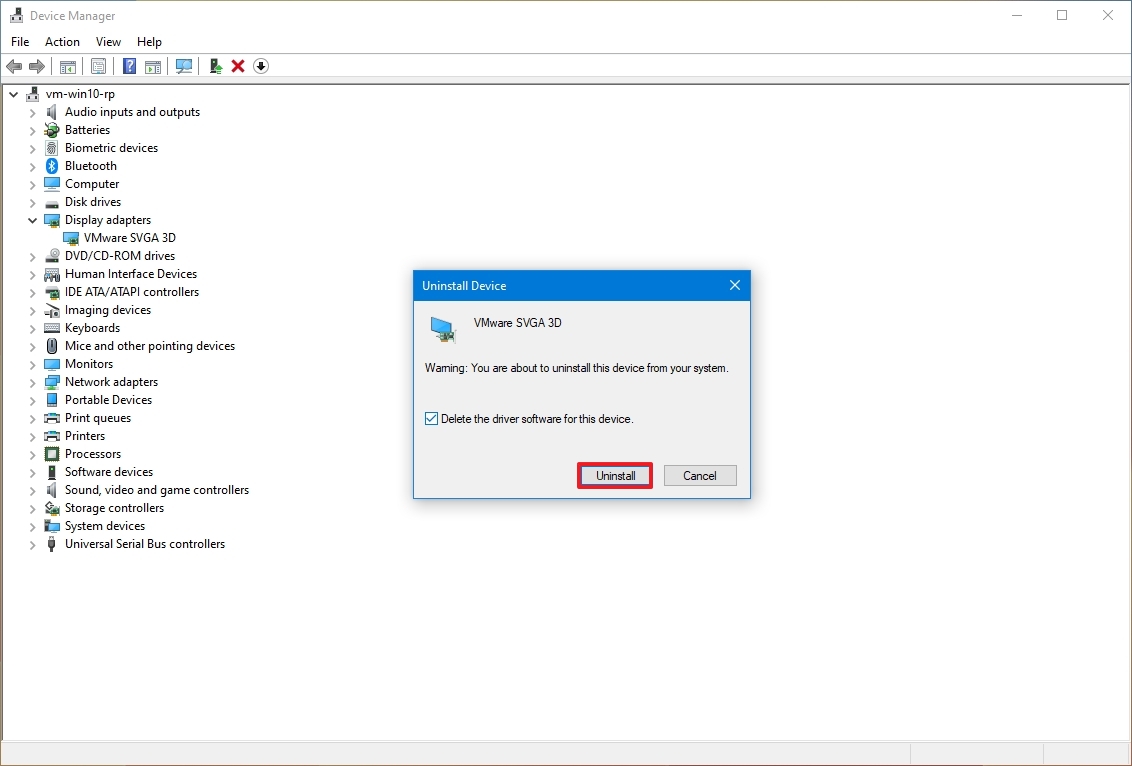
1. Open Device Manager and double-click Display adapters.
2. Right-click your display driver and select Uninstall device.
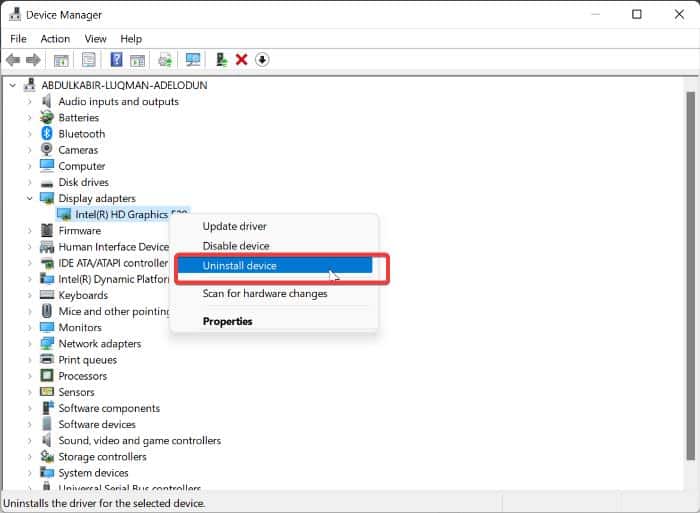
3. Then, restart your computer and open Device Manager again.
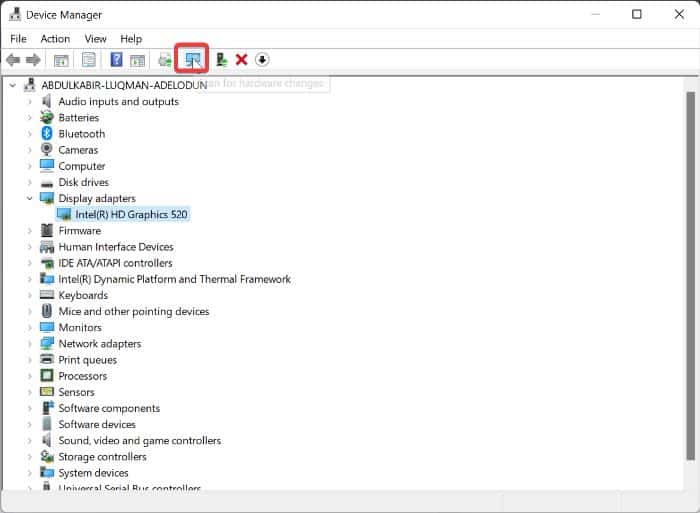
4. On the Device Manager page, click on Scan for hardware changes.
Fix 4: Roll back Display Driver
If the problem arose right after you updated your display driver or performed Windows Update, then there is a problem with the updated driver version. Therefore, you should roll back to the previous version of your display driver. Here is how to roll back the display driver.
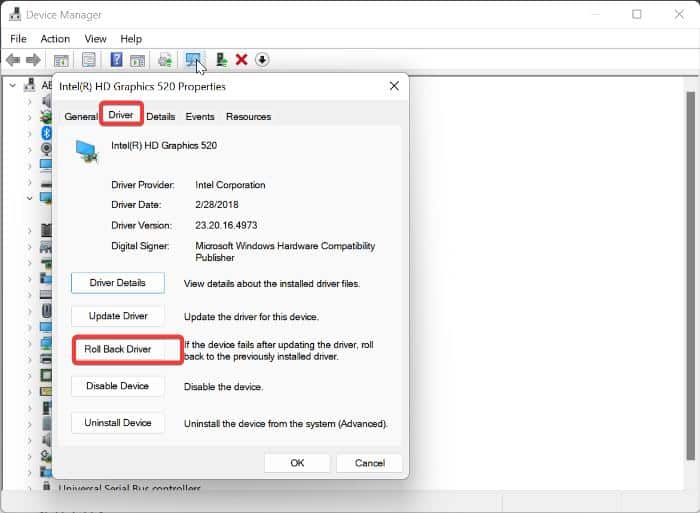
1. Open Device Manager and double-click on Display adapters.
2. Right-click your display driver and select Properties.
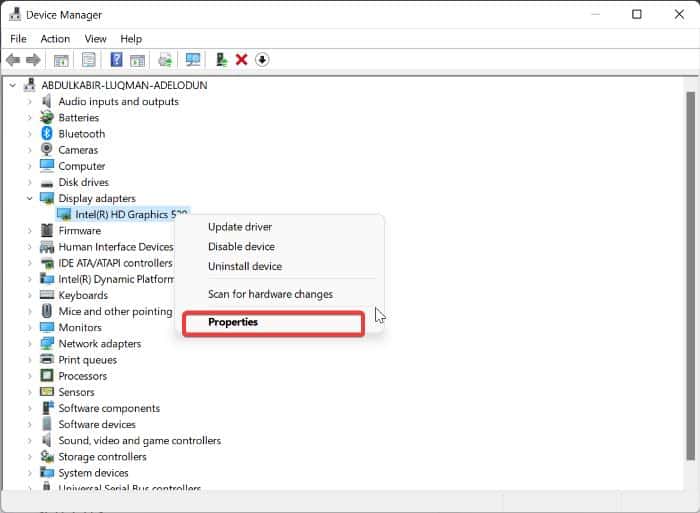
3. Switch to the Driver section, click on Roll Back Driver and select Yes to confirm the action.
Also Read: No Sound on Windows 11? Here’s How To Fix No Audio [SOLVED]
Fix 5: Set the same refresh rate on both screens
Another approach you can use to fix Windows 11 not detecting dual monitor issue is to set the same refresh rate for both screens. This is because setting different refresh rates for the screen may cause software conflict on your PC and lead to this issue.
1. Press Windows + I to open Settings on your computer.
2. Select System and click on Display.
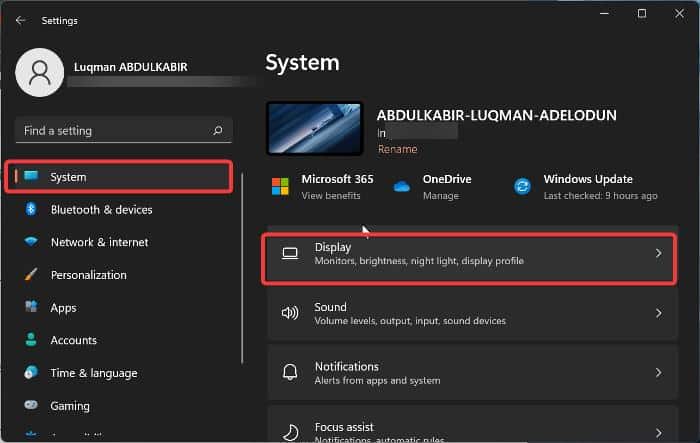
3. Scroll down and select Advanced display.
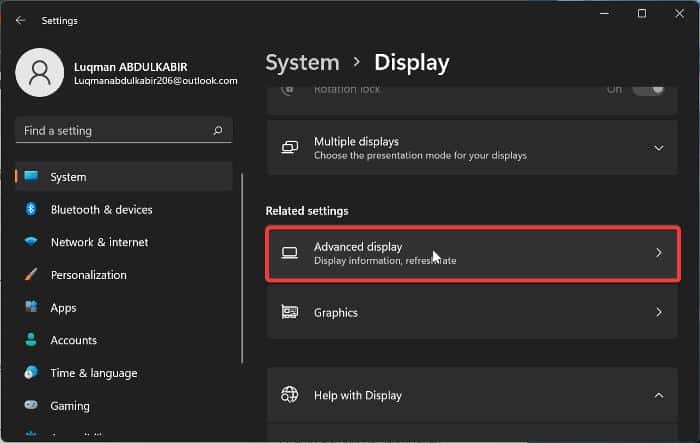
4. On the Select a display to view or change its settings option, choose the display you want to change its refresh rate.
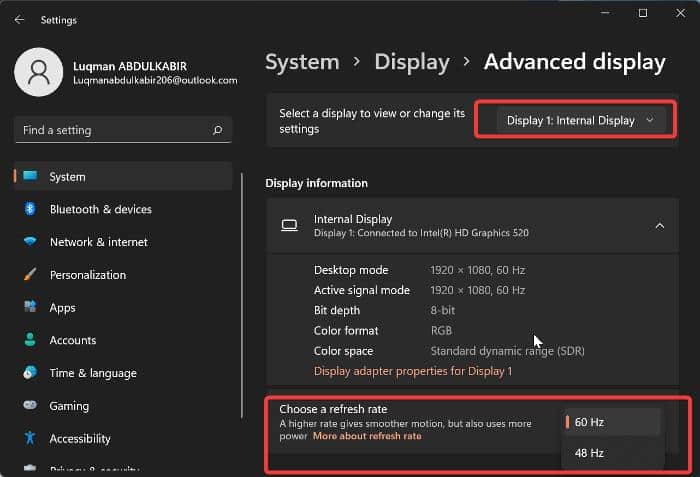
5. Go to Choose a refresh rate and select a refresh rate that works with both screens. Then follow other on-screen prompts to save the change.
After this, unplug the monitor from your PC and reconnect it. Hopefully, the issue will have been fixed.
Fix 6: Check Display Preferences
There are times when the second monitor would have connected with your monitor, but due to the display preference on your PC, you won’t be seeing anything on the second monitor. This is what you can do in that case:
1. Press Windows + P on your keyboard.
2. On the resulting menu, select Extend.
Fix 7: Force your computer to detect the monitor
You can also force your computer to detect the second monitor by following the steps below:
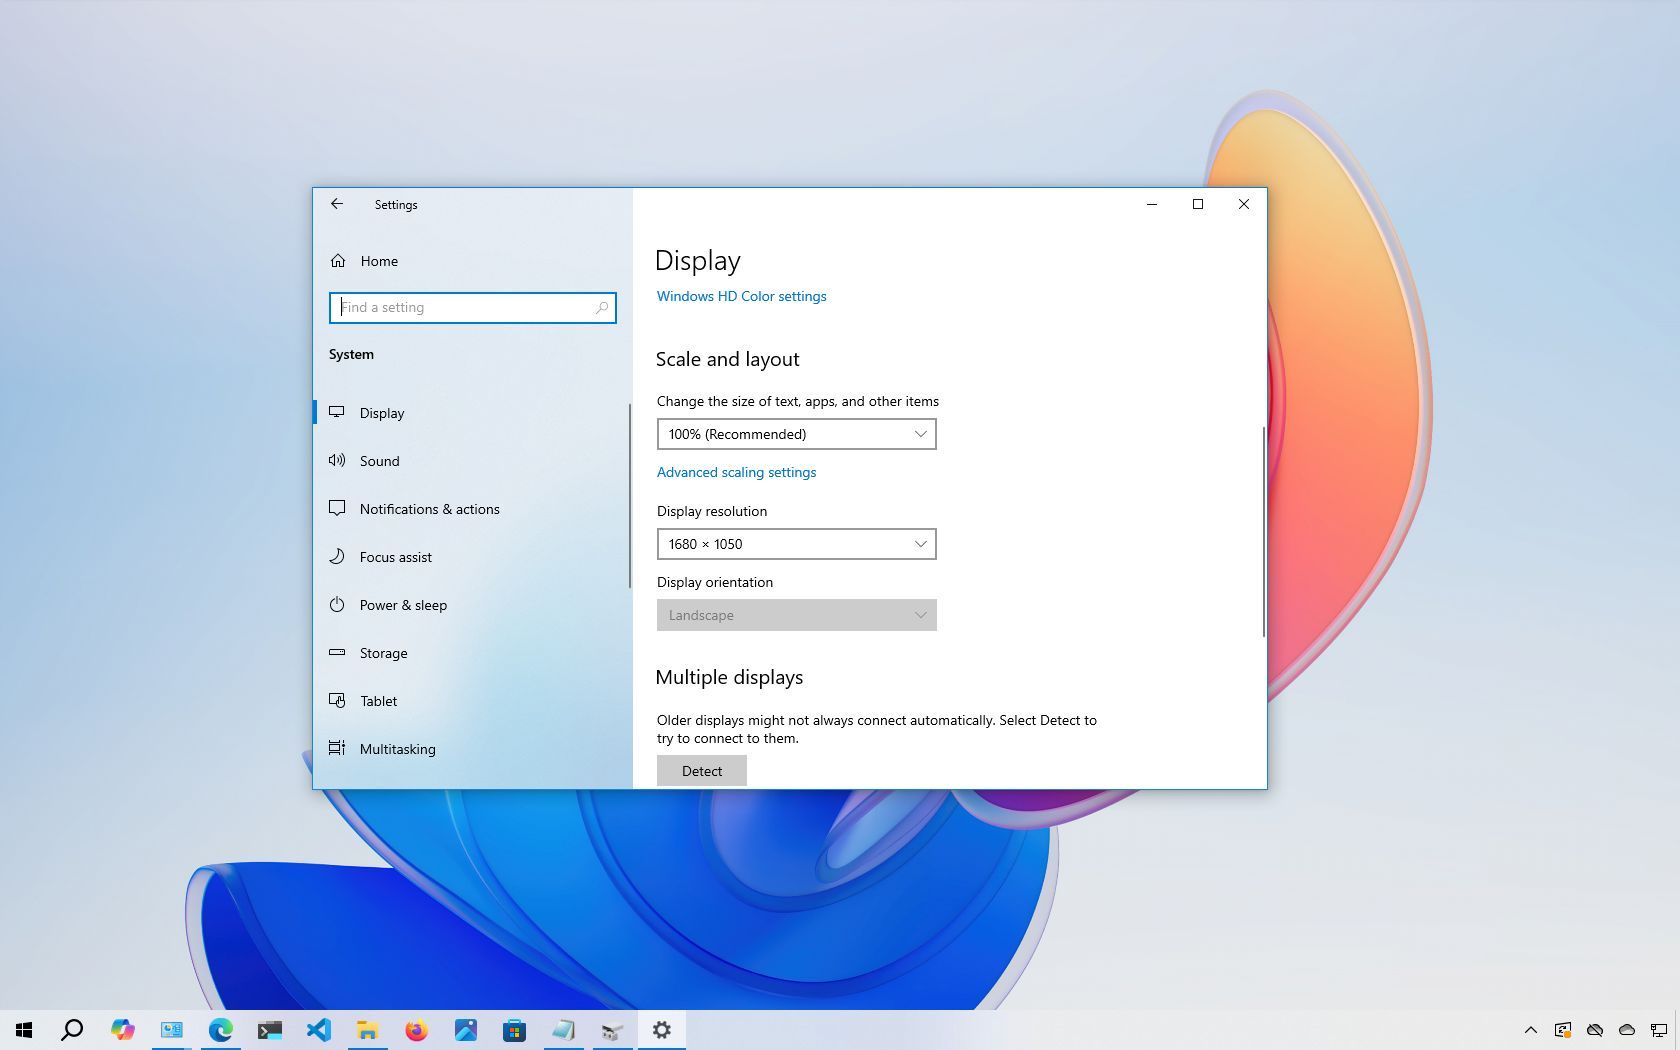
1. Press Windows + I to open Settings on your computer
2. Select System and tap on Display.
3. Navigate to the Multiple displays option under the Scale & layouts category and click on it.
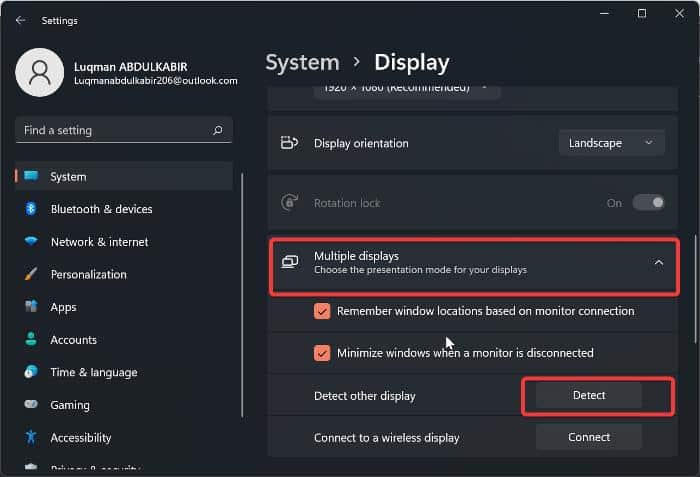
4. Check the boxes under the Multiple displays option and tap on Detect.
Frequently Asked Questions
Why is my second monitor not detected on Windows 11?
If you’ve ruled out hardware problems like HDMI port cable or ports issue, what majorly causes Windows 11 not to detect a second monitor is a buggy, corrupted, or outdated display driver. In order to resolve this issue, you can go over the solutions we’ve discussed in the article.
Can my HDMI cable be the reason for Windows 11 not detecting second monitor issue?
A faulty or improperly plugged HDMI cable will make it impossible for your PC to detect a second monitor. Hence, if you are having issues with Windows 11 detecting a second monitor, try checking if your HDMI cable is properly plugged in and make sure it is in good condition also.
How can I connect with a second monitor wirelessly?
If you need to connect your Windows 11 PC with a second monitor using Bluetooth, here are the steps to do it:
1. Put the second monitor in pairing mode (you can refer to the monitor’s manual for directions on how to do that).
2. On your Windows PC, press Windows + I to show the Cast option, then click on the monitor you want to connect to.
Final Thoughts
It is important to know that using multiple displays on a Windows computer is quite simple, but it could be challenging if you have problems with your graphics driver or don’t know how to connect to the monitor.
However, using the suggestions in this article, you ought to be able to quickly fix the problem with Windows 11 not detecting second monitor and get your PC to a working condition.
Let us know the solution that worked for you in the comment section below

Luqman
A tech junkie, and music fan.
I love writing Reviews, How-to, and explainer articles related to Android, iOS, and Windows. If I’m not on my laptop brainstorming ideas for content, you’ll most probably see me watching Tv shows or streaming videos on Youtube. Don’t forget to follow me on Twitter as @Luqqman14
Все способы:
- Способ 1: Обнаружение устройства
- Способ 2: Формат отображения
- Способ 3: Регулировка частоты обновления
- Способ 4: Работа с драйверами
- Способ 5: Настройка BIOS
- Способ 6: Диагностика физического подключения
- Вопросы и ответы: 5
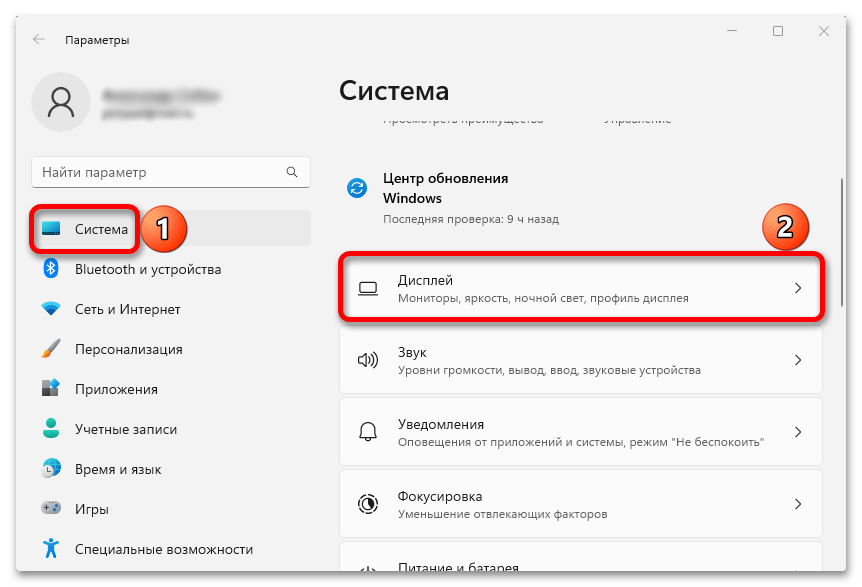
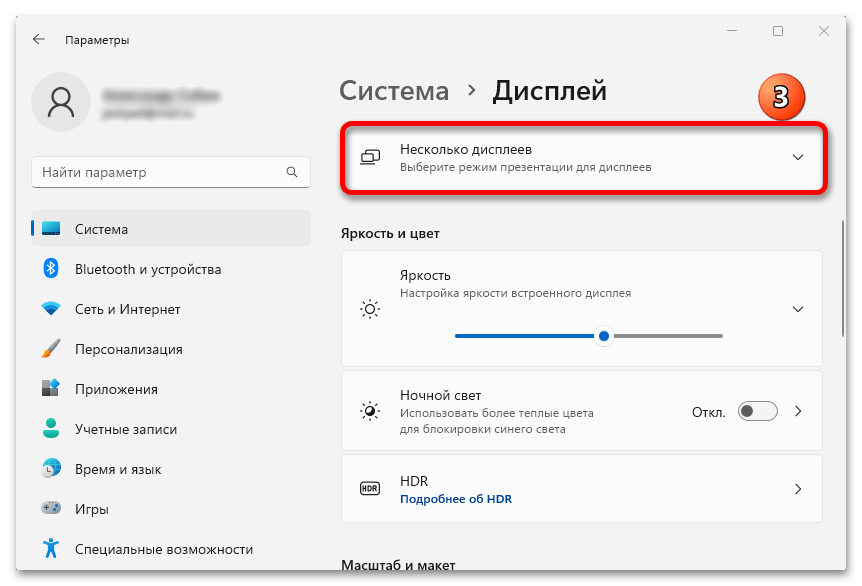
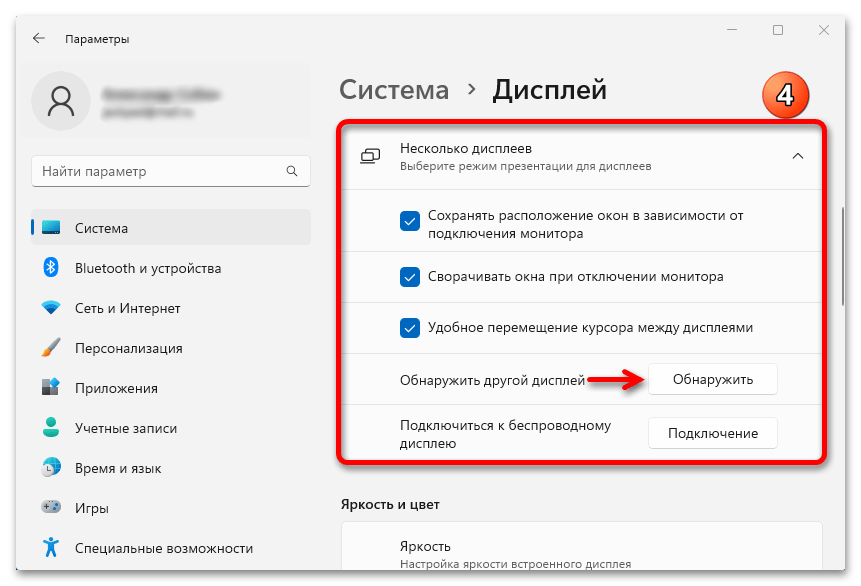
Способ 1: Обнаружение устройства
Обычно второй монитор начинает работать без дополнительной настройки, но если система его даже не идентифицировала, можно воспользоваться функцией принудительного обнаружения.
- Сочетанием клавиш «Win+I» открываем «Параметры» Windows 11, во вкладке «Система» переходим в настройки дисплея,

открываем блок «Несколько дисплеев»

и нажимаем «Обнаружить». Возможно, это поможет распознать второй монитор.
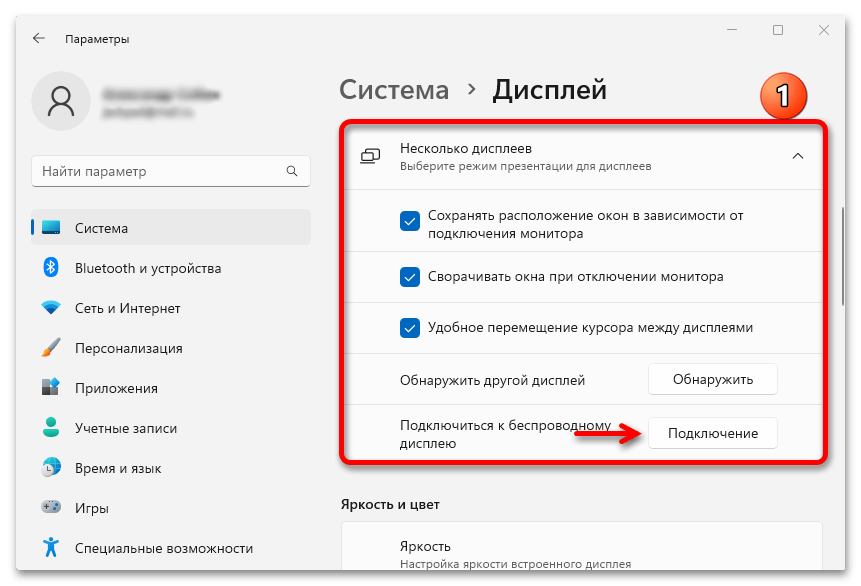
- Если монитор беспроводной, нажимаем «Подключение»,

в появившемся окне выбираем дисплей, а затем подтверждаем сопряжение на самом устройстве.
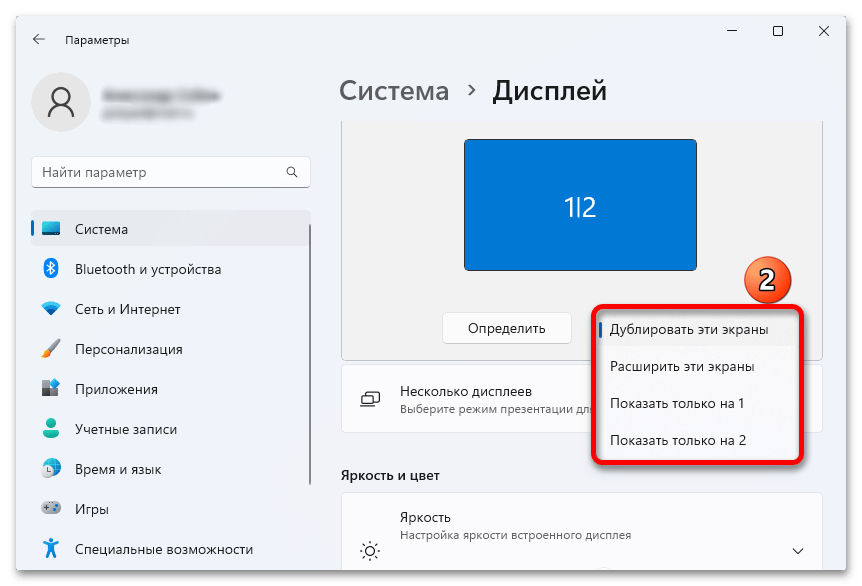
Способ 2: Формат отображения
Windows 11 поддерживает разные режимы проецирования. Возможно, у вас выбран тот, при котором второй монитор не получает картинку. Естественно, эта функция будет работать, если устройство обнаружено, но оно ничего не транслирует.
- Комбинацией клавиш «Windows+P» вызываем окно выбора типа передачи картинки на экран. В данном случае включен «Повторяющийся» режим, при котором изображение должно быть одинаковое на обоих экранах, а значит, проблема не в этом.
Но если у вас выбран режим «Только экран компьютера» или «Только второй экран», переключитесь с них, так как они предусматривают передачу изображения лишь на один из мониторов.
- Альтернативный вариант – открываем настройки дисплея, как мы это делали в первом способе, в верхней части страницы кликаем кнопку под изображением экранов

и переключаем режимы.

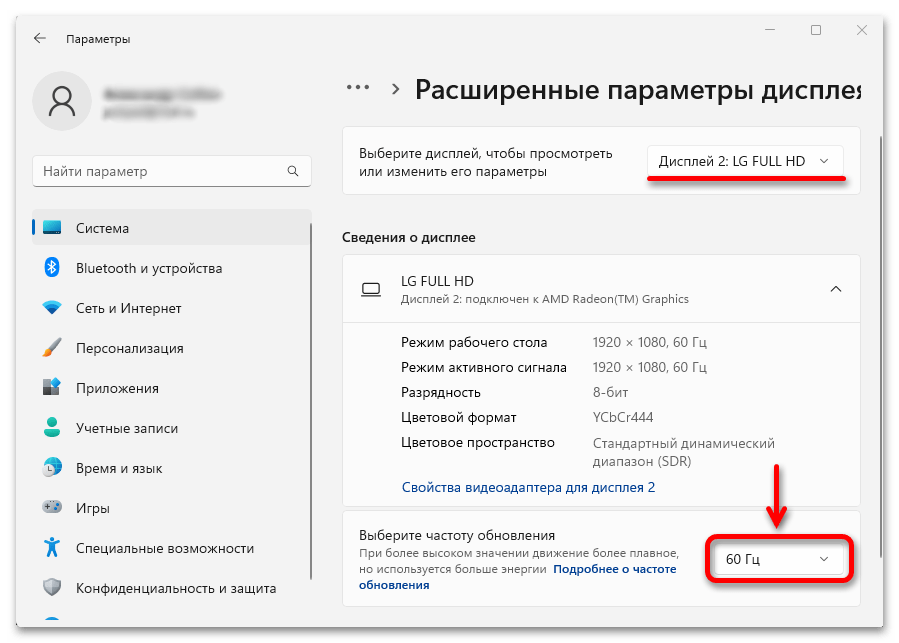
Способ 3: Регулировка частоты обновления
Вообще, два монитора с разной частотой обновления могут работать одновременно. Но, возможно, ваша видеокарта не способна обработать установленную герцовку или само устройство отображения данных, согласно своим характеристикам, ее не поддерживает. В этом случае можно подключится к другой видеокарте, если она есть, либо попробовать изменить значение частоты обновления, например снизить его, если стоит самое высокое.
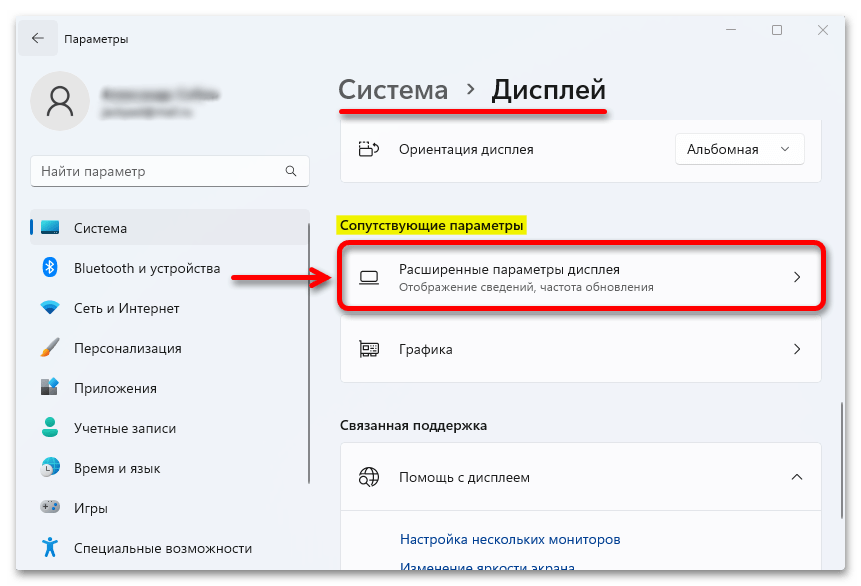
- Снова открываем блок с настройками экрана, прокручиваем страницу вниз и кликаем «Расширенные параметры дисплея».
- Сверху выбираем второй монитор, а в блоке ниже меняем значение частоты обновления.
Способ 4: Работа с драйверами
Иногда недостаточно просто подключить монитор к видеокарте, так как и тому, и другому устройству для нормального взаимодействия с системой нужны драйверы. Возможно, в этой области как раз и кроется проблема.
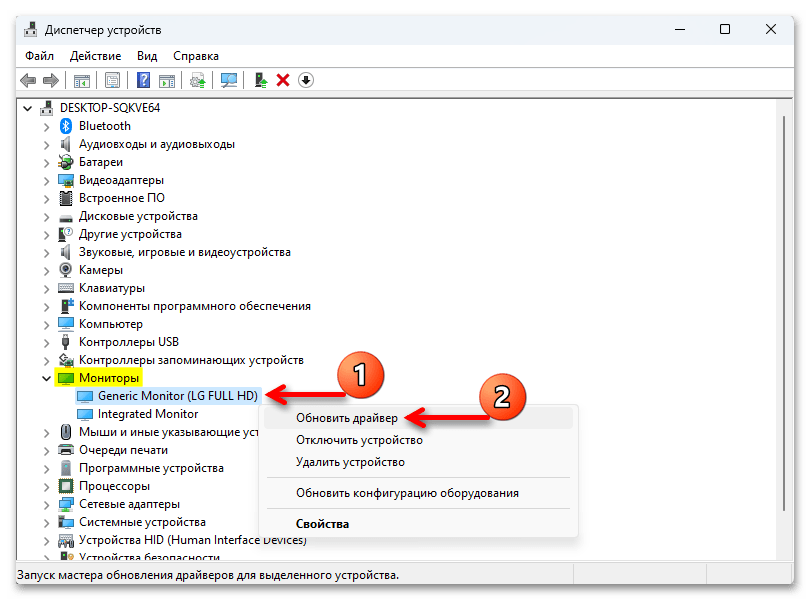
- Кликаем правой кнопкой мышки «Пуск» и открываем «Диспетчер устройств».
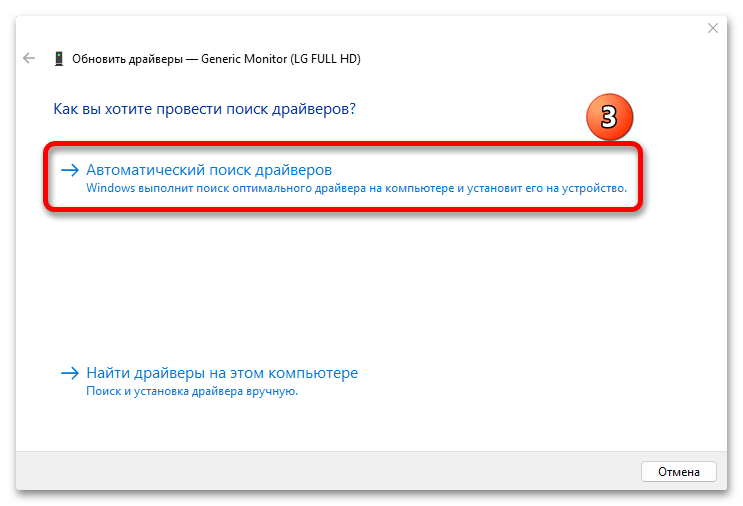
- Ищем вкладку «Мониторы», разворачиваем ее и, если кроме основного дисплея в ней отображается второй монитор или хотя бы неизвестное устройство, значит, Виндовс 11 все же их видит, но из-за устаревания драйверов или их отсутствия не передает картинку. Поэтому кликаем по устройству правой кнопкой мышки, в контекстном меню выбираем «Обновить драйверы»

и кликаем «Автоматический поиск».
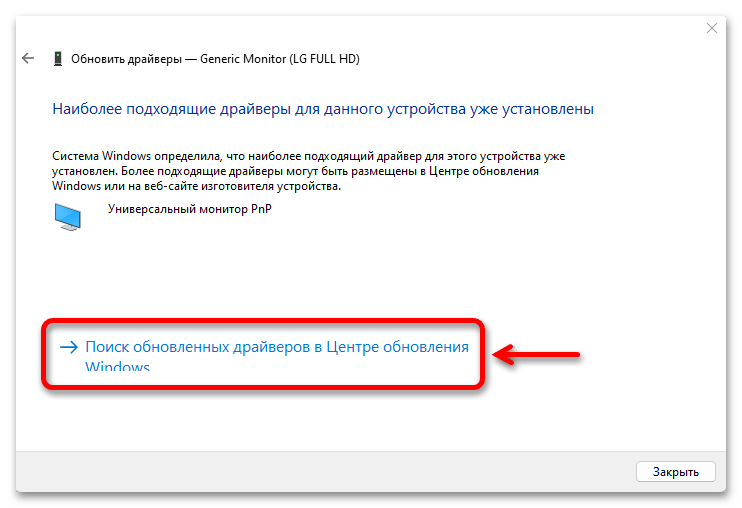
- Если подходящего ПО нет, можно запустить поиск в Центре обновления Windows.
- Если это не помогло или второй монитор вообще не отображается, значит, возможно, дело в драйверах видеокарты. Например, установлена версия, которая не поддерживает подключение второго монитора. Поэтому открываем блок «Видеоадаптеры» и таким же образом пробуем обновить драйверы видеокарты.
Впрочем, ограничиваться поиском программного обеспечения только с помощью службы «Windows Update» не стоит. Довольно распространены случаи, когда производитель выпускает для своих устройств «свежие» драйверы, но они далеко не сразу появляются на серверах Microsoft. Поэтому поищите актуальные версии ПО самостоятельно, используя способы, которые описаны в отдельных статьях на нашем сайте.
Подробнее:
Поиск и инсталляция драйверов для монитора
Установка драйверов на видеокарту
Способ 5: Настройка BIOS
Если компьютер оборудован двумя видеокартами – интегрированной и дискретной, и к обоим подключены мониторы, откройте «Диспетчер устройств» и посмотрите, сколько видеоадаптеров отображается. Если один, значит какая-то графическая карта, скорее всего, отключена в системе BIOS. Конечно, на разных материнских платах процесс переключения может отличаться, но основной принцип подробно описан в отдельных статьях на нашем сайте.
Подробнее:
Включение дискретной видеокарты в BIOS
Как переключать видеокарты на ноутбуке HP
Способ 6: Диагностика физического подключения
Проверьте все кабельные соединения на наличие повреждений. Если используются переходники, попробуйте подсоединиться без них или используйте другие, ведь такие аксессуары, особенно если они дешевые, как раз могут быть причиной неполадок. По возможности попробуйте подключить другой монитор или телевизор. Также отключите на время все внешние периферийные устройства (флешки, диски, колонки, принтеры, проекторы и прочее), которые в данный момент не нужны вам для работы.
Наша группа в TelegramПолезные советы и помощь
In today’s fast-paced digital world, a dual-monitor setup is not just a luxury; it’s a necessity for many. The ability to spread your digital workspace across two screens can significantly boost productivity, make multitasking a breeze, and enhance the overall computing experience. However, the transition to Windows 11 has brought with it a slew of technical quirks, one of the most frustrating being the operating system’s occasional failure to detect a second monitor. This hiccup can derail your workflow, leaving you scrambling for solutions.

Fortunately, you’re not without hope. This comprehensive guide aims to demystify this issue, offering step-by-step solutions to get your dual-monitor setup back on track. From checking physical connections to tweaking display settings, we’ll cover all bases to ensure no stone is left unturned in your quest for resolution. Additionally, we introduce a powerful ally in this journey: DriverSupport. This tool is invaluable for automatically detecting and updating outdated or corrupted drivers, often a root cause of monitor detection issues. Whether you’re a tech novice or a seasoned pro, our guide, peppered with insights on leveraging DriverSupport, will help you navigate through the common pitfalls associated with dual-monitor configurations in Windows 11.
As we delve into the nitty-gritty of troubleshooting, remember that every problem has a solution. With the right approach and tools at your disposal, your dual-monitor setup will soon be up and running, ready to enhance your digital life. So, let’s embark on this journey to reclaim your productivity and expand your digital horizon with Windows 11.Give DriverSupport | ONE a try today!
Understanding Windows 11 not detecting second monitor
Common Causes
- Hardware Compatibility: Not all monitors are created equal, and sometimes, a second monitor may not be compatible with your current setup or Windows 11’s hardware requirements. This includes issues with the monitor itself, the cable types (HDMI, DisplayPort, VGA), or the port being used on your computer.
- Outdated or Corrupted Graphics Drivers: Drivers are the bridge between your operating system and hardware. If they’re outdated or corrupted, Windows 11 might not be able to recognize your second monitor. This is where DriverSupport shines, offering an easy way to keep your drivers up to date and in good health.
- Incorrect Display Settings: Sometimes, the issue is not with the hardware or drivers but with the display settings within Windows 11. Incorrect configuration can prevent the second monitor from being detected properly.
How to Identify Your Issue
- Check Hardware Compatibility: Verify that your monitor, cables, and ports support dual-monitor setups and are compatible with Windows 11. A quick check of your hardware specifications against the manufacturer’s recommendations can save you a lot of time.
- Inspect Cables and Connections: Loose or damaged cables are often the culprit. Ensure that all connections are secure and that the cables are not damaged. Try swapping cables if possible to rule out any issues here.
- Use Device Manager to Check Drivers: Navigate to the Device Manager and check for any warning signs next to your graphics drivers. This could indicate a problem that needs addressing.
- Review Display Settings: Go to your display settings in Windows 11 to ensure the second monitor is enabled and set up correctly. Sometimes, simply clicking “Detect” can resolve the issue.
By methodically ruling out each potential cause, you can narrow down the specific issue at hand.

Step-by-Step Solutions
Check Physical Connections
Follow these steps to ensure that your hardware connections are not the problem:
- Secure Connections: Double-check that both ends of your display cable (HDMI, DisplayPort, VGA, etc.) are securely connected to your monitor and your PC.
- Try Different Ports: If your PC has multiple output ports, try connecting your second monitor to a different port. Sometimes, the issue could be with a specific port.
- Switch Cables: If possible, swap your current cable with another one to rule out any cable-related issues.
Updating or Reinstalling Display Drivers with DriverSupport
- Automatically Update Drivers: DriverSupport scans your system for outdated drivers and provides an easy way to update them with just a few clicks, ensuring your graphics drivers are always up to date.
- Manual Driver Update: If you prefer a hands-on approach, you can manually update your drivers through the Device Manager. Right-click on your graphics driver, select “Update driver,” and follow the prompts.
- Reinstall Drivers: Sometimes, an update isn’t enough. Uninstalling and then reinstalling your graphics driver can resolve deeper issues.
Adjusting Display Settings
- Display Settings: Right-click on your desktop and select “Display settings.” Use the “Detect” button to try and force Windows to recognize your second monitor.
- Projecting to This PC: Press the Windows key + P to open the projection options. Select “Extend” to see if it helps in detecting your monitor.
Troubleshoot Hardware Issues
- Test the Monitor: Connect your second monitor to another computer. If it doesn’t work there, the issue might be with the monitor itself.
- Check for Monitor Compatibility: Ensure that your monitor is compatible with Windows 11. Some older monitors might have compatibility issues.
By following these step-by-step solutions, you should be able to resolve the issue of Windows 11 not detecting your second monitor.
Leveraging DriverSupport for Easy Resolution
When it comes to troubleshooting monitor detection issues on Windows 11, DriverSupport stands out as a pivotal tool. Here’s how DriverSupport can be your ally in resolving these issues:
Simplifying Driver Updates
- Automated Detection and Update: DriverSupport scans your system to identify any outdated or missing drivers. With its comprehensive database of drivers, it ensures that your graphics drivers, crucial for monitor detection, are always up to date with the latest versions provided by manufacturers.
- Ease of Use: With an intuitive interface, DriverSupport makes it easy for anyone to update their drivers without diving into the complexities of device management. This is especially beneficial for users who may not feel comfortable navigating the Device Manager or who are unsure which driver versions are optimal for their system.
Diagnosing and Fixing Driver Issues
- Identifying Driver-Related Issues: DriverSupport can help pinpoint if a driver issue is causing your second monitor not to be detected. By ensuring drivers are not only current but also correctly installed, it removes a significant barrier to dual-monitor setup.
- Streamlined Reinstallation: In cases where a simple update doesn’t solve the issue, DriverSupport facilitates the reinstallation of drivers. This clean slate approach can often resolve deeper-seated issues that an update alone cannot fix.
Advantages Over Manual Management
- Time-Saving: Manually checking, downloading, and updating drivers can be a time-consuming process, requiring significant effort and technical knowledge. DriverSupport automates this process, saving users time and reducing the risk of errors.
- Reducing the Risk of Incompatibility: Incorrect driver versions can lead to further issues. DriverSupport ensures that the drivers installed are compatible with your specific hardware and Windows 11, mitigating the risk of compatibility problems.
How To Use DriverSupport
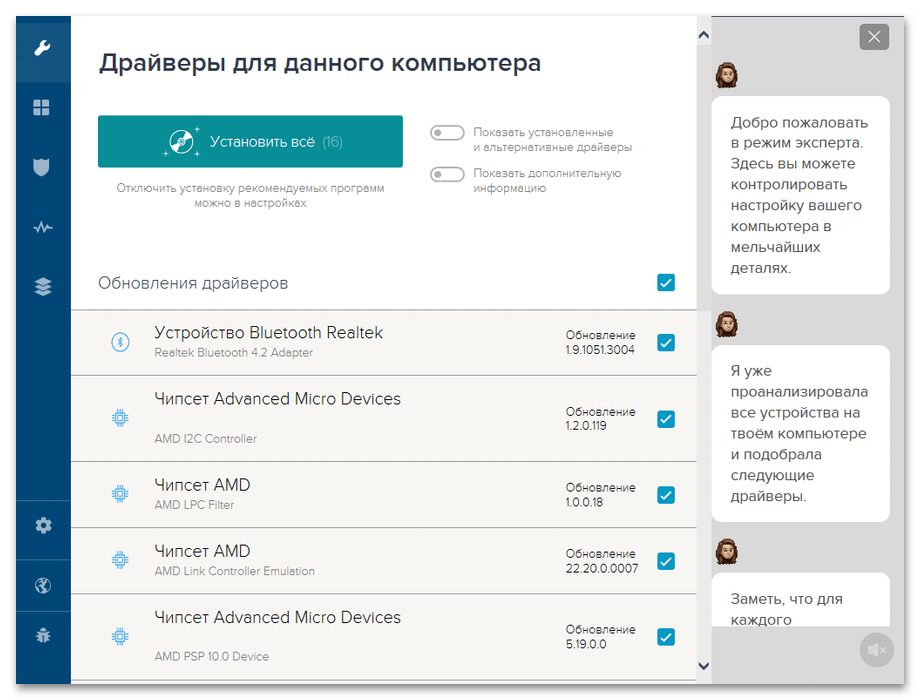
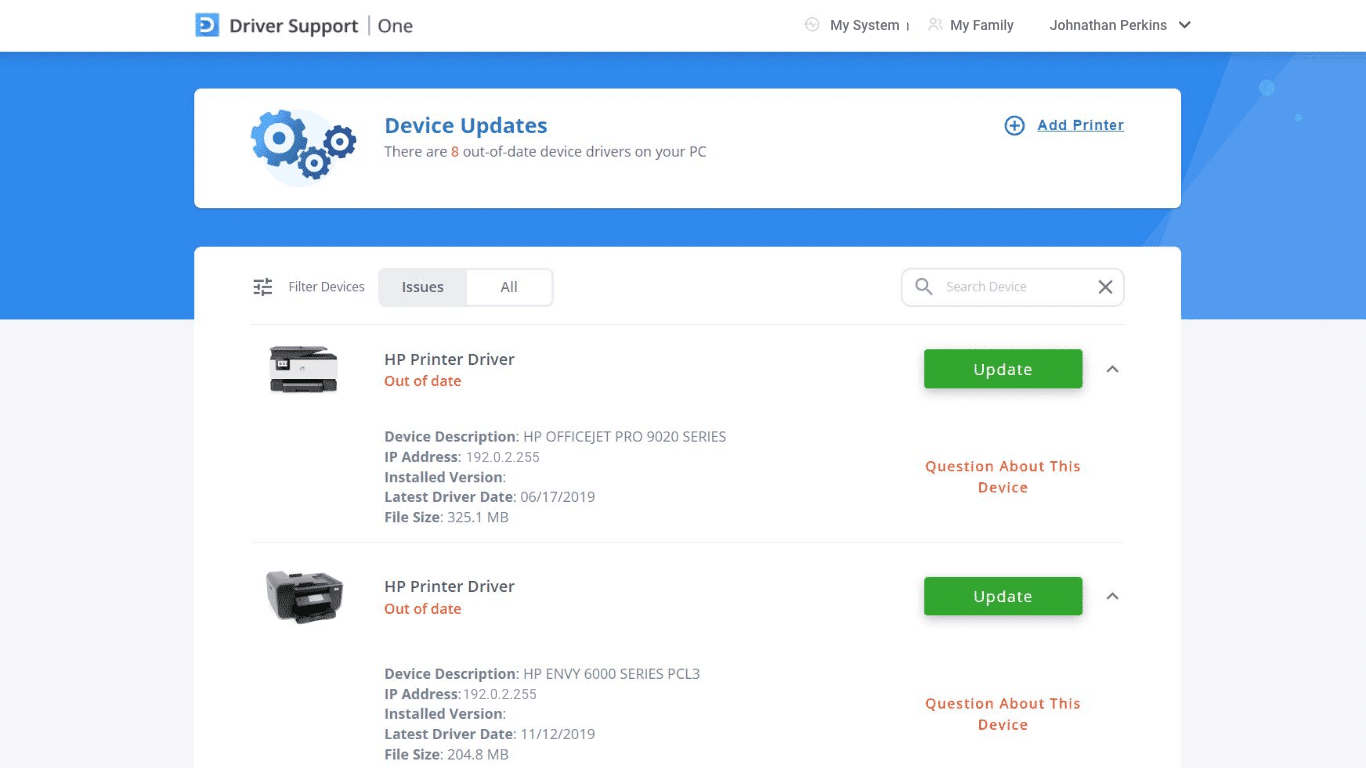
If you want to save time and frustration and not have to install drivers manually, you can use DriverSupport to help you. DriverSupport can scan and detect all all the major devices in your computer and give you a list of devices that need to be updated. You can easily and quickly pick which devices to update and DriverSupport will download and install the correct driver for you.
-
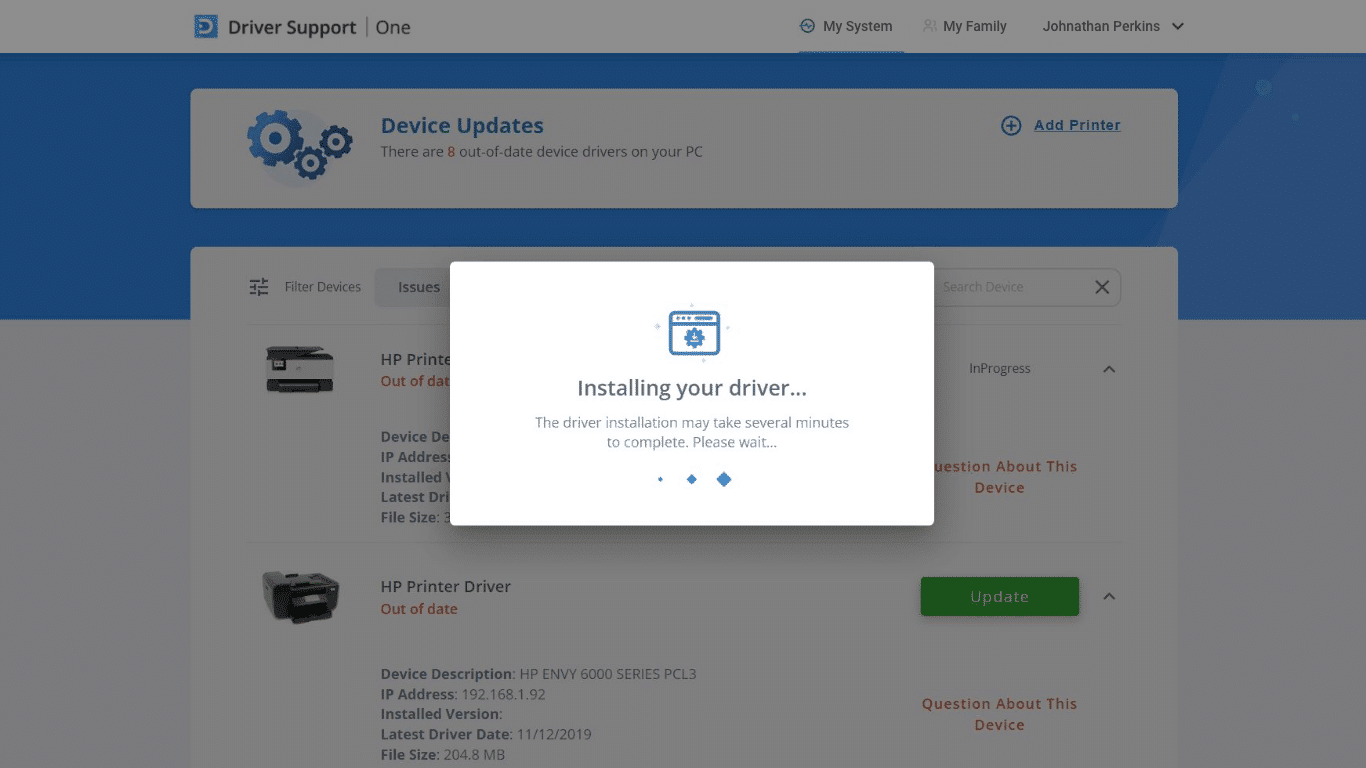
When you are registered and in the app you can go to the Driver Update section and see all the devices that need attention, example below

DriverSupport — Driver Update List - Once the driver update has finished automatically downloading you can click the green «Update» button on whatever device you want to update first, once the install begins we will walk you through the process.
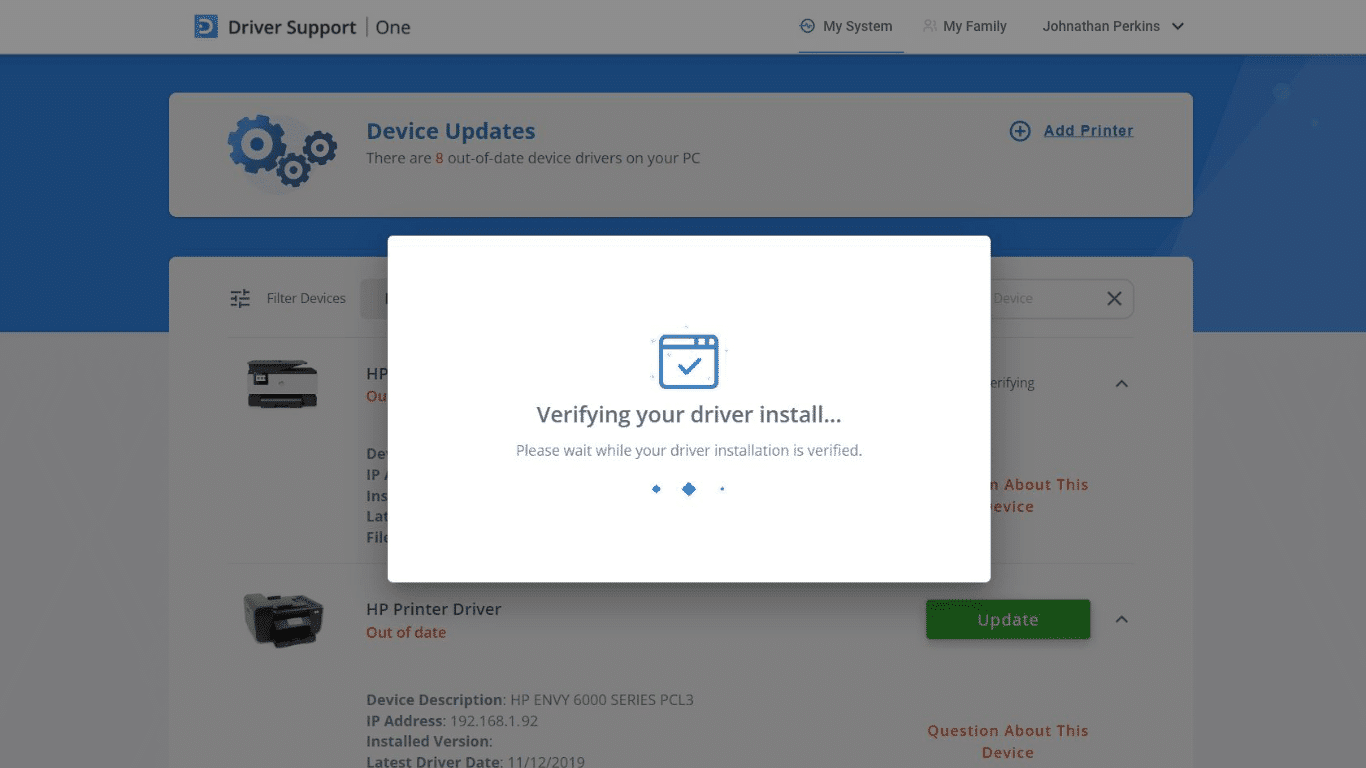
DriverSupport — Driver Installing - When the device driver is fully updated we will verify the driver is in place and also confirm when finished. It’s that easy!
-
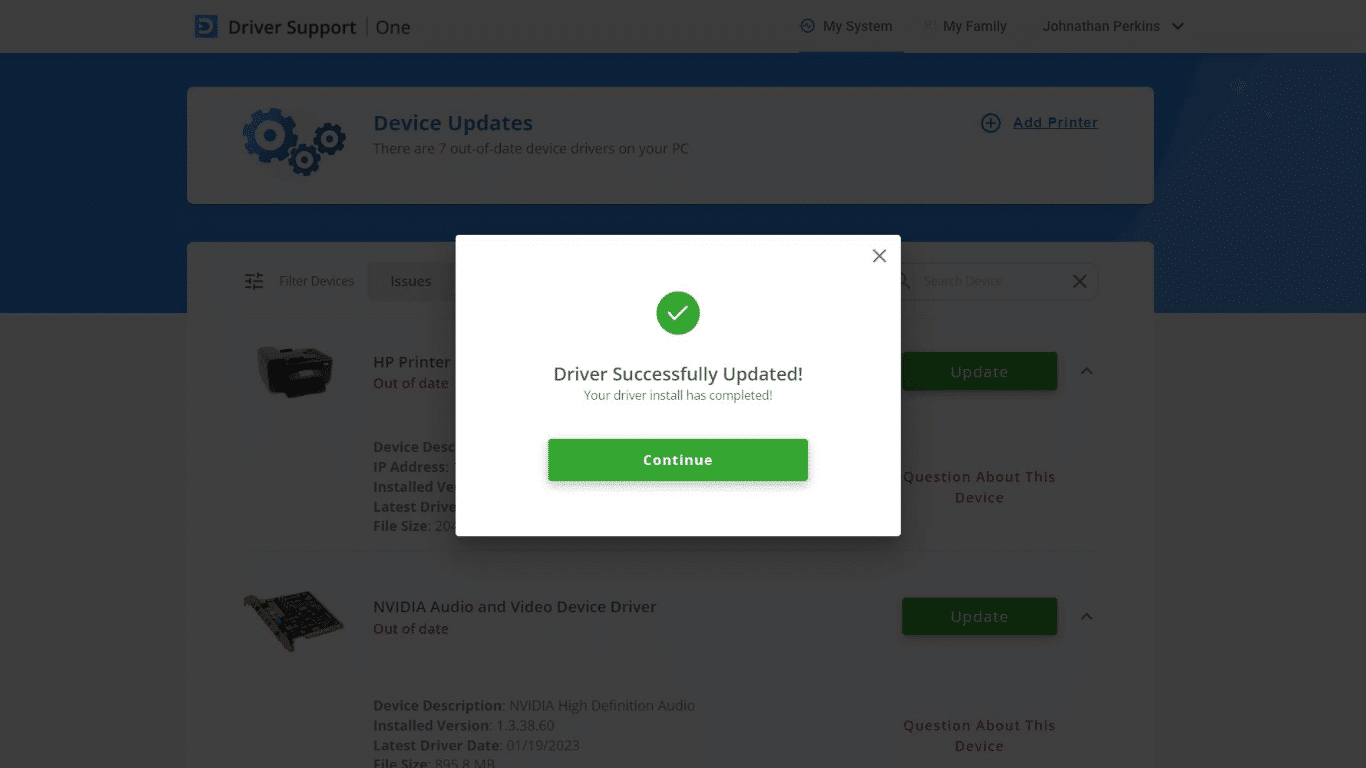
When the driver is finished verifying DriverSupport will notify you of the successful update!
We make it hassle free and accurate! Give DriverSupport a try today!
-
By incorporating DriverSupport into your troubleshooting toolkit, you enhance your chances of quickly resolving monitor detection issues.
Advanced Troubleshooting for Windows 11 not detecting your second monitor
When the basic and intermediate steps fail to resolve the second monitor detection issue in Windows 11, it’s time to consider advanced troubleshooting techniques. These methods should be approached with caution and are recommended for users comfortable with deeper system adjustments.
Editing the Registry (For Advanced Users)
Caution: Editing the Windows registry can have significant implications if not done correctly. It’s recommended to back up the registry before making any changes.
- Open Registry Editor: Press
Win + R, typeregedit, and hit Enter to open the Registry Editor. - Navigate to the Graphics Drivers Key: Go to
HKEY_LOCAL_MACHINE\SYSTEM\CurrentControlSet\Control\GraphicsDrivers. - Configure TdrDelay: Right-click on the GraphicsDrivers key, select New > DWORD (32-bit) Value, and name it
TdrDelay. Double-click on it and set the Value data to8. This increases the GPU processing time, which can help in detection. - Restart Your Computer: For the changes to take effect, restart your computer and check if the issue is resolved.
Resetting Windows 11 Display Settings
Sometimes, a fresh start can resolve lingering issues. Resetting your display settings to their default can eliminate any incorrect configurations causing the problem.
- Open Windows Settings: Press
Win + Ito open the Settings app. - Navigate to System > Display: Here you can find various display settings.
- Reset Display Settings: Look for an option to reset the display settings to their default. If there’s no direct option, you may need to manually adjust the settings to their original state, based on your system’s default configuration.
- Check for Monitor Detection: After resetting, check if Windows 11 now detects your second monitor.
These advanced techniques target deeper system settings and can often resolve issues that simpler methods cannot. However, due to their complexity and potential impact on system operation, they should be used as a last resort and with great care.
Conclusion
Setting up dual monitors in Windows 11 can be tricky, especially if the second monitor isn’t detected. Yet, with this guide’s clear solutions and troubleshooting tips, including checking connections and using DriverSupport, you’re ready to tackle these issues and boost your productivity.
Remember, while technology can sometimes falter, the solutions are often within reach. DriverSupport emerges as a particularly valuable tool in this journey, simplifying the process of keeping your drivers up to date and in optimal condition. This not only helps in resolving current issues but also in preventing future ones, ensuring a smoother, more reliable computing experience.
In conclusion, the path to a fully functional dual-monitor setup in Windows 11 involves a blend of basic troubleshooting, software assistance, and, when necessary, advanced system tweaks. By approaching this process methodically and with patience, you can overcome the challenges and enjoy the vast benefits of an expanded digital workspace.
We encourage you not to let technical difficulties dampen your productivity or creativity. With the right tools and knowledge, every problem has a solution. Here’s to an uninterrupted, expansive view of your digital world, made possible by a seamless dual-monitor setup on Windows 11.

HDMI or High-Definition Multimedia Interface standard for simultaneously transmitting digital video and audio from a source such as computer to monitor. PC and laptops come with HDMI port that allows connect second monitor or to enjoy TV and movies on a bigger screen. But after upgrading to Windows 11 few users report, HDMI port is not working on their laptop or PC, preventing connect PC or laptop to an external monitor via HDMI port. Sometimes you may experience, the computer monitor is connected through HDMI port but the sound is not playing. or HDMI Display Not working after the current Windows 11 Update.
Contents
- 1 Why HDMI port not working on Windows 11?
- 1.1 Basic things to check
- 1.2 Restart windows 11
- 1.3 Update windows 11
- 1.4 Check Resolution and Refresh Rate
- 1.5 Check Multi-Monitor Mode
- 1.6 Update Display Drivers
- 1.7 Run SFC or DISM Scan
Several things might cause HDMI not working on Windows 11, faulty HDMI cables, dust and debris inside the HDMI port, outdated display (Graphics) driver, Outdated windows 11 version or Windows update bug are common. Here is what to do if Windows 11 not detecting HDMI TV/Monitor or a sound problem on your PC.
- Ensure the HDMI cable is connected properly between your PC/Laptop and Monitor or TV.
- Installing the latest Windows 11 update sometimes brings fix for the problem.
- If HDMI sound is not working run the sound troubleshooter and make sure the latest audio drivers are installed on your PC.
- An outdated display driver is another common reason why Windows 11 Not Detecting HDMI TV/Monitor, update or reinstall the display driver most probably work for you.
Basic things to check
- The first thing you need to ensure the HDMI cable is connected properly, blow out any dust from the HDMI port manually.
- Try to unplug the HDMI cable from the Windows 11 device as well as the output device and then plug it back in properly.
- Next, visually inspect the cable to check for damage, or try changing the HDMI cable and use a different HDMI port to dock the cable as well.
- If you have a graphics card, ensure you’ve plugged the cable into the HDMI port on the graphics card and not the HDMI port on the motherboard.
Restart windows 11
Sometimes due to temporary glitches Windows might fail to recognize the port is active and result HDMI Connection Not Working on Windows 11. Let’s reboot your computer, not only refresh the operating system and restart running process, but also clear temporary glitches and Windows should recognize the port and (if necessary) install the correct driver.
Update windows 11
Microsoft regularly updates Windows with the latest bug fixes and security improvements. And it’s essential to keep your system up to date as the latest Windows updates may contain a fix for HDMI not working on your Windows 11 PC.
- Press Windows key + X and select settings,
- Click on windows update then hit the Check for Updates button,
- If Windows updates are pending there, allow them to download and install,
- In addition, click on advanced options then optional updates,
- If optional updates or driver updates are available, check and allow them to download and install as well.
Once done reboot your PC to apply the change and check if the second display is detected or if HDMI sound working.
Check Resolution and Refresh Rate
Ensure the correct resolution and refresh rate are selected when you plug in the HDMI cable to your PC and external display.
- Right-click an empty area on the desktop and click Display settings from the context menu.
- Next, select the display you want to modify. If you don’t see it, click the Identify button.
- Scroll down to the Scale and Layout section and use the dropdown menu to adjust the Display resolution for the external monitor.
- Now click Advanced Display under the Related settings section.
- Adjust the refresh rate for the display in the Choose a refresh rate section.
Note – You can refer to your monitor or TV’s user guide for the maximum rate to use here.
Check Multi-Monitor Mode
If you’re using HDMI for a second display, it’s worth checking the multi-monitor setup, because due to incorrect configuration, your PC might ignore your HDMI TV or monitor entirely.
- Right-click an empty area on the desktop and click Display settings.
- You can choose between Duplicate these displays, extend these displays, show only on 1, or show only on 2.
Note – If you have more than two monitors, you’ll see additional options.
Update Display Drivers
Outdated Graphics driver is another common reason why HDMI Displays Not working on Windows 11. Ensure your graphics card drivers are updated.
To update your display drivers:
- Right-click on the start menu and select Device Manager
- This will display all devices and peripherals connected to your computer,
- locate and expand display adapters, right-click your graphics card and select Update driver.
- Select Search automatically for drivers and Windows will search for an updated driver.
- Or you can download the updated driver from the manufacturer’s website, and manually install it.
- Also, you can download the OEM update tool from the manufacturer and run the OEM’s update utility. Usually, it consists of OEM software updates and, more important, driver updates.
Run SFC or DISM Scan
Sometimes system file corruption could be the reason why Windows 11 HDMI not detecting the second monitor. If the above solutions haven’t yet fixed the problem, you can use the SFC and DISM tools to check your local drive for corrupted system files and replace them.
- Open command prompt as administrator,
- First, run DISM command DISM /Online /Cleanup-Image /RestoreHealth
- Next, run the system file checker command sfc /scannow
- Let the scanning complete, once done Restart your PC and see if HDMI is working once the SFC tool finishes its scan.
Well, if you are only experiencing HDMI Audio Not Working in Windows 11.
- Ensure the correct HDMI output is selected from the list. You can check the same on the System Tray volume controls section.
- Run the built-in Windows sound troubleshooter to automatically scan and fix HDMI audio not working problem.
- Again, old versions of audio/sound drivers might cause the HDMI audio not to connect properly, update sound drivers in Windows 11 that probably restore the audio on your PC.
- Sometimes restarting the Audio service restart Windows audio from the Services menu fix the problem as well.
Also read
- Windows 10 Not Detecting HDMI TV (5 working solutions)
- How to Fix Windows 10 Doesn’t Recognize Android Phone?
- 7 ways to fix Microsoft Edge Black Screen Issue on Windows 11
- Microsoft Edge Crashes or Not Working after Windows 10 update !!!
- Windows 11 Won’t Shut Down? Here are 6 ways to fix it
(Image credit: Mauro Huculak)
On Windows 10 and Windows 11, connecting a second display allows you to expand your desktop and work with multiple apps, as well as play games, on your laptop or desktop computer.
Although setting up an external monitor is usually straightforward, the operating system may sometimes fail to detect older displays or second monitors due to driver or hardware-related issues. However, if your device has a problem, you can use several troubleshooting steps, including checking the connection and installing the correct drivers, to fix the issue quickly.
In this how-to guide, I’ll explain several ways to troubleshoot and fix issues that block the system from automatically detecting the second monitor. This set of instructions is focused on Windows 10, but you can also refer to them if you’re dealing with the same issues on Windows 11. I have also added a section with more specific steps for the newer version of the operating system.
Disclaimer
These instructions has been updated to ensure accuracy and reflect changes to the process in the operating system.
How to fix external monitor connection issues from hardware troubleshooting
When your desktop or laptop does not detect the second external display, it could be a software problem, but it might also be an issue with the physical connection or the monitor itself.
If the monitor does not show up in the settings, use these steps before messing around with the configuration settings on Windows:
- Confirm the monitor is receiving power – Confirm that the display is securely connected to a working power outlet and that the power cable is not damaged.
- Verify the monitor is turned on – Use the physical power button on the monitor to check if it’s powered on. Look for any LED indicators.
- Restart your computer – A simple reboot can refresh the hardware connections and resolve minor glitches.
- Check the input source on the monitor – Use the monitor’s built-in menu to ensure it’s set to the correct input port (for example, HDMI or DisplayPort).
- Inspect the signal cable connection – Check that the cable connecting the monitor to the graphics card is securely plugged in at both ends.
- Reconnect the signal cable – Disconnect the video cable from both the monitor and the computer, wait for 60 seconds, then reconnect it firmly.
- Swap the video cable – Use a different cable to rule out a faulty or incompatible one. Even small issues, such as bent pins or poor shielding, can screw up the signal.
- Check cable specifications – Ensure you’re using a cable that meets the monitor’s requirements. For example, DisplayPort 1.4 or HDMI 2.0/2.1 may be necessary for high resolutions or refresh rates. Refer to the manufacturer’s documentation for compatibility guidelines.
- Try different video ports – If your monitor and graphics card support multiple input and output ports, test each one to rule out port-specific issues.
- Connect the monitor to another computer – This will help determine if the issue lies with the display itself.
- Test a different monitor – Connect a known working monitor to your computer to check if the problem is related to your system’s graphics card or drivers.
- Disconnect all peripheral devices – Unplug printers, cameras, USB drives, and other accessories to eliminate potential conflicts.
- Surface devices using a docking station – Bypass the dock and connect the monitor directly to the device. This helps identify whether the dock is the cause of the problem.
- Update your monitor’s firmware – Although rare, outdated firmware can cause compatibility or performance issues. Check your manufacturer’s website for firmware updates and installation instructions.
If the basic troubleshooting steps outlined above do not fix the problem with the second monitor, it could be a software-related issue, which you may be able to fix with the steps below.
In the event that the problem is the monitor or you are in the market for a new one, check our best 4K monitor roundup that you should consider getting.
All the latest news, reviews, and guides for Windows and Xbox diehards.
How to fix external monitor connection issues from Settings
After determining that there isn’t a physical problem with the connection, monitor, or computer, you can use the Settings app to force the system to detect the second monitor.
Force second display detection
To detect a second monitor manually on Windows 10, use these steps:
- Open Settings.
- Click on System.
- Click on Display.
- Click the Detect button to connect to the external monitor under the «Multiple displays» section.
- (Optional) Click the Detect button in the bottom-right corner, under the «Rearrange your displays» section (if applicable).
- Quick note: If you have only one monitor, the option won’t be present since it’s only available when connecting multiple displays.
Once you complete the steps, Windows 10 should detect the external monitor connected to the computer.
Connect wireless external display
To connect a wireless display on Windows 10 as a secondary screen on your computer, use these steps:
- Open Settings.
- Click on Devices.
- Click on Bluetooth & other devices.
- Turn on the Bluetooth toggle switch (if applicable).
- Click the «Add Bluetooth or other device» button.
- Select the «Wireless display or dock» option.
- Confirm the wireless display is on and discoverable (refer to device documentation).
- Select the display (wireless monitor, TV, or PC with Miracast support) from the list.
- Continue with the on-screen directions (if applicable).
After you complete the steps, the wireless display will be detected as a new external display.
How to fix external monitor connection issues from latest graphics drivers
A buggy, outdated, or corrupted graphics driver can cause problems that prevent the operating system from automatically detecting a second monitor. The easiest method to fix this issue is to update, reinstall, or downgrade the driver.
Update graphics driver
To update the graphics card driver through Windows Update, use these steps:
- Open Settings.
- Click on Update & Security.
- Click on Windows Update.
- Click the «View optional updates» option.
- Quick tip: If the option is not available, Windows Update does not have a newer driver available.
- Select the Driver updates setting.
- Check the graphics driver to update on Windows 10.
- Click the «Download and install» button.
Once you complete the steps, Windows Update will install the graphics driver, fixing the external monitor’s detection problem.
If Windows Update does not have a newer driver version, check the manufacturer’s support website to download and install a more recent version (if available).
Reinstall graphics driver
To reinstall a corrupted video driver on Windows 10, use these steps:
- Open Start.
- Search for Device Manager and click the top result to open the app.
- Double-click to expand the Display adapters branch.
- Right-click the adapter and select the Uninstall device option.
- Clear the «Delete the driver software from this device» option (if applicable).
- Click the Uninstall button.
- Restart the computer.
- Open Device Manager again.
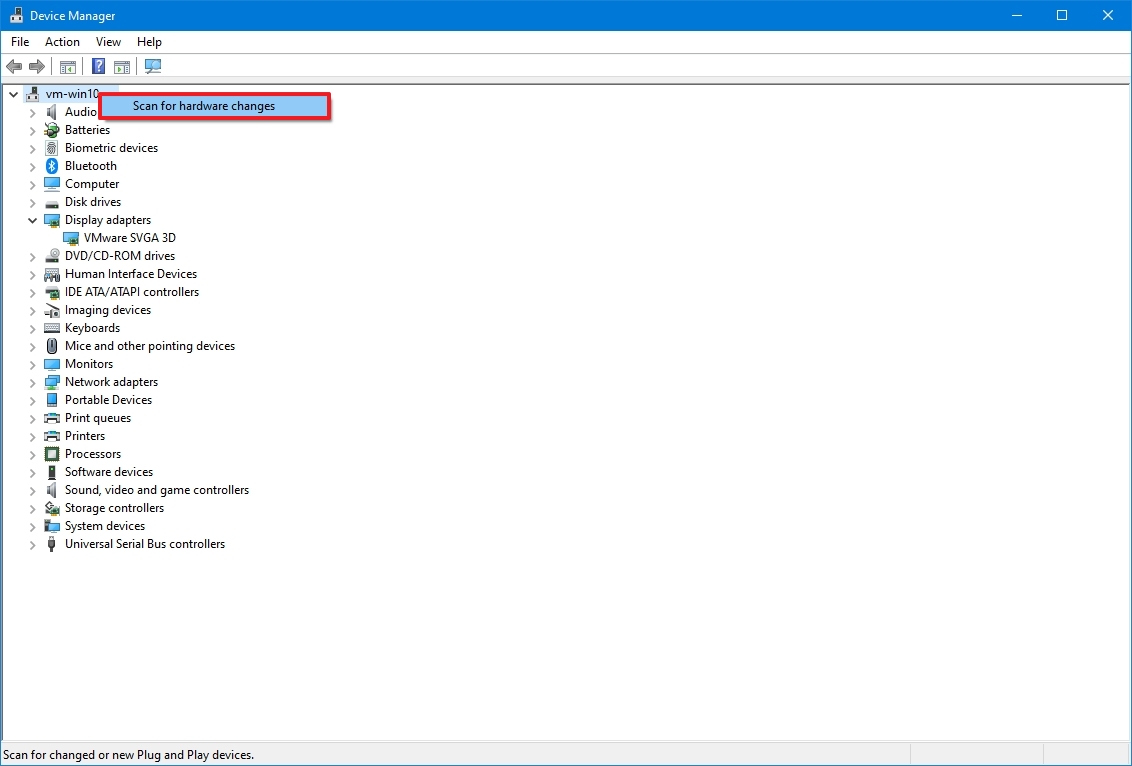
- Quick note: The system should detect the monitor again automatically. If it’s not the case, you can scan for changes manually to reinstall the display.
- Right-click the computer name and select the «Scan for hardware changes» option.
After you complete the steps, Windows 10 will automatically reinstall the driver. However, it’s good to follow the above steps to ensure the driver is installed correctly.
Rollback graphics driver
If the computer was recently updated or the graphics driver was manually upgraded, and the system cannot detect the second monitor, rolling back to the previous driver version may resolve the issue.
To remove and reinstall an older version of a graphics driver on Windows 10, use these steps:
- Open Start.
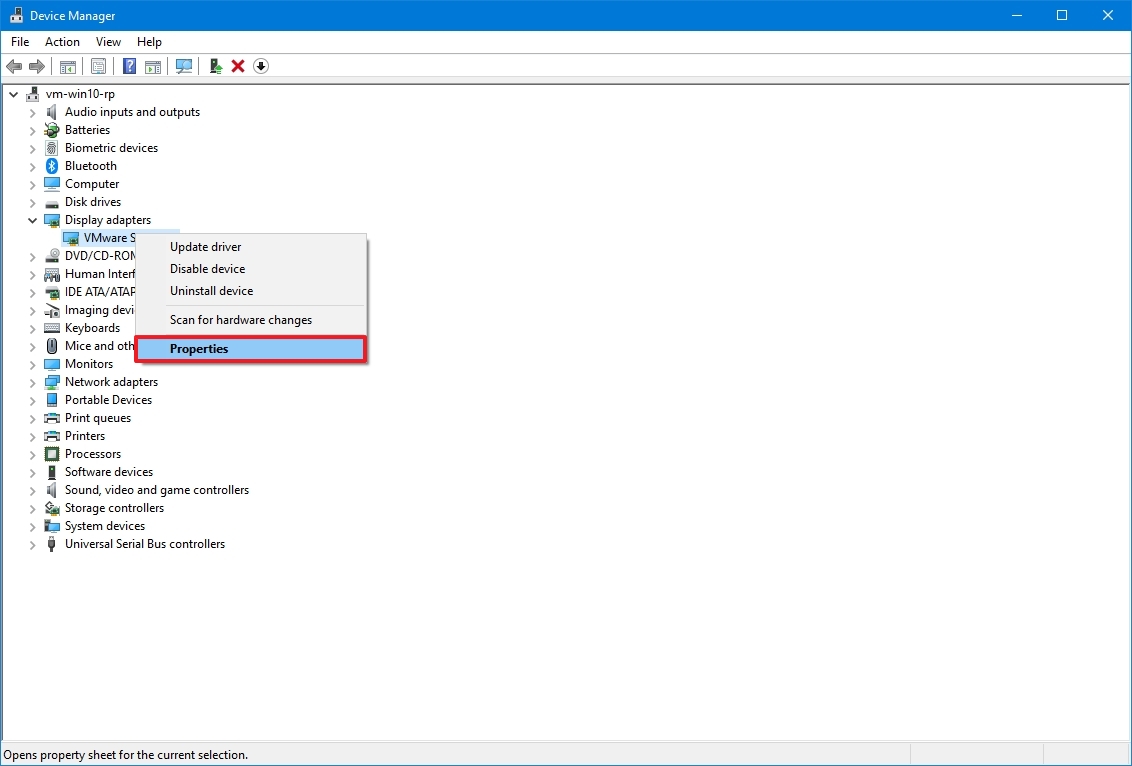
- Search for Device Manager and click the top result to open the app.
- Double-click to expand the Display adapters branch.
- Right-click the graphics adapter and select the Properties option.
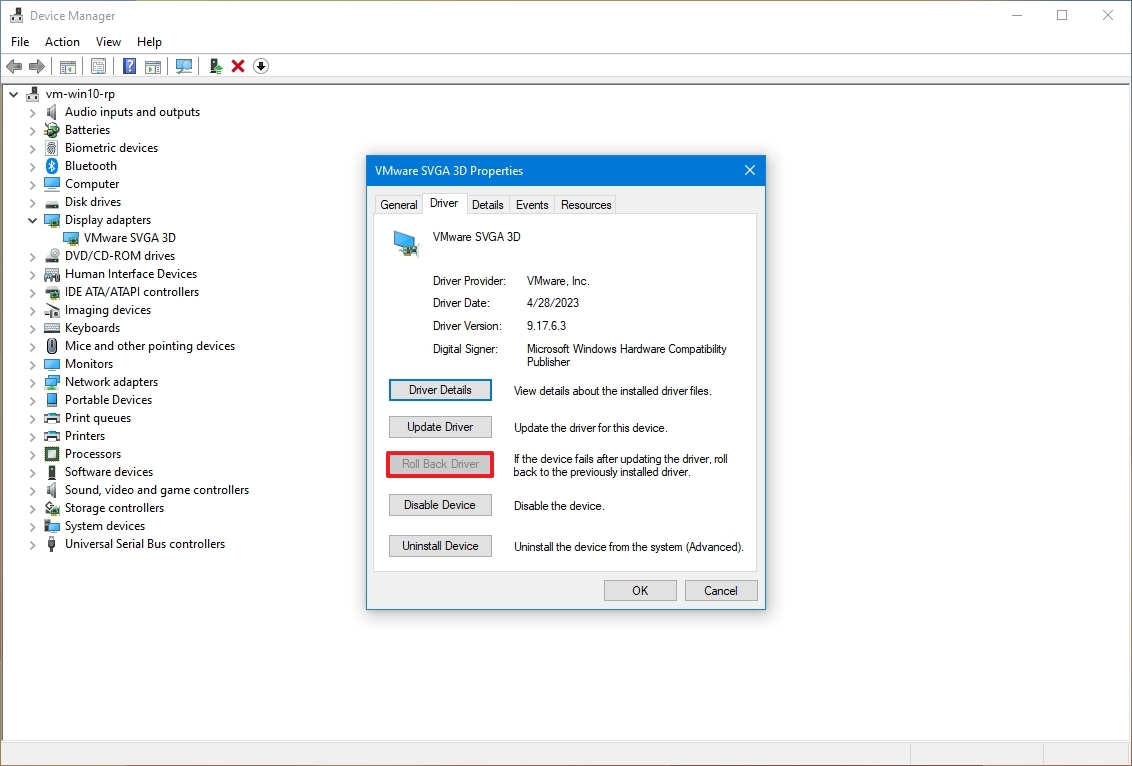
- Click the Driver tab.
- Click the Roll Back Driver button.
- Quick tip: You cannot use this rollback process if the option is unavailable. However, you may still be able to use an older version from the device manufacturer’s support website, if available.
- Select an option to answer the question.
- Click the Yes button.
- Restart the device.
Once you complete the steps, Windows 10 should start rendering content on the external monitor.
Update graphics driver with manufacturer control panel
The operating system can automatically install drivers for most graphics adapters, but the drivers available through Windows Update are usually not the most recent. If you need to install the latest driver, companies like NVIDIA, AMD, and Intel offer tools to quickly update to the newest version, which may help fix external display problems.
Check out these links to download the drivers, depending on your manufacturer:
- Intel Driver & Support Assistant
- NVIDIA GeForce Experience
- AMD Radeon Software Adrenalin Edition
If you want to use the manufacturer’s control panel application, the installation is simple. You only need to download and double-click the installer using the links above. Then, follow the on-screen directions to complete the setup and check for updates.
Alternatively, you can download the drivers directly from the manufacturer’s support website using their recommended instructions. You can use the links below to find the drivers:
- Intel
- NVIDIA
- AMD
Check manufacturer and driver version
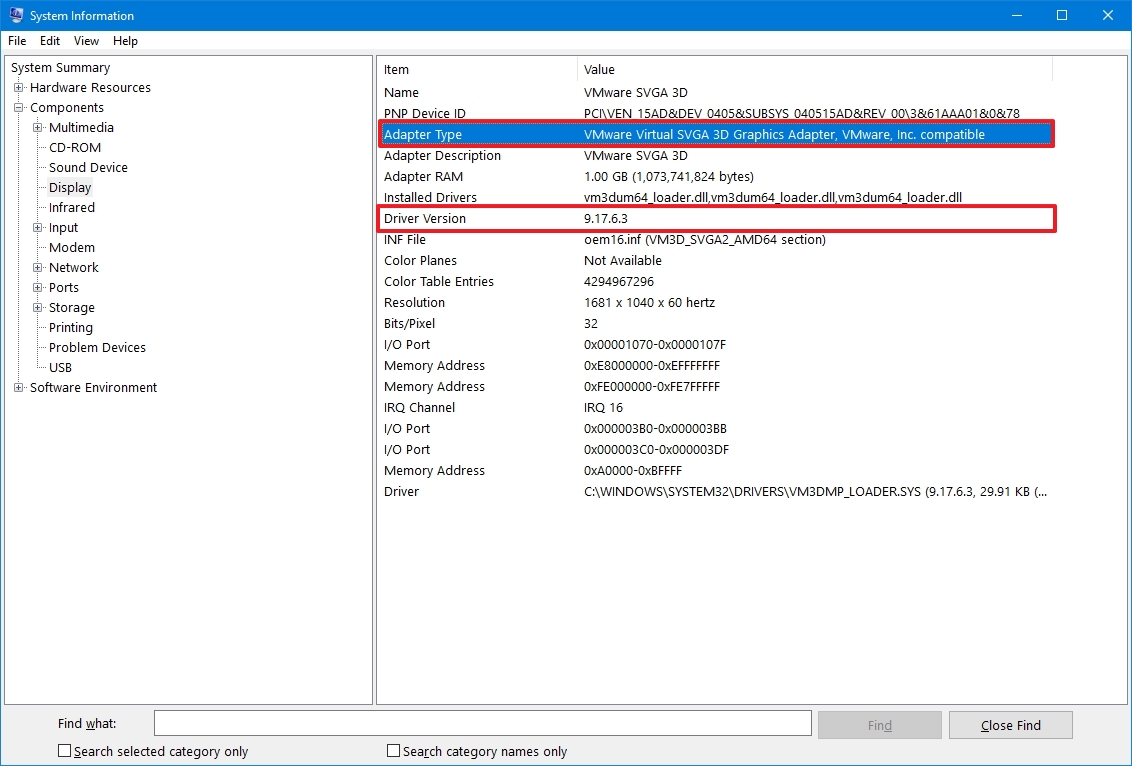
To check the graphics card vendor and driver version on Windows 10, use these steps:
- Open Start.
- Search for System Information and click the top result to open the app.
- Double-click to expand the Components branch on the left pane.
- Select the Display category.
- Confirm the Adapter Type and Driver Version information to determine the driver’s card model and current version.
Once you’ve completed the steps, use the links above to find, download, and install the correct driver.
Finally, manufacturers (such as Dell, HP, Razer, Acer, and Microsoft) usually change the original drivers to optimize their computers. As a result, if you have a branded computer (also known as an Original Equipment Manufacturer, or OEM, computer), you should always consider using the graphics driver available from the device manufacturer before trying those from the graphics card manufacturer to avoid problems.
How to fix external monitor connection issues on Windows 11
Although these instructions also apply to Windows 11, some steps are slightly different because the newer version features an updated interface.
Force external monitor detection
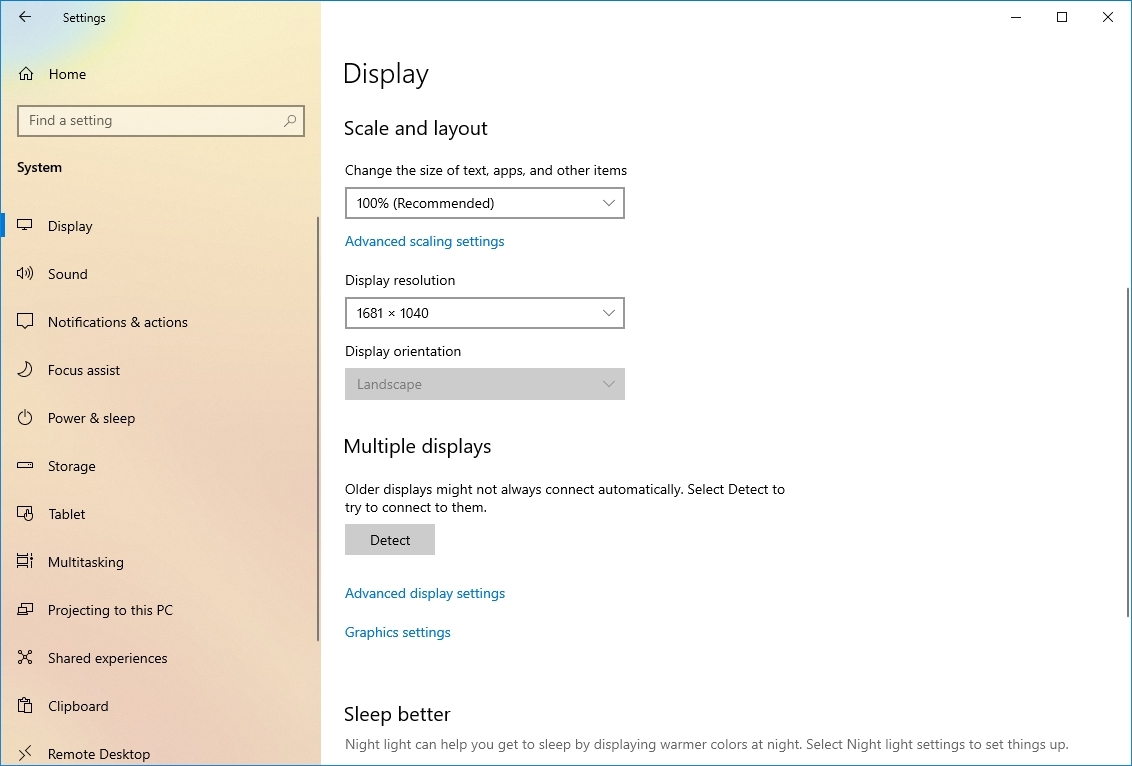
To detect an external monitor manually on Windows 11, use these steps:
- Open Settings.
- Click on System.
- Click the Display page on the right side.

- Click the Multiple displays setting.
- Click the Detect button.
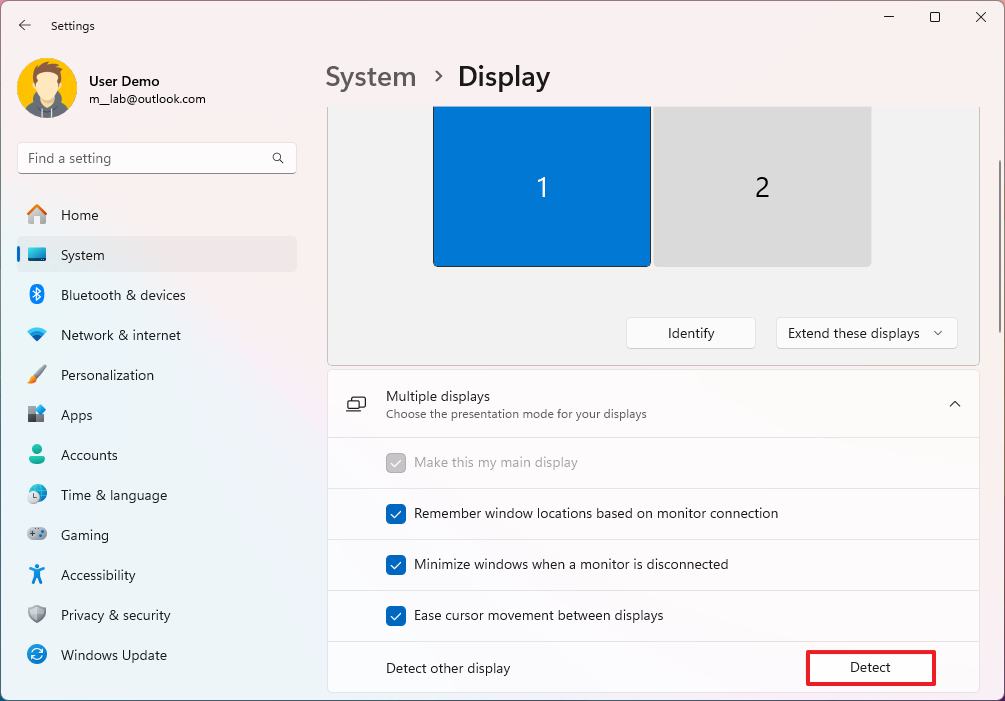
Once you complete the steps, the system should detect the external display.
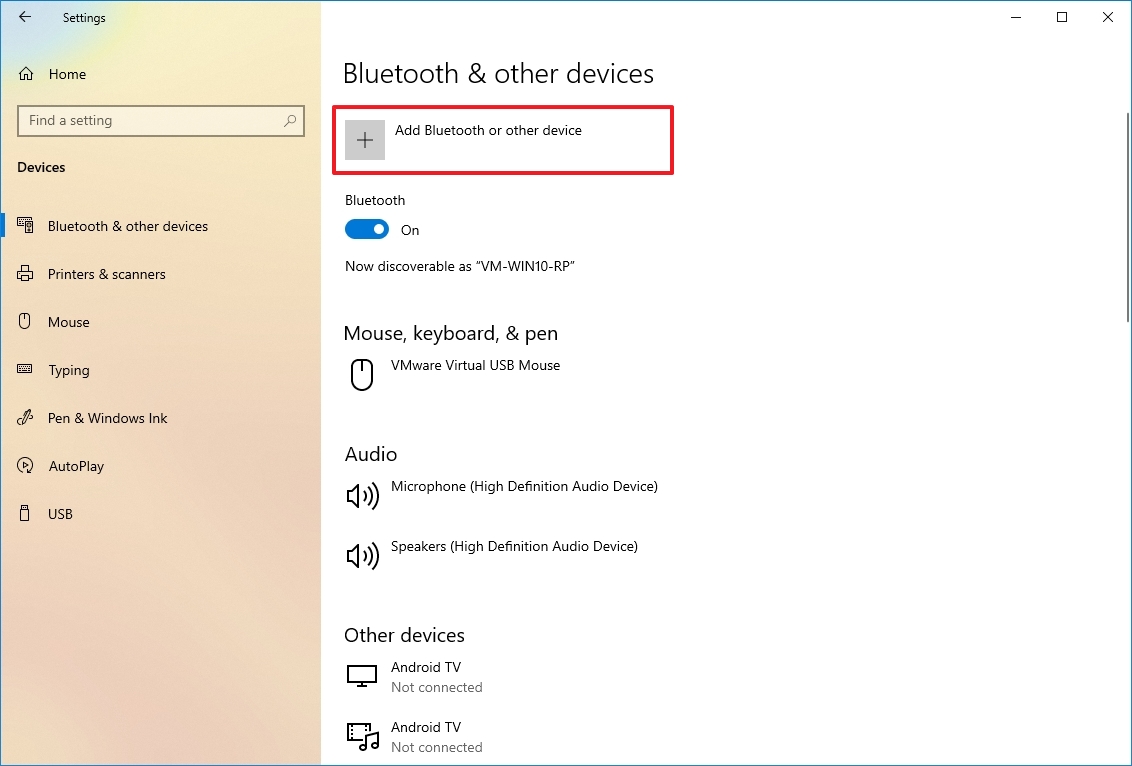
Connect wireless external display
To connect a wireless display as a secondary screen, use these steps:
- Open Settings.
- Click on Bluetooth & devices.
- Turn on the Bluetooth toggle switch (if applicable).
- Click the Add device button.
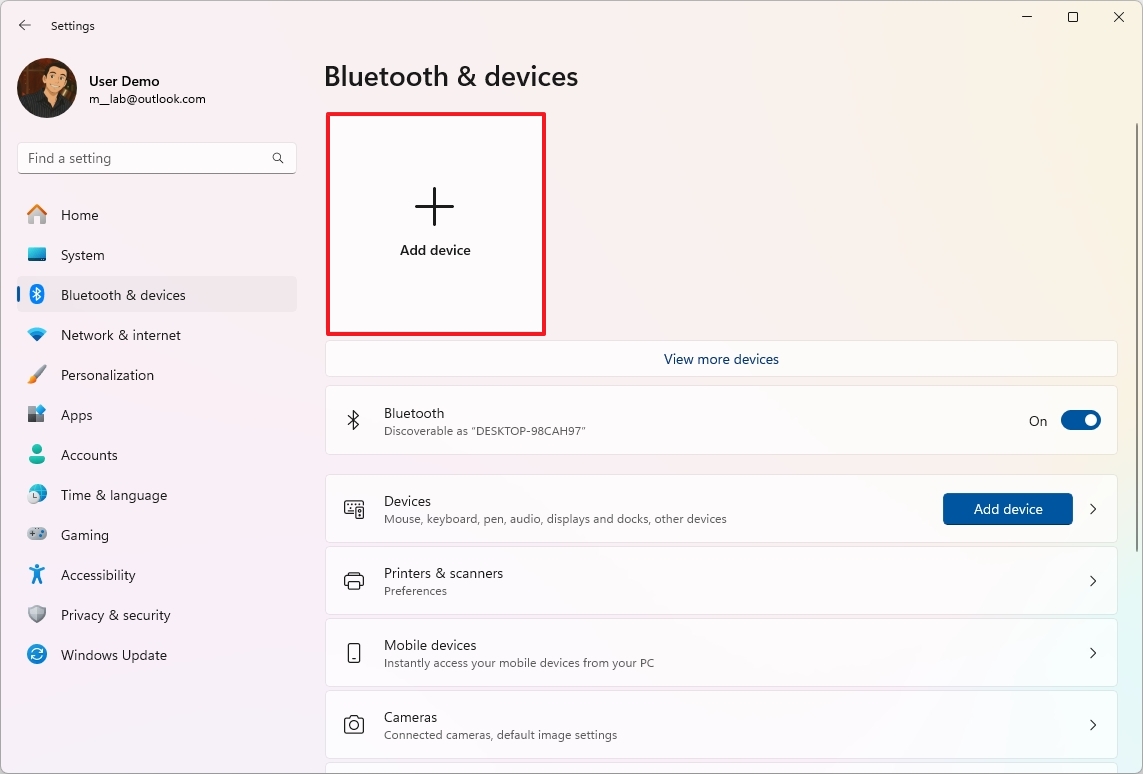
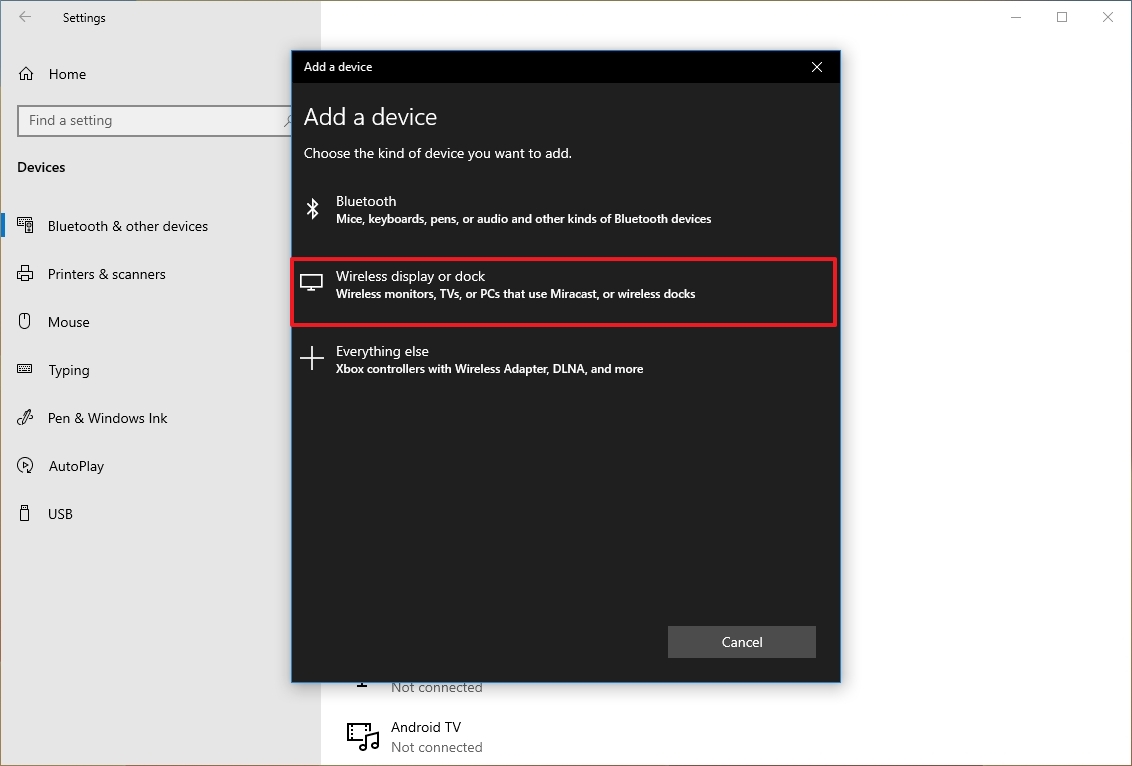
- Select the «Wireless display or dock» option.

- Confirm the wireless display is turned on and discoverable (refer to device documentation).
- Select the display (wireless monitor, TV, or PC with Miracast support) from the list.
- Continue with the on-screen directions (if applicable).
After you complete the steps, the display will be detected as a new external display on the computer.
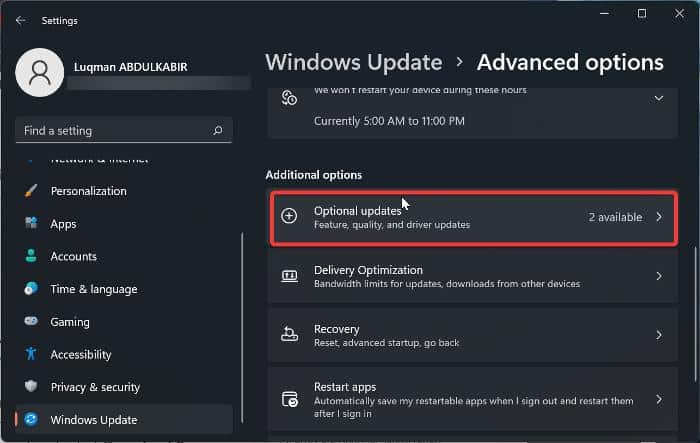
Update graphics driver
To update the graphics driver, use these steps:
- Open Settings.
- Click on Windows Update.
- Click the Advanced options page on the right side.
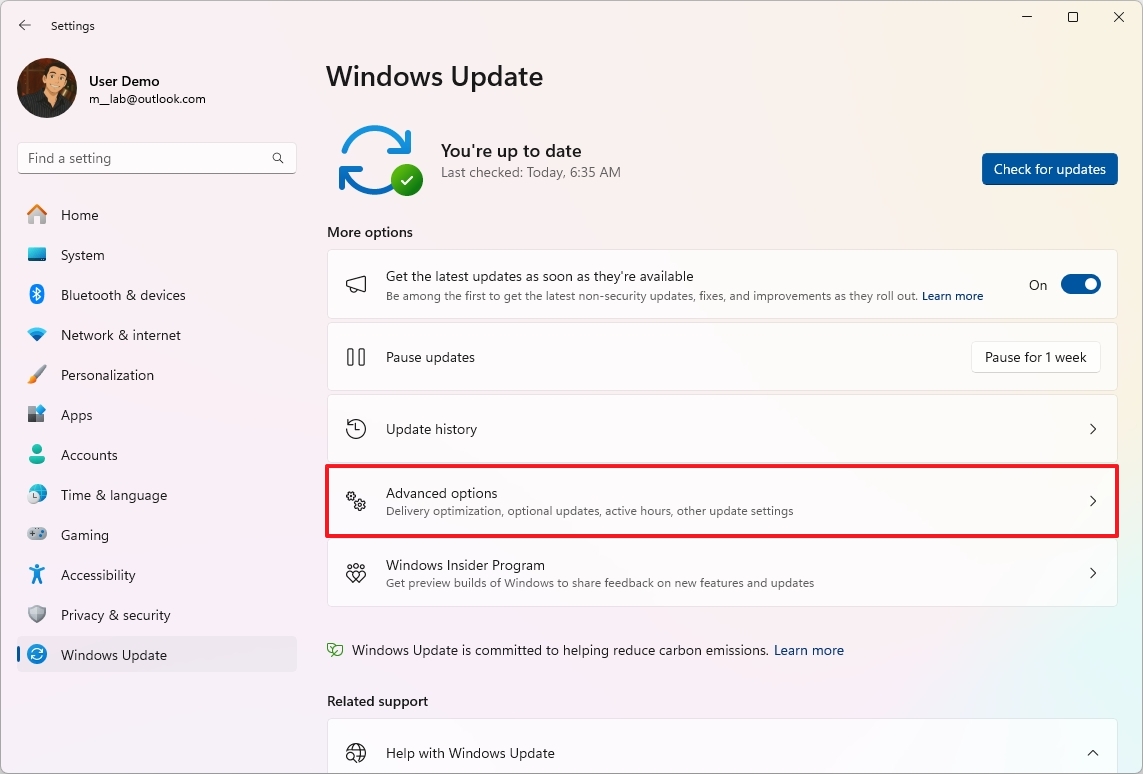
- Click the Optional updates option under the «Additional options» section.
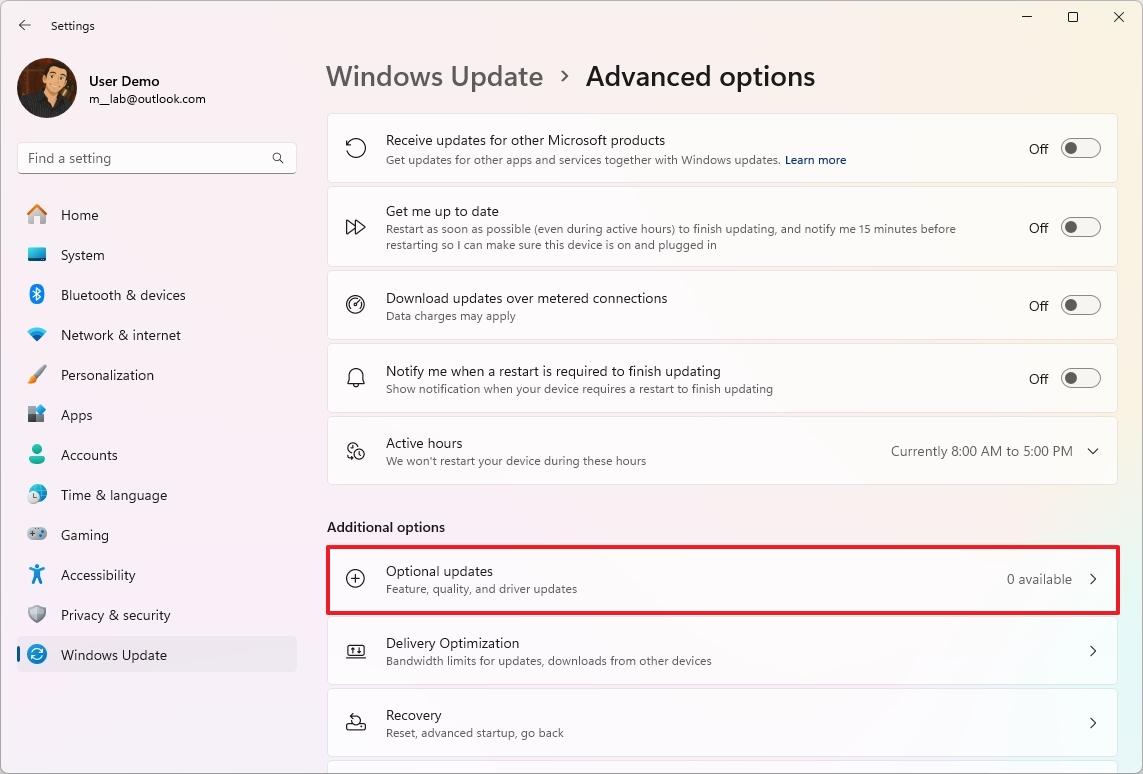
- Select the newer graphics driver to install on Windows 11.
- Click the «Download & install» button.
Once you complete the steps, the system will download and install the available update for the graphics driver, fixing the external monitor’s detection problem.
More resources
Find in-depth guides, troubleshooting tips, and the latest updates on Windows 11 and 10 here:
- Windows 11 on Windows Central — All you need to know
- Windows 10 on Windows Central — All you need to know
Mauro Huculak has been a Windows How-To Expert contributor for WindowsCentral.com for nearly a decade and has over 15 years of experience writing comprehensive guides. He also has an IT background and has achieved different professional certifications from Microsoft, Cisco, VMware, and CompTIA. He has been recognized as a Microsoft MVP for many years.