
Одна из частых проблем пользователей, особенно после чистой установки Windows — компьютер или ноутбук не видит сетевой адаптер: не важно, идет ли речь о сетевой карте Ethernet или же о сетевом адаптере Wi-Fi, причины обычно одни и те же.
В этой инструкции подробно о том, что делать, если ПК или ноутбук не видит сетевой адаптер в Windows 11 или Windows 10, чтобы решить проблему.
Включение сетевой карты или Wi-Fi адаптера в БИОС/UEFI
Если в диспетчере устройств отсутствуют любые признаки наличия сетевого адаптера: нет неизвестных устройств или устройств с ошибками, при этом вы уверены, что физически он присутствует, возможно, сетевая карта Ethernet или Wi-Fi адаптер отключены в БИОС.
Шаги, чтобы это проверить и включить сетевой адаптер в БИОС/UEFI:
- Зайдите в БИОС/UEFI, на ПК обычно для этого нужно нажать клавишу Del при включении, на ноутбуке — чаще F2 (но возможны и иные варианты). Подробнее: Как зайти в БИОС/UEFI на компьютере и ноутбуке.
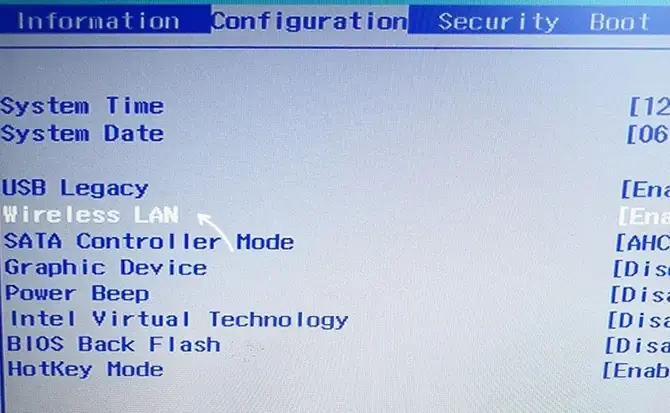
- Найдите раздел и пункты, отвечающие за включение и отключение периферийных устройств. Варианты пути могут быть разными, например: Advanced — Onboard Device Configuration, где необходимо включить LAN/Ethernet/Network или WLAN/Wireless/Wi-Fi адаптер (установить в Enabled).

- Параметры могут находиться и в других разделах, например: Configuration, Chipset, Onboard Devices, Integrated Peripherals, Network Configuration.

- Во всех случаях ищем обозначение нужного адаптера, и, если его состояние установлено в Disabled, переключаем в Enabled, затем выходим с сохранением настроек БИОС (обычно — клавиша F10).


После включения сетевого адаптера в БИОС и повторного запуска Windows драйверы сетевого адаптера обычно устанавливаются автоматически: но иногда не те, либо по какой-то причине вообще не могут установиться: это тоже может быть причиной того, что сетевая карта или беспроводный адаптер не видны.
Драйверы сетевого адаптера
В случае, если в диспетчере устройств отображаются какие-либо сетевые адаптеры, неизвестные устройства, либо устройства с ошибками (желтый восклицательный знак), вероятнее всего причиной проблемы является отсутствие подходящих драйверов.
Наиболее надежный путь — вручную скачать и установить драйверы с официального сайта производителя материнской платы ПК либо с сайта производителя ноутбука именно для вашей модели устройства. Порядок действия будет следующим:
- С компьютера (или даже смартфона) где есть доступ в Интернет, найдите официальную страницу поддержки вашей модели материнской платы или ноутбука.
- На странице поддержки устройства найдите раздел загрузки драйверов, а в нём — соответствующие драйверы сетевого адаптера. Для сетевой карты Ethernet они могут иметь названия Network Driver, LAN Driver, Ethernet Driver, для беспроводной сети — Wi-Fi, WLAN, Wireless LAN, скачайте эти драйверы к себе на устройство, а затем скопируйте на компьютер с проблемой. Внимание: если на сайте представлены драйверы только для предыдущей версии Windows, всё равно попробуйте их скачать и установить — обычно они могут исправно работать и в современных Windows 11 и Windows 10.

- Установите скачанные драйверы и проверьте, была ли решена проблема.
- На некоторых ПК и ноутбуках возможна ситуация, когда драйверы сетевого адаптера не устанавливаются либо не работают пока не будут установлены оригинальные драйверы чипсета или управления питанием. Если вы столкнулись с этим, попробуйте также скачать и установить их. Вас будут интересовать драйверы Chipset, Power Management, ACPI, ATK, Intel ME или Management Engine, Serial I/O
- После установки драйверов рекомендую перезагрузить компьютер.
- Если сетевой адаптер отображается в диспетчере устройств, но не работает или работает с ошибками, можно попробовать следующий вариант действий: в диспетчере устройств нажмите правой кнопкой мыши по сетевому адаптеру, выберите пункт «Обновить драйвер», затем: Найдите драйверы на этом компьютере — Выбрать драйвер из списка доступных драйверов на компьютере. Проверьте, нет ли в списке совместимых драйверов каких-то иных вариантов, помимо установленного в настоящий момент: при наличии выберите его и нажмите кнопку «Далее» для установки.


Если вы не можете найти драйверы самостоятельно, можно попробовать выполнить установку с помощью специализированных программ, рекомендую Snappy Driver Installer.
В завершение — ещё некоторые варианты, которые могут оказаться полезными в некоторых сценариях возникновения проблем с наличием сетевого адаптера в Windows:
- Если сетевой адаптер пропадает после завершения работы и включения, но появляется, если использовать пункт «Перезагрузка» в меню завершения работы, попробуйте отключить быстрый запуск — это может помочь.
- Проверьте наличие сетевых адаптеров в скрытых и отключенных устройств в диспетчере устройств. Чтобы показать скрытые устройства, используйте пункт меню «Вид». Для отключенных устройств рядом со значком отображается стрелка, а если нажать по устройству правой кнопкой мыши, в контекстном меню будет доступен пункт «Включить устройство».
- Попробуйте использовать встроенное средство устранения неполадок сети и посмотреть, о чем оно сообщает. В некоторых случаях сообщение может выглядеть как «Не удалось обнаружить правильно установленный сетевой адаптер», тема рассмотрена в этой инструкции. Многие другие сообщения средства устранения неполадок также рассмотрены на этом сайте: можно использовать поиск по сайту, не исключено, что инструкция найдётся.
- Если аппаратные проблемы исключены, а проблема появилась на давно работающей Windows и не сразу, могут помочь точки восстановления системы.
- Попробуйте загрузиться с LiveCD с поддержкой сети — если в этом случае сетевой адаптер исправно работает, проблема в установленной системе, драйверах и настройках. Если нет — в настройках БИОС, подключении, либо аппаратных неисправностях сетевого адаптера.
- Дополнительно при решении проблемы могут пригодиться инструкции: Не работает интернет в Windows 10 (подойдет и для Windows 11), Что делать, если работает Wi-Fi на ноутбуке, Не работает Интернет по кабелю или Wi-Fi.
Надеюсь, один из вариантов поможет в решении проблемы. Если остаются вопросы — опишите ситуацию в деталях в комментариях ниже, не исключено, что мне удастся подсказать подходящее решение.
34118
В этой статье мы разберем проблему, когда на ноутбуке или компьютере с установленной Windows 11 или Windows 10 внезапно пропал Wi-Fi адаптер, или Bluetooth адаптер. Или же оба адаптера вместе. Рассмотрим случай, когда Wi-Fi или Bluetooth исчезли именно внезапно, а не после каких-то действий. Решения подойдут для всех ноутбуков (ASUS, Acer, MSI, Lenovo, Dell и т. д.) и компьютеров.
Сама проблема выглядит так: Wi-Fi и/или Bluetooth нормально работал и просто в один момент исчез. Или после выключения, перезагрузки, спящего режима. Нет кнопки Wi-Fi или Bluetooth на панели задач, нет соответствующего раздела в параметрах Windows и т. д.

В диспетчере устройств так же пропал Wi-Fi и/или Bluetooth адаптер. Обычно остается только сетевая карта (кабельное подключение, Ethernet).

Там могут быть адаптеры типа WAN Miniport, Bluetooth Device, раздел Bluetooth, но без основного адаптера, через которой работает беспроводная передача данных по Bluetooth и подключение к беспроводным Wi-Fi сетям.
Ниже на скриншоте вы можете посмотреть, как должно быть. Когда беспроводные адаптеры установлены и работают нормально.

Название адаптера зависит от установленного в вашем ноутбуке беспроводного модуля (Intel, Atheros, Broadcom, Mediatek). Сам адаптер должен отображаться без ошибок, как на скриншоте выше.
Почему исчез Wi-Fi и Bluetooth в Windows 11, 10 и как это исправить?
Причины могут быть самые разные. Какой-то сбой в Windows или в BIOS, аппаратная поломка, несовместимость оборудования и т. д. Если у вас обычный стационарный компьютер, и к нему был подключен внешний Wi-Fi адаптер, то убедитесь, что он все еще подключен. Попробуйте подключить в дугой USB-порт. Если с подключением все в порядке, или у вас ноутбук, то применяйте решения, о которых я сейчас расскажу. Но первым делом просто перезагрузите свой ноутбук. Не редко даже это помогает.
Экстренная перезагрузка ноутбука
Решение очень простое. Сохраните все данные и закройте открытые программы. Зажмите кнопку питания на ноутбуке и держите ее до отключения ноутбука. Обычно это 5-10 секунд.

Если ноутбук сам не запустится, то включите его этой же кнопкой.
В случае с ПК (когда Wi-Fi модуль интегрирован в материнскую плату), можно попробовать выключить его из розетки, а так же вытянуть батарейку (на материнской плате) на минут 10.
Попытка установки драйвера
Загрузите с сайта производителя драйвер на Wi-Fi и/или Bluetooth и попробуйте его установить. Возможно, просто слетел драйвер, адаптер находится в разделе Другие устройства (в диспетчере устройств) и установка драйвера все исправит.
Драйвер загружайте только с сайта производителя ноутбука, материнской платы или Wi-Fi/Bluetooth адаптера и строго для своей модели. Так же смотрите, подходит ли драйвер для Windows 11 или Windows 10.
Инструкции:
- Обновление (установка) драйвера на Wi-Fi в Windows 10
- Драйвер Wi-Fi адаптера в Windows 11: обновление, откат, замена для решения разных проблем и ошибок
Если при установке подходящего драйвера вы видите сообщение, что устройство не найдено или отключено, то смотрите следующие решения.
Сброс настроек BIOS
Еще одно простое решение, которое может вернуть Wi-Fi и Bluetooth. Откройте BIOS на своем ноутбуке и восстановите заводские настройки. Там должна быть кнопка Load Optimized Defaults, Default Settings, Load Defaults или что-то похожее.
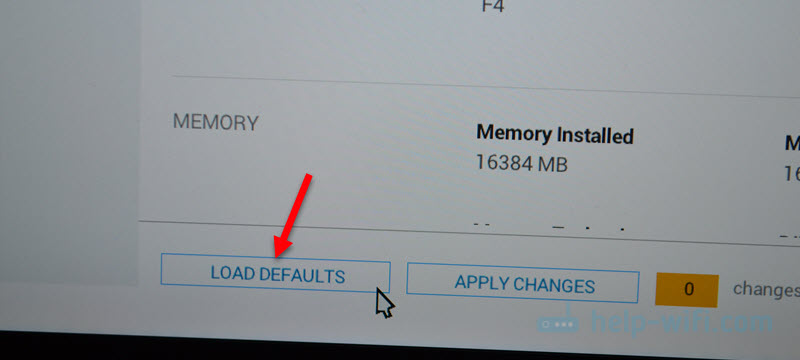
На разных ноутбуках и компьютерах эти настройки будут разные. После восстановления заводских настроек скорее всего придется сохранить настройки BIOS и перезагрузить ноутбук.
Обновление BIOS
Обновлять BIOS нужно не только тогда, когда пропал Wi-Fi. Это очень полезная процедура, которая улучшает работу вашего ноутбука. Но как я заметил, очень часто, особенно после установки обновлений Windows 11 пропадает Wi-Fi и лечится это именно обновлением BIOS. Особенно на новых ноутбуках.
Сейчас BIOS без проблем обновляется из-под Windows. Во всяком случае, на ноутбуке Dell это делается именно так. Достаточно скачать обновление с сайта производителя для модели своего ноутбука и запустить установку.

А еще, практически у каждого производителя сейчас есть утилиты, которые сканируют систему на наличие обновлений, сами их загружают и устанавливают.

Обязательно установите все доступные обновления. Так же установите все обновления Windows 11/10.
Так же причина может быть в аппаратной поломке Wi-Fi модуля, который установлен внутри ноутбука. Или, например, в контактах на самом модуле или материнской плате. Здесь уже нужно разбирать ноутбук, смотреть, искать причину, и возможно менять Wi-Fi модуль.
-
Home
-
Clone Disk
- Top 5 Methods to Fix Windows 10 Network Adapter Missing
By Ariel | Follow |
Last Updated
Many users report the Windows 10 network adapter missing from the Network Connections. What causes this vexing issue? How to fix it? Now, you can try the following top 5 troubleshooting methods from MiniTool.
Here are 3 major situations below when it comes to the Windows 10 network adapter missing issue:
- Windows 10 Wi-Fi not showing up under Network Connections
- Wireless adapter missing in Device Manager
- Network adapter not detected or not found in Windows 10
Why Windows 10 network adapter missing happen? The outdated or incompatible network drivers are mainly responsible for the problem. In addition, the current system updates or corrupted programming data can also lead to the wireless adapter missing issue.
Many people reported that they fixed the issue by simply restarting the computer. Perhaps you may have a try. If a simple restart fails to work, you can take the following measures.
Method 1. Run Built-in Network Troubleshooter in Windows 10
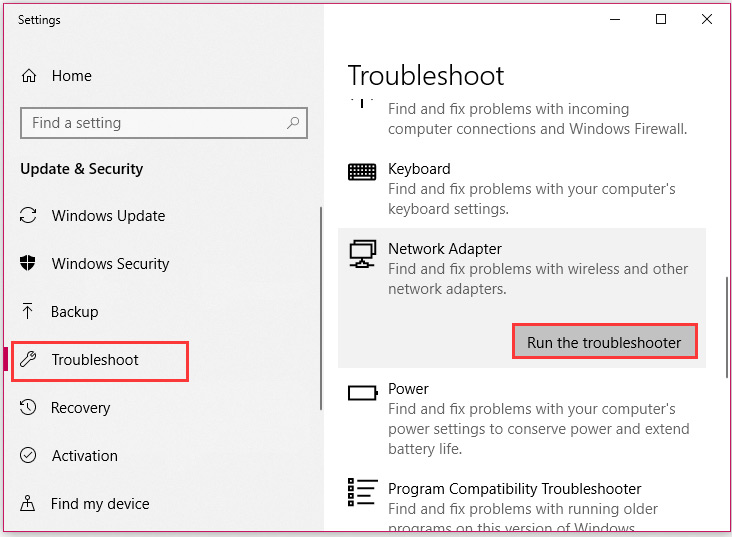
The network troubleshooter is the most commonly used tool to handle various network issues such as no secured Wi-Fi connection error, IPv6 no network access, wireless adapter missing Windows 10, etc. Here you can follow the guide below to run the troubleshooter.
Step 1. Type troubleshooting in the search box and select the Troubleshoot option from the context menu.
Step 2. In the pop-up window, scroll down the right sidebar to the Network Adapter section, double click it and click on Run the troubleshooter.
Then this tool will detect the issues with the network adapter automatically. You need to wait a moment for this tool to complete this operation. If this method can’t help you fix the Windows 10 wireless adapter missing issue, move on to the next ways.
Method 2. Update the Driver for Wireless Network Adapter
If the network adapter drivers get outdated or corrupted, the wireless adapter missing Windows 10 may also happen. Follow the steps below to update the driver for the wireless network adapter.
Step 1. Right-click the Start menu and select Device Manager from the context menu.
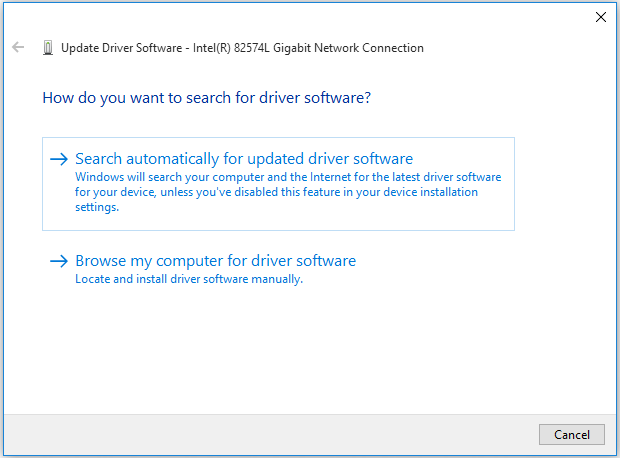
Step 2. Expand the Network adapters section, right-click the wireless adapter (here we take the Intel for example) and select the Update Driver Software option.
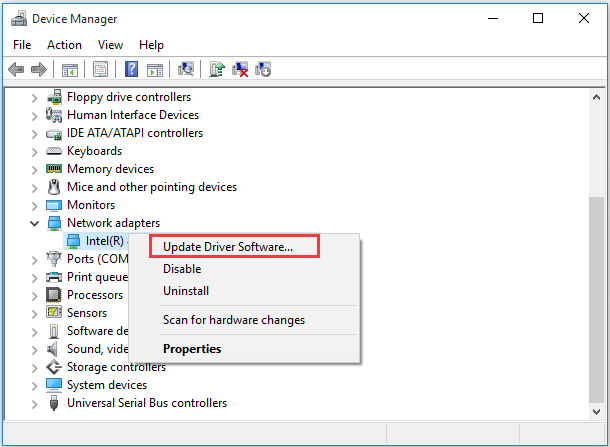
Step 3. In the pop-up window, you can select an update the network adapter driver automatically or manually based on your demands. After selecting the way to update the driver, follow the on-screen prompts to complete the update.
This method should help you fix the outdated network driver issue. If it still fails to resolve the Windows 10 Wi-Fi not showing up issue. Don’t worry. Here are 3 methods to try.
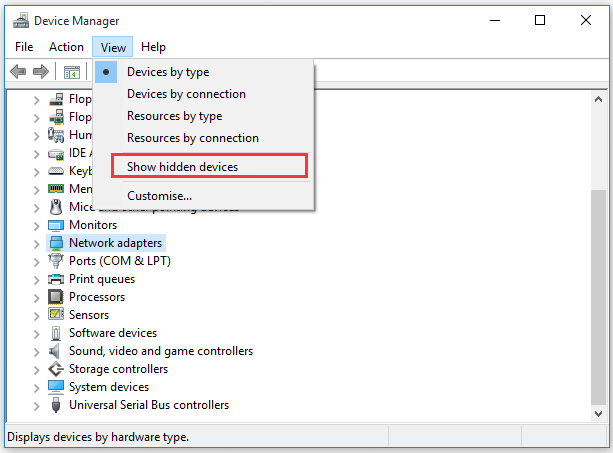
In addition to the above reasons mentioned, the wireless network adapter may be hidden in Device Manager. The hidden devices can also cause the Windows 10 Wi-Fi adapter missing issue. Here’s how to show the hidden devices in Device Manager.
Step 1. Open the Device Manager window, click the View tab on the top and select the Show hidden devices option from the drop-down menu.
Step 2. Then navigate to the Network adapters section, and click the Action on the top and click on Scan for hardware changes option from the drop-down menu.
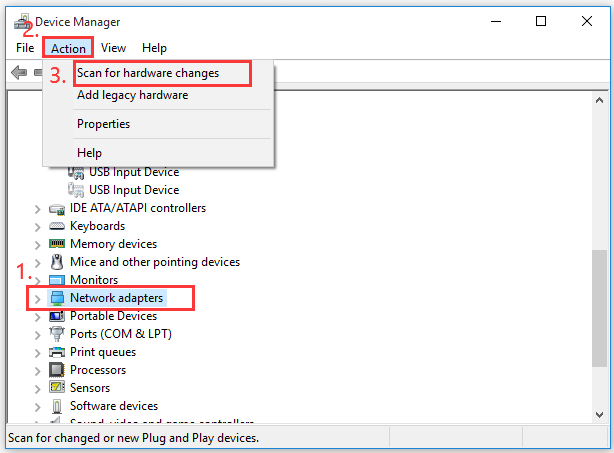
Step 3. Then the hardware changes will be scanned automatically. Once the scan completes, expand the Network adapters and check if the wireless network adapter appears on this list.
If the wireless network adapter not showing up among the list, please continue the following methods.
Method 4. Reset the Winsock Data
Winsock plays an important role in supporting your Windows network software to access network service. It is a supporting program in the Windows operations system as well as a programming interface. Once its data get corrupted, the network issue may occur.
Here you can try resetting the Winsock data to fix the Windows 10 network adapter missing. For that:
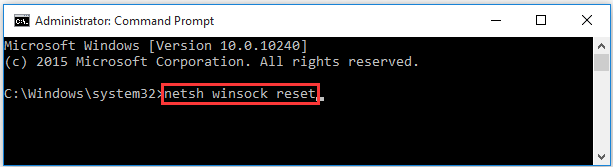
Step 1. Press Win + R keys to open the Run dialog box, and then type cmd in it and press the Ctrl + Shift + Enter keys simultaneously to open an elevated command prompt.
Step 2. Type netsh winsock reset command in the elevated command prompt and hit Enter.
Step 3. Restart your computer to take the operation into effect.
After that, you can check if the Windows 10 wireless adapter missing issue still persists.
Method 5. Perform a System Restore
If you find the wireless adapter missing issue just occurs after you install the Windows 10 updates, you can perform a system restore to undo these changes. To restores your Windows system, the system restores point is commonly used. Alternatively, you can use other free tools to restore your system.
To know more detailed steps, you can refer to this post “how to perform s system restore from command prompt”. If there is no system restore point in your Windows system, just click here to get an instruction. After restoring the system, you can check if this issue is fixed.
About The Author
Position: Columnist
Ariel has been working as a highly professional computer-relevant technology editor at MiniTool for many years. She has a strong passion for researching all knowledge related to the computer’s disk, partition, and Windows OS. Up till now, she has finished thousands of articles covering a broad range of topics and helped lots of users fix various problems. She focuses on the fields of disk management, OS backup, and PDF editing and provides her readers with insightful and informative content.
If you don’t see Wireless Adapter under Network Connections neither there is a Network adapter tab under device manager then it seems like your Network Adapter is missing or not detected on your Windows 10 which is a serious issue because you won’t be able to access the Internet until the issue is resolved. In short, when you click on the Wireless icon on the system tray there won’t be any device listed in order to connect to the Internet and if you open Device Manager then you won’t see the Network Adapter tab.

These are the reasons behind the Network Adapter missing issue:
- Network adapter missing in Device manager
- No Network Adapters showing in Device Manager
- Network Adapter Not Detected
- Network Adapter Not Found Windows 10
- No Network Adapter In Device Manager
The main cause of this issue seems to be outdated, incompatible or corrupted Network Adapter drivers. If you have recently upgraded from previous versions of Windows then it’s possible that the old drivers will not work with the new Windows and hence the issue. So without wasting any time let’s see how to actually Fix Network Adapter Missing in Windows 10 issue with the below-listed troubleshooting steps.
Note: Just make sure to uninstall any VPN software on your PC before continuing.
Table of Contents
Make sure to create a restore point just in case something goes wrong.
Method 1: Reboot your Computer
Most of us know about this very basic trick. Rebooting your computer can sometimes fix any software conflict by giving it a fresh start. So if you are someone who would rather put their computer on sleep, restarting your computer is a good idea.
1. Click on the Start menu and then click on the Power button available at the bottom left corner.

2. Next, click on the Restart option and your computer will restart itself.
After the computer restarts, check if your problem is resolved or not.
Method 2: Flush DNS and Reset Winsock Components
1. Open elevated Command Prompt.
2. Now type the following command and press Enter after each one:
ipconfig /release
ipconfig /flushdns
ipconfig /renew
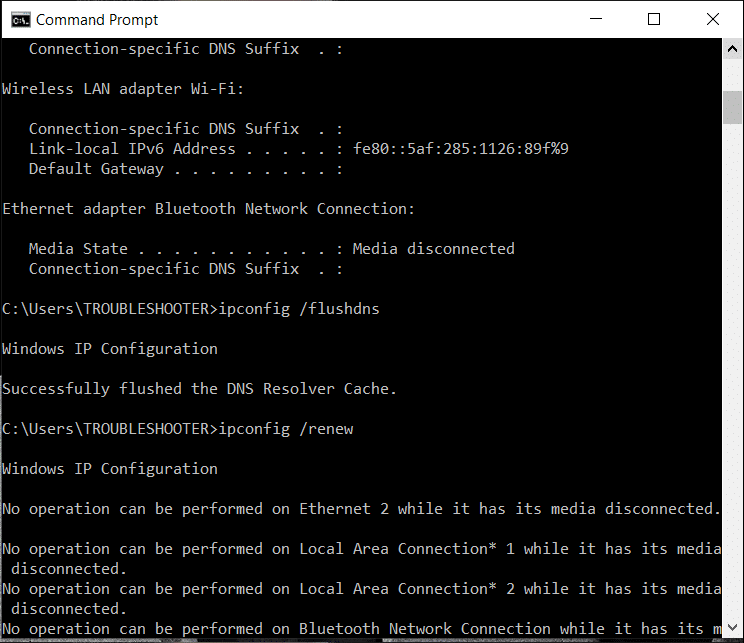
3. Again open Command Prompt and type the following command one by one and hit enter after each one:
ipconfig /flushdns
nbtstat –r
netsh int ip reset
netsh winsock reset


4. Reboot to apply changes. Flushing DNS seems to Fix Network Adapter Driver Issues on Windows 10.
Method 3: Run WWAN AutoConfig Service
1. Press Windows Key + R then type services.msc and hit Enter.
2. Find WWAN AutoConfig Service in the list (press W to reach to the end of the list quickly).
3. Double-click on WWAN AutoConfig Service.

4. If the service is already running then click on Stop, then from the Startup type drop-down select Automatic.

5. Click Apply followed by OK.
6. Right-click on the WWAN AutoConfig Service and select Start.
Method 4: Update Network Adapter Drivers
1. Press Windows key + R and type “devmgmt.msc” in Run dialogue box to open device manager.

2. Expand Network adapters, then right-click on your Wi-Fi controller (for example Broadcom or Intel) and select Update Driver Software.

3. Now select “Search for automatically for updated driver software“.

4. Now Windows will automatically search for the Network driver update and if new update is found, it will automatically download and install it.
5. Once finished, close everything and reboot your PC.
6. If you’re still facing the Network Adapter Missing in Windows 10 issue, then again right-click on your WiFi controller and select Update driver in Device Manager.
7. Now, in the Update Driver Software Windows, select “Browse my computer for driver software.“

8. Now select “Let me pick from a list of available drivers on my computer.“

9. Try to update drivers from the listed versions (make sure to checkmark compatible hardware).
10. If the above didn’t work then go to the manufacturer’s website to update drivers.

11. Download and install the latest driver from the manufacturer’s website then restart your PC.
Method 5: Uninstall Network Adapter Drivers
1. Press Windows Key + R then type “devmgmt.msc” and hit Enter to open Device Manager.
2. Expand Network Adapters and find your network adapter name.
3. Make sure you note down the adapter name just in case something goes wrong.
4. Right-click on your network adapter and uninstall it.

5. It will ask for confirmation select Yes.
6. Restart your PC and Windows will automatically install the network adapter drivers again.
7. If the drivers are not installed automatically then again open the Device Manager.
8. From the Device Manager menu, click on Action then click on “Scan for hardware changes“.

Method 6: Make sure Windows is up to date
1. Press Windows Key + I to open Settings then click on Update & Security.
2. From the left-hand side, menu click on Windows Update.
3. Now click on the “Check for updates” button to check for any available updates.

4. If any updates are pending then click on Download & Install updates.
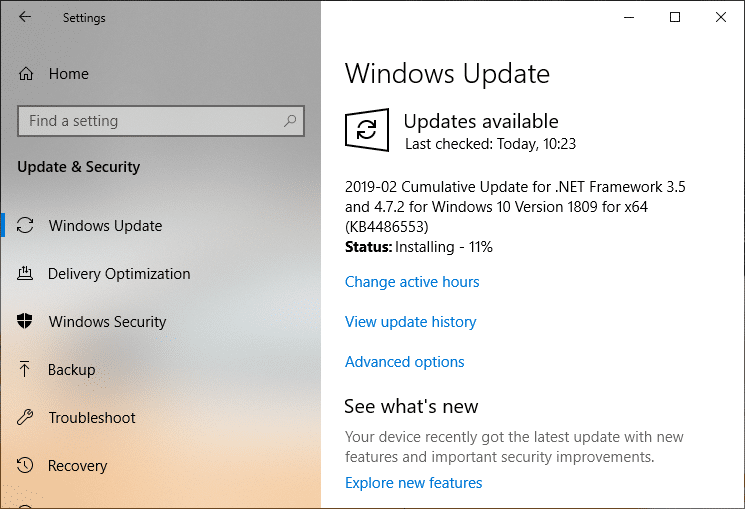
5. Once the updates are downloaded, install them and your Windows will become up-to-date.
6. After the updates are installed reboot your PC to save changes.
Method 7: Run Network Adapter Troubleshooter
1. Press Windows Key + I to open Settings then click on Update & Security.
2. From the left-hand menu select Troubleshoot.
3. Under Troubleshoot click on Internet Connections and then click Run the troubleshooter.
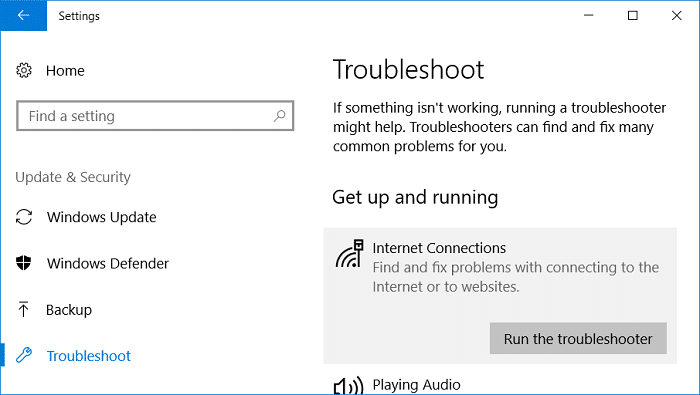
4. Follow further on-screen instructions to run the troubleshooter.
5. If the above didn’t fix the issue then from the Troubleshoot window, click on Network Adapter and then click on Run the troubleshooter.

5. Reboot your PC to save changes and see if you’re able to fix the Network Adapter Missing issue.
Method 8: Install Intel PROSet/Wireless Software
Sometimes the problem is caused due to outdated Intel PROSet Software, hence updating it seems to fix Network Adapter Missing in Windows 10 issue. Therefore, go here and download the latest version of PROSet/Wireless Software and install it. This is a third party software which manages your WiFi connection instead of Windows and if PROset/Wireless Software is outdated is can cause drivers issue in Wireless Network Adapter. Hence, read How to Update Network Adapter Drivers on Windows 10.
Method 9: Reset Network Connection
1. Press Windows Key + I to open Settings then click on Network & Internet.
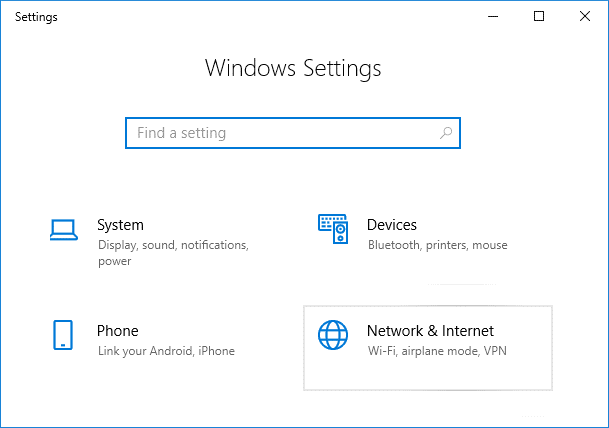
2. From the left-hand menu select Status.
3. Now scroll down and click on Network reset at the bottom.

4. Again click on “Reset now” under Network reset section.

5. This will successfully reset your network adapter and once it is complete the system will be restarted.
Method 10: Perform a System Restore
System Restore always works in resolving the error, therefore System Restore can definitely help you in fixing this error. So without wasting any time run system restore in order to resolve Network Adapter Missing issue.

Method 11: Using elevated Command Prompt
1. Press Windows Key + X then select Command Prompt (Admin).
2. Type the following command into cmd and hit Enter:
netcfg –s n

3. This will display a list of networking protocols and in that list find DNI_DNE.
4. If DNI_DNE is listed then type the following command into cmd:
reg delete HKCR\CLSID\{988248f3-a1ad-49bf-9170-676cbbc36ba3} /va /f
netcfg -v -u dni_dne

5. If you don’t see DNI_DNE listed then only run the command netcfg -v -u dni_dne.
6. Now if you receive the error 0x80004002 after trying to run the above command then you need to delete the above key manually.
7. Press Windows Key + R then type regedit and hit Enter.
8. Navigate to the following Registry Key:
HKEY_CLASSES_ROOT\CLSID\{988248f3-a1ad-49bf-9170-676cbbc36ba3}
9. Delete this key and then again type netcfg -v -u dni_dne command in cmd.
10. Reboot your PC to save changes.
Recommended for you:
- Fix Mail, Calendar, and People Apps not working
- How to Fix Chrome err_spdy_protocol_error
- Fix losing internet connection after installing Windows 10
- Fix Working on updates 100% complete Don’t turn off your computer
That’s it you have successfully Fix Network Adapter Missing in Windows 10 but if you still have any questions regarding this post then feel free to ask them in the comment’s section.
Readers help support Windows Report. We may get a commission if you buy through our links.
Read our disclosure page to find out how can you help Windows Report sustain the editorial team. Read more
The benefits of the Wi-Fi network over the LAN are obvious.
If you need Wi-Fi connectivity but don’t want cables, the USB Wi-Fi adapter seems to be the best solution for you.
However, a lot of users have had a hard time with those, especially the unbranded ones. Namely, it seems that Windows 10 can’t recognize some of them.
For that purpose, we prepared a list of possible solutions in order to fix this and make your Wi-Fi adapter recognizable for Windows 10.
Make sure to move through the enlisted steps one by one, so we can resolve it together.
What can I do if the USB Wi-Fi adapter is not recognized?
1. Update driver through the system
- Right-click the Start button, and open Device Manager.
- Navigate to Network adapters.
- Right-click on your external USB WI-Fi adapter and Update driver.
2. Try an alternative USB port
After thousands of plug-in and unplug cycles, your USB ports must suffer. Over time of extensive use, there’s a good chance that one of the available ports is malfunctioning.
So, make sure to try out multiple ports before you discard hardware as the possible issue instigator. USB ports are prone to malfunctions, so this is a common problem.
Luckily, every PC comes with multiple USB ports so you’ll at least have a choice. If you have appropriate tools, you can check for the power outage.
3. Install proper drivers
- Right-click on Start and open Device Manager.
- Navigate to Network adapters.
- Right-click on USB Wi-Fi adapter and open Properties.
- Choose the Details tab.
- Select Hardware Ids.
- Copy the first line and paste it into your browser.
- Locate the official drivers in results. Download and install them.
- Make sure to download and install only official drivers from trusted sources.
- Restart your PC and look for changes.
Most of the contemporary USB Wi-Fi adapters come with the support disk with drivers compatible with Windows 10.
It’s uncertain whether the automatically installed drivers will suffice, so it’s of the utmost importance to install the drivers provided by the OEM.
If you’re missing the installation disk, you can find the drivers online. The only thing you’ll need to do is to locate them manually.
Keep in mind that updating your drivers is an advanced procedure. If you’re not careful, you can cause permanent damage to your system by manually downloading the wrong driver versions.
Since updating drivers manually can be a long process, we recommend a professional driver updating tool that will automatically update all your drivers for you.
Once installed, this software will check your installed driver versions against its cloud database of the latest versions and will download the updates automatically.
4. Check Power settings
- Right-click on the Battery icon, and open Power Options.
- Select your preferred plan and click on Change plan settings.

- Choose the Change advanced power settings option.

- ExpandUSB settings, and go to USB selective suspend settings.
- Disable this option for both On battery and Plugged In alternatives.
- Save changes and restart your PC.


A large chunk of power consumption on your PC goes to USB ports and dedicated devices you’ve plugged in.
In order to reduce the power consumption, Windows has some hidden power-related options that tend to suspend USB in order to preserve battery life.
- Fix: WiFi adapter not working in Windows 10 & Windows 11
- Fix: USB Type C is not recognized/working on Windows 10/11
- Wi-Fi not working on laptop, but working on phone [Solved]
5. Disable the turn off this device to save power option

- Right-click the Start button, and open Device Manager.
- Navigate toUniversal Serial Bus controllers, and expand the section.
- Right-click on each individual USB root hub, and open Properties.
- Click on the Power management tab.
- Uncheck the Allow the computer to turn off this device to save power box and confirm changes.
- You’ll need to do this for each USB hub, respectively.
- Restart your PC.
This is a crossover of Power settings and drivers. Namely, every USB hub has it’s dedicated power settings. The idea is to disable certain USBs in order to preserve power.
However, this can affect the devices connected via USB negatively , which can affect the Wi-Fi adapter performance or even trigger the error code 10. Because of that, make sure to disable this option for all USB root hubs.
In case you found an alternative solution for USB Wi-Fi adapter issues in Windows 10, make sure to tell us in the comments below. We’ll be grateful for your valuable insights on the subject.
Aleksandar Ognjanovic
Aleksandar’s main passion is technology. With a solid writing background, he is determined to bring the bleeding edge to the common user. With a keen eye, he always spots the next big thing surrounding Microsoft and the Windows OS.
Focused on Windows errors and how to solve them, he also writes about the OS’s latest features as well as its interface.
In his free time, he likes to read, listen to music, and enjoy the nature. Hiking is one of his newly found passions.