
Если вам потребовалось восстановить Windows или Linux в заводском состоянии на ноутбуке Dell Inspiron, Vostro, Latitude, XPS или другом, для этого есть простые возможности: вы можете скачать образ восстановления системы с официального сайта Dell или использовать встроенный образ на самом ноутбуке.
В этой инструкции подробно о том, как скачать образ восстановления Dell для ноутбука с Windows 10, 8.1 и Windows 7 или Linux, а также о том, как запустить восстановление из встроенного образа при его наличии. См. также: Как восстановить заводские настройки ноутбука.
- Как скачать образ восстановления Dell
- Использование встроенного образа восстановления на ноутбуке Dell
- Дополнительная информация
Как скачать образ восстановления системы для ноутбука Dell
Dell — одна из компаний-производителей ноутбуков, которая позволяет в любой момент скачать образ восстановления Windows или Linux для вашего устройства даже в тех случаях, когда использование встроенного образа невозможно (например, после его удаления и замены жесткого диска или SSD).

Для загрузки вам потребуется сервисный код ноутбука, который расположен на наклейке в нижней части (на некоторых моделях скрыт под шторкой), обычно обозначен как «Service tag (S/N) и состоит из 7 букв и цифр, а вот Express Service Code, расположенный там же, нам не требуется.
Если на текущем компьютере у вас установлена Windows, вы можете выполнить следующие шаги для скачивания образа восстановления системы (флешку, на которую будет загружаться образ лучше подключить заранее, также учитывайте, что все данные с неё будут удалены):
- Зайдите на официальную страницу https://www.dell.com/support/home/ru/ru/rubsdc/drivers/osiso/recoverytool и скачайте с неё программу OS Recovery Tool.

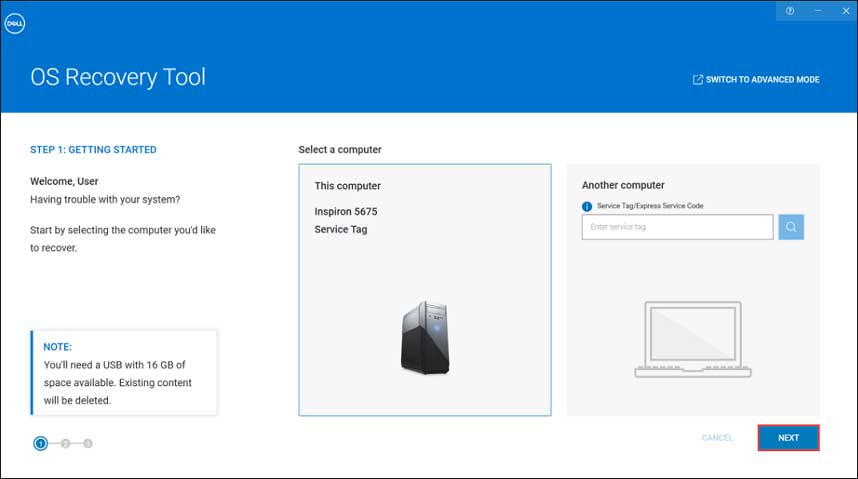
- Установите и запустите Dell OS Recovery Tool. В главном окне требуется выбрать: текущий ли ноутбук будет восстанавливаться (тогда сервисный код будет введен автоматически) или вы хотите скачать образ для другого ноутбука (т.е. запустили утилиту не на Dell, требующем восстановления). Я использую второй вариант.

- После ввода 7-значного сервисного кода и короткого периода ожидания, вы увидите, какие образы Windows и Linux доступны для загрузки. Для некоторых моделей ноутбуков в списке также отобразится утилита SupportAssist OS Recovery, с помощью которой можно попробовать восстановить имеющуюся систему без загрузки образа.
- После нажатия «Загрузить» и загрузки образа восстановления системы выберите флешку, на которую он будет записан (флешка станет загрузочной с возможностью восстановить систему с её использованием) и дождитесь завершения записи.


Утилита Dell OS Recovery Tool доступна только для Windows, однако вы можете скачать образ восстановления в формате ISO из Linux или Mac OS (или даже из Windows, если сменить в браузере user-agent), после чего вручную записать его на USB-накопитель:
- Зайдите на страницу https://www.dell.com/support/home/ru/ru/rubsdc/drivers/osiso/win (если зайти на нее из под Windows, вас перенаправит на страницу загрузки OS Recovery Tool). Обратите внимание, если вам требуется образ Linux, вверху нажмите по соответствующей ссылке для перехода на нужную страницу.

- Введите сервисный код ноутбука и проверочный код, а затем нажмите кнопку «Проверить доступность».
- При наличии образов вы увидите их в списке и сможете скачать ISO с образом восстановления к себе на компьютер (не забудьте снять отметки с ненужных образов). А затем использовать любые программы создания загрузочной флешки для записи образа на USB.


К сожалению, для некоторых ноутбуков, как правило, с предустановленной Linux, при попытке скачать образ восстановления сообщается «Образ восстановления сейчас недоступен» или «Нет образов ОС для этого кода». Тогда, восстановление возможно из встроенного образа, если вы его не удалили (например, при ручной установке системы).
Использование встроенного образа восстановления на ноутбуке Dell
На старых ноутбуках Dell с предустановленной Windows 7 для запуска восстановления из встроенного образа нужно было выполнить такой порядок действий: при включении нажимать клавишу F8, пока не откроется меню, а затем выбрать пункт «Repair your computer».
На новых ноутбуках с заводской Windows 10 и 8.1 можно зайти в особые варианты загрузки (в Windows 10 — Пуск — Параметры — Обновление и безопасность — Восстановление — Перезагрузить сейчас, либо на экране блокировки, удерживая Shift нажать по кнопке питания и пункту «Перезагрузка»), а затем найти пункт «Восстановление из образа» в дополнительных параметрах восстановления. Однако, после переустановки ОС или обновлений системы пункт может пропадать.
В случаях, когда нужного пункта нет или если компьютер не запускается и ни один из способов не помогает, вы можете использовать официальную утилиту Dell Recovery & Restore, доступную на странице https://www.dell.com/support/home/ru/ru/rudhs1/drivers/keyincloud. Для загрузки Dell Recovery & Restore также ввести сервисный код устройства.

После скачивания:
- Подключите USB флешку (данные с нее будут удалены) и запустите утилиту. Сделать это можно и на другом компьютере.
- Выберите флешку в списке и нажмите кнопку для записи. В моем тесте Dell Recovery and Restore отображалась странно (как на скриншоте), но отработала исправно. Если вы тоже столкнетесь с таким отображением, убедитесь, что не подключены другие съемные накопители (потому как могут быть затронуты данные на них).

- По завершении работы вы получите загрузочную флешку со средствами восстановления Dell. После загрузки ноутбука с неё и выбора языка появится следующий экран.

- После нажатия «Continue» будет выполнена попытка восстановления уже имеющейся системы на диске, а при неудаче — предложено и начато восстановление из встроенного образа, если он присутствует на жестком диске.


Дополнительная информация
Некоторые дополнительные сведения, которые могут оказаться полезными в контексте восстановления ноутбука Dell к заводским настройкам из образа:
- Для использования флешки в обоих способах вам нужно будет поставить загрузку с флешки в БИОС или использовать Boot Menu (на Dell обычно вызывается по F12). Для современных систем с предустановленной Windows 10 или 8 используйте загрузку в UEFI режиме.
- Образы восстановления содержат все драйверы для вашего ноутбука, а на сайте Dell их даже обновляет, но все равно обычно там не последние версии, обновитесь после восстановления (особенно если использовали встроенный образ).
- Windows 10 содержит встроенные средства для восстановления системы и её переустановки, которые применимы независимо от марки вашего компьютера, подробнее: Автоматическая чистая установка Windows 10, Как сбросить Windows 10.
- Если ни один из методов не помогает, а образ восстановления не удается скачать, вы можете скачать Windows 10 с официального сайта Майкрософт и вручную выполнить чистую установку. Какой-либо ключ при установке вводить не нужно (при условии, что на ноутбуке была предустановлена Windows 10, 8 или 8.1), система будет активирована после подключения к Интернету. Останется вручную или с помощью Dell Support Assist установить все оригинальные драйверы.
Надеюсь, что-то из описанного в руководстве окажется полезным в вашей ситуации. Если же проблемы сохраняются, подробно опишите их в комментариях, я постараюсь помочь.
Sometimes you need to use the Dell OS Recovery Tool to reinstall the system on your Dell PC due to a system crash, hard drive replacement, etc. This post from MiniTool tells you how to use it. Besides, you can know what to do when the Dell OS Recovery Tool is not working.
You can use the Dell OS Recovery Tool to create a recovery image for supported Dell PCs. Then, the created Dell Windows recovery image can be used to reinstall the system. Before you perform the reinstallation process, you need to prepare some things.
What You Need to Prepare
1. Download and install the Dell OS Recovery Tool from Dell’s official website.
2. Prepare a USB flash drive with at least 16GB of free space.
3. Microsoft .Net Framework 4.5.2 or higher.
4. Administrator user rights and at least 16GB of available storage space to download the Dell Windows recovery image.
Now, you can use the Dell USB Recovery Tool to reinstall your system. Follow the steps below:
Step 1: Create a USB Recovery Media
First, you need to create a USB recovery media using the Dell USB Recovery Tool.
1. After you download and install the tool, you need to click Start to launch the application.
2. Click This Computer to use the same Dell PC and click Next to continue.
3. Then, connect a USB flash drive to the PC.
4. After that, you need to select the USB flash drive that you want to use to create the USB recovery media and check the I understand that the selected drive will be reformatted and existing data will be deleted button.
Tip: It’s recommended to back up your important data on your USB flash drive since formatting the USB flash drive will cause the data loss.
5. Click the Download button to download the operating system for your Dell PC. When the process is completed, there will be a summary screen.
Step 2: Use the Dell Windows Recovery Image to Reinstall the System
Now, it’s time to use the recovery media to reinstall the operating system. The steps of reinstalling Windows 7/8 and Windows 10 are different. You should refer to the steps based on your system version.
Reinstall Windows 7/8
1. Connect the USB flash drive to your Dell PC. Restart the PC and when the Dell logo appears, press the F12key until you see the Preparing one-time boot menu.
2. On the boot menu, select your USB drive and press Enter under UEFI boot. Then, select your preferences when Windows Setup appears.
3. On the Windows Installation dialog box, click Install Now. Select I accept the license terms after reviewing the license agreement.
4. In the window, click Custom (advanced) to be the installation type.
5. Select the largest internal disc as the primary partition, then click Next on the Where do you want to install Windows window. If the primary partition shows 0GB free, select Unallocated Space and click the Next button.
6. The new Windows partition will be automatically created and formatted by the Windows Setup. Then it will start to install Windows.
7. It will take some time to perform the reinstallation process and your PC may restart several times.
Reinstall Windows 10
1. Connect the USB flash drive to your Dell PC. Restart the PC and when the Dell logo appears, press the F12 key until you see the Preparing one-time boot menu.
2. On the boot menu, select the USB drive and press Enter.
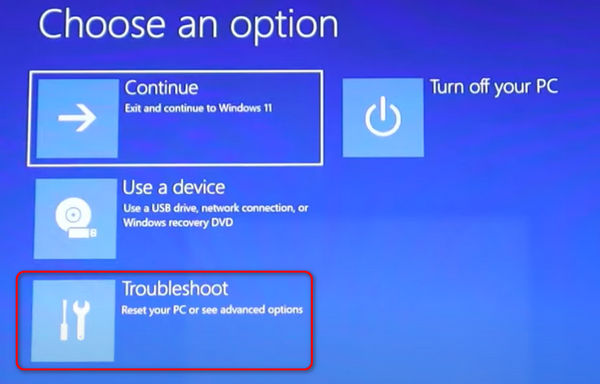
3. On the Choose an option screen, click Troubleshoot and then click Recover from a drive.
4. Follow the instructions on the screen to finish the reinstallation process. The installation process will take some time and your PC may restart several times.
Here are all the steps of using the Dell USB Recovery Tool to reinstall Windows 7/8/10. However, some people reported that when they used the Dell OS Recovery Tool, it was not working, that is to say, it failed to create the recovery media. If you are one of them, please continue based on the following solutions.
1. Try the Microsoft Media Creation Tool
When the “Dell OS Recovery Tool not working” issue appears, you can try using the Windows 10 Media Creation Tool to reinstall your Windows on your Dell PC. Here is how to do that:
Tip: Before you start the following steps, you had better back up all the important files on your system disk. This post – How to Backup Files on Windows 10? Try These Top 4 Ways maybe is what you need.
Step 1: Download the Windows 10 Media Creation Tool from Microsoft‘s official website. Then follow the instruction to get the following page and check the Create installation media (USB flash drive, DVD, or ISO file) for another PC option and click Next.

Step 2: Choose the Language, Windows Edition, and Architecture and click Next to continue.
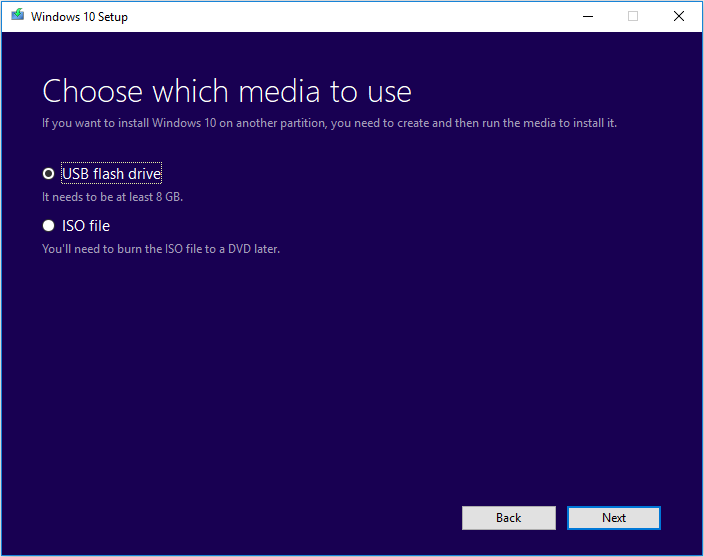
Step 3: Choose which media to use and click Next. Here I take the USB flash drive as an example.
Tip: Since the USB flash drive will be formatted, you had better back up your important data on the USB drive in advance.
Step 4: Select the USB drive you want to use for creating Windows 10 installation media and click Next.
Step 5: Then the Windows 10 installation files will be downloaded on your device. When the download is completed, it will start to create Windows 10 media.
Step 6: Click Finish and then you can use that drive to boot up your computer and reinstall Windows 10.
2. Perform a System Restore
When the Dell Recovery Tool is not working, you can perform a system restore to restore the system to earlier data. You should notice that once you have created a system restore point, you can use this method. This post – What Is System Restore Point and How to Create It? Look Here can help you create it on your Dell PC. Now, you can continue.
Step 1: Type Create a restore point in the Search box and select the best match result to open the System Properties window.
Step 2: Under the System Protection tab, click the System Restore button, and follow the instructions to select a restore point to restore your Windows 10 computer to a previous working healthy state.
3. Reset This PC
You can also try resetting your Dell PC without losing data if the Dell Recovery Tool is not working. Follow the instructions below:
Step 1: Type reset in the Search box and click Reset this PC to open it.
Step 2: Then, click Get Started to continue.
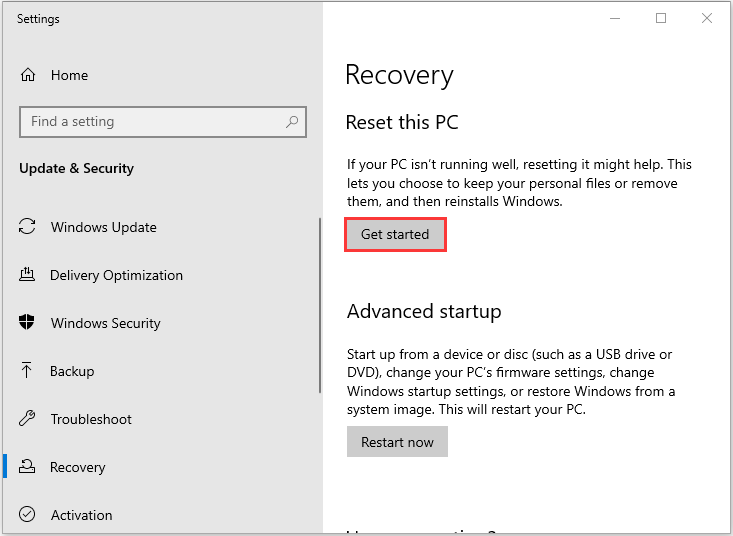
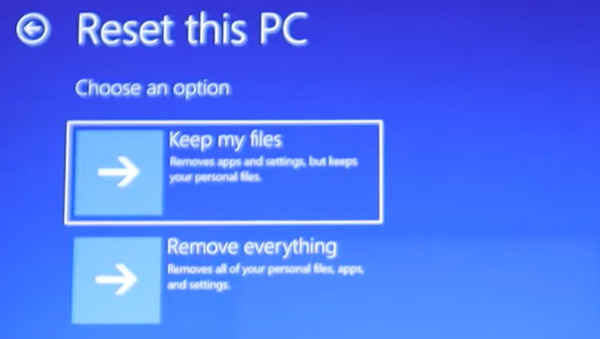
Step 3: Choose Keep my files or Remove everything. Then, follow the on-screen instructions to complete the reset process. This takes some time and your computer will restart.
An Easy Way to Get Windows 7/8/10
You may find that reinstalling the Windows system will take you much time from the content above. Is there a method to get the system without reinstalling? Yes! There is a piece of professional backup software – MiniTool ShadowMaker for you to do that.
MiniTool ShadowMaker supports backing up the system including Windows 7/8/10. Then you can restore the system on your Dell PC without reinstalling it. When the system crashes, you should create bootable media at first to boot your computer, and then use the system image to restore it to the normal state.
Besides backing up the system, this software can also be used to back up files, folders as well as the partitions. It is also a clone tool that can help you to clone the OS from HDD to SSD without data loss. So, besides creating a system image, you can also choose to clone the OS disk to another hard drive to get the Windows system without reinstalling.
This backup software offers a Trial Edition that allows a 30-day free trial for all backup features. If you want to use it permanently, get its Pro Edition. Now you can download and try MiniTool ShadowMaker to back up your system.
MiniTool ShadowMaker TrialClick to Download100%Clean & Safe
Now, let’s see how to back up the Windows system with MiniTool ShadowMaker step by step:
Step 1: Launch MiniTool ShadowMaker
1. Click Keep Trial.
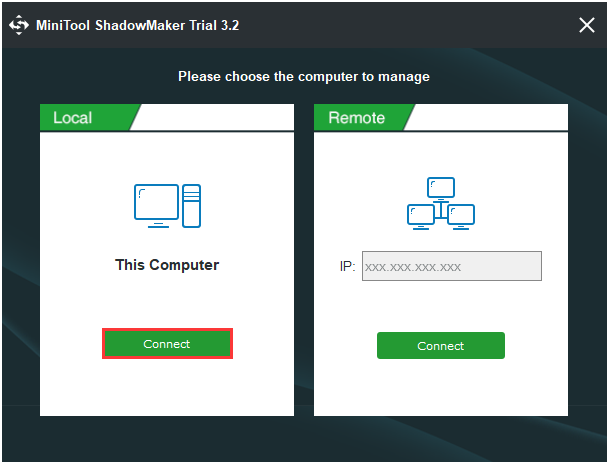
2. Choose Connect in This Computer to enter the main interface.
Step 2: Choose the Backup Source
MiniTool ShadowMaker chooses the operating system as the backup source by default. There is no need for you to choose again.
Step 3: Choose the Destination Path
1. Click the Destination source to choose the backup destination.
2. Click OK to continue.
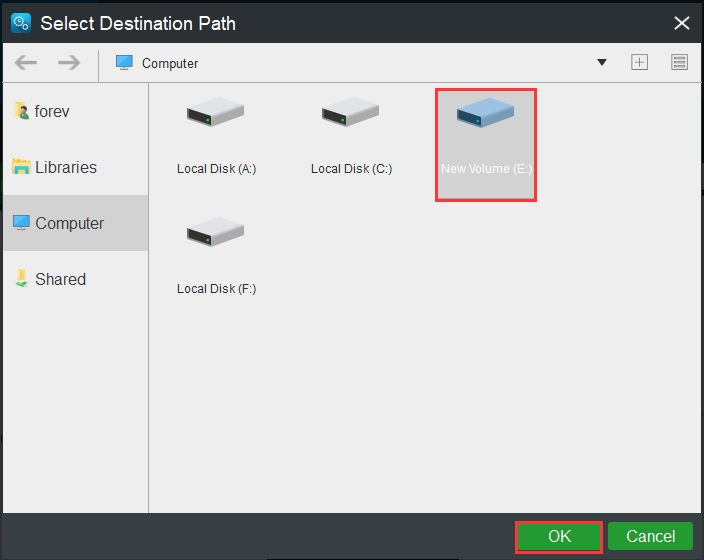
Tip: You had better choose an external hard drive as the destination since you can also access it even if the computer is crashed.
Step 4: Start to Back up
1. You can click Back up Now to perform the backup task immediately.
2. You can also click Back up Later to delay the task.

Wait for the process to be finished. After it is finished, you have successfully backed up the system. Then, you can restore the system.
MiniTool ShadowMaker, the free backup software, can help you restore the system without reinstalling easily and quickly.Click to Tweet
Final Words
In conclusion, this post introduced how to use the Dell OS Recovery Tool to reinstall Windows 7/8/10. Besides, you can know what to do when the Dell OS Recovery Tool is not working. If you want to use this tool, this post is helpful.
If you have any other solutions to fix the “Dell OS Recovery Tool not working” issue or have any questions during using MiniTool Software, you can tell us by sending an email to [email protected] or leaving your idea in the comment part below.
?How do I reinstall Windows 10 without CD?
?Can I reinstall Windows 10 with the same product key?
Microsoft says that Windows 10’s same edition can be reinstalled on the same PC and you don’t need to enter a product key. But it requires you currently have an activated copy of Windows 10. If you receive a prompt that asks you to enter the product key when you reinstall Windows 10, you can click the Skip option.
?Will resetting Windows 10 remove license?
If the Windows version installed earlier is activated and genuine, the license won’t be removed after you reset Windows 10 since the Windows 10’s license key has been activated on the motherboard. Maybe you need this post – How to Test Motherboard for Faults? Much Info Is Introduced.
?Will resetting PC make it faster?
PC will run faster after you reset it, however, the performance of it will decrease since you will install applications, copy some files to the hard drive. If you want to learn how to speed up Windows 10, this post – Top Tips On How To Speed Up Windows 10 Quickly is what you need.
Как восстановить заводские настройки ноутбука Dell с самого начала (Windows 10/8/7)
Ваш ноутбук Dell обычно работает медленно или тормозит? В этом случае вы можете выполнить сброс настроек ноутбука Dell до заводских настроек. Если вы столкнулись с серьезными системными ошибками или ошибками, вы также можете выполнить сброс настроек ноутбука Dell до заводских настроек, чтобы обновить его.
Помимо сброса настроек ноутбука Dell, вы также можете сбросить пароль ноутбука Dell. Это поможет вам получить доступ к ноутбуку Dell, который долгое время не использовался. Теперь посмотрим как восстановить заводские настройки ноутбуков Dell с паролями или без них во всех версиях Windows.

В этой статье:
- Часть 1. Как восстановить заводские настройки ноутбука Dell
- Часть 2. Сброс пароля ноутбука Dell без потери данных
- Часть 3. Часто задаваемые вопросы о заводских настройках ноутбука Dell
В случае непредвиденной потери данных рекомендуется создать резервную копию Dell вручную. Позже вы можете сбросить системные файлы Dell до заводских настроек.
Раздел 1. Использование истории файлов для резервного копирования файлов Dell
Шаг 1
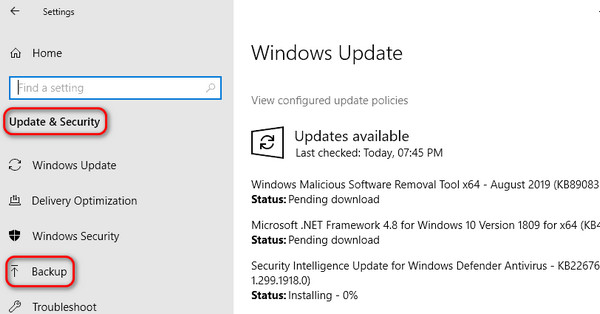
Из окон Начинать меню, выберите Настройки вариант.
Шаг 2
Выбирать Обновление и безопасность с последующим Резервное копирование.
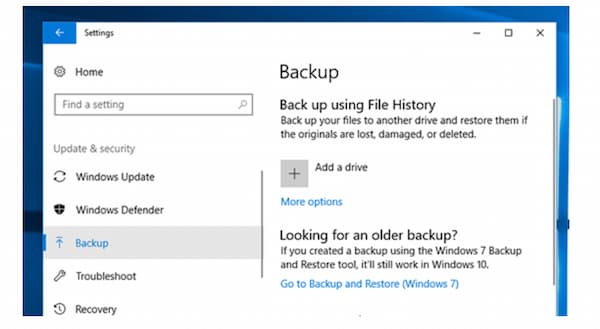
Шаг 3
Выбирать Добавить диск. Затем выберите определенный внешний диск или сетевое расположение для вашего ноутбука Dell.
Раздел 2. Восстановление заводских настроек ноутбука Dell с Windows 10/8/7
Когда ты забыть пароль Windows 10, вы не можете получить доступ к окну рабочего стола. В этом случае все еще есть возможность восстановить заводские настройки ноутбука Dell и восстановить доступ.
Шаг 1
Отключите от ноутбука Dell все ненужные аппаратные компоненты, такие как сканер, модем, USB-накопитель и т. д.
Шаг 2
Выключите и снова включите ноутбук Dell. Нажимать F8 на клавиатуре, когда вы сразу увидите логотип Windows. Затем нажмите кнопку Устранение неполадок кнопку для сброса настроек ноутбука Dell.
Шаг 3
в Устранение неполадок окно, конечно, вы должны выбрать Сбросить этот компьютер потому что вы хотите перезагрузить свой ноутбук Dell.
Шаг 4
Ты можешь выбрать Сохранить мои файлы или же Удалить все. Если вы хотите выполнить сброс настроек ноутбука Dell до его полного обновления, выберите Удалить все. После этого все данные будут удалены, и вы также сможете удалить учетную запись администратора в Windows 10/11.
Шаг 5
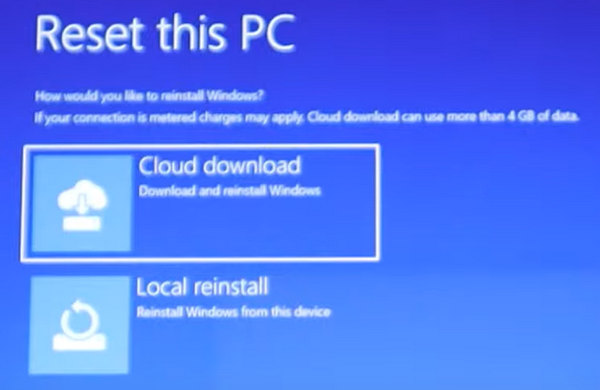
The Облачная загрузка может обновить версию Windows, в то время как Локальная переустановка может сохранить текущую версию Windows. Вам нужно только выбрать Локальная переустановка когда вы просто хотите восстановить заводские настройки ноутбука Dell.
Часть 2. Сброс пароля ноутбука Dell без потери данных
Если вы хотите выполнить сброс настроек ноутбука Dell в Windows 7/10/11, вам потребуется ввести пароль администратора, если пароль был установлен ранее. Если ваш Dell не использовался в течение длительного времени и пароль был забыт, вы не сможете успешно выполнить сброс настроек ноутбука Dell до заводских настроек. В этом случае вы можете использовать imyPass сброс пароля Windows для сброса любого пароля ноутбука Dell, а также может помочь вам перезагрузить компьютер, если вы этого хотите. Все ваши предыдущие файлы и настройки Dell останутся в безопасности. После разблокировки нет необходимости выполнять резервное копирование или восстановление вашего ноутбука Dell. Позже вы сможете разблокировать Dell и с легкостью выполнить все изменения.
4 000 000+ загрузок
Сброс пароля администратора Windows и стандартного пользователя без потери данных.
Создайте новую учетную запись администратора за считанные секунды без регистрации.
Гарантия не форматировать и не переустанавливать ОС Windows.
Удалите и сбросьте пароль ноутбука Dell в Windows 10/8.1/8/7/Vista/XP/Server.
Поддержка всех моделей ноутбуков Dell, таких как Dell Inspiron, Dell Latitude, Dell Vostro, Dell XPS и т. д.
Часто задаваемые вопросы.
-
Знаете ли вы, как восстановить заводские настройки ноутбука Dell без потери данных?
Это легко; при сбросе настроек к заводским настройкам в BIOS или на рабочем столе вам следует выбрать Сохранить мои файлы скорее, чем Удалить все и продолжайте. После этого вы сможете выполнить сброс настроек ноутбука Dell до заводских настроек без потери данных.
-
Как я могу сбросить настройки ноутбука Dell без пароля администратора?
Вы можете сделать это только в окне BIOS, также необходим установочный диск или дисковод Windows. Однако если вы захотите удалить пароль, вы также полностью очистите хранилище.
-
Частая перезагрузка ноутбука Dell приводит к поломке жесткого диска?
Нет, это не так. При сбросе настроек ноутбука Dell к заводским настройкам вы просто запускаете программу, встроенную в систему Windows, которая не причинит вреда.
-
Могу ли я сохранить подключение к Wi-Fi после сброса настроек ноутбука Dell к заводским настройкам?
Нет, ты не можешь. Вы можете перезагрузить компьютер, сохранив все данные и файлы, но соединение Wi-Fi не сохранится.
-
В чем разница между аппаратным сбросом ноутбука Dell и его сбросом к заводским настройкам?
Когда вы выполняете полную перезагрузку ноутбука Dell, вы заставляете компьютер перезагружаться, когда на нем возникает определенная проблема. При сбросе настроек ноутбука Dell к заводским настройкам вы сбрасываете все настройки или глубоко обновляете компьютер.
Вывод
В общем, вы можете сбросить настройки ноутбука Dell до заводских в 2025 году, выполнив указанные выше действия. Поддерживаются все версии Windows и модели ноутбуков Dell. Вы можете сбросить настройки ноутбука Dell до заводских с паролем или без него здесь. Кстати, вы можете сбросить настройки настольного компьютера Dell до заводских, выполнив те же действия. Сброс до заводских настроек ноутбука не является универсальным решением. Вы можете использовать imyPass для сброса пароля Windows и другие профессиональные инструменты, чтобы получить лучшие решения Dell для разблокировки и устранения неполадок. Если у вас есть другие вопросы и предложения по перезагрузке ноутбука Dell с Windows 10/8/7, вы можете связаться с нами. Или вы можете оставлять сообщения в комментариях ниже.
Пенни Уоррен
Пенни Уоррен, старший редактор imyPass, специализируется на программном обеспечении MS Office. Вы можете найти профессиональные учебные пособия и решения для программного обеспечения MS Office из ее сообщений.
/Guides /Dell Recovery Partition – Guide for Windows XP, Vista, 7, 8
This is a guide for recovering Dell computers using the recovery partition for the following versions of Windows: Windows XP, Windows Vista, Windows 7 and Windows 8.
Looking for a recovery disk for Dell? Download Easy Recovery Essentials, our recovery and repair disk for Dell computers.
Download recovery disk for Dell
If the recovery partition of your Dell computer is corrupt or not working, you can download Easy Recovery Essentials that works with Dell computers.
Download Easy Recovery Essentials for Dell
Features of Easy Recovery Essentials include:
- Automatically find and fix boot errors
- Works even when you can’t get into Windows
- Recover from virus infections
- Restore your PC to a working state
- Access and backup your important data
- Advanced tools for IT experts

Easy Recovery Essentials is compatible with any Dell computer running Microsoft Windows XP, Vista, 7 or 8:
- Microsoft Windows 8 (read more on our Windows 8 Recovery Disk and Repair Disc Download article)
- Microsoft Windows 7 (read more on our Windows 7 Recovery Disk and Repair Disc Download article)
- Microsoft Windows Vista (read more on our Windows Vista Recovery Disk and Repair Disc Download article)
- Microsoft Windows XP (read more on our Windows XP Recovery and Repair Disk article)
- Microsoft Windows Server 2003, 2008 and 2012 (read more on our Windows Server 2008 and 2012 Recovery Discs Download article)
You can burn Easy Recovery Essentials directly to a CD, DVD or a USB flash drive.
Note: Easy Recovery Essentials can not be used to install or reinstall Windows.
Repair a Dell computer
Run Automated Repair to automatically find and fix various boot errors on your Dell computer:
- Download Easy Recovery Essentials
- Burn the ISO image. Follow these instructions on how to burn the bootable ISO image. Instructions on how to create a bootable Easy Recovery Essentials recovery USB stick are also available.
- Boot Easy Recovery Essentials
- Choose Automated Repair option and click Continue

- Choose the installation drive letter of your Windows (usually
C:\) and click Automated Repair - Easy Recovery Essentials will now begin to fix errors automatically
- Once the process is complete, click Restart
- Done! Your Windows should now start again.


Restore a Dell computer
Using the System Restore feature, you can access System Restore and restore your Dell computer:
- Download Easy Recovery Essentials
- Burn the ISO image. Follow our instructions on how to burn the bootable ISO image. Instructions on how to create a bootable Easy Recovery Essentials recovery USB stick/drive are available.
- Boot Easy Recovery Essentials
- Select your operating system and click System Restore
- Choose a restore point
- Easy Recovery Essentials will now create a backup of your current system configuration and begin restoring the selected snapshot
- Once the process is complete, click Restart
- Done!


More features
The following features are also available in Easy Recovery Essentials:
- Virus Scanner
- Browse/Backup files
- Partition Editor
- Internet Browser
Download Easy Recovery Essentials for Dell
The Dell recovery partition
Dell computers have a recovery partition that you can access to recover and restore your computer. The recovery partition may not be available for your computer if it was deleted or overwritten somehow.
Below you can see the recovery partition shown on a Dell computer, named “RECOVERY” on the “D:/” drive. In this example, Windows is installed on the “OS” partition, “C:/“.
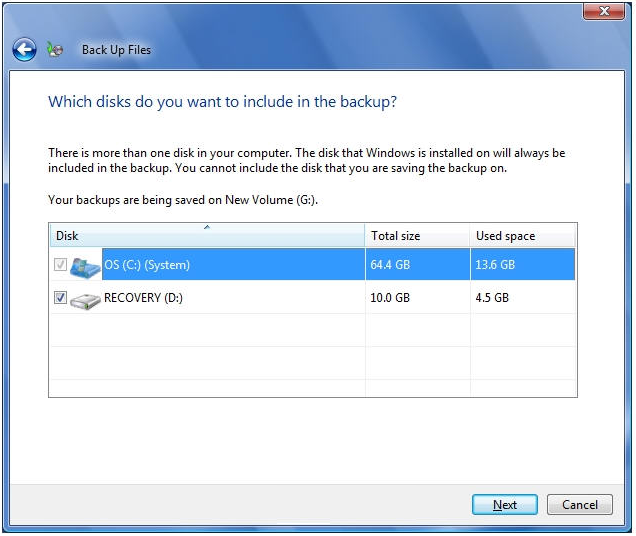
Recovery partition of a Dell computer is shown here
If your computer doesn’t have a recovery partition, use a recovery disk to fix your computer of boot errors. Our recovery disk – Easy Recovery Essentials – works with all Dell computers and all Windows versions (XP, Vista, 7 or 8). Download Easy Recovery Essentials.
Some Dell series models like the Inspiron Mini 9 or the Vostro A90 do not support a restore process to factory settings because these models do not have a F11 key. For these models, you need to do a manual reinstallation of your Windows using the original installation disk.
Access the recovery partition in Windows XP
Windows XP users can access the recovery partition created by Dell and restore their Windows XP to the factory settings by following these instructions.
Using the Dell PC Restore software will restore your computer to its default settings. This action erases all your files: personal files, folders, programs, drivers, emails, photos etc.
Backup your files before you continue. You can use Easy Recovery Essentials Browse/Backup Files to backup your files. You can use Browse/Backup Files even if you can’t boot into Windows. Download Easy Recovery Essentials.
- Boot your computer
- When the Dell logo appears on your screen, hold the Ctrl key and press F11 simultaneously
- The Dell PC Restore by Symantec screen should now appear
- Select Restore and follow the instructions of the wizard. Use the Tab key to highlight “Restore” and make the selection
- When the “all data will be lost” warning message appears, click Confirm (or use the Tab key to select Confirm)
- Press Enter
- The progress screen will appear and the restore process starts. This process can take up to 10 minutes
- A success message will appear when the process is finished: The system recovery process was successful.
- Click Finish (or use the Tab key to select Finish)
- Press Enter
Access the recovery partition in Windows Vista
Windows Vista users can access the recovery partition created by Dell by following these instructions:
Using the recovery software from Dell to restore your computer to its default settings will delete all files: personal files, folders, programs, drivers, emails, photos etc.
Backup your files before you continue. You can use Easy Recovery Essentials Browse/Backup Files to backup your files. You can use Browse/Backup Files even if you can’t boot into Windows. Download Easy Recovery Essentials.
- Remove any peripherals, except your keyboard and mouse. This includes scanners, printers, USB drives, smartphones, camera and so on.
- Boot your computer
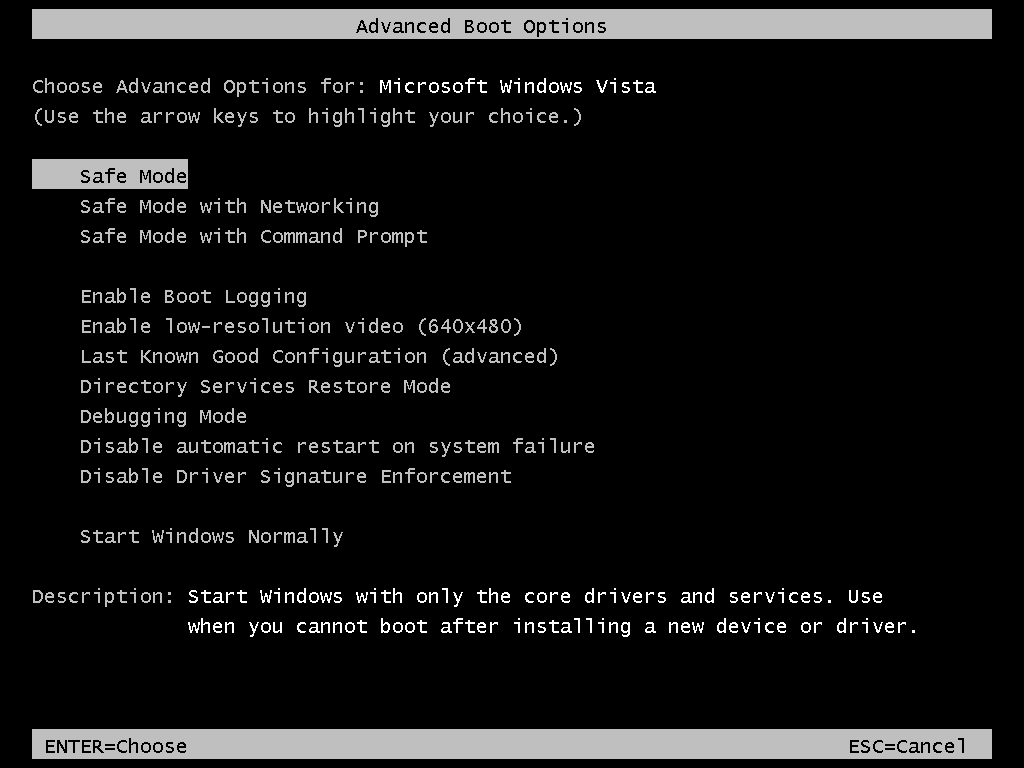
- When the computer starts, press F8 until the Advanced Boot Options menu appears on the screen.

The Advanced Boot Options screen in Windows Vista on a Dell
- Use your arrow keys to select Repair Your Computer from the list
- Press Enter
- Choose your language
- Login as “Administrator” or any user that has administrative rights to the system
- Click on the Dell Factory Image Restore (usually the last item in the list).
Below, this is called Dell Backup and Recovery Manager as the computer model does not use Dell DataSafe Local Backup software – see Tips for more details about this.

The Dell Backup and Recovery Manager in System Recovery Options
- When the “Dell Backup and Recovery Manager” screen appears, click Next
- Click on Yes, reformat hard drive and restore system software to factory condition checkbox.
Warning:
This will erase all your personal files (pictures, emails, music, movies). Backup your files! - Click Next
- When the process is finished, click Finish to restart your computer

Access the recovery partition in Windows 7
Users of Windows 7 operating system can access the recovery partition on Dell computers by following these set of instructions.
Using the Dell Factory Tools or Dell Backup and Recovery Manager software to restore your computer to its default settings will delete all files: personal files, folders, programs, drivers, emails, photos etc.
Backup your files before you continue. You can use Easy Recovery Essentials Browse/Backup Files to backup your files. You can use Browse/Backup Files even if you can’t boot into Windows. Download Easy Recovery Essentials.
- Remove any plugged peripherals, except your keyboard and mouse. Peripherals include your scanner, printer, USB drives, smartphone, tablet etc.
If you use a laptop and it’s docked: remove the laptop from the dock station. It should not run on battery, but with AC adapter plugged in.
- Boot your computer.
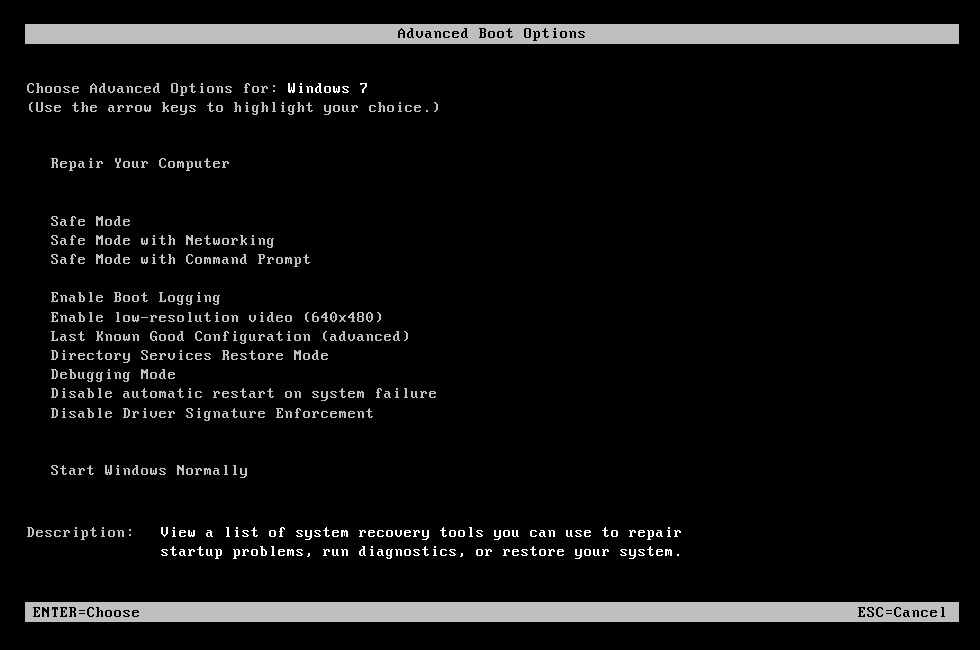
- When the Dell logo appears on your screen, press the F8 key several times to boot into the Advanced Boot Options menu of the Windows 7 system.

The Advanced Boot Options screen in Windows 7 on a Dell
- Select Repair Your Computer from the list. Use the arrow keys to go up and down through the list.
- The “System Recovery Options” screen will appear, select your keyboard and click Next.
- Log in as “Administrator“. If you don’t have this account, use any user account that has administrative rights to Windows 7.
- Select Dell Factory Tools (this is usually the last item in the list). The name can also be Dell Backup and Recovery Manager – see Tips on why this may be different for your computer.
- Click Next to confirm the action
- Check the Yes, reformat hard drive and restore system software to factory condition checkbox.
Warning:
This will restore your computer to its default settings. This action will delete all your personal files (emails, photos, movies). Backup your files! You can use Easy Recovery Essentials Browse/Backup Files to backup your files. - The restore process will now start. The process can take up to 10 minutes.
- When the process is finished, click Next to restart your computer.
Access the recovery partition in Windows 8
Windows 8 (Windows 8.1 too) users can access the recovery partition created by Dell by following these instructions.
Make sure your computer boots with Secure Boot on (UEFI/Secure Boot) before accessing the recovery partition. Follow the instructions from Troubleshooting, Boot in the Dell UEFI/Secure Boot to setup this for Dell computers.
Backup your files before you continue. You can use Easy Recovery Essentials Browse/Backup Files to backup your files. You can use Browse/Backup Files even if you can’t boot into Windows. Download Easy Recovery Essentials.
- Remove any peripherals, except your keyboard and mouse: scanners, printers, USB drives, smartphones or tablets etc.
If you have a laptop, remove it from the dock station and make sure it runs with AC adapter plugged in.
- Do not restart your computer yet.
- While you are logged into Windows 8, hold the Shift key and restart your computer (restart the computer while holding the Shift key). If this doesn’t work, try any of the next alternatives:
Alternative #1:
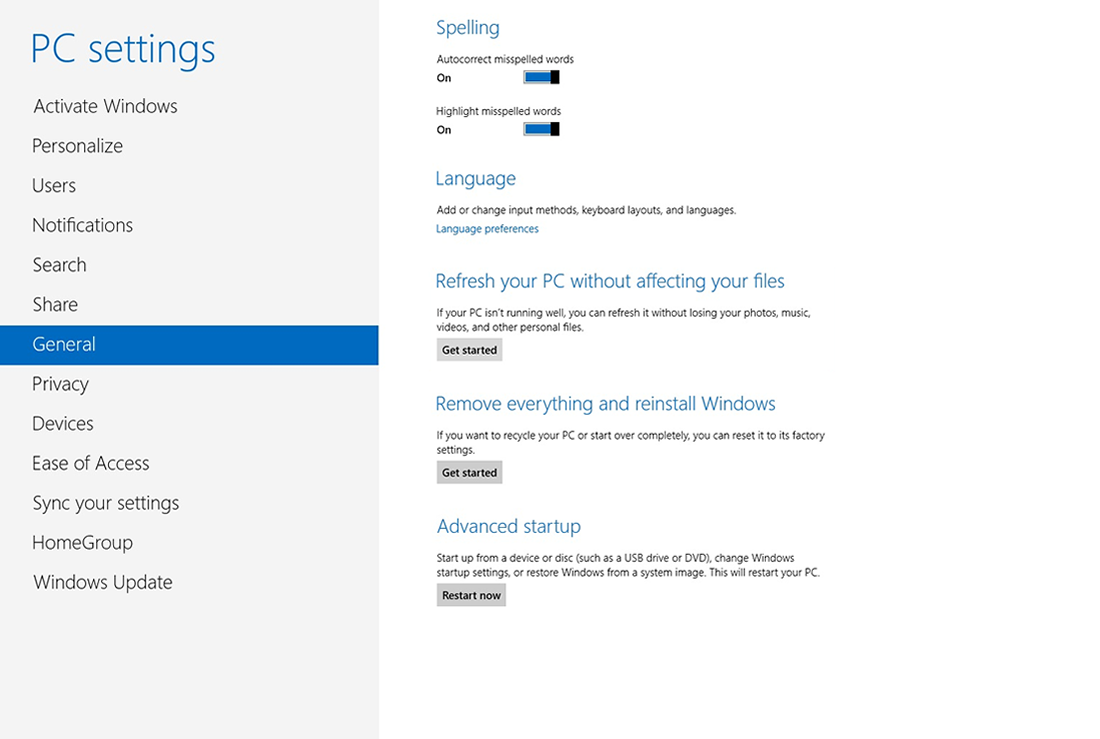
Click the “Restart now” option from the PC settings’ Advanced startup menu. You can find it by going to PC settings, at the Advanced startup tab. Click on the Restart now button.

The Windows 8 Advanced startup screen in PC settings
Alternative #2:
If Alternative #1 doesn’t work, try restarting your computer 4 times, one after another after it loads for a few seconds. This should make the system to boot into recovery options automatically.
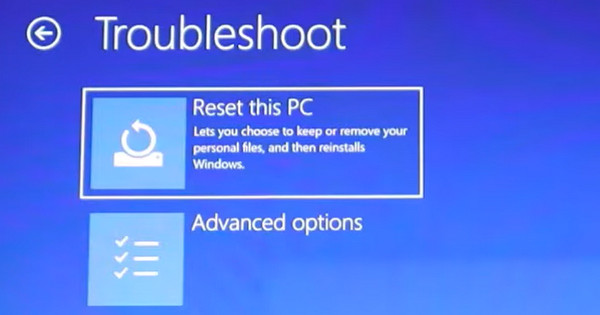
- Your computer should now restart into the recovery options menu. Choose Troubleshoot when the screen is titled “Choose an option“.
Troubleshoot in Windows 8 recovery options screen
- Select Dell Backup and Recovery item from the list – this is usually the last item in the list.
- Your computer may restart again.
- Click Next when the “Dell Backup and Recovery” screen appears
- Windows 8 Smart Repair feature will load and check if any errors can be fixed automatically. When this process is done, click Next.
- Choose the “Factory Image” option
- Click Next
- You’ll be asked to backup your files. If you have a USB flash drive to backup your data, select Yes, backup my personal files. If you are OK with delete all data from your computer, you can select No, Erase my files.
- The process will now start. When this is finished select Restart to restart your computer.
- Follow the wizard instructions to setup Windows 8 again.

Tips
Dell has 2 programs for backup and restore:
- Dell Inspiron, Dell Studio and Dell XPS models are using the Dell DataSafe Local Backup 2.0 software
- Dell OptiPlex, Dell Latitude, Dell Vostro and Dell Precisions models are using the Dell Backup and Recovery Manager software
- Windows XP and Windows Vista users may have their Dell backup and recovery software called Dell PC Restore (by Symantec)
Backup your files before using the recovery partition
If you are able to access your Windows copy, backup your files before accessing the recovery partition.
Restoring your Windows factory image by accessing the recovery partition will delete all files from your computer. This action restores your computer to its default settings.
To backup your files, use Easy Recovery Essentials Browse/Backup Files to access and backup your files. You can use Browse/Backup Files even if you can’t boot into Windows. Download Easy Recovery Essentials.
If you are not sure if your computer has the DataSafe Local Backup or the Backup and Recovery Manager software, go to Tips above and determine what software your Windows is using, depending om what Dell computer model you have and what is your Windows version.
Backup files using Dell DataSafe Local Backup 2.0
You can create a full system backup using DataSafe Local Backup by following these instructions:
- Boot the Windows system
- Go to Start and then to All Programs
- Find the Dell DataSafe Local Backup 2.0 folder
- Click on Dell DataSafe Local Backup 2.0
- Click on Back up your files menu item
- Select Full System Backup
- Click Backup now to start the backup process. You can click on “Edit plan” to change the location of your backups or setup a backup schedule.
- Select the location where you want your backup to be saved.
- Once you selected the location, click Next
- If you want the backup to be saved now, select I will manually backup my system and then click Next. If you want a backup later, select Backup my system automatically (recommended) and choose the time you wish the backup process to start.
- Click Finish.
Backup files using Dell Backup and Recovery Manager
If your Dell computer uses the Backup and Recovery Manager software, follow these instructions:
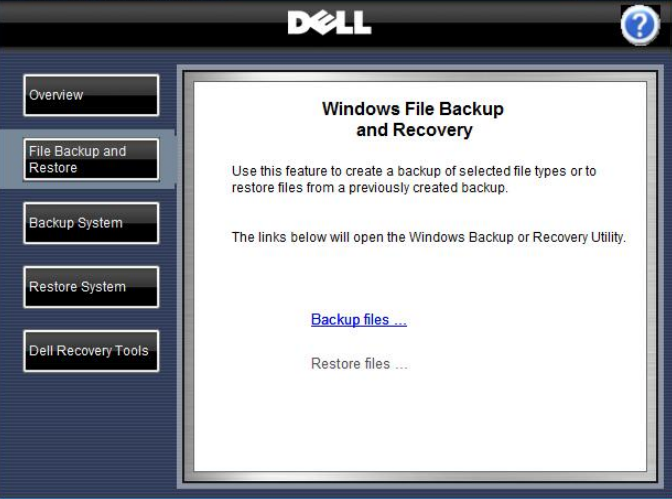
- Open the Dell Backup and Recovery Manager software
- Select “File Backup and Restore” from the left
- Click “Backup files…”

The Backup files option
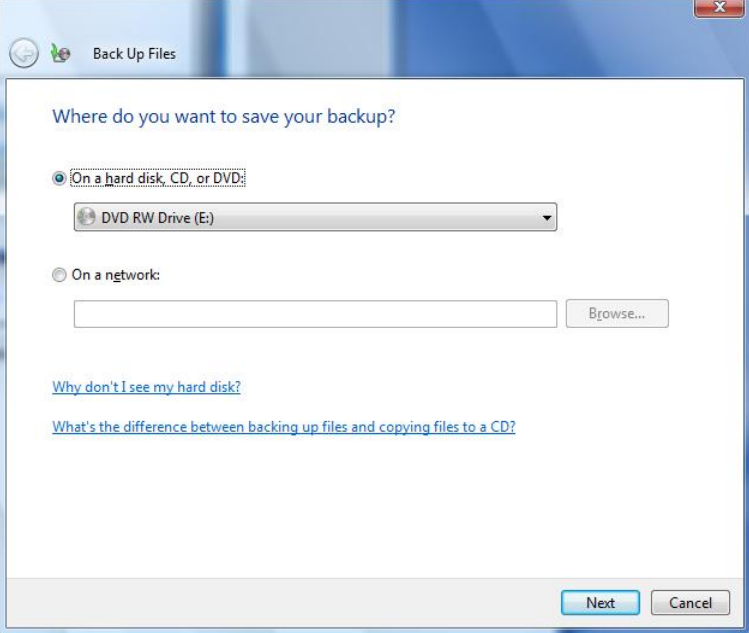
- Select On a hard disk, CD, or DVD to save your backup to the hard drive, to a CD or to a DVD.

Backup on a hard disk, CD or DVD
- Specify the location where to save the backup
- Click Next
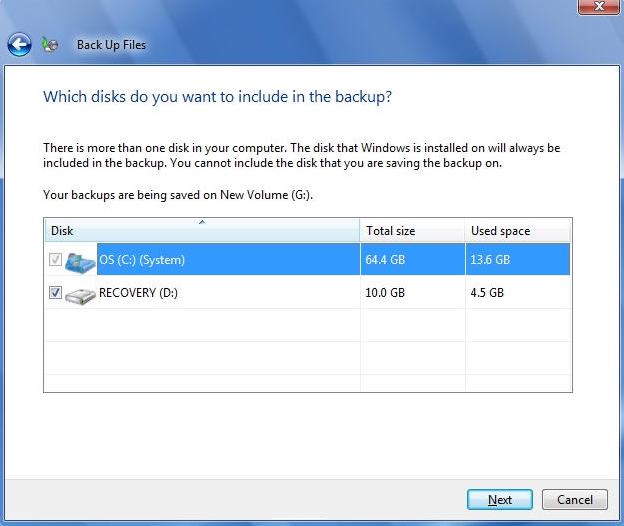
- Select what hard drive to backup

Select what disk to backup
- Click Next
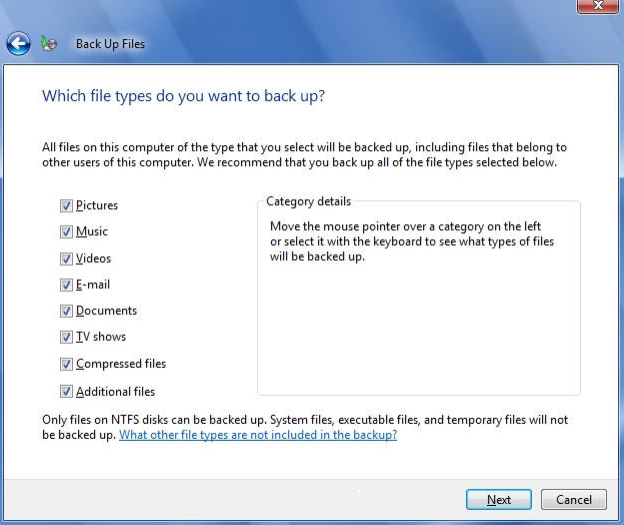
- Select what type of files you want to backup. You can select all the available checkboxes.

Select all available checkboxes to backup all types of files
- The software will ask you how many times you want to create backups (how often, on which day and at what time). If this is your first backup, it will create the full backup after clicking Save.
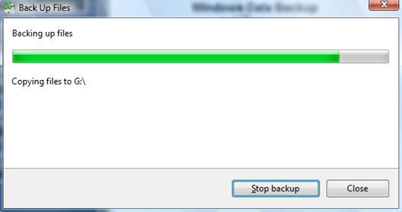
- Click Save settings and start backup.
- The Backup and Recovery Manager software will now begin the process

The process begins
Restore your files after using the recovery partition
If you are not sure what type of software your computer is using (the DataSafe Local Backup or the Backup and Recovery Manager), go to Tips and determine this based on your computer model series.
Restore files using Dell DataSafe Local Backup 2.0
You can restore a full system backup using the Dell DataSafe Local Backup 2.0 software by following these instructions:
- Power on your computer. If you are not able to boot into Windows, see different instructions below.
- Click on the Start icon and go to All Programs
- Search for a Dell DataSafe Local Backup 2.0 folder
- In this folder, click on Dell DataSafe Local Backup 2.0
- Click on “Restore my files“
- Select what kind of restore you want. You have 3 options here that depend on how you the first system backup:
- Restore your entire system to a previous date
- Restore specific files or folders from a System Backup
- Restore individual files from File & Folder Backups
- Select the date of the backup to be restore and click Next
- Confirm the selection and click on either Restart or Finish:
- Click Restart, if you selected “Restore specific files or folders from a System Backup“.
- Click Finish, if you selected “Restore individual files from File & Folder Backups“.
If you are not able to load Windows, follow these instructions:
- Boot your computer
- Press the F8 key when the Dell logo appears on your screen
- When the Advanced Boot Options screen appears, select Repair Your Computer. Use your arrows key to go up and down through the screen list.
- Click Next
- Login as “Administrator“. If you do not have the Administrator account, try to login with any user that has administrative rights.
- Click on Dell Factory Image Recovery and DataSafe options.
- When the “DataSafe Local Backup” screen appears, check the Preserve new or changed files before restoring to selected System Backup checkbox, if you want to keep any files since your last backup or check the Restore without preserving new or changed files checkbox, if not.
- Click Next
- If you selected “Preserve new or changed files before restoring to selected System Backup” checkbox earlier, click Next.
If you selected the “Restore without preserving new or changed files” checkbox, go directly to Step #12 here.
- The software will now scan the system and ask what files and folders you want to preserve. Make your selection of files and/or folders and click Next.
- Select the location for these files and folders and click Next
- Confirm your selections and click Next
- Once your preserved files are saved to your selected location, click Next
- Click the Yes, continue checkbox and then click Next.
- Click Restart once the software completed the restore process.
Restore files using Dell Backup and Recovery Manager
You can restore your files by following these instructions, if your computer is using the Dell Backup and Recovery Manager software.
Dell Backup and Recovery Manager will not show the “Restore files…” option if you haven’t created a backup through this software before. You cannot restore files if you don’t have a backup created.
- Open the Dell Backup and Recovery Manager software
- Select “File Backup and Restore” from the left
- Click “Restore files…“
- Choose what to restore: Files from the latest backup or Files from an older backup.

Choose what files to restore
- Click Next
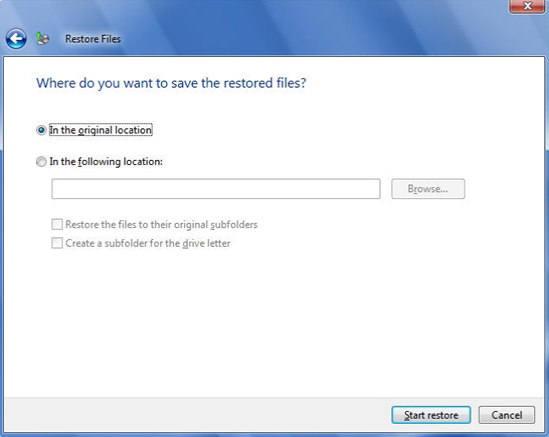
- Select the files and folders to restore.
- Select the location where to save the restored files.

Select the location
- Click Start restore.

Boot in the Dell UEFI/Secure Boot
Before accessing the recovery partition, you can check if your computer (from Dell) is going to boot with Secure Boot enabled or not. Follow these steps to do so:
- Boot your computer
- When the Dell logo appears, press the F2 key
- The “UEFI” screen will now appear
- Navigate to the Boot tab by using the arrow keys of the keyboard.
- In the Boot tab screen, make sure that you have [Enabled] next to the Secure Boot option.
![Secure Boot [Enabled] on a Dell computer](data:image/svg+xml,%3Csvg%20xmlns='http://www.w3.org/2000/svg'%20viewBox='0%200%20850%20465'%3E%3C/svg%3E)
Secure Boot [Enabled] on a Dell computer
- The Boot List Option must be set as UEFI. Use your arrow keys to navigate to the Boot List Option item and then hit Enter to open the window and select UEFI.
- Go to the Exit tab. Exit the Boot screen by saving the changes.
![Secure Boot [Enabled] on a Dell computer](https://neosmart.net/wiki/wp-content/uploads/sites/5/2014/02/dell-uefi-secure-boot-enabled-disabled.png)
Troubleshooting
My Dell recovery partition is not accessible
If your system still has the recovery partition active but you can not access it, follow the next set of instructions to access it.
Windows Setup CD/DVD Required!
Some of the solutions below require the use of the Microsoft Windows setup CD or DVD. If your PC did not come with a Windows installation disc or if you no longer have your Windows setup media, you can use Easy Recovery Essentials for Windows instead. EasyRE will automatically find and fix many problems, and can also be used to solve this problem with the directions below.
- Boot your computer with the Command Prompt using your original Windows installation disk
- When Command Prompt loads run the following commands in order, one by one:
Alternative #1:
path d:\windows;d:\windows\system32
d:
cd tools
pcrestore
In this example,
C:\is where Windows is installed on andD:\is the recovery partition from Dell.Alternative #2: (if #1 doesn’t work)
imagex /apply d:\dell\image\factory.wim 1 c:\
- The recovery process should now start. This process may take up to 10 minutes.
- Type
exitwhen the process is completed to exit Command Prompt. - Restart your computer
My Dell recovery partition is not there
If your Dell computer doesn’t have a recovery partition (or if the partition is deleted or corrupted), you need to use a recovery disk instead to perform a recover and restore process for your computer.
Unless your recovery partition is accessible, you cannot use the DataSafe Local Backup software or the Backup and Recovery Manager to create system recovery disks.
If your computer displays boot errors, you can use Easy Recovery Essentials (our recovery and repair disk). It is compatible with all Dell computers (desktops, laptops/notebooks etc.) and with the following Windows systems: Windows XP, Vista, 7, 8 or Server versions.
Use the Automated Repair feature to automatically find and fix errors that prevent your computer from booting or the Browse/Backup files feature to access and backup your files.
You can burn Easy Recovery Essentials to USB drives, CDs or DVDs.
Download Easy Recovery Essentials for Dell computers from here
Note: Easy Recovery Essentials can not be used to install or reinstall Windows.
More Information
Support Links
- Easy Recovery Essentials for Windows – our repair and recovery disk.
It’s an easy-to-use and automated diagnostics disk. It’s available for Windows 8, Windows 7 and Windows Vista. It’s also available for Windows XP and Windows Server.
Read more at Windows Recovery Disks.
- The NeoSmart Support Forums, member-to-member technical support and troubleshooting.
- Get a discounted price on replacement setup and installation discs: Windows XP, Windows Vista, Windows 7, Windows 8.
Applicable Systems
This Windows-related knowledgebase article applies to the following operating systems:
- Windows XP (all editions)
- Windows Vista (all editions)
- Windows 7 (all editions)
- Windows 8 (all editions)
- Windows 8.1 (all editions)
- Windows Server 2003 (all editions)
- Windows Server 2008 (all editions)
- Windows Server 2012 (all editions)
Applicable Models
This Dell-related knowledge base article applies to the following computer models:
- Inspiron series: 1000, 10z, 1100, 1121, 1122, 1150, 11z, 1200, 1210, 13, 1300, 1318, 1320, 1370, 13z, 14, 1410, 1420, 1425, 1427, 1428, 1440, 1464, 1470, 14r, 14z, 15, 1501, 1520, 1521, 1525, 1526, 1545, 1546, 1555, 1570, 15r, 15z, 17, 1720, 1721, 1750, 1764, 17r, 2000, 2100, 2200, 2500, 2600, 2650, 3000, 300m, 3200, 3500, 3700, 3800, 4000, 4100, 4150, 500, 519, 519, 530, 530s, 537, 537s, 537st, 545, 546, 560, 570, 5000, 5000e, 500m, 5100, 510M, 5150, 5160, 5425, 560, 6000, 600M, 6100, 630m, 640, 6400, 640m, 7000, 700m, 710m, 7500, 8000, 8100, 8200, 8500, 8600, 9100, 9200, 9300, 9400, B120, B130, DUO, E1405, E1505, E1705, M301z, M411r, M421r, M5010, M5030, M5040, M7010, MINI 10, MINI 1012, MINI 1018, MINI 10V, MINI 10V N, MINI 12, MINI 9, MINI 910, MM061, MP061, MXC061, N3110, N4120, X200, XPS, XPS Gen 2, XPS M140, One 2205, One 2305, One 2320
- Dimension series: 200, 400, 420, 630i, 1100, 1200, 2100, 2200, 2300, 2300c, 2350, 2400, 2400c, 3000, 3100, 3100, 3100c, 410, 4100, 420, 4200, 4250, 4300, 4300S, 4400, 44450, 500, 4500C, 4500S, 4550, 4590t, 4600, 4600c, 4601, 4700, 4700c, 5000, 5100, 5100c, 5150, 5600, 600, 6000, 610, 6700, 8100, 8200, 8250, 8300, 8300n, 8400, 900, 9100, 9150, 9200, B110, C521, D-610, E310, E510, E520, E521, GX150, L1000R, L600R, L667R, L800CXE, V333C
- Latitude series: 100L, 110L, 120L, 13, 131L, 2100, 2110, 2120, 2600, 3330, 3440, 3540, 6000d, 6430u, 840, ATG, C400, C500, C510, C540, C600, C610, C640, C800, C810, C840, Cpi, Cpt, CS, Csx, D400, D410, D420, D430, D500, D505, D510, D520, D530, D531, D600, D610, D620, D630, D630c, D631, D800, D810, D820, D830, E4200, E4300, E4310, E5400, E5410, E5420, E5420M, E5430, E5440, E5500, E5510, E5520, E5520M, E5530, E5540, E6220, E6230, E6320, E6330, E6400, E6410, E6420 , E6430, E6430s, E6440, E6500, E6510, E6520, E6530, E6540, E7240, E7440, L400, LM, LS, LT, LX, LXP, SX 4, V700, V710, V740, X1, X200, X300, XP4, Xpi, XT, XT2, XT3, Z
- Vostro series: 1000, 1011, 1014, 1015, 1088, 1220, 13, 130, 1320, 1400, 1420, 1440, 1450, 1500, 1510, 1520, 1540, 1550, 1700, 1720, 200, 220, 230, 2420, 2421, 2510, 2520, 2521, 3000, 3300, 3350, 3360, 3400, 3450, 3460, 3500, 3550, 3555, 3560, 3700, 3750, 5460, 5470, 5560, A860, V131
- Precision series: 350, 360, 370, 380 Workstation, 390 Workstation, 650, 670 Workstation, M50, M60, M65, M70, M90, M2400, M4300, M4700, M4700, T3400
- OptiPlex series: 150D, 160, 160L, 170L, 170LN, 210L, 210LN, 3010, 3011 AIO, 3020, 320, 330, 360, 380, 390, 5100, 560, 580, 7010, 740, 745, 745c, 755, 760, 780, 790, 9010, 9020 AIO, 960, 980, 990, E1, FX160, G1, GC, GH1, GH2, GH3, GL, GM, GMT, GX1, GX100, GX110, GX115, GX150, GX1p, GX200, GX240, GX260, GX260n, GX270, GX270n, GX280, GX300, GX400, GX50, GX520, GX60, GX60N, GX620, L60, N, NX1, SX260, SX270, SX270N, SX280, VDI Blaster, XE, XE2, XL, XM, XMT
- XPS series: 11, 12, 13, 14, 14z, 15, 15z, 17, 400, 410, 420, 720, 8100, 8200, 8250, 8300, 8400, 8500, 8600, 8700, 9150, 9200, L511X, M1210, M1330, M1530, M1531, M1532, M1533, M1534, M1535, M1710, M2010, MXC062, MXG061, MXP061
- Studio series: 1440, 1450, 1457, 1458, 15, 1530, 1535, 1536, 1537, 1555, 1557, 1558, 1569, 1735, 1736, 1737, 1745, 1747, 1749, 1909
- Studio XPS series: 13, 16, 1645, 1647, 1340, 1640, X1340
- Dimension XPS series: 210, 400, 410, 4100V, 420, 50, 600, 630i, 66, 720, 9200, D233, D234, M1530, One, P60, T450, T600, XTS800
- Alienware series: 14, 17, 18
- Adamo series
Propose an edit
Related Articles
-
Disable Legacy Boot Mode and Enable UEFI
-
How To Reinstall Windows 10
-
Remove Dual Boot Menu – Fix for Windows
-
Windows won’t start – Guide for Windows XP, Vista, 7, 8, 10
-
Fix slow boot – Guide for Windows XP, Vista, 7, 8, 10
-
How to Reset PC BIOS/CMOS
Загрузить PDF
Загрузить PDF
Сброс ноутбука Dell к исходному состоянию вернет его к заводским настройкам, сотрет всю личную информацию и поможет решить возможные проблемы с программным обеспечением. Большинство ноутбуков Dell с операционной системой Windows можно сбросить на экране «Дополнительные параметры загрузки» при запуске компьютера.
-
1
-
2
Подсоедините ноутбук к источнику питания, чтобы он не отключился в ходе сброса из-за недостаточного заряда батареи.
-
3
Проведите по экрану справа-налево и нажмите на «Настройки».
- Если вы пользуйтесь мышкой, направьте курсор мыши в правый нижний угол экрана, поднимите его (курсор) вверх, а затем нажмите на «Настройки».
-
4
Нажмите на «Выключение», а затем «Перезагрузка». Когда ноутбук перезагрузится, на экране появится меню запуска.
-
5
Нажмите на «Диагностика» и выберите «Вернуть в исходное состояние».
-
6
Нажмите «Далее», а затем выберите способ удаления файлов с компьютера. Система может просто удалить все файлы или полностью очистить диск. Компьютер вернется в исходное состояние, после чего на экране появится окно приветствия.[1]
- Если вы собираетесь продать или отдать свой ноутбук, выберите вариант, согласно которому система полностью сотрет данные на диске. Тогда вам не придется беспокоиться о том, все ли ваши файлы были стерты и не сможет ли новый владелец их восстановить.
Реклама
-
1
Сделайте копию и сохраните всю личную информацию на диск, USB-накопитель, в облачном хранилище или в программе резервного копирования. Процесс сброса приведет к удалению всей личной информации с ноутбука.
-
2
Подсоедините ноутбук к источнику питания, чтобы он не отключился в ходе сброса из-за недостаточного заряда батареи.
-
3
Выключите ноутбук и отключите его от док-станции.
-
4
Отсоедините от ноутбука другие периферийные устройства, такие как мышь, принтер или внешний жесткий диск.
-
5
Включите ноутбук и нажимайте клавишу F8, пока на экране не появится меню «Дополнительные параметры загрузки».
-
6
С помощью стрелок выберите опцию «Устранение неполадок компьютера» и нажмите «Enter».
-
7
Выберите предпочитаемую раскладку клавиатуры, после чего нажмите «Далее».
-
8
Введите свое имя пользователя и пароль, а затем выберите «Dell DataSafe Restore и Emergency Backup» (восстановление данных с помощью Dell DataSafe и аварийное резервное копирование).
-
9
Нажмите «Далее», а затем поставьте галочку рядом с опцией «Да, отформатировать жесткий диск и восстановить систему до заводских настроек».
-
10
Нажмите «Далее». Процесс сброса ноутбука до заводских настроек займет не менее пяти минут.
-
11
По его завершении нажмите «Завершить». Ноутбук перезагрузится и на экране появится окно приветствия.[2]
Реклама
-
1
Сделайте копию и сохраните всю личную информацию на диск, USB-накопитель, в облачном хранилище или в программе резервного копирования. Процесс сброса приведет к удалению всей личной информации с ноутбука.
-
2
Подсоедините ноутбук к источнику питания, чтобы он не отключился в ходе сброса из-за недостаточного заряда батареи.
-
3
Выключите ноутбук и отключите его от док-станции.
-
4
Отсоедините от ноутбука все периферийные устройства, такие как мышь, принтер или внешний жесткий диск.
-
5
Включите ноутбук и нажимайте клавишу F8, пока на экране не появится меню «Дополнительные параметры загрузки».
-
6
С помощью стрелок выберите опцию «Устранение неполадок компьютера» и нажмите «Enter».
-
7
Выберите предпочитаемый язык и нажмите «Далее».
-
8
Введите свои имя пользователя и пароль, а затем нажмите «Далее».
-
9
Нажмите на «Dell DataSafe Restore и Emergency Backup» (восстановление данных с помощью Dell DataSafe и аварийное резервное копирование), после чего нажмите «Далее».
- Некоторые модели ноутбуков Dell, вроде серии Inspiron Mini, не поддерживают функцию восстановления системы. Это значит, что у вас, скорее всего, не получится сбросить ноутбук к заводским настройкам.
-
10
Поставьте галочку рядом с опцией «Да, отформатировать жесткий диск и восстановить систему до заводских настроек», после чего нажмите «Далее». Система запустит процедуру сброса к заводским настройкам.
-
11
Нажмите «Завершить», когда на экране появится сообщение о завершении процесса восстановления. Ноутбук перезагрузится и на экране появится окно приветствия.[3]
Реклама
-
1
Сделайте копию и сохраните всю личную информацию на диск, USB-накопитель, в облачном хранилище или в программе резервного копирования. Процесс сброса приведет к удалению всей личной информации с ноутбука.
-
2
Подсоедините ноутбук к источнику питания, чтобы он не отключился в ходе сброса из-за недостаточного заряда батареи.
-
3
Выключите ноутбук и отключите его от док-станции.
-
4
Отсоедините от ноутбука все периферийные устройства, такие как мышь, принтер или внешний жесткий диск.
-
5
Включите ноутбук и подождите, пока на экране не появится логотип Dell.
-
6
Пока на экране отображен логотип Dell, зажмите клавиши Control + F11, а затем одновременно их отпустите.
-
7
Выберите «Восстановление системы», а затем подтвердите свое желание сбросить компьютер к заводским настройкам. После этого начнется процесс сброса, на завершение которого может уйти от 8 до 10 минут.
- Некоторые модели ноутбуков Dell, вроде серии Inspiron Mini, не поддерживают функцию восстановления системы. Это значит, что у вас, скорее всего, не получится сбросить ноутбук к заводским настройкам.
-
8
Нажмите «Завершить», когда на экране появится сообщение, что восстановление системы прошло успешно. Ноутбук перезагрузится и на экране появится окно приветствия.
Реклама
Советы
- Верните ноутбук Dell в исходное состояние, если вы планируете продать его или отдать на благотворительность. Сброс ноутбука к исходному состоянию сотрет все файлы и вернет его к заводским настройкам, не позволив будущим владельцам восстановить и получить доступ к вашим личным файлам.
Реклама
Об этой статье
Эту страницу просматривали 36 927 раз.