
Все способы:
- Способ 1: Приложение «Параметры»
- Способ 2: «Редактор реестра»
- Способ 3: Редактирование локальной групповой политики
- Решение проблем с отображением центра уведомлений
- Способ 1: Изменение параметра конфиденциальности
- Способ 2: Повторная регистрация центра действий
- Способ 3: Проверка целостности системных файлов
- Вопросы и ответы: 4
Способ 1: Приложение «Параметры»
Для работы с центром уведомлений в Windows 10 предназначен специальный значок на панели задач. Нажатие по нему разворачивает расширенное меню, в котором и видны все уведомления с датой, их полным описанием и возможностью перейти к каждому событию, если оно содержит ссылку. Включение центра уведомлений как раз подразумевает добавление этого значка для дальнейшего доступа к нему, что мы и предлагаем сделать разными вариантами. Начнем с «Параметров» и управления персонализацией.
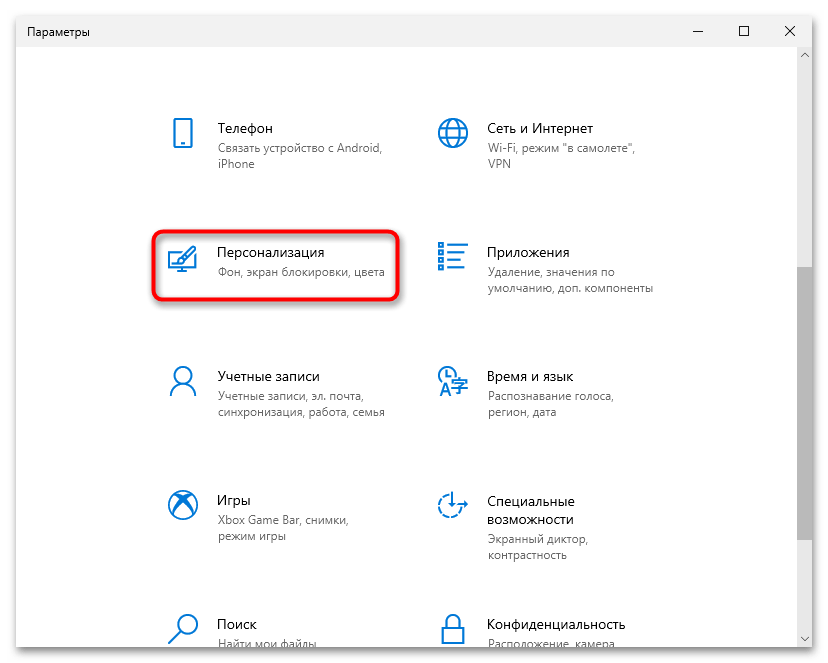
- Откройте «Пуск» и слева нажмите по значку с шестеренкой, чтобы перейти в «Параметры».
- Щелкните по плитке «Персонализация», чтобы отобразить все настройки внешнего вида и иконок для пользователя.
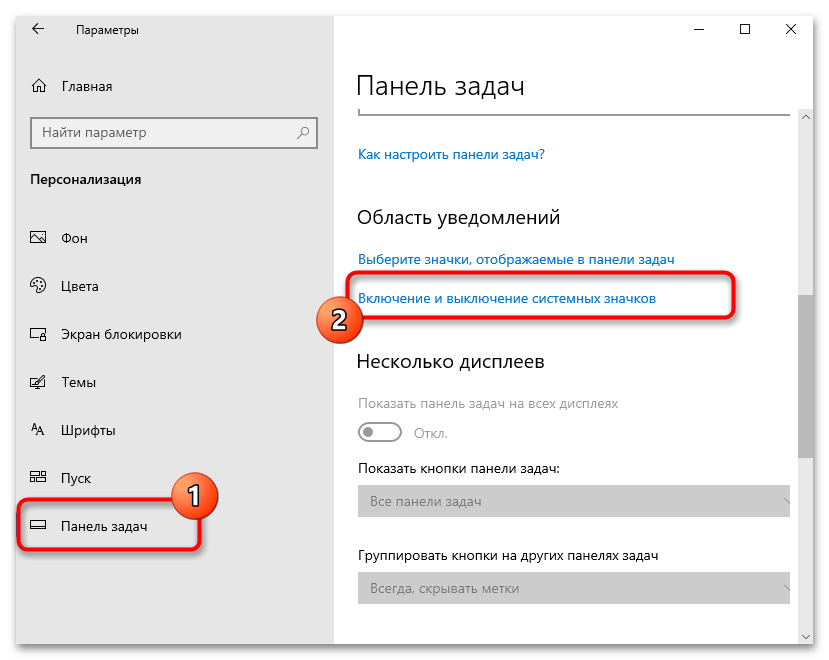
- Выберите слева категорию «Панель задач», затем кликните по ссылке «Включение и выключение системных значков».
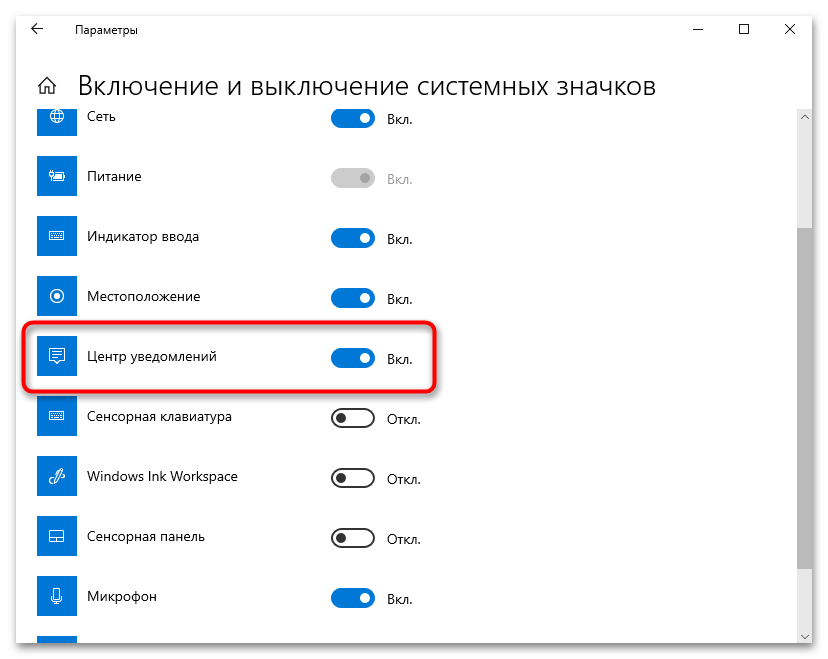
- Системных значков для панели задач есть много, но сейчас нужен только «Центр уведомлений». Переключатель справа должен находиться в положении «Вкл.».
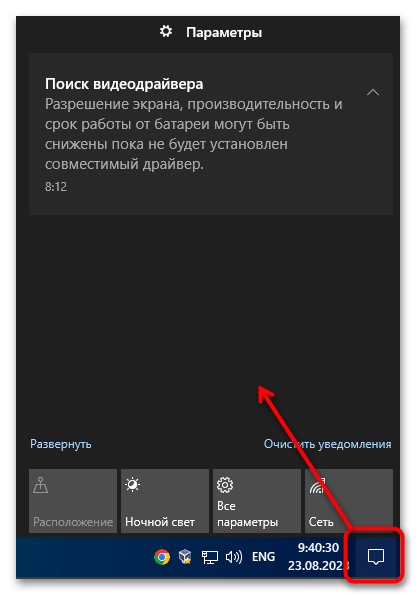
- Сразу после включения значок должен отобразиться в правом углу панели задач. Нажатие по нему левой кнопкой мыши отображает само меню с непросмотренными уведомлениями.
Способ 2: «Редактор реестра»
Внесение изменений в реестр — отличный метод настройки отображения центра уведомлений для тех пользователей, у кого время от времени сбивается настройка персонализации или же она вообще не работает. Это может быть по причине отсутствия нужного параметра в самом реестре или его неправильного состояния, что и блокирует соответствующую функцию.
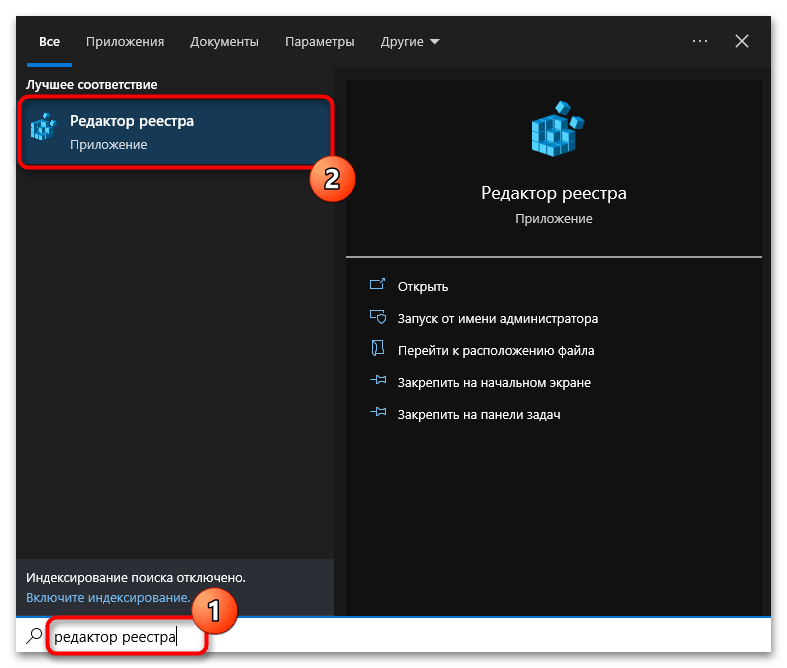
- Попасть в «Редактор реестра» проще всего через «Пуск». Просто откройте данное меню и начните вводить название приложения, чтобы найти и запустить его.
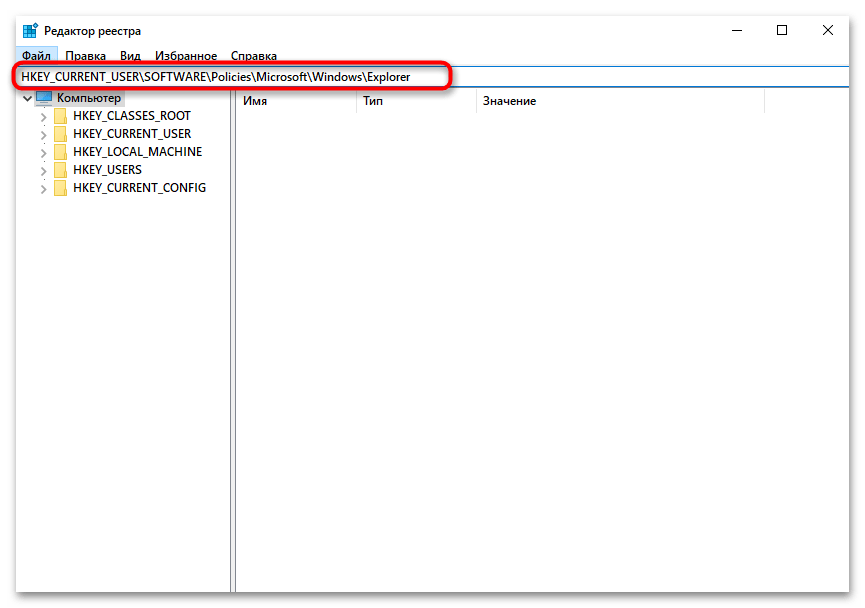
- Далее перейдите по пути
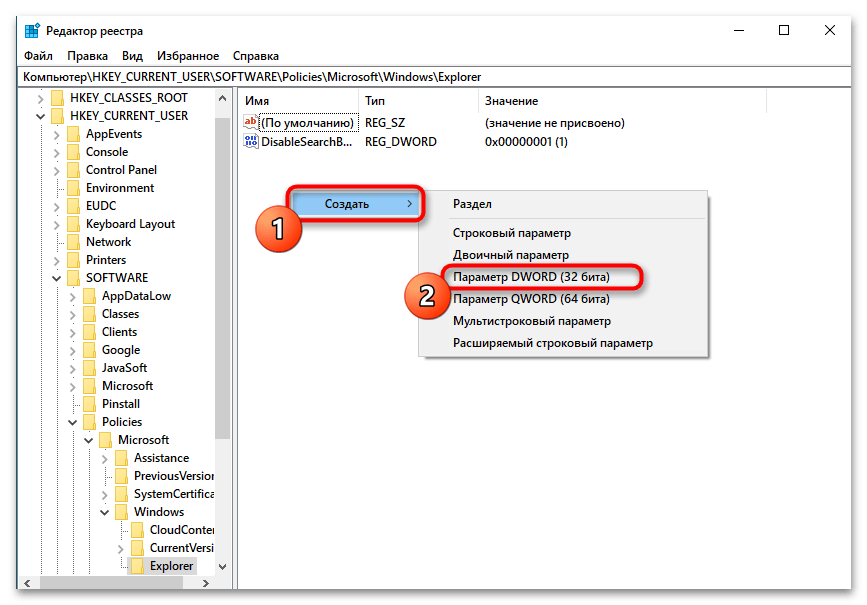
HKEY_CURRENT_USER\SOFTWARE\Policies\Microsoft\Windows\Explorer, вставив его в адресную строку сверху. - В конечной папке необходимо кликнуть правой кнопкой мыши по пустому месту в центральной области, навести курсор на «Создать», выбрать пункт «Параметр DWORD (32 бита)» и переименовать его в «DisableNotificationCenter».
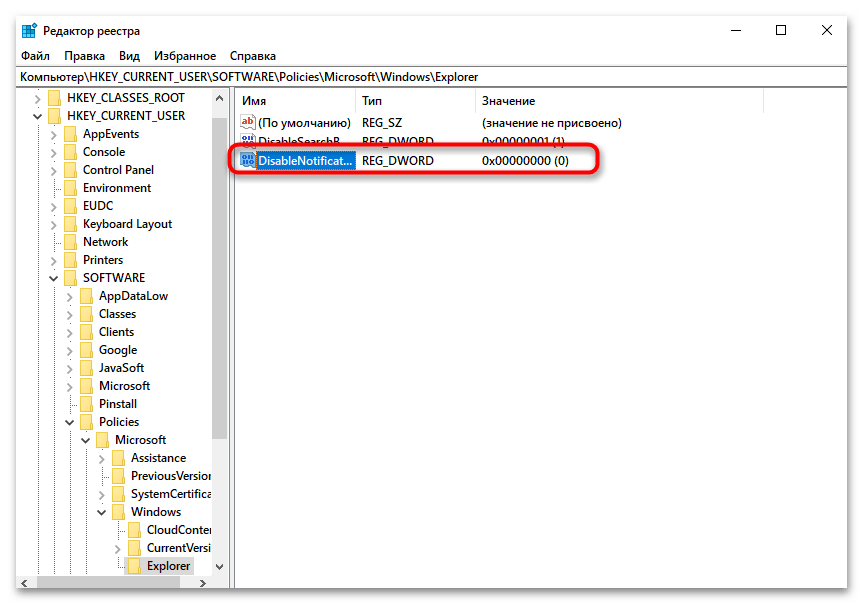
- Если этот параметр у вас уже есть, просто кликните по нему дважды для изменения значения.
- Само значение обязательно должно быть «0», поскольку «1» отвечает за отключение центра уведомлений, в результате чего значок не будет отображаться. После внесения изменений перезагрузите Windows 10, чтобы изменения вступили в силу.
Способ 3: Редактирование локальной групповой политики
Обладатели Windows 10 Pro и Enterprise дополнительно имеют доступ к «Редактору локальной группой политики», что является графическим аналогом «Редактора реестра». В нем собрано множество настроек, отвечающих за поведение ОС и ее отдельных элементов. Политики отдельных пользователей предлагают блокировать разные компоненты персонализации, включая и центр уведомлений. Поэтому если предыдущие инструкции вам не подошли, стоит найти локальную политику и проверить, не заблокирован ли центр уведомлений на панели задач.
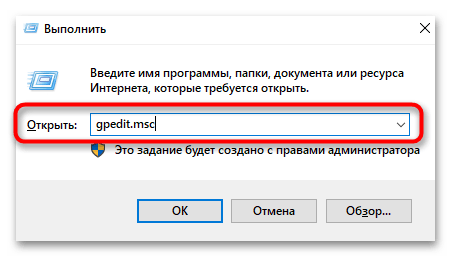
- Щелкните правой кнопкой мыши по «Пуску» и выберите из меню пункт «Выполнить».
- В этой утилите введите команду
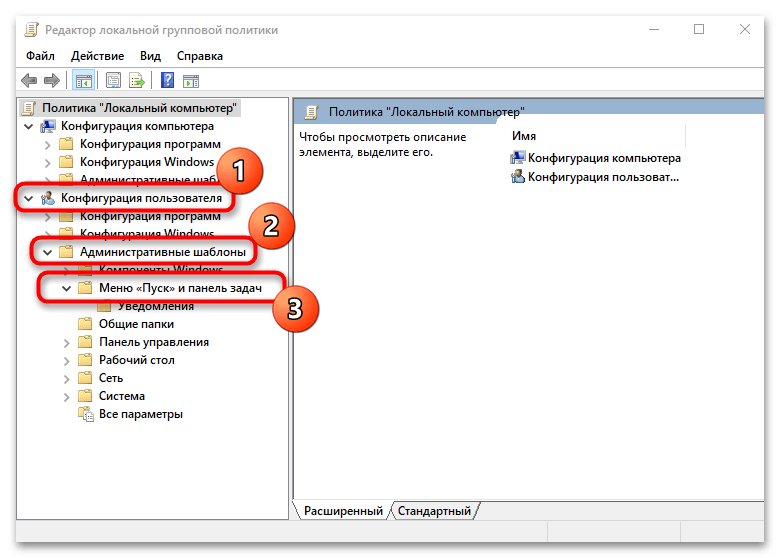
gpedit.msc, чтобы перейти к «Редактору локальной групповой политики». - В новом окне разверните ветку «Конфигурация пользователя», выберите директорию «Административные шаблоны» и «Меню «Пуск» и панель задач».
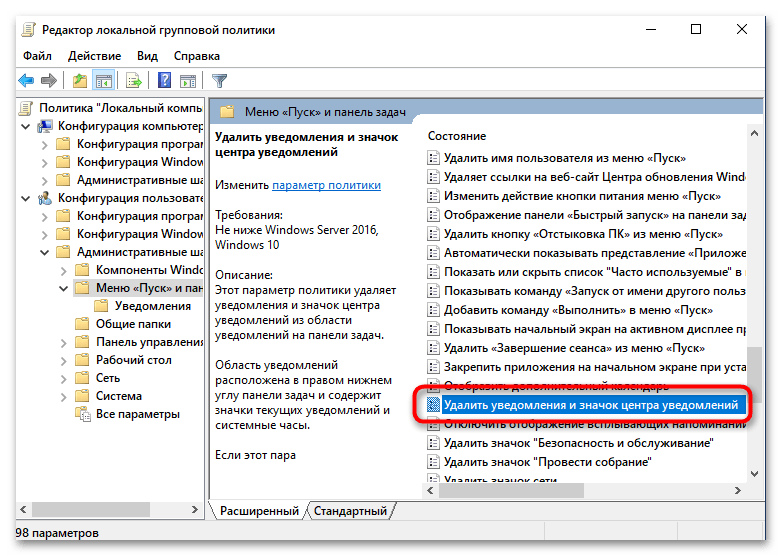
- Справа вам необходимо найти политику с названием «Удалить уведомления и значок центра уведомлений». Нажмите дважды по ней левой кнопкой мыши, чтобы открыть «Свойства».
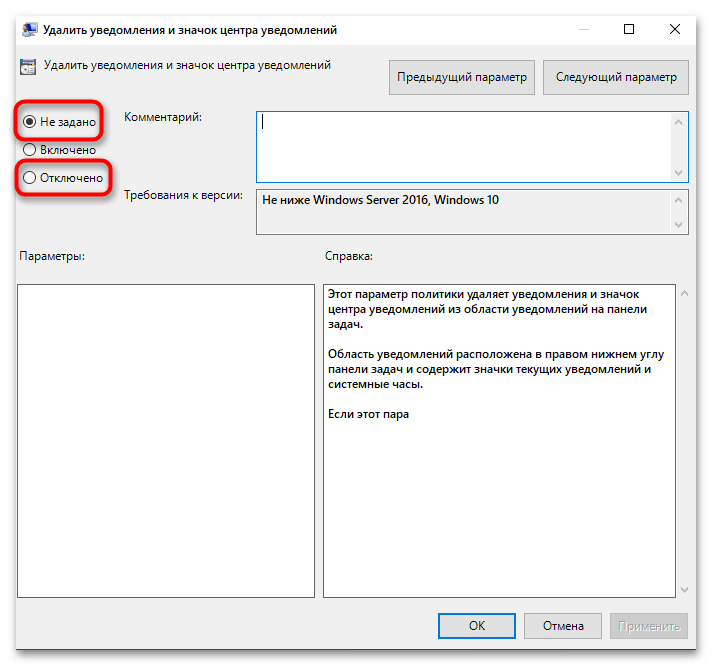
- Установите значение «Не задано» или «Отключено», чтобы политика перестала действовать и не блокировала значок. Обязательно примените изменения и перезагрузите компьютер.
Решение проблем с отображением центра уведомлений
В завершение материала разберем несколько основных причин, по которым значок центра уведомлений может отсутствовать даже после включения настройки всеми описанными выше методами. Мы рекомендуем начать с первого способа исправления, поскольку он самый простой в реализации и чаще всего помогает восстановить значок на панели задач.
Способ 1: Изменение параметра конфиденциальности
В первую очередь необходимо проверить настройку конфиденциальности, отвечающую за показ уведомлений в Windows 10. Возможно, вы не видите кнопку и сообщений как раз потому, что ранее запретили приложениям работать с уведомлениями. Изменить ситуацию можно буквально в несколько кликов.
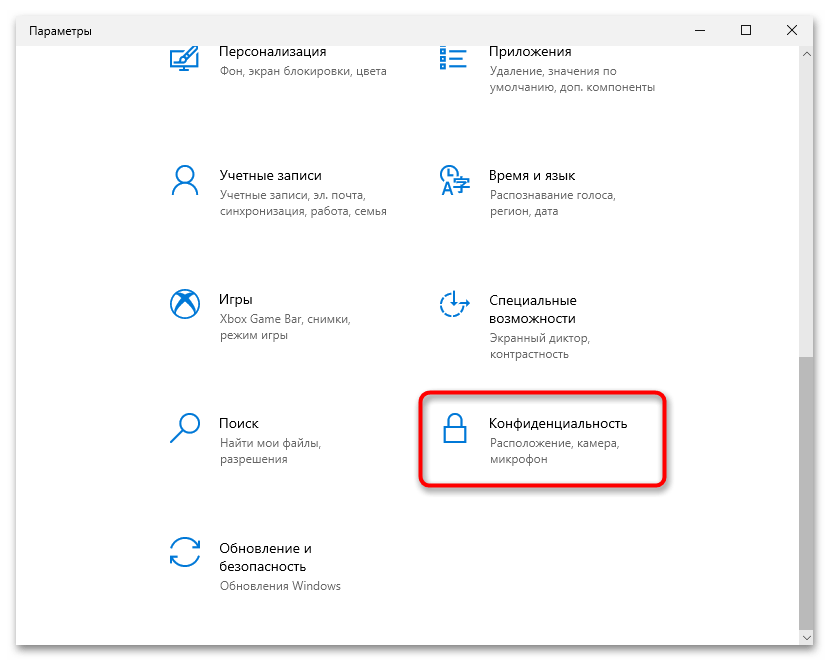
- Через «Пуск» перейдите в «Параметры».
- Выберите раздел «Конфиденциальность».
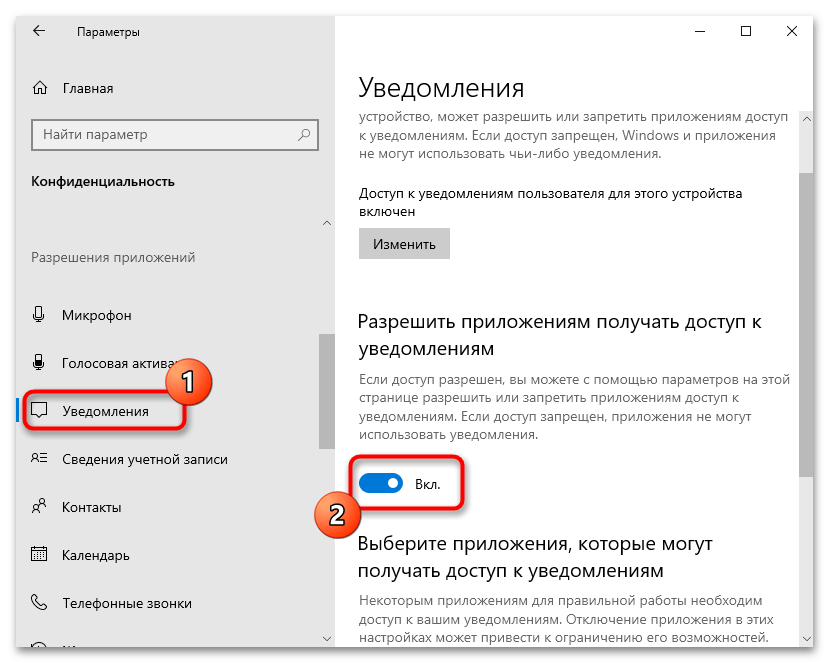
- В списке слева отыщите «Уведомления», затем найдите настройку «Разрешить приложениям получать доступ к уведомлениям» и перетащите переключатель в состояние «Вкл.».
Способ 2: Повторная регистрация центра действий
Центр уведомлений входит в состав центра действий, который по умолчанию отображается на панели задач. Через него вы управляете яркостью экрана, звуком и основными устройствами. Возможно, случилась поломка именно центра действий, из-за чего некоторые его элементы пропали или работают некорректно. Можно попробовать выполнить его повторную регистрацию, используя для этого одну команду.
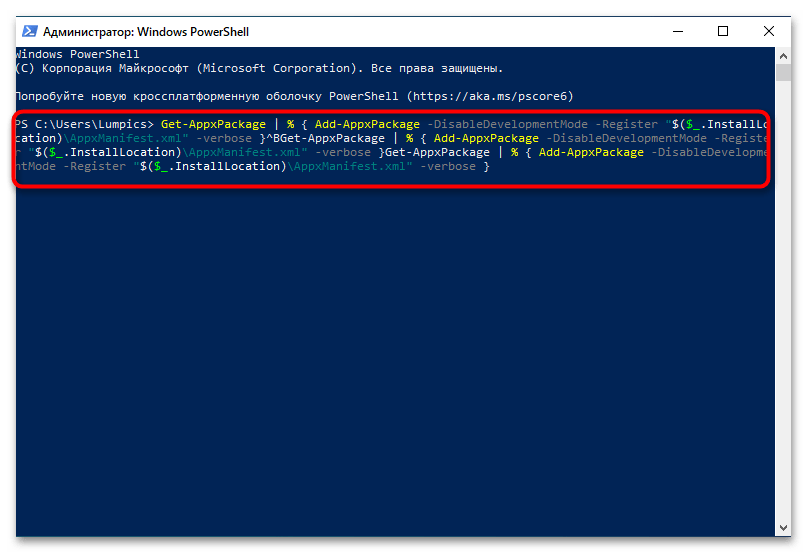
- Нажмите ПКМ по «Пуску» и запустите «PowerShell» от имени администратора.
- Введите команду
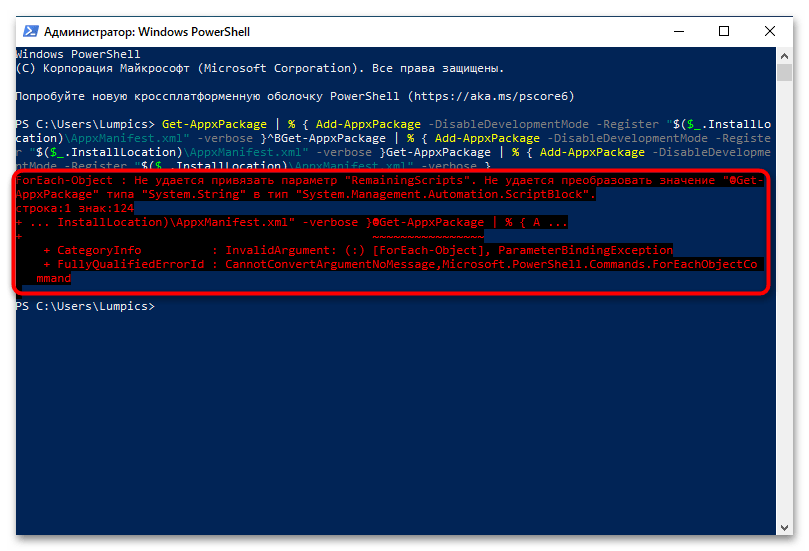
Get-AppxPackage | % { Add-AppxPackage -DisableDevelopmentMode -Register "$($_.InstallLocation)\AppxManifest.xml" -verbose }и нажмите Enter для ее подтверждения. - В результате вы можете увидеть, что необходимые файлы будут догружены. Если появился красный текст с информацией о проблеме при обработке данных, скорее всего, повторная регистрация пакетов и не нужна, из-за чего она и прервалась.
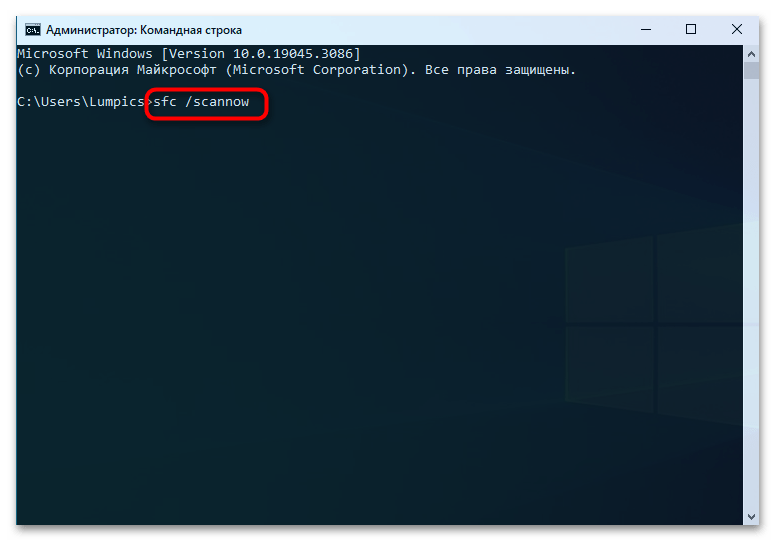
Способ 3: Проверка целостности системных файлов
При сохранении проблемы с отображением уведомлений в Windows 10 даже после включения всех необходимых настроек стоит проверить целостность системных файлов. Есть вероятность, что какие-то компоненты операционной системы были повреждены или удалены, из-за чего и нарушилось функционирование центра уведомлений и, возможно, еще каких-то других элементов. Проверить целостность файлов довольно просто, поскольку для этого предназначены специальные стандартные консольные утилиты. Они же и исправляют найденные ошибки в автоматическом режиме.
Подробнее: Использование и восстановление проверки целостности системных файлов в Windows 10
Наша группа в TelegramПолезные советы и помощь
Skip to content
Navigation Menu
Sign in
Provide feedback
We read every piece of feedback, and take your input very seriously.
Include my email address so I can be contacted
Saved searches
Use saved searches to filter your results more quickly
Sign in
Sign up
r57zone
/
NotificationCenter
Public
-
Notifications
You must be signed in to change notification settings -
Fork
4 -
Star
21
Alternative notification center for Windows / Альтернативный центр уведомлений для Windows
License
View license
21
stars
4
forks
Branches
Tags
Activity
Star
Notifications
You must be signed in to change notification settings
BranchesTags
Folders and files
| Name | Name |
Last commit message |
Last commit date |
|---|---|---|---|
Latest commitHistory41 Commits |
|||
|
Source |
Source |
||
|
LICENSE |
LICENSE |
||
|
README.RU.md |
README.RU.md |
||
|
README.md |
README.md |
||
Repository files navigation
← Choose language | Выберите язык
Notification center
Alternative notification center for Windows. Compatible with notifications for programs. Can be used together with EasyReminders, EchoBackuper and RSS checker.
Setup
To enable blinking of the keyboard LED (Scroll Lock), change the ScrollBlink parameter to 1 in the Setup.ini file.
Screenshots

Download
Version for Windows 7, 8.1, 10, 11 with Internet Explorer 11 installed.
Download
Feedback
r57zone[at]gmail.com
About
Alternative notification center for Windows / Альтернативный центр уведомлений для Windows
Topics
notifications
windows
notification-center
notification
notificationcenter
notification-hub
Resources
Readme
License
View license
Activity
Stars
21
stars
Watchers
1
watching
Forks
4
forks
Report repository
Releases
10
Notification center 0.7.8
Latest
Feb 13, 2025
+ 9 releases
Languages
-
Pascal
92.7% -
HTML
7.0% -
Batchfile
0.3%
Skip to content
Notification Center for Windows 10.
The required files to get Notification Center in Windows 10
Please read the readme.txt file.
Author: https://twitter.com/adeyblue.
Download ‘Notification Center for Windows 10’
Size: 133.74 Kb
Download link: Click here to download the file
Support us
Winaero greatly relies on your support. You can help the site keep bringing you interesting and useful content and software by using these options:
If you like this article, please share it using the buttons below. It won’t take a lot from you, but it will help us grow. Thanks for your support!
For the longest time, notifications in the Windows operating system have been something of a joke. In Windows 10, however, users are finally treated to a notification center they can use.
Notifications can make or break a system, and in each one be it Android, iOS, or OS X, notifications comprise an important aspect of user/app interaction. Windows 8 introduced its own toast notifications, which were small rectangular boxes that slid out from the top-right corner. Truth be told, they never really caught on and the worst part was, once a notification disappeared, it was gone forever.
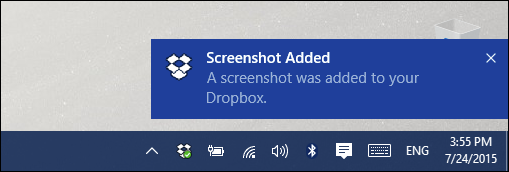
To fix this, Microsoft has introduced a new notification center, known as the «Action Center», which retains your notification history so if you miss anything, you can open the center up and review them. To open the Action Center, click the icon as shown in the following screenshot.
(Note that this icon will turn white if you have any unread notifications.)
The Action Center displays all your previous notifications, which you can go back and expand to review or clear out if desired. Click «Clear all» to do this in one go, or click the «X» to delete each one individually.

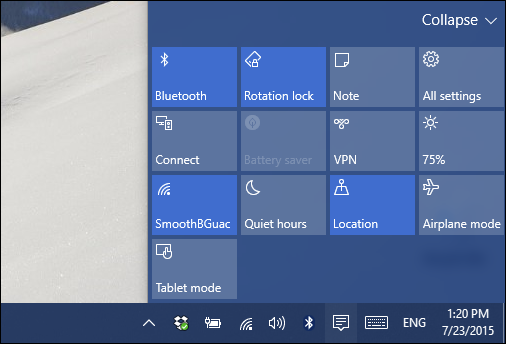
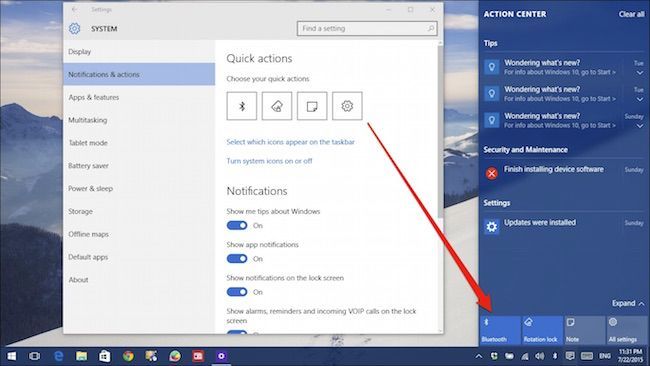
At the bottom of the Action Center are four settings, which can be expanded to show everything.
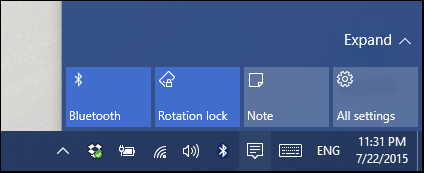
These are called «Actions» and can be configured in the Settings, which we’ll talk about next.
To configure notifications and the Action Center, open the settings, then the System group, and then click «Notifications and actions». The top-most set of options are the «Quick actions».
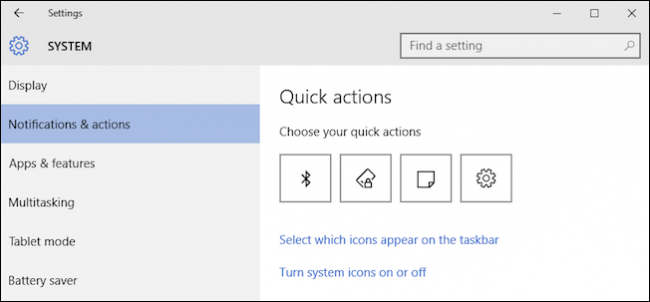
These are the first four actions you’ll see whenever you open the Action Center. You can change these to the ones you think you’ll use most often.
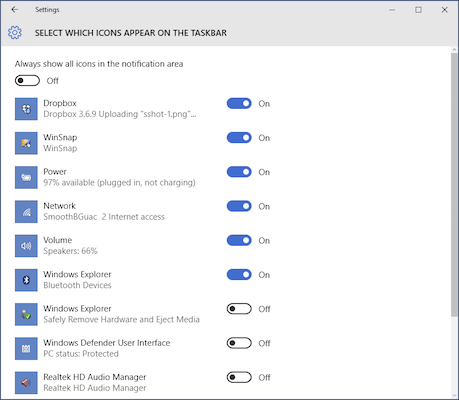
If you click the link «Select which icons appear on the taskbar» you’ll be able to decide how crowded or sparse the system tray is, or you can just turn them all «Off».
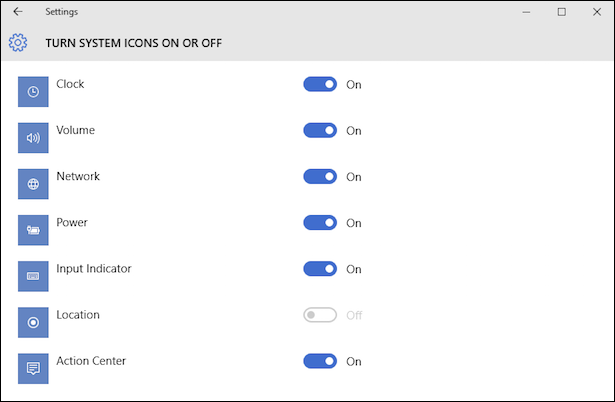
As with previous Windows versions, you can also turn system icons on or off, such as the clock, volume control, and even the Action Center itself.
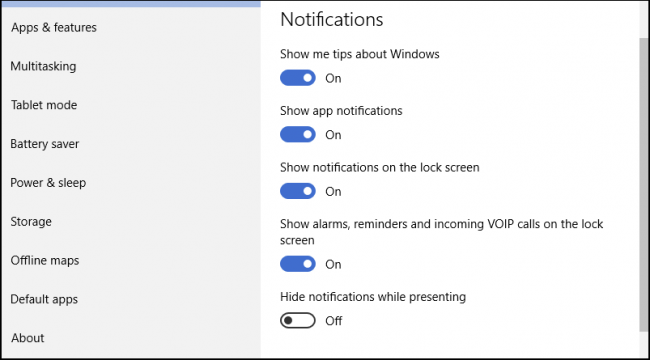
There are five options to control notifications in Windows 10, though unfortunately you cannot turn off notification sounds. This must still be done in the Sound control panel, which we described in an earlier article.
Turning off the first two options will likely quash many to most notifications, so if you don’t like receiving them, then you’re going to want to start turning options off.
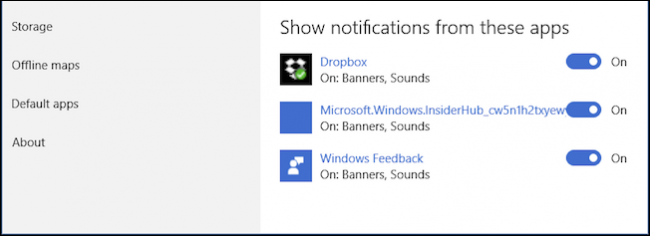
There are also options to turn off notifications from specific apps. So, if you don’t want to disable app notifications wholesale, but still don’t want to see them from certain ones, you can selectively disable them.
As you can see, the Action Center is a welcome addition to the Windows operating system. Finally users can track events and won’t miss anything important.
Further, the ability to customize which actions are available at your fingertips adds a greater level of customization so if you use certain controls far more frequently than others, you’re not constantly having to dig into the settings to use them.
We’d like to hear from you now, what do you think of Windows 10’s new Action Center? Does it address Windows’ notification issues, or would you like to see it do more? Please leave your feedback in our discussion forum.
Recently Microsoft released its latest preview build 9879 for the Windows 10 users. In the new build, the main change we can find out is the Notification Center, where all the notifications will be saved until we are acknowledging that.
This Notification Center in Windows 10 is configurable for the users for those who wants to remove from the desktop. In addition to that, the Windows 10 new build presents the Windows Insider hub to make their feedback reporting easy.
Also in new build, Microsoft gives the option to hide the Search icon and Task View icon from Taskbar for those who wants to remove it by right clicking on Taskbar. Here we will see the simple step for removal of Notification Center from desktop and can be accomplished by with a couple of easy steps.
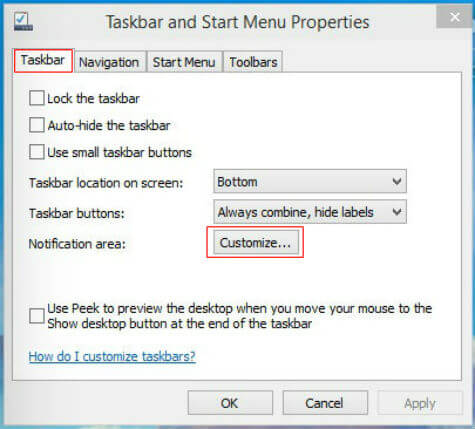
To start with, right click on empty space of Taskbar to take the properties. You will get the same settings from Control panel too. From here, we can also remove the integrated Search icon and Task view icon from Taskbar, by unchecking both. Select properties here and the Taskbar and Start menu properties window will be open up.
In the Taskbar and Start menu window, there are options for customizing the taskbar location and presentation of programs. Below that we can see the Notification Area settings with a “Customize” button.
We need to click on that “Customize Button to remove the Notification Center from Windows 10. Settings for Notification Area Icons will be open for customization.
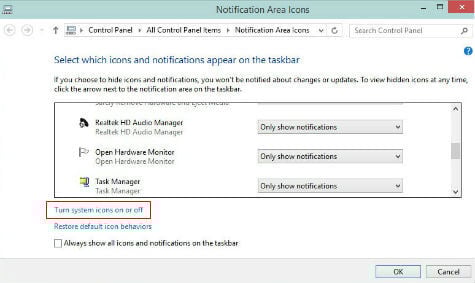
In the Notification Area Icons windows, there are options given for different icons like Network, Security and Maintenance, Microsoft OneDrive etc to disable the notifications and icons too.
Here we need to look at the bottom of these icons to find out “Turn system icons on or off” setting and click on that. Now the settings for System Icons window will display.
In the System Icon window settings, we can see the icons like Clock, Volume, Network etc along with the Notification Center with the current setting as ON.
To remove the Notification Center from the Taskbar, we only need to turn this setting to OFF. You can see the notification center will be disappearing as soon as the settings change.
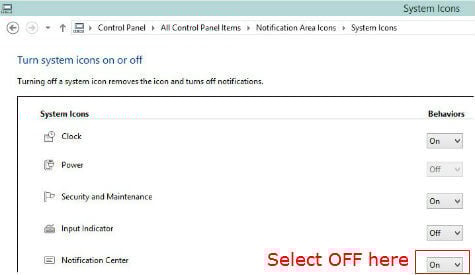
From the System Icon Window, it is also possible to remove the icons for Clock, Network, Power and other icons to look your desktop as clean one.
This shows that the new Windows 10 OS is designed to have more customization options in system level when compared to previous Windows versions to address the customer feedbacks. We will expect more features and customizations in the coming builds which is expected at mid-January 2015.
Disclosure: Mashtips is supported by its audience. As an Amazon Associate I earn from qualifying purchases.