
Уровень сложностиСложный
Время на прочтение12 мин
Количество просмотров4.3K
Что делать если надо запустить современный софт в устаревшем окружении? Рассказываем о процессе «портирования назад» последней версии Node.js на старую Windows 7.

В то время как «где‑то там высоко в облаках» нейросети во главе с Илоном Маском бороздят просторы солнечной Калифорнии, а все приличное общество ждет прихода сингулярности и новой версии iOS — на нашей грешной Земле все также стоят и работают вполне обычные фабрики с заводами. На которых является нормой использовать оборудование вместе с управляющим софтом десятилетиями.
В результате такого подхода на каждом крупном промышленном предприятии живет и процветает целая экосистема, работающая на устаревшем (по меркам остальной ИТ‑индустрии) ПО и от него же зависящая.
Всем этим я просто заранее отвечаю на вопросы из серии «зачем это надо» и «кому это нужно» — теперь вы тоже знаете, что даже на суперсовременных производствах обязательно есть темный подвал, в котором стоит пыльный станок под управлением Windows 2000 (в лучшем случае), без которого все сгорит и расплавится.
Так что задача взаимодействия с устаревшим окружением врядли потеряет свою актуальность в обозримом будущем, по крайней мере до наступления сингулярности и окончательной победы роботов.
Нам тоже регулярно поступают подобные задачи, по мотивам выполнения которых и написана эта статья.
В первой версии, написанной еще в январе 2024го года мы портировали 20ю Node.js, которая тогда являлась последней LTS‑версией (т.е. с самым длинным циклом поддержки).
Спустя полгода и ввиду пожеланий по дальнейшему обновлению — портировали уже 22.3.0, в первую очередь для обкатки возможных будущих проблем в следующем LTS.
Node.js и Windows 7
Официальная поддержка Windows 7 в проекте закончилась еще в 2019м году:
With issues like 20348 being closed as wontfix, I dont think its fair to say that Node supports Windows 7 anymore, as the experience with the default terminal is so bad as to be unusable. Node now requires Windows 8 or Windows 10, whatever the case is.
Последняя доступная версия для устаревшей «семерки» это 12.22.7, которой уже не хватает для запуска и сборки современных проектов на Node.js.
Если же вы попробуете скачать и запустить более свежую версию — увидите вот такое сообщение:

Увы но официальная сборка Node.js для Windows больше не работает, послав вас в сторону сайта с обновлениями.
Немного технических деталей
Node.js — достаточно старый кроссплатформенный проект, причем Windows долгое время не являлась для него основной платформой.
С точки зрения задачи бекпортирования это означает две вещи:
-
места вызовов WinAPI изолированы и вынесены в отдельные файлы;
-
ограничения на поддерживаемую ОС по большей части искусственны а основной код проекта не имеет привязки к какой-либо конкретной ОС и тем более ее версии.
Но разумеется все не настолько просто и будут места где придется включать голову и даже немного ей думать.
Сам проект написан на C++ (и ожидаемо немного чистого Си), еще в нем активно используется Python для сборки — это первая серьезная проблема.
Дело в том что последние версии сборок Python для Windows также не поддерживают Windows 7:
Note that Python 3.12.1 cannot be used on Windows 7 or earlier.
Чтобы не заморачиваться сборкой еще и Python из исходников — был взят готовый сторонний бекпорт отсюда. Для сборки Node.js подойдет последняя версия 3.9 ветки.
Окружение разработки
Конечно же у столь популярного проекта развертывание окружения для разработки полностью автоматизировано:
A Boxstarter script can be used for easy setup of Windows systems with all the required prerequisites for Node.js development. This script will install the following Chocolatey packages:
И для обычной разработки на поддерживаемой ОС точно стоит использовать именно эти инструменты. Но поскольку мы делаем бекпорт — вся эта автоматизация не сработает и точно также пошлет вас лесом в сторону обновлений.
Так что увы, но придется разворачивать все окружение для разработки своими руками, как в былые времена.
Python
Скачиваем и устанавливаем неофициальную сборку Python 3.9 для Windows 7, лучше в папку попроще — без пробелов и символов юникода в пути.
Убеждаемся что python.exe находится в переменной окружения PATH:

NASM
Внезапно оказалось что в Node.js есть вставки на чистом ассемблере, поэтому для сборки нужно установить NASM. Я использовал последнюю (уже нет) версию 2.16.02rc7, с официального сайта, которой проводилась сборка 20й версии в январе.
Инсталлятор успешно отрабатывает на Windows 7, но к сожалению не добавляет приложения из набора NASM в переменную окружения.
Поэтому после установки необходимо добавить папку с NASM в переменную PATH:
Visual Studio
Наконец последней, но самой большой проблемой является собственно компилятор C++. Вам нужно будет скачать и установить среду разработки Visual Studio 2019 — последнюю доступную версию для Windows 7, еще поддерживаемую скриптами сборки Node.js (уже нет):
В 22й версии Node.js из скрипта сборки полностью удалили поддержку всех устаревших версий Visual Studio кроме последней.
К сожалению Microsoft очень не любит когда используют устаревшие версии ее продуктов, поэтому поиск ссылки на скачивание 2019й версии Visual Studio является еще тем квестом.
Мне удалось ее обнаружить случайно в этой статье, скачав версию «professional», прямая ссылка для скачивания инсталлятора, но без гарантий как долго она будет оставаться актуальной.
Также отмечу, что стоит скачать и установить именно среду разработки а не просто «build tools», поскольку нужно будет редактировать исходный код Node.js — делать это в голом «блокноте» мягко говоря не очень удобно.
Вот так выглядит установленная версия Visual Studio:

Нужно будет установить отмеченные красным пакеты целиком:

Учитывайте также что установка займет ~22Гб места на диске, еще ~15Гб займет локальная сборка Node.js.
Сборка
Исходный код Node.js можно забрать из репозитория Github или скачать один из релизных архивов с исходниками. Второй вариант — быстрее, поэтому я использовал его, скачав архив с исходниками с официального сайта.
Распаковываем архив, например с помощью 7Zip в каталог без пробелов и символов юникода и запускаем сборку через скрипт vcbuild.bat в корне:

Разумеется первая сборка упадет, но не сразу:
мы должны убедиться что нашлись и определились все необходимые инструменты для сборки — эта информация будет отображена в самом начале сборки.
Только убедившись что все необходимое нашлось, переходим к редактированию исходников.
Патчи
Первым делом отключаем очевидную заглушку, которая не дает использовать Node.js на устаревших версиях Windows — она в уже отключенном виде показана на первом скриншоте в статье.
Файл src/node_main.cc, нам нужны строки ~34-50:
int wmain(int argc, wchar_t* wargv[]) {
  // Windows Server 2012 (not R2) is supported until 10/10/2023, so we allow it
  // to run in the experimental support tier.
  char buf[SKIP_CHECK_STRLEN + 1];
  if (!IsWindows8Point1OrGreater() &&
      !(IsWindowsServer() && IsWindows8OrGreater()) &&
      (GetEnvironmentVariableA(SKIP_CHECK_VAR, buf, sizeof(buf)) !=
           SKIP_CHECK_STRLEN ||
       strncmp(buf, SKIP_CHECK_VALUE, SKIP_CHECK_STRLEN) != 0)) {
    fprintf(stderr, "Node.js is only supported on Windows 8.1, Windows "
                    "Server 2012 R2, or higher.\n"
                    "Setting the " SKIP_CHECK_VAR " environment variable "
                    "to 1 skips this\ncheck, but Node.js might not execute "
                    "correctly. Any issues encountered on\nunsupported "
                    "platforms will not be fixed.");
    exit(ERROR_EXE_MACHINE_TYPE_MISMATCH);
}
Весь этот блок необходимо удалить или закомментировать целиком.
Вообще-то самому процессу сборки эта проверка не мешает, зато не даст потом запустить собранную версию.
Следующая остановка — файл deps/uv/src/win/util.c, он большой и страшный поскольку содержит слой интеграции с ОС Windows и вызовы WinAPI.
Вот тут и начинается безудержное веселье, поскольку разработчики Node.js начали использовать функции WinAPI доступные только в последних версиях Windows.
Для того чтобы это обойти и заставить работать новый софт на старой ОС существует всего два решения:
-
эмулировать недоступную функцию,
-
использовать ее доступный аналог.
Второе сильно проще и поскольку проект Node.js не успел сильно далеко убежать от своих кроссплатформенных основ — такая замена одного вызова WinAPI на другой выглядит легким решением проблемы.
Первая остановка на пути к успешной сборке — функция uv_os_gethostname, (строка ~1531) которая использует новую функцию WinAPI GetHostNameW:
The GetHostNameW function retrieves the standard host name for the local computer as a Unicode string.
Которая к сожалению не существовала в Windows 7:
Windows 8.1 and Windows Server 2012 R2: This function is supported for Windows Store apps on Windows 8.1, Windows Server 2012 R2, and later.
Но все не так плохо, поскольку нашлись патчи из других открытых проектов, заменяющие эту функцию на стандартный POSIX-аналог gethostname, например вот такой.
Поэтому итоговое исправление будет лишь легкой прогулкой:
int uv_os_gethostname(char* buffer, size_t* size) {
  //WCHAR buf[UV_MAXHOSTNAMESIZE];
  char buf[UV_MAXHOSTNAMESIZE];
size_t len;
//char* utf8_str;
//int convert_result;
if (buffer == NULL || size == NULL || *size == 0)
return UV_EINVAL;
uv__once_init(); /* Initialize winsock */
if (pGetHostNameW == NULL)
return UV_ENOSYS;
//if (pGetHostNameW(buf, UV_MAXHOSTNAMESIZE) != 0)
if (gethostname(buf, sizeof(buf)) != 0)
return uv_translate_sys_error(WSAGetLastError());
// convert_result = uv__convert_utf16_to_utf8(buf, -1, &utf8_str);
buf[sizeof(buf) - 1] = '\0'; /* Null terminate, just to be safe. */
len = strlen(buf);
// if (convert_result != 0)
//   return convert_result;
// len = strlen(utf8_str);
if (len >= *size) {
*size = len + 1;
//  uv__free(utf8_str);
return UV_ENOBUFS;
}
//memcpy(buffer, utf8_str, len + 1);
//uv__free(utf8_str);
memcpy(buffer, buf, len + 1);
*size = len;
return 0;
}
В виде diff можно посмотреть вот тут.
Как видите вся переделка заключается в замене вызова функции WinAPI и использовании немного других структур данных для работы.
Следующая проблемная функция это uv_clock_gettime (строка ~509), в которой также используется новая функция WinAPI GetSystemTimePreciseAsFileTime:
The GetSystemTimePreciseAsFileTime function retrieves the current system date and time with the highest possible level of precision (<1us). The retrieved information is in Coordinated Universal Time (UTC) format.
Недоступная в устаревшей Windows 7:
Minimum supported client Windows 8 [desktop apps | UWP apps]
Minimum supported server Windows Server 2012 [desktop apps | UWP apps]
К нашему счастью и тут есть простое решение в виде замены вызова на GetSystemTimeAsFileTime:
int uv_clock_gettime(uv_clock_id clock_id, uv_timespec64_t* ts) {
  FILETIME ft;
  int64_t t;
if (ts == NULL)
return UV_EFAULT;
switch (clock_id) {
case UV_CLOCK_MONOTONIC:
uv__once_init();
t = uv__hrtime(UV__NANOSEC);
ts->tv_sec = t / 1000000000;
ts->tv_nsec = t % 1000000000;
return 0;
case UV_CLOCK_REALTIME:
GetSystemTimeAsFileTime(&ft);
//	  GetSystemTimePreciseAsFileTime(&ft);
/* In 100-nanosecond increments from 1601-01-01 UTC because why not? /
t = (int64_t) ft.dwHighDateTime << 32 | ft.dwLowDateTime;
/ Convert to UNIX epoch, 1970-01-01. Still in 100 ns increments. /
t -= 116444736000000000ll;
/ Now convert to seconds and nanoseconds. /
ts->tv_sec = t / 10000000;
ts->tv_nsec = t % 10000000  100;
return 0;
}
return UV_EINVAL;
}
К еще большей радости оказалось, что более старая функция использует точно такую же структуру данных в качестве аргумента, поэтому вся правка заключается только в замене вызовов:
GetSystemTimeAsFileTime(&ft);
//GetSystemTimePreciseAsFileTime(&ft);
Наконец последним проблемным участком, появившимся в новой 22й версии Node.js является вот это место в файле deps\v8\src\maglev maglev-assembler-inl.h (строка ~490):
template <typename Descriptor, typename... Args>
void PushArgumentsForBuiltin(MaglevAssembler* masm, std::tuple<Args...> args) {
  std::apply(
      [&](auto&&... stack_args) {
        if (Descriptor::kStackArgumentOrder == StackArgumentOrder::kDefault) {
          masm->Push(std::forward<decltype(stack_args)>(stack_args)...);
        } else {
          masm->PushReverse(std::forward<decltype(stack_args)>(stack_args)...);
        }
      },
      args);
}
Компилятор почему-то ругается на kStackArgumentOrder — не может его найти.
Проблема заключается в том что проект Maglev, это оптимизирующий компилятор, работающий внутри движка V8, на котором и основан Node.js. Это мягко говоря непростая штука, полностью разобраться в работе которой займет наверное пару лет чистого времени и медитаций.
Которых у меня разумеется нет. Поэтому было решено пойти другим путем — посмотреть кто еще из открытых проектов использует этот Maglev.
Достаточно быстро обнаружился вот такой коммит в исходниках движка QtWebEngine, использующего внутри V8 и Chromium для работы.
Согласно этому коммиту, был изменен класс Descriptor на Descriptor2, чтобы итоговый код выглядел следующим образом:
template <typename Descriptor2, typename... Args>
void PushArgumentsForBuiltin(MaglevAssembler* masm, std::tuple<Args...> args) {
  std::apply(
      [&](auto&&... stack_args) {
        if (Descriptor2::kStackArgumentOrder == StackArgumentOrder::kDefault) {
          masm->Push(std::forward<decltype(stack_args)>(stack_args)...);
        } else {
          masm->PushReverse(std::forward<decltype(stack_args)>(stack_args)...);
        }
      },
      args);
}
К сожалению не удалось установить каких‑либо деталей и подробностей — откуда именно вылезли эти уши проблемы, но само решение оказалось вполне рабочим:
Maglev успешно собрался, вместе со всеми своими тестами, каких-либо ошибок замечено не было.
Сборка
Внесенных в код изменений достаточно для работы уже нет:
В скрипте сборки Node.js v22 (в отличие от 20й LTS) удалили поддержку устаревших версий Visual Studio, поэтому прежде чем запускать скрипт — необходимо вернуть на место секцию, отвечающую за сборку на старой 2019й версии:
@rem Look for Visual Studio 2019
:vs-set-2019
if defined target_env if "%target_env%" NEQ "vs2019" goto msbuild-not-found
echo Looking for Visual Studio 2019
@rem VCINSTALLDIR may be set if run from a VS Command Prompt and needs to be
@rem cleared first as vswhere_usability_wrapper.cmd doesn't when it fails to
@rem detect the version searched for
if not defined target_env set "VCINSTALLDIR="
call tools\msvs\vswhere_usability_wrapper.cmd "[16.0,17.0)" %target_arch% "prerelease"
if "_%VCINSTALLDIR%_" == "__" goto msbuild-not-found
@rem check if VS2019 is already setup, and for the requested arch
if "_%VisualStudioVersion%_" == "_16.0_" if "_%VSCMD_ARG_TGT_ARCH%_"=="_%target_arch%_" goto found_vs2019
@rem need to clear VSINSTALLDIR for vcvarsall to work as expected
set "VSINSTALLDIR="
@rem prevent VsDevCmd.bat from changing the current working directory
set "VSCMD_START_DIR=%CD%"
set vcvars_call="%VCINSTALLDIR%\Auxiliary\Build\vcvarsall.bat" %vcvarsall_arg%
echo calling: %vcvars_call%
call %vcvars_call%
if errorlevel 1 goto msbuild-not-found
if defined DEBUG_HELPER @ECHO ON
:found_vs2019
echo Found MSVS version %VisualStudioVersion%
set GYP_MSVS_VERSION=2019
set PLATFORM_TOOLSET=v142
goto msbuild-found
Затем добавляем безусловный переход в секцию для 2022:
@rem Look for Visual Studio 2022
:vs-set-2022
::if defined target_env if "%target_env%" NEQ "vs2022"
goto vs-set-2019
Вызов goto vs-set-2019 сразу сделает переход в добавленный нами блок, без попытки поиска 2022й версии Visual Studio.
После всех правок запускаем сборку:
vcbuild.bat full-icuГде аргумент full-icu указывает на поддержку всех локалей.
Сборка будет идти достаточно долго (~2ч в моей виртуальной машине, но разумеется это зависит от оборудования), причем 22я версия собирается ощутимо дольше чем 20 LTS. Судя по логу сборки — из‑за выросшего количества автотестов.
Если все закончится успешно — в каталоге out\Release появится готовый билд. Для проверки запустите:
Release\node.exe -e "console.log('Hello from Node.js', process.version)"Должно произойти выполнение Javascript-кода и отобразиться версия только что собранного Node.js.
Но это еще не все, поскольку после сборки не будет пакетного менеджера NPM. Чтобы он появился, необходимо собрать финальный архив — такой же как вы скачивали с официального сайта.
Делается это командой:
vcbuild.bat packageПосле чего в папке Release появится еще один каталог с названием релиза, в который и будет добавлен скрипт для запуска npm.cmd.
Этот каталог содержит финальную сборку Node.js, которую можно использовать для сборки и запуска ваших современных проектов.
Архив с дистрибутивом собирается с помощью 7zip, поэтому путь к нему должен быть в переменной PATH.
Тесты работоспособности
Разумеется самые упертые и подозрительные опытные из читателей, имеющие за плечами много лет практики в разработке и понимающие чем может грозить «легкая замена» одного вызова WinAPI на другое, сразу же усомнились — а будет ли такой «самопал» работать на реальных проектах и в боевых условиях?
Нам это тоже было интересно, поэтому первым (после успешной сборки) делом мы взяли «жирный» boilerplate на Angular 16 в качестве тестового проекта, собрали и запустили.
Выглядит это вот так:

Как видите запущен локальный сервер в режиме разработки с HMR (фоновой перекомпиляцией при изменениях) — самый ресурсоемкий вариант запуска.
Disclaimer #1:
Разумеется одного такого запуска мало для серьезной оценки, поэтому был создан целый набор автотестов, полностью эмулирующий окружение заказчика и все варианты использования им Node.js — каких‑либо проблем пока не было обнаружено.
Disclaimer #2:
Тем не менее это не гарантирует что проблем не будет лично у вас — окружение и кейсы использования могут очень сильно отличаться от проекта к проекту. По этой причине описанное выше — не руководство к действию и не повод к немедленному внедрению такого решения в прод. Особенно если у вас опасное производство, авиационное или медицинское ПО.
Хотите таким заниматься — извольте 90% бюджета потратить на сложное интеграционное тестирование, помимо работ по самой сборке с патчами.
0x08 Software
Мы небольшая команда ветеранов ИТ‑индустрии, создаем и дорабатываем самое разнообразное программное обеспечение, наш софт автоматизирует бизнес‑процессы на трех континентах, в самых разных отраслях и условиях.
Оживляем давно умершее, чиним никогда не работавшее и создаем невозможное — затем рассказываем об этом в своих статьях.
As an experienced full-stack developer, I often need to downgrade the Node.js runtime to older versions for projects I work on. Whether it‘s to resolve compatibility issues with outdated modules or replicate a legacy production environment, flexibility in Node.js version management is key.
In this comprehensive 3200+ word guide, I‘ll share my real-world expertise on the best practices for downgrading Node.js runtime versions on Windows, so you can effortlessly switch between Node releases.
Why Downgrade Node.js Versions?
Before jumping into the step-by-step instructions, it‘s important to understand what motivates the need to downgrade in the first place.
There are a few common reasons why as a full-stack developer you may need to downgrade the Node.js version on your Windows development machine or servers:
1. Incompatible Modules and Libraries
The Node.js ecosystem sees new module and library releases daily. In fast-moving landscapes, the latest Node.js runtime will often utilize cutting-edge JavaScript features that older modules are unable to leverage without updates.
Downgrading Node.js allows you to continue using incompatible modules by matching the version they were built for.
After new major Node.js releases, a spike of incompatible modules is common
2. Replicating Production/Legacy Environments Locally
If you are maintaining an application that runs on older versions of Node.js in production or legacy environments, you‘ll need to emulate the same runtime locally during development to accurately replicate behavior and bugs.
Pinning a local Node.js version to match production avoids unexpected issues down the road.
3. Testing Version Specific Functionality
The Node.js release cycle brings shiny new features with each version, but also shifts in how the runtime functions. When developing modules and applications that rely on specific Node.js functionality, testing across versions is crucial to ensure broad compatibility.
Having fine-grained control over the Node engine powering your experiments makes verifying version-specific behavior much easier.
4. Compatibility with Other Tools
Node.js often interacts with other programming tools like JavaScript transpilers, linters, bundlers, and runtimes. The versions need to align for a smooth developer experience.
For example, a project utilizing Babel v7 will require Node v10+ to operate properly. By downgrading Node appropriately you can eliminate unnecessary headaches.
Hopefully this gives some background on why you may find yourself needing to downgrade the Node.js version! Now let‘s look at effective approaches to accomplish this on Windows machines.
Prerequisite: Install a Node Version Manager
Before installing specific Node.js versions, a version manager tool should be set up to orchestrate switching between different runtime releases.
There are two excellent version managers I recommend for Windows:
nvm-windows – Activates Node versions dynamically at the command prompt
nodist – Installs Node versions into standalone directories
Both have their pros and cons. I‘ll provide instructions for nvm-windows and also touch on nodist as an alternative.
Option 1: Install nvm-windows
nvm-windows runs as a background service that intercepts Node commands allowing on-the-fly version switching. No need for separate Node installs or changing environment variables.
Benefits:
- Lightweight, runs fully in the background
- Easy commands to switch between versions dynamically
Drawbacks:
- Slower install/activation for some workflows
- Not all npm packages play nicely with environment hooking
To install nvm-windows:
- Download and run the nvm-windows installer
- Restart any open terminals to ensure PATH gets updated
- Verify it is working with
nvm --version
Once installed, nvm-windows enables you to switch between locally installed Node versions with two simple commands.
You can now install and manage any Node.js version needed!
Option 2: Install nodist
nodist takes a different approach, fully isolating Node versions into separate directories instead of dynamically redirecting commands.
Benefits:
- Node versions don‘t interfere with each other
- Productions apps can leverage standalone versions
Drawbacks:
- Requires changing PATH variable to switch versions
- More involved cleanup to remove unneeded versions
To quickly install nodist:
- Install Scoop to simplify Windows command line installs
- Run
scoop install nodistfrom an admin PowerShell prompt - Verify with
nodist --version
With nodist initialized you can now install into isolated Node directories.
Let‘s look at how to actually downgrade Node.js from here.
Step 1: Identify Target Node.js Version
The first step is identifying the specific Node.js version you intend to downgrade to. But how do you determine what version to use?
Taking a deliberate approach here pays dividends down the road to avoid compatibility issues. Here are smart ways to select a target version:
Match production environment – Replicate the Node runtime your applications run on in production environments. Check with your hosting provider, sysadmin teams, CI/CD pipelines to find out.
Consult documentation – Module README‘s will often list recommended, tested, or compatible Node versions to use with their code. Target those.
Review usage statistics – Understanding the adoption rates for various Node releases helps pick balanced versions.
v10, v12, v14 LTS prove most popular in downloads and usage
As you can see from the visual above, even-numbered LTS (Long-term Support) versions of Node have the highest usage which is important to consider.
Now that you know how to pick, choose the Node downgrade target. For the rest of this guide, I‘ll use v12.22.1 as an example.
Step 2: Install the Target Node Version
With nvm-windows or nodist installed, installing any Node.js version takes just a single command.
I‘ll include examples for both tools:
// nvm install command
nvm install 12.22.1

// nodist install command
nodist + 12.22.1
Wait for the installation process to complete.
The engines and binaries are now ready for the targeted v12.22.1 release!
Step 3: Activate the Downgraded Version
Once installed, the downgraded Node version must be activated to override your existing default.
nvm-windows command:
nvm use 12.22.1nodist instructions:
- Get path for the installed version:
nodist dist -l | find "12.22.1" - Set as node.exe alias:
set "path=C:\Users\name\nodist\dists\node-v12.22.1-win-x64;%path%"
Now confirm it worked:
node -v
# Should show v12.22.1
The Node runtime powering your terminal or actions like node . invocations should match the target version number.
Tip: To revert back, use nvm use default or reset PATH variables if on nodist.
You have successfully downgraded Node.js! But handling multiple coexisting versions takes a bit more consideration.
Maintaining Multiple Node.js Versions
In sophisticated development environments, you‘ll often need several Node.js versions simultaneously:
- Legacy apps on old stacks
- Modern tooling requiring newer releases
- Testing across targeted LTS versions
Managing the matrix of required Node engines can complicate things. Here are my recommended best practices as a senior full stack developer when dealing with Node.js downgrades across projects:
1. Categorize Projects by Required Node Versions
Audit projects and systems to create a checklist of required runtimes. Group together components relying on the same engines. This allows you to isolate conflicts.
Example:
- API Server – Node v12
- Admin Dashboard – Node v14
- CLI Tools – Node v16
Segment what parts apply to each downgrade path.
2. Standardize Environments with Version Managers
Centralize control of Node versions within version managers instead of local Node installations.
Benefits:
- Eliminates confusion tracking down binaries
- Standard tooling avoids surprises
- Single interface to manage
This concentrates the complexity into a consistent single tool.
3. Containerize Incompatible Components
If diverse Node requirements conflict, containerization isolates incompatible environments.
For example, building frontends relying on modern Node alongside legacy backend systems requiring older Node versions.
Spinning either up within Docker containers lets them coexist peacefully. Just be careful of networking contention.
4. Abstract Environment Differences in Code
Your source should adapt to the executed Node environment by feature detecting capabilities. Don‘t assume API support.
Encapsulate engine version checks into separate modules:
function supportsAsyncAwait() {

  // Node only supports native async/await after v7.6
  return parseFloat(process.version) >= 7.6;

}
This insulates your application code from underlying environment differences.
Following these leading practices pushes complexity out of your main code and maximizes flexibility in managing disparate Node.js versions across components.
The main takeaways around downgrading Node.js on Windows include:
- Use Node version managers like nvm-windows or nodist
- Identify target Node.js version wisely
- Install and activate older releases
- Additional care to handle multiple versions
Downgrading Node empowers you to eliminate version-specific bugs, achieve compatibility requirements, and match production environments accurately during development.
Mastering Node.js runtime version management ensures you can tackle projects relying on both modern and legacy stacks with confidence.
Whether working individually or leading a full-stack team spread across microservices, follow the approaches outlined here to gain absolute control over the engines powering your Node.js application components.
Now go forth and seamlessly downgrade across Node versions! The keys to downgrade without headaches are in your hands.
Developers use the Node.js runtime environment to build server-side and networking applications using JavaScript. To guarantee optimal performance and security, you need to update Node.js to the latest version regularly.
However, developers sometimes need to downgrade Node to a previous version when they encounter compatibility issues with dependencies or when a project requires a specific release.
Learn how to downgrade the Node version in Windows and manage multiple Node.js versions on a machine.
Prerequisites
- Access to the Windows command prompt (CMD) or PowerShell.
- Administrator privileges.
Downgrade Node Version on Windows
Removing an existing Node distribution and reinstalling a previous version whenever you have a different project is impractical.
The nvm (Node Version Manager) tool enables developers to install different versions of Node side-by-side and switch between these versions via the Windows command line.
Note: Having two concurrent Node distributions, one installed using nvm and another using npm, may lead to compatibility issues. It is recommended to uninstall existing Node versions before installing nvm.
Step 1: Uninstall Existing Node Version
To remove a Node.js version from your Windows system:
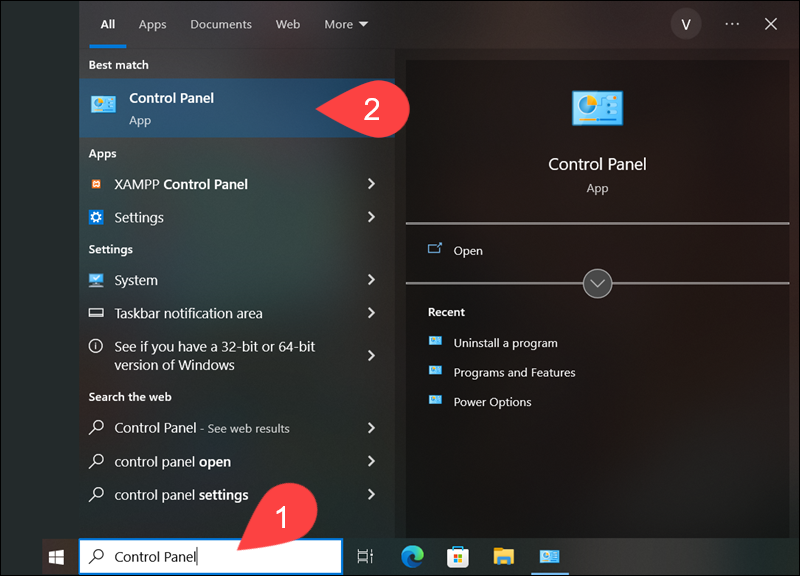
1. Type Control Panel in the search box on the taskbar.
2. Open the Control Panel app.
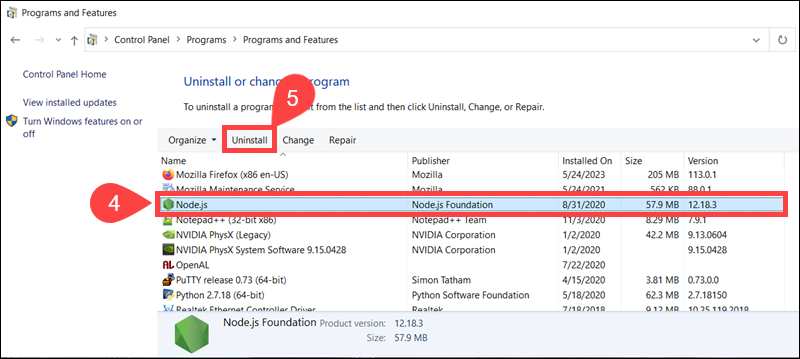
3. Click Uninstall a program in the Programs category.

4. Select the Node.js installation.
5. Click Uninstall.
The Windows Installer proceeds to uninstall Node.js. Follow on-screen prompts to ensure the process runs its course and that the current Node.js version is completely removed from your Windows system.
Step 2: Install nvm on Windows
To install nvm on Windows:
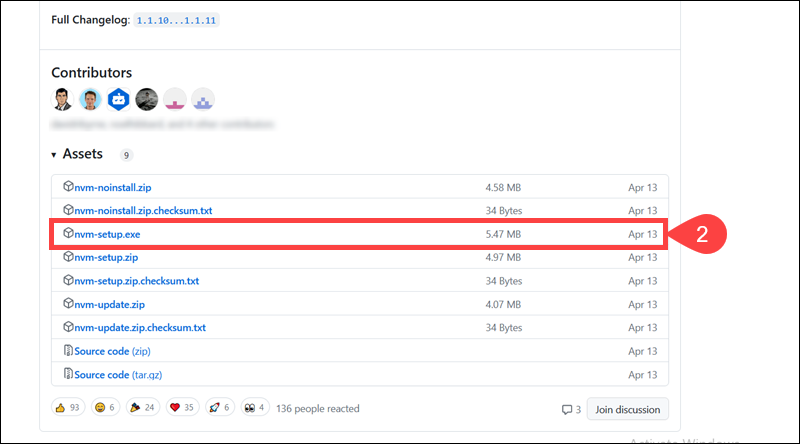
1. Use a browser to access the nvm GitHub repository.
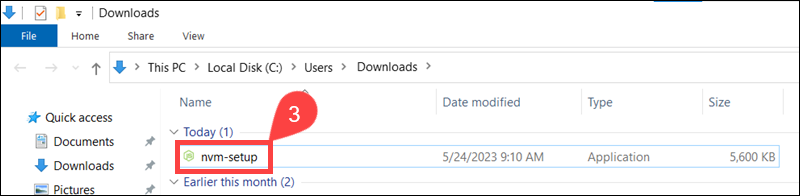
2. Download the latest nvm installer by clicking nvm-setup.exe in the Assets section.
3. Locate the installer on your local machine and double-click to start the installation.
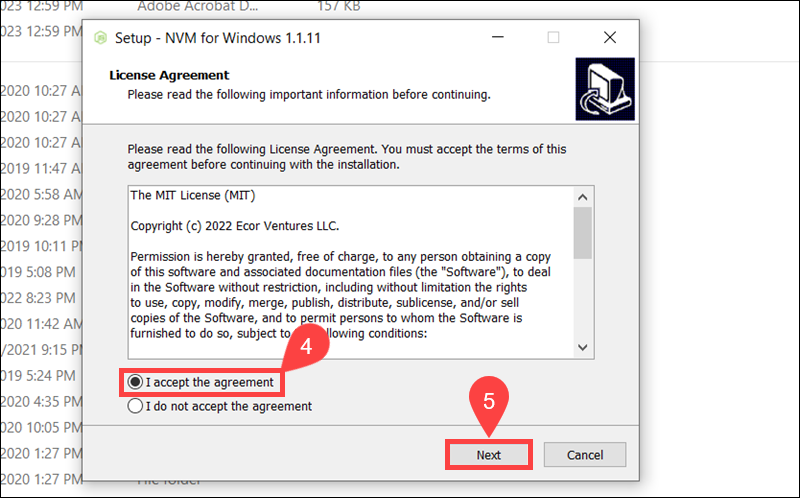
4. Select I accept the agreement.
5. Click Next.
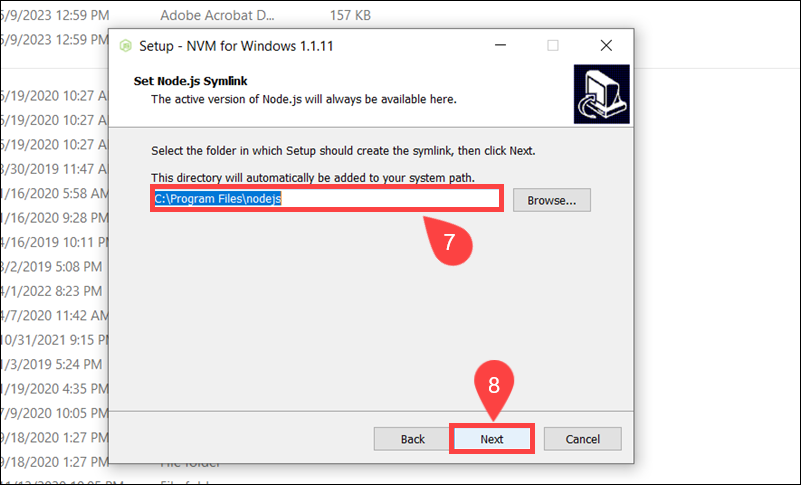
6. Choose an nvm installation path and select Next.

7. Keep the default path or define a custom symlink for the active Node.js version.
8. Click Next.
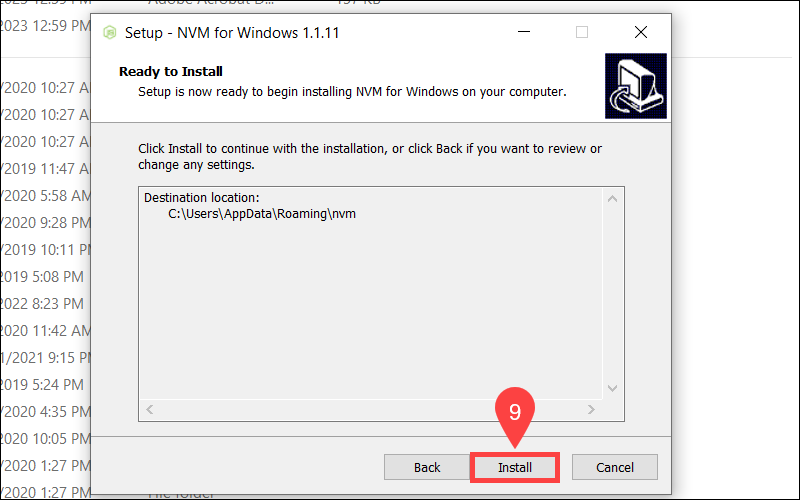
9. Select Install.
10. Click Finish.
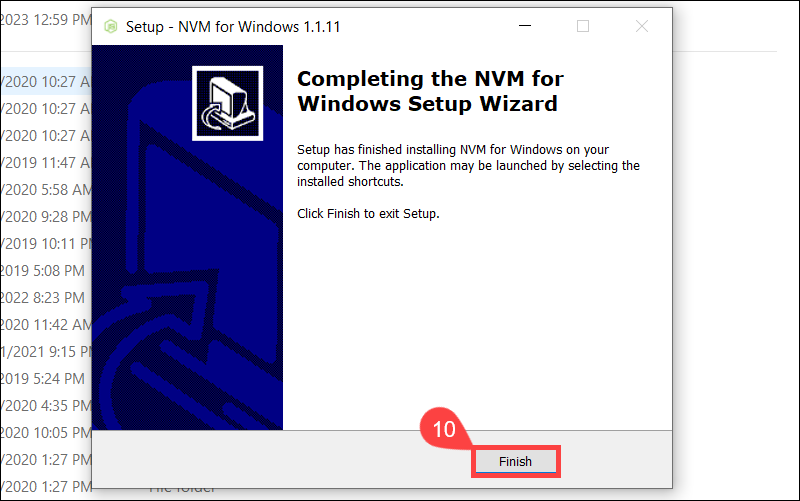
The nvm installation process is complete.
Step 3: Use nvm to Install Node
Managing Node.js versions via nvm requires administrator privileges for the Windows command prompt (CMD) or PowerShell.
To install a specific Node version using cmd:
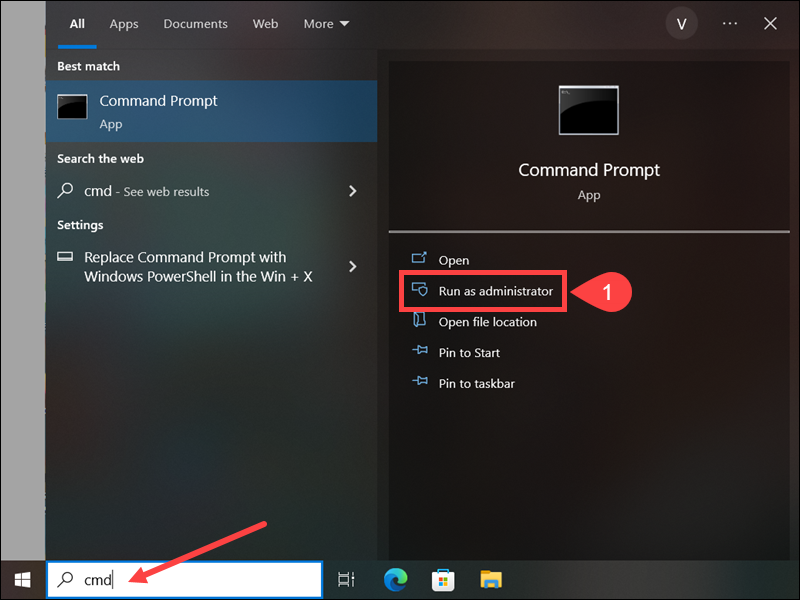
1. Type cmd in the search bar and select Run as administrator.
2. List the available Node versions using the following command:
nvm list available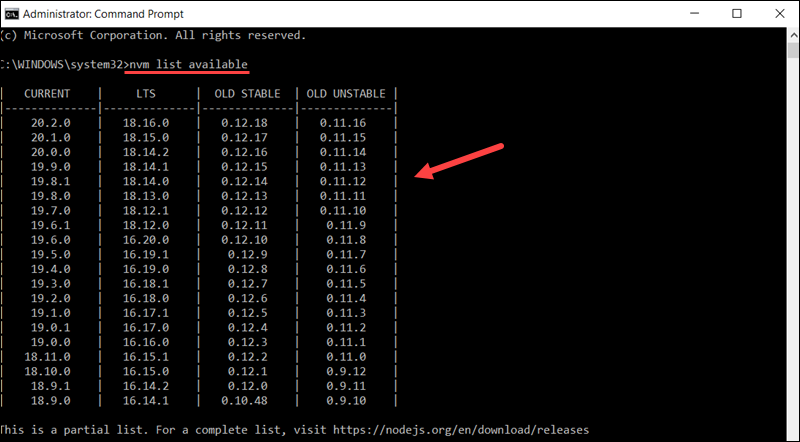
Identify the version you want to install and note the version number.
3. To install a specific version, use the following command (replace x.x.x with the version number):
nvm install x.x.xFor example, to install Node.js version 16.14.1, type:
nvm install 16.14.1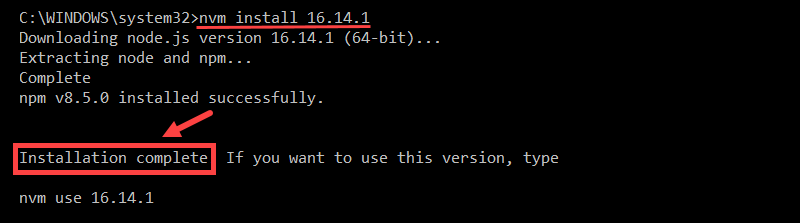
The system confirms that the installation is complete.
To install the latest available Node version, enter:
nvm install latest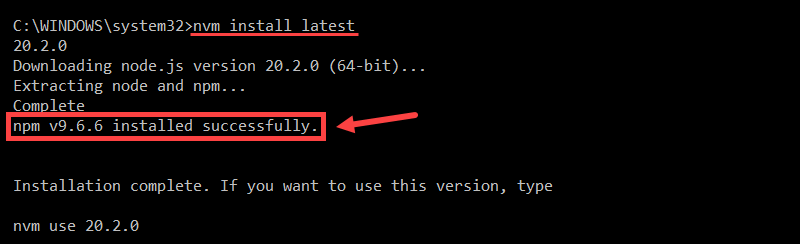
Note: Every time you use nvm to install a new Node.js version, the tool also installs the corresponding npm version by default.
To install the latest stable version, which is recommended for most users, type:
nvm install lts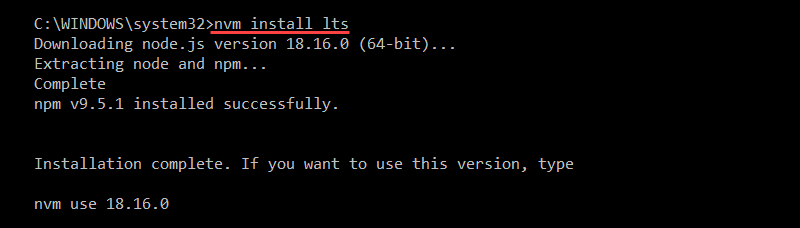
To start using the lts version, enter the following command:
nvm use lts
The system confirms the Node version currently being used.
Step 4: Downgrade Node Version
To downgrade a Node version, type the following command::
nvm use x.x.xReplace x.x.x with a version number.
Note: Ensure that the version you want to use is already installed.
For example, to start using a previously installed version, 16.14.1, enter:
nvm use 16.14.1
You have successfully downgraded the Node.js version on Windows using nvm.
Step 5: Check Current Node Version
To verify the system is using the correct Node version, run the following command:
node -v
The version number is shown in the terminal.
To confirm the npm version, type:
npm -v
The system displays the npm version.
How to Switch Between Node Versions
Before switching between Node versions, list the versions installed on your Windows machine.
1. Use the following command to list installed Node versions:
nvm list2. Switch to a different Node version from the list. For example:
nvm use 20.2.03. List installed Node versions again to confirm the correct version is actively used:
nvm list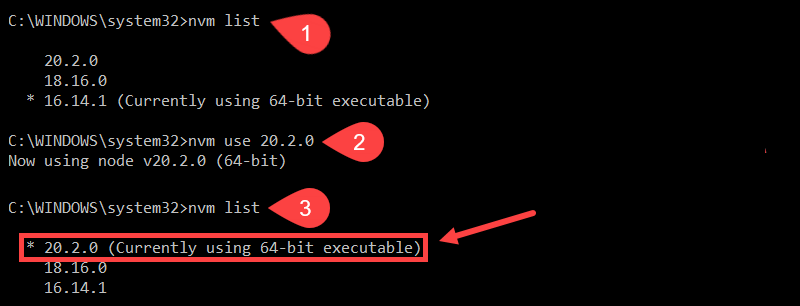
The asterisk (*) symbol shows which Node.js version the system currently uses.
Conclusion
Now you know how to downgrade and manage Node.js versions on Windows using the nvm tool.
Use this knowledge to quickly switch between Node versions based on project requirements and avoid potential compatibility issues.
Was this article helpful?
YesNo
By Filip on 04/28/2024
This guide provides step-by-step instructions on how to downgrade or switch to an older version of Node.js on various operating systems, including Windows, macOS, and Linux.
Table of Contents
- Introduction
- Step-by-Step Guide
- Method 1: Using Node Version Manager (nvm)
- Method 2: Using npm
- Method 3: Manual Installation
- Code Example
- Additional Notes
- Summary
- Conclusion
- References
Introduction
In the ever-evolving landscape of web development, managing different Node.js versions is crucial for compatibility and optimal performance. Whether you’re facing compatibility issues or simply need to revert to a previous version, downgrading Node.js is a valuable skill. This guide explores three effective methods to achieve this: utilizing the Node Version Manager (nvm), leveraging the npm package manager, and performing a manual installation. Each approach caters to different preferences and scenarios, empowering you to choose the most suitable option for your needs.
Step-by-Step Guide
There are several methods to downgrade your Node.js version, each with its own advantages. Here are three popular options:
Method 1: Using Node Version Manager (nvm)
nvm is a popular tool for managing multiple Node.js versions on a single machine. It allows seamless switching between versions without affecting your global npm packages.
Steps:
- Install nvm: Follow the installation instructions for your operating system on the nvm GitHub repository.
-
List available Node.js versions: Use the command
nvm ls-remoteto see a list of available Node.js versions. -
Install the desired version: Use the command
nvm install <version>where<version>is the specific version you want (e.g.,nvm install 14.17.0). -
Use the installed version: Use the command
nvm use <version>to switch to the installed version. -
Verify: Run
node -vto confirm you’re using the correct version.
Example (JavaScript):
// Install nvm (assuming you have cURL)
curl -o- https://raw.githubusercontent.com/nvm-sh/nvm/v0.39.3/install.sh | bash

// List available versions
nvm ls-remote

// Install version 14.17.0
nvm install 14.17.0

// Use version 14.17.0
nvm use 14.17.0

// Verify
node -v
Method 2: Using npm
While not as versatile as nvm, npm can directly install specific Node.js versions.
Steps:
- Find the desired version: Visit the Node.js download page and identify the version you need.
-
Install using npm: Use the command
npm install -g nto install thenpackage globally. -
Install the specific version: Use the command
n <version>where<version>is the desired version (e.g.,n 14.17.0). -
Verify: Run
node -vto confirm you’re using the correct version.
Example (JavaScript):
// Install n package globally
npm install -g n

// Install version 14.17.0
n 14.17.0

// Verify
node -v
Method 3: Manual Installation
This method involves downloading the desired Node.js version directly and installing it.
Steps:
- Download the installer: Visit the Node.js download page and download the installer for your operating system and the specific version you need.
- Run the installer: Follow the installation instructions provided by the installer.
-
Verify: Run
node -vto confirm you’re using the correct version.
Note: This method may require additional steps depending on your operating system and existing Node.js installation.
Choosing the Right Method:
- nvm: Best for managing multiple Node.js versions and switching between them frequently.
- npm: Simpler for one-time downgrades but requires installing an additional package.
- Manual Installation: Offers more control but can be more complex and time-consuming.
Additional Tips:
- Remember to update your npm packages after downgrading Node.js, as some packages may have compatibility issues with older versions.
- Consider using a version control system like Git to track changes and revert if necessary.
- Always back up your projects before making significant changes to your development environment.
I hope this comprehensive guide helps you successfully downgrade your Node.js version!
Code Example
The provided JavaScript code demonstrates two methods for downgrading Node.js: using nvm (Node Version Manager) and using npm. The first method utilizes nvm to install and switch between different Node.js versions. The second method employs the ‘n’ package, installed via npm, to achieve the same outcome. A third method, manual installation, is mentioned but not fully demonstrated due to its platform-specific nature. The code includes functions for executing shell commands and handling output, along with example usage for downgrading to Node.js version 14.17.0. Important reminders emphasize adapting the code to specific environments, considering process managers, and thorough testing after downgrading.
While the provided guide explains the methods and steps clearly, let’s illustrate them with practical JavaScript code snippets for better understanding.
Method 1: Using nvm (Node Version Manager)
const { exec } = require('child_process');

// Function to execute shell commands and handle output
function runCommand(command) {
  return new Promise((resolve, reject) => {
    exec(command, (error, stdout, stderr) => {
      if (error) {
        reject(error);
      } else {
        resolve(stdout.trim());
      }
    });
  });
}

async function downgradeNode(version) {
  try {
    // Install nvm if not already installed (assuming cURL is available)
    await runCommand('curl -o- https://raw.githubusercontent.com/nvm-sh/nvm/v0.39.3/install.sh | bash');

    // Install the desired Node.js version
    await runCommand(`nvm install ${version}`);

    // Use the installed version
    await runCommand(`nvm use ${version}`);

    // Verify the current Node.js version
    const currentVersion = await runCommand('node -v');
    console.log(`Now using Node.js version: ${currentVersion}`);
  } catch (error) {
    console.error('Error during downgrade:', error);
  }
}

// Example usage: Downgrade to Node.js version 14.17.0
downgradeNode('14.17.0');
Method 2: Using npm
const { exec } = require('child_process');

async function downgradeNodeWithNpm(version) {
  try {
    // Install the 'n' package globally
    await runCommand('npm install -g n');

    // Install the desired Node.js version using 'n'
    await runCommand(`n ${version}`);

    // Verify the current Node.js version
    const currentVersion = await runCommand('node -v');
    console.log(`Now using Node.js version: ${currentVersion}`);
  } catch (error) {
    console.error('Error during downgrade:', error);
  }
}

// Example usage: Downgrade to Node.js version 14.17.0
downgradeNodeWithNpm('14.17.0');
Method 3: Manual Installation
This method involves platform-specific steps and cannot be fully demonstrated in JavaScript. However, you can use JavaScript to automate certain parts, such as downloading the installer using libraries like node-fetch or axios.
Remember:
- Adapt the code examples to your specific environment and error handling needs.
- Consider using a process manager like
pm2to manage your Node.js applications and their versions. - Always test your applications thoroughly after downgrading Node.js to ensure compatibility.
Additional Notes
Incorporating visual elements and external resources can significantly enhance the clarity and comprehensiveness of the Node.js downgrading guide.
Screenshots and Diagrams:
- nvm Installation: Include screenshots of the nvm installation process on different operating systems (Windows, macOS, Linux) to provide a visual reference for users.
- Command Line Examples: Add screenshots of the command line interface showing the execution of nvm and npm commands, highlighting the input and output for better understanding.
- Version Switching: Create a diagram illustrating the concept of nvm and how it manages multiple Node.js versions, emphasizing the isolation between environments.
External Links and References:
- Node.js Official Website: Link to the official Node.js download page where users can find installers for different versions and platforms.
- nvm GitHub Repository: Provide a link to the nvm GitHub repository for detailed installation instructions, usage examples, and troubleshooting tips.
-
npm Documentation: Include a link to the npm documentation, specifically the section on the
npackage, for users who prefer the npm method. - Node.js Version Compatibility Table: If available, link to a resource that shows compatibility between Node.js versions and popular npm packages to help users avoid potential issues.
Additional Tips:
- Video Tutorials: Consider creating short video tutorials demonstrating the downgrading process using each method. Visual demonstrations can be particularly helpful for users who are new to command-line tools.
- Interactive Guides: Explore interactive platforms or tools that allow users to practice the commands and steps involved in downgrading Node.js in a simulated environment.
- Community Support: Mention relevant online communities or forums where users can seek help and share their experiences with Node.js downgrades.
By incorporating these visual aids and external resources, you can create a more engaging and informative guide that caters to different learning styles and provides users with the necessary support to successfully downgrade their Node.js version.
Summary
| Method | Description | Advantages | Disadvantages |
|---|---|---|---|
| Node Version Manager (nvm) | Manage multiple Node.js versions | Seamless switching, no impact on global packages | Requires additional installation |
| npm | Install specific versions directly | Simple for one-time downgrades | Requires installing the n package |
| Manual Installation | Download and install specific versions | More control over the process | Can be complex and time-consuming |
Conclusion
By understanding these methods and their respective strengths and weaknesses, you can confidently choose the most appropriate approach for your specific needs. Remember to consider factors such as the frequency of version switching, the number of Node.js versions you need to manage, and your comfort level with command-line tools.
Downgrading Node.js is a valuable skill for any web developer, ensuring compatibility, resolving issues, and maintaining optimal performance in your projects. With the knowledge gained from this guide, you can navigate the process smoothly and efficiently.
References
-

How to Switch to an Older Version of Node.js | A guide on how to change to an older version of Node.js.
- node.js — How to downgrade node version? — Stack Overflow | Dec 23, 2021 … use node version manager nvm , you can switch any node version that you want. … You can use: npm install -g node@version . … might have to force …
-
How to install the previous version of Node and npm … | Learn how to easily install a previous version of Node.js and npm using nvm, n, or npm itself.
-
How to switch Node.js versions with NVM — LogRocket Blog | Switch between Node.js versions with NVM, simplifying your development process by managing and installing multiple Node environments.
-
How to Downgrade Node Version in Windows | phoenixNAP KB | Find out how to run multiple Node.js versions on a single Windows machine and switch between different versions at will.
- How do I downgrade node or install a specific previous version … | Feb 11, 2015 … For example, to install Node.js v6 (as of this writing, the most recent LTS version): brew install node@6. You may need to run brew update …
- Install older version/specific version of a node-red node? — Node … | I updated to the latest version of node-red-contrib-modbus on my groov RIO and it seems to have broken the flex-write node? Is there a way to install the older version of node-red-contrib-modbus again? It was working fine with v5.13.1 of the modbus node, but I get the following error since installing v5.14.0. Error: Modbus exception 4: Slave device failure (device reports internal error) at ModbusRTU._onReceive (/home/dev/.node-red/node_modules/modbus-serial/index.js:348:21) at TcpPor…
- Step-by-Step Guide: Changing to an Older Version of Node.js | Explore our guide and find the answer on smoothly changing to an Older Version of Node.js.
- Intalling an older version of Node via package manager on linux | Apr 9, 2013 … pacman -S nodejs but now I want to go back to an older version like v0.8.xx 1. How do I install this version via package manager. 2. Would I …


In this article, we’ll walk through the simple steps to downgrade Nodejs version on Windows. So, let’s get started!
To begin, we need to install the Node Version Manager (NVM) which will handle the node version management. We can do this by going to the link provided and downloading the NVM setup execution file.
https://github.com/coreybutler/nvm-windows/releases

Next, we will need to run the NVM installer. Once we have downloaded the installer from the link provided, we can find it in «Downloads» folder (usually the default location). Simply navigate to the folder and double-click on the «nvm-setup.exe» file to initiate the installation process.
After double-clicking on the «nvm-setup.exe» file, a wizard called «Setup-NVM for Windows» will appear on screen. To proceed with the installation of NVM, we will need to accept the license agreement by selecting the corresponding radio button and clicking the «Next» button.
We can leave the default selected location as is and click the «Next» button. Finally, click the «Install» button to start the NVM installation process.

Great job! We have successfully installed NVM on our Windows machine. All that’s left to do now is to click the «Finish» button to wrap up the installation process and close the setup wizard.

And now, lets downgrade the Node version on Windows using NVM,
Open the Command Prompt on your Windows machine as an administrator. We can do this by searching for «Command Prompt» in the «Start» menu and then right-clicking on it and selecting «Run as administrator».

check the current Node version that is installed on Windows machine by using the «-v» option in the Command Prompt.

We are currently using node “v18.12.1” on Windows. Use the «nvm» command and specify the version we want to wish to install. For example, if we want to switch from Node version 18.12.1 to 18.5.0, simply execute the appropriate «nvm» command with the version number.
nvm install v18.5.0
Enter fullscreen mode
Exit fullscreen mode
Use the downgraded version, with the command:
nvm use 18.5.0
Enter fullscreen mode
Exit fullscreen mode
After downgrading the Node version using NVM, it is important to verify whether the downgrade was successful or not. To do this, check the Node version again using the same command as before.
node -v
Enter fullscreen mode
Exit fullscreen mode
That’s it! if the output displays the version number that you specified during the downgrade process, then it indicates that you have successfully downgraded the Node version using NVM. Great Job!
Now if we want to check all the Node versions that are currently installed on our Windows machine using NVM, simply execute the command
nvm list
Enter fullscreen mode
Exit fullscreen mode
This will give us a list of all the installed Node versions. To switch to a specific version that we want to use, use the «nvm use» command along with the version number just like we did above process.
We demonstrate the simplest and most commonly used method to downgrade Node version on a Windows machine. Follow the steps carefully and we’ll be able to successfully switch to the desired version. Thanks for reading this article. HAPPY CODING 🚀!!