
node-gyp-install
Manually download node/iojs header files for usage with node-gyp.
npm install -g node-gyp-install
Usage
To download the node/iojs header files for the node/iojs version you currently
have installed simply run
Afterwards installing native modules that uses node-gyp using iojs should just work
node-gyp-install
npm install level # does not explode \o/
Per default node-gyp-install will install header files for your current node version.
To see all available options see node-gyp-install --help.
Download From Mirrors
To use a mirror of the node/iojs header files, set $NVM_NODEJS_ORG_MIRROR and $NVM_IOJS_ORG_MIRROR.
Take an example for users from China:
export NVM_NODEJS_ORG_MIRROR=http://npm.taobao.org/mirrors/node
export NVM_IOJS_ORG_MIRROR=http://npm.taobao.org/mirrors/iojs
Download From Secure Mirrors
To use private mirrors that need some https/tls configuration e.g. for client authentification you
can pass some more environment settings:
export NODE_GYP_INSTALL_PASSPHRASE=mysecret
export NODE_GYP_INSTALL_REJECTUNAUTHORIZED=false
export NODE_GYP_INSTALL_PFX=/path/to/my/key.p12
export NODE_GYP_INSTALL_CERT=/path/to/my/cert.crt
export NODE_GYP_INSTALL_KEY=/path/to/my/key.key
export NODE_GYP_INSTALL_CA=/path/to/my/ca.crt
This variables refers to the according options of the https.request() function.
Please have a look to nodejs tls api documentation
for more details.
Programmatic usage
You can also use this as a module
var install = require('node-gyp-install')
install(function (err) {
  console.log('header files installed', err)
})
License
MIT
In this article, I will show how you can set up a Node.jsNode.js is an asynchronous event-driven JavaScript runtime and is the most effective when building scalable network applications. Node.js is free of locks, so there’s no chance to dead-lock any process. environment on Windows 10, and I’ll checkout and run the project I’m currently working on (which depends on koa, pg, amqplib and other modules).
Note, that the primary focus right now is just setting up a developer environment for a Node.js project, not running one. I will cover deployment to Azure later, but that is beyond the scope of this post.
Preparation
Developing with Node.js on Windows used to be pretty cumbersome, but it’s much better now than it was a year or two ago. This is the reason why we had such a hard time choosing between Windows 7 and Windows 10 as a topic of this post.
While 7 is still pretty popular and 10 had some bad press (due to metrics and extensive data collection), we decided to go with Windows 10 this time, because having an up to date operating system is crucial for security reasons.
In this tutorial we will use the newest tools and applications available (and use the 64bit version of them). I know that this is not always possible in corporate environments, but it is important not to let your tools fall behind.
Everything we install will be done natively. I would not recommend Cygwin for Node, and while VirtualBox is free, I always had problems with running a Linux VM on a Windows machine.
Step 1: Install Git
First, let’s install Git. Use the default settings; they are quite sensible.
I usually have a Projects folder in my home directory. To set it up, right-click on the folder, select “Git bash here” and check git’s version with git --version.
This is a nice bash environment, so feel free to create a .bash_profile, which is going to be executed when you open a bash window. This is not a cmd.exe window, so check out the Options (click on the icon in the upper left corner). You can paste text into the window with the middle mouse button (just like on popular Linux terminals).
Step 2: Install Node.js on Windows 10
Download and install Node.js. Use the LTSLTS means long-term support. The acronym is often used to mark Node.js release lines that will be maintained and supported for an extended period. There are two separate kinds of LTS releases: Active and Maintenance. The Active release line often gets new features and other improvements beside security patches and bug fixes, and the Maintenance only gets the latter. It… version.
I don’t recommend installing multiple versions side by side since the node version manager (NVM) does not officially support Windows – still, there are alternatives like nvm-windows or nodist. Even on other systems, installing node utilities globally with different versions seems like asking for trouble.

Step 3: Update npm
Node comes with npmnpm is a software registry that serves over 1.3 million packages. npm is used by open source developers from all around the world to share and borrow code, as well as many businesses. There are three components to npm: the website the Command Line Interface (CLI) the registry Use the website to discover and download packages, create user profiles, and…, the package manager which should be available after installing Node.js.
Open a bash shell and check the versions with npm --version. If npm is 2.x, then you should upgrade it to version 3, which solves many problems (the most important for us is the way it handles peer dependencies). Search for Power Shell in your start menu, run it as Administrator and follow these three steps.

Step 4: Install Visual Studio and Python
Node packages usually depend on packages with native code, so you have to install Visual Studio.
Node-gyp is a wrapper around Python GYP (Generate Your Projects), a tool that can generate project files for Gcc, XCode, and Visual Studio. Since the de facto method of Windows development is via Visual Studio, that’s the supported one.
Install Python (version 2.x)
As you can see, you will need Python, so download the 2.x branch for x64, and install it. You can go with the default settings, plus select the “Add to path” option. This will add the Python binary to the global path, meaning you will eventually have to log out and log back in.
As a next step, go to the environment variables settings (in System, Advanced settings) and add GYP_MSVS_VERSION=2015 to the global ones, since the next step will be the Visual Studio 2015 install.

Install Visual Studio (VS2015)
VS2015 works fine with x64 Node.js, unlike the pre 2012 versions. For a while, we are going to follow the Node-gyp tutorial for Windows 10.
Unless you already have a full VS on your machine, download the Visual Studio 2015 Community Edition, choose custom install and select the whole Visual C++ branch (without XP support); from tools choose Windows SDKs. In case anything goes wrong during the install, you can go to Programs and Features, select VS2015, choose change and then repair.
The gyp install howto also mentions the Windows 7 SDKs, but we installed the Win 8 one above, so hopefully that is not going to be needed.
Step 5: Install Package Dependencies
Currently, I’m working on the alerting microservice in Trace, so I’ll do an npm -i to install our package dependencies. As a result I’m getting this back:

Fsevents is an optional dependency and is for OSX only; this is just a warning – the rest of the modules are fine here.
This microservice uses Postgres and RabbitMQ, so I installed them (along with Erlang) too. The only difference compared to the OSX brew (a package manager, similar to apt, Chocolatey or many others) and rocket (a service manager) setup is that I had to manually enable the web admin on port 15672.
On the database part, I added my default user and created a database, but all of that could be done from the PgAdmin client effortlessly.
Step 6: Handling Environment Variables
Usually, Node.js projects are highly dependent on environment variables.

As you can see in the screenshot of my project, the IS_INTERACTIVE is an env var, which is very easy to define on Linux and OSX, but works a bit differently on Windows.
In the scripts section of the package.json you can use locally installed node modules. I suggest to avoid installing packages globally with npm -g.
Also, I don’t recommend adding env vars directly to the scripts section on Windows (or rather in a cross-platform team), but we have other options.
Npm passes these commands directly to the OS, in this case to the NT command interpreter (cmd.exe). The quickest fix is to copy the script line into our bash window and run it there, but of course, this will not work as a long-term solution. The newly announced bash shell support in Windows(in beta stage right now) will probably solve this issue.

The cleanest solution is to use one command per script line (as you can see, our npm run lint command will work just fine).
Anything that relies on flashvars (temporary env variables) or tries to do lots of things at once shall go to a /scripts folder as Node executable JavaScript files.
Don’t use bash scripts, cmd can’t handle them. Cmd.exe supports &&, so two or three commands may be fine, but don’t write a full shell script as a one liner (especially not with bash language features).
This is okay for support scripts, but to run our application, we will need lots of env vars.
At RisingStack, we use nodemon during development (some may use pm2 though). Nodemon is a file watcher and parses the nodemon.json file upon start, where one can define env vars.

I usually put nodemon. in my .gitignore_global file* (in the home dir, do not forget to initialize it with git config --global core.excludesfile ~/.gitignore_global), this way I can have multiple nodemon json templates in my project.
While it’s not an elegant solution, I usually install nodemon globally. Sometimes it’s easier just to launch it manually during development, not via the appropriate run script.
With the above json I can now start up my microservice, which will look like this:

Of course, nodemon may not be the best solution for just running scripts since I don’t want to watch for file changes. For those cases, I usually convert my nodemon.json to a nodemon.sh, where I export each and every env var. Beware: You can call it anything you like, just do not forget to add it to the ignore file – pushing this file accidentally into a repo can give you a real headache:
export NODE_ENV="development"
export PORT=3060
export AMQP_URI="amqp://localhost:5672/"
export EMAIL_SENDER_NAME="Developer"
#etc.
After this, I can source it on the command line (source nodemon.dev.sh) – this is for the MinGW bash we are using, but it would be easy to convert it to a traditional bat file. Since our DB setup needs a couple of env vars and I don’t want to watch it, this is the quick and dirty way I run it locally. On a cloud provider, I would set up the env vars properly.
That’s it, the project works, just like on OSX or Linux.
Conclusion
This covers our short Node.js on Windows 10 tutorial. Some of the modules in npm may not support Windows, but things are getting better. Windows has some nice and friendly GUI tools, and Visual Studio can be a powerful asset.
If your team is willing to tolerate the extra overhead, it may be a viable option.
Please, share your questions and feedbacks in the comment section.
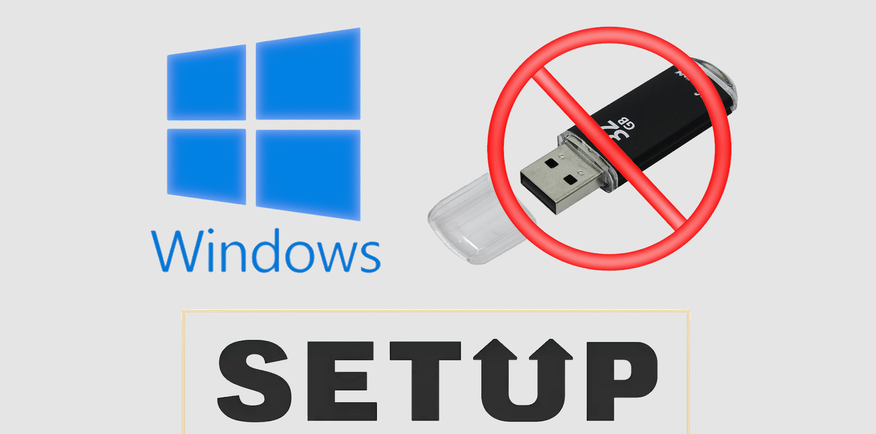
Как установить Windows 7, 10, 11 не используя флешку и установочный DVD диск?
Если вы периодически занимаетесь установкой Windows 7, 10 и 11, то данное видео будет очень полезно посмотреть. Так как мы рассмотрим вариант установки ОС Windows без флешки и диска, как бы странно это не звучало.
Причем, если в процессе установки вы сталкиваетесь с различными ошибками, то этот метод так же позволит их обойти.
Собственно, суть метода в том, что мы подключаем жесткий диск пользователя к нашему рабочему или домашнему компьютеру, пробрасываем его к виртуальной машине и выполняем все необходимые настройки.
После чего, подключаем диск обратно и пользователь уже может работать.
А как это сделать, сейчас мы рассмотрим на практике.
Достоинства и недостатках данного метода:
.jpg)
- + нужен только жесткий диск, который вы можете забрать у клиента или попросить занести его вам. Если речь идет о новой установке, допустим у меня частенько бывает, когда пользователь хочет перейти на жесткий диск SSD, то он мне просто переводит деньги, я покупаю диск, все настраиваю, а потом подключаю к его компьютеру и все J
- + минимум времени, проведенного у клиента
- + комфортная обстановка, вы можете настраивать в любом удобном для вас месте в привычной рабочей среде
- + удобство настройки, так как нет необходимости постоянно отвлекаться на другое устройство, все выполняется в отдельном окне той же операционной системы за которой вы работаете
- + все необходимое у вас уже находится на рабочем компьютере (образы, софт, инструкции, инструменты и т.д.), поэтому нет потребности таскать все это на флешке с ограниченным объемом и следить за их актуальностью
- + удобно выполнять резервное копирование данных пользователя (если работа ведется у него за компом, то порой нужно использовать флешку, чтобы перекинуть часть данных и т.д.) А тут мы все можем перенести на свой компьютер и после вернуть обратно.
- — придется активировать софт заново, или как минимум проверить не слетела ли активация. К примеру, у меня активация Windows и Office не слетает, но с Windows 7 такая проблема была актуальна. Тем более, что бывают программы, активационные данные которых хранятся в профиле пользователя и их придется активировать заново. Можно вообще сам процесс активации выполнять уже на рабочем железе клиента.
- — а также придется все равно выполнять минимальную настройку операционной системы под пользователя (настройка папки Temp, объема виртуальной памяти, автозапуск программ и т.д. все что вы настраиваете обычно), т.е. настроить все под ключ не получится. Однако, если пользователь не сильно деревянный, можно его попросить, чтобы он подключил жесткий диск, создал пользователя и просто прислал вам данные для TeamViewer.
Работа с данными пользователя
Если у вас не новый диск, то перед нами стоит задача, перенести данные с системного раздела, установить на него операционную систему и настроить её, установив последние обновления и софт.
Если пользователю необходимо скопировать какие-то данные с прошлой Windows, то мы можем просто перенести либо все данные на раздел с данными, либо папку рабочий стол, мои документы и загрузки (как правило все данные хранятся там). Так же можно попросить пользователя указать где конкретно находятся важные для него файлы.
.jpg)
Создание виртуальной машины для настройки системы
Когда все нужные данные перенесены, можем приступать к переустановке операционной системы. Как я и говорил, для этого нам понадобится виртуальная машина, в моем случае это будет VMWare (Файл \ Новая виртуальная машина \ Выборочно \ Далее \ Я установлю операционную систему позже \ Windows 10 x64 \ Путь любой, так как много места эта машина занимать не будет, так как мы будем использовать не файл жесткого диска, а непосредственно физический жесткий диск для работы \ BIOS \ Процессоры \ Оперативка \ Мост, репликация состояния физического сетевого подключения \ Далее \ SATA \ Использовать физический диск \ Выбор физического диска).
.jpg)
Проброс физического диска в виртуальную машину
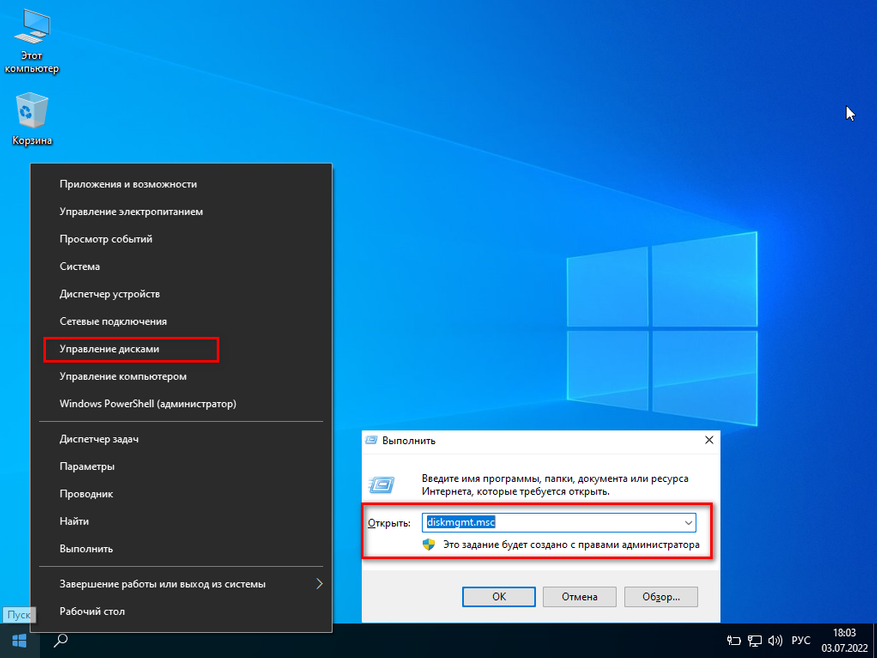
И тут очень внимательно, так как нам нужно выбрать именно наш диск (Этот компьютер \ ПКМ \ Управление \ Управление дисками \ Смотрим номер диска \ PhysicalDriver0 \ Использовать отдельные разделы, чтобы проверить, действительно тот диск выбран или нет \ Назад \ Использовать весь диск, чтобы все выглядело аналогично установке на реальной машине \ Далее \ Готово)
.jpg)
.jpg)
Подключаем установочный образ Windows
Подключим образ с операционной системой к виртуальному приводу (Параметры VM \ DVD \ Файл образа \ ОК)
.jpg)
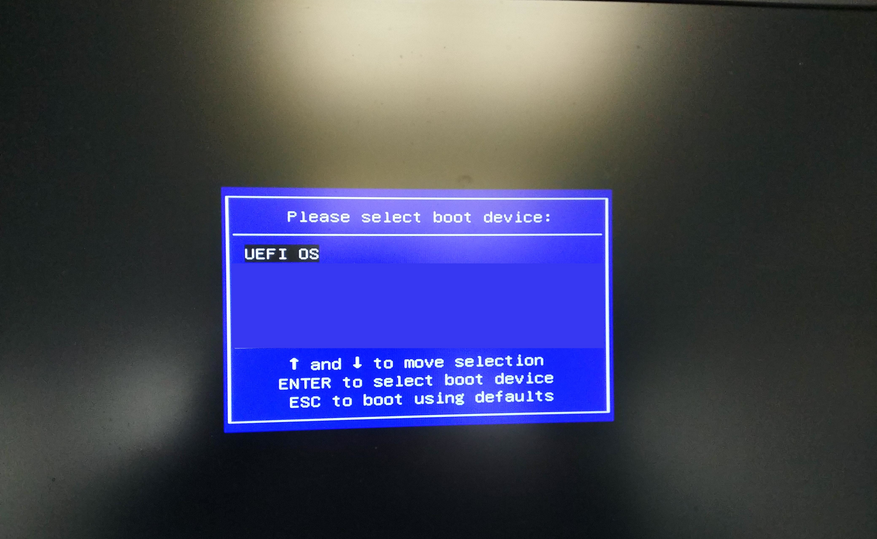
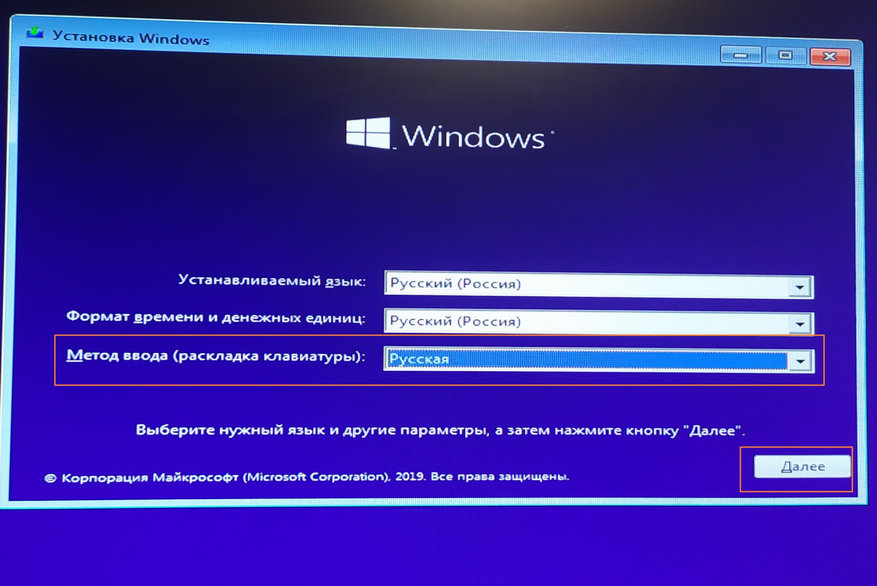
Устанавливаем ОС (Запустить \ F2 \ BIOS \ Приоритет загрузки \ Далее \ Установить \ У меня нет ключа \ Windows 10 Pro \ Выборочная настройка, только для опытных \ Раздел 1 форматировать \ Выбираем его для установки \ Далее \ Установка)
.jpg)
Запускаемся в режиме аудита
Когда появляется диалоговое окно, «Давайте начнем с региона», нажимаем Ctrl+Shift+F3 чтобы попасть в режим аудита, виртуальная машина перезагрузится.
Режим аудита позволяет не сохранять всякий мусор в системе, и по завершению работы в данном режиме, система очищается от всех данных текущего пользователя, чтобы система была чистой, как будто еще ни один пользователь не создавался в текущей системе. А также удаляется привязка к оборудованию, т.е. у вас не возникнут проблемы при запуске на компьютере с другим процессором или материнской платой.
Закрывать появившееся окно не нужно!
Установка программ и настройка системы
Теперь нам необходимо установить весь требуемый софт и обновления Windows, если вам это нужно.
Обновления (Пуск \ Параметры \ Обновления и безопасность \ Центр обновления Windows \ Проверка наличия обновлений)
Что касаемо установки софта, то тут нам потребуется получить доступ к файлам хост системы (Виртуальная машина \ Установить паке VMWare Tools \ Установить \ Typical \ Перезагрузка)
.jpg)
Теперь можем подключить папку с софтом к виртуальной машине (Виртуалка \ Параметры \ Параметры \ Общие папки \ Всегда включено \ Подключить как сетевой диск в гостевых Windows \ D:/Софт \ Включить этот общий ресурс \ ОК)
.jpg)
Теперь мы можем устанавливать нужный нам софт (Этот компьютер \ Shared Folders \ Софт \ Устанавливаем все необходимые программы)
Удаляем софт VMWare Tools, конечно можно и обойтись без него, но тогда придется настраивать должным образом сеть и сетевые доступы, а это не всегда удобно.
Подготовка системы к первому запуску
Далее в программе подготовки системы 3.14 указываем Переход в окно приветствия системы \ Подготовка к использованию \ Завершение работы. Именно завершение работы, так как далее мы вытащим диск, и подключим его к клиентскому компьютеру.
Если мы сейчас включим виртуальную машину, то увидим все то, что будет происходить на физической машине. Т.е. настройка Windows при первом входе в систему, но, тут я думаю вы прекрасно знаете, что делать.
Так мы можем настраивать сразу несколько компьютеров одновременно.
Спасибо за внимание и жду ваше мнение по поводу всего рассмотренного.
Для работы проектов iXBT.com нужны файлы cookie и сервисы аналитики.
Продолжая посещать сайты проектов вы соглашаетесь с нашей
Политикой в отношении файлов cookie
Думаю, что каждый попадал в ситуацию, когда позарез была необходима USB-флешка, а под рукой её либо не было или она весьма не вовремя отправлялась на тот свет. В этом материале вы узнаете, как установить Windows/Linux без использования переносных носителей.
На самом деле в установке ОС без USB-флешки нет ничего сложного. Благо в век SSD-носителей всё это делается в два клика.
1. Запускаем редактор дисков нажатием на клавиатуре Win+R и в появившемся окне вводим команду diskmgmt.msc,а затем подтверждаем на кнопку ОК. Так же вы можете выполнить вызов редактора через обычный правый клик по панели пуска.
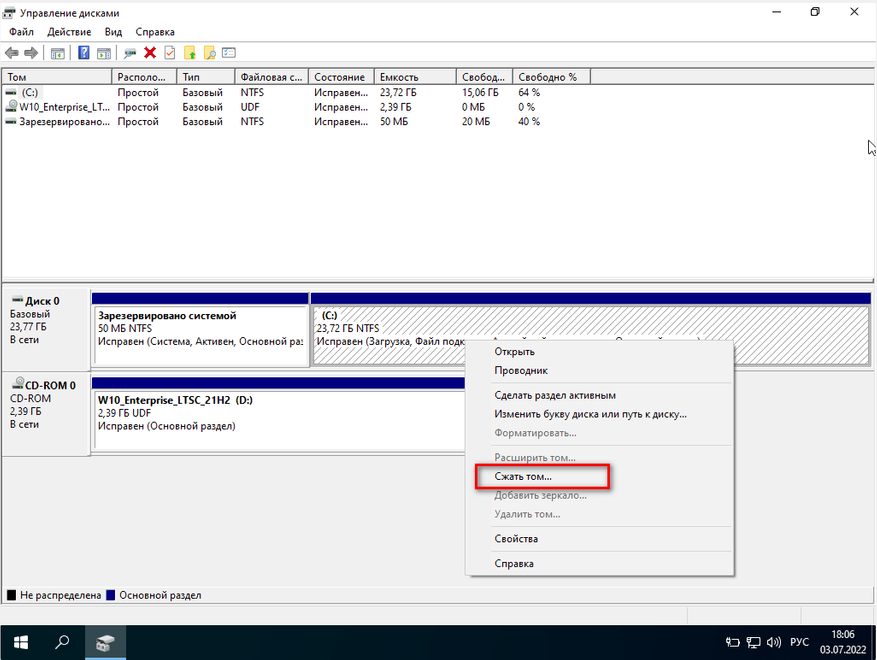
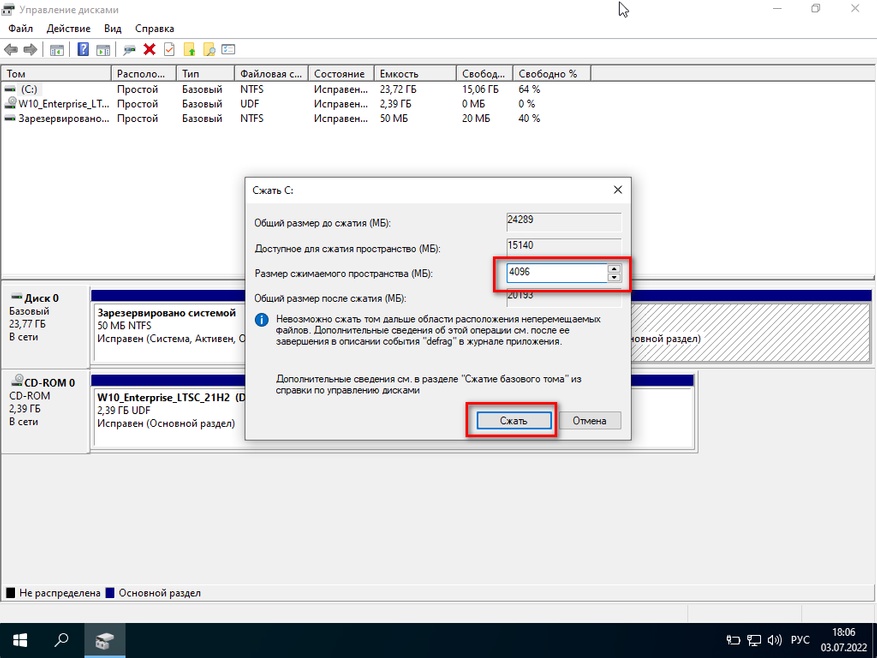
2. В интерфейсе открывшейся программы находим любой диск и через правый клик по нему активируем функцию сжатия.После того как ПО немного подумает, оно предложит выбрать желаемый размер нового диска. Указываем любой размер, в моём случаем это 4096 Мб, и переходим к следующему шагу.
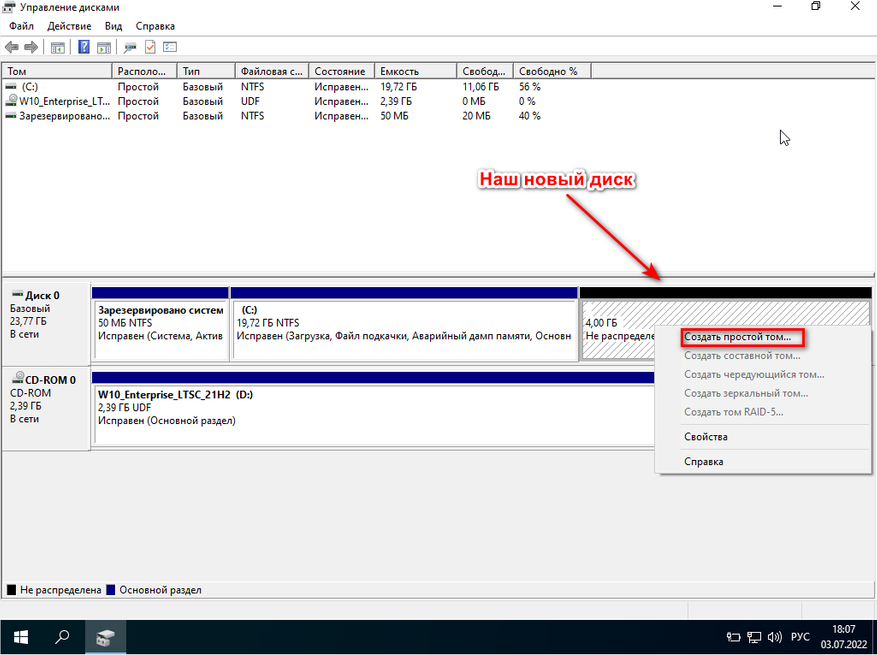
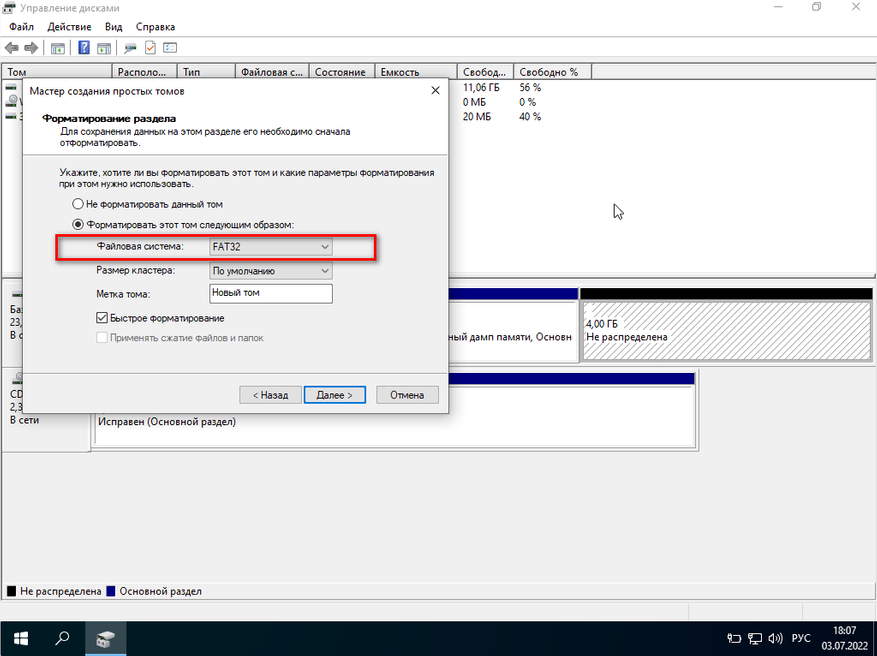
3. Если вы сделали всё правильно, то в интерфейсе ПО появится новый неразмеченный диск. Кликаем по нему правым кликом и выбираем Создать простой том. В окне Мастера создания томов нажимаем далее>далее>готово, но на моменте выбора форматирования разделов указываем файловую систему FAT32.
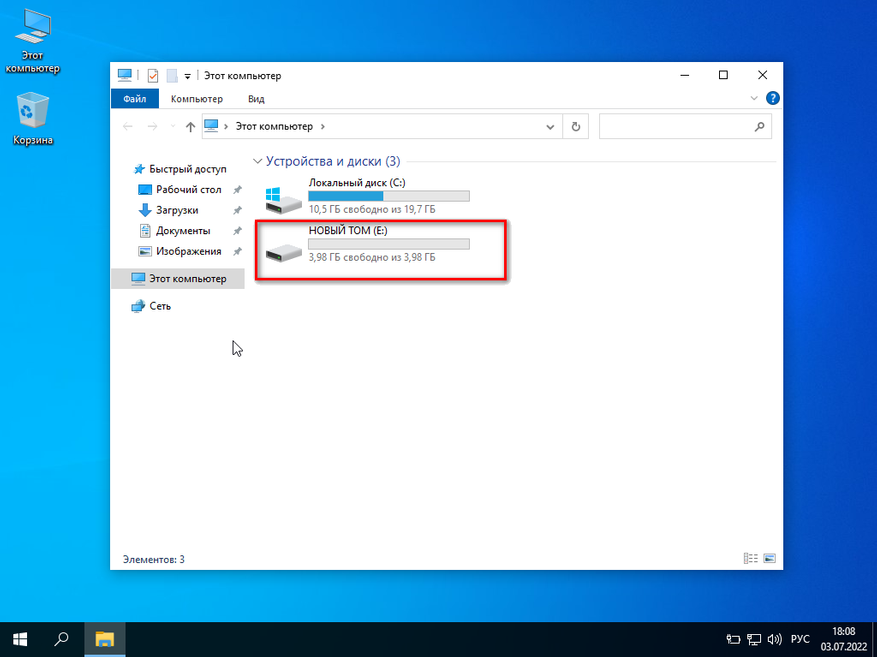
В принципе, самая муторная часть инструкции официально подошла к концу. Если вы вновь всё сделали правильно, то при заходе в «Этот компьютер» у вас появится новый диск.
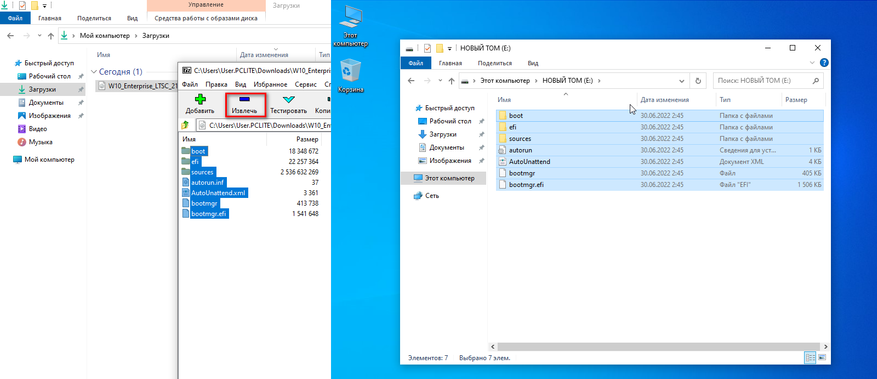
4. Выбираем ISO-образ нашей будущей системы и через архиватор 7-Zip распаковываем файлы на недавно созданный диск. Перегружаем ПК.
5. Теперь процесс загрузки системы не будет отличаться от использования базовой загрузочной USB-флешки.Через F11 выбираем установщик и наслаждаемся установкой системы.
Вот, собственно, и всё. Немного исхитрившись, мы выполнили установку системы без каких-либо отдельных носителей. Главное в этом способе — иметь 2 отдельных диска, чтобы случайно не затереть самого себя. А так пользуйтесь, так как это и вправду волшебно!
PS. Способ для Linux полностью аналогичен, просто используйте Gparted.
node-gyp is a tool that enables the compilation of native add-on modules for Node in multiple platforms. It has widespread use and is included as a dependency in many NPM packages.
On most systems, this isn’t an issue, and installing node-gyp with the rest of your packages works as expected. Unfortunately, this is not the case with Windows, as is evidenced by this thread from 2015. The Windows environment makes getting node-gyp to work a less-than-stellar developer experience, full of multiple pitfalls and many ways for things to go wrong.
This guide is meant to help solve the issues that can arise when installing a package that requires node-gyp.
1. Try running npm install with the --no-optional flag.
If you’re lucky, the dependency that requires node-gyp will be optional, and you can skip the entire process required to get it working. Try running npm install –no-optional to install only the required dependencies.
If you run this and still get the error, I have bad news: You’re in for a bit of a ride. As we begin our journey into getting node-gyp up and running, here’s an important note for all of the steps that follow. Make sure that you’re always working in an elevated terminal (with administrator privileges) and that you restart your console whenever a download is complete.
2. Try downloading the windows-build-tools package.
According to the node-gyp documentation, this step should be the end-all-be-all solution to fixing node-gyp problems. For most people, that’s true. NPM has a package called windows-build-tools that should automatically install everything you need to get node-gyp working, including the Microsoft build tools, compilers, Python, and everything else required to build native Node modules on Windows.
The good news is that installing this package should take care of all of the wiring up of these components. The bad news is that there are a lot of things included in it.
Depending on the version you download, it can hover between three and eight gigabytes (all to get some dependencies installed!). The install can take upwards of 30 minutes depending on your connection, so don’t despair if it seems like the install is hanging for a while.
You can download them by running this command: npm install --global --production windows-build-tools --vs2015
Important note
If you run this command without any additional flags, you’ll install the files associated with the latest version of Visual Studio, which is VS2017 at the time of writing. However, node-gyp requires the v140 distributable, not the v150 (which comes with VS2017). This is why the --vs2015 flag is added to the end of the command, since that’s the last version of Visual Studio that came with the v140 package. You can see more notes about that near the bottom of the package’s website.
Hopefully, that’s all it will take for you to get everything installed. If you’ve still got issues, then you’re going to have to grab all of the required files manually.
3. Download the Visual Studio 2015 build tools manually.
Rather than installing the build tools through NPM, download them manually. You can find them on the Microsoft download page. Once they’re downloaded, just run the installer.
4. Tell Node to use the 2015 build tools.
Now that we have the build tools, we need to tell Node to use them. You’ll have to run this command: npm config set msvs_version 2015 –global
5. Make sure you have Python 2.7 installed.
Next up is to download Python 2.7. This is important–by default, you’ll install the newest version (3.x.x), but only 2.7 is compatible with node-gyp. If you try to use a newer version of Python, you’ll get a syntax error due to print being made into an actual function in Python 3.
If you have another version of Python already installed, that’s okay. They can coexist with each other. You can grab Python 2.7 at this link.
6. Set your Node config to use Python 2.7.
Now that you have Python 2.7, you’re going to have to set Node to use it by default. To do that, run this command: npm config set python python2.7
If you followed the last few steps, you should now have everything necessary to get node-gyp working. Make sure you’ve restarted your terminal and are running it as an administrator, and try doing your install again. Hopefully, at this point, you can successfully install the dependencies you need. If not, we’re going to have to try one last thing.
7. Repeat Step 2 with the Visual Studio 2017 build tools.
I’ve personally had issues when I’ve tried to download the 2017 version of the build tools, even when trying to use newer versions of node-gyp. If you look online, you’ll see lots of other people with the same problem, including some of the commenters on this StackOverflow question.
However, most of the documentation around node-gyp and compiling native Node modules on Windows doesn’t specify to use the --vs2015 flag, and some even mention downloading the 2017 version. If you’re still having issues with getting node-gyp to run, try repeating Step 2 while omitting the --vs2015 flag.
8. Try installing an older version of Node.
Still getting an installation error? Try installing an older version of Node. If you’re on an experimental version, try going back to the last stable release (and then make sure that you’re actually using that version when you try and do npm install).
If that still doesn’t work, try going back to Node 8. You’ll find some issues online of people having issues with Node 10 that were resolved by downgrading to Node 8, and sometimes newer versions of Node don’t play nice with node-gyp.
9. File an issue.
If you’re still having trouble getting node-gyp to work, then your issue probably doesn’t fall into one of the more common problems. It’s worth doing some research online to see if that solves your problem. Otherwise, your best option is to file an issue on the GitHub page for node-gyp and see what advice you can get there.
Other Resources
Much of this information can now be found on the GitHub readme for node-gyp, but it wasn’t always there. It only made an appearance after a few thousand posts from disgruntled Windows users who just wanted to install some dependencies. Even then, the information is missing some of the issues that arise with installing the wrong version of the build tools.
Another great resource is Microsoft’s guide on working with Node on Windows. It even has sections dedicated to compiling native Node modules and resolving basic node-gyp problems.
Additionally, this question on StackOverflow contains useful answers and comments regarding this issue. Leave a note in the comments if you’ve found anything else helpful in solving node-gyp issues!