
Quick Tips
- Download and copy the necessary drivers to the USB.
- Use the 32-bit version of Windows 11/10 as a temporary fix.
- Use Diskpart to change the disk format from MBR to GPT.
Preliminary Fixes
- Check/Switch the USB Ports: One common cause of this error is the USB port being used. Some USB ports may not be compatible with the installation process, especially if they are USB 3.0 ports. Check and fix it.
- Check the USB Drive on Another System: Sometimes, the issue might be with the USB drive itself. Verifying the USB drive on another system can help determine if the drive is faulty or if the installation media is corrupted.
Method 1: Disable CSM and Secure Boot
CSM and Secure Boot features can interfere with the installations, so you must disable them using the BIOS settings. You can install Windows 11 without Secure Boot if you have TPM 2.0 and UEFI on your PC. Here’s how to disable Secure Boot in the BIOS:
Step 1: Restart your PC.
Step 2: Press the designated F-key (usually the F2 or Esc key) to access the BIOS.
You need to check the key assigned by the PC manufacturer to access the BIOS.
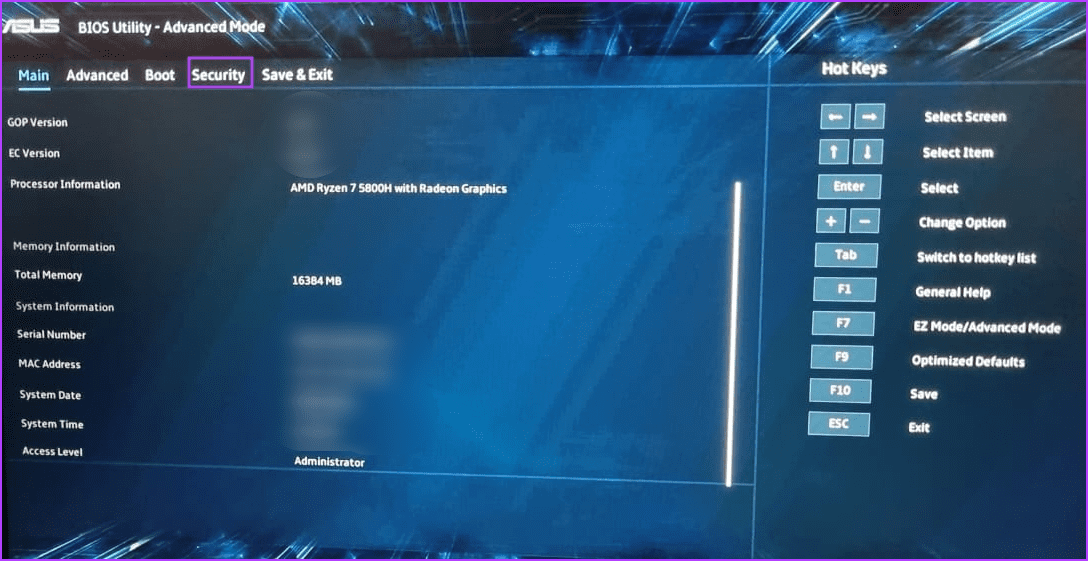
Step 3: After you enter the BIOS, switch to the Security tab.
Note: Your PC’s BIOS option may differ. Look for the Secure Boot option in all the tabs in the BIOS.

Step 4: Click on the Secure Boot option.

Step 5: Click on the Secure Boot Control option and select the Disabled option.

Step 6: Press the F10 key to save the changes and exit the BIOS.
Step 7: Your PC will reboot, and you must boot using the Windows USB installation media. Proceed with the installation and check if the Windows setup encounters the same error.
Similarly, disable the CSM mode, which is also a feature in the BIOS that enables support for installing older operating systems.
Method 2: Download and Install the Missing Drivers
If your PC uses an Intel processor, download and extract the Intel Rapid Storage Technology (IRST) driver for your PC model. AMD users will have to do the same and download and extract the AMD RAID Driver (SATA, NVMe RAID) drivers.

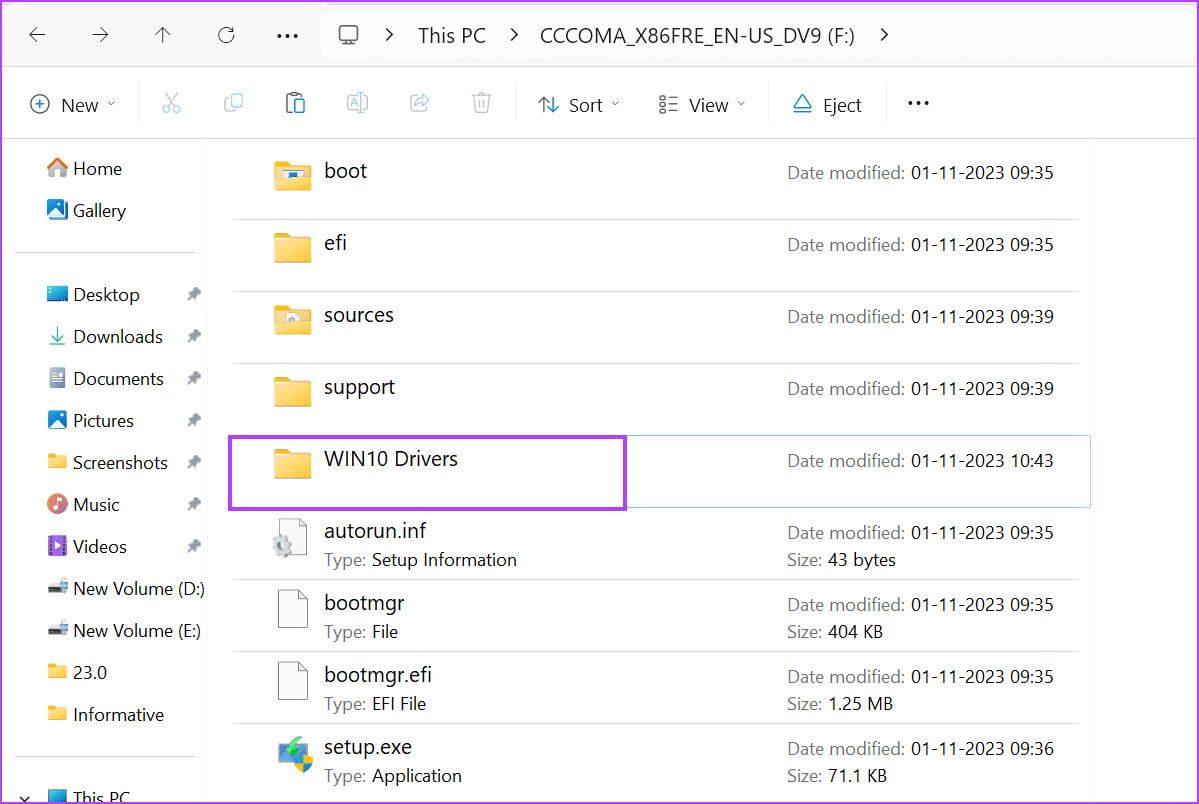
After that, copy the extracted drivers folder to the Windows USB installation media.

Repeat the following steps:
Step 1: Power on your PC and boot using the Windows USB installation media till you reach where the setup asks you to load drivers. If you copied the drivers to another USB drive, plug it in.
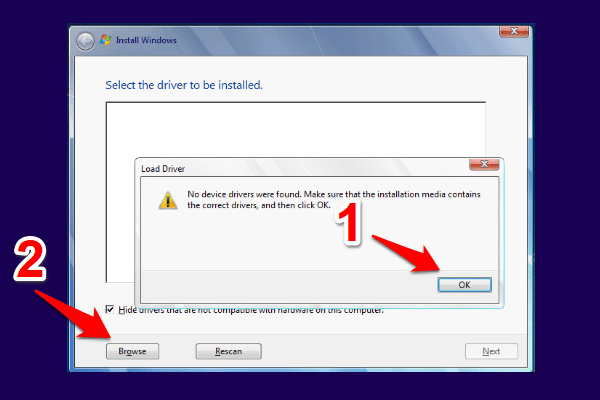
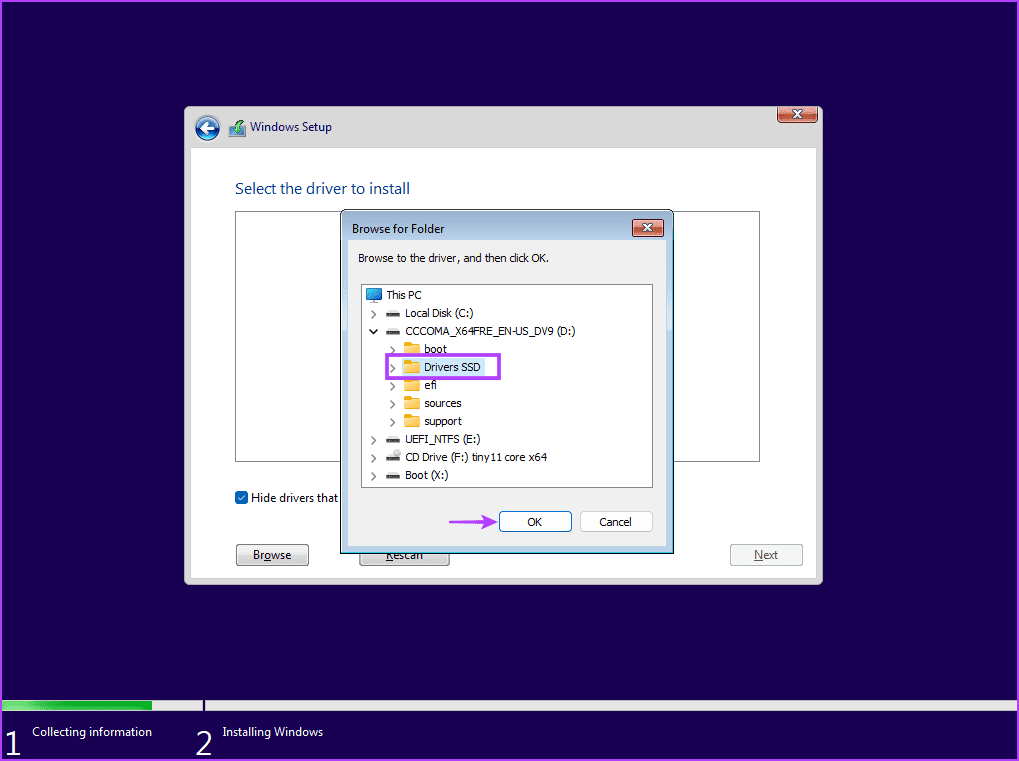
Step 2: Click on the Browse button.

Step 3: Select the appropriate driver folder and click on the OK button.

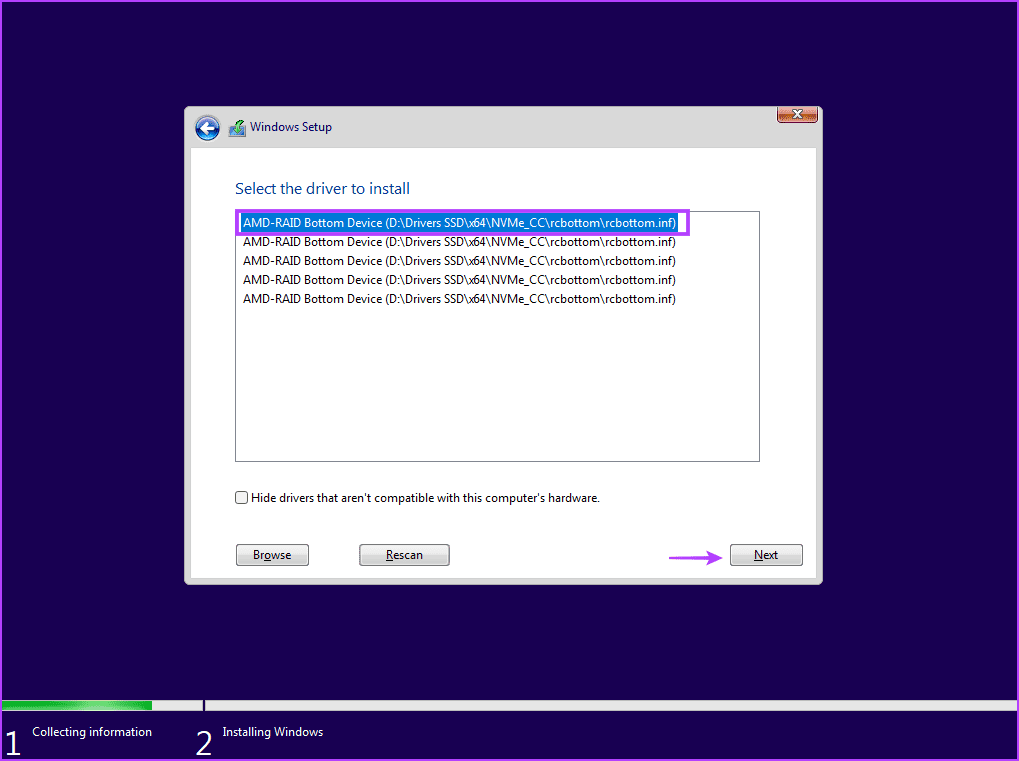
Step 4: Click on the driver to select it and then click on the Next button.

Step 5: After the driver installs successfully, pick a drive for installation and continue with the setup.
Method 3: Try Installing the 32-Bit Version (For Windows 10)
If you are having trouble with the Windows 10 installation, try the 32-bit version of the operating system instead of the 64-bit version. This is a temporary workaround that worked for many users, but you will have to stick with the 32-bit version on the OS. And whenever you wish to change, you’ll have to clean install the 64-bit version of Windows.
Corrupt USB installation media is also a reason why the error pops up when you try to select the drive and proceed with the Windows installation. So, you must recreate the Windows USB installation media with the help of either the Windows Media Creation tool or Rufus.
Ensure you download the latest ISO file from the official Windows website and use it to create the Windows USB installation media. Connect the USB drive to your PC and check if the installation proceeds without any errors.
Method 5: Convert Disk to GPT
Windows 11 requires the PC to support UEFI, and the storage drive must be in the GPT format. If the primary storage disk is in MBR format, you must convert it to GPT before installing the operating system.
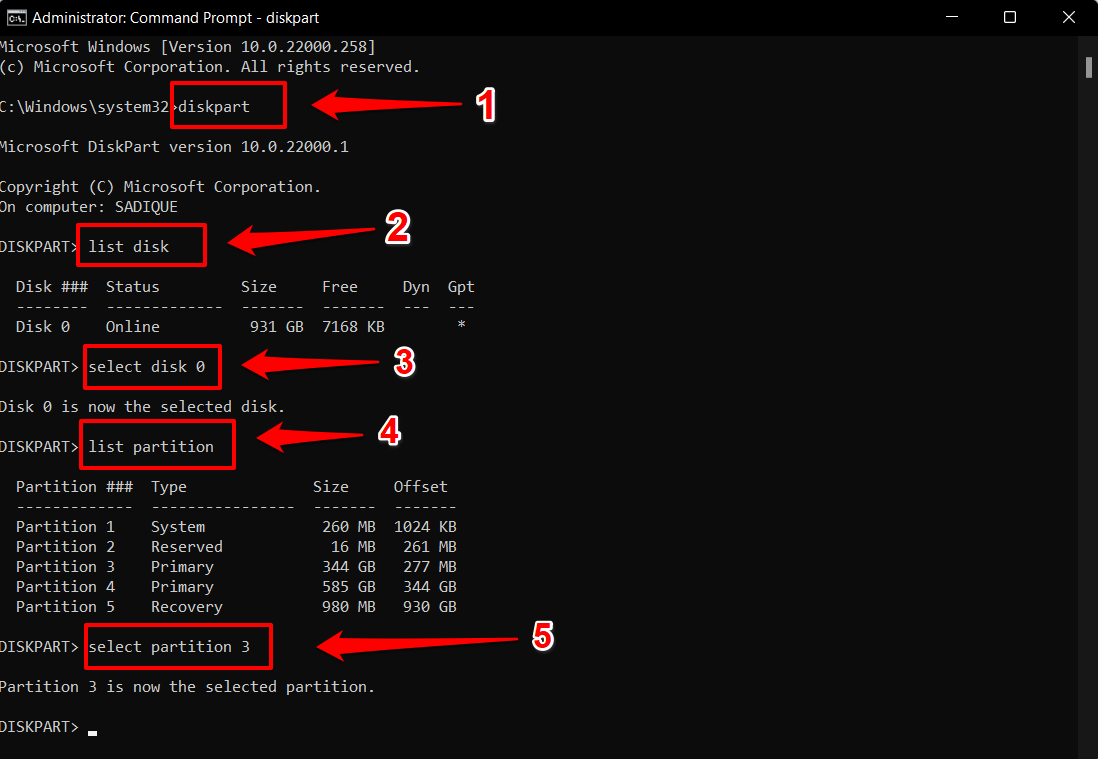
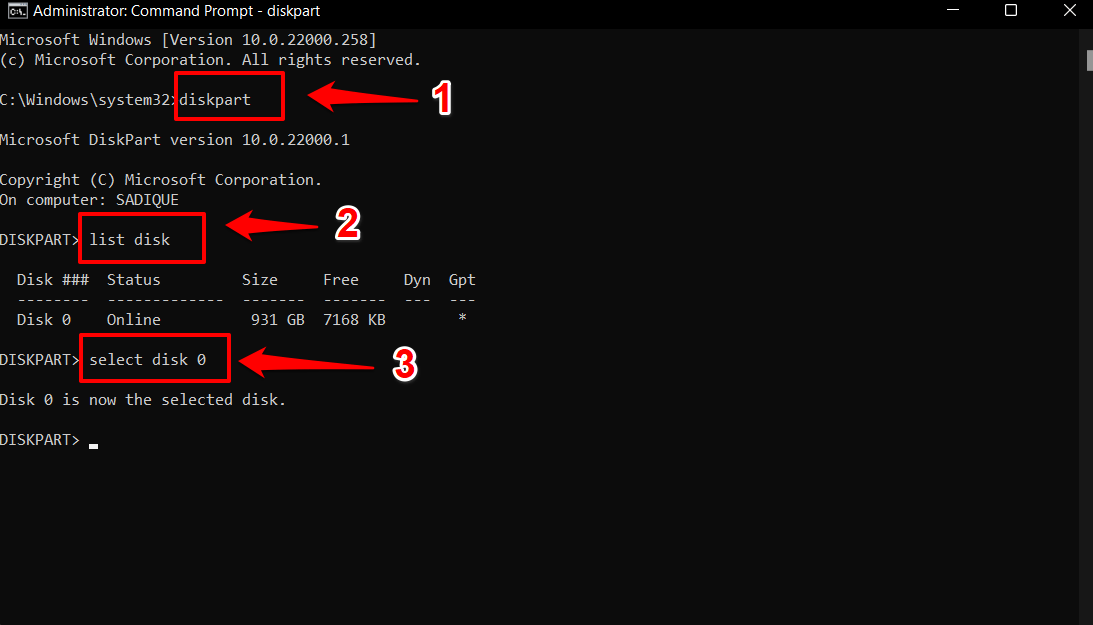
Step 1: Press the Shift + F10 keyboard shortcut to open the Command Prompt on the Windows Setup page.
Step 2: Type the following command and press Enter to launch the Diskpart utility:
diskpart
Step 3: After that, execute the following command:
list disk
Step 4: You will see a list of all the disks, including the Windows USB installation media. Note the number of your system disk. The command to select the disk is:
select disk disknumberStep 5: Replace the disknumber part with the actual number of the disk from the list. So, the final command in our case becomes:
select disk 0
Step 6: After selecting the disk, execute the following command:
clean
Step 7: The selected disk is wiped clean. Execute the following command to convert it to GPT:
convert gpt
Step 8: After you see the successful command execution message, execute the following command:
list disk
Step 9: You will notice that an asterisk (*) appears in front of the disk under the GPT column. It indicates that the disk is in GPT format now.
Step 10: Close the Command Prompt window and continue the Windows installation.
That’s it. This should fix the no device drivers were found error from your Windows 10/11 PC once and for all.
Was this helpful?
Thanks for your feedback!
The article above may contain affiliate links which help support Guiding Tech. The content remains unbiased and authentic and will never affect our editorial integrity.
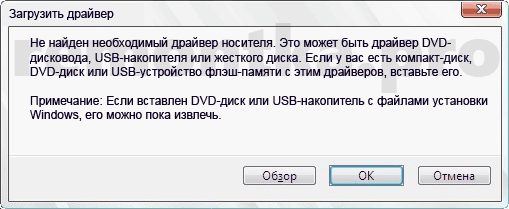
При установке Windows 11 и 10 (а также 8.1 и 7) на компьютер или ноутбук пользователь может столкнуться с ошибками «Не найден необходимый драйвер носителя. Это может быть драйвер DVD-дисковода, USB-накопителя или жесткого диска» (во время установки Windows 11/10 и 8.1), «Не найден необходимый драйвер для дисковода оптических дисков. Если у вас есть дискета, CD, DVD или флэш-накопитель USB с этим драйверов, вставьте этот носитель» (при установке Windows 7).
Текст сообщения об ошибке не особо понятен, особенно для начинающего пользователя, потому как не ясно, о каком именно носителе идет речь и можно предположить (неверно), что дело в SSD или новом жестком диске, на который происходит установка (об этом здесь: Не виден жесткий диск при установке Windows 7, 8 и Windows 10), однако обычно это не так и дело в другом.
Основные шаги, чтобы исправить ошибку «Не найден необходимый драйвер носителя», которые будут подробно описаны в инструкции далее:
- Для новых ноутбуков и ПК попробуйте отключить контроллер VMD в БИОС/UEFI. Обычно опцию можно найти где-то на вкладке Advanced.
- Если вы устанавливаете Windows 7 и делаете это с флешки (см. Установка Windows 7 с флешки), подключите USB накопитель к разъему USB 2.0.
- Если диск с дистрибутивом записан на DVD-RW, либо долго не использовался, попробуйте заново записать загрузочный диск с Windows (а лучше, возможно, попробовать установку с флешки, особенно если есть сомнения в полной работоспособности привода для чтения дисков).
- Попробуйте записать установочную флешку с помощью другой программы, см. Лучшие программы для создания загрузочной флешки. Например, сравнительно часто (по неясным причинам) ошибку «Не найден необходимый драйвер для дисковода оптических дисков» видят пользователи, записавшие USB накопитель в UltraISO.
- Используйте другой USB накопитель, удалите разделы на текущей флешке, если она содержит несколько разделов.
- Заново скачайте ISO Windows и создайте установочный накопитель (дело может быть в поврежденном образе). Как скачать оригинальные ISO образы Windows 10, 8 и Windows 7 с сайта Майкрософт.
Основная причина ошибки Не найден необходимый драйвер носителя при установке Windows 7
Ошибка «Не найден необходимый драйвер носителя» во время установки Windows 7 наиболее часто бывает вызвана (особенно в последнее время, по мере обновления компьютеров и ноутбуков у пользователей) тем, что загрузочная флешка для установки подключается к разъему USB 3.0, а официальная программа установки ОС не имеет встроенной поддержки драйверов USB 3.0.
Простое и быстрое решение проблемы — подключить флешку к порту USB 2.0. Их отличие от разъемов 3.0 — в том, что они не синего цвета. Как правило, после этого установка происходит без ошибок.
Более сложные способы решения проблемы:
- Записать на ту же флешку драйверы для USB 3.0 с официального сайта производителя ноутбука или материнской платы. При условии, что там есть эти драйверы (могут находиться в составе Chipset Drivers), а записывать их обязательно нужно в распакованном виде (т.е. не как exe, а как папку с файлами inf, sys и, возможно, другими). При установке нажать «Обзор» и указать путь к этим драйверам (если драйверов нет на официальных сайтах, можно использовать сайты Intel и AMD для поиска драйверов USB 3.0 для вашего чипсета).
- Интегрировать драйверы USB 3.0 в образ Windows 7 (здесь требуется отдельное руководство, которого у меня на данный момент нет).
Ошибка «Не найден необходимый драйвер для дисковода оптических дисков» при установке с DVD
Основная причина ошибки «Не найден необходимый драйвер для оптических дисков» при установке Windows с диска — поврежденный диск или плохо читающий диски привод DVD.

При этом, повреждений вы можете и не видеть, а на другом компьютере установка с этого же диска происходить без проблем.
В любом случае, первое, что следует попробовать в данной ситуации — либо записать новый загрузочный диск Windows, либо использовать загрузочную флешку для установки ОС. Оригинальные образы для установки доступны на официальном сайте Майкрософт (выше приводил инструкцию о том, как их скачать).
Использование другого ПО для записи загрузочного USB накопителя
Иногда случается, что сообщение об отсутствующем драйвере носителя появляется при установке Windows 10, 8 и Windows 7 с флешки, записанной какой-то определенной программой и не появляется при использовании другой.
Попробуйте:
- Если у вас мультизагрузочная флешка, записать накопитель с одним образом, например, с помощью Rufus или WinSetupFromUSB.
- Просто использовать другую программу для создания загрузочной флешки.
Проблемы с загрузочной флешкой
Если указанные в предыдущем разделе пункты не помогли, дело может быть и в самой флешке: если есть возможность, попробуйте использовать другую.
А заодно проверьте, не содержит ли ваша загрузочная флешка несколько разделов — это тоже может приводить к появлению таких ошибок при установке. Если содержит, удалите эти разделы, см. Как удалить разделы на флешке.
Дополнительная информация
В некоторых случаях, ошибка может быть вызвана и поврежденным образом ISO (попробовать загрузить заново или из другого источника) и более серьезными проблемами (например, неправильно работающая оперативная память может приводить к повреждению данных при копировании), хотя это и случается редко. Тем не менее, если есть возможность, стоит попробовать произвести загрузку ISO и создание накопителя для установки Windows на другом компьютере.
На официальном сайте Майкрософт также присутствует собственная инструкция по исправлению проблемы: https://support.microsoft.com/ru-ru/kb/2755139.
Missing Correct Drivers when installing Windows on your PC. Here are best methods to fix the Windows 11 no device drivers were found error.
This guide will make you aware of six different methods to Fix the Windows 11 no device drivers were found error. Now that the latest iteration of OS has been released in a stable state and most of the bugs have been ironed out, many users are looking forward to trying it out on their PC.
In this regard, there are three different approaches to performing the upgrade—from the Settings menu, via the Media Creation Tool, or by using an ISO file. While the first method passes without any hiccups, the second and third methods cause quite a few issues.
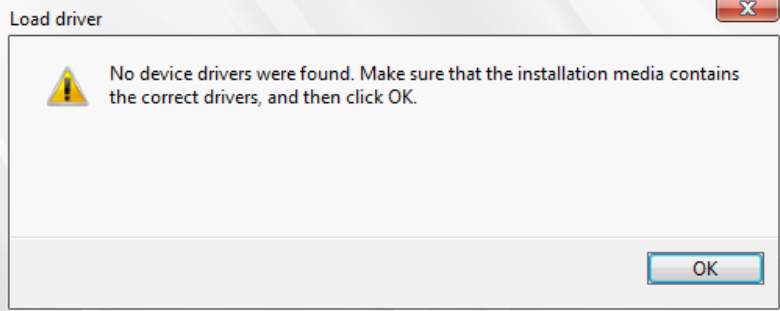
When users are trying to install Windows 11 via a bootable USB (created either via the official Media Creation Tool or via a third-party app like Rufus), the installation seems to get stuck at the point when it’s time to install the drivers. Users are instead being greeted with the following error message:
“No device drivers were found. Make sure that the installation media contains the correct drivers, and then click OK”. If you are also getting bugged with this issue, then fret not. In this tutorial, we will show you numerous methods to Fix the Windows 11 no device drivers were found error. So without any further ado, let’s get started.
Fix 1: Switch to USB 2.0 Port
While the USB 3.0 Port does give a faster read/write speed, however, in some environments, such as in Windows Recovery or BIOS, your system might not be able to identify the device connected to this port.
Therefore, it is recommended to connect your USB drive to the tried and tested 2.0 port. So try out this tweak and then check if it Fixes the Windows 11 no device drivers were found error.
Fix 2: Use a Standalone USB for Drivers
Windows packs in all the required drivers along with the OS, but as of now, the system is unable to unpack and install these drivers from the ISO file. So your next course of action should be to create a standalone bootable USB device, put in only the drivers there, and then try installing the drivers from that secondary USB. Here’s how:
- To begin with, create a second bootable USB device using third-party software like Rufus.
- Then download the SATA drivers corresponding to your chipset: AMD | Intel
- Now transfer the driver files over to this second USB device.
- After that, start off the installation using the primary USB device that has the ISO file.
- Once it throws up the “no device drivers were found” error, connect the second USB device that has the driver file.
- Now click OK to close the error message. Then click Browse, navigate to the driver files present in the second USB device, and hit OK.

- The drivers will now be loaded and subsequently installed. And with that, it should also Fix the no device drivers were found error on Windows 11.
Fix 3: Manually Set the Active Partition
The issue could also be attributed to the fact that the system is unable to identify the active partition and hence install the drivers. Hence you will have to manually let it know of the same so that it could then proceed ahead with the installation. Here’s how:
- To begin with, insert the bootable USB drive to your PC that has the ISO setup file.
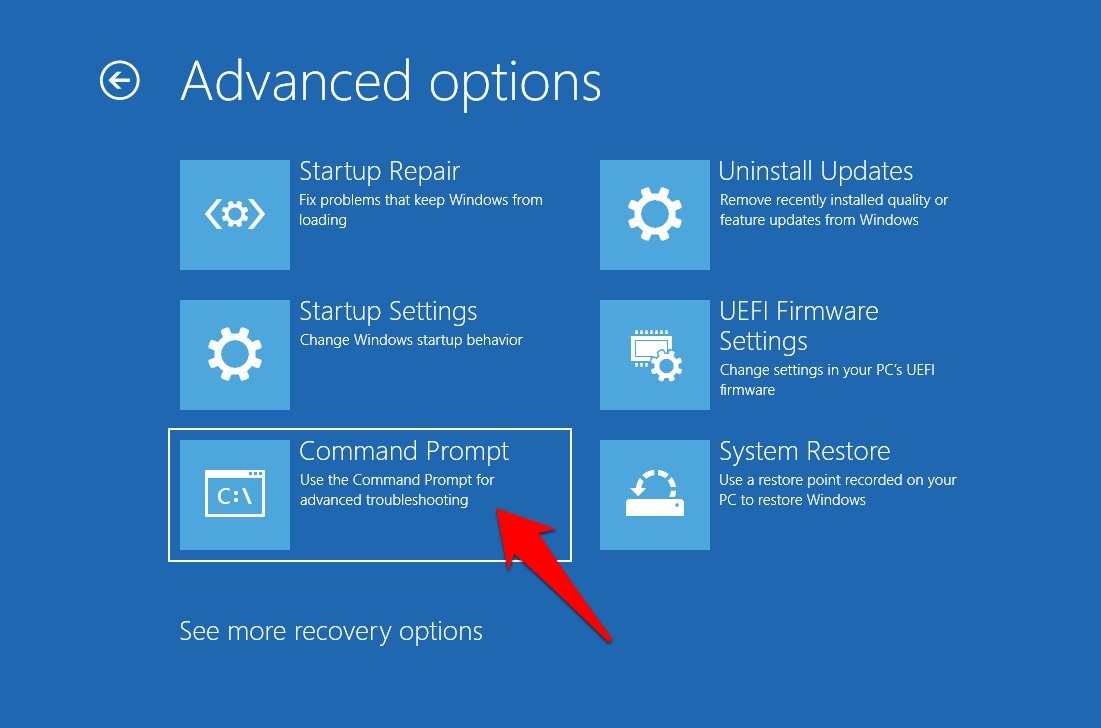
- Then restart your PC and start again with the installation process. Once you reach the Choose an option screen, click on Troubleshoot.

- After that, click on Advanced Options followed by Command Prompt.

- Now execute the following five commands (one at a time) in this CMD window. Make sure to replace X with the disk and partition name where you are installing the OS:
diskpart
list disk
select disk X
list partition
select partition X

- Now that you have selected the desired partition, just execute the below command to make it the active one:
active
- Once that is done, you may close the CMD window and proceed ahead with the rest of the installation. Check if it manages to Fix the device drivers not found issue.

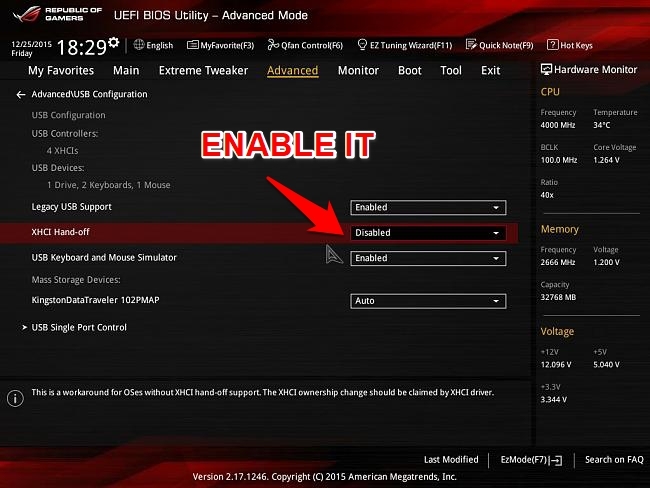
Fix 4: Enable xHCI hand-off in BIOS
The extensible Host Controller Interface (xHCI), lays down the guidelines for the interaction of the USB 3.0 controller hardware and software. When it is enabled, BIOS gives full authority to the OS to manage the said ports.
On the other hand, if you disable it, then BIOS has total control and the OS has no say in the handling and control of the ports.
In the current scenario, many users were able to achieve success after giving the authority to the OS. In other words, they were able to rectify the device driver issues by enabling XHCI hand-off from BIOS. So let’s enable the Host Controller and then check out the results.
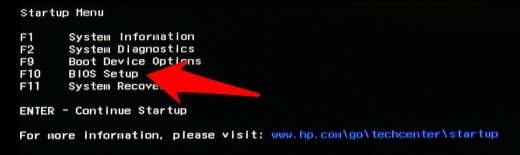
- Start by powering off your PC. Then turn it back on, and as soon as it is booting up, continuously press the Esc key.
- This shall bring up the Startup menu. Press F10 to select the BIOS menu from there. Your PC will now boot to the BIOS.

- From there, go to the Advanced tab and scroll to the USB Configuration section.
- You should now see the BIOS xHCI Hand-Off or BIOS EHCI Hand-OFF option, change its state to Enabled.

- Once done, save the changes and then restart the installation process. Check if the Windows 11 no device driver error has been fixed or not.
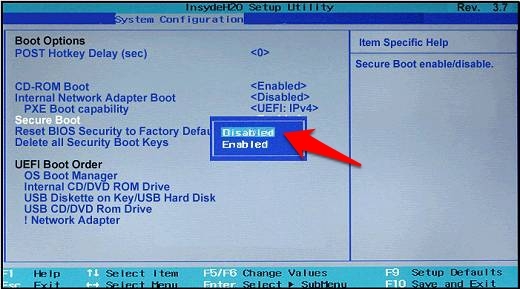
Fix 5: Disable Secure Boot from BIOS
Secure Boot is basically a security mechanism put in place by Microsoft that verifies the credibility of each driver that is being installed or loaded at boot time. However, in rare instances, it might raise a false positive and could prevent the installation of legitimate drivers as well. The only way to verify and hence rectify this issue is to disable this security check (aka Secure Boot).
- So start by booting your PC to the BIOS, as explained above.
- Then go to the Security tab and you should see the Secure Boot option. Change its state to Disabled and then save the changes.

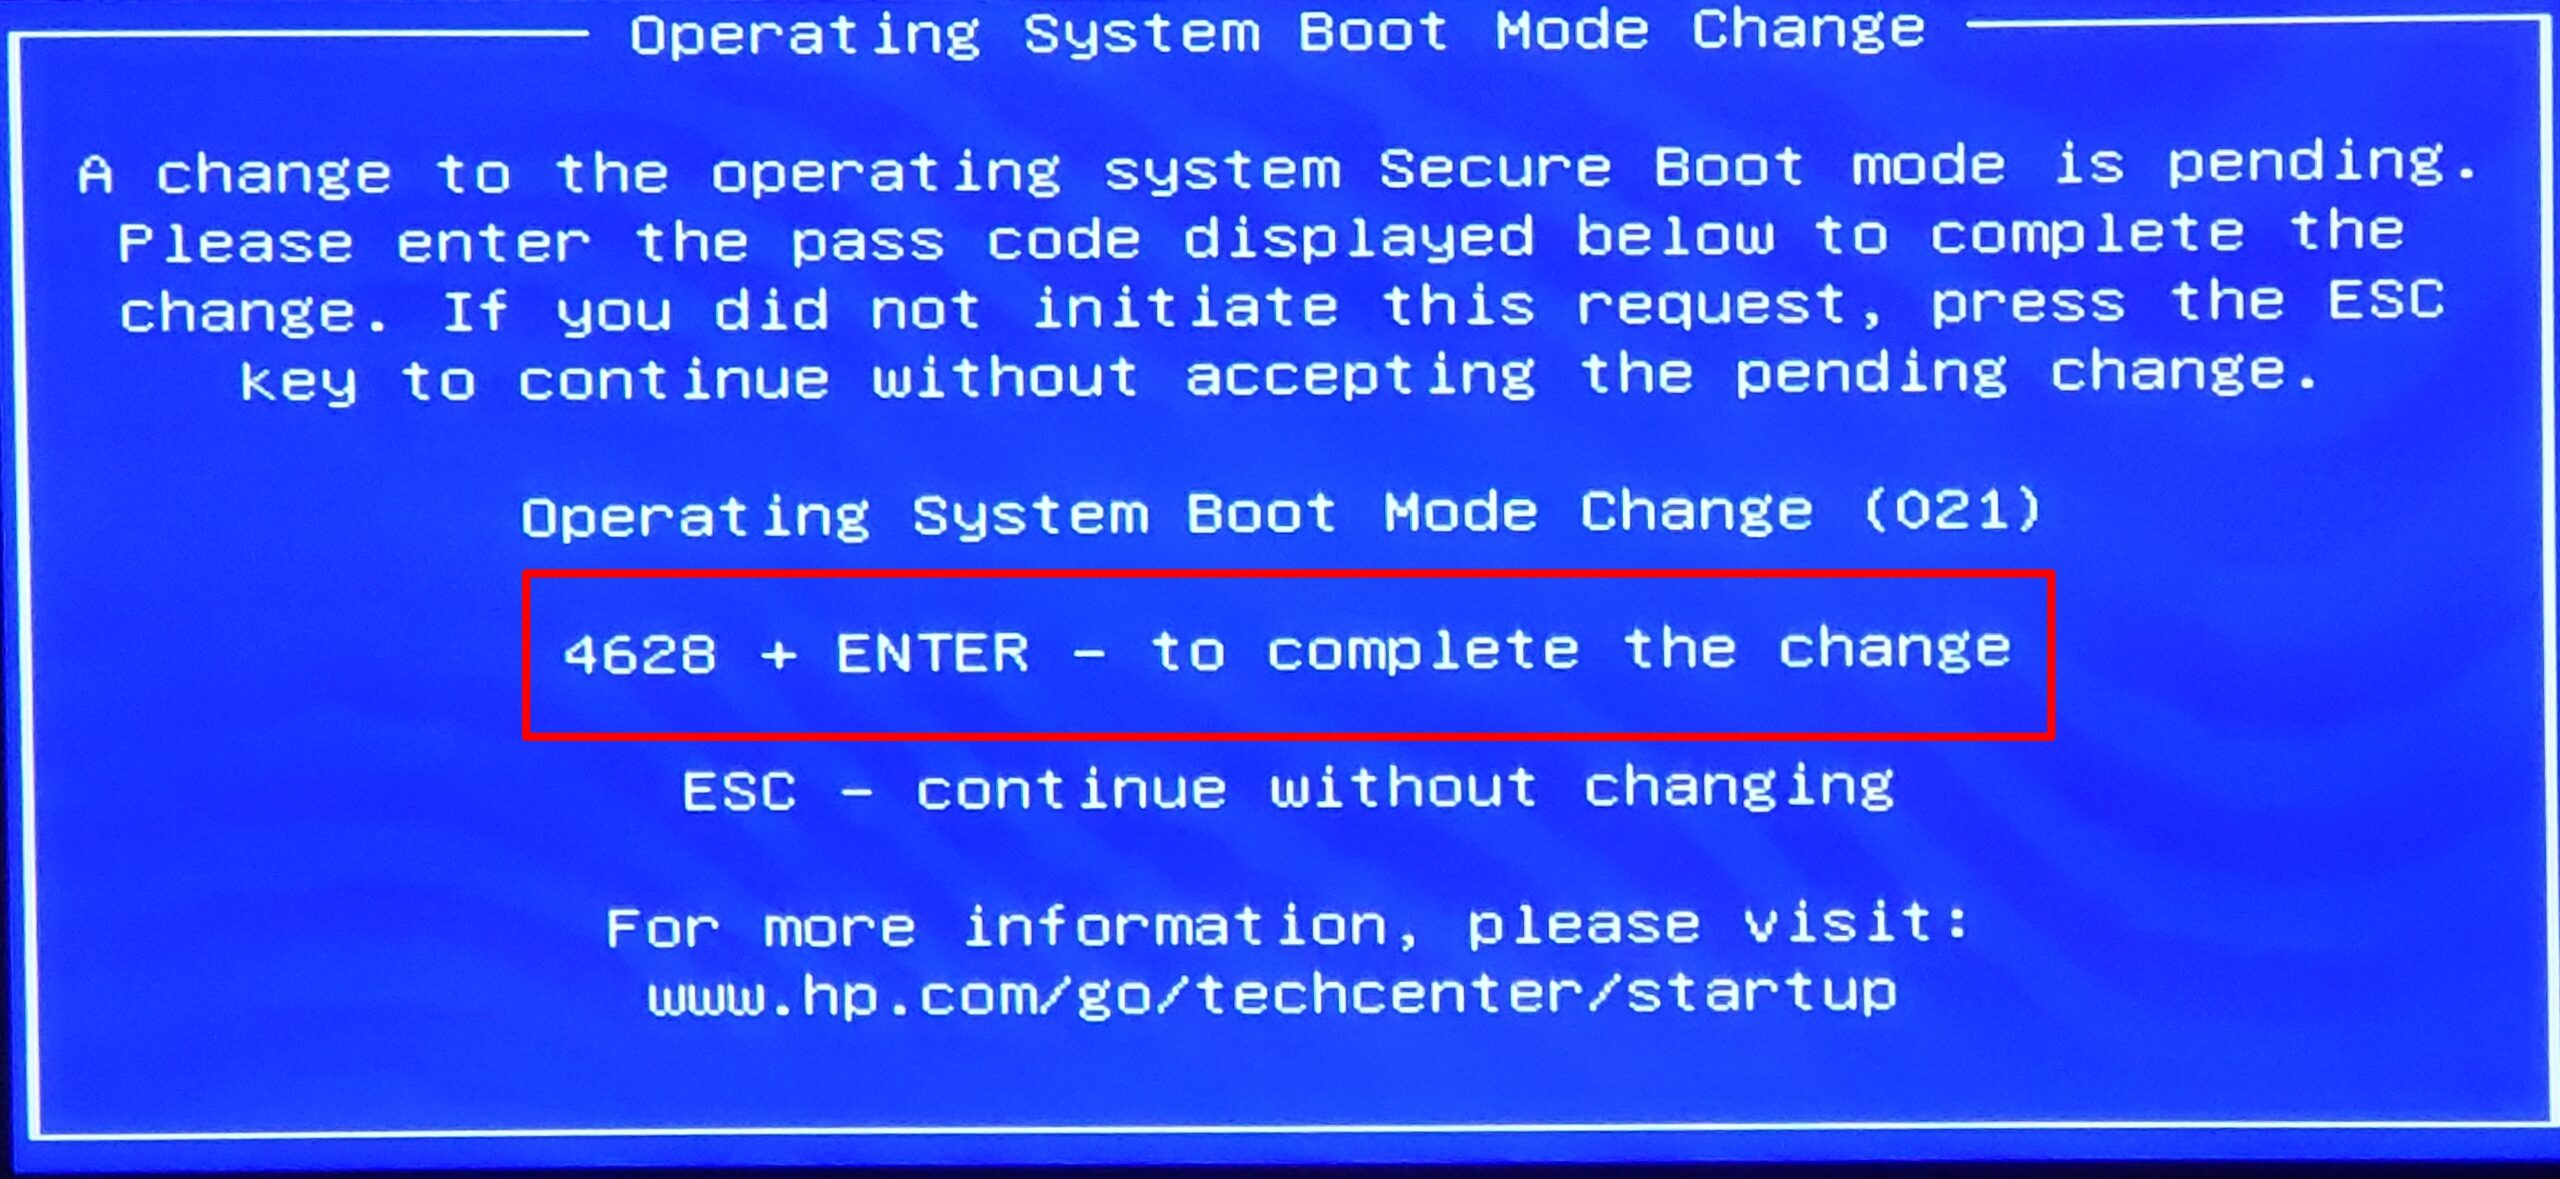
- However, If the Secure Boot option is not there, then check for it under the Boot/Authentication/System configuration section and then disable it.
- Once done, restart the PC and you should get the Operating System Boot Mode Change prompt. Type in the requested code and hit Enter to verify the changes that you have made to the BIOS.

- Now proceed ahead with the setup and verify whether the Windows 11 no device drivers were found error stands Fixed or not.
Fix 6: Clean Install Windows 11
If none of the aforementioned methods managed to spell out success, then it could be the case of bad sectors or corrupt data on your C drive. Hence the only way out is to perform a clean install of Windows 11, which will delete all the data in the process. So if you wish to take this route, then take a backup beforehand and then refer to the below instructions.
- Boot your device to the Windows 11 setup via the bootable USB Device that has the ISO file.
- Once you reach the Windows Setup screen, press the Shift + F10 shortcut keys to open the Command Prompt.
- Then execute the below two commands in the CMD window to bring up the list of the Disk Drive names
diskpart
list disk
- After that, type in the below command to select the partition where the OS needs to be installed. Make sure to replace the X keyword accordingly:
select disk X

- Finally, execute the below command to wipe the selected disk:
clean
- Once the drive has been formatted, restart the installation procedure. This time you shouldn’t get the device driver issues.
Conclusion
So with this, we rounded off the guide on how you could fix the Windows 11 no device drivers were found error. We have listed six different methods for the same. Do let us know in the comments section which one worked out in your favor.
If you’ve any thoughts on How to Fix No Device Drivers Were Found While Installing Windows?, then feel free to drop in below comment box. Also, please subscribe to our DigitBin YouTube channel for videos tutorials. Cheers!
Installing Windows on your PC using a bootable USB drive is something that you should know how to do. The process is fairly simple to grasp, but if you hit a snag, it can get confusing to diagnose the problem. Most users often get the ‘No Device Drivers Were Found’ error while installing Windows 10/11. If you’ve hit the same error too, there is no need to panic. These fixes will resolve the error in no time.
Read Also: Top 4 Ways to See Who Viewed Your Instagram Story (2023)
What could be causing the ‘No Device Drivers Were Found’ error to pop up while installing Windows 10/11 on your PC?
As you can probably guess, this error pops up when Windows fails to find the driver package during the installation process. This is very unusual because the installation media typically contains all the necessary drivers required for the installation of the OS on your PC. If you get this error it could be due to either one of these reasons:
- The driver package in the installation media is corrupted.
- The installation media file is corrupted.
- Windows cannot verify the authenticity of the driver package.
- The drivers are outdated and not supported by Windows anymore.
Let’s take a look at some of the possible fixes.
Create an active disk partition

Step 1: Plug in the USB to your computer and load the Windows Installation Media on it.
Step 2: Press Shift + F10 to open Command Prompt.
Step 3: Type the following commands:
diskpart
list disk
select disk [disk number]
list partition
select partition [partition number]
active
Step 4: Continue installing the Windows OS on your PC.
Manually download the drivers from the manufacturer’s website

If the Windows Installation Media on your USB drive does not contain the appropriate drivers, you will need to download them from the manufacturer’s website. Sometimes, a corrupt driver package may lead to the ‘no device drivers were found’ error showing up during the installation process. To fix this, simply download the SATA AHCI controller drivers from the OEM’s website. You will need another PC to do this. Once you have downloaded the driver package, plug the USB drive into the computer again until you reach the error window. In the error window, select Load Driver, followed by Browse. Locate the recently downloaded driver package and install it on the PC.
Reinstall Windows Installation Media

If there’s something wrong with the Windows Installation Media on your USB drive, reinstall it from the official Microsoft website. First, download the Windows Installation Assistant, followed by the Windows Installation Media and Windows Disk Image (ISO). Now, plug in the USB drive to your computer and launch mediacreationtool.exe that you installed on the PC. Select ‘Create installation media for another PC’ and choose your USB drive as the target storage. When the installation process is complete, use the USB drive to boot Windows on another PC.
Reset Motherboard Settings

Step 1: Restart your PC and enter BIOS using its assigned key. This varies among different manufacturers so Google which key leads to BIOS for your PC. Del, F2, or F10 should do the job.
Step 2: Go to Exit and select Load Setup Defaults/Load Optimal Defaults.
Step 3: Confirm your selection in the following popup box.
Step 4: Save your changes and exit BIOS.
Plug the USB drive into a different port
If you’ve tried all the fixes mentioned above and are still getting the ‘no device drivers were found’ error while installing Windows 10 or 11 on your PC, it is possible that the fault may lie with the USB port that your drive is plugged into. Make sure that you plug it into a USB 2.0 port and not a USB 3.0 port. Once that’s done, start the installation process all over again.
Frequently Asked Questions (FAQs)
Why am I getting the ‘No Drivers Were Found Error’ while installing Windows 10/11 on my PC?
This error usually pops up when the driver package on your Windows Installation Media is missing or corrupted. It could also be due to a faulty ISO file for the OS or a dysfunctional USB port.
How do I fix the ‘No Drivers Were Found’ error?
To fix this error, you need to install a new driver package from your PC manufacturer’s official website. If the Windows ISO file is at fault, install a new one from Microsoft’s website.
How do I download Windows 10/11 ISO legally?
Microsoft allows users to download the ISO image legally for free from its official website. Go to this page to download Windows 10 ISO and read this article to learn how to install it on your PC.
Read Also: How to use Google Chrome’s new Reading Mode like a pro?
Conclusion
These are the top 5 ways to fix the ‘No Device Drivers Were Found’ error while installing Windows 10 or 11 on your device. Check out this article to find out how you can update the audio drivers on your PC. This article lets you know how to install the WiFi driver on your device. If you know any more ways to fix this error, let us know in the comments!
Support Us
We are a humble media site trying to survive! As you know we are not placing any article, even the feature stories behind any paywall or subscription model. Help us stay afloat, support with whatever you can!

Utkarsh Joshihttps://www.gadgetbridge.com/
Utkarsh is a seasoned writer who seeks to simplify complex concepts and bring the latest in technology to a broader audience. You can catch his exhaustive ‘How to’ guides, deep-dive feature articles, cutting edge news stories, and comprehensive tech reviews on Gadgetbridge.com. Apart from dabbling in all things tech, Utkarsh also enjoys watching club football, adding to his TBR pile of books, and making Spotify playlists. Automobile enthusiasts and motorheads can also catch his articles on Motorbridge.com.
Установка новой копии Windows 11 или 10 — довольно простой процесс. Однако некоторые пользователи застревают при установке Windows 10 и 11 и видят сообщение «Драйверы устройств не найдены». В результате они не могут пройти мимо экрана выбора диска.
Эта проблема может возникнуть из-за поврежденного устройства установки носителя, неисправных портов, отсутствия драйверов и неправильного формата раздела диска. Мы обсудим семь способов устранения этой ошибки и успешной установки операционной системы Windows на ваш компьютер.
1. Проверьте/переключите USB-порты
Если вы столкнулись с сообщением «Драйверы устройств не найдены, убедитесь, что установочный носитель содержит правильную ошибку драйверов при установке ОС, вам необходимо переключиться на другой USB-порт на вашем компьютере». Отключите USB-накопитель от компьютера, подключите его к другому порту USB (2.0 или 3.0) и повторите попытку установки.
Некоторые пользователи даже избежали этой ошибки, закрыв окно подсказки по установке драйвера и вернувшись к экрану приветствия. После этого отключите USB-накопитель, а затем подключите его к другому USB-порту и приступайте к установке.
2. Проверьте USB-накопитель в другой системе
Если после создания загрузочного USB-накопителя Windows вы обнаружите, что при установке Windows отсутствует драйвер, необходимо проверить его в другой системе. Если вы не столкнулись с проблемой и можете пройти первую страницу настройки, значит, проблема связана с вашим USB-портом, настройками системы или драйверами.
3. Отключите CSM и безопасную загрузку
Функции CSM и Secure Boot могут помешать установке, поэтому их необходимо отключить в настройках BIOS. Вы можете установить Windows 11 без безопасной загрузки, если на вашем компьютере установлены TPM 2.0 и UEFI. Вот как отключить безопасную загрузку в BIOS:
Шаг 1. Перезагрузите компьютер.
Шаг 2. Нажмите назначенную клавишу F (обычно F2 или Esc), чтобы получить доступ к BIOS. Вам необходимо проверить ключ, назначенный производителем ПК для доступа к BIOS.
Шаг 3: После входа в BIOS перейдите на вкладку «Безопасность». Обратите внимание, что это BIOS для компьютеров с материнскими платами ASUS. Таким образом, BIOS на вашем компьютере будет выглядеть по-другому с вашей стороны. В любом случае вам придется искать опцию «Безопасная загрузка» на всех вкладках BIOS.
Шаг 4: Нажмите на опцию «Безопасная загрузка».
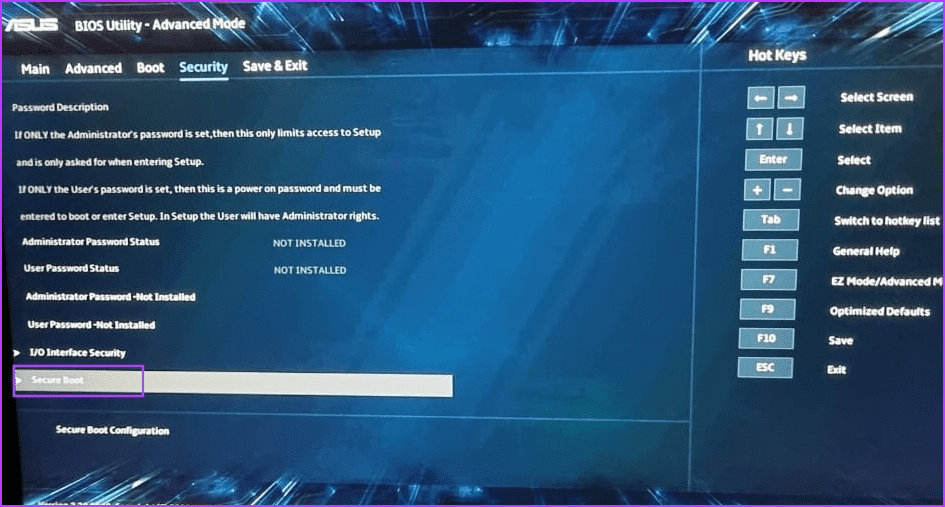
Шаг 5: Нажмите на опцию «Управление безопасной загрузкой» и выберите опцию «Отключено».
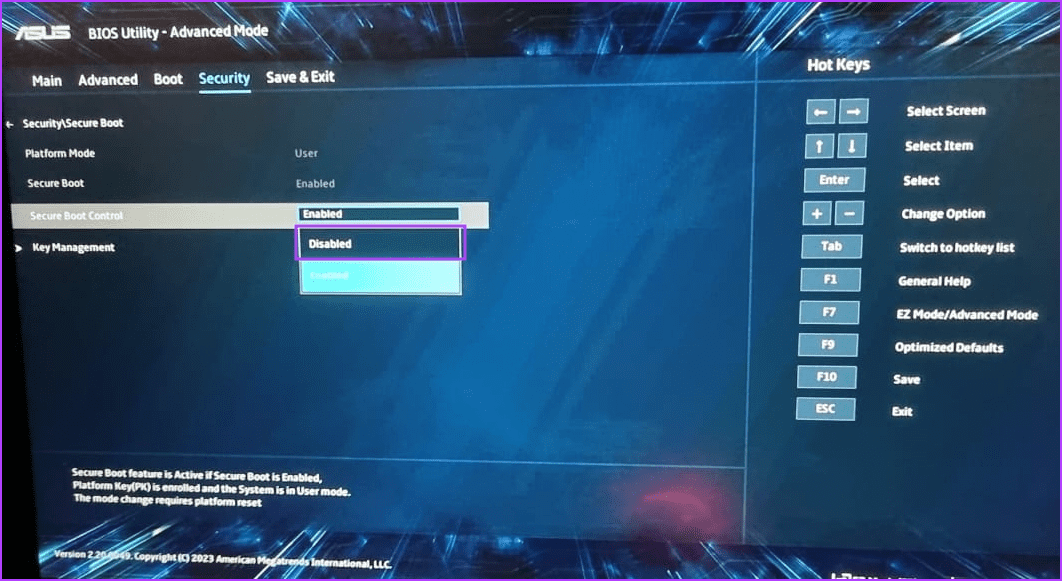
Шаг 6: Нажмите клавишу F10, чтобы сохранить изменения и выйти из BIOS.
Шаг 7: Ваш компьютер перезагрузится, и вам придется загрузиться с установочного USB-носителя Windows. Продолжите установку и проверьте, не возникает ли при установке Windows ту же ошибку.
Аналогичным образом отключите режим CSM, который также является функцией BIOS, обеспечивающей поддержку установки старых операционных систем.
4. Загрузите и установите недостающие драйверы
Вы также можете столкнуться с ошибкой, если в Windows нет драйвера для устройства хранения данных. Итак, вам необходимо загрузить недостающие драйверы с помощью другого ПК и скопировать их на установочный USB-накопитель Windows. Вы также можете использовать другой USB-накопитель.
Если на вашем компьютере используется процессор Intel, загрузите и извлеките драйвер Intel Rapid Storage Technology (IRST) для вашей модели ПК. Пользователям AMD придется сделать то же самое: загрузить и извлечь драйверы AMD RAID Driver (SATA, NVMe RAID).
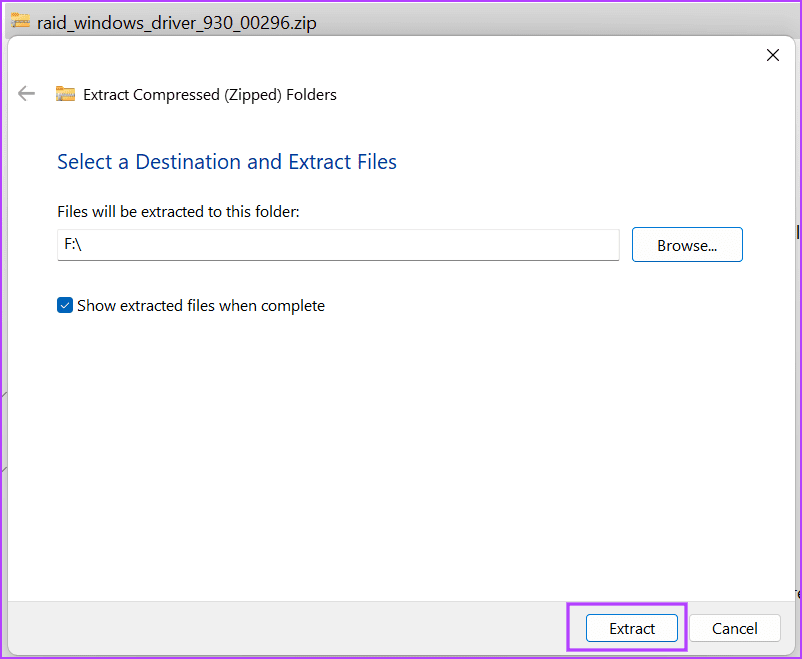
После этого скопируйте извлеченную папку драйверов на установочный USB-носитель Windows.
Повторите следующие шаги:
Шаг 1. Включите компьютер и загружайтесь с помощью установочного USB-носителя Windows, пока не дойдете до места, где программа установки попросит вас загрузить драйверы. Если вы скопировали драйверы на другой USB-накопитель, подключите его.
Шаг 2: Нажмите кнопку «Обзор».
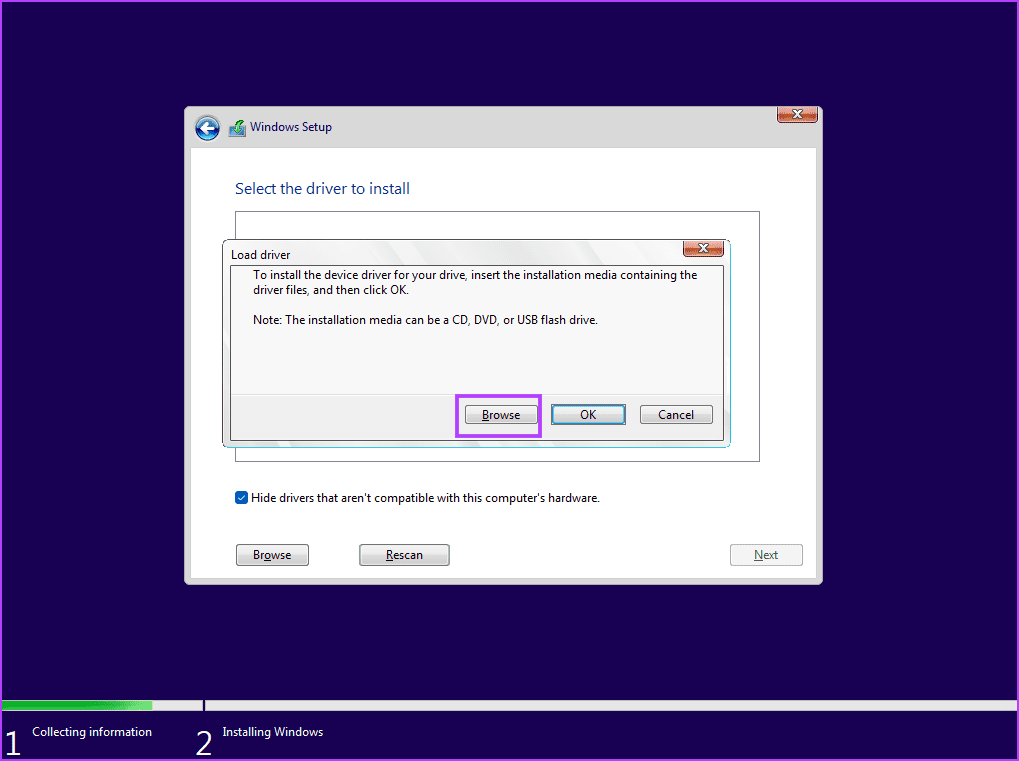
Шаг 3: Выберите соответствующую папку драйвера и нажмите кнопку «ОК».
Шаг 4: Нажмите на драйвер, чтобы выбрать его, а затем нажмите кнопку «Далее».
Шаг 5. После успешной установки драйвера выберите диск для установки и продолжите установку.
5. Попробуйте установить 32-битную версию (для Windows 10)
Если у вас возникли проблемы с установкой Windows 10, попробуйте 32-битную версию операционной системы вместо 64-битной. Это временное решение, которое сработало для многих пользователей, но вам придется придерживаться 32-разрядной версии ОС. И всякий раз, когда вы захотите изменить, вам придется выполнить чистую установку 64-разрядной версии Windows.
6. Воссоздайте установочный USB-носитель.
Поврежденный установочный USB-носитель также является причиной появления ошибки при попытке выбрать диск и продолжить установку Windows. Итак, вам необходимо воссоздать установочный USB-носитель Windows с помощью инструмента Windows Media Creation или Rufus.
Обязательно загрузите последнюю версию ISO-файла с официального веб-сайта Windows и используйте его для создания установочного USB-носителя Windows. Подключите USB-накопитель к компьютеру и проверьте, проходит ли установка без ошибок.
7. Конвертировать диск в GPT
Windows 11 требует, чтобы компьютер поддерживал UEFI, а накопитель должен быть в формате GPT. Если основной диск хранения имеет формат MBR, перед установкой операционной системы необходимо преобразовать его в GPT. Однако прежде чем идти по этому пути, создайте резервную копию всех ваших личных файлов на всех дисках на внешнем жестком диске.
Мы будем использовать утилиту Diskpart для преобразования диска из MBR в GPT, что предполагает полную очистку диска. Вот как это сделать:
Шаг 1. Нажмите сочетание клавиш Shift+F10, чтобы открыть командную строку на странице установки Windows.
Шаг 2. Введите следующую команду и нажмите Enter, чтобы запустить утилиту Diskpart:
diskpart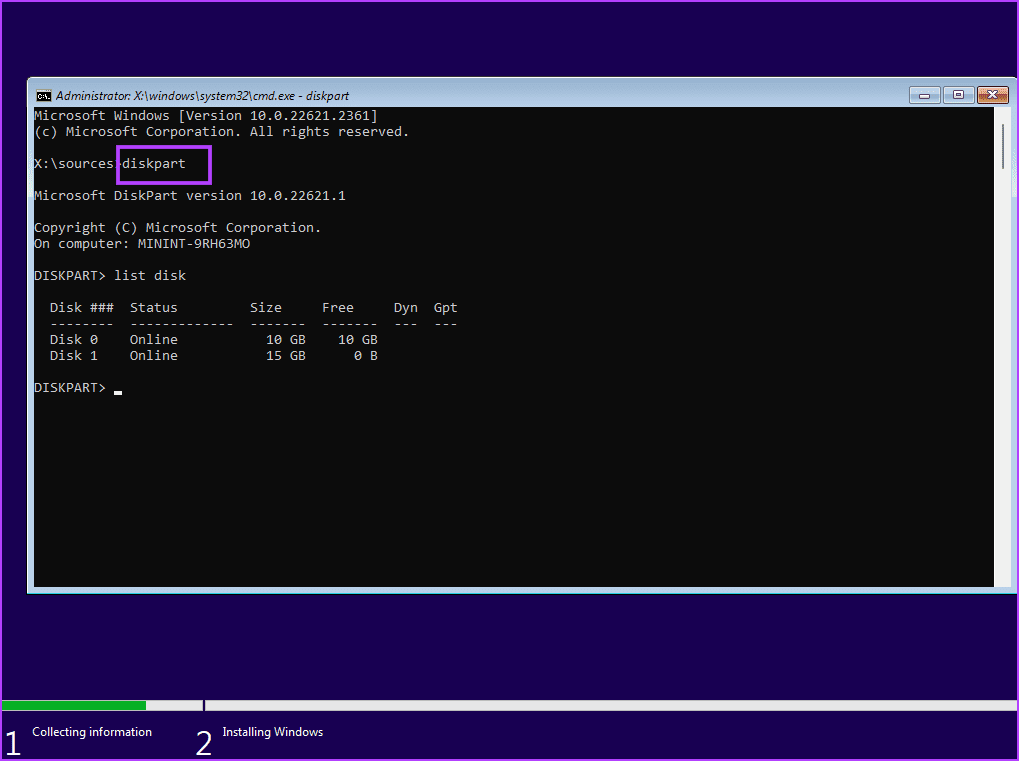
Шаг 3: После этого выполните следующую команду:
list disk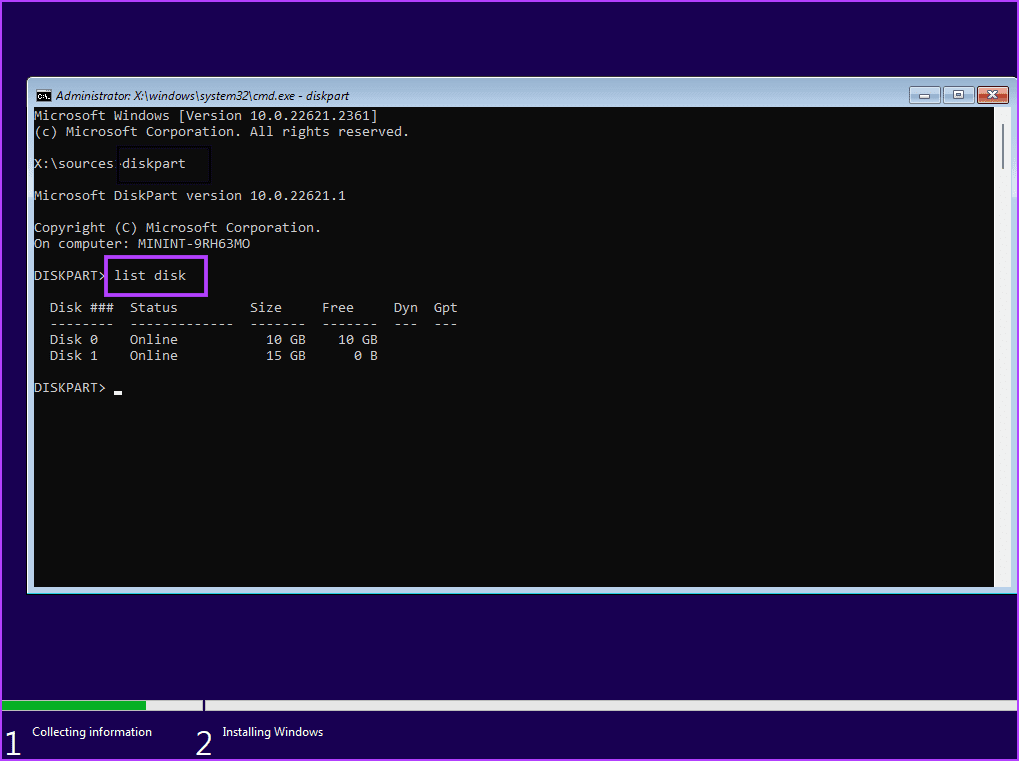
Шаг 4. Вы увидите список всех дисков, включая установочный USB-носитель Windows. Запишите номер вашего системного диска. Команда выбора диска:
select disk disknumberШаг 5: Замените часть номера диска фактическим номером диска из списка. Итак, последняя команда в нашем случае будет такой:
select disk 0
Шаг 6: После выбора диска выполните следующую команду:
clean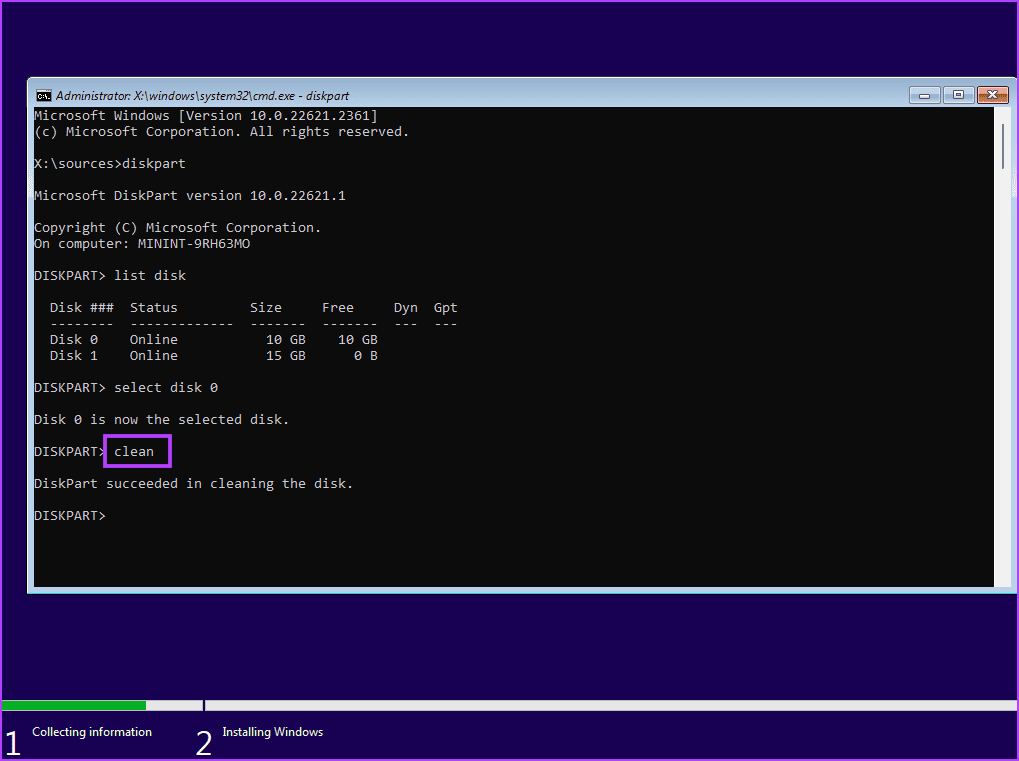
Шаг 7: Выбранный диск будет очищен. Выполните следующую команду, чтобы преобразовать его в GPT:
convert gpt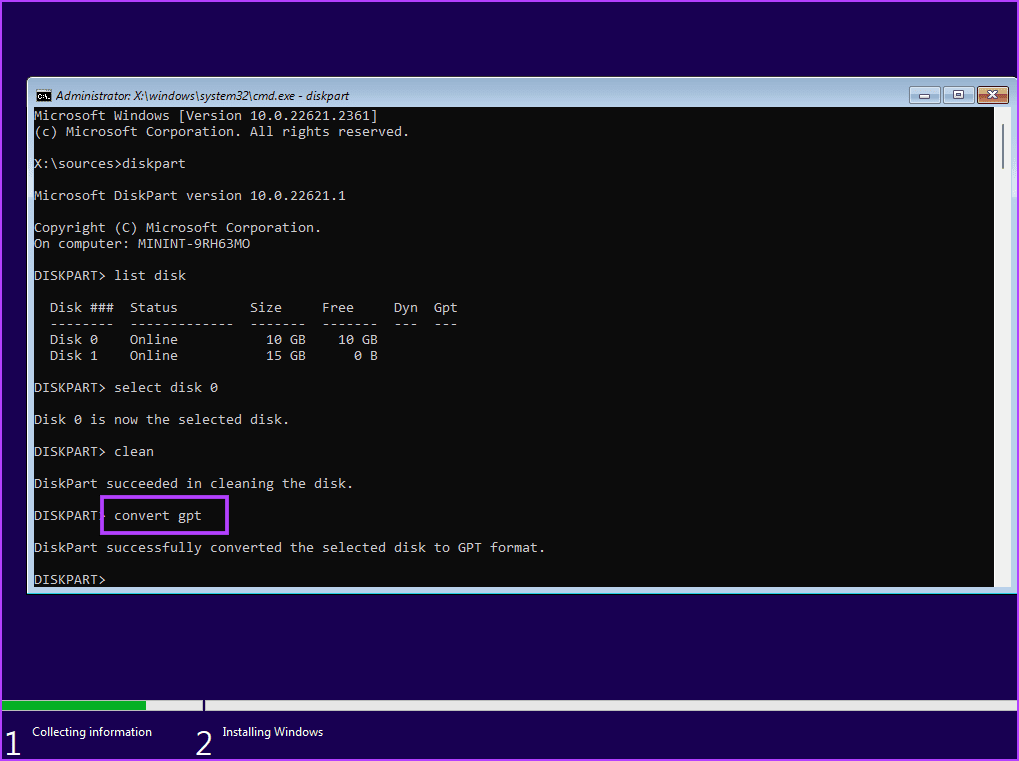
Шаг 8. После того, как вы увидите сообщение об успешном выполнении команды, выполните следующую команду:
list disk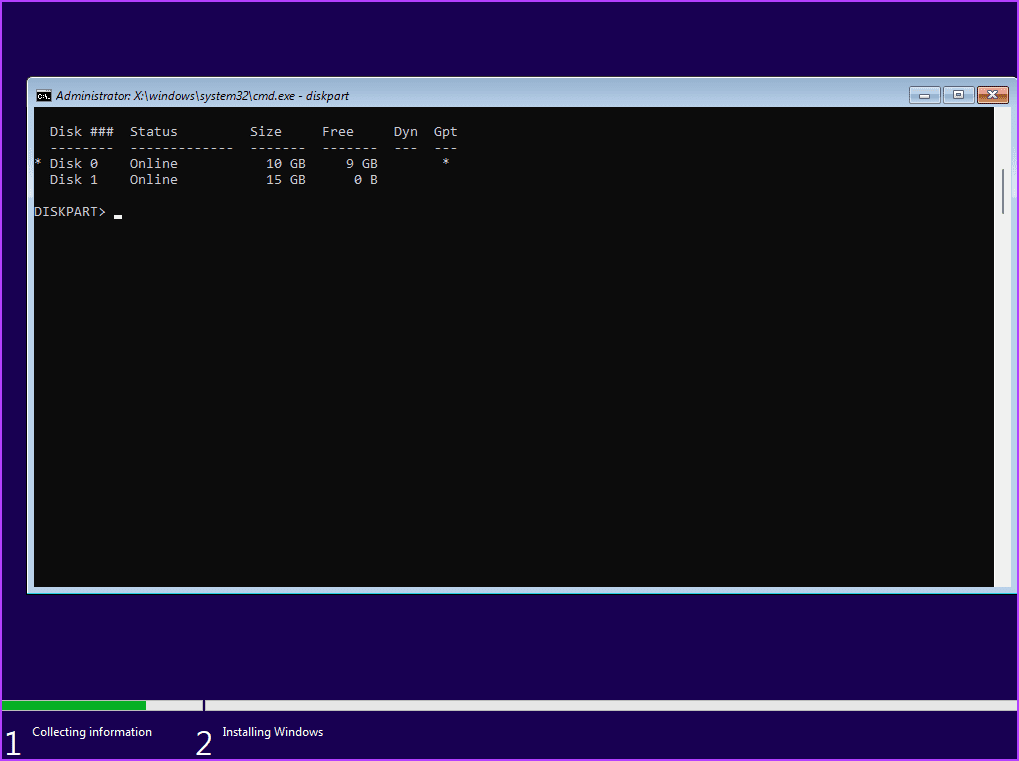
Шаг 9: Вы заметите, что перед диском в столбце GPT появится звездочка (*). Это указывает на то, что диск теперь имеет формат GPT.
Шаг 10. Закройте окно командной строки и продолжите установку Windows.
Это были семь способов исправить ошибку «не найдены подписанные драйверы устройств» при установке Windows 10 или 11. Проверьте установочный USB-носитель Windows, отключите CSM и безопасную загрузку и установите отсутствующие драйверы. После этого заново создайте установочный носитель USB и преобразуйте диск в MBR для успешной установки Windows.
Просмотров: 61 671