
Key Takeaways:
- «No boot disk has been detected or the disk has failed» error usually occurs when booting the computer.
- A wrong boot configuration or a corrupt boot disk may cause the no boot disk has been detected error.
- EaseUS will provide six options to fix the error, and you can follow this tutorial.
HP or Acer users may receive no boot disk has been detected error when booting their PC. The system cannot find the boot information needed to load the operating system. EaseUS will help you analyze the detailed cause and provide possible solutions to boot your computer successfully.
The computer needs to boot up the system by checking the hard drive for boot information and other operational information. No boot disk has been detected or the disk has failed, indicating that the boot information retrieval has failed. The following are some common causes of this error:
- Faulty or loose hard disk connection
- Incorrect boot order setting
- Corrupt boot configuration data
- Failed hard drive
- HDD/SSD missing operating system
After understanding the causes of these difficulties, we will continue to show you effective solutions on how to solve the no boot disk has been detected or the disk has failed problem. If you like this passage, click the social buttons below to share it with others in need.
Six Solutions to Fix No Boot Disk Has Been Detected Error
Knowing why the error occurred, you can jump directly to the target solution for error repair. Instead, you can fix the undetected boot disk error through these troubleshooting steps in order:
- 1. Check the Hard Disk Connection
- 2. Change the Boot Order
- 3. Repair the Boot Sector
- 4. Check the File System
- 5. Run the Automatic Repair
- 6. Do A fresh install of Windows
This guide will provide detailed step-by-step instructions for each method:
📖Extend Reading: Default Boot Device Missing or Boot Failed
1. Check the Hard Disk Connection
To fix the boot error, check the hard drive connection and ensure it is properly connected to your computer. Laptop shaking may cause the connected wires to loose, resulting in undetected boot disk errors. Please be careful when handling it to avoid damaging the hardware.
Step 1. Turn off the computer remove the battery, and remove the HDD from the computer.
Step 2. Clean all ports and cables and reconnect the HDD.
Note: If you do not have professional tools and practical knowledge, it is better to consult a computer person or engineer to help you.
2. Change the Boot Order
If the boot disk is not at the top of the boot order, the computer will try to boot from another source. This may also cause the problem of undetected disk errors if the computer cannot find valid boot information. For this case, you can change the computer’s boot order in the BIOS as follows:
Step 1. Turn on your computer and enter BIOS by holding F1/F2/F12/Del or another specified key.
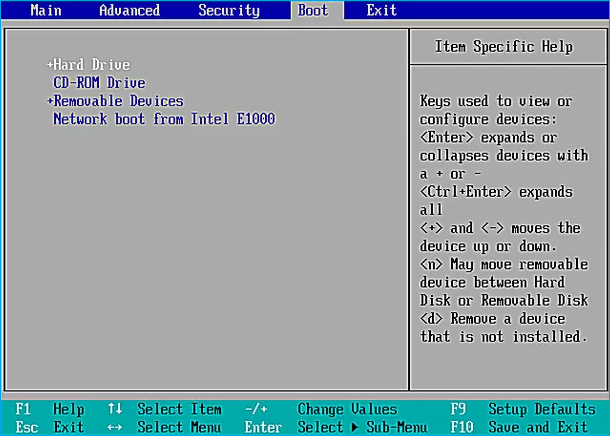
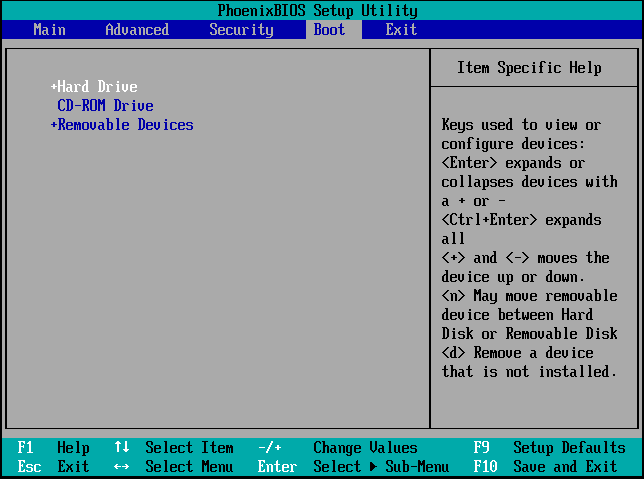
Step 2. Select the Boot option from the list of options.
Step 3. Find the computer’s boot order and use the arrows to move it up.
If this method is not working, please continue to try other fixes.
Also read: The System Cannot Find Any Bootable Devices
3. Repair the Boot Sector
The master boot record is located at the beginning of the bootable hard disk, and it helps your computer boot successfully. A corrupted MBR can also cause the system to fail to recognize the boot information and thus fail to boot your computer. Therefore, you must repair the boot sector. There are two ways that users can repair the boot sector:
Use EaseUS Partition Master to Rebuild MBR
EaseUS Partition Master is a versatile disk management tool. It simplifies the steps of the Windows built-in tool to help you quickly repair the MBR. Creating a WinPE bootable disk makes it possible to easily boot your computer without losing data. If you are not familiar with computer operations, this tool is perfect for you:
Free download this powerful tool and rebuild MBR:
Step 1. Create a WinPE bootable disk
- Launch EaseUS Partition Master, and click «Bootable Media» on the toolbar. Select «Create bootable media».
- Click «Next» to finish the process.

Step 2. Boot EaseUS Partition Master Bootable USB
- Connect the bootable USB or CD/DVD to your PC.
- Press F2 or Del when you restart the computer to enter the BIOS screen. Set and boot your computer from «Removable Devices» or «CD-ROM Drive». And then EaseUS Partition Master will run automatically.
Step 3. Rebuild MBR
- Click «Toolkit» and choose «Rebuild MBR».

- Select the disk and the type of MBR. Then, click «Rebuild».

- After that, you can see «MBR has been successfully rebuilt on Disk X».

If you meet other boot errors, you can use EaseUS Partition Master to fix them:
Use CMD to Rebuild MBR
If you are familiar with computer commands, you should use the Windows Media Creation Tool to create bootable media and then use the command prompt to repair the MBR in the Windows recovery environment:
Step 1. Boot your computer from the Windows bootable installation CD or DVD.
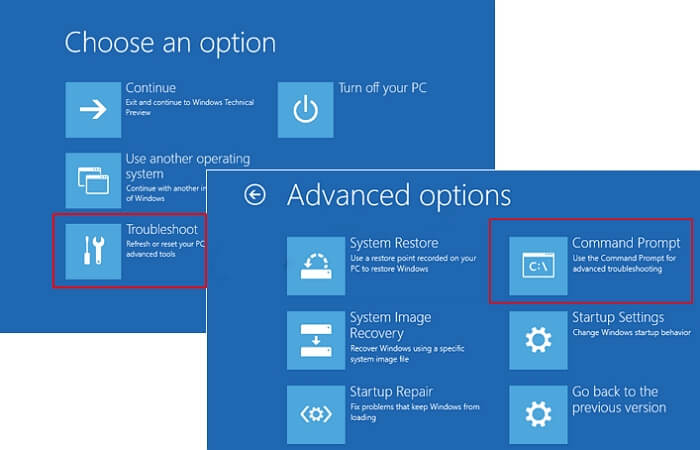
Step 2. Start the command prompt: select Troubleshoot in Choose an option and select Command prompt in Advanced options.
Step 3. Enter the following commands in sequence at the command prompt box and press enter:
- bootrec /fixmbr
- bootrec /fixboot
- bootrec /scanos
- bootrec /rebuildbcd
Please be careful when entering the commands to avoid data loss. You can then reboot your computer to see if the problem with the failed disk has been resolved.
4. Check the File System
If something is wrong with your system hard drive, you may also get a «the disk has failed» error. In this case, you have two ways to detect and fix the file system error on your hard disk. Both ways are based on the same principle as method 3, requiring you to have created bootable media. You can check the file system as follows:
Use EaseUS Partition Master to Check File System
EaseUS Partition Master provides «Check File System» and «Disk Surface Test» to help you find and fix hard disk errors. It is an alternative to Windows commands, but it is simpler and more comprehensive in solving problems. After you create bootable USB in Method 3, you can open your computer and use the tool directly:
Step 1. Right-click the target partition that may have a problem.
Step 2. Choose «Check» > «Check File System».
Step 3. In the Check File System window, check the «Try to fix errors if found» option by clicking the «Start» button.
Step 4. Please wait patiently. After the process, you can click the «Finish» button to exit the window.
In addition, the tool can check hard drive health comprehensively and alert you if there are problems with hard drive performance or temperature.
Run CHKDSK to Check File System
CHKDSK is a method Windows provides to detect and repair file system errors. Similar to method 3, you need to go to the command prompt:
Step 1. Start your computer from a Windows bootable device.
Step 2. Go to Advanced Options and select Command Prompt.
Step 3. Type the command: chkdsk c: /f/R/X and press Enter.

Extend reading: How to Run CHKDSK on SSD
5. Run the Automatic Repair
You can also run the Automatic Repair/Startup Repair on your system to fix the error that prevents your PC from booting. Before you start, you must also use EaseUS Partition Master or Windows installation media to enter the Windows recovery environment.
Step 1. Boot from the CD/DVD and press any key to continue.
Step 2. Click on Repair your computer and select Troubleshoot.
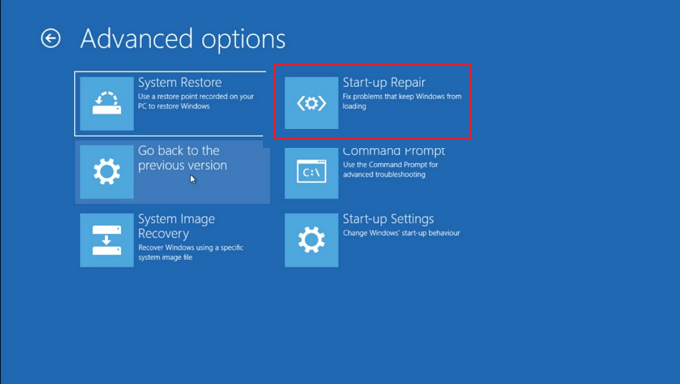
Step 3. Select Advanced options>Automatic/Start-up Repair.
Step 4. Wait for Windows to finish repairing automatically.
6. Do A Fresh Install of Windows
If all solutions are not working, a Windows system may fail. You can fix the error by doing a fresh install of Windows. This method will erase all files, so you can back up important information or copy a partition to another drive before doing a fresh install.
Read more about installing Windows at: How to Clean Install Windows
You May Also Like:
Conclusion
Six solutions are provided to fix the boot error: «no boot disk has been detected, or the disk has failed» error. Whether using an HP laptop or another computer, you can find solutions to boot problems in this article. Among other things, EaseUS Partition Master provides a quick and easy solution to help you create bootable media and fix the most likely errors.
FAQs About No Boot Disk Has Been Detected
If you have more questions about this topic, you can check out the simple questions and answers below 1:
1. What should I do if no bootable device shows?
No bootable device is probably because you did not change the boot order. To fix the error, you should change the bootable device first:
Step 1. Restart your computer and enter the BIOS screen.
Step 2. Under the Boot tab, find the hard drive and move it to the top of the boot order.
2. What does no boot disk has been detected mean?
No boot disk has been detected means that your computer will not boot. This could be because your boot disk is corrupt or poorly connected to your computer, and the computer cannot access it to retrieve boot information.
3. Why does «media test failure, check cable» happen?
This error indicates that there is a problem with the PXE of the computer. Problems with your boot sequence configuration, corrupt boot devices, corrupt boot sectors, or power supply problems can all cause this error.
Ошибка «Загрузочный диск не обнаружен или произошел сбой диска» обычно появляется, когда пользователи пытаются загрузить компьютер. Обычно это означает, что конфигурация загрузки неверна или загрузочный диск поврежден. В этой статье будут представлены 7 подходов к этому вопросу.
Вас беспокоит ошибка «Не обнаружен загрузочный диск или диск вышел из строя»? Обычно это указывает на то, что что-то не так с загрузочной конфигурацией или загрузочным диском на вашем компьютере. Чтобы устранить его, вы можете использовать следующие 7 решений.

Решение 1. Убедитесь, что загрузочный диск подключен правильно
Есть вероятность, что ошибка возникает из-за неправильного или плохого подключения жесткого диска вашего компьютера. Поэтому, чтобы определить, является ли виновником неисправное соединение, вам необходимо открыть корпус компьютера, чтобы проверить cabлес Конечно, новичкам этот шаг покажется немного запутанным. Так что лучше обратитесь за помощью к профессионалам.
Решение 2. Проверьте порядок загрузки компьютера
Кроме того, неправильный порядок загрузки на компьютере также может привести к этой ошибке. Итак, вы должны проверить последовательность загрузки.
- Во-первых, резtart ваш компьютер и тем временем нажмите клавишу «Delete» или «F1» или «F2», чтобы войти в экран настройки BIOS.
- Затем перейдите на вкладку «BIOS» в приведенном выше списке параметров.
- Затем вы можете проверить приоритет загрузочного устройства, чтобы убедиться, что жесткий диск компьютера имеет наивысший приоритет. Если нет, измените порядок.
- Наконец, нажмите «F10», чтобы сохранить изменения и выйти из настройки BIOS.
Решение 3. Запустите диагностикуostic для проверки загрузочного диска
Если вышеуказанные средства не помогают исправить эту ошибку, вероятно, на жестком диске возникли какие-то проблемы. В этой ситуации вам необходимо отсканировать и восстановить диск, например, с помощью встроенной «Диагностики Windows».ostИнструмент «ИК».
- Сначала резtarкомпьютер и нажмите клавишу «F12».
- При входе в меню загрузки выделите «Служебный раздел» или «Диагностика».ostИКС».
- Затем нажмите «Enter», чтобы запустить инструмент.
- Он автоматически проверит все оборудование на компьютере и сообщит о найденных проблемах.
Решение 4. «Автоматическое восстановление» на загрузочном диске
Помимо «Диагн.ostic», Windows также предлагает функцию «Автоматическое восстановление» для восстановления диска.
- К start с, вставьте установочный DVD Windows.
- Затем резtarт ПК.
- Далее нажмите любую клавишу для загрузки с DVD.
- Позже нажмите «Восстановить компьютер» > «Устранение неполадок» > «Дополнительные параметры» > «Автоматическое восстановление».
- После ремонта попробуйте перезагрузить ПК.
Решение 5. Запустите CHKDSK и SFC
При условии, что «Автоматическое восстановление» беспомощно, не расстраивайтесь. Просто используйте CHKDSK и SFC, чтобы снова восстановить диск.
- Сначала выполните шаги, описанные в Решении 4, чтобы войти в список «Дополнительные параметры».
- Затем выберите опцию «Командная строка».
- В окне командной строки введите следующие строки и нажмите «Enter»:
sfc /scannow /offbootdir=c:\ /offwindir=c:\windows chkdsk c: /r
- В конце концов, выйдите из командной строки и restarт ПК.
Решение 6. Восстановить загрузочный сектор
Более того, при условии, что загрузочный сектор плохой, ошибка тоже будет. Следовательно, необходимо восстановить загрузочный сектор.
- Как и в приведенном выше решении, запустите командную строку.
- Затем попробуйте выполнить следующие командные строки одну за другой.
bootrec.exe / FixMbr bootrec.exe / FixBoot bootrec.exe / RebuildBcd
- После этого выйдите из командной строки и перезагрузите компьютер.
Решение 7. Чистая установка Windows
Если, к сожалению, все вышеперечисленные решения бесполезны, возможно, преступником является неисправная система Windows. В этой ситуации вы можете попробовать «чистую установку Windows». Но, таким образом, все данные на загрузочном диске будут стерты. После этого вы должны попытаться восстановить данные, например, используя восстановление PST программное обеспечение, чтобы вернуться лost Данные ПСТ.
Об авторе:
Ширли Чжан — эксперт по восстановлению данных в DataNumen, Inc., которая является мировым лидером в области технологий восстановления данных, включая восстановить мдф и программные продукты для ремонта Outlook. Для получения дополнительной информации посетите www.datanumen.com
Are you an HP user getting the error No boot disk detected when you boot up your PC? There is no reason to worry; we’ve got the right solutions for you.
Some Windows users reported that when they boot up their HP computer, they see the error message No boot disk detected or the disk has failed.
What causes the No boot disk detected error?
This error occurs because, during the process of booting up a computer, the system checks the HDD for boot information and other Operating System information so as to utilize the information to boot up the system.
However, if the HP computer is unable to retrieve any not boot information or Operating System details on the HDD, the error message is displayed on the screen. Another variation of the error message that may appear is the requested system device cannot be found.
The reason for the boot information retrieval failure is largely connected to the HP computer/laptop which includes:
- Incorrect boot order settings
- Missing operating system from the HDD
- Hard Disk failure
- Loose Hard disk connection to PC
- Corrupt Boot Configuration Data (BCD)
Meanwhile, we are going to show you efficient solutions that are applicable in solving the hp error no boot disk detected problem.
How can I fix the error No boot disk detected or the disk has failed?
- Set the boot disk at the top of the computer’s boot order in BIOS
- Replace your Hard Disk Drive (HDD)
- Perform a clean installation of the Windows OS
- Check the PC-to-HDD’s connections
- Run Automatic Repair/Start Repair
- Run CHDSK
1. Set the boot disk at the top of the computer’s boot order in BIOS
-
1. Power up your computer.
-
2. Press the F1 key or any specified key to enter the BIOS (other keys such as F1, F12 or Delete may be used, depending on your HP system).
-
3. Locate your computer’s boot order under BIOS Boot.
-
4. Select the HDD/SSD i.e. the boot disk and move it upward using the arrow key.

-
5. Save the changes by following the screen prompts and exiting the BIOS.
-
6. After you exit the BIOS, your PC will restart, and will be devoid of the error problem.
One of the reasons for the no boot disk detected or the disk has failed error message is because the HDD/ boot disk is not at the top of the boot order.
The system retrieves boot information and OS details by following a boot order; the boot order consists of the sequence of sources that the computer searches in order retrieve valid information.
However, if the HDD/boot disk is not at the top of the boot order, the computer tries to boot from another source which results in the error message.
If you intend to set the boot disk i.e. HDD at the top of the boot order in BIOS (Basic Input/Output System), follow these steps:

However, if the HDD i.e. the boot disk is at the top of the boot order in the BIOS, you can proceed to the next method.
- FIX: No bootable device found [Acer, Dell]
- [Solved] Hard disk 3f0 error, boot device not found on HP
- FIX: BIOS Recognizes SSD But Won’t Boot [2022 Guide]
- 7 Ways to Fix Inaccessible_Boot_Device Error in Windows 11
- FIX: PC won’t exit BIOS
2. Replace your Hard Disk Drive (HDD)
Another reason for the computer’s inability to boot up is because the HDD is in a failed state which triggers the error ‘No boot disk detected or the disk has failed’.
You can detach the HDD from your PC; connect it to another PC to access the files and folders on the PC so as to check if the HDD is accessible.

However, if you are unable to access the contents of the HDD, you definitely need a replacement.
You can return the HDD back to your manufacturer-HP if the PC still has a warranty or purchase a new HDD from your HP eCommerce website, Amazon, or from your local computer shop.
However, we highly recommended that you can carry out the replacement with a professional – computer engineer.
Meanwhile, when you replace the HDD with a new one, ensure you install a new Windows OS on it.
Keep your new HDD healthy by using one of these perfect HDD cleaner tools.
3. Perform a clean installation of the Windows OS
Another way of fixing this error problem is to perform a clean install of Windows OS on your PC.
However, this method will clear all pre-installed apps, files, and folders but it will solve the boot error problem regardless of this.
The Operating System or boot information on your HDD may have been wiped out intentionally or due to virus attacks on your PC.
Meanwhile, you can visit the official Microsoft installation media for a guide on how to clean install Windows 7/8/10 versions.
If you need some help reinstalling Windows 10, check out our dedicated article.
4. Check the PC-to-HDD’s connections
Sometimes, the laptop may wobble resulting in a loosened state of the PC-to-HDD connections.
The wires connecting the HDD to the system and vice versa might have been unfastened which causes the ‘no boot disk detected or the disk has failed’ error message.
Follow these steps to check the connections and fix the problem:
- Power off your computer and remove the battery. Open up your computer’s casing afterward.
- Detach the HDD from your computer
- Clean all the ports and wirings linking the HDD to the computer and vice versa.

- Now, reconnect the HDD to the computer. (Ensure that all the connections are fastened tightly.
- Hence, attach the battery and power up your computer.

However, if you do not have the tools and required practical knowledge involved in using this method; it is advisable that you consult a computer technician or computer engineer to help you out.
5. Run Automatic Repair/Start Repair
You can also fix the boot error problem by performing automatic repair/start repair on your system by using Windows bootable installation DVD. Here’s how to do this:
- Insert Windows 10 bootable installation DVD and restart your PC afterward.
- Press any key to boot from CD or DVD when prompted to continue.
- Select your language preferences, and click “Next”.
- Click Repair your computer in the bottom-left.
- In the “choose an option” screen, Click Troubleshoot > Click Advanced option > Automatic Repair or Startup Repair. Then, wait for the Windows Automatic/Startup Repairs to be complete.
- Restart your PC and boot to Windows.
If your PC is stuck in Automatic Repair, we have an article with solutions to try out.
6. Run CHDSK
Alternatively, if Method 5 did not solve the HP error no boot disk was detected or the disk has failed, you can run CHKDSK on your PC to fix the problem.
Also, the steps are similar to Method 5 above, although, it requires utilizing command codes. Here’s how to do this:
- Boot from Windows bootable installation DVD.
- When prompted, press any key to boot from CD or DVD.
- Select your language preferences, and click Next.
- Now, click on Repair your computer.
- Hence, click on Troubleshoot > Advanced options > Command Prompt.
- Hence, type CHKDSK C: /F without quotes in the Command Prompt.
- Then type CHKDSK C: /R without quotes in the Command Prompt and hit Enter key.

- After the CHKDSK process, restart your PC.

In conclusion, any of the methods listed above should be able to help you fix the HP error no boot disk detected or the disk has failed’, the choice is yours to make.
However, if you can afford to purchase a new HDD, you can try Method 2 or Method 3 to perform Windows clean install.
If you have any problems trying out any of the fixes we mentioned, please let us know by commenting below.
We also have a guide dedicated to Network Boot Duplicate Address error, so don’t miss it.
Also, if you have other ideas or suggestions on how to fix this problem, feel free to list the steps to follow in the comments below.
Ivan Jenic
Windows Hardware Expert
Passionate about all elements related to Windows and combined with his innate curiosity, Ivan has delved deep into understanding this operating system, with a specialization in drivers and driver troubleshooting.
When he’s not tackling diverse driver-related problems, Ivan enjoys watching good movies and spending time hiking with his family and friends.
Thanks I already tried this and the only options that came up as boot selections were my network card IPv4 and IPv6 options …… so evidently it isn’t seeing my hard drive at all
So I put in an old windows 10 iso disc that I made and it acted like it was going to start up but then it went to this screen
Checking media Presence
Media Present
Start PXE over IPv4
Then after about 3 minutes it goes to a black screen with a blue box that reads the following
Boot device is not found
Please install an operating system on your hard drive
Hard Drive — Error (3F0)
F2 System Diagnostics
and then tells me to go to a hp tech center start up site (my computer is a HP Pavilion 500-217c)
I have no idea what to try next, except to take it to a computer place and see if they can retrieve my files and order restoration discs for my computer, because of course I never burned them off my computer
Sometimes, while booting a computer, you may see the error: no boot disk has been detected or the disk has failed. Here, in this post, MiniTool Partition Wizard provides some methods for you to fix the error. To remove the error message, you can follow the tutorial.
When you are trying to boot up your computer, the system will check the HDD/SSD for boot information and other operating system information in order to boot successfully. However, if the computer cannot find any boot information or operating system on the HDD/SSD, the error: no boot disk has been detected or the disk has failed may appear on your screen.
There are some possible factors that may cause the “no boot disk has been detected or the disk has failed” issue:
- Improper hard disk connection to PC
- Incorrect boot order settings
- Missing operating system from the HDD/SSD
- Hard disk failure
- Corrupt Boot Configuration Data (BCD)
To fix the issue, you should check the hard disk connection first to make sure it is connected to your PC properly. Please be careful while operating in case you damage certain hardware. If you are not sure about how to connect a hard drive properly, you can ask professors for help as well.
If the error still persists, then you are supposed to try the following solutions.
Solution 1: Change Computer’s Boot Order in BIOS
If you don’t set the HDD/SSD boot disk at the top of the computer’s boot order, the computer will try to boot from another disk and find no valid boot information. As a result, you will fail to boot up your computer with the error message “no boot disk has been detected or the disk has failed” showing up on the screen.
Faced with this situation, you should change the computer’s boot order in BIOS.
Step 1: Power on your computer.
Step 2: Press F2 on the keyboard quickly to enter the setup utility.
Tip: On different PCs, you may need to press different specified keys to enter the BIOS. To get the correct key for your PC, you can check your user manual or search online in advance.
Step 3: Go to the Boot tab. Then select your HDD/SSD boot disk and move it to the top according to the helpful instructions at the bottom or from the right side.
Step 4: Once you manage to change the order, press F10 to save your changes and exit the setup utility.
Note: The detailed steps might be different on different PCs. Just follow the on-screen instructions.
After that, your computer will restart automatically from the correct boot disk. If the issue is not resolved in this way, you should continue with the next solution.
Solution 2: Run Automatic Repair/Startup Repair
You can also fix the “no boot disk has been detected or the disk has failed” issue by performing automatic repair or startup repair in Windows RE (Recovery Environment). To enter Windows RE, you can use Windows installation media. Alternatively, just follow the steps below.
Step 1: Turn off your computer, and then press the Power button to turn it on. As soon as the screen lights up, hold the Power button again to turn off the computer.
Step 2: Repeat the action of turning on and turning off your computer several times until a blue screen with Recovery appears.
Step 3: Click the See advanced repair options button, and then select the Troubleshoot option in the next window that shows Choose an option.
Step 4: Finally, go to Advanced Options > Startup Repair or Automatic Repair.
Wait until the repair is completed, and then restart your computer to see if the boot device has not been detected issue is resolved.
Solution 3: Run the SFC Scan
The SFC (System File Checker) scan is a built-in Windows utility that may help you to fix the “no boot disk has been detected or the disk has failed” caused by corrupted system files.
To run the scan, follow the steps below.
Step 1: Enter the Windows RE by following the first two steps shown in Solution 2.
Step 2: Click the See advanced repair options button, and then go to Troubleshoot > Advanced Options > Command Prompt.
Step 3: In the Command Prompt panel, type sfc/scannow and then press Enter to execute the command.
Your Windows will start to scan corrupted system files in the system and repair them automatically. Exist Command Prompt after the scan is accomplished and restart your computer. You may find that the “boot device has not been detected” disappears and you can boot your Windows normally.
Solution 4: Run CHKDSK
The error: no boot disk has been detected or the disk has failed possibly comes out if there is something wrong with your system hard drive. In this case, you are supposed to run the CHKDSK tool to repair the error.
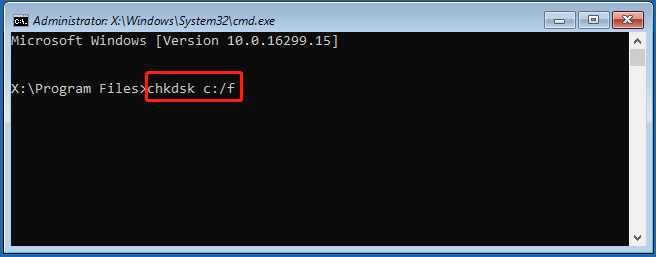
Step 1: Enter Command Prompt in Windows RE.
Step 2: In the Command Prompt panel, type chkdsk c: /f and press Enter to carry out the command.
Tip: The above command can fix logical disk errors. If you want to check if there are physical disk errors, you can run chkdsk c: /r after this command to locate bad sectors and recover readable information on the disk.
After that, restart your computer and the “no boot disk has been detected or the disk has failed” error might be repaired.
MiniTool Partition Wizard is a comprehensive partition management program that can help you manage disks and partitions efficiently. For example, you can format partitions, copy disks, and do other things with MiniTool Partition Wizard.
MiniTool Partition Wizard can also help you fix the “no boot disk has been detected or the disk has failed” by checking file system. It is an alternative solution to Solution 4.
The operation can be divided into two parts.
Part 1: Create a Bootable USB Flash Drive
First, you need to build a bootable USB flash drive with MiniTool Bootable Media Builder on another computer. So, you can boot your computer with bootable media and check the file system later.
Note: The Bootable Media Builder is supported in Pro and higher editions. So, upgrade MiniTool Partition Wizard to a proper edition before the operation.
Step 1: Connect your USB flash drive to a computer that can run normally.
Note: MiniTool Bootable Media Builder will format your USB flash drive when creating the bootable drive. Therefore, you’d better use an empty USB flash drive or backup the data on the USB drive before you start to build a bootable USB disk.
Step 2: Download and install MiniTool Partition Wizard first. And then launch it to enter the main interface.
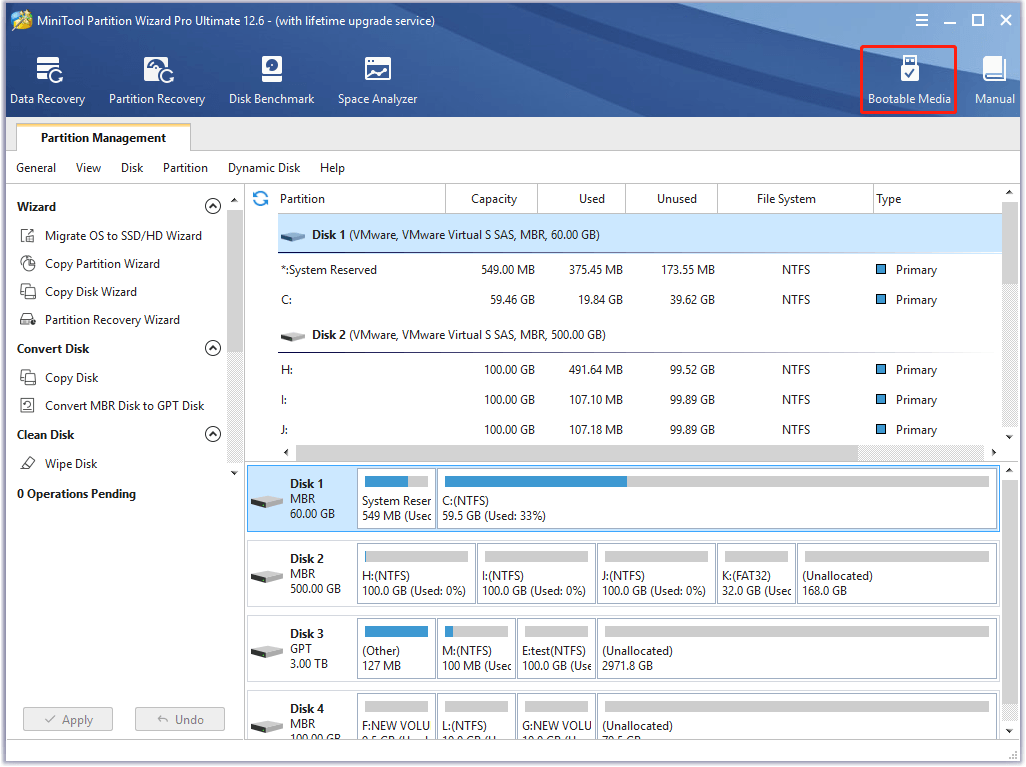
MiniTool Partition Wizard DemoClick to Download100%Clean & Safe
Step 3: To build a bootable USB flash drive, click the Bootable Media feature in the top-right corner.
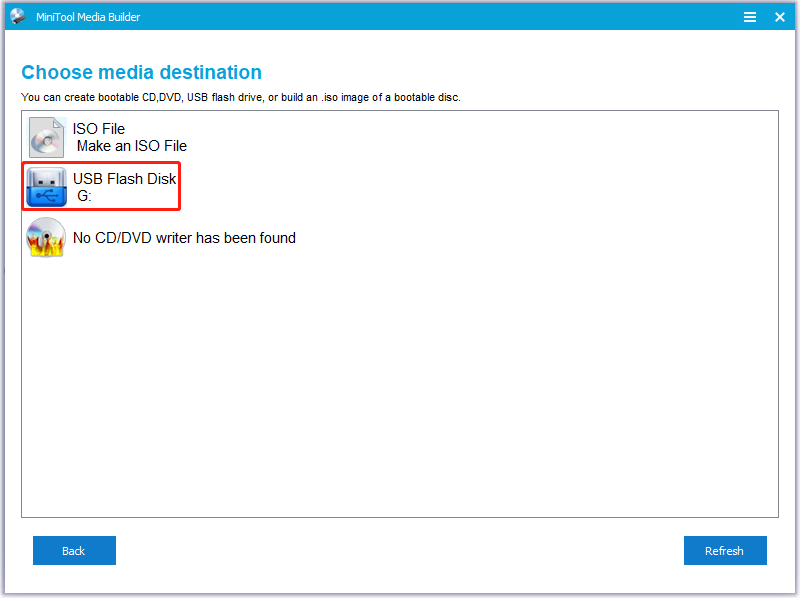
Step 4: Click WinPE-based media with MiniTool plug-in to go on.
Step 5: In the next window, check the USB Flash Disk and then click Yes to continue when there is a warning saying that the data on the USB flash drive will be destroyed.
Step 6: Wait a moment until the MiniTool Bootable Media Builder finishes to build the bootable USB disk. Finally, click Finish.
Part 2: Check File System
With the bootable USB drive, you can boot your computer and check the file system.
Step 1: Boot your computer from the bootable USB drive.
Step 2: Select the boot partition and choose the Check File System feature in the left action panel.
Tip: In MiniTool Partition Wizard, the boot partition is usually marked as Boot under the Status tab.
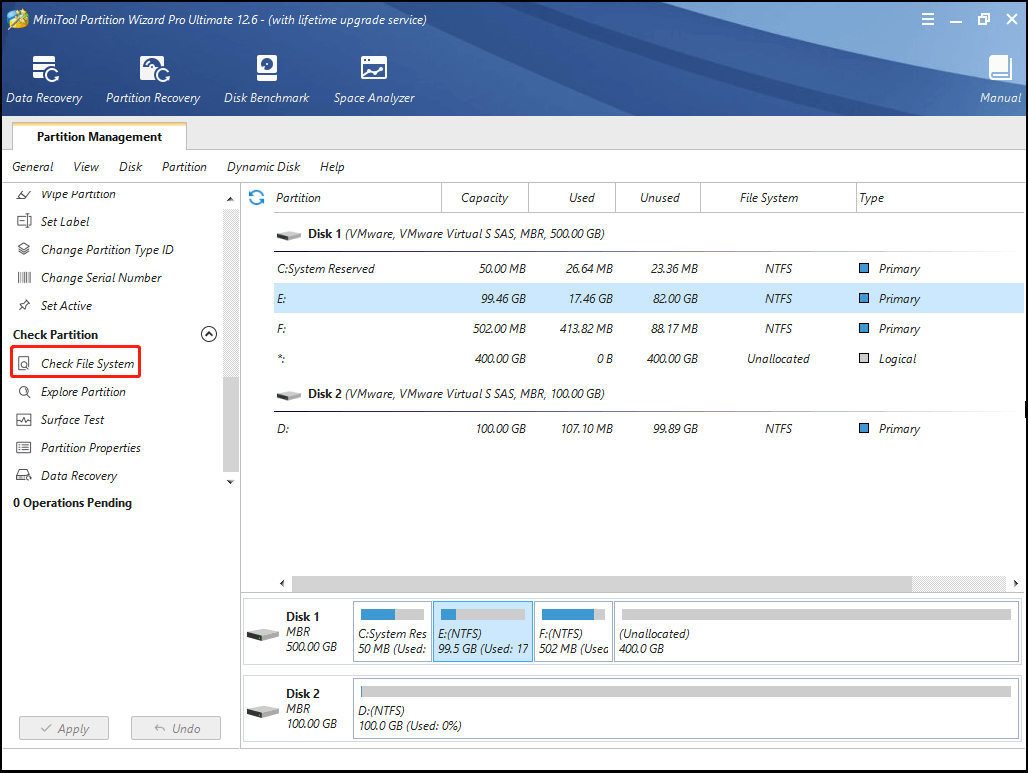
Step 3: In the pop-up window, select Check & fix detected errors, and then click Start to begin the operation.
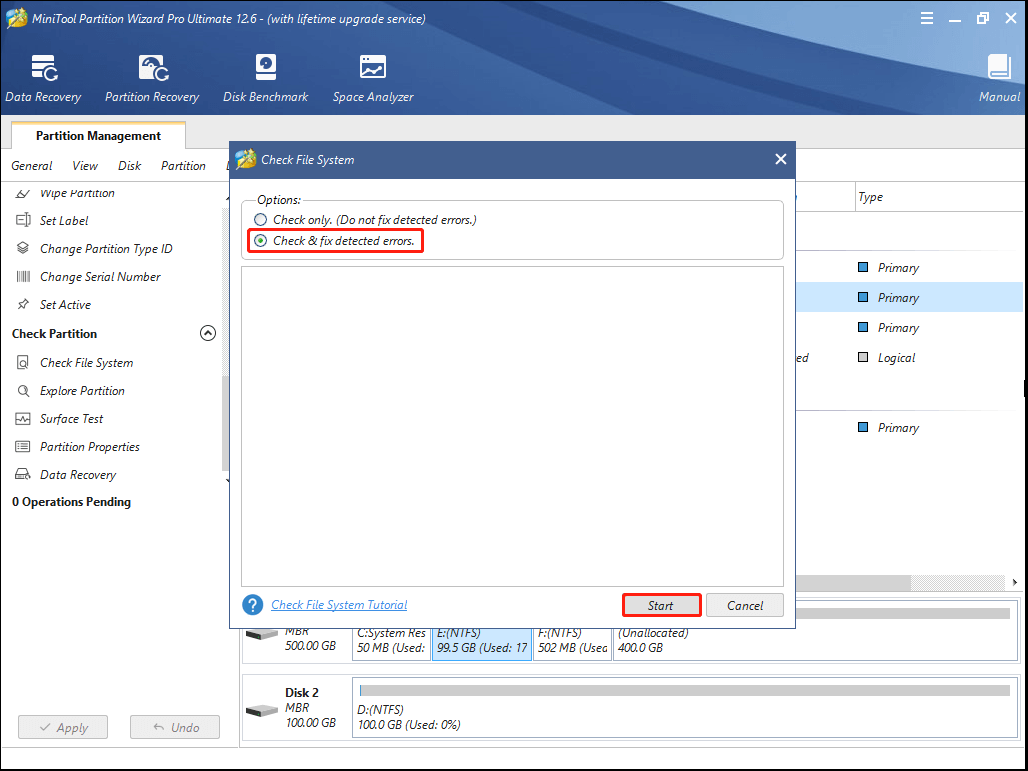
Once the detection finishes, close MiniTool Partition Wizard and restart your computer to check if the error: no boot disk has been detected or the disk has failed is repaired successfully.
Solution 6: Rebuild the Boot Sector
In this way, you need to fix the “boot device has not been detected” error in Windows RE. And first of all, you are supposed to rebuild MBR (Master Boot Record).
MBR is a special type of boot sector at the very beginning of your bootable system hard drive. It helps your computer boot successfully. If the MBR is damaged, your system cannot recognize the boot information and will fail to start the computer. There are two available ways to fix MBR.
Rebuild MBR with MiniTool Partition Wizard
MiniTool Partition Wizard can help you to fix MBR when some issues appear in your boot disk.
Step 1: Boot your computer from the MiniTool bootable USB flash drive.
Step 2: After you enter the main interface of MiniTool Partition Wizard, right-click the boot disk containing damaged MBR and select the Rebuild MBR feature.
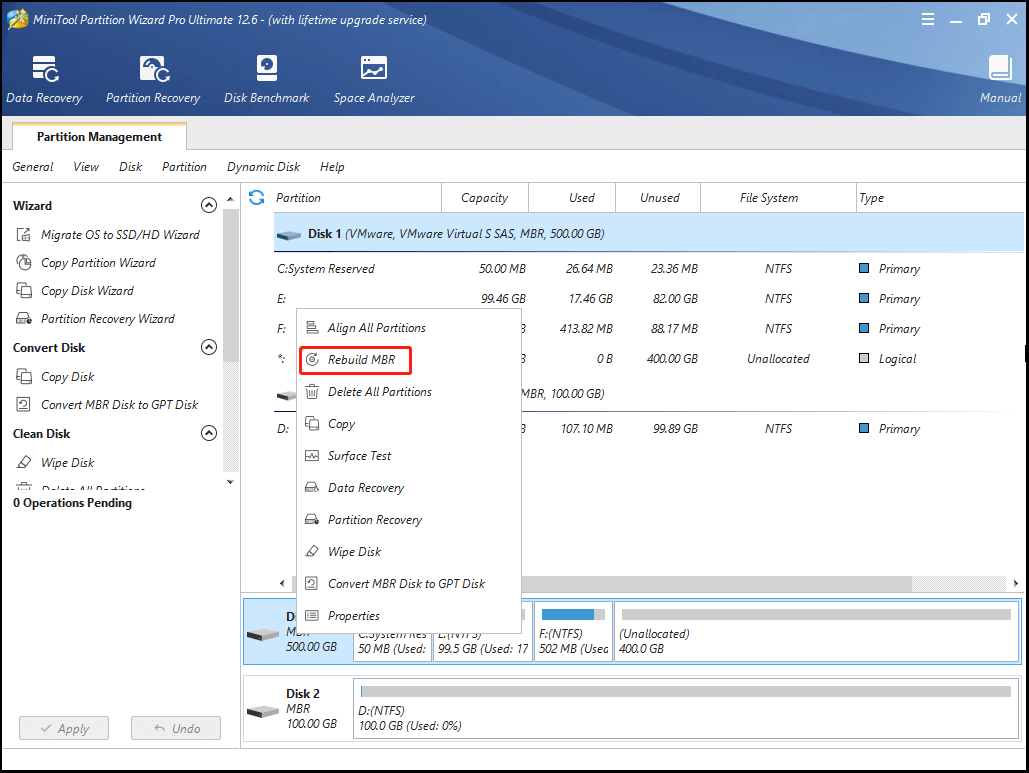
Step 3: Finally, don’t forget to click Apply to execute the operation.
Fix MBR with Command Prompt in Win-PE
You can also fix MBR by using Command Prompt in Windows 10 Recovery Environment.
Step 1: Enter Windows RE with Windows bootable installation CD or DVD.
Step 2: Go to Repair your computer > Troubleshoot > Advanced Options > Command Prompt.
Step 3: In the Command Prompt pane, type bootrec/ fixmbr in the panel and then press the Enter button to carry out this command.
Rebuild BCD
After managing to repair MBR, you can go on with the following steps to rebuild BCD.
Step 1: Enter Command Prompt in the Windows RE.
Tip: If you boot your computer from the MiniTool bootable media, then you should select Command Console on the MiniTool PE Loader screen.
Step 2: In the Command Prompt panel, type the following commands one by one and press Enter after each one to carry out all of them.
- bootrec/ fixboot
- bootrec/ scanos
- bootrec/ rebuildbcd
After these commands are executed, restart your computer to see if the “no boot disk has been detected or the disk has failed” error has been fixed.
I met the “no boot disk has been detected or the disk has failed” error when booting my system. Luckily, I eventually solved it according to the guide. I’d like to share it with you if you have the same error. Click to tweet
Bottom Line
These methods mentioned above are feasible to fix the “no boot disk has been detected or the disk has failed” error. You just need to follow them when you get stuck in the error.
If you have any other problems with the error, you can leave a message in our comment zone below. In addition, if you have something confused when using MiniTool Partition Wizard, welcome to contact us via [email protected].