
- Nmap Network Scanning
- Chapter 2. Obtaining, Compiling, Installing, and Removing Nmap
- Windows
While Nmap was once a Unix-only tool, a Windows version was
released in 2000 and has since become the second most popular Nmap
platform (behind Linux). Because of this popularity and the fact that
many Windows users do not have a compiler, binary executables are
distributed for each major Nmap release. We support Nmap on Windows 7
and newer, as well as Windows Server 2008 and newer. We also maintain
a guide for users
who must run Nmap on earlier Windows releases. While it has improved dramatically, the Windows port is not
quite as efficient as on Unix. Here are the known limitations:
-
Nmap only supports ethernet interfaces (including most
802.11 wireless cards and many VPN clients) for raw packet scans.
Unless you use the-sT -Pnoptions, RAS connections
(such as PPP dialups) and certain VPN clients are not supported. This
support was dropped when Microsoft removed raw TCP/IP socket support
in Windows XP SP2. Now Nmap must send lower-level ethernet frames
instead. -
When using Nmap without Npcap, you cannot
generally scan your own machine from itself (using a
loopback IP such as 127.0.0.1 or any of its
registered IP addresses). This is a Windows limitation that we
have worked around in Npcap, which is included in the Windows self-installer.
Users stuck without a Npcap installation can use a TCP
connect scan without pinging (-sT -Pn) as that uses
the high level socket API rather than sending raw
packets.
Scan speeds on Windows are generally comparable to those on
Unix, though the latter often has a slight performance edge. One
exception to this is connect scan (-sT), which is
often much slower on Windows because of deficiencies in the Windows
networking API. This is a shame, since that is the one TCP scan that
works over all networking types (not just ethernet, like the raw packet scans).
Connect scan performance can be
improved substantially by applying the Registry changes in the
nmap_performance.reg file included with Nmap. By default these changes are applied for you by the Nmap executable installer. This registry file
is in the nmap-<version>
directory of the Windows binary zip file, and
nmap-<version>/mswin32
in the source tarball (where <version> is the
version number of the specific release). These changes increase
the number of ephemeral ports reserved for user applications (such as
Nmap) and reduce the time delay before a closed connection can
be reused. Most people simply check the box to apply these changes in the executable Nmap installer, but you can also apply them by double-clicking on
nmap_performance.reg, or by running the command
regedt32 nmap_performance.reg. To make the changes by hand, add these three Registry DWORD values to
HKEY_LOCAL_MACHINE\SYSTEM\CurrentControlSet\Services\Tcpip\Parameters:
- MaxUserPort
-
Set a large value such as 65534 (0x0000fffe). See MS KB 196271.
- TCPTimedWaitDelay
-
Set the minimum value (0x0000001e). See MS KB 149532.
- StrictTimeWaitSeqCheck
-
Set to 1 so TCPTimedWaitDelay is checked.
Windows users have three choices for installing
Nmap, all of which are available from the
download page at https://nmap.org/download.html.
Windows Self-installer
Every Nmap release includes a Windows
self-installer named
nmap-<version>-setup.exe
(where <version> is the version number of the
specific release). Most Nmap users choose this option since it is so
easy. Another advantage of the self-installer is that it provides the option to install the Zenmap GUI and other tools. Simply run the installer file and let it walk you through
panels for choosing an install path and installing Npcap. The
installer was created with the open-source Nullsoft Scriptable
Install System. After it completes, read the section called “Executing Nmap on Windows” for instructions on executing Nmap on the
command-line or through Zenmap.
Command-line Zip Binaries
| Note | |
|---|---|
|
Most users prefer installing Nmap with the self-installer discussed previously. |
Every stable Nmap release comes with Windows
command-line binaries and associated files in a Zip archive. No
graphical interface is included, so you need to run
nmap.exe from a DOS/command window. Or you can
download and install a superior command shell such as those included
with the free
Cygwin
system available from https://www.cygwin.com. Here are the step-by-step instructions for installing and executing the Nmap .zip binaries.
Installing the Nmap zip binaries
-
Download the .zip binaries from
https://nmap.org/download.html. -
Extract the zip file into the directory you want
Nmap to reside in. An example would beC:\Program. A directory called
Files
nmap-should be created, which includes<version>
the Nmap executable and data files. -
For improved performance, apply the Nmap Registry
changes discussed previously. -
Nmap requires the free Npcap packet capture library.
We include a recent Npcap installer which is available in the zip file
asnpcap-,<version>.exe
where<version>is the Npcap version rather
than the Nmap version. Alternatively, you can obtain and install
the latest version fromhttps://npcap.com. -
Due to the way Nmap is compiled, it requires the
Microsoft Visual C++ Redistributable Package of runtime
components. Many systems already have this installed from other
packages, but you should runVC_redist.x86.exe
from the zip file just in case you need it.
Pass the/qoption to run these installers in quiet (non interactive) mode. -
Instructions for executing your compiled Nmap are
given in the section called “Executing Nmap on Windows”.
Compile from Source Code
Most Windows users prefer to use the Nmap binary self-installer,
but compilation from source code is an option, particularly if you plan to help with Nmap development. Compilation requires
Microsoft Visual C++ 2019, which is part of their commercial Visual Studio
suite. Any of the Visual Studio 2019 editions should work, including the free
Visual Studio 2019 Community.
Some of Nmap’s dependencies on Windows are inconvenient to build. For
this reason, precompiled binaries of the dependencies are stored in
Subversion, in the directory /nmap-mswin32-aux.
When building from source, whether from a source code release or from
Subversion, check out /nmap-mswin32-aux as
described below.
Compiling Nmap on Windows from Source
-
Download the Windows dependencies from Subversion with the command
svn checkout https://svn.nmap.org/nmap-mswin32-aux.
The build files are configured to look for dependencies in this
checked-out directory. If you want to build the dependencies yourself
instead, you will have to reconfigure the Visual Studio project files to
point to the alternate directory. -
Decide whether to obtain the Nmap source code by downloading the latest release from nmap.org, or using a Subversion client to retrieve even newer (but less tested) code from our repository. These instructions are for the web download approach, but using Subversion instead is straightforward (see the section called “Obtaining Nmap from the Subversion (SVN) Repository”).
-
Download the latest Nmap source distribution from
https://nmap.org/download.html. It has the name
nmap-or<version>.tar.bz2
nmap-. Those are the same tar file compressed using bzip2 or gzip, respectively. The bzip2-compressed version is smaller.<version>.tgz -
Uncompress the source code file you just downloaded. The
source code directory and thenmap-mswin32-auxmust
be in the same parent directory.
Recent releases of the free Cygwin distribution can handle both the.tar.bz2and.tgzformats. Use the command tar xvjf nmap-version.tar.bz2 or tar xvzf nmap-version.tgz, respectively. Alternatively, the common WinZip application can decompress these files. -
Open Visual Studio and the Nmap solution file (
nmap-).<version>/mswin32/nmap.sln -
Right click on
Solution 'nmap'in the Solution Explorer sidebar and choose “Configuration Manager”. Ensure that the active solution configuration isReleaseand then close the Configuration Manager. -
Build Nmap by pressing F7 or choosing “Build
Solution” from the GUI. Nmap should begin compiling, and
end with the line “-- Done --” saying
that all projects built successfully and there were zero
failures. -
The executable and data files can be found in
nmap-. You can copy them to a preferred directory as long as they are all kept together.<version>/mswin32/Release/ -
Ensure that you have Npcap installed. You can obtain it by
installing our binary self-installer or executing
npcap-from<version>.exe
our zip package. Alternatively, you can obtain the official installer at
https://npcap.com. -
Instructions for executing your compiled Nmap are
given in the next section.
If you wish to build an Nmap executable Windows
installer or Zenmap executable,
see docs/win32-installer-zenmap-buildguide.txt in the Nmap SVN repository.
Many people have asked whether Nmap can be compiled with the
gcc/g++ included
with Cygwin or other compilers. Some users have reported success with
this, but we don’t maintain instructions for building Nmap under
Cygwin.
Executing Nmap on Windows
Nmap releases now include the
Zenmap graphical user interface for Nmap.
If you used the Nmap installer and left the Zenmap field checked,
there should be a new Zenmap entry on your desktop and Start Menu.
Click this to get started. Zenmap is fully documented in
Chapter 12, Zenmap GUI Users’ Guide. While many users love Zenmap, others prefer
the traditional command-line approach to executing Nmap. Here are
detailed instructions for users who are unfamiliar with command-line
interfaces:
-
Make sure the user you are logged in as has
administrative privileges
on the computer (user should be a member of theadministratorsgroup). -
Open a command/DOS Window. Though it can be found in
the program menu tree, the simplest approach is to choose “Start”
-> “Run” and type cmd<enter>. Opening a Cygwin window (if you installed it) by clicking on the Cygwin icon on the desktop works too, although the necessary commands differ slightly from those shown here. -
Change to the directory you installed Nmap into. You can skip this step if Nmap is already in your command path (the Zenmap isntaller adds it there by default). Otherwise, type the following commands.
c:cd "\Program Files (x86)\Nmap"On Windows releases prior to Windows 7, specify
\Program Files\Nmapinstead. The directory will also be different if you chose to install Nmap in a non-default location. -
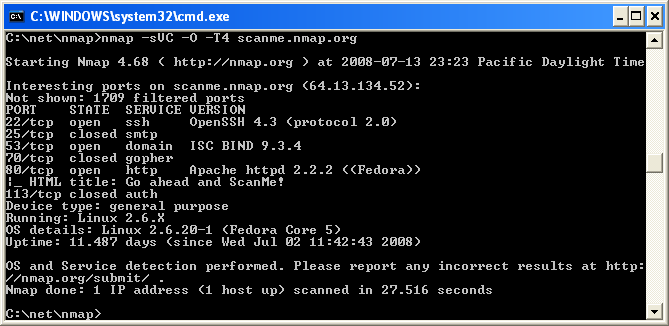
Execute nmap.exe. Figure 2.1 is a screen shot showing a simple example.
Figure 2.1. Executing Nmap from a Windows command shell
If you execute Nmap frequently, you can add the Nmap directory
(c:\Program Files (x86)\Nmap by default) to your command execution path:
-
Open the System Properties window to the Advanced tab by running
SystemPropertiesAdvanced.exe. -
Click the “Environment
Variables” button. -
Choose
Pathfrom the
System variablessection, then hit
edit. -
Add a semi-colon and then your Nmap directory (e.g.
c:\Program Files (x86)\Nmap) to the end of the value. -
Open a new command prompt and you should be able to execute a
command such as nmap scanme.nmap.org from any directory.
Nmap is a powerful and flexible tool used for port scanning and vulnerability assessments. It is an essential tool you need to be familiar with as a server administrator.
While the most popular way of using Nmap is through the command line, it also has a GUI called Zenmap.
Download Nmap for Windows 10/11/Server
Nmap supports both Windows and Linux-based operating systems. If you are on Windows, click on This Link to download Nmap.
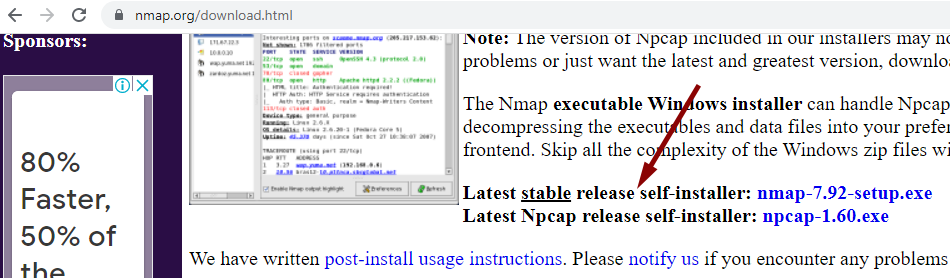
Download the latest stable release of the self-installer, which provides both command-line and GUI versions of the Nmap for Windows.
After the download is complete, double-click the downloaded file to launch the installer.
In the Choose Components window, you can select which features of Nmap to install. Go with default selection, as shown in the following screenshot).
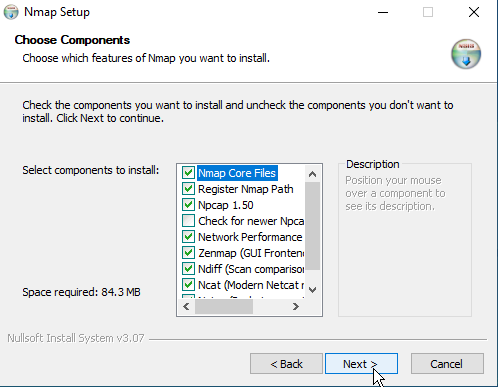
Make sure that the Register Nmap Path is selected to run the Nmap command from the CMD. The Zenmap package provides the graphical user interface (GUI) for the Nmap command.
Using Nmap and Zenmap
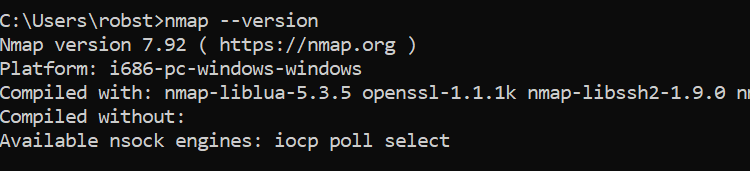
After the installation is complete, open a command prompt (CMD) or PowerShell, and execute the following command:
nmap --versionThe above command will show the Nmap version installed on your Windows PC.
The syntax of nmap is as follows:
nmap <options> <Target>You can perform a simple scan just by using the IP Address (or hostname) of the remote computer:
nmap 192.168.1.10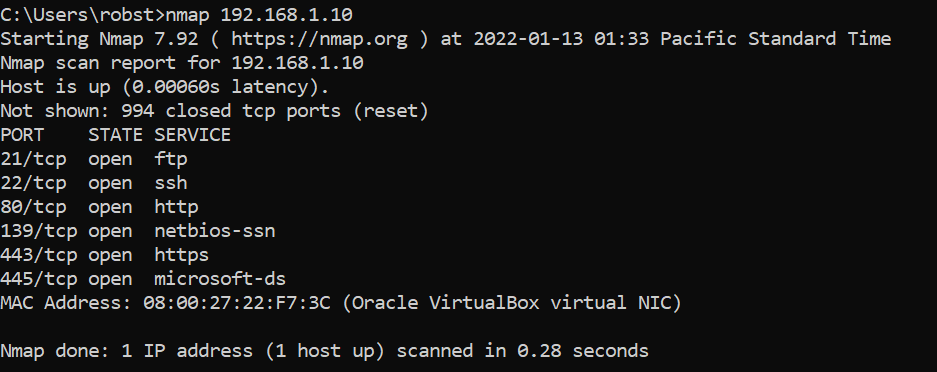
Here is another example that checks if port 80 is open:
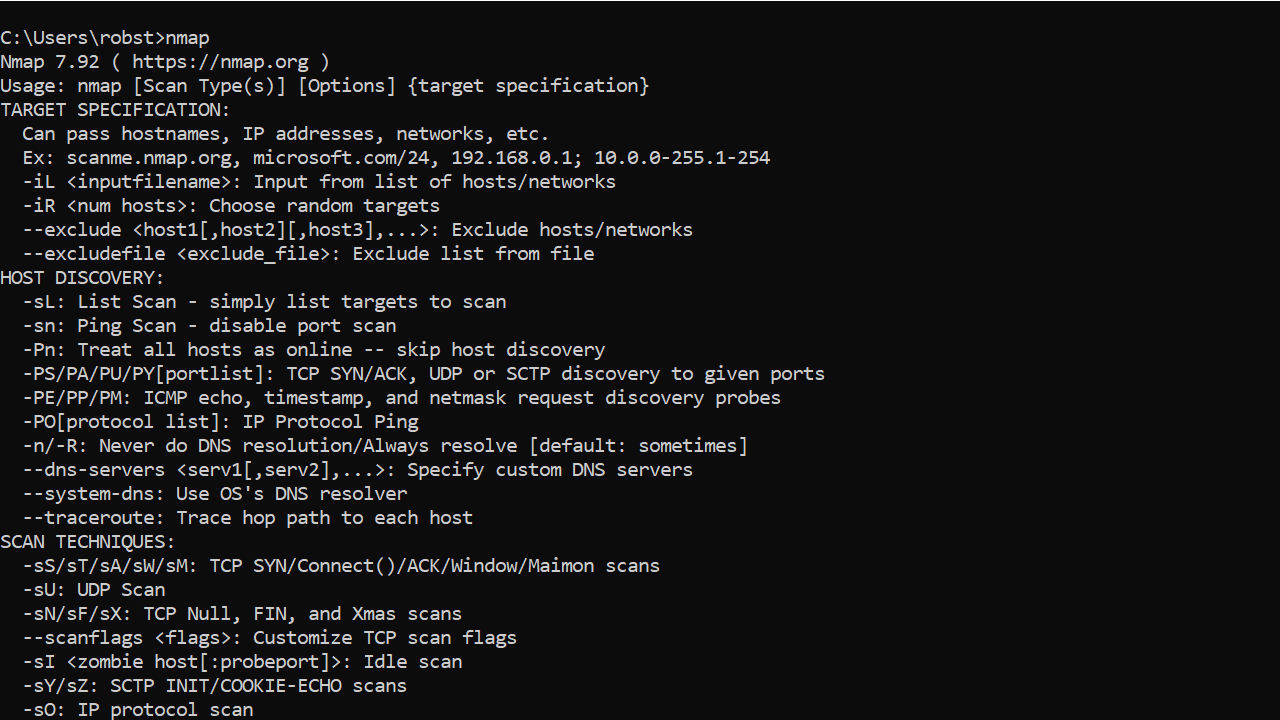
nmap -p 80 192.168.1.10Run the nmap command without any parameters and switches to show the help page:
Shortcut to the Nmap GUI (Zenmap) will be available in the Windows Start Menu.
The following screenshot shows the Zenmap interface:
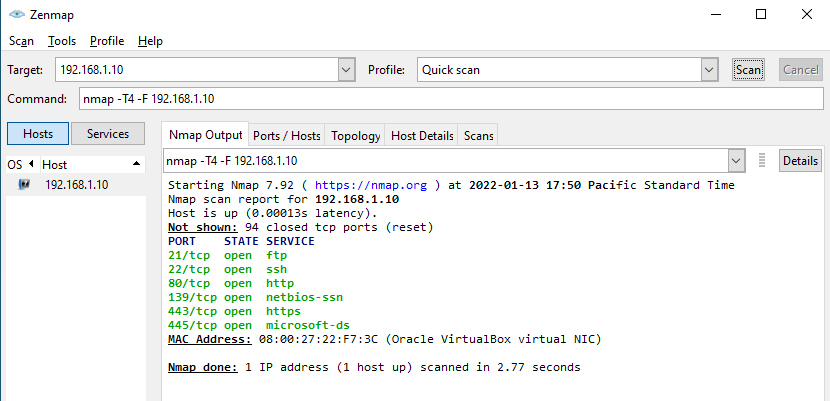
To perform a quick scan: put the IP address in the Target field and then select Quick scan from the Profile drop-down list before clicking the Scan button.
In the Zenmap interface, click Help (Ctrl+H) to open the documentation to learn more about the nmap command.
Загрузить PDF
Загрузить PDF
Вы беспокоитесь о безопасности вашей или какой-нибудь другой сети? Защита вашего маршрутизатора от нежелательных подключений является залогом безопасности вашей сети. Одним из простых методов является Nmap или Network Mapper. Это программа сканирования, которая проверяет какие порты открыты и какие закрыты, а так же другие детали. Специалисты по безопасности используют эту программу для тестирования безопасности сети. Чтобы научиться использовать эту программу смотрите Шаг 1.
-

Вы можете найти установщик на сайте разработчиков и скачать бесплатно. Рекомендуется скачивание именно с сайта разработчиков, чтобы избежать риск скачивания вирусов или подмененных файлов. Скачивая Nmap вы одновременно получить Zenmap, графический интерфейс для Nmap, что делает программу простой в использовании для новичков при выполнении сканирования без знания команд.
- Программа Zenmap доступна для операционных систем Windows, Linux, и Mac OS X. Вы можете найти установщики на официальном сайте Nmap.
-
Запустите установщик сразу после окончания загрузки. Выберите компоненты для установки. Чтобы полностью воспользоваться всеми возможностями Nmap выберите все компоненты. Nmap не будет устанавливать рекламные или шпионские приложения.
-

Если во время установки вы оставили все пункты не тронутыми, то иконка программы должна появиться на вашем рабочем столе. Если нет, посмотрите в меню старт и запустите Zenmap.
-

Программа Zenmap превращает сканирование сети в очень простой процесс. В первую очередь выберете цель сканирования. Вы можете ввести домен (example.com), IP-адрес (127.0.0.1), сеть (192.168.1.0/24), или комбинацию перечисленных.
- В зависимости от загрузки и цели вашего сканирования, использование Nmap может оказаться нарушением пользовательских правил вашего интернет провайдера. Всегда проверяйте местные пользовательские правила во время использования Nmap в случаях сканирования этой программой вне вашей собственной сети.
-
Профили представляют из себя группу модификаций, которые изменяют структуру сканирования. Профили позволяют быстро выбрать разные типы сканов без необходимости набора модификаций в командной строке. Выберете лучший профиль для ваших нужд:[1]
- Intense scan — обширное сканирование. Включает распознавание операционной системы, версии, скриптов, трассировку, и имеет агрессивное время сканирования.
- Ping scan — это сканирование, определяет онлайн статус цели вашего сканирования, и не сканирует порты.
- Quick scan — сканирует быстрее чем обычный скан с агрессивным временем сканирования и выборку портов.
- Regular scan — это стандартны Nmap скан без каких-либо модификаций. Результат включает пинг и открытые порты.
-
Активные результаты скана будут отображаться во вкладке Nmap Output. Время сканирования будет зависеть от выбранного профиля, физического расстояния до цели, и сетевой конфигурации.
-
После окончания скана, вы увидите сообщение “Nmap is done” в низу вкладки Nmap Output. Теперь вы можете проверить ваши результаты, в зависимости от типа выбранного скана. Все результаты собраны во вкладке Output, но, выбирая другие вкладки, вы можете более детально изучить получившийся результат.[2]
Реклама


-
Nmap является не большой и бесплатной программой. Вы можете скачать программу на сайте разработчика. Следуйте инструкциям исходя из вашей операционной системы:
-
Команды Nmap работают из командной строки и показывают результаты сразу под командой. Вы можете использовать параметры, чтобы изменить структуру сканирования. Вы можете запустить сканирования из любого места прописанного в вашей командной строке.
-
Чтобы начать простое сканирование, напишите
nmap <target>. Таким образом начнется пинг выбранной цели и сканирование портов. Этот скан очень просто распознать. Результаты будут видны на вашем экране. Возможно вам придется прокрутить наверх, чтобы увидеть результаты полностью.- В зависимости от загрузки и цели вашего скана, использование Nmap может оказаться нарушением правил вашего интернет провайдера. Всегда проверяйте местные пользовательские правила во время использования Nmap в случаях сканирования этой программой вне вашей собственной сети.
-
Вы можете использовать командные переменные, чтобы изменить параметры сканирования, в результате получая более или менее обширное сканирование. Вы можете добавить несколько переменных оставляя пробел между каждым. Переменные ставятся до цели:
nmap <variable> <variable> <target>[3]
- -sS — это скрытое сканирование SYN. Это сканирование сложнее обнаружить, чем обычное, но может занять дольше времени для завершения. Большинство новых файерволов могут обнаружить сканирование –sS.
- -sn — это сканирование пинга. Это сканирование не использует обнаружение портов, и только проверяет онлайн статус цели.
- -O — это сканирование определяет вид операционной системы цели.
- -A — эта переменная включает обнаружение более обширной информации: операционная система, версия, скрипты, и трассировка.
- -F — включает быстрое сканирование, и уменьшает количество сканируемых портов.
- -v — эта переменная показывает большее количество результатов вашего сканирования, делая их читабельными.
-
Вы можете настроить вывод результатов вашего сканирования в XML файл и, в последствии, легко открыть их в любом веб-браузере. Чтобы это сделать используйте переменную -oX с названием файла для вывода данных. Полностью команда выглядит таким образом
nmap –oX ScanResults.xml <target>.- Ваш XML файл будет сохранен в текущей директории работы вашей командной строки.
Реклама


Советы
- Интересно как проходит сканирование? Нажмите пробел, или любую кнопку, во время работы скана, чтобы посмотреть прогресс Nmap.
- Цель не отвечает? Попробуйте добавить переменную “-P0” к вашему сканированию. В результате сканирование Nmap начнет свою работу, даже если программа «думает», что цель не существует. Это бывает полезно, когда компьютер защищён файерволом.
- Если ваше сканирование занимает большое время (больше 20 минут), попробуйте добавить переменную “-F”, таким образом Nmap сканирование затронет только недавно использовавшиеся порты.
Реклама
Предупреждения
- Убедитесь, что у вас есть разрешение на сканирование цели. Сканирование государственных сайтов принесет вам не мало проблем. Если вы хотите проверить сканирование, вы можете использоваться scanme.nmap.org. Это тестовый компьютер установленный создателем программы.
- Если вы часто используете сканирование Nmap, будьте готовы ответить на вопросы от вашего интернет провайдера. Некоторые провайдеры специально проверяют трафик на сканирование Nmap. Программа является известной и часто используемой хакерами.
Реклама
Об этой статье
Эту страницу просматривали 32 189 раз.
Была ли эта статья полезной?
Advertisement
A port scanner is software that can be used to check which services in a system are working with TCP or UDP over the Internet protocol. The port scanner relieves the user of the work of examining and interpreting the response behavior of a system itself with a sniffer.
Nmap is a free port scanner for scanning and evaluating hosts in a computer network. The name stands for Network Mapper. Earlier, we published two usage guide for Nmap – (1) WordPress Security Test with Nmap NSE Scripts (2) Basic nmap, thc-ipv6 Commands. The guides were for Mac OS X and CentOS.
Installing Nmap on Windows is quite straightforward and there are three options. The official GUI alternative is called ZeNmap and is a quite robust tool.
First Way (CLI) : Via Windows Subsystem for Linux (WSL)
We already know that we can run Bash Shell on Microsoft Windows. If you have configured your WSL with Ubuntu Bash, simply run these commands to install Nmap :
|
apt update —y && apt upgrade —y sudo apt—get install nmap |
You can not now use the standard Nmap commands (for Linux & Mac) before reading the Third Way described below. Its too buggy way to use. I have described a fix below.
Second Way (CLI) : Via Windows CMD
You need to run nmap.exe from a DOS/command window. Alternatively, you can download and install a command shell like Cygwin. Also, you need to run the Npcap and Microsoft Visual C++ 2013 Redistributable Package installers.
Download Link :
|
https://nmap.org/book/inst—windows.html |
Look under “Command-line Zip Binaries” sub-header. Not our suggested way to run because it is complex to most of the non-Windows experts.
Third Way (GUI) : Via ZeNmap
The Nmap executable Windows installer includes the Zenmap graphical frontend. So, it is easy to install – just download the exe file and go ahead :
|
https://nmap.org/download.html |
Download from the link of “Latest stable release self-installer”.
ZeNmap is the official Nmap GUI. It has its own guide :
|
https://nmap.org/zenmap/man.html |
The downloaded file is an executable. Right-click the file and then click “run as administrator.” A window will appear and click “I Agree”. Next, the installer will ask you which components of Nmap you’d like to install. All of the components will be selected by default. Unless you are experienced, go ahead without modification and accept the proposed installation. Then the installer will ask you where you want to install Nmap. It will default to C:\Program Files (x86)\Nmap. The important thing is that you know where Nmap is installed because you’ll need that information to call it from the command line. Click “Install”, and Nmap will start to install.
For “First Way”, i.e. WSL usage, you need to alias it from Ubuntu bash:
|
alias nmap=‘»/mnt/c/Program Files (x86)/Nmap/nmap.exe»‘ |
Hopefully, you can now use Nmap from Ubuntu bash too. The graphical user interface of ZeNmap is like puTTY.

Conclusion
We have mentioned three methods. Sounds great. But unfortunately except for the GUI (ZeNmap), nothing is that great. Even, ZeNmap has limitations because essentially Nmap works better on *nix systems. WSL has a large number of socket issues. So, with WSL you may face “Couldn’t open a raw socket. Error: Permission denied (13)”. Although, I have described the fix, I am required to mention it.
Tagged With nmap windows cli install , download n map for windows phone , how to run nse scripts windows , nmap windows using cli , rfr pfgecnbnm nmap tp ecnfyjdrb , where should i download Nmap to on HP
Nmap один из основных инструментов, используемых администраторами сети для устранения проблем с подключением к сети и сканирования портов.
Nmap также может определять Mac-адрес, тип ОС, версию службы и многое другое.
В этой статье объясняются основы использования команды nmap для выполнения различных сетевых задач.
Nmap — это многоплатформенная программа, которую можно установить во всех основных операционных системах. Первоначально он был выпущен как инструмент только для Linux, а позже был перенесен на другие системы, такие как BSD, Windows и macOS.
Если вы предпочитаете графический интерфейс, а не командную строку, Nmap также имеет графический пользовательский интерфейс под названием Zenmap.
Официальные бинарные пакеты доступны для загрузки со страницы загрузки Nmap.
Процедура установки проста и зависит от вашей операционной системы.
Установка Nmap в Ubuntu и Debian
Nmap доступен из репозиториев Ubuntu и Debian по умолчанию. Чтобы установить его, запустите:
|
|
Установка Nmap на CentOS и Fedora
На CentOS и других производных от Red Hat запускаются:
|
|
Установка Nmap на macOS
Пользователи macOS могут установить Nmap, загрузив установочный пакет «.dmg» с сайта Nmap или через Homebrew:
Установка Nmap в Windows
Версия Nmap для Windows имеет некоторые ограничения и, как правило, немного медленнее, чем версия для UNIX.
Самый простой вариант установки Nmap в Windows — это загрузить и запустить самоустанавливающийся exe-файл.
Вы можете запустить Nmap в Windows либо из командной строки, либо запустив программу Zenmap. Для получения дополнительной информации о том, как использовать Nmap в Windows, ознакомьтесь с инструкциями по использованию после установки.
Использование Nmap
Nmap обычно используется для аудита сетевой безопасности, отображения сети, определения открытых портов и поиска сетевых устройств.
Упрощенный синтаксис команды nmap следующий:
|
|
Самый простой пример использования Nmap — сканирование одной цели от имени обычного пользователя без указания каких-либо параметров:
При вызове от имени пользователя без полномочий root, у которого нет прав доступа к исходным пакетам, nmap запускает сканирование TCP-соединения. (-sT) по умолчанию включен в непривилегированном режиме.
Вывод будет выглядеть примерно так, включая основную информацию о сканировании и список открытых и отфильтрованных TCP-портов.
|
|
Самым популярным вариантом сканирования является сканирование TCP SYN (-sS), которое работает быстрее, чем параметр подключения, и работает со всеми совместимыми стеками TCP.
-sS включается по умолчанию, когда nmap вызывается от имени пользователя с административными привилегиями:
|
|
Для более подробного вывода используйте увеличение детализации с помощью -v или -vv:
|
|
Чтобы выполнить сканирование UDP, вызовите команду с параметром (-sU) от имени пользователя root:
|
|
Для получения полного списка методов сканирования портов посетите страницу документации Nmap.
Nmap также поддерживает адреса IPv6. Чтобы указать хост IPv6, используйте параметр -6:
|
|
Указание целевых хостов
Nmap рассматривает все аргументы, которые не являются опциями, как целевые хосты.
Аргументы считаются вариантами, если они начинаются с одинарного или двойного тире (
-,--).
Самый простой вариант — передать один или несколько целевых адресов или доменных имен:
|
|
Вы можете использовать нотацию CIDR, чтобы указать диапазон сети:
Чтобы указать диапазон октетов, используйте символ тире. Например, для сканирования 192.168.10.1, 192.168.11.1 и 192.168.12.1:
Другой символ, который вы можете использовать для указания целей, — это запятая. Следующая команда нацелена на те же хосты, что и предыдущая:
|
|
Вы можете комбинировать все формы:
|
|
Чтобы убедиться, что вы указали правильные хосты перед сканированием, используйте параметр сканирования списка (-sL), который перечисляет только целевые объекты без запуска сканирования:
|
|
Если вы хотите исключить цели, которые включены в указанный вами диапазон, используйте параметр --exclude:
|
|
Указание и сканирование портов
По умолчанию Nmap выполняет быстрое сканирование 1000 самых популярных портов. Это не первые 1000 последовательных портов, а 1000 наиболее часто используемых портов в диапазоне от 1 до 65389.
Чтобы сканировать все порты с 1 по 65535, используйте параметр -p-:
|
|
Каждый порт может находиться в одном из следующих состояний:
- open — программа, запущенная на порту, отвечает на запрос.
- closed — на порту не работает ни одна программа, и хост отвечает на запросы.
- filtered — Хост не отвечает на запрос.
Порты и диапазоны портов указываются с параметром -p.
Например, чтобы просканировать только порт 443, вы должны использовать следующую команду:
|
|
Чтобы указать более одного порта, разделите целевые порты запятой:
|
|
Диапазоны портов можно указать с помощью символа тире. Например, чтобы просканировать все порты UDP в диапазоне от 1 до 1024, вы должны запустить:
|
|
Все вместе:
|
|
Порты также можно указать с помощью имени порта. Например, для поиска порта 22, ssh, вы можете использовать:
|
|
Ping сканирование
Чтобы выполнить ping-сканирование или обнаружение хоста, вызовите команду nmap с параметром -sn:
|
|
Опция -sn указывает Nmap только обнаруживать сетевые хосты и не выполнять сканирование портов. Это полезно, когда вы хотите быстро определить, какой из указанных хостов запущен и работает.
Отключение разрешения DNS-имен
По умолчанию Nmap выполняет обратное разрешение DNS для каждого обнаруженного хоста, что увеличивает время сканирования.
При сканировании больших сетей рекомендуется отключить разрешение обратного DNS и ускорить сканирование. Для этого вызовите команду с параметром -n:
|
|
Определение ОС, служб и версий
Nmap может обнаружить операционную систему удаленного хоста с помощью снятия отпечатков стека TCP / IP. Чтобы запустить обнаружение ОС, вызовите команду с параметром -O:
|
|
Если Nmap может обнаружить ОС хоста, он напечатает что-то вроде следующего:
|
|
Обычно системные службы прослушивают стандартные порты, которые хорошо известны и зарезервированы для них. Например, если порт 22, соответствующий службе SSH, открыт, вы предполагаете, что на узле работает SSH-сервер. Однако вы не можете быть абсолютно уверены, потому что люди могут запускать службы на любых портах, которые они хотят.
Благодаря обнаружению службы и версии Nmap покажет вам, какая программа прослушивает порт и версию программы.
Для поиска службы и версии используйте параметр -sV:
|
|
|
|
Вы также можете сканировать ОС, версии и запускать traceroute одной командой, используя параметр -A:
|
|
Вывод Nmap
По умолчанию Nmap выводит информацию на стандартный вывод (stdout).
Если вы сканируете большую сеть или нуждаетесь в информации для дальнейшего использования, вы можете сохранить результат в файл.
Nmap предоставляет несколько типов вывода. Чтобы сохранить вывод в нормальном формате, используйте параметр -oN, за которым следует имя файла:
|
|
Самый популярный вариант — сохранить вывод в формате XML. Для этого используйте параметр -oX:
|
|
Еще один полезный формат — вывод grepable, который можно анализировать с помощью стандартных инструментов Unix, таких как grep, awk и cut. Вывод grepable указывается с параметром -oG:
|
|
Механизм сценариев Nmap
Одна из самых мощных функций Nmap — это скриптовый движок. Nmap поставляется с сотнями скриптов, и вы также можете писать свои собственные скрипты на языке Lua.
Вы можете использовать скрипты для обнаружения вредоносных программ и бэкдоров, выполнения атак методом перебора и многого другого.
Например, чтобы проверить, скомпрометирован ли данный хост, вы можете использовать:
|
|
Заключение
Nmap — это инструмент с открытым исходным кодом, который в основном используется администраторами сети для обнаружения хоста и сканирования портов.
Обратите внимание, что в некоторых странах сканирование сетей без разрешения является незаконным.