
- Nmap Network Scanning
- Chapter 4. Port Scanning Overview
- A Quick Port Scanning Tutorial
One of my goals in developing Nmap is to keep the most common
usage simple, while retaining the flexibility for custom and advanced
scans. This is accomplished with the command-line interface by
offering dozens of options, but choosing sane defaults when they are
not specified. A newbie can start out with a command as simple as
nmap <target>.
Meanwhile, advanced users sometimes specify so many options that their
terminal line wraps around.
A similar balance must be struck with command output. The most
important results should stick out even to the occasional user who
hasn’t even read the man page. Yet the output should be comprehensive and
concise enough to suit professional penetration testers who run Nmap
against thousands of machines daily. Users smart enough to read this
book or the Nmap source code benefit from greater control of
the scanner and insights into what Nmap output really means.
This tutorial demonstrates some common Nmap port scanning
scenarios and explains the output. Rather than attempt to be
comprehensive, the goal is simply to acquaint new users well enough to
understand the rest of this chapter.
The simplest Nmap command is just nmap by
itself. This prints a cheat sheet of common Nmap options and syntax.
A more interesting command is nmap
<target>, which does the
following:
-
Converts
<target>from a
hostname into an IPv4 address using DNS. If an
IP address is specified instead of a hostname this lookup is skipped. -
Pings the host, by default with an ICMP echo request packet
and a TCP ACK packet to port 80, to determine whether it is up and
running. If not, Nmap reports that fact and exits. I could have
specified-Pnto skip this test. See Chapter 3, Host Discovery (“Ping Scanning”). -
Converts the target IP address back to the name using
a reverse-DNS query. Because of the way DNS works, the reverse name
may not be the same as the<target>
specified on the command-line. This query can be skipped with the
-noption to improve speed and
stealthiness. -
Launches a TCP port scan of the most popular 1,000 ports listed
innmap-services. A SYN stealth scan is usually
used, but connect scan is substituted instead for non-root Unix users
who lack the privileges necessary to send raw
packets. -
Prints the results to standard output in normal
human-readable format, and exits. Other output formats and locations
(files) can be specified, as described in Chapter 13, Nmap Output Formats.
Example 4.2
displays the results when scanme.nmap.org is used as
<target>.
Example 4.2. Simple scan: nmap scanme.nmap.org
# nmap scanme.nmap.org

Starting Nmap ( https://nmap.org )
Nmap scan report for scanme.nmap.org (64.13.134.52)
Not shown: 994 filtered ports
PORT    STATE  SERVICE
22/tcp  open   ssh
25/tcp  closed smtp
53/tcp  open   domain
70/tcp  closed gopher
80/tcp  open   http
113/tcp closed auth

Nmap done: 1 IP address (1 host up) scanned in 4.99 seconds
The first output line in
Example 4.2 simply gives the URL for downloading Nmap. The time Nmap started and
version number are normally provided as well, though these were
generally removed from this book for consistency and to avoid line
wrapping.
The next line provides the target IP address (IPv4 in this
case), and
reverse DNS
name (also known as the PTR record)
if it is
available. Nmap promises to show the “interesting ports”, though all
ports scanned are accounted for. The ports considered most
interesting because they are open or in a rarely-seen state for that
host are itemized individually. When many ports are in a single
non-open state, they are considered a default state, and aggregated onto a
single line to avoid diluting the results with thousands of
uninteresting entries. In this case, Nmap notes that 994 ports are
filtered.
The interesting ports table comes next, and provides the key
scan results. The columns vary depending on options used, but in
this case provide the port number and protocol, state, and service
protocol for each port. The service here is just a guess made by
looking up the port in nmap-services. The
service would be listed as unknown if any of the
ports had no name registered in that file. Three of these ports are open
and three are closed.
Finally, Nmap reports some basic timing stats before it exits.
These stats are the number of targets specified, the number of those
that the ping scan found to be up, and the total time taken.
While this simple command is often all that is needed, advanced
users often go much further. In Example 4.3, the scan is modified with
four options. -p0- asks Nmap to scan every possible
TCP port, -v asks Nmap to be verbose about it,
-A enables aggressive tests such as remote OS
detection, service/version detection, and the Nmap Scripting Engine
(NSE). Finally, -T4 enables a more aggressive timing
policy to speed up the scan.
Example 4.3. More complex: nmap -p0- -v -A -T4 scanme.nmap.org
# nmap -p0- -v -A -T4 scanme.nmap.org

Starting Nmap ( https://nmap.org )
Completed Ping Scan at 00:03, 0.01s elapsed (1 total hosts)
Scanning scanme.nmap.org (64.13.134.52) [65536 ports]
Discovered open port 22/tcp on 64.13.134.52
Discovered open port 53/tcp on 64.13.134.52
Discovered open port 80/tcp on 64.13.134.52
SYN Stealth Scan Timing: About 6.20% done; ETC: 00:11 (0:07:33 remaining)
Completed SYN Stealth Scan at 00:10, 463.55s elapsed (65536 total ports)
Completed Service scan at 00:10, 6.03s elapsed (3 services on 1 host)
Initiating OS detection (try #1) against scanme.nmap.org (64.13.134.52)
Initiating Traceroute at 00:10
64.13.134.52: guessing hop distance at 9
Completed SCRIPT ENGINE at 00:10, 4.04s elapsed
Host scanme.nmap.org (64.13.134.52) appears to be up ... good.
Nmap scan report for scanme.nmap.org (64.13.134.52)
Not shown: 65530 filtered ports
PORT    STATE  SERVICE VERSION
22/tcp  open   ssh     OpenSSH 4.3 (protocol 2.0)
25/tcp  closed smtp
53/tcp  open   domain  ISC BIND 9.3.4
70/tcp  closed gopher
80/tcp  open   http    Apache httpd 2.2.2 ((Fedora))
|_HTML title: Go ahead and ScanMe!
113/tcp closed auth
Device type: general purpose
Running: Linux 2.6.X
OS details: Linux 2.6.20-1 (Fedora Core 5)
Uptime guess: 2.457 days (since Thu Sep 18 13:13:24 2008)
TCP Sequence Prediction: Difficulty=204 (Good luck!)
IP ID Sequence Generation: All zeros

TRACEROUTE (using port 80/tcp)
HOP RTT   ADDRESS
[First eight hops cut for brevity]
9   10.36 metro0.sv.svcolo.com (208.185.168.173)
10  10.29 scanme.nmap.org (64.13.134.52)

Nmap done: 1 IP address (1 host up) scanned in 477.23 seconds
           Raw packets sent: 131432 (5.783MB) | Rcvd: 359 (14.964KB)
Nmap certainly provided the requested verbosity in Example 4.3! Fortunately the extra
output is easy to understand. The first 13 new lines are runtime
information letting the user know what is happening as she stares
expectantly at the terminal, hoping for good news. What
constitutes good news depends on whether she is a systems
administrator who has to fix problems, a pen-tester who needs some
issues to report on, or a black-hat cracker trying to exploit
them. About a dozen similar lines were removed for brevity. The “discovered open port” lines provide
as-it-happens notification of open ports so that she can start banging
on them before the scan even finishes. The “scan timing” line
provides a completion time estimate, so she knows whether to keep
staring at the screen or have lunch. Since network conditions
(latency, congestion, bandwidth, etc.) and packet filtering rules vary
so much, the same scan options may take 30 seconds to complete against
one host and 45 minutes against another. If you want the current time estimate while scanning, just press
enter.
The port table shows no new ports. All the extra ports scanned
are in the filtered state, raising the filtered port total from 994
to 65,530. While there are no new itemized ports, the entries have
changed. A new VERSION column provides the application name and version details for the listening service. This comes
from service detection, one of the features enabled by
the -A option.
Another feature of service detection is that all
of the service protocols in the SERVICE column have actually been
verified. In the previous scan, they were based on the relatively
flimsy heuristic of an nmap-services port number lookup.
That table lookup happened to be correct this time, but it won’t
always be.
Another feature added by -A is the Nmap
Scripting Engine,
which is discussed in depth in
Chapter 9, Nmap Scripting Engine. The only script shown here is HTML. Dozens of other scripts exist, but none found useful
title
output for this machine. The
traceroute
results were also added
by -A. This option is more efficient and more
powerful than most traceroute programs since probes are performed in
parallel and Nmap uses scan results to determine a favorable probe
type (TCP packets to port 80 in this case).
Most of the remaining new lines come from OS detection (also
enabled by -A), which is discussed in depth in
Chapter 8, Remote OS Detection. The final line shows that all this extra
info came at a price—the scan took almost 100 times longer than
Example 4.2, “Simple scan: nmap scanme.nmap.org” to complete (477
seconds compared to 5).
Время на прочтение5 мин
Количество просмотров431K

Вы когда-нибудь интересовались откуда атакующий знает какие порты открыты в системе? Или как узнать, какие приложения запущены на сервере, не спрашивая об этом администратора? Вы можете сделать все это и даже больше вместе с небольшим инструментом под названием Nmap.
Что такое Nmap? Название Nmap это сокращение от “network mapper”, сам nmap это набор инструментов для сканирования сети. Он может быть использован для проверки безопасности, просто для определения сервисов запущенных на узле, для идентификации ОС и приложений, определения типа фаерволла используемого на сканируемом узле.
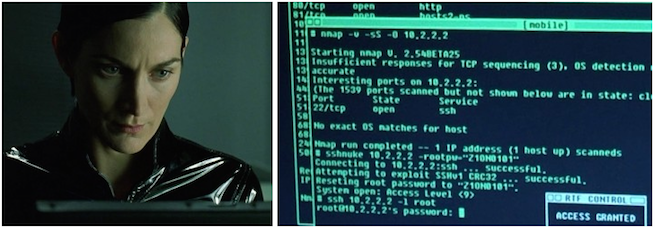
Nmap это знаменитый инструмент. Как только вы узнаете больше о Nmap, вы поймете, что он делает в эпизодах таких фильмов как Матрица Перезагрузка, Ультиматум Борна, Хоттабыч, и других.
В этом руководстве будут описаны основы использования Nmap и приведены некоторые примеры, которые вы сможете использовать.
Где взять Nmap?
Если Вы используете Linux, то можете найти пакеты Nmap в репозиториях для большинства дистрибутивов. Последний релиз Nmap вышел в начале 2010, поэтому самой свежей версии может не быть в текущих стабильных ветках. Найти исходники и некоторые бинарные сборки можно на странице загрузки.Там есть и windows версия.
Основы использования Nmap.
Синтаксис Nmap следующий:
nmap Опции_сканирования Цель_сканирования.
Допустим Вы хотите сканировать узел и узнать какая операционная система на нем работает. Чтобы сделать это выполните следующее:
nmap -O target.host.com
Заметим что Nmap требует привилегий суперпользователя для запуска подобного типа сканирования. Процесс сканирования может занять около минуты, так что будьте терпеливы. Когда процесс закончится вы увидите что то похожее на это:
Starting Nmap 5.21 ( nmap.org ) at 2010-02-27 23:52 EST

Nmap scan report for 10.0.0.1

Host is up (0.0015s latency).

Not shown: 997 closed ports

PORT STATE SERVICE

53/tcp open domain

5009/tcp open airport-admin

10000/tcp open snet-sensor-mgmt

MAC Address: 00:11:24:6B:43:E2 (Apple Computer)

Device type: WAP|printer

Running: Apple embedded, Canon embedded, Kyocera embedded, Xerox embedded

OS details: VxWorks: Apple AirPort Extreme v5.7 or AirPort Express v6.3; Canon imageRUNNER printer (5055, C3045, C3380, or C5185); Kyocera FS-4020DN printer; or Xerox Phaser 8860MFP printer

Network Distance: 1 hop
Как вы видите Nmap предоставляет множество информации. Здесь он отображает предположение об операционной системе, которая была запущена на узле. В данном случае выполнялось сканирование маршрутизатора Apple Airport Extrime. В качестве дополнительного бонуса Nmap сообщил, что устройство на расстоянии одного прыжка, а также MAC адрес устройства и производителя сетевой карты, открытые порты и сколько времени выполнялось сканирование.
Ниже приведены результаты другого сканирования, домашнего компьютера с запущенной Ubuntu 9.10:
Starting Nmap 5.21 ( nmap.org ) at 2010-02-28 00:00 EST

Nmap scan report for 10.0.0.6

Host is up (0.0039s latency).

Not shown: 999 closed ports

PORT STATE SERVICE

22/tcp open ssh

MAC Address: 00:17:08:2A:D6:F0 (Hewlett Packard)

Device type: general purpose

Running: Linux 2.6.X

OS details: Linux 2.6.19 - 2.6.31

Network Distance: 1 hop
OS detection performed. Please report any incorrect results at nmap.org/submit .
Nmap done: 1 IP address (1 host up) scanned in 3.40 seconds
Здесь мы видим, что система имеет сетевую карту HP, запущено Linux между версиями 2.6.19 и 2.6.31. Кстати, Вы не сможете явно идентифицировать дистрибутив, только версию Linux ядра.
Сканирование чужих узлов.
В примерах выше для сканирования были выбраны локальный маршрутизатор и одна из рабочих станций, потому что мы имели право на их сканирование. Однако, будет плохой идеей запуск множественного сканирования чужого узла, если вы их не контролируете или не имеете прав для сканирования. Для экспериментов Nmap имеет общедоступный тестовый сервер scanme.nmap.org который Вы можете использовать.
Многие администраторы не любят несанкционированного сканирования их серверов, так что лучшим вариантом будет ограничение сканирования узлов своей локальной сети или тех для которых у вас есть права на сканирование. Также в некоторых случаях вы можете нарушить договор с вашим провайдером, при использовании некоторых особо агрессивных методов сканирования Nmap, поэтому будьте осторожны.
Сканирование нескольких узлов.
Вы можете сканировать больше чем один узел за раз, используя nmap. Если вы производите сканирование по IP-адресу вы можете определить диапазон 10.0.0.1-6 или 10.0.0.0/24.Используя диапазон 10.0.0.1-6 будут сканироваться узлы от 10.0.0.1 до 10.0.0.6. Используя определение /24 будет сканироваться весь диапазон узлов от 10.0.0.0 до 10.0.0.255. Для примера, если нужно просканировать узлы от 10.0.0.1 до 10.0.0.42 и узнать какая ОС вероятно запущена используйте:
nmap –O 10.0.0.1-42
Если у вас есть некоторый список доменных имен вместо IP адресов, вы можете разделить их в командной строке, вот так:
nmap -O host1.target.com host2.target.com
Проверка открытых портов
Если вы запустите nmap вообще без опций и укажите какой то узел, то он будет сканировать порты и покажет все найденные открытые порты и сервисы запущенные на них. Например запустите:
nmap target.hostname.com
после чего он должен выдать что то похожее на это:
Interesting ports on target.hostname.com (10.0.0.88):

Not shown: 1711 closed ports

PORT STATE SERVICE

22/tcp open ssh

80/tcp open http

3306/tcp open mysql
Nmap done: 1 IP address (1 host up) scanned in 0.228 seconds
Nmap выдаст больше информации если использовать опцию -v (verbose).
Сканирование запущенных сервисов
Если вы хотите узнать какой сервис возможно запущен попробуйте опцию –sV. Эта опция произведет более агрессивное сканирование и попытается выяснить какая версия сервисов запущена на данном узле, а также может помочь более точно определить какая ОС запущена. Для пример запустим nmap –sV на тестовый сервер и получим следующий ответ:
Starting Nmap 5.21 ( nmap.org ) at 2010-02-28 00:15 EST

Nmap scan report for test.host.net (XX.XXX.XXX.XX)

Host is up (0.090s latency).

Not shown: 965 closed ports, 33 filtered ports

PORT STATE SERVICE VERSION

22/tcp open ssh OpenSSH 4.7p1 Debian 8ubuntu1.2 (protocol 2.0)

80/tcp open http Apache httpd 2.2.8 ((Ubuntu) PHP/5.2.4-2ubuntu5.10 with Suhosin-Patch)

Service Info: OS: Linux
Service detection performed. Please report any incorrect results at nmap.org/submit .
Nmap done: 1 IP address (1 host up) scanned in 11.43 seconds
Как вы видите, Nmap может проанализировать пакеты и определить версию запущенного приложений на SSH и HTTP портах. Здесь вы можете увидеть что опрашиваемая система это Ubuntu с Apache 2.2.8 и OpenSSH 4.7p1. Эта информация может быть полезна по ряду причин. Nmap сканирование может идентифицировать систему под управлением устаревших сервисов которые могут быть уязвимы для известных эксплойтов.
Кто в моей сети?
Не знаете сколько онлайн узлов находятся в вашей сети? Попробуйте использовать nmap –sP который запустит ping сканирование указанной сети. Для примера, nmap –sP 10.0.0.0/24 сканирует 256 узлов от 10.0.0.0 до 10.0.0.255 проверит доступны ли они и доложит об этом. Так же вы можете использовать диапазон, например:
nmap –sP 10.0.0.1-15
Zenmap
Наконец, если все эти радости командной строки не для вас, nmap имеет GUI который вы можете использовать для построения и выполнения команд. Называется Zenmap. Он позволит выбрать цель, запустить сканирование, отобразить результаты, а также сохранить их и сравнить с другими.
GUI Zenmap это хороший способ познакомиться с Nmap, но лучше знать как использовать Nmap в командной строке, если вы собираетесь работать с ним часто.
В будущем руководстве мы более глубоко познакомимся с Nmap и конкретными задачами которые вы сможете решить.
Данный пост это вольный перевод статьи Beginner’s Guide to Nmap. Спасибо за внимание.
Эта статья написана, чтобы стать максимально подробным гайдом по nmap.
Что это такое? Как им пользоваться? Оптимизация процесса сканирования. Примеры обычного и продвинутого сканирования nmap. Советы по его использования при разных обстоятельствах.
Nmap — это очень популярный сканер сети с открытым исходным кодом, который может использоваться как в Windows, так и в Linux. Программа Nmap или Network Mapper была разработана Гордоном Луоном и на данный момент используется специалистами по безопасности и системными администраторами по всему миру.
Эта программа помогает системным администраторам очень быстро понять какие компьютеры подключены к сети, узнать их имена, а также посмотреть какое программное обеспечение на них установлено, какая операционная система и какие типы фильтров применяются. Функциональность программы может быть расширена за счет собственного скриптового языка, который позволяет администраторам автоматизировать много действий.
А как мы используем nmap обычно?
nmap 192.168.1.1 — Сканирование только 1 IP
nmap 192.168.1.1 192.168.2.1 — Сканирование несколько IP
nmap 192.168.1.1-254 — Сканирование список IP адресов
nmap scanme.nmap.org — Сканирование домена
nmap 192.168.1.0/24 — Сканирование с указанием CIDR
А что здесь не так спросите вы? Всё не так! NMAP имеет поистине огромные возможности в расширении своего функционала в зависимости от того, чего вы хотите добиться.
Необходимые базовые флаги для сканирования
-iL <list.txt>: Сканирования список целей(IP, домены)
--exclude <IP/s>: Исключить указанный цели из сканирования
--excludefile <файл>: Исключить указанный цели из списка для сканирования
Техники сканирования:
-sS/-sT/-sA/-sW/-sM: сканирование с использованием системного вызова TCP
SYN/Connect()/ACK/Window/Maimon
-sU: UDP сканирование
-sN/-sF/-sX: TCP Null, FIN и Xmas сканирование
--scanflags <флаги>: Указать собственные TCP флаги
-sI: <зомби_хост[:порт]>: «Ленивое» (Idle) сканирование
-sO: Сканирование IP протокола
--traceroute: Трассировка пути к хосту
--reason: Выводить причину, почему Nmap установил порт в определенном состоянии
Обнаружение хостов
-sL: Сканирование с целью составления списка — просто составить список целей для сканирования
-sP: Пинг сканирование — просто определить, работает ли хост
-Pn: Пропустить ping хостов. nmap будет считать, что все хосты UP
-PS/-PA/-PU [список_портов]: TCP SYN/ACK или UDP пингование заданных хостов
-PE/-PP/-PM: Пингование с использованием ICMP-эхо запросов, запросов временной метки и сетевой маски
-PO [список_протоколов]: Пингование с использованием IP протокола
-PR: ARP сканирование сети
-n: Никогда не делать DNS resolution
--dns-servers <сервер1[,сервер2],…>: Задать собственные DNS сервера для разрешения доменных имён
Определение портов и порядка сканирования
-p- : Сканирование всех портов (1-65535)
-p <диапазон_портов>: Сканирование только определенных портов
Пример: -p22; -p1-65535; -pU:53,111,T:21-25,80,8080 (U — UDP, T — TCP);
-p http, https
-F: Быстрое сканирование — Сканирование ограниченного количества портов (100 портов)
-r: Сканировать порты последовательно — не использовать случайный порядок портов
--top-ports <количество_портов>: Сканировать <количество_портов> наиболее распространенных портов
Пример: —top-ports 1000 ; —top-ports 5000

Определение служб и их версий
-sV: Исследовать открытые порты для определения информации о службе/версии
-sV --version-intensity <уровень>: Устанавливать от 0 (легкое) до 9 (пробовать все запросы)
-sV --version-light: Ограничиться наиболее легкими запросами (интенсивность 2)
-sV --version-all: Использовать каждый единичный запрос (интенсивность 9)

Определение OS
-O: Активировать функцию определения ОС
-O --osscan-limit: Использовать функцию определения ОС только для «перспективных» хостов
-O --osscan-guess: Угадать результаты определения ОС
-O –max-os-tries: Сколько раз nmap будет пытаться определить OS Пример:
-O –max-os-tries 1
-A: Включает обнаружение ОС, определение версии, сканирование при помощи скриптов и traceroute.
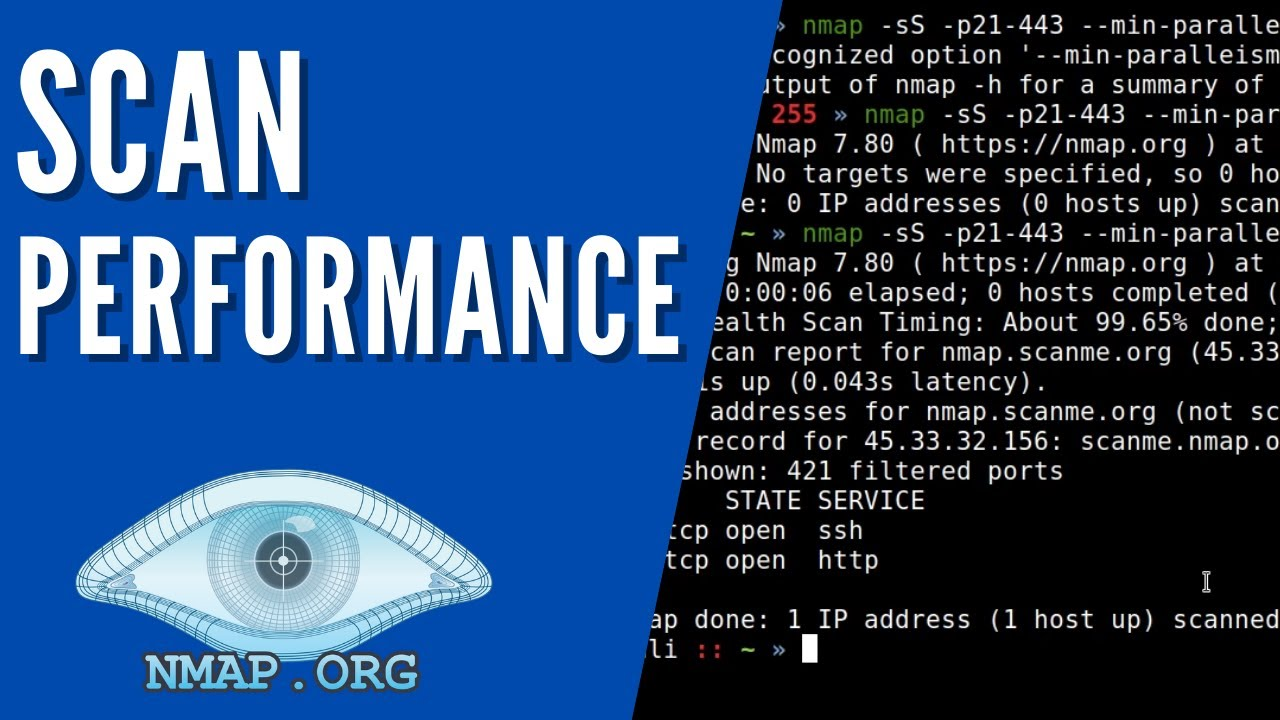
Управление временем и производительностью
Опции, принимающие аргумент <время>, задаются в миллисекундах, пока вы не добавите ‘s’ (секунды), ‘m’ (минуты), или ‘h’ (часы) к значению.
-T0: Параноик (0) Уклонение от системы обнаружения вторжений
-T1: Незаметный (1) обход системы обнаружения вторжений
-T2: Вежливый (2) замедляет сканирование, чтобы использовать меньшую пропускную способность и меньше ресурсов целевой машины
-T3: Нормальный (3) — скорость по умолчанию
-T4: Агрессивный (4) скорость сканирования; предполагает, что вы находитесь в достаточно быстрой и надежной сети
-T5: Безумный (5) ускоряет сканирование; предполагает, что вы находитесь в чрезвычайно быстрой сети
--min-rate <число>: Посылать запросы с интенсивностью не меньше чем <число> в секунду
--max-rate <число>: Посылать запросы с интенсивностью не больше чем <число> в секунду
--scan-delay/--max-scan-delay <время>: Регулирует задержку между запросами
--host-timeout <время>: Прекращает сканирование целей, которые не отвечают какое-то время
--max-retries <количество_попыток>: Задает максимальное количество количество попыток на запрос
--min-rtt-timeout/max-rtt-timeout/initial-rtt-timeout <время>: Регулирует время ожидания ответа на запрос
--min-parallelism/max-parallelism <количество_запросов>: Регулирует распараллеливание запросов
--min-hostgroup/max-hostgroup <кол_хостов>: Установить размер групп для параллельного сканирования

Обход Firewall/IDS
-f: Отправка маленьких IP пакетов(включая ping-сканирование), что может помочь обойти фильтрацию пакетов
--mtu <значение>: Фрагментировать пакеты с указаннием конкретного значения фрагментации
-D <фикт_хост1,фикт_хост2[,ME],…>: Маскировка сканирования с помощью фиктивных хостов
-S <IP_адрес>: Изменить исходный IP адрес -e <интерфейс>: Использовать конкретный сетевой интерфейс
-g/--source-port <номер_порта>: Изменить исходный номер порта
--data-length <число>: Добавить произвольные данные к посылаемым пакетам. Число это количество байт
--ip-options <опции>: Посылать пакет с заданным ip опциями
--ttl <значение>: Установить TTL запроса (time-to-live (время жизни пакета))
--spoof-mac <MAC_адрес/префикс/название производителя>: Задать собственный MAC адрес
--badsum: Посылать пакеты с фиктивными TCP/UDP контрольными суммами –proxies: Передача соединений через HTTP/SOCKS4 прокси Пример команды для
Пример обхода Firewall/IDS
nmap -f -T0 -n -Pn –data-length 200 -D 192.168.1.101,192.168.1.102,192.168.1.103,192.168.1.23 192.168.1.1
Вывод результатов
-oN/-oX/-oS/-oG <файл>: Выводить результаты нормальном виде, XML, s|<rIpt kIddi3 и Grepable формата вывода, соответственно, в заданный файл
-oA <базовове_имя_файла>: Использовать сразу три основных формата вывода
-v: Увеличить уровень вербальности (задать дважды или более для увеличения эффекта)
-d[уровень]: Увеличить или установить уровень отладки (до 9)
--open: Показывать только открытые (или возможно открытые) порты
--packet-trace: Отслеживание принятых и переданных пакетов
--iflist: Вывести список интерфейсов и роутеров (для отладки)
--log-errors: Записывать ошибки/предупреждения в выходной файл нормального режима
--append-output: Добавлять выходные данные в конец, а не перезаписывать выходные файлы
--resume <имя_файла>: Продолжить прерванное сканирование
--stylesheet <путь/URL>: Устанавливает XSL таблицу стилей для преобразования XML вывода в HTML
--webxml: Загружает таблицу стилей с Nmap.Org
--no-stylesheet: Убрать объявление XSL таблицы стилей из XML
--reason: Вывести причину, по которой порт находится в определенном состоянии, вывод такой же, как и -vv
NSE скрипты
-sC / --script default: запускает стандартные скрипты –script: можно указать какой конкретно скрипт/ы использовать
Пример: nmap 192.168.1.1 –script=http,banner; nmap 192.168.1.1 –script=http*
--script-args: NSE скрипты с аргументами
Пример: nmap –script snmp-sysdescr –script-args snmpcommunity=admin 192.168.1.1
Теперь перейдем к разным полезным командами
Примеры nmap команд для вывод/обработки результатов
nmap -p80,443,8080,8443,8081 -sV -oG – –open 192.168.1.1/24 | grep open : Сканирование на наличие веб-серверов и grep на каких IP-адресах запущены веб-серверы
nmap -iR 10 -n -oX out.xml | grep "Nmap" | cut -d " " -f5 > live-hosts.txt: Генерация списка IP живых хостов
nmap -iR 10 -n -oX out2.xml | grep "Nmap" | cut -d " " -f5 >> live-hosts.txt: Добавление IP в список живых хостов
ndiff scanl.xml scan2.xml: сравнение результатов двух сканирований с помощью ndiff
xsltproc nmap.xml -o nmap.html: конвертация xml в html

Примеры nmap команд для сканирования
nmap 192.168.1.1-1/24 -PR -sn -vv : ARP сканирование локальной сети
nmap -sV --top-ports 5000 -T1 –reason -oG nmap.scan -f -n -Pn –data-length 200 -A --mtu 30 --badsum : Скрытное сканирование топ 5000 популярных портов, без ping и резолва DNS; добавление рандомых 200 байт; определение OS; указание причины, почему nmap считает, что порт в том или ином состоянии; фрагментация пакетов; отправка пакетов с фиктивными TCP/UDP контрольными суммами
nmap -sV --version-all -p- -T5 –reason -oA nmap.scan -Pn –min-rate 3000 –host-timeout 2m –max-retries 3 --script vulners --min-parallelism 10 : Данный режим сканирования больше подходит для лаб, тестовых заданий, CTF и в случаях если не применяются никакие средства защиты от сетевого сканирования. Данный скан будет максимально агрессивным и быстрым; агрессивное распознование сервисов; без ping; nmap будет считать, что хост/ы жив/ы; минимальная скорость сканирования: 3000; сканирование OS и скрипты по умолчанию; если хост не отвечает 2 минуты, то он пропускается; максимум 3 попытки для сканирования; запуститься скрипт vulners — скрипт ищет уязвимости по найденным сервисам.
Дополнительный материал
Отличная подробка репозиторием с различными NSE скриптами под разным цели, системы, CVE и т.д.
https://github.com/emadshanab/Nmap-NSE-scripts-collection
Загрузить PDF
Загрузить PDF
Вы беспокоитесь о безопасности вашей или какой-нибудь другой сети? Защита вашего маршрутизатора от нежелательных подключений является залогом безопасности вашей сети. Одним из простых методов является Nmap или Network Mapper. Это программа сканирования, которая проверяет какие порты открыты и какие закрыты, а так же другие детали. Специалисты по безопасности используют эту программу для тестирования безопасности сети. Чтобы научиться использовать эту программу смотрите Шаг 1.
-

Вы можете найти установщик на сайте разработчиков и скачать бесплатно. Рекомендуется скачивание именно с сайта разработчиков, чтобы избежать риск скачивания вирусов или подмененных файлов. Скачивая Nmap вы одновременно получить Zenmap, графический интерфейс для Nmap, что делает программу простой в использовании для новичков при выполнении сканирования без знания команд.
- Программа Zenmap доступна для операционных систем Windows, Linux, и Mac OS X. Вы можете найти установщики на официальном сайте Nmap.
-
Запустите установщик сразу после окончания загрузки. Выберите компоненты для установки. Чтобы полностью воспользоваться всеми возможностями Nmap выберите все компоненты. Nmap не будет устанавливать рекламные или шпионские приложения.
-

Если во время установки вы оставили все пункты не тронутыми, то иконка программы должна появиться на вашем рабочем столе. Если нет, посмотрите в меню старт и запустите Zenmap.
-

Программа Zenmap превращает сканирование сети в очень простой процесс. В первую очередь выберете цель сканирования. Вы можете ввести домен (example.com), IP-адрес (127.0.0.1), сеть (192.168.1.0/24), или комбинацию перечисленных.
- В зависимости от загрузки и цели вашего сканирования, использование Nmap может оказаться нарушением пользовательских правил вашего интернет провайдера. Всегда проверяйте местные пользовательские правила во время использования Nmap в случаях сканирования этой программой вне вашей собственной сети.
-
Профили представляют из себя группу модификаций, которые изменяют структуру сканирования. Профили позволяют быстро выбрать разные типы сканов без необходимости набора модификаций в командной строке. Выберете лучший профиль для ваших нужд:[1]
- Intense scan — обширное сканирование. Включает распознавание операционной системы, версии, скриптов, трассировку, и имеет агрессивное время сканирования.
- Ping scan — это сканирование, определяет онлайн статус цели вашего сканирования, и не сканирует порты.
- Quick scan — сканирует быстрее чем обычный скан с агрессивным временем сканирования и выборку портов.
- Regular scan — это стандартны Nmap скан без каких-либо модификаций. Результат включает пинг и открытые порты.
-
Активные результаты скана будут отображаться во вкладке Nmap Output. Время сканирования будет зависеть от выбранного профиля, физического расстояния до цели, и сетевой конфигурации.
-
После окончания скана, вы увидите сообщение “Nmap is done” в низу вкладки Nmap Output. Теперь вы можете проверить ваши результаты, в зависимости от типа выбранного скана. Все результаты собраны во вкладке Output, но, выбирая другие вкладки, вы можете более детально изучить получившийся результат.[2]
Реклама


-
Nmap является не большой и бесплатной программой. Вы можете скачать программу на сайте разработчика. Следуйте инструкциям исходя из вашей операционной системы:
-
Команды Nmap работают из командной строки и показывают результаты сразу под командой. Вы можете использовать параметры, чтобы изменить структуру сканирования. Вы можете запустить сканирования из любого места прописанного в вашей командной строке.
-
Чтобы начать простое сканирование, напишите
nmap <target>. Таким образом начнется пинг выбранной цели и сканирование портов. Этот скан очень просто распознать. Результаты будут видны на вашем экране. Возможно вам придется прокрутить наверх, чтобы увидеть результаты полностью.- В зависимости от загрузки и цели вашего скана, использование Nmap может оказаться нарушением правил вашего интернет провайдера. Всегда проверяйте местные пользовательские правила во время использования Nmap в случаях сканирования этой программой вне вашей собственной сети.
-
Вы можете использовать командные переменные, чтобы изменить параметры сканирования, в результате получая более или менее обширное сканирование. Вы можете добавить несколько переменных оставляя пробел между каждым. Переменные ставятся до цели:
nmap <variable> <variable> <target>[3]
- -sS — это скрытое сканирование SYN. Это сканирование сложнее обнаружить, чем обычное, но может занять дольше времени для завершения. Большинство новых файерволов могут обнаружить сканирование –sS.
- -sn — это сканирование пинга. Это сканирование не использует обнаружение портов, и только проверяет онлайн статус цели.
- -O — это сканирование определяет вид операционной системы цели.
- -A — эта переменная включает обнаружение более обширной информации: операционная система, версия, скрипты, и трассировка.
- -F — включает быстрое сканирование, и уменьшает количество сканируемых портов.
- -v — эта переменная показывает большее количество результатов вашего сканирования, делая их читабельными.
-
Вы можете настроить вывод результатов вашего сканирования в XML файл и, в последствии, легко открыть их в любом веб-браузере. Чтобы это сделать используйте переменную -oX с названием файла для вывода данных. Полностью команда выглядит таким образом
nmap –oX ScanResults.xml <target>.- Ваш XML файл будет сохранен в текущей директории работы вашей командной строки.
Реклама


Советы
- Интересно как проходит сканирование? Нажмите пробел, или любую кнопку, во время работы скана, чтобы посмотреть прогресс Nmap.
- Цель не отвечает? Попробуйте добавить переменную “-P0” к вашему сканированию. В результате сканирование Nmap начнет свою работу, даже если программа «думает», что цель не существует. Это бывает полезно, когда компьютер защищён файерволом.
- Если ваше сканирование занимает большое время (больше 20 минут), попробуйте добавить переменную “-F”, таким образом Nmap сканирование затронет только недавно использовавшиеся порты.
Реклама
Предупреждения
- Убедитесь, что у вас есть разрешение на сканирование цели. Сканирование государственных сайтов принесет вам не мало проблем. Если вы хотите проверить сканирование, вы можете использоваться scanme.nmap.org. Это тестовый компьютер установленный создателем программы.
- Если вы часто используете сканирование Nmap, будьте готовы ответить на вопросы от вашего интернет провайдера. Некоторые провайдеры специально проверяют трафик на сканирование Nmap. Программа является известной и часто используемой хакерами.
Реклама
Об этой статье
Эту страницу просматривали 32 189 раз.
Была ли эта статья полезной?
Nmap is a network mapping tool. It provides a range of powerful scanning options. Many network administrators use Nmap to scan open ports & services on a network, guessing the operating system on the targeted machine, monitoring hosts, and discovering different services with their version information. In this article, you will see how Nmap on windows works.
Nmap is free and open-source software that was created by Gordon Lyon. Nmap is utilized to find out hosts and services on a network by transmitting some packages over the targeted network. Nmap was once limited only to Linux operating systems, but now it is available for Windows and macOS too.
Note: If you want to use Nmap on Windows without the need of installing bare-metal Linux or a virtual machine utilizing the power of WSL 2, we have an entire tutorial series covering how to do that.
Table of Contents
- Why should you use Nmap
- Nmap Installation Process
- Nmap features
- Zenmap for Windows
- Different scan types in Nmap
- Scanning TCP/UDP ports with Nmap on windows
- Scanning all ports
- Scanning specific TCP ports within a range
- Faster Scan option
- Scanning TCP ports without a range
- Scanning UDP ports within a range
- Scanning all UDP ports
- Scanning TCP/UDP at once within a specific range
- Other common Nmap commands
- Scanning OS & service detection
- Detecting vulnerabilities using Nmap
- Saving your Nmap results
- Detecting Malware on the remote hosts
- Conclusion
👀 This Tutorial has some related Articles!
👉 Part 1 – Nmap Basics
👉 Part 2 – Nmap Host Discovery
👉 Part 3 – Advanced Nmap Commands
👉 Part 4 – Nmap NSE Scripts
👉 Part 5 – Nmap on Windows
Why should you use Nmap
Nmap is a network mapping tool with a ton of other useful features. Many security researchers and pentester use this open-source tool. Nmap is also a favorite tool for both black and white hat hackers.
A hacker with good knowledge can create images of your network topology. Scanning your network can help you to make yourself more secure and spot the flaws in your system. You can check for any unauthorized devices that are connected to your network, you can find ports that are meant to be closed but are open for some reason, and to point out the users that are running any unauthorized services on your network.
Nmap Installation Process
Installing Nmap on Windows is extremely easy. You have to follow some short steps to use this powerful tool.
- Go to the following web address nmap.org/download.html and download the latest stable version
- Once the setup is downloaded from their website, now you have to browse to the downloaded “.exe” setup file. Right-click on the file and run it as an administrator.
- Now the installation process will start, read the license agreement thoroughly and only accept the license agreement if you agree, by clicking the “I agree” button.
- Now choose the components that you want to install with Nmap but choosing them all is recommended. Click on the “Next” button.
- The installation location for Nmap will be C:\Program Files (x86)\Nmap, but you can change the Installation folder to wherever you want. Now click on the “Install” button.
- Now the actual installation process will start, and all files will be extracted. Once it is done, your Nmap is ready to use now.
Nmap features
This powerful tool carries many features that can be used by a hacker to get a lot of information about their targeted machine.
- Identify open ports.
- Network Inventory.
- Map a network.
- Exploiting and finding a vulnerability.
- Host uptime monitoring.
- Network security audit.
- Detecting OS.
- Detect service and version.
Network Mapping – It can be beneficial for you to check the devices present on a network including all the routers, servers, and switches, and to verify how they are connected physically. Nmap on Windows has the capability to show a whole map of the network.
Detecting OS – Nmap can also be used for OS footprinting. You can check the operating system running on your targeted device, including the vendor name and the version of the system. It can also give you an estimate for the ‘devices’ up-time.
Security Auditing – After footprinting the OS and knowing the applications running on the system, network managers now discover the vulnerability that can lead to specific flaws.
Discovering services – By using Nmap you can do more than just find hosts on the network, you can also check their behavior and whether they are acting as web servers or mail servers and information regarding the version of the software they are using.
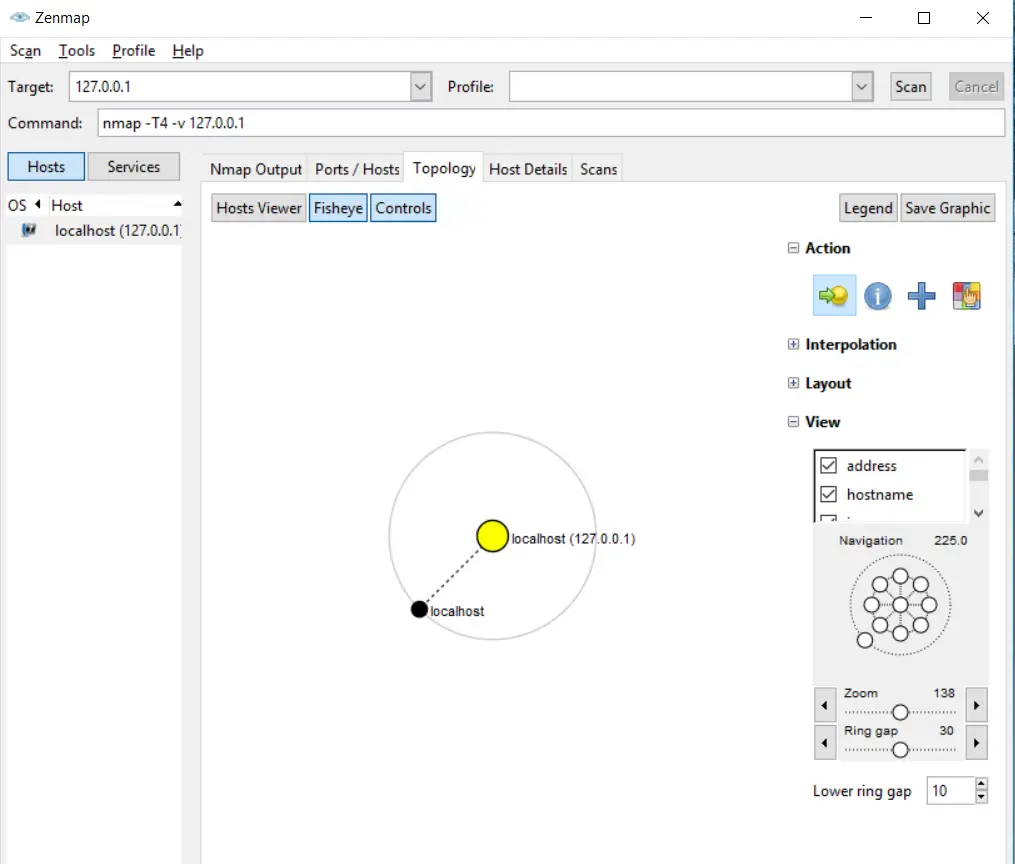
Zenmap for Windows
Zenmap offers you a graphical user interface for all the tasks you would normally perform in Nmap by using the command line. Zenmap offers you some extraordinary features that you do not see in the classic Nmap, for example, a network topology map.
You are provided with more options in this GUI version. You can save your scan results with the Nmap format (.nmap) or in the XML (.xml) format.
This incredible GUI of Nmap is available for Windows, and it is very beneficial for users who do not want to play with the CLI interface of Nmap.
Different scan types in Nmap
There are different types of scans that can be performed by using Nmap. The Nmap user performs these scans for various purposes.
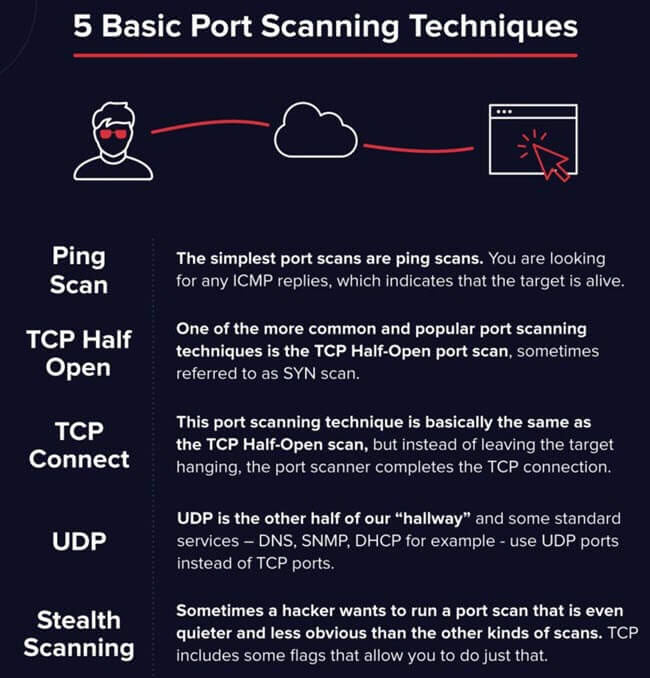
TCP Scan
TCP scan performs a three-way handshake from your device to the targeted device. Someone with minimal effort can easily detect the TCP scan, and your IP address of the sender can be logged by the services efficiently.
UDP Scan
UDP is used to check whether there is any port that is listening for the upcoming requests on the targeted machine. You may get a false report in your scan results, as there is no mechanism to respond positively. The UPD scans can be used to uncover any hidden trojan or any RPC services. These scans are not very fast because the machines handle this kind of traffic slowly.
SYN Scan
It is a type of TCP scan. The syn packets are crafted by using Nmap itself, and this syn packet is used to initiate a TCP connection. Nmap results are based upon these special Syn packets. These packets themselves do not establish a connection, but they are utilized to produce scan results on Nmap.
ACK Scan
To check if ports are filtered or not, ACK scans are used. This type of scan can be beneficial if you want to check for the firewalls. If there is simple packet filtering, then it will allow an established connection with the help of ACK bit set.
FIN Scan
The FIN scan is most likely the SYN scan. If the targeted machine receives FIN input, then most of them will send the reset packet (RST) back.
NULL Scan
As the name suggests, the NULL scan sets all the header fields to zero (null). These kinds of packets are not authentic, and some of the targets do not know how to handle this packet. These targets could be your windows machine, and when you scan them using NULL packets, they produce undependable results.
XMAS Scan
XMAS scan has the same nature as the NULL scan, as both of these are hard to detect. The implementation of the TCP stack will prevent windows from responding to the Xmas scans. The XMAS scans are used to operate the FIN, URG, and PSH flag present in the TCP header.
RPC Scan
These kinds of scans are utilized to find the systems that reply to the RPC (Remote procedure call) services. It can allow the commands to run on a specific machine remotely. RPC services can also be used to run on many different ports; that’s why it becomes difficult to tell whether the RPC services are working or not. RPC scan should be done often to check the running RPC services.
IDLE Scan
From all of the above scans for Nmap on Windows or Linux, the IDLE scan is the stealthiest of them all. The attackers mostly use the IDLE scan for malicious attacks. Some specific conditions are necessary to perform this scan.
Scanning TCP/UDP ports with Nmap on windows
One of the best usages of Nmap is to scan ports on the network. By default, there are 1000 ports that Nmap can automatically scan, and you can change that port range according to your scan requirements.
Scanning all ports
In Nmap, we can specify the port range by using the “-p” option. The maximum or highest port number is 65535. If we want to scan all TCP ports, then we can use -p0-65535 option:
nmap -p- 127.0.0.1Code language: CSS (css)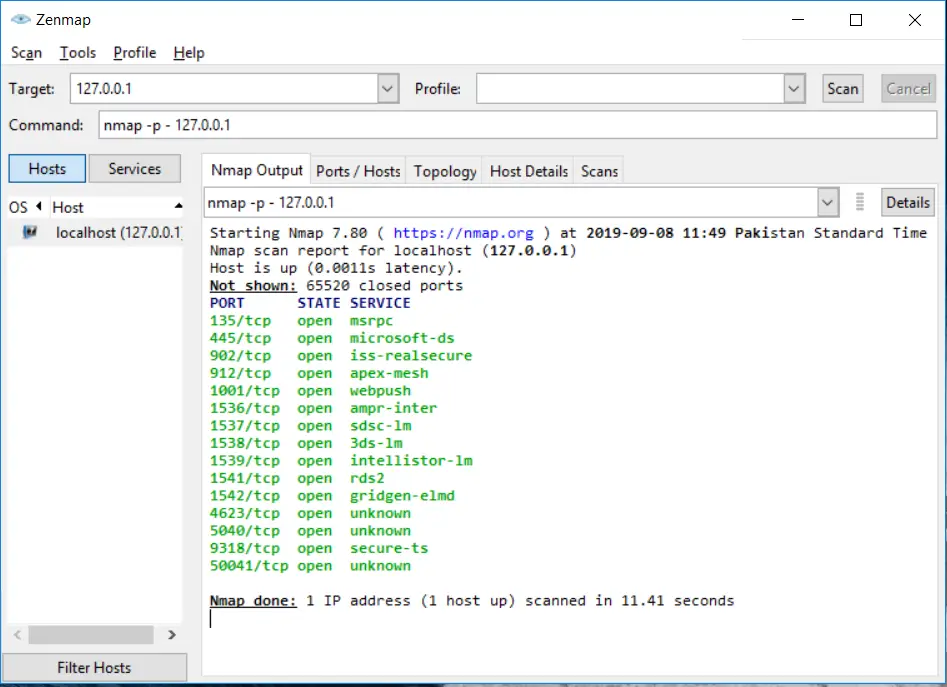
Scanning specific TCP ports within a range
In Nmap, we can specify the port range by using the “-p” option. The maximum or highest port number is 65535. If we want to scan all TCP ports, then we can use -p1-10 option:
nmap -p1-500 127.0.0.1Code language: CSS (css)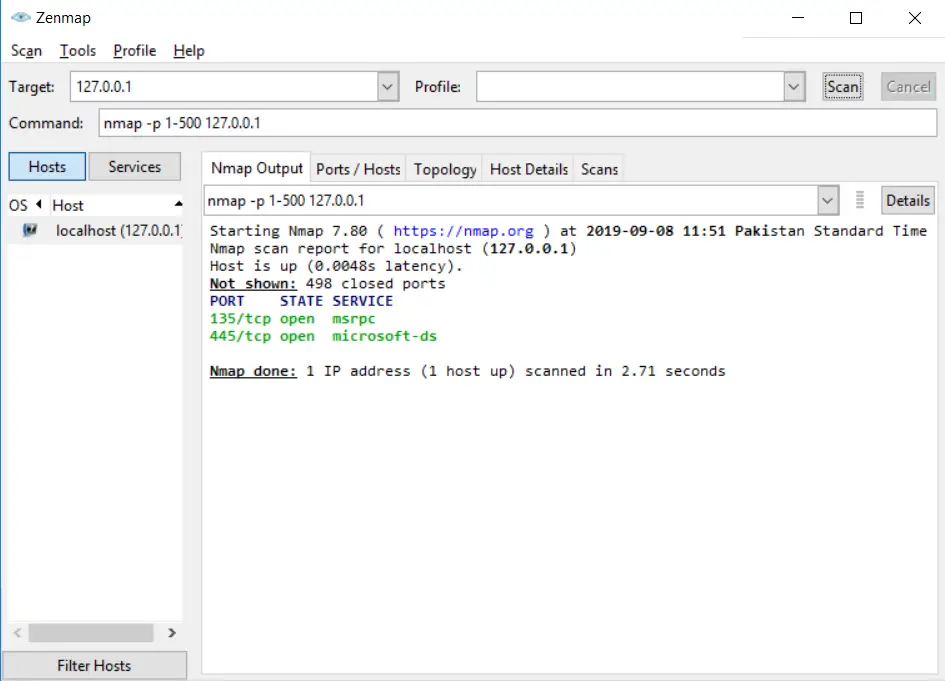

Faster Scan option
If you want your scan to finish fast, then you can use the fast scan option. The regular scan will consume a lot of time, whereas a fast scan option will do it in less time. Use this option if your situation is not critical. You can use -T5 parameter for the quickest level scan of Nmap:
nmap -p- -T5 127.0.0.1Code language: CSS (css)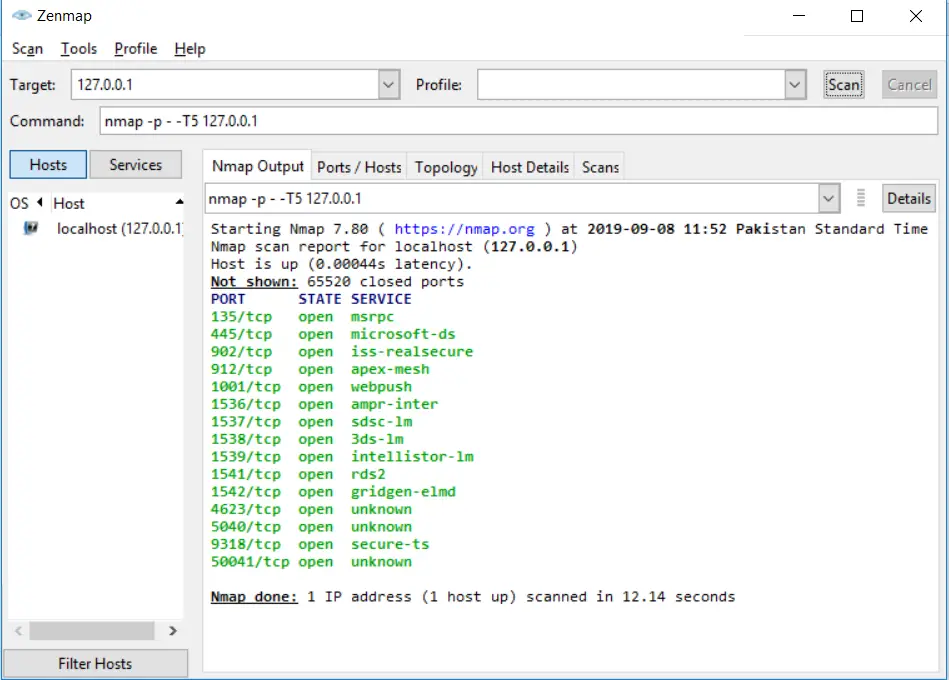
Scanning TCP ports without a range
There is another way of scanning TCP ports without specifying the range of ports. It will scan for the common 1000 ports:
nmap 127.0.0.1Code language: CSS (css)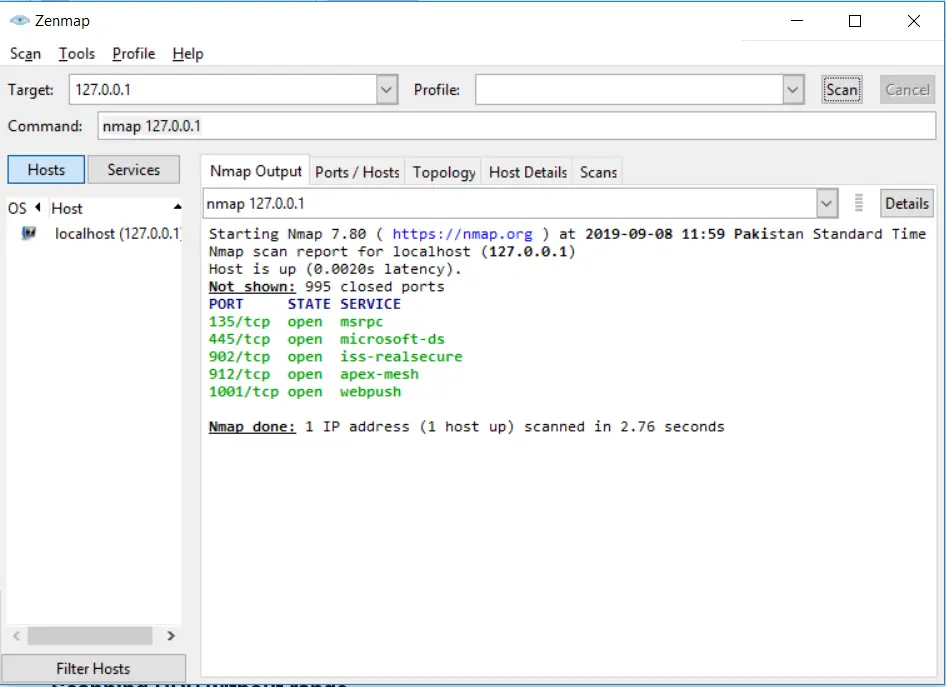
Scanning UDP ports within a range
In Nmap when you scan ports, TCP is scanned per default. In order to scan UDP ports, you have to specify the UDP scan in the statement. You can use -sU for scanning UDP ports.^:
nmap -sU -p 1-500 127.0.0.1Code language: CSS (css)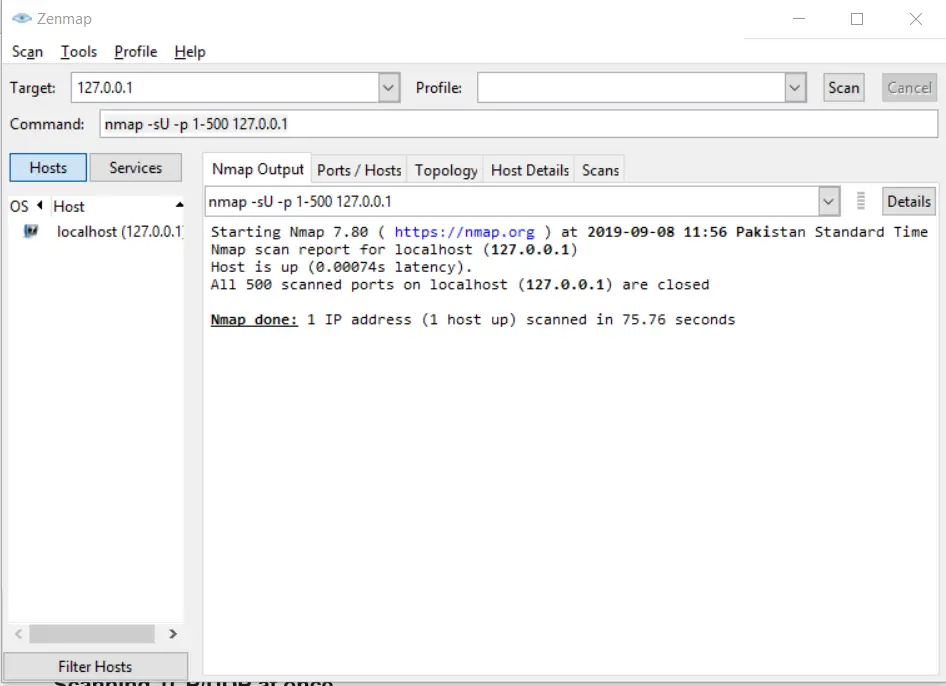
Scanning all UDP ports
Scanning UDP without range is similar to scanning TCP without range. You use the same -p- option to scan UDP ports without specifying a range:
nmap -sU -p - -T5 127.0.0.1Code language: CSS (css)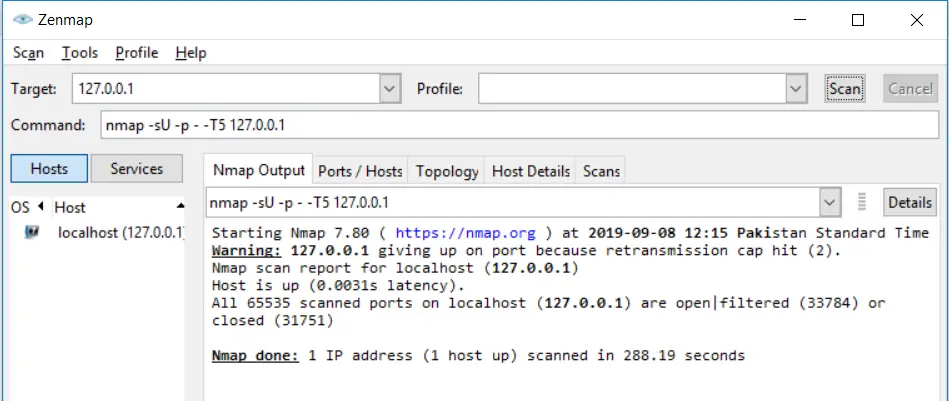
👀 This Tutorial has some related Articles!
👉 How to get started in Cyber Security – The Complete Guide
👉 How to get started with Bug Bounties
👉 Terminal Customization Series
👉 Best Ethical Hacking Books
👉 Download Kali Linux Safe & Easy
👉 Best Ethical Hacking Tools
👉 Install VSCode on Kali Linux
👉 Dual Boot Kali Linux with Windows
👉 Install Kali Linux on VirtualBox – Complete Beginner Guide
👉 Top Things to do after installing Kali Linux
👉 WiFi Adapter for Kali Linux – The Ultimate Guide
👉 Nmap Beginner Guide Series
👉 Metasploit Tutorial Series
👉 Burp Suite Beginner Guide
Scanning TCP/UDP at once within a specific range
You can also scan both TCP/UDP by using a single statement. You have to use -sU for UDP ports and TCP ports ‘; you’ll use the -sT option:
nmap -sT -sU -p 1-500 127.0.0.1Code language: CSS (css)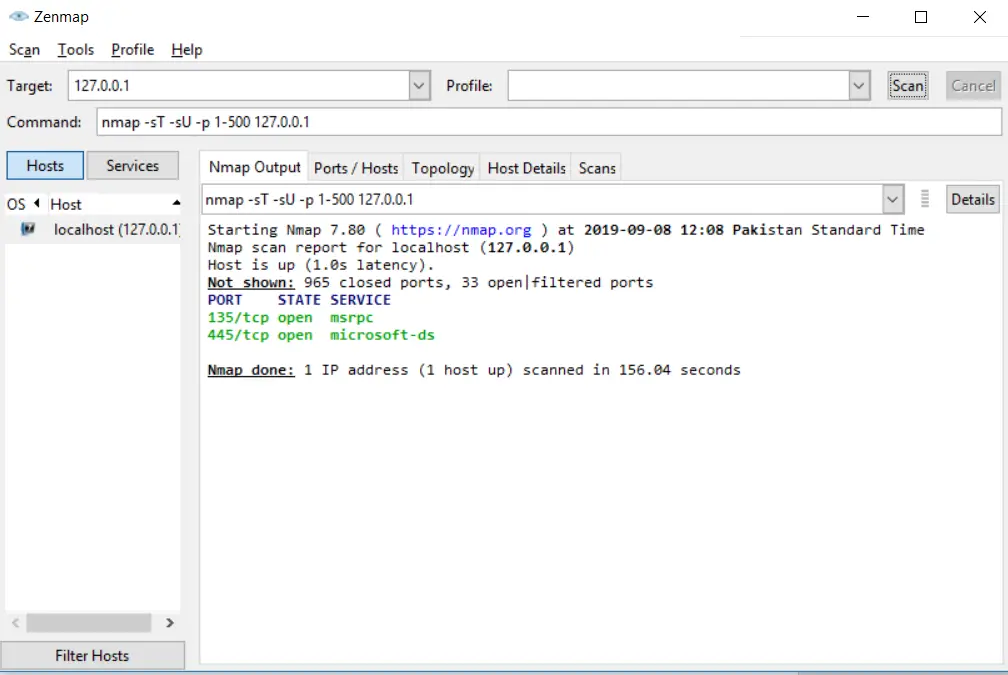
Other common Nmap commands
There are a ton of commands that you cannot master in a day, but there are some common and useful commands that you can use instantly. These commands are the basic ones. You can go advance, once you have learned the basics of it. Have a look at some of the most common yet useful commands.
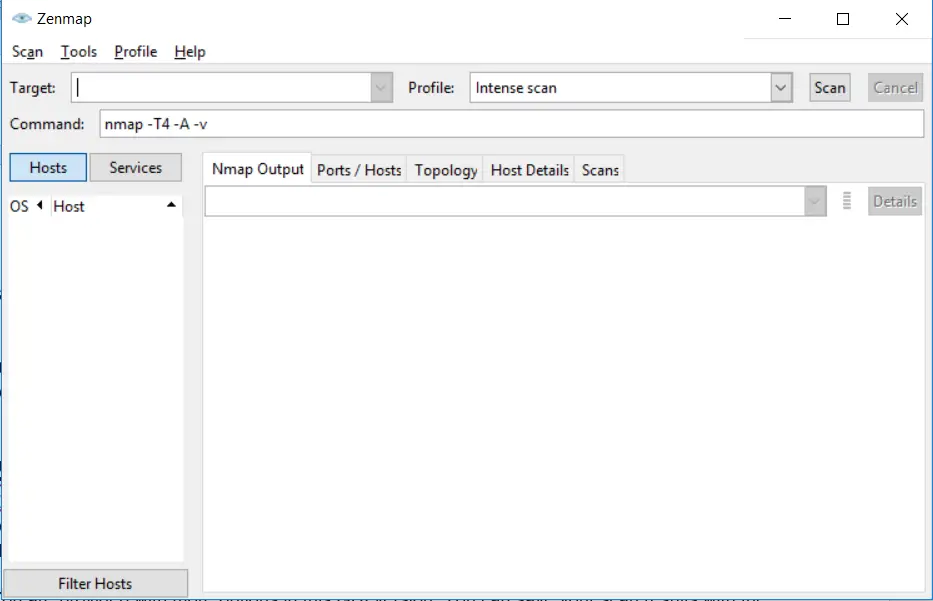
Scanning OS & service detection
You can enable service detection and OS detection by using the -A option and to allow fast scanning we can use -T4 with it. Here is an example:
nmap -T4 -A 127.0.0.1Code language: CSS (css)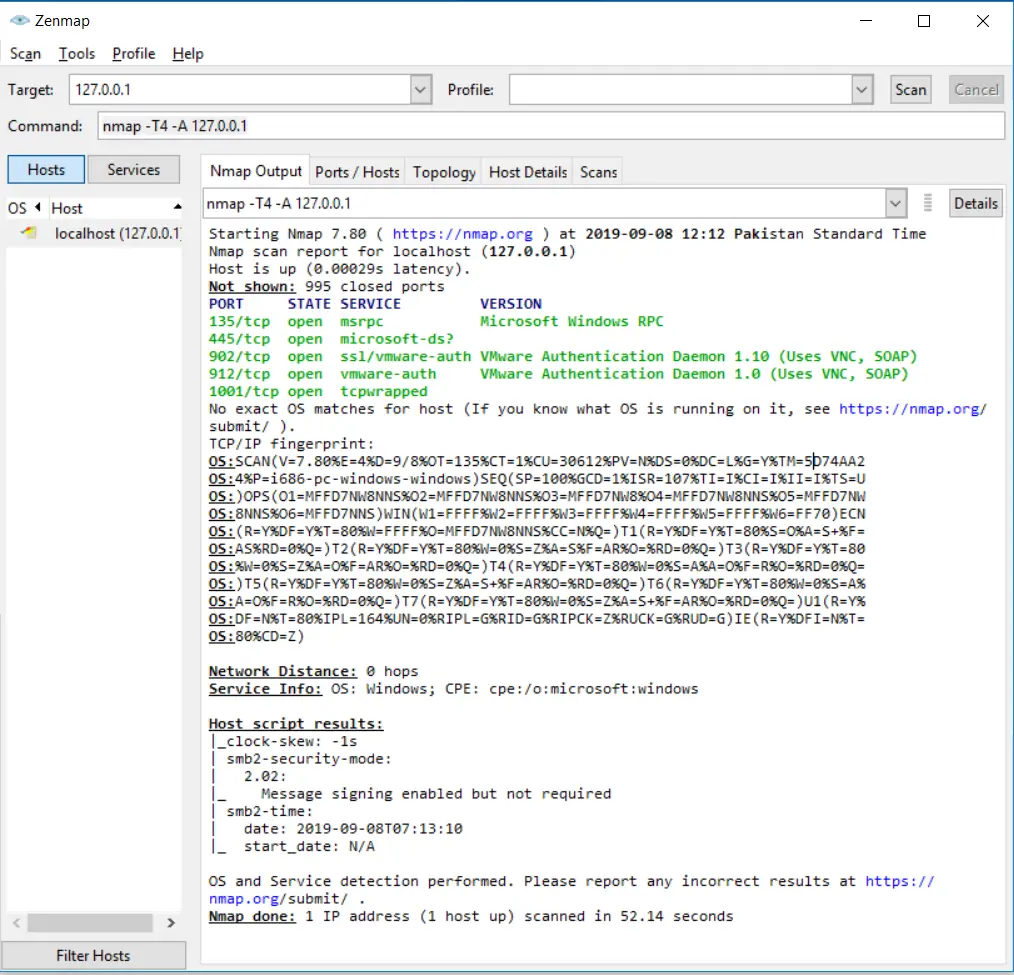
Detecting vulnerabilities using Nmap
One of the most significant Nmap features that allow you to go beyond your expectations is that you can use the “Nmap scripting engine” through which you can execute a set of pre-defined scripts, and you can write your won scripts as well in Lua programming language.
NSE (Nmap Scripting Engine) is essential to use when you have to perform a full vulnerability scan. You have to automate everything during a scan that’s why we use scripts.
To perform a vulnerability test, you can use:
nmap -T5 --script vuln 127.0.0.1Code language: CSS (css)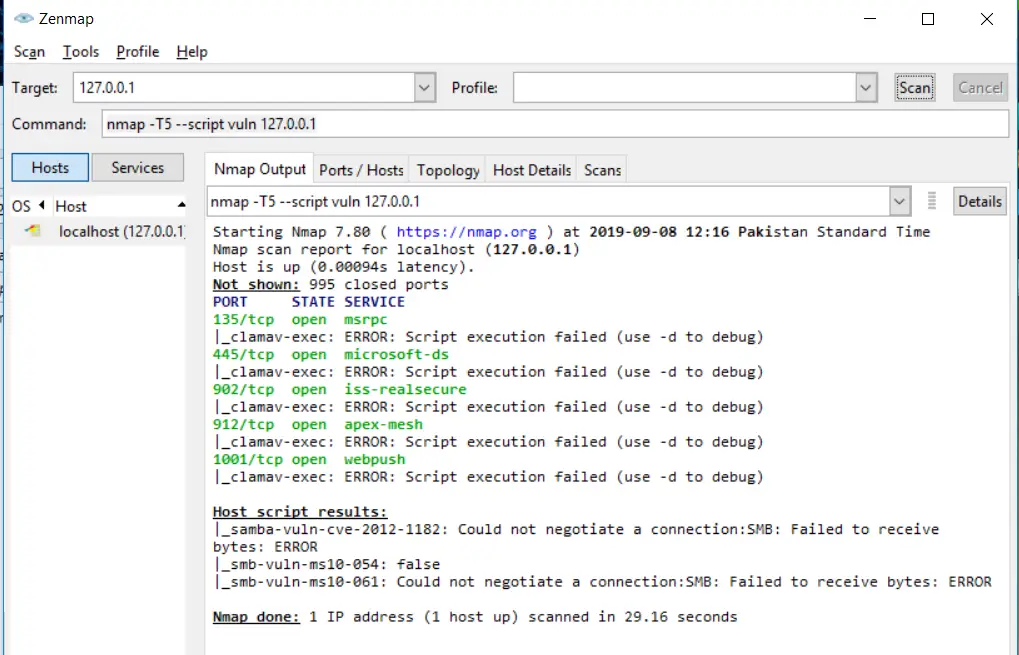
Saving your Nmap results
You can save your results after the scan in Nmap. You can save them in two formats i.e Nmap (.nmap) format or XML (.xml) format. While exporting the results from the Nmap, you have to use the following command statement:
nmap -oN output.txt example.comCode language: CSS (css)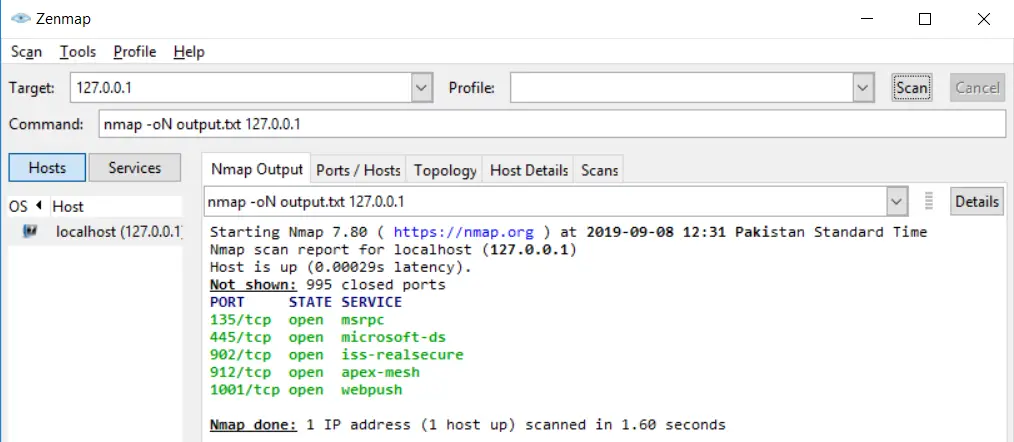
You can export the results as an XML document as well:
nmap -oX output.xml example.comCode language: CSS (css)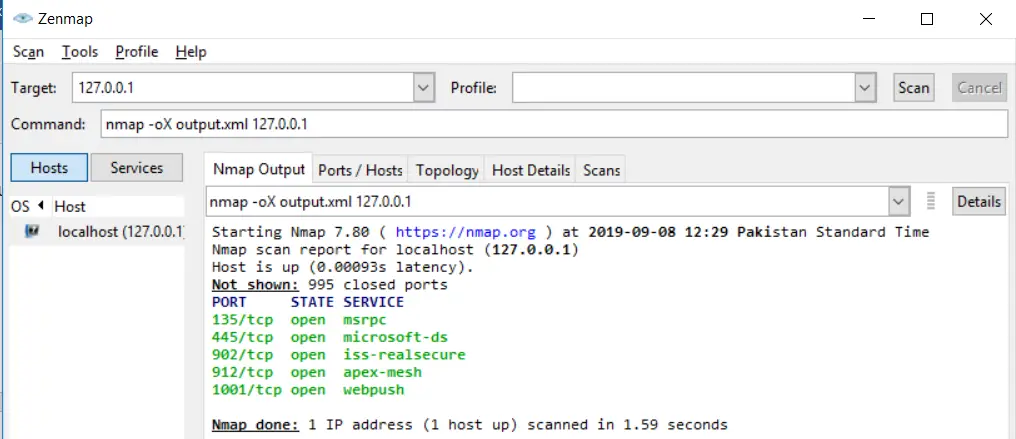
Detecting Malware on the remote hosts
Nmap has the capability to run different tests to check for Malware or backdoor on some popular operating system services like Proftpd, IRC, SMTP, and SMB. It also offers a module that checks for any malicious file signs in Virustotal databases.
To perform a very simple & straight scan:
nmap -sV --script http-malware-host 127.0.0.1Code language: CSS (css)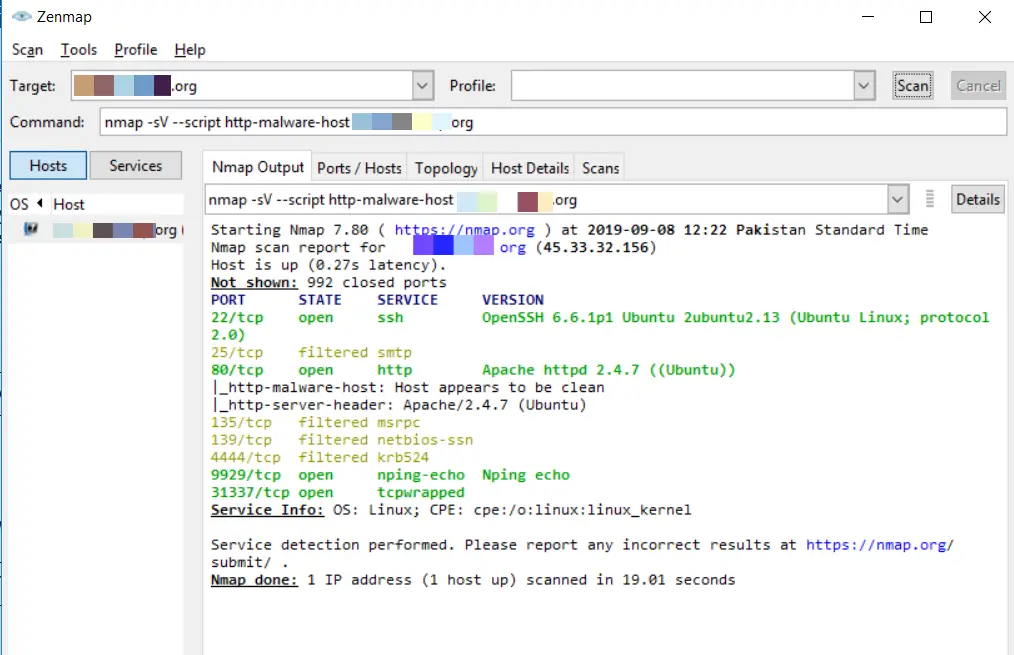
By using ‘google’s malware check:
nmap -p 80 --script HTTP-google-malware 127.0.0.1Code language: CSS (css)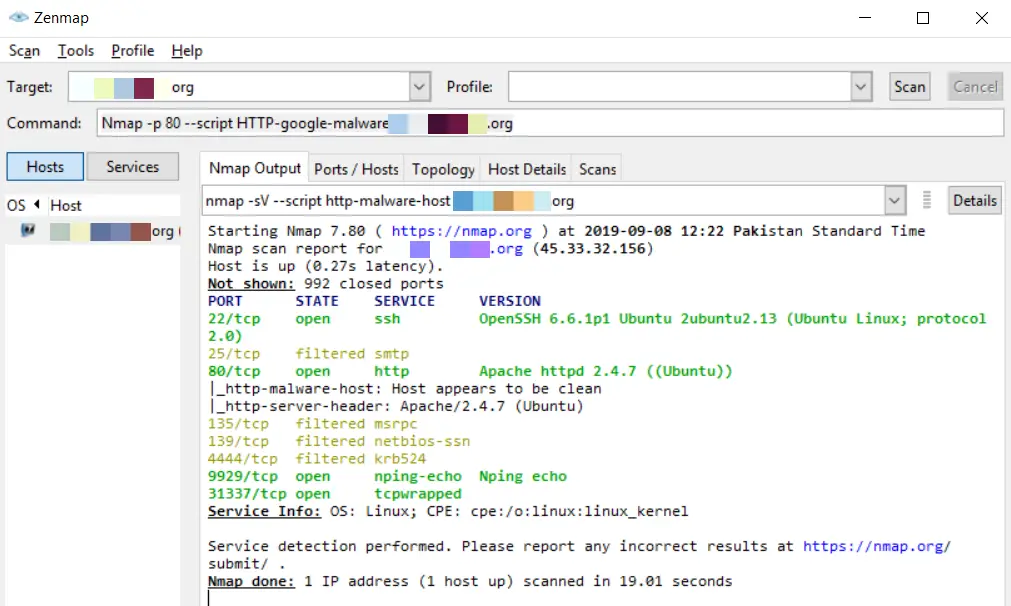
Conclusion
Nmap for Windows is one of the most important and robust tools used for gathering network information and performing operations using NSE. You can stick to Nmap and learn more about it to be a professional. The significance of this tool is enough that every security researcher has heard its name. If you want to be a cybersecurity expert, then you should consider using this tool that carries a lot of flexibility and strength in itself. This beginner’s guide will surely help you to make your base strong so that you can move to advance steps. We also have a series of Nmap tutorials, you may have a look at it to learn more about it here.
👀 This Tutorial has some related Articles!
👉 Part 1 – Nmap Basics
👉 Part 2 – Nmap Host Discovery
👉 Part 3 – Advanced Nmap Commands
👉 Part 4 – Nmap NSE Scripts
👉 Part 5 – Nmap on Windows