
In this article:
-
Adjust display brightness
-
Night light
-
Color profile management
-
Use HDR
Adjust display brightness
Managing your display brightness can significantly enhance your viewing experience and help conserve battery life. You can adjust the brightness manually or let your PC handle it automatically based on lighting conditions or content.
Important: You might not see the Brightness slider on devices that have an external monitor. To change the brightness on an external monitor, use the buttons on it.
To adjust display brightness, select the Network icon on the right side of the taskbar, and then move the Brightness slider to adjust the brightness.
Alternatively, you can adjust the display brightness from Settings > System > Display.
Important: You might not see the Brightness slider on desktop PCs that have an external monitor. To change the brightness on an external monitor, use the buttons on it.
Some PCs can let Windows automatically adjust screen brightness based on the current lighting conditions. To find out if your PC supports this, select Settings > System > Display. Select Brightness, look for the Change brightness automatically when lighting changes check box, and then select it to use this feature. This automatic setting helps make sure your screen is readable wherever you go. Even if you use it, you can still move the Brightness slider to fine-tune the brightness level for the built-in display.
Note: On HDR displays, Windows optimizes the automatic brightness adjustment behavior to better match how the human eye perceives brightness changes. As a result, brightness adjustments might take more time on HDR displays when lighting conditions change.
Some Windows 11 PCs can automatically adjust the screen brightness and contrast based on content that’s displayed on your built-in screen. For example, if you’re watching a video that has a dark scene, followed by a brighter scene (for example, one that shows a bright sunny day), the brightness and contrast may change. This is normal.
Content adaptive brightness control provides ideal brightness and contrast levels, while saving power and providing longer battery life at the same time. If these sudden brightness changes are distracting, or if you work in photo and video apps where color accuracy is important to you, these settings can be adjusted to best meet your needs between providing appropriate brightness and contrast and conserving battery life.
-
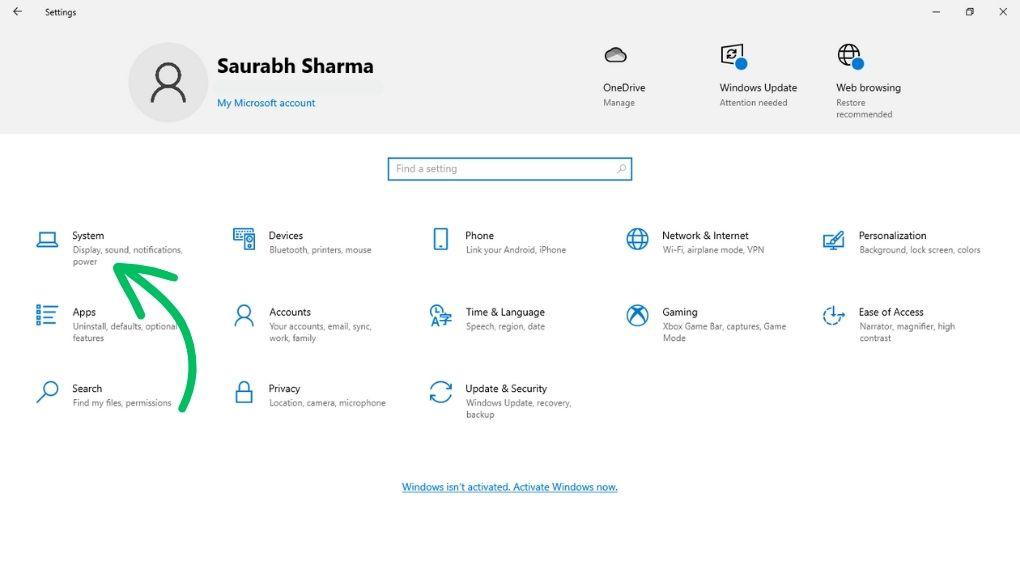
Select the Start button, then type settings. Select Settings > System > Display .
-
In Display settings, select Brightness , then set the Change brightness based on content drop-down as needed:
-
Off: Adaptive brightness control will be turned off and screen brightness and contrast will not be adjusted. This can result in shorter battery life.
-
Always: Adaptive brightness control will always run regardless of whether the device is plugged in or on battery.
-
On Battery Only: Adaptive brightness control will only be activated when the device is on battery power.
-
Night light
Your display emits blue light—the kind of light you see during the day—which can keep you up at night. To help you get to sleep, turn on the night light and your display will show warmer colors at night that are easier on your eyes.
Note: Night light isn’t available if your device uses certain drivers, like DisplayLink or Basic Display.
Select the Network icon on the right side of the taskbar. then locate Night light under Quick settings and select it to toggle it on or off.
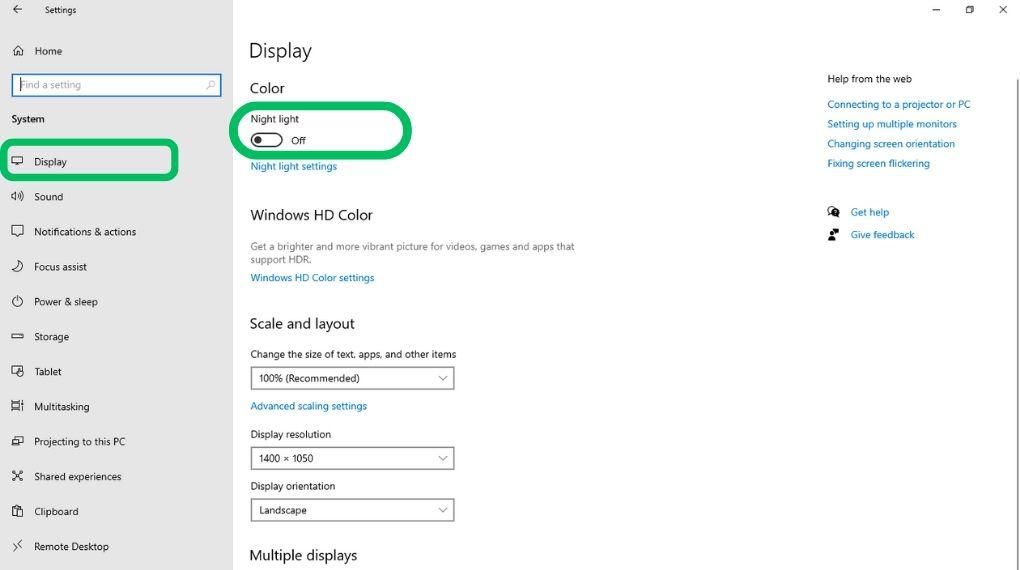
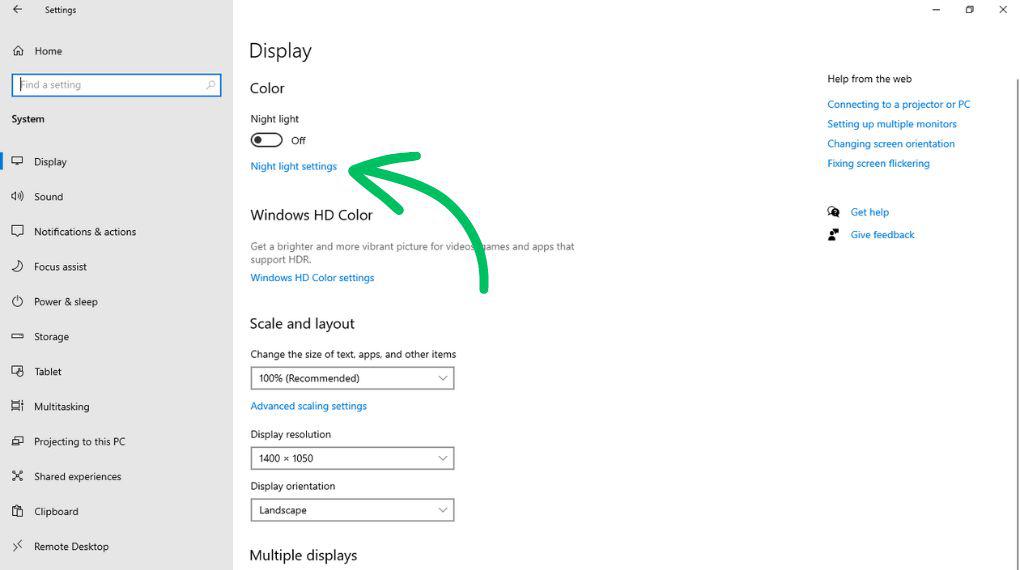
Alternatively, you can toggle the Night light setting under Settings > System > Display.
-
Select Start , then type settings in the search box. Select Settings > System > Display > Night light.
-
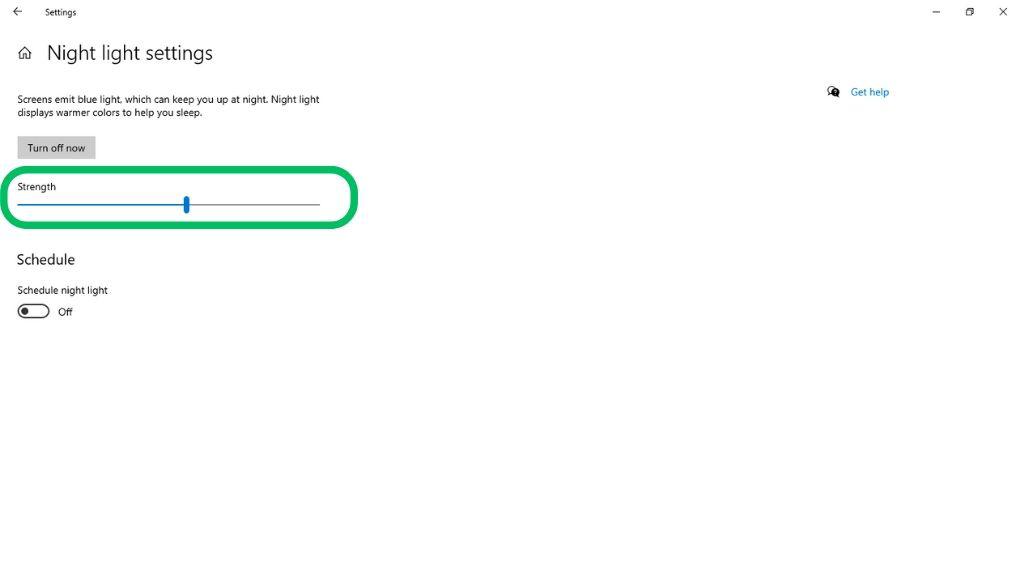
Move the strength slider to adjust the intensity of the blue light reduction.
-
Select Start , then type settings in the search box. Select Settings > System > Display > Night light.
-
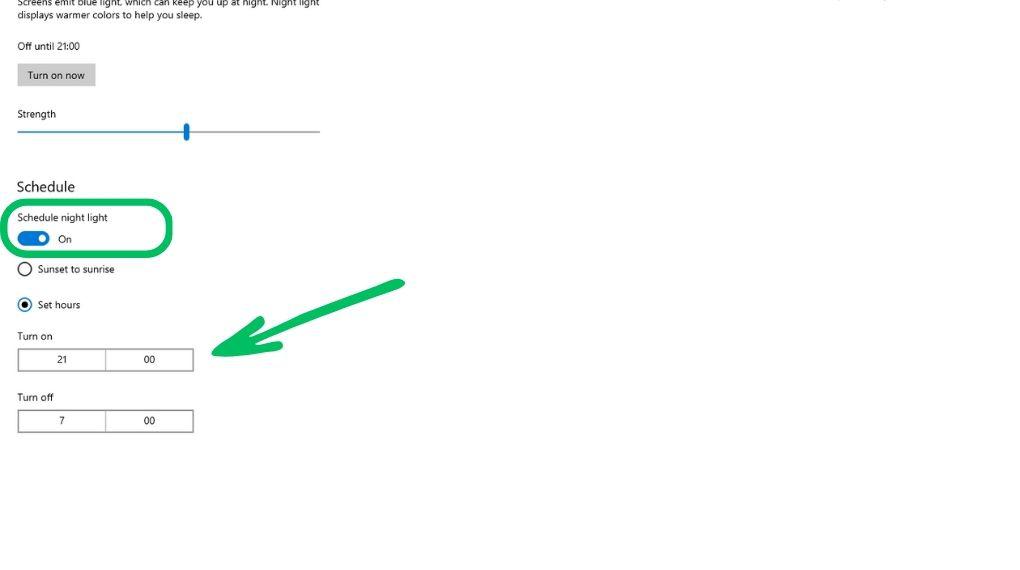
Turn on Schedule night light. Then, either select Sunset to sunrise, or select Set hours and enter custom times for the night light to turn on and off.
Color profile management
Windows color management settings enable users to add or remove color profiles, set default color profiles for the connected displays, as well as access display calibration and enable automatic color management.
Creative professionals and enthusiasts care about fully calibrated, accurate colors because it helps to make sure colors remain consistent from the beginning to the end of their projects. Auto color management in Windows provides system-level color management to ensure that colors across Windows apps appear accurately and consistently on supported displays—whether the apps are color-managed or not.
Auto color management also helps new and updated apps render more colors with greater accuracy. This provides extra detail and fewer color artifacts (for example, in gradients, shadows, and darker scenes or pictures). With auto color management, apps can use billions of colors with 10-16 bits of precision. Even on displays that only support 8-bit color, auto color management helps to improve color quality by using different techniques, such as dithering.
To turn on auto color management
-
Select the Start button, then select Settings > System > Display > Color profile.
-
Select your display near the top, then check for the following setting: Automatically manage color for apps.
-
Select Automatically manage color for apps to turn it on.
-
Go to Settings > System > Display > Color profile.
-
In the Color management settings page, select the display you want to manage color profiles for.
-
Add a new color profile by clicking Add profile and locate a color profile.
-
Go to Settings > System > Display > Color profile.
-
In the Color management settings page, select the display you want to manage color profiles for.
-
Expand the color profile that you want to remove and click Remove at the bottom.
-
Go to Settings > System > Display > Color profile.
-
In the Color management settings page, select the display you want to manage color profiles for.
-
Set one of the color profiles as the default by clicking Set profile.
-
Go to Settings > System > Display > Color profile.
-
Select Calibrate display and follow the display calibration steps. This will create a new color profile for the display where the calibration tool is located.
Use HDR
HDR content on Windows offers better brightness and color capabilities compared to traditional content (sometimes called standard dynamic range [SDR] content). Traditional content typically shows details in a bright part of a scene or a darker part of a scene, but not in both parts at the same time.
To learn more about HDR settings in Windows, see What is HDR in Windows?
Все способы:
- Ночной режим в Виндовс 10
- Шаг 1: Включение «Ночного света»
- Шаг 2: Настройка функции
- Заключение
- Вопросы и ответы: 0
Многие пользователи, проводя за монитором компьютера большое количество времени, рано или поздно начинают беспокоиться о собственном зрении и здоровье глаз в целом. Ранее для уменьшения нагрузки требовалось устанавливать специальную программу, которая урезала исходящее с экрана излучение в синем спектре. Сейчас же аналогичного, а то и более эффективного результата можно добиться стандартными средствами Windows, по крайней мере, ее десятой версии, так как именно в ней появился столь полезный режим под названием «Ночной свет», о работе которого мы и расскажем сегодня.
Ночной режим в Виндовс 10
Как и большинство возможностей, инструментов и элементов управления операционной системой, «Ночной свет» скрыт в ее «Параметрах», к которым нам с вами и потребуется обратиться для включения и последующей настройки этой функции. Итак, приступим.
Шаг 1: Включение «Ночного света»
По умолчанию ночной режим в Windows 10 деактивирован, следовательно, прежде всего необходимо его включить. Делается это следующим образом:
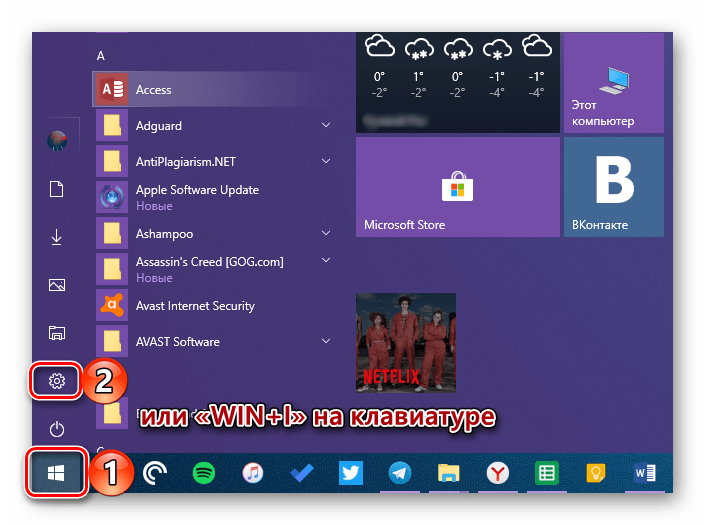
- Откройте «Параметры», нажав левой кнопкой мышки (ЛКМ) сначала по стартовому меню «Пуск», а затем по иконке интересующего нас раздела системы слева, выполненной в виде шестеренки. Как вариант, можно воспользоваться клавишами «WIN+I», нажатие которых заменяет эти два шага.
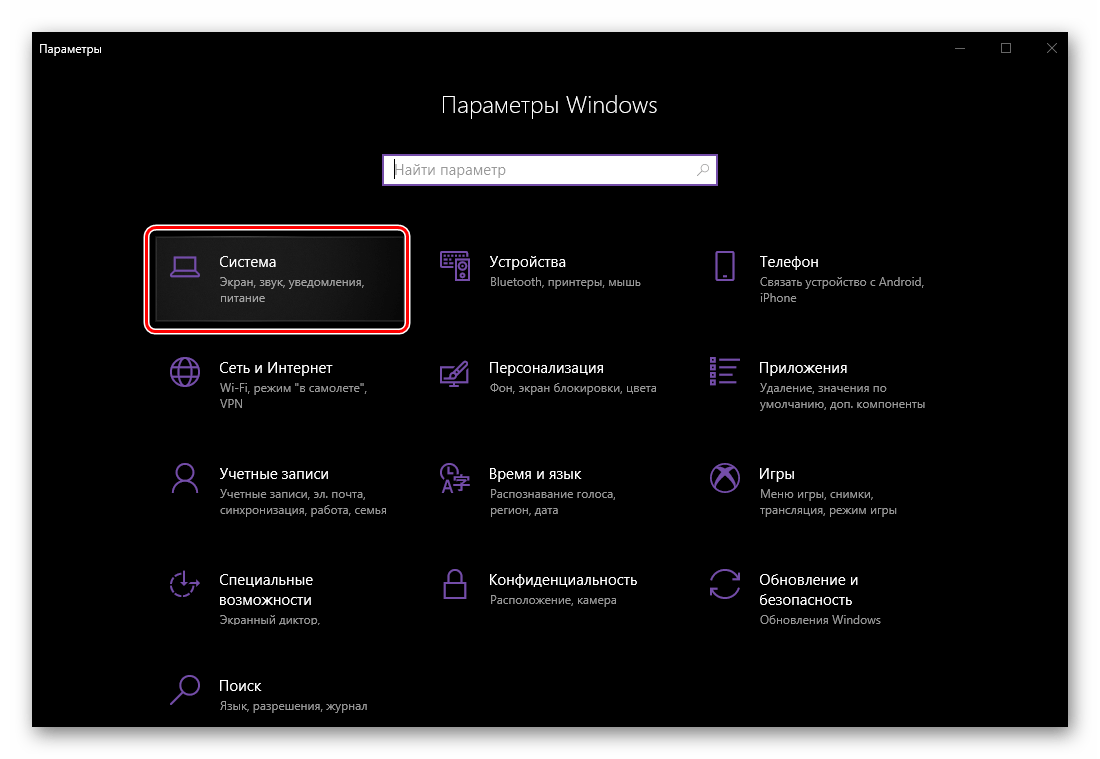
- В списке доступных параметров Виндовс перейдите к разделу «Система», нажав по нему ЛКМ.
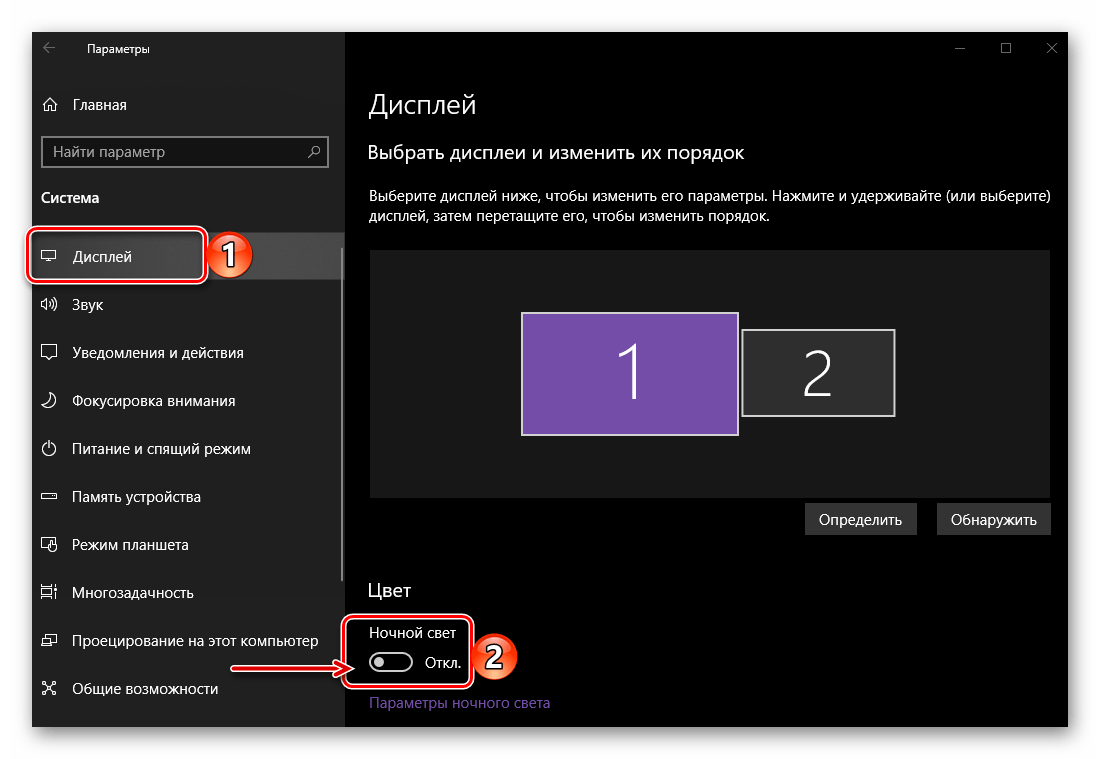
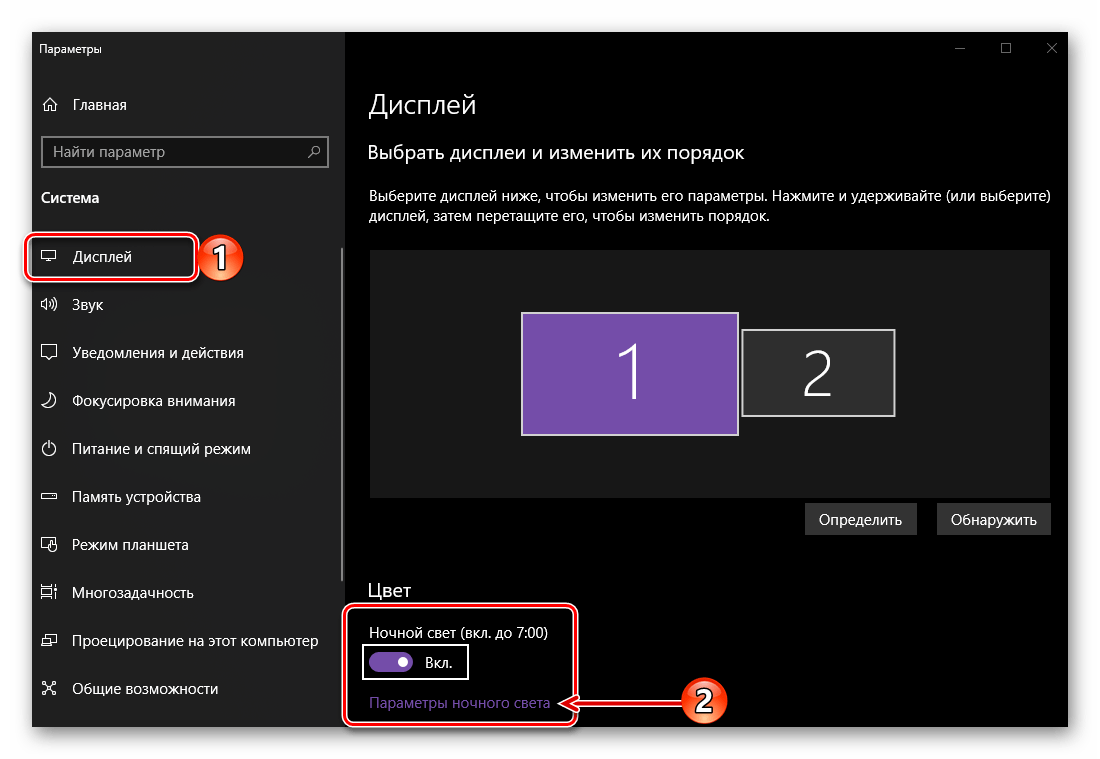
- Убедившись, что вы окажетесь во вкладке «Дисплей», переведите в активное положение переключатель «Ночной свет», расположенный в блоке опций «Цвет», под изображением дисплея.
Активировав ночной режим, вы можете не только оценить то, как он выглядит при установленных по умолчанию значениях, но и выполнить его более тонкую настройку, чем мы и займемся далее.
Шаг 2: Настройка функции
Для перехода к настройкам «Ночного света», после непосредственного включения этого режима, нажмите по ссылке «Параметры ночного света».

Всего в данном разделе доступно три параметра – «Включить сейчас», «Цветовая температура ночью» и «Запланировать». Значение первой кнопки, отмеченной на изображении ниже, понятно – она позволяет принудительно включить «Ночной свет», вне зависимости от времени суток. И это не лучшее решение, так как нужен данный режим только поздним вечером и/или ночью, когда он существенно снижает нагрузку на глаза, да и каждый раз лезть в настройки как-то не очень удобно. Поэтому, чтобы перейти к ручной настройке времени активации функции переведите в активное положение переключатель «Планирование ночного света».

Важно: Шкала «Цветовой температуры», отмеченная на скриншоте цифрой 2, позволяет определить то, насколько холодным (вправо) или теплым (влево) будет свет, излучаемый в ночное время дисплеем. Рекомендуем оставить его хотя бы на среднем значении, но еще лучше – переместить левее, не обязательно до конца. Выбор значений «по правую сторону» практически или фактически бесполезен – нагрузка на глаза будет снижаться минимально либо вообще никак (если выбран правый край шкалы).
Итак, чтобы задать свое время для включения ночного режима, сначала активируйте переключатель «Планирование ночного света», а затем выберите один из двух доступных вариантов – «От заката до рассвета» или «Установить часы». Начиная с поздней осени и заканчивая ранней весной, когда темнеет довольно рано, лучше отдать предпочтение самостоятельной настройке, то есть второму варианту.
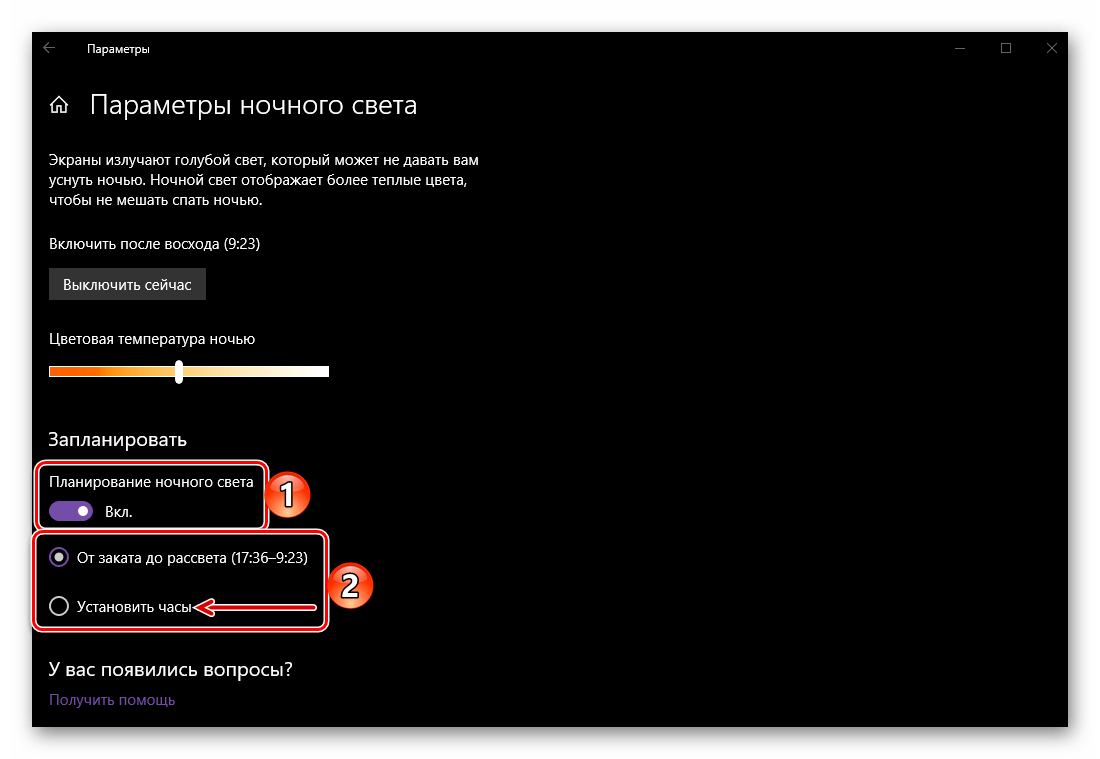
После того как вы отметите маркером чекбокс напротив пункта «Установить часы», можно будет самостоятельно задать время включения и выключения «Ночного света». Если же вами был выбран период «От заката до рассвета», очевидно, что функция будет включаться с заходом солнца в вашем регионе и отключаться на рассвете (для этого у Windows 10 должны быть права на определение вашего местоположения).
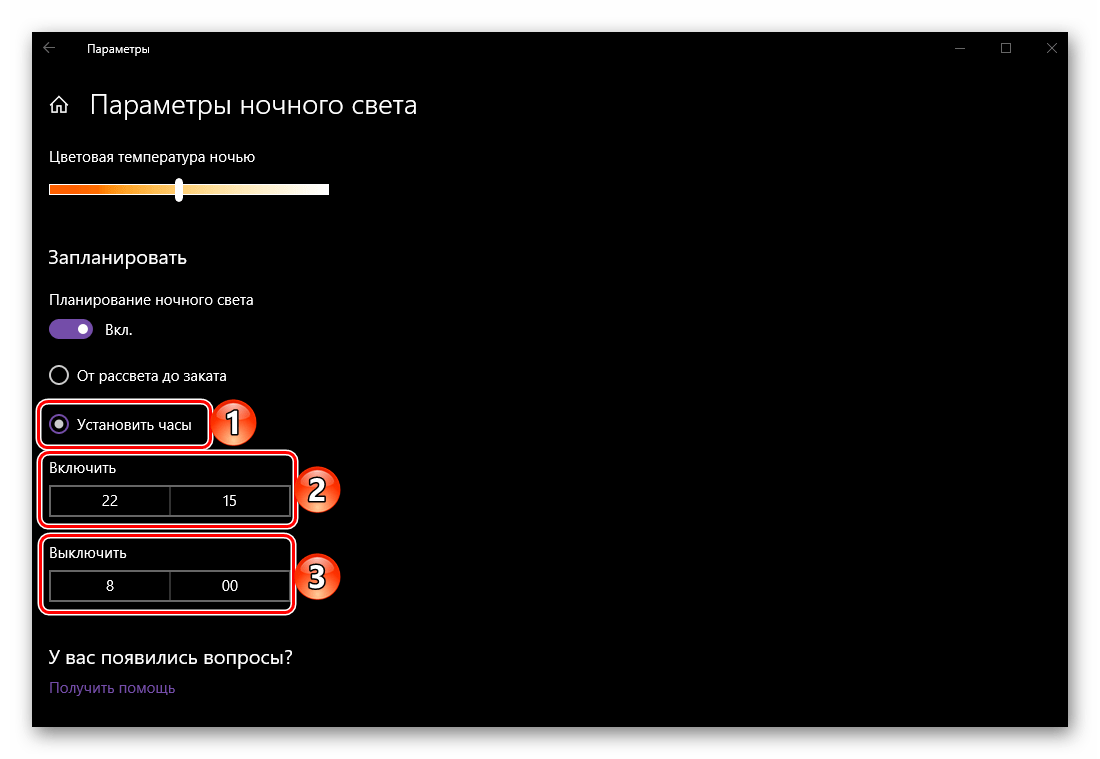
Для установки своего периода работы «Ночного света» нажмите по указанному времени и выберите сначала часы и минуты включения (прокручивая список колесиком), нажимая после этого на галочку для подтверждения, а затем повторите аналогичные действия для указания времени выключения.

На этом с непосредственной настройкой работы ночного режима можно было бы закончить, мы же расскажем еще о паре нюансов, упрощающих взаимодействие с данной функцией.
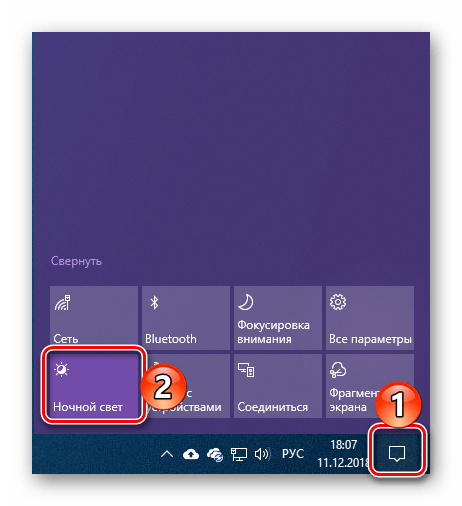
Так, для быстрого включения или отключения «Ночного света» отнюдь не обязательно обращаться к «Параметрам» операционной системы. Достаточно вызвать «Центр управлений» Виндовс, а затем нажать по плитке, ответственной за рассматриваемую нами функцию (цифра 2 на скриншоте ниже).
Если же вам все-таки потребуется снова выполнить настройку ночного режима, нажмите правой кнопкой мышки (ПКМ) по этой же плитке в «Центре уведомлений» и выберите единственный доступный в контекстном меню пункт — «Перейти к параметрам».
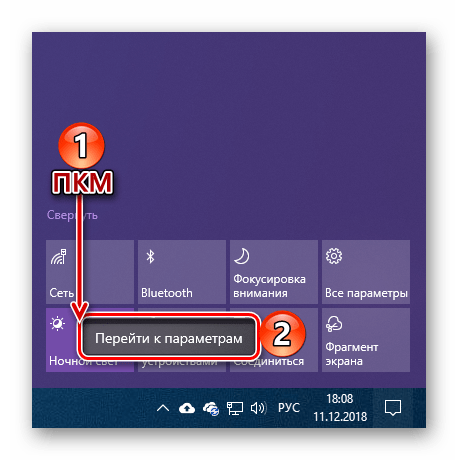
Вы снова окажетесь в «Параметрах», во вкладке «Дисплей», из которой мы и начали рассмотрение данной функции.
Читайте также: Назначение приложений по умолчанию в ОС Виндовс 10
Заключение
Вот так просто можно активировать функцию «Ночной свет» в Windows 10, а затем и настроить ее под себя. Не стоит пугаться, если поначалу цвета на экране будут казаться слишком уж теплыми (желтыми, оранжевыми, а то и близкими к красным) – к этому можно привыкнуть буквально за полчаса. Но куда более важно не привыкание, а то, что такая, казалось бы, мелочь, способна действительно облегчить нагрузку на глаза в темное время суток, тем самым минимизировав, а, возможно, и вовсе исключив ухудшение зрения при продолжительной работе за компьютером. Надеемся, этот небольшой материал был полезен для вас.
Наша группа в TelegramПолезные советы и помощь
Last Updated :
08 Aug, 2024
The Windows 10 Night Light feature is designed to reduce eye strain by adjusting the color temperature of your screen to a warmer hue. This feature can be particularly beneficial during nighttime use, as it reduces the blue light emitted by your display, which can interfere with your sleep patterns.
In this guide, we will show you how to use Windows 10 Night Light, including how to enable Night Light in Windows 10 and configure its settings for optimal use.
Table of Content
- 1. How to Enable Night Light in Windows 10?
- 2. How to Adjust the Color Temperature Strength of Night Light?
- 3. How to Set the Schedule for the Night Light?
- 4. How to update display driver?
- How to Use the Windows 10 Night Light Feature — FAQs
1. How to Enable Night Light in Windows 10?
Step 1: Open settings by pressing Windows Key + I then navigate to «System«
Step 2: Then, On the left pane click on «Display»
Step 3: On the right pane, Toggle on the «Night Lights«
2. How to Adjust the Color Temperature Strength of Night Light?
Step 1: Open settings by pressing Windows Key + I then navigate to «System«
Step 2: Then, On the left pane click on «Display»
Step 3: On the right side pane, Click on the «Night Light Settings«
Step 4: Use the Color temperature strength slider to adjust the color temperature to your preference.
3. How to Set the Schedule for the Night Light?
Step 1: Open settings by pressing Windows Key + I then navigate to «System«
Step 2: Then, On the left pane click on «Display»
Step 3: On the right side pane, Click on the «Night Light Settings«
Step 4: Toggle the Schedule Night Light switch to On.
Step 5: Choose Sunset to sunrise, or set custom hours for the Night Light to activate
Tips for Night Light in Windows
|
Set Your Night Light Schedule |
Make sure to set your Night Light to activate automatically during your preferred hours. |
|
Increase Night Light Strength |
Boost the Night Light strength if the warm color effect seems too weak. |
|
Activate Location Services |
Turn on location services on your device to enable the ‘Sunset to Sunrise’ schedule. |
Troubleshooting Night Light in Windows
|
Update or Reinstall Your Display Driver |
Affecting Night Light functionality, outdated or corrupt display drivers should be updated or reinstalled via Device Manager. |
|
Update or Reinstall Your Display Driver |
Affecting Night Light functionality, outdated or corrupt display drivers should be updated or reinstalled via Device Manager. |
|
Correct Your Date and Time Settings |
To prevent scheduling issues, configure your date and time settings to update automatically. |
|
Restart Your Computer |
Resolve temporary Night Light glitches by restarting your computer. |
|
Manually Reset Night Light Settings |
Persisting issues may require a manual reset of the Night Light settings. |
|
Keep Windows 10 Updated |
Regular updates to your Windows 10 can fix issues related to Night Light. |
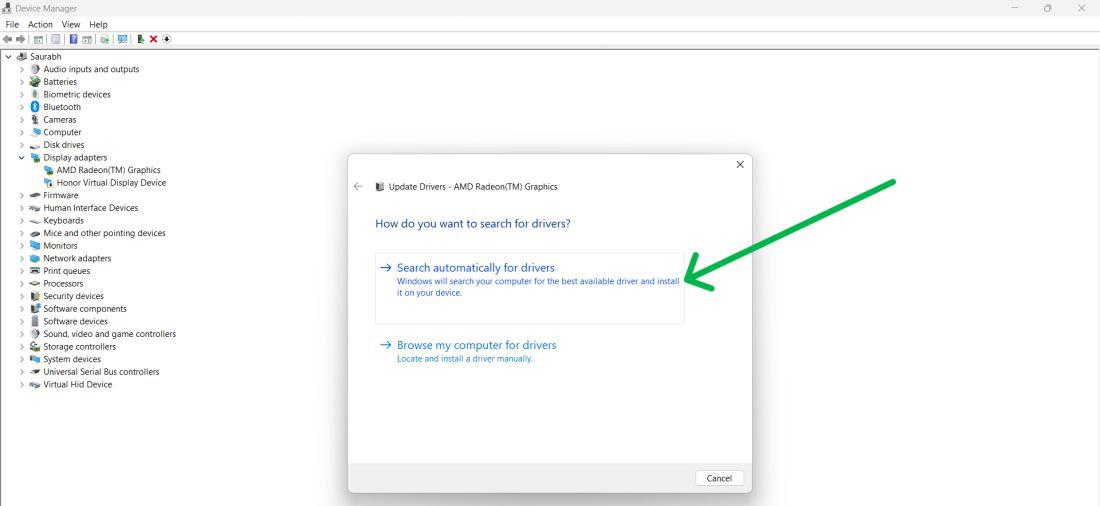
4. How to update display driver?
Step 1: Press the Windows key + X, and select Device Manager.
Step 2: Expand the device category.
Step 3: Right-click the device, and select “Update driver.”
Step 4: Choose «Search automatically for driver «
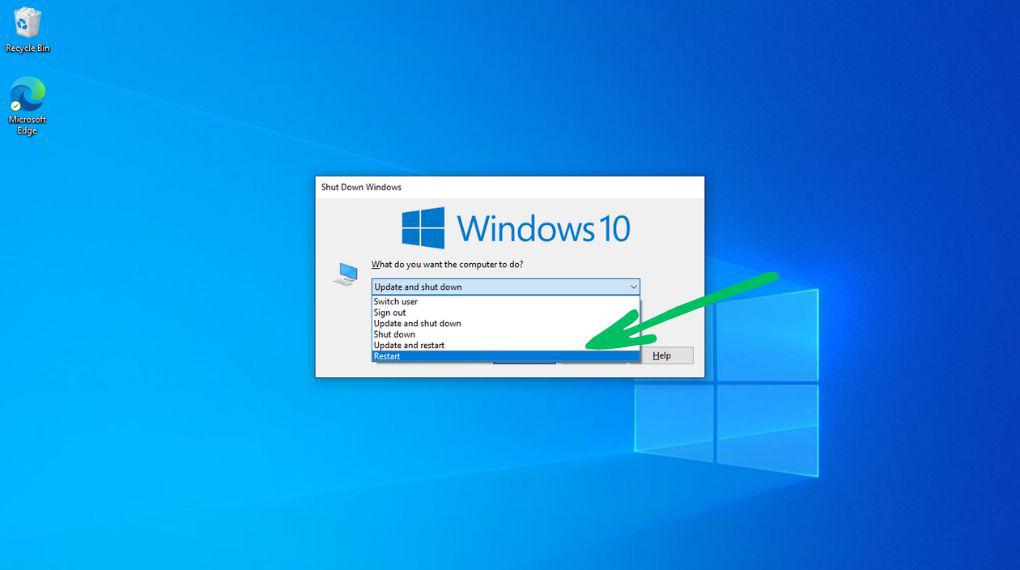
To Restart Your Computer your computer follow these steps
Step 1: Press Windows Key + D simultaneously to close all apps
Step 2: Press Alt + F4 together
Step 3: A popup window titled «Shut Down Windows» will appear, offering several options. From the dropdown menu, select «Restart.»
Conclusion
By following the steps outlined in this guide, you can easily use the Windows 10 Night Light feature to reduce eye strain and improve your sleep quality. Enabling and configuring Night Light settings in Windows 10 is straightforward and can make a significant difference in your overall comfort while using your computer at night. Take advantage of this built-in feature to create a more comfortable and healthier screen viewing experience.
Also Read
- How to Enable Dark Mode on Windows 11?
- How to Check if An App is In Dark Mode and Change it To Light Mode in Android?
- Enable In-Built Dark Mode on Windows 10
The night light is a feature more commonly seen on mobile devices as a method to reduce strain on the eyes.
The night light feature was added to Windows 10 and it’s still a quite rarely used feature, as a lot of users don’t realize it was introduced in the latest versions of Windows.
The easiest way to enable night light on Windows 10 is to just type ‘Night light‘ in your start menu search bar. Alternatively go to Settings from the start menu and click on System > Display to see the night light toggle button.
There are a few common issues with the night light functionality like the buttons being grayed out or disabled, but we also listed a few workarounds and fixes for such issues below.
Why is Night Light so Important?
A lot of people often think blue light is a myth and don’t give it a second thought. However it is very real and the human eye is not very good at blocking it.
Blue light in in itself isn’t harmful, but our screens emit a lot of it at full brightness levels which is a strain to the eye, especially in darker environments.
The night light or night mode changes the color output on your device screen, replacing bright blue colors with warmer ones that are less strenuous to the eye.
You will have an easier time going to sleep and your eyes wont start hurting after long sessions in front of your PC at night.
You can read more about the harmful effects of blue light here: https://www.allaboutvision.com/cvs/blue-light.htm
Turning On the Night Light Feature
You have most likely already tried to do this if you are reading this article, but let’s go through the basics just in case.
The fastest way to get to your night mode settings in Windows 10 is to open up your start menu and search for ‘Night light‘.
If you can’t find it, type in ‘Settings‘ and open it up. Then look for the ‘System‘ -button which includes a lot of different settings including the display settings. After clicking it, your display settings should open up automatically.
In the display settings you will see a Color header and under it a toggle button to enable or disable the night light.
From there you can also access the advanced night light options by clicking the ‘Night light settings‘ hyperlink.
You would have reached those settings directly by using the first method.
Now you should be able to see the advanced options of the night mode. You can toggle the feature on and off from the button at the top and change the brightness levels from the strength slider below the button.
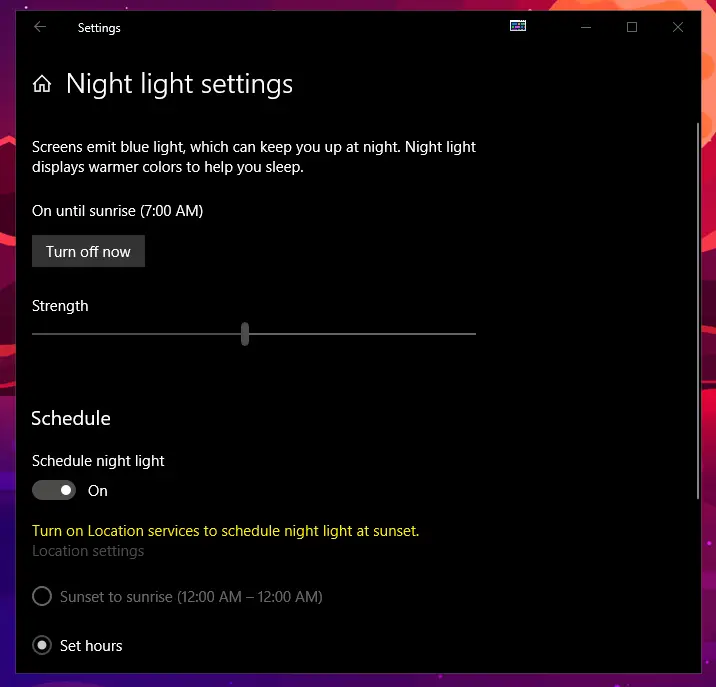
The best part about the settings window is that you can automate the night light to turn on and off at specific times of the day.
Simply toggle the schedule button and select the hours from the boxes below. This will then activate night mode every day at the same time.
Fixing Grayed Out or Disabled Night Light Options
It seems to be a very common occurrence on Windows 10 that the night mode toggle button is grayed out or disabled for seemingly no good reason.
There are a few known causes for this issue, the first one being a faulty registry entry.
Update your Graphics Drivers
The official Microsoft instructions for night light says that the most common issue with the feature not working is outdated or incompatible drivers.
This means you need to either update or re-install your display drivers as they are used to reduce the blue light and generate a warmer color scheme.
The Windows Updater should automatically download any required display drivers that you might need for the functionality, so make sure you have all the latest updates downloaded by typing ‘updates‘ in the search bar and opening up ‘Search for updates‘.
If you see nothing useful in the updates, you should go ahead and try re-installing your drivers. This process is quite simple and poses no risk to your system.
First you need to open up your Device Manager by typing it into the search bar or by opening up the ‘Run‘ prompt and typing in devmgmt.msc and pressing enter.
From the list, expand the ‘Display adapters‘ section and look for your graphics card.
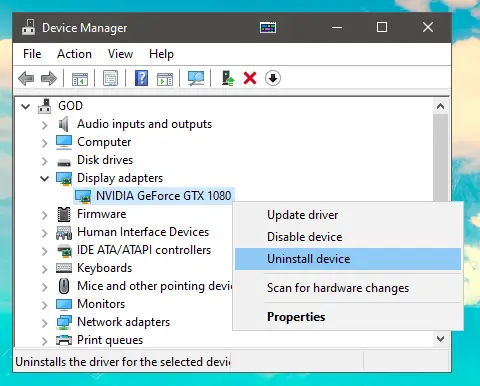
In order to check if your still have some possible updates, right-click on the card and select the top option to do an automated search for any updates.
If the search provides no updates, click on the ‘Uninstall device‘ option and go through all the prompts.
Once the process is complete, restart your system for the changes to take effect.
Once you’ve started your system up again, go back to the Windows updates as shown before and download the graphics driver updates that will show up. Windows 10 should look for the missing drivers automatically.
If nothing shows up, go back to the device manager and look for the drivers. If still nothing shows up, a simple google search with your GPU name followed by ‘drivers’ will take you to the correct installation files.
In case this hasn’t fixed the night light issues, move on to the registry fixes.
Fix the Night Light Entries from Windows Registry
Corrupted or faulty registry entries are the root cause for a lot of different Windows related issues. These are mostly caused by Microsoft rolling out new updates and not being able to properly update all registry values.
Thankfully editing the registry is quite simple and painless as long as you follow the steps.
First you need to type in ‘Registry Editor‘ into the start menu search bar and open it up. Alternatively, you can type in ‘Run’ and in the text box that opens up, type ‘regedit‘ to open up the same editor.
Next you need to navigate to the following folder in the hierarchy:
Computer\HKEY_CURRENT_USER\Software\Microsoft\Windows\CurrentVersion\CloudStore\Store\DefaultAccount\Cloud\
From that folder right click and delete the two following folders:
default$windows.data.bluelightreduction.bluelightreductionstate
default$windows.data.bluelightreduction.settings
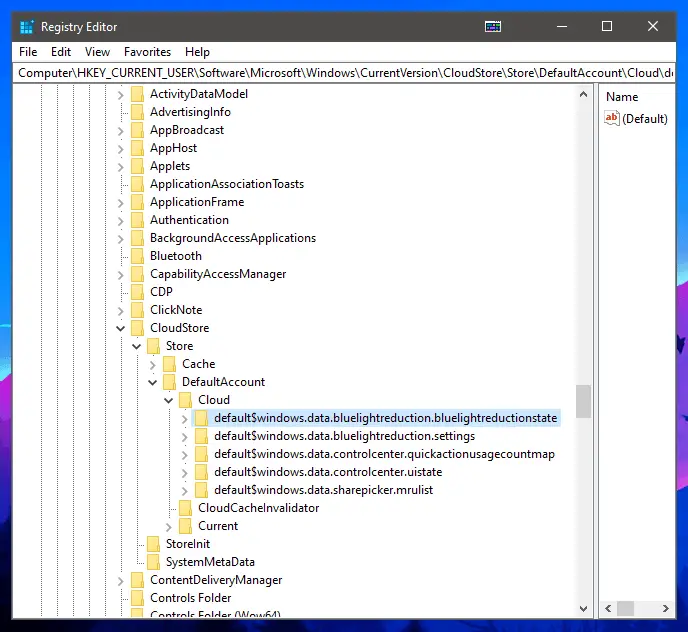
If you do not see the folders above, check if you can find them under the Cache > DefaultAccount folder in the same CloudStore directory.
Finally, you need to restart your system for the registry changes to take effect.
Best Third Party Software for a Night Light
If for some reason the troubleshooting above hasn’t fixed the issues, there are two great alternatives to the native Windows functionality. The first one, flux, provides the best lighting settings, but doesn’t allow setting specific starting times for the night light, as it uses your geographic location for the timing.
The second software is a little more lightweight and allows you to set specific values and timers, while being a little less professional with its user-interface.
F.lux
F.lux is a free solution to reducing blue light on your computer screen and it provides a more user-friendly interface and options in comparison to the Windows 10 settings.
Once you’re done installing the software, it will ask for your location to be able to estimate the proper time-zone to set the color levels automatically. You can set any country or location and the app will then determine when it should adjust your screen brightness accordingly.
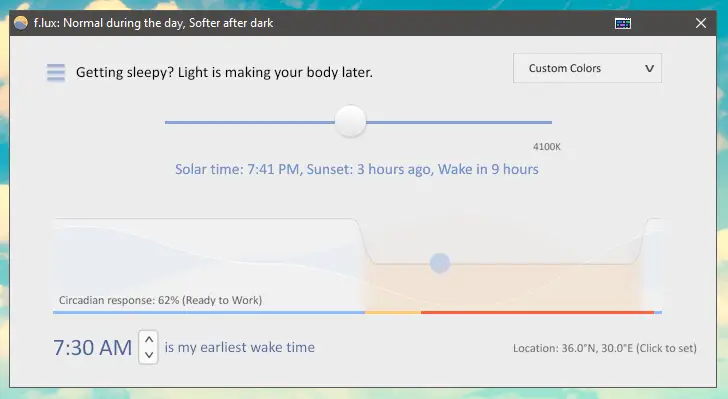
There is a clear graph in the middle showing your current settings and what would be an optimal setting to use. You can then set up your usual wake-up time, so the light wont be dim too early.
There are plenty of options for smart lighting, custom pre-made color schemes from candle light to daylight.
The software even has possible optimizations depending on what type of monitor you are using.
We highly recommend giving f.lux a chance even if you are using the Windows 10 night light, as you might like it more.
LightBulb
LightBulb is an independently developed small application that provides great customization for your Night Light functionality.
The clean user-interface allows you to preview what your current settings will look like, after which you can set all the color temperatures and timings to whatever values you wish in the settings.
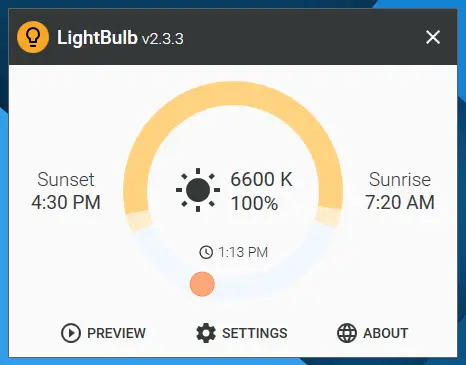
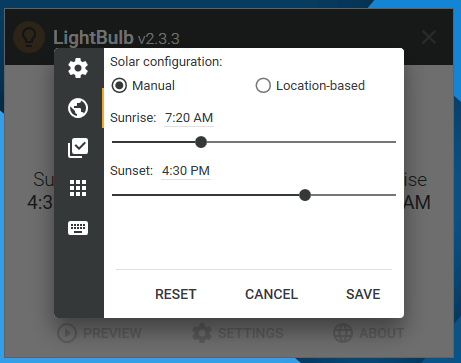
You can also set the timers to adjust automatically according to your location, but they’re not quite as accurate as f.lux.
LightBulb also allows the setting of custom shortcut keys to adjust the colors and turning the night light on or off.
This is definitely the best alternative if you don’t quite like the limited settings in f.lux.
In order to download LightBulb, go to its official GitHub page from the link below and download the latest LightBulb-Installer.exe file.
Знаете ли вы что с выходом обновления Windows 10 Creators Update появилась возможность автоматически снижать интенсивность синего спектра излучения от вашего ПК в ночное время суток с помощью функции Ночной свет (Night light)?
Если вы работаете с девайсом допоздна, оптимальное свечение помогает вашему мозгу подготовиться к качественному ночному сну. Пользователи смартфонов уже по достоинству оценили эту функцию и вот теперь, с выходом обновления Creators Update, она появилась и в ОС Windows 10.
Вот как включить Ночной свет (Night light):
Нажимаем сочетание кнопок Windows key + I или заходим в Параметры – Система — Экран, после чего включаем Ночной свет (Night light). Вы также можете настроить цветовую температуру и расписание в разделе Параметры ночного света.