
This file contains hidden or bidirectional Unicode text that may be interpreted or compiled differently than what appears below. To review, open the file in an editor that reveals hidden Unicode characters.
Learn more about bidirectional Unicode characters
| Step 1: Download the files from the official Nginx site | |
| — Download the latest Nginx ZIP package from http://nginx.org/en/download.html | |
| Step 2: Unpack the distribution to your chosen directory (for example, C:\nginx) | |
| Step 3: Test it | |
| — go to C:\nginx directory, and run | |
| start nginx | |
| — If you open http://localhost/ in your browser, you should see the welcome screen. | |
| * Some other useful commands: | |
| .\nginx.exe -s stop (fast shutdown) | |
| .\nginx.exe -s quit (graceful shutdown) | |
| .\nginx.exe -s reload (reload conf files) | |
| Step 4: Configure Nginx to run with PHP-fpm | |
| — Open the Nginx conf file, at C:\nginx\nginx-1.13.0\conf\nginx.conf | |
| — Uncomment the following lines: | |
| #location ~ \.php$ { | |
| # root html; | |
| # fastcgi_pass 127.0.0.1:9000; | |
| # fastcgi_index index.php; | |
| # fastcgi_param SCRIPT_FILENAME $document_root$fastcgi_script_name; | |
| # include fastcgi_params; | |
| #} | |
| — Remove the fastcgi_param line, as it’s unnecessary. | |
| — Edit include to poing to the Windows .conf file: | |
| include fastcgi.conf; | |
| Step 5: Run php-fpm via PowerShell and test | |
| php-cgi -b 127.0.0.1:9000 | |
| — Open an info.php file using a browser and ta-da! | |
Из данного HOWTO Вы узнаете как установить и настроить связку nginx + php (в режиме FastCGI) + СУБД MySQL для работы под операционной Microsoft Windows.
Мы подробно рассмотрим вопросы установки, базовой и расширенной настройки, а также безопасности.
В статье приводятся примеры скриптов запуска и остановки, а также примеры файлов конфигурации nginx и php.
Подробности смотрите под катом.
Шаг 1. Подготовка к установке
Для начала рекомендуем в корне системного диска создать каталог nginx (например, c:\nginx\), а в нём подкаталоги public_html, php и mysql. Лучше всего связка работает, когда все основные компоненты находятся в одном каталоге. В каталог php мы будем устанавливать интерпретатор PHP5, в mysql соответственно данную СУБД, а в public_html — файлы главного сайта.
Разместив все компоненты таким образом, Вы сделаете пакет перемещаемым (Portable) и готовым к работе с любого компьютера.
Шаг 2. Загрузка необходимых компонентов
Нам потребуются следующие компоненты:
- PHP — http://windows.php.net/download/. Вам необходимо скачать версию с инсталлятором (*.msi) в варианте Thread Safe;
- MySQL — http://dev.mysql.com/downloads/mysql/. Также скачайте версию с msi-инсталлятором;
- nginx — http://nginx.org/ru/download.html. Скачайте последнюю версию;
- RunHiddenConsole — http://redmine.lighttpd.net/attachments/660/RunHiddenConsole.zip.
Шаг 3. Установка компонентов
По окончании скачивания приступайте к установке компонентов согласно данному алгоритму:
- распакуйте архив с nginx в созданный на шаге 1 каталог в корне (например, c:\nginx\). Далее в данном HOWTO будет использоваться именно этот каталог, поэтому если Вы изменили путь, сделайте соответствующие правки;
- установите PHP в каталог c:\nginx\php\:
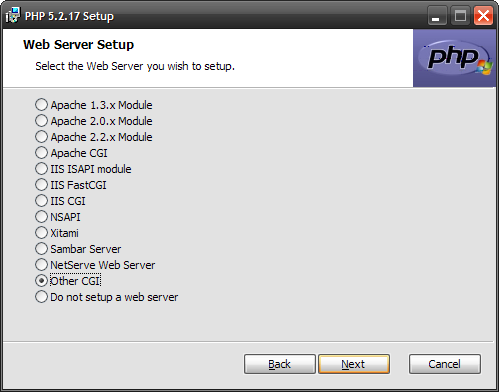
- на этапе выбора типа установки (Web Server Setup) обязательно выберите вариант «Other CGI«, иначе модули, необходимые для работы PHP в режиме FastCGI не будут установлены;

PHP — Web Server Setup - на этапе выбора необходимых модулей (Choose Items to Install) обязательно выберите MySQL, MySQLi и OpenSSL (если хотите далее настроить SSL). Также рекомендуется выбрать модули, необходимые для большинства CMS: bzip2, Curl, Exif, GD2, Gettext, XML. Если Вы забыли что-то нужное и оно Вам потребуется, Вы всегда сможете доустановить/удалить эти компоненты, снова запустив программу установки PHP и выбрав пункт Change.
PHP — выбор компонентов
- на этапе выбора типа установки (Web Server Setup) обязательно выберите вариант «Other CGI«, иначе модули, необходимые для работы PHP в режиме FastCGI не будут установлены;
- установите СУБД MySQL в каталог c:\nginx\mysql\. Здесь нет ничего сложного. В мастере конфигурации выберите стандартную конфигурацию и обязательно задайте пароль администратора (пароль встроенной учётной записи суперпользователя root);
- распакуйте архив RunHiddenConsole.zip в каталог c:\nginx\.

Шаг 4. Создание скриптов запуска и остановки
Для быстрого запуска набора Вам потребуется создать в каталоге c:\nginx\ 3 файла: start.cmd, shutdown.cmd и restart.cmd, предназначенные соответственно для запуска, остановки и перезапуска серверов.
Листинг файла start.cmd (запуск сервера):
@echo off
echo Starting servers...
set PHP_FCGI_MAX_REQUESTS=0
set SRVPATH=C:\nginx
net start MySQL
start /D%SRVPATH% nginx.exe
%SRVPATH%\RunHiddenConsole.exe %SRVPATH%\php\php-cgi.exe -b 127.0.0.1:9000 -c %SRVPATH%/php/php.ini
Листинг файла shutdown.cmd (остановка сервера):
@echo off
echo Shutting down servers...
taskkill /IM nginx.exe /F
taskkill /IM php-cgi.exe /F
net stop MySQL
Листинг файла restart.cmd (перезапуск сервера):
@echo off
echo Shutting down servers...
taskkill /IM nginx.exe /F
taskkill /IM php-cgi.exe /F
net stop MySQL
echo Starting servers...
set PHP_FCGI_MAX_REQUESTS=0
set SRVPATH=C:\nginx
net start MySQL
start /D%SRVPATH% nginx.exe
%SRVPATH%\RunHiddenConsole.exe %SRVPATH%\php\php-cgi.exe -b 127.0.0.1:9000 -c %SRVPATH%/php/php.ini
Если Вы изменили путь со стандартного C:\nginx\, на что-то другое, внесите соответствующие правки в скрипты.
Если требуется запускать сервер nginx+php+mysql при загрузке системы, то добавьте задание на автозапуск скрипта start.cmd с помощью оснастки Назначенные задания Windows.
Откройте файл c:\nginx\conf\nginx.conf в любом текстовом редакторе (я рекомендую Notepad++).
1. Измените строку:
worker_processes 1;
Здесь вместо 1 укажите количество рабочих процессов nginx. Рекомендуется указывать число, равное количеству ядер процессора.
2. Уберите символ комментария (решётку) у строки:
error_log logs/error.log;
Это позволит включить запись логов ошибок в файл error.log, который Вы всегда найдёте в каталоге c:\nginx\logs\.
3. Измените значение директивы server{} для nginx без использования SSL:
server {
 listen 80 default;
 server_name localhost;

 server_tokens off;

 #charset koi8-r;

 #access_log logs/access.log  main;

 location / {
 root c:/nginx/public_html;
 index index.html index.htm index.php;
 }

 location ~ \.php$ {
 fastcgi_pass 127.0.0.1:9000;
 fastcgi_index index.php;
 fastcgi_param SCRIPT_FILENAME $document_root$fastcgi_script_name;
 include fastcgi_params;
 }

 location ~ /\.ht {
 deny all;
 }

 #error_page 404 /404.html;

 error_page 500 502 503 504 /50x.html;
 location = /50x.html {
 root html;
 }
}
Если Вы хотите использовать SSL, Вам потребуется совсем иной конфиг:
server {
 listen 443 default;
 server_name localhost;

 server_tokens off;

 ssl on;
 ssl_certificate C:/nginx/private/ssl_cert_domain.pem;
 ssl_certificate_key C:/nginx/private/ssl_cert_domain.key;

 ssl_session_timeout 5m;

 ssl_protocols SSLv2 SSLv3 TLSv1;
 ssl_ciphers ALL:!ADH:!EXPORT56:RC4+RSA:+HIGH:+MEDIUM:+LOW:+SSLv2:+EXP;
 ssl_prefer_server_ciphers on;

 #charset koi8-r;

 #access_log logs/access.log  main;

 location / {
 root c:/nginx/public_html;
 index index.html index.htm index.php;
 }

 location ~ \.php$ {
 fastcgi_pass 127.0.0.1:9000;
 fastcgi_index index.php;
 fastcgi_param SCRIPT_FILENAME $document_root$fastcgi_script_name;
 include fastcgi_params;
 fastcgi_param HTTPS on;
 }

 #error_page 404 /404.html;

 error_page 500 502 503 504 /50x.html;
 location = /50x.html {
 root html;
 }

 location ~ /\.ht {
 deny all;
 }
}
Здесь C:/nginx/private/ssl_cert_domain.pem — файл сертификата SSL, а C:/nginx/private/ssl_cert_domain.key — закрытый ключ для него. Внимание! При старте сервера у Вас запросят пароль для расшифровки закрытого ключа, поэтому чтобы не вводить его постоянно, во время создания (получения) сертификата оставьте поле ввода пароля пустым (это конечно небезопасно, но экономит время во время запуска сервера). В новых версиях возможно появится функция указания пароля в конфиге (как у Apache).
Вы можете включить ведение логов доступа (access.log), убрав символ комментария у строки #access_log logs/access.log main;.
Вы также можете переопределить страницы ошибок 404, 500, 502, 503, 504 и 403 путём указания в директиве error_page кода ошибки и имени файла, который будет отображаться при её возникновении.
Шаг 6. Настройка php и безопасность
Откройте текстовый файл C:\nginx\php\php.ini в любом текстовом редакторе. Из соображений безопасности рекомендуем изменить строку
safe_mode = Off
на
safe_mode = On
Также найдите в файле строку
disable_functions =
и замените её на следующую:
disable_functions = exec,passthru,shell_exec,system,proc_open,popen,curl_exec,curl_multi_exec,parse_ini_file,show_source
Эти действия включат безопасный режим для PHP (Safe Mode), при котором запрещены большинство небезопасных функций и исполнение файлов, а также отключит ряд потенциально уязвимых функций. Внимание! Если Ваша CMS не работает при включённом режиме PHP Safe Mode, отключите его, либо поставьте правильную CMS ;-).
Если Вы являетесь разработчиком и хотите видеть ошибки и сообщения PHP, то найдите строку
display_errors = Off
и замените её на
display_errors = On
Для исправления опасной уязвимости в PHP, позволяющей выполнять PHP-код из загружаемых файлов, найдите в php.ini строку
;cgi.fix_pathinfo=1
уберите символ комментария (;) около неё и замените на следующую:
cgi.fix_pathinfo = 0
Дальнейшие настройки файла изменять не требуется — всё уже настроено оптимально для большинства применений программой установки PHP.
Шаг 7. Обработка нескольких PHP-файлов одновременно
К сожалению, PHP в Windows не умеет создавать копии своих экземпляров, поэтому придётся заранее запускать несколько копий и описать их использование в конфиге nginx.
В файле start.cmd пропишите запуск php-cgi.exe на разные номера портов:
%SRVPATH%\RunHiddenConsole.exe %SRVPATH%\php\php-cgi.exe -b 127.0.0.1:9000 -c %SRVPATH%/php/php.ini
%SRVPATH%\RunHiddenConsole.exe %SRVPATH%\php\php-cgi.exe -b 127.0.0.1:9001 -c %SRVPATH%/php/php.ini
%SRVPATH%\RunHiddenConsole.exe %SRVPATH%\php\php-cgi.exe -b 127.0.0.1:9002 -c %SRVPATH%/php/php.ini
%SRVPATH%\RunHiddenConsole.exe %SRVPATH%\php\php-cgi.exe -b 127.0.0.1:9003 -c %SRVPATH%/php/php.ini
%SRVPATH%\RunHiddenConsole.exe %SRVPATH%\php\php-cgi.exe -b 127.0.0.1:9004 -c %SRVPATH%/php/php.ini
Запустите столько процессов, сколько вам потребуется (обычно достаточно 5-20). В нашем примере используется 5 экземпляров с номерами портов 9000 — 9004.
Откройте файл nginx.conf в текстовом редакторе и перед директивой server {} пропишите следующие строки:
upstream backend {
server 127.0.0.1:9000;
server 127.0.0.1:9001;
server 127.0.0.1:9002;
server 127.0.0.1:9003;
server 127.0.0.1:9004;
}
Теперь откройте файл fastcgi_params и в самом начале пропишите следующее:
fastcgi_connect_timeout 1;
fastcgi_next_upstream timeout;
fastcgi_pass backend;
Обязательно уберите fastcgi_pass 127.0.0.1:9000; во всех директивах location.
Пример готового конфига nginx.conf:
worker_processes 4;

error_log logs/error.log;

events {
worker_connections 1024;
}

http {
include mime.types;
default_type application/octet-stream;
sendfile on;
keepalive_timeout 65;
gzip on;
upstream backend {
server 127.0.0.1:9000;
server 127.0.0.1:9001;
server 127.0.0.1:9002;
server 127.0.0.1:9003;
server 127.0.0.1:9004;
}
server {
listen 80 default;
server_name localhost;
server_tokens off;
location / {
root C:/nginx/public_html;
index index.html index.htm index.php;
location ~ \.php$ {
include fastcgi_params;
}
}
error_page 500 502 503 504 /50x.html;
location = /50x.html {
root html;
}
location ~ /\.ht {
deny all;
}
}
}
Пример конфига, использующего SSL:
worker_processes 4;

error_log logs/error.log;

events {
worker_connections 1024;
}

http {
include mime.types;
default_type application/octet-stream;
sendfile on;
keepalive_timeout 65;
gzip on;
upstream backend {
server 127.0.0.1:9000;
server 127.0.0.1:9001;
server 127.0.0.1:9002;
server 127.0.0.1:9003;
server 127.0.0.1:9004;
}
server {
listen 443 default;
server_name localhost;
server_tokens off;
ssl on;
ssl_certificate C:/nginx/private/ssl_cert_domain.pem;
ssl_certificate_key C:/nginx/private/ssl_cert_domain.key;
ssl_session_timeout 5m;
ssl_protocols SSLv2 SSLv3 TLSv1;
ssl_ciphers ALL:!ADH:!EXPORT56:RC4+RSA:+HIGH:+MEDIUM:+LOW:+SSLv2:+EXP;
ssl_prefer_server_ciphers on;
location / {
root C:/nginx/public_html;
index index.html index.htm index.php;
location ~ \.php$ {
include fastcgi_params;
fastcgi_param HTTPS on;
}
}
error_page 500 502 503 504 /50x.html;
location = /50x.html {
root html;
}
location ~ /\.ht {
deny all;
}
}
}
Пример файла fastcgi_params:
fastcgi_connect_timeout 1;
fastcgi_next_upstream timeout;
fastcgi_pass backend;

fastcgi_param  QUERY_STRING       $query_string;
fastcgi_param  REQUEST_METHOD     $request_method;
fastcgi_param  CONTENT_TYPE       $content_type;
fastcgi_param  CONTENT_LENGTH     $content_length;

fastcgi_param  SCRIPT_NAME        $fastcgi_script_name;
fastcgi_param  REQUEST_URI        $request_uri;
fastcgi_param  DOCUMENT_URI       $document_uri;
fastcgi_param  DOCUMENT_ROOT      $document_root;
fastcgi_param  SCRIPT_FILENAME    $document_root$fastcgi_script_name;
fastcgi_param  SERVER_PROTOCOL    $server_protocol;
fastcgi_param  HTTPS              $https if_not_empty;

fastcgi_param  GATEWAY_INTERFACE  CGI/1.1;
fastcgi_param  SERVER_SOFTWARE    nginx/$nginx_version;

fastcgi_param  REMOTE_ADDR        $remote_addr;
fastcgi_param  REMOTE_PORT        $remote_port;
fastcgi_param  SERVER_ADDR        $server_addr;
fastcgi_param  SERVER_PORT        $server_port;
fastcgi_param  SERVER_NAME        $server_name;

# PHP only, required if PHP was built with --enable-force-cgi-redirect
fastcgi_param  REDIRECT_STATUS    200;
fastcgi_index  index.php;
Шаг 8. Тестирование и заключение
Запустите серверы и создайте в каталоге C:\nginx\public_html\ файл test.php со следующим содержанием:
<?php
phpinfo();
?>
Откройте этот файл в браузере по адресу http://localhost/test.php и если Вы увидели информацию об установленном сервере, значит всё работает корректно и Вы можете приступать к использованию сервера.
Шаг 9. Готовые примеры файлов конфигурации
По многочисленным просьбам мы решили выложить примеры всех файлов конфигурации nginx в Git-репозитории. В данный момент доступно три разных готовых конфига:
- nginx_simple.conf — простейший конфиг для запуска одного сайта без поддержки SSL;
- nginx_ssl.conf — конфиг для запуска одного сайта с поддержкой SSL;
- nginx_vhosts.conf — специально настроенный конфиг с относительными путями, поддержкой SSL, виртуальных хостов (позволяет держать несколько сайтов на одном сервере) и отдельных логов.
Там же вы найдете готовые скрипты запуска и остановки сервера, а также файл конфигурации PHP.
You probably heard from the new kid around the block called «Docker»?
You are a PHP developer and would like to get into that, but you didn’t have the time to look into it, yet?
Then this tutorial is for you! By the end of it, you should know:
— how to set up Docker «natively» on a Windows 10 machine
— how to build and run containers from the command line
— how to log into containers and explore them for information
— what a Dockerfile is and how to use it
— how containers can talk to each other
— how docker-compose can be used to fit everything nicely together
Note: I will not only walk on the happy path during this tutorial. That means I’ll deep-dive into
some things that are not completely related to docker (e.g. how to find out where the configuration
files for php-fpm are located), but that are imho important to understand, because they enable you to
solve problems later on your own.
But if you are short on time, you might also jump directly to the tl;dr.
All code samples are publicly available in my
Docker PHP Tutorial repository on Github.
The branch for this tutorial is
part_1_setting-up-php-php-fpm-and-nginx-for-local-development-on-docker.
All published parts of the Docker PHP Tutorial are collected under a dedicated page at
Docker PHP Tutorial. The following part is
Setting up PhpStorm with Xdebug for local development on Docker .
If you want to follow along, please subscribe to the RSS feed
or via email
to get automatic notifications when the next part comes out 
Table of contents
- Introduction
- Preconditions
- Why use Docker?
- Transition from Vagrant
- Setup Docker
- Setting up the PHP cli container
- Installing Xdebug in the PHP container
- Persisting image changes with a Dockerfile
- Setting up a web stack with php-fpm and nginx
- Setting up nginx
- Setting up php-fpm
- Installing xdebug
- Connecting nginx and php-fpm
- Putting it all together: Meet docker-compose
- The tl;dr
Introduction
Preconditions
I’m assuming that you have installed Git bash for Windows. If not, please do that before,
see Setting up the software: Git and Git Bash.
Why use Docker?
I won’t go into too much detail what Docker is and why you should use it, because
others
have
already
talked about this extensively.
As for me, my main reasons were
— Symlinks in vagrant didn’t work the way they should
— VMs become bloated and hard to manage over time
— Setup in the team involved a lot of work
— I wanted to learn Docker for quite some time because you hear a lot about it
In general, Docker is kind of like a virtual machine, so it allows us to develop in an OS of our choice (e.g. Windows)
but run the code in the same environment as it will in production (e.g. on a linux server). Thanks to its core principles,
it makes the separation of services really easy (e.g. having a dedicated server for your database) which — again —
is something that should happen on production anyway.
Transition from Vagrant
On Windows, you can either use the Docker Toolbox
(which is essentially a VM with Docker setup on it) or the Hyper-V based Docker for Windows.
This tutorial will only look at the latter.
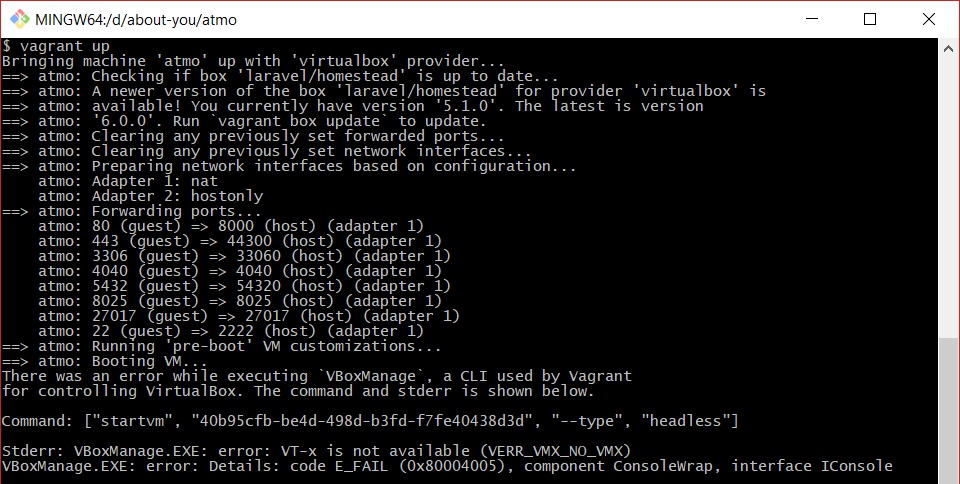
A word of caution: Unfortunately, we cannot have other Gods besides Docker (on Windows).
The native Docker client requires Hyper-V to be activated which in turn will cause Virtualbox to not work any longer.
Thus, we will not be able to use Vagrant and Docker alongside each other.
This was actually the main reason it took me so long to start working with Docker.
Setup Docker
First, download Docker for Windows
(requires Microsoft Windows 10 Professional or Enterprise 64-bit). The version I am using in this tutorial is 18.03.1-ce-win65.
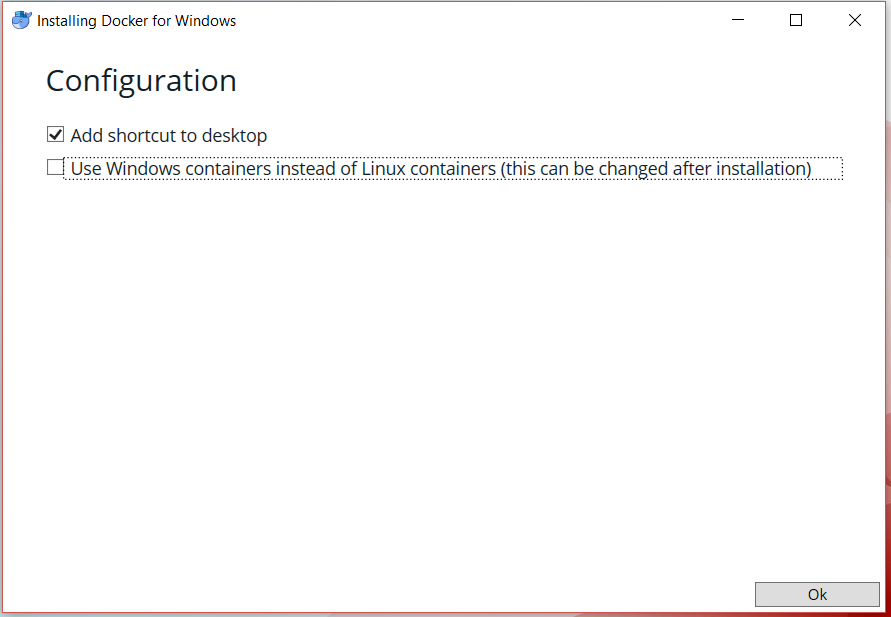
During the installation,
leave the option «Use Windows Containers instead of Linux containers» unticked as we intend to develop on linux containers
(you can change it later anyway).
After the installation finishes, we need to log out of Windows and in again.
Docker should start automatically. If not, there should be a «Docker for Windows» icon placed on your desktop.
If Hyper-V is not activated yet, Docker will automatically urge you to do so now.
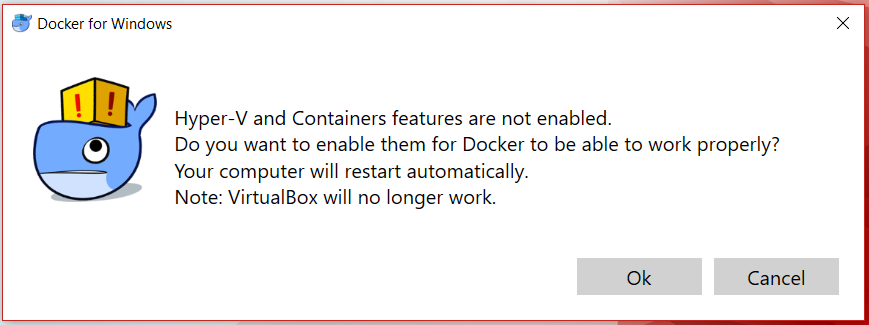
If you agree, Hyper-V and container features are activated and a reboot is initiated.
See Install Hyper-V on Windows 10
to deactivate it again.
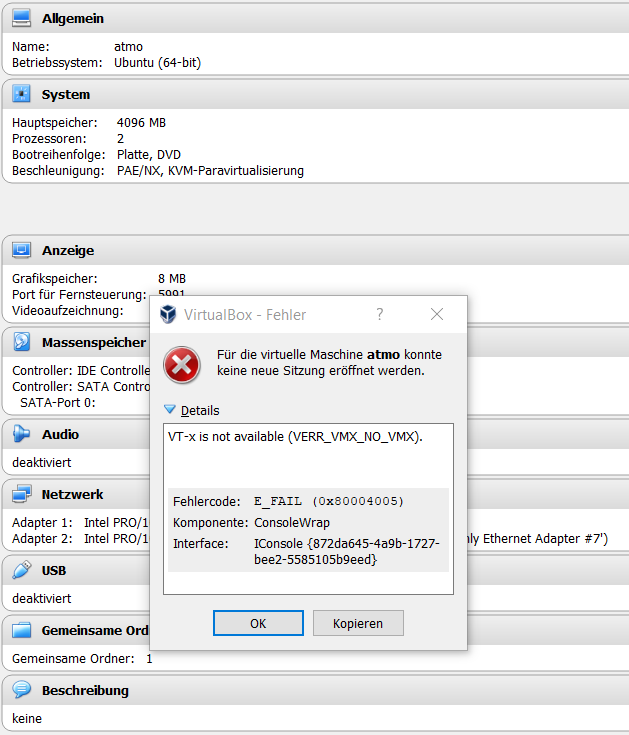
Caution: VirtualBox will stop working afterwards! Starting one of my previous machines from the VirtualBox interface
or via vagrant up fails with the error message
VT-x is not available (VERR_VMX_NO_VMX)
After rebooting, Docker will start automatically and a welcome screen appears.
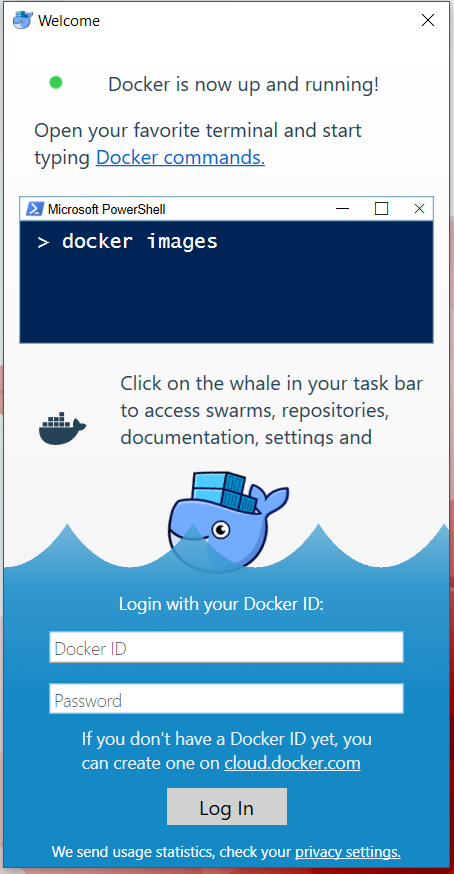
We can ignore that (close the window).
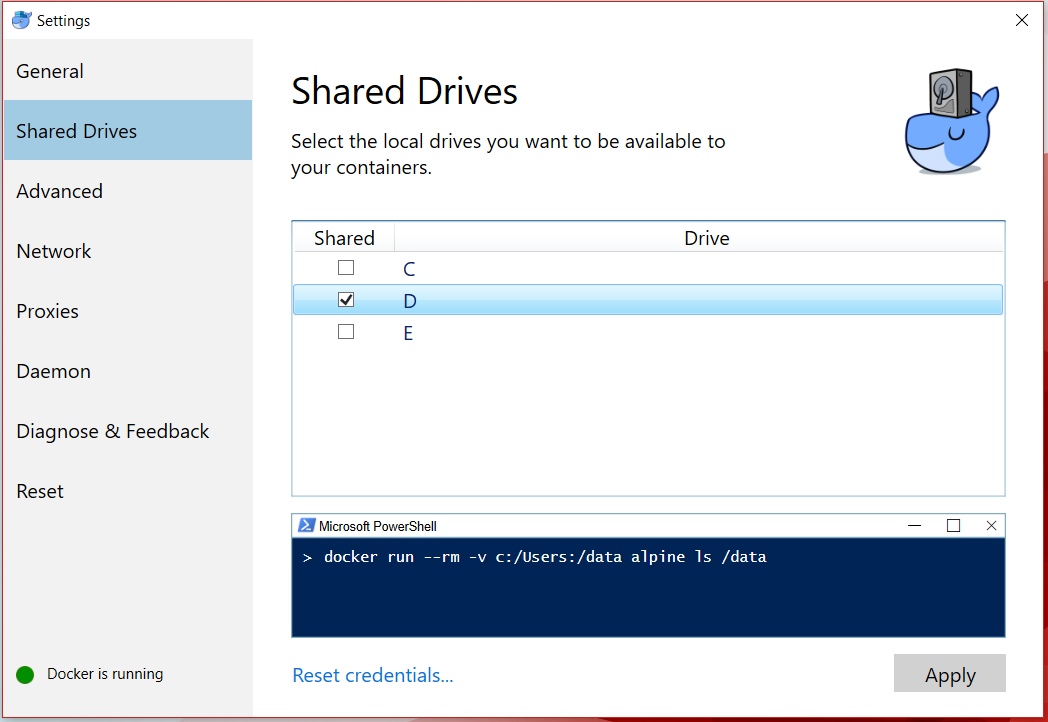
In addition, a new icon is added to your system tray. A right-click reveals the context menu.
Open the tab «Shared Devices» and tick the hard drives on your host machine that you want to share with Docker containers.
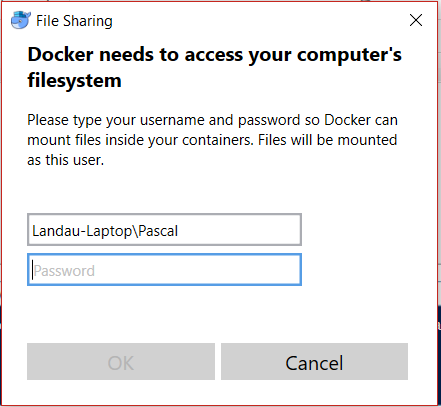
Note: We will still need to define explicit path mappings for the actual containers later on, but the hard drive that the path belongs
to must be made available here. After clicking «Apply», you will be prompted for your credentials
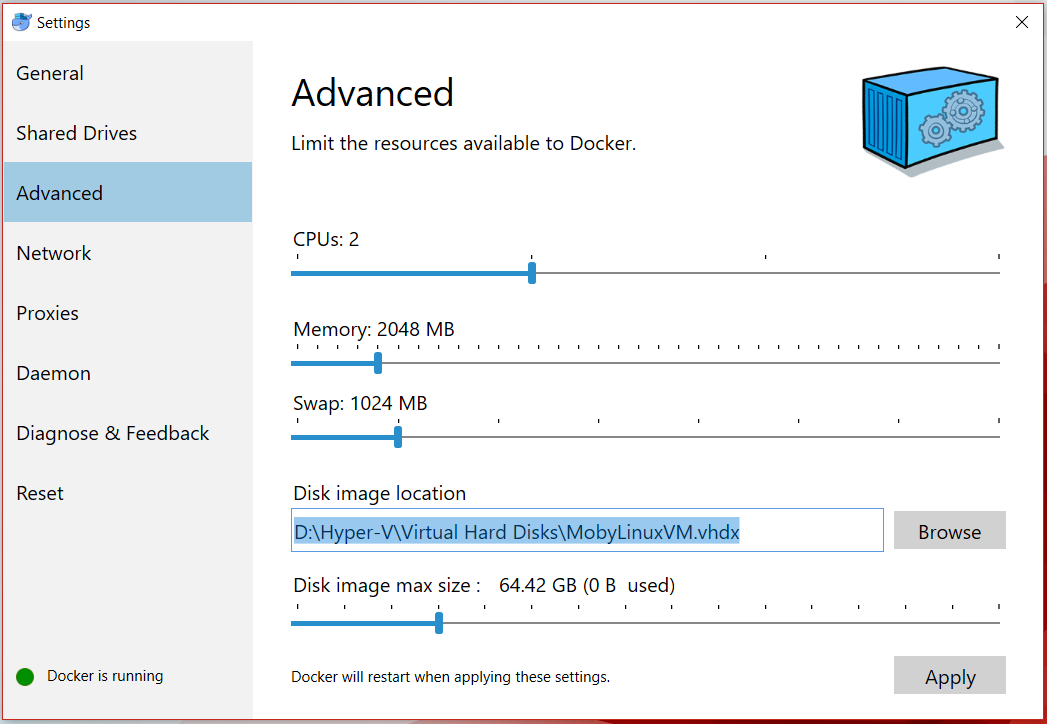
Next, open tab «Advanced». You don’t actually have to change any of the settings but if you (like me)
don’t have C:/ set up as you biggest partition, you might want to change the «Disk image location».
I’m putting mine at C:\Hyper-V\Virtual Hard Disks\MobyLinuxVM.vhdx. It might take some minutes for Docker to process the changes.
Docker «physically» stores the container images in that location.
Congratulations, Docker is now set up on your machine 😊
Setting up the PHP cli container
Now that we have the general stuff out of the way, let’s set up our first container.
I’ve created the directory C:/codebase/docker-php/ and will run the remaining examples in there.
Firstly, lets create a directory for our sourcecode:
mkdir -p "C:/codebase/docker-php/app"
For the sake of simplicity, we will stick to the official PHP image and run:
docker run -d --name docker-php -v "C:/codebase/docker-php/app":/var/www php:7.0-cli
Which means:
docker run                               // run a container
-d                                       // in the background (detached)
--name docker-php                        // named docker-php
-v "C:/codebase/docker-php/app":/var/www // sync the directory C:/codebase/docker-php/app on the
                                         // windows host with /var/www in the container
php:7.0-cli                              // use this image to build the container
The result looks something like this:
$ docker run -d --name docker-php -v "C:/codebase/docker-php/app":/var/www php:7.0-cli
Unable to find image 'php:7.0-cli' locally
7.0-cli: Pulling from library/php
f2aa67a397c4: Pulling fs layer
c533bdb78a46: Pulling fs layer
65a7293804ac: Pulling fs layer
35a9c1f94aea: Pulling fs layer
54cffc62e1c2: Pulling fs layer
153ff2f4c2af: Pulling fs layer
96d392f71f56: Pulling fs layer
e8c43e665458: Pulling fs layer
35a9c1f94aea: Waiting
54cffc62e1c2: Waiting
153ff2f4c2af: Waiting
96d392f71f56: Waiting
e8c43e665458: Waiting
c533bdb78a46: Verifying Checksum
c533bdb78a46: Download complete
35a9c1f94aea: Verifying Checksum
35a9c1f94aea: Download complete
f2aa67a397c4: Verifying Checksum
f2aa67a397c4: Download complete
153ff2f4c2af: Verifying Checksum
153ff2f4c2af: Download complete
54cffc62e1c2: Verifying Checksum
54cffc62e1c2: Download complete
e8c43e665458: Verifying Checksum
e8c43e665458: Download complete
96d392f71f56: Verifying Checksum
96d392f71f56: Download complete
f2aa67a397c4: Pull complete
65a7293804ac: Verifying Checksum
65a7293804ac: Download complete
c533bdb78a46: Pull complete
65a7293804ac: Pull complete
35a9c1f94aea: Pull complete
54cffc62e1c2: Pull complete
153ff2f4c2af: Pull complete
96d392f71f56: Pull complete
e8c43e665458: Pull complete
Digest: sha256:ff6c5e695a931f18a5b59c82b1045edea42203a299e89a554ebcd723df8b9014
Status: Downloaded newer image for php:7.0-cli
56af890e1a61f8ffa5528b040756dc62a94c0b929c29df82b9bf5dec6255321f
Since we don’t have the image on our machine (see Unable to find image 'php:7.0-cli' locally),
Docker attempts to pull it from the official registry at https://hub.docker.com/.
We’ve specifically chosen the «7.0-cli» version of the PHP image (which means: PHP 7.0 CLI only).
See https://hub.docker.com/_/php/ for a list of all available tags/images.
Now let’s see if the container is actually running via docker ps
$ docker ps
CONTAINER ID        IMAGE               COMMAND             CREATED             STATUS              PORTS               NAMES
Weird. For some reason, we don’t see our newly created container there. Let’s check with the -a flag to list all containers,
even the ones that are not running.
$ docker ps -a
CONTAINER ID        IMAGE               COMMAND                 CREATED             STATUS                      PORTS               NAMES
56af890e1a61        php:7.0-cli         "docker-php-entrypoi…"   27 seconds ago     Exited (0) 25 seconds ago                       docker-php
Aha. So the container was created, but immediately stopped (see Created 27 seconds ago; Exited (0) 25 seconds ago).
That’s because a container only lives as long as it’s main process is running.
According to the docs,
A container’s main running process is the ENTRYPOINT and/or CMD at the end of the Dockerfile.»
This answer explains the difference between CMD and ENTRYPOINT quite well.
Since we don’t have a Dockerfile defined, we would need to look at the
Dockerfile of the base image
we’re using, but I actually don’t wanna go down this rabbit hole for now. Basically, the «problem» is, that the
container doesn’t have a long running process / service defined, (as the php-fpm or the nginx containers do later on).
To keep the container alive, we need to add the -i flag to the docker run command:
docker run -di --name docker-php -v "C:/codebase/docker-php/app":/var/www php:7.0-cli
But then this happens:
Pascal@Landau-Laptop MINGW64 /
$ docker run -di --name docker-php -v "C:/codebase/docker-php/app":/var/www php:7.0-cli
C:\Program Files\Docker\Docker\Resources\bin\docker.exe: Error response from daemon: Conflict. The container name "/docker-php" is already in use by container "56af890e1a61f8ffa5528b040756dc62a94c0b929c29df82b9bf5dec6255321f". You have to remove (or rename) that container to be able to reuse that name.
See 'C:\Program Files\Docker\Docker\Resources\bin\docker.exe run --help'.
Apparently, we cannot use the same name (docker-php) again. Bummer. So, let’s remove the previous container first via
docker rm docker-php
and try again afterwards:
Pascal@Landau-Laptop MINGW64 /
$ docker rm docker-php
docker-php

Pascal@Landau-Laptop MINGW64 /c/codebase/docker-php
docker run -di --name docker-php -v "C:/codebase/docker-php/app":/var/www php:7.0-cli
7b3024a542a2d25fd36cef96f4ea689ec7ebb758818758300097a7be3ad2c2f6

Pascal@Landau-Laptop MINGW64 /c/codebase/docker-php
$ docker ps
CONTAINER ID        IMAGE               COMMAND                 CREATED             STATUS              PORTS               NAMES
7b3024a542a2        php:7.0-cli         "docker-php-entrypoi…"   5 seconds ago      Up 4 seconds                            docker-php
Sweet, so now that the container is up and running, let’s «log in» via
docker exec -it docker-php bash
You might get the following error message
Pascal@Landau-Laptop MINGW64 /c/codebase/docker-php
$ docker exec -it docker-php bash
the input device is not a TTY.  If you are using mintty, try prefixing the command with 'winpty'
If so, prefixing the command with winpty should help:
winpty docker exec -it docker-php bash
Pascal@Landau-Laptop MINGW64 /c/codebase/docker-php
$ winpty docker exec -it docker-php bash
root@7b3024a542a2:/#
A quick php -v within the container verifies, that we can actually run php scripts in there:
root@7b3024a542a2:/# php -v
PHP 7.0.30 (cli) (built: May 23 2018 23:04:32) ( NTS )
Copyright (c) 1997-2017 The PHP Group
Zend Engine v3.0.0, Copyright (c) 1998-2017 Zend Technologies
Remember the path mapping, that we specified? Let’s create a simple «hello world» script on the windows 10 host machine
at C:\codebase\docker-php\app\hello-world.php to make sure it works:
cd "C:\codebase\docker-php\app"
echo '<?php echo "Hello World (php)\n"; ?>' > hello-world.php
Should look like this on the host machine:
Pascal@Landau-Laptop MINGW64 /c/codebase/docker-php
$ ls -alh app
total 1,0K
drwxr-xr-x 1 Pascal 197121  0 Mai 28 12:29 ./
drwxr-xr-x 1 Pascal 197121  0 Mai 28 11:46 ../
-rw-r--r-- 1 Pascal 197121 49 Mai 28 12:30 hello-world.php
And like this from within the container:
root@7b3024a542a2:/# ls -alh /var/www
total 4.5K
drwxr-xr-x 2 root root  0 May 28 10:29 .
drwxr-xr-x 1 root root 4.0K May 28 10:00 ..
-rwxr-xr-x 1 root root   31 May 28 10:31 hello-world.php
Let’s run the script in the container via
php /var/www/hello-world.php
root@7b3024a542a2:/# php /var/www/hello-world.php
Hello World
Purrfect. We created the file on our host system and it’s automatically available in the container.
Installing Xdebug in the PHP container
Since we intend to use Docker for our local development setup, the ability to debug is mandatory. So let’s extend our image with the xdebug extension.
The readme of the official Docker PHP repository does a good job at explaining
how to install extensions.
For xdebug, we’ll use PECL. To install the extension, make sure to be logged into the container and run
pecl install xdebug-2.6.0
You should see an output like this:
root@7b3024a542a2:/# pecl install xdebug-2.6.0
[...]
Build process completed successfully
Installing '/usr/local/lib/php/extensions/no-debug-non-zts-20151012/xdebug.so'
install ok: channel://pecl.php.net/xdebug-2.6.0
configuration option "php_ini" is not set to php.ini location
You should add "zend_extension=/usr/local/lib/php/extensions/no-debug-non-zts-20151012/xdebug.so" to php.ini
The xdebug extension has been build and saved in /usr/local/lib/php/extensions/no-debug-non-zts-20151012/xdebug.so.
To actually activate it, run
docker-php-ext-enable xdebug
That helper command will place the file docker-php-ext-xdebug.ini in the directory for additional php ini files with the content
zend_extension=/usr/local/lib/php/extensions/no-debug-non-zts-20151012/xdebug.so
which enables the extension. Btw. you can locate the additional php ini files folder by running
php -i | grep "additional .ini"
Result:
root@7b3024a542a2:/# php -i | grep "additional .ini"
Scan this dir for additional .ini files => /usr/local/etc/php/conf.d
When we check the contents of that folder, we will indeed find the xdebug.ini file with the before mentioned content and php -m reveals,
that xdebug is actually active.
root@7b3024a542a2:/# ls -alh /usr/local/etc/php/conf.d
total 12K
drwxr-sr-x 1 root staff 4.0K May 28 13:30 .
drwxr-sr-x 1 root staff 4.0K Apr 30 20:34 ..
-rw-r--r-- 1 root staff   81 May 28 13:30 docker-php-ext-xdebug.ini
root@7b3024a542a2:/# cat /usr/local/etc/php/conf.d/docker-php-ext-xdebug.ini
zend_extension=/usr/local/lib/php/extensions/no-debug-non-zts-20151012/xdebug.so
root@7b3024a542a2:/# php -m | grep xdebug
xdebug
Now we’ll log out of the container (type «exit» or hit CTRL +D) and stop the container via
docker stop docker-php
Pascal@Landau-Laptop MINGW64 /c/codebase/docker-php
$ docker stop docker-php
docker-php

Pascal@Landau-Laptop MINGW64 /c/codebase/docker-php
$ docker ps -a
CONTAINER ID        IMAGE               COMMAND                 CREATED             STATUS                      PORTS               NAMES
7b3024a542a2        php:7.0-cli         "docker-php-entrypoi…"   2 hours ago        Exited (137) 7 seconds ago                      docker-php
Now we start the container again via
docker start docker-php
log back in and check if xdebug is still there:
Pascal@Landau-Laptop MINGW64 /c/codebase/docker-php
$ docker start docker-php
docker-php

Pascal@Landau-Laptop MINGW64 /c/codebase/docker-php
$ winpty docker exec -it docker-php bash
root@7b3024a542a2:/# php -m | grep xdebug
xdebug
And… it is! So the changes we made «survived» a restart of the container. But: They won’t survive a «rebuild» of the container.
First we stop and remove the container via
docker rm -f docker-php
The -f flag forces the container to stop. Otherwise we would need an additional docker stop docker-php before.
Then we rebuild it, log in
docker run -di --name docker-php -v "C:/codebase/docker-php/":/codebase php:7.0-cli
inpty docker exec -it docker-php bash
and check for xdebug:
php -m | grep xdebug
… which won’t be there anymore.
Pascal@Landau-Laptop MINGW64 /c/codebase/docker-php
$ docker rm -f docker-php
docker-php

Pascal@Landau-Laptop MINGW64 /c/codebase/docker-php
$ docker run -di --name docker-php -v "C:/codebase/docker-php/":/codebase php:7.0-cli
1da17524418f5327760eb113904b7ceec30f22b41e4b4bd77f9fa2f7b92b4ead

Pascal@Landau-Laptop MINGW64 /c/codebase/docker-php
$ winpty docker exec -it docker-php bash
root@1da17524418f:/# php -m | grep xdebug
root@1da17524418f:/#
Note the new container ID (before: 7b3024a542a2; now: 1da17524418f) and that php -m | grep xdebug doesn’t yield anything.
Persisting image changes with a Dockerfile
Simply put, a Dockerfile describes the changes we make to a base image,
so we (and everybody else) can easily recreate the same environment. In our case,
we need to define the PHP base image that we used as well as instructions for installing and enabling xdebug.
To clearly separate infrastructure from code, we’ll create a new directory at C:/codebase/docker-php/php-cli/.
Create a file named Dockerfile in this directory
mkdir "C:/codebase/docker-php/php-cli/"
touch "C:/codebase/docker-php/php-cli/Dockerfile"
and give it the following content:
FROM php:7.0-cli
RUN pecl install xdebug-2.6.0 \
    && docker-php-ext-enable xdebug
Change to the C:/codebase/docker-php/php-cli/ directory and build the image based on that Dockerfile
cd "C:/codebase/docker-php/php-cli/"
docker build -t docker-php-image -f Dockerfile .
The -f Dockerfile is actually optional as this is the default anyway. «docker-php-image» is the name of our new image.
If you encounter the following error
"docker build" requires exactly 1 argument.
See 'docker build --help'.

Usage:  docker build [OPTIONS] PATH | URL | - [flags]

Build an image from a Dockerfile
you probably missed the trailing . at the end of docker build -t docker-php-image -f Dockerfile . 
Pascal@Landau-Laptop MINGW64 /c/codebase/docker-php/php-cli
$ docker build -t docker-php-image -f Dockerfile .
Sending build context to Docker daemon   5.12kB
Step 1/2 : FROM php:7.0-cli
 ---> da771ba4e565
Step 2/2 : RUN pecl install xdebug-2.6.0    && docker-php-ext-enable xdebug
 ---> Running in ff16ef56e648
downloading xdebug-2.6.0.tgz ...
Starting to download xdebug-2.6.0.tgz (283,644 bytes)
[...]
You should add "zend_extension=/usr/local/lib/php/extensions/no-debug-non-zts-20151012/xdebug.so" to php.ini
Removing intermediate container ff16ef56e648
 ---> 12be27256b12
Successfully built 12be27256b12
Successfully tagged docker-php-image:latest
SECURITY WARNING: You are building a Docker image from Windows against a non-Windows Docker host. All files and directories added to build context will have '-rwxr-xr-x' permissions. It is recommended to double check and reset permissions for sensitive files and directories.
Note, that the building takes longer than before, because Docker now needs to do the extra work of installing xdebug.
Instead of using the base php:7.0-cli image, we’ll now use our new, shiny docker-php-image image to start the container and check for xdebug.
docker run -di --name docker-php -v "C:/codebase/docker-php/app":/var/www docker-php-image
Pascal@Landau-Laptop MINGW64 /c/codebase/docker-php/php-cli
$ docker run -di --name docker-php -v "C:/codebase/docker-php/app":/var/www docker-php-image
C:\Program Files\Docker\Docker\Resources\bin\docker.exe: Error response from daemon: Conflict. The container name "/docker-php" is already in use by container "2e84cb536fc573142a9951331b16393e3028d9c6eff87f89cfda682279634a2b". You have to remove (or rename) that container to be able to reuse that name.
See 'C:\Program Files\Docker\Docker\Resources\bin\docker.exe run --help'.
Aaaand we get an error, because we tried to use the same name («docker-php»), that we used for the previous, still running container.
Sigh.. fortunately we already know how to solve that via
docker rm -f docker-php
Retry
docker run -di --name docker-php -v "C:/codebase/docker-php/app":/var/www docker-php-image
Pascal@Landau-Laptop MINGW64 /c/codebase/docker-php/php-cli
$ docker rm -f docker-php
docker-php

Pascal@Landau-Laptop MINGW64 /c/codebase/docker-php/php-cli
$ docker run -di --name docker-php -v "C:/codebase/docker-php/app":/var/www docker-php-image
f27cc1310c836b15b7062e1fd381f283250a85133fb379c4cf1f891dec63770b

Pascal@Landau-Laptop MINGW64 /c/codebase/docker-php/php-cli
$ winpty docker exec -it docker-php bash
root@f27cc1310c83:/# php -m | grep xdebug
xdebug
Yep, all good. Btw. since we «only» want to check if xdebug was installed, we could also simply pass -m to the docker run command:
Pascal@Landau-Laptop MINGW64 /c/codebase/docker-php/php-cli
$ docker run docker-php-image php -m | grep xdebug
xdebug
Be aware that this will create a new container every time it’s run (, note the first entry with the wonderful name «distracted_mclean»):
Pascal@Landau-Laptop MINGW64 /c/codebase/docker-php/php-cli
$ docker ps -a
CONTAINER ID        IMAGE               COMMAND                 CREATED             STATUS                      PORTS               NAMES
abc9fec8a88b        docker-php-image    "docker-php-entrypoi…"   4 minutes ago      Exited (0) 4 minutes ago                        distracted_mclean
f27cc1310c83        docker-php-image    "docker-php-entrypoi…"   10 minutes ago     Exited (137) 6 minutes ago                      docker-php
Before we move on, let’s []stop and remove all containers via](https://coderwall.com/p/ewk0mq/stop-remove-all-docker-containers).
docker rm -f $(docker ps -aq)
The $(docker ps -aq) part returns only the numeric ids of all containers and passes them to the docker rm -f command.
Pascal@Landau-Laptop MINGW64 /c/codebase/docker-php/php-cli
$ docker rm -f $(docker ps -aq)
abc9fec8a88b
f27cc1310c83
Setting up a web stack with php-fpm and nginx
Since most people are probably not only working on CLI scripts but rather on web pages,
the next step in this tutorial is about setting up an nginx web server and connect it to php-fpm.
Setting up nginx
We’re gonna use the official nginx image and since we don’t know anything about that image yet,
let’s run and explore it a bit:
docker run -di nginx:latest
yields
Pascal@Landau-Laptop MINGW64 /
$ docker run -di nginx:latest
Unable to find image 'nginx:latest' locally
latest: Pulling from library/nginx
[...]
Status: Downloaded newer image for nginx:latest
15c6b8d8a2bff873f353d24dc9c40d3008da9396029b3f1d9db7caeebedd3f50
Note that we only used the minimum number of arguments here. Since we did not specify a name, we will simply use the ID instead to log in
(so be sure to use the one that your shell returned — don’t just copy the line below :P)
$ winpty docker exec -it 15c6b8d8a2bff873f353d24dc9c40d3008da9396029b3f1d9db7caeebedd3f50 bash
root@15c6b8d8a2bf:/#
We would expect that there is an nginx process running, but upon checking with ps aux we get
bash: ps: command not found" as a response.
This is common when using docker images, because they are usually kept as minimal as possible.
Although this is a good practice in production, it is kind of cumbersome in development.
So, let’s install ps via
apt-get update && apt-get install -y procps
and try again:
root@15c6b8d8a2bf:/# apt-get update && apt-get install -y procps
Get:1 http://security.debian.org/debian-security stretch/updates InRelease [94.3 kB]
[...]
associated file /usr/share/man/man1/w.procps.1.gz (of link group w) doesn't exist
Processing triggers for libc-bin (2.24-11+deb9u3) ...
root@15c6b8d8a2bf:/# ps aux
USER        PID %CPU %MEM    VSZ   RSS TTY      STAT START   TIME COMMAND
root          1  0.0  0.2  32608  5148 ?        Ss   06:46   0:00 nginx: master process nginx -g daemon off;
nginx         5  0.0  0.1  33084  2388 ?        S    06:46   0:00 nginx: worker process
root         14  0.0  0.1  18132  3272 pts/0    Ss   06:50   0:00 bash
root        259  0.0  0.1  36636  2844 pts/0    R+   06:53   0:00 ps aux
root@15c6b8d8a2bf:/#
Ah. Much better. Lets dig a little deeper and see how the process is configured via nginx -V
root@15c6b8d8a2bf:/# nginx -V
nginx version: nginx/1.13.12
built by gcc 6.3.0 20170516 (Debian 6.3.0-18+deb9u1)
built with OpenSSL 1.1.0f  25 May 2017
TLS SNI support enabled
configure arguments: --prefix=/etc/nginx --sbin-path=/usr/sbin/nginx --modules-path=/usr/lib/nginx/modules --conf-path=/etc/nginx/nginx.conf --error-log-path=/var/log/nginx/error.log --http-log-path=/var/log/ng
inx/access.log --pid-path=/var/run/nginx.pid --lock-path=/var/run/nginx.lock --http-client-body-temp-path=/var/cache/nginx/client_temp --http-proxy-temp-path=/var/cache/nginx/proxy_temp --http-fastcgi-temp-path
=/var/cache/nginx/fastcgi_temp --http-uwsgi-temp-path=/var/cache/nginx/uwsgi_temp --http-scgi-temp-path=/var/cache/nginx/scgi_temp --user=nginx --group=nginx --with-compat --with-file-aio --with-threads --with-
http_addition_module --with-http_auth_request_module --with-http_dav_module --with-http_flv_module --with-http_gunzip_module --with-http_gzip_static_module --with-http_mp4_module --with-http_random_index_module
 --with-http_realip_module --with-http_secure_link_module --with-http_slice_module --with-http_ssl_module --with-http_stub_status_module --with-http_sub_module --with-http_v2_module --with-mail --with-mail_ssl_
module --with-stream --with-stream_realip_module --with-stream_ssl_module --with-stream_ssl_preread_module --with-cc-opt='-g -O2 -fdebug-prefix-map=/data/builder/debuild/nginx-1.13.12/debian/debuild-base/nginx-
1.13.12=. -specs=/usr/share/dpkg/no-pie-compile.specs -fstack-protector-strong -Wformat -Werror=format-security -Wp,-D_FORTIFY_SOURCE=2 -fPIC' --with-ld-opt='-specs=/usr/share/dpkg/no-pie-link.specs -Wl,-z,relr
o -Wl,-z,now -Wl,--as-needed -pie'
Sweet, so the configuration file is placed in the default location at /etc/nginx/nginx.conf
(see --conf-path=/etc/nginx/nginx.conf). Checking that file will show us, where we need to place additional config files
(e.g. for the configuration of our web site). Run
cat /etc/nginx/nginx.conf
… and see
root@15c6b8d8a2bf:/# cat /etc/nginx/nginx.conf

user  nginx;
worker_processes  1;

error_log  /var/log/nginx/error.log warn;
pid        /var/run/nginx.pid;


events {
    worker_connections  1024;
}


http {
    include       /etc/nginx/mime.types;
    default_type  application/octet-stream;

    log_format  main  '$remote_addr - $remote_user [$time_local] "$request" '
                      '$status $body_bytes_sent "$http_referer" '
                      '"$http_user_agent" "$http_x_forwarded_for"';

    access_log  /var/log/nginx/access.log  main;

    sendfile        on;
    #tcp_nopush     on;

    keepalive_timeout  65;

    #gzip  on;

    include /etc/nginx/conf.d/*.conf;
}
Note the line include /etc/nginx/conf.d/*.conf at the end of the file. In this directory, we’ll find the default nginx config:
ls -alh /etc/nginx/conf.d/
cat /etc/nginx/conf.d/default.conf
root@15c6b8d8a2bf:/# ls -alh /etc/nginx/conf.d/
total 12K
drwxr-xr-x 2 root root 4.0K Apr 30 13:55 .
drwxr-xr-x 3 root root 4.0K Apr 30 13:55 ..
-rw-r--r-- 1 root root 1.1K Apr  9 16:01 default.conf
root@15c6b8d8a2bf:/# cat /etc/nginx/conf.d/default.conf
server {
    listen       80;
    server_name  localhost;

    #charset koi8-r;
    #access_log  /var/log/nginx/host.access.log  main;

    location / {
        root   /usr/share/nginx/html;
        index  index.html index.htm;
    }

    #error_page  404              /404.html;

    # redirect server error pages to the static page /50x.html
    #
    error_page   500 502 503 504  /50x.html;
    location = /50x.html {
        root   /usr/share/nginx/html;
    }

    # proxy the PHP scripts to Apache listening on 127.0.0.1:80
    #
    #location ~ \.php$ {
    #    proxy_pass   http://127.0.0.1;
    #}

    # pass the PHP scripts to FastCGI server listening on 127.0.0.1:9000
    #
    #location ~ \.php$ {
    #    root           html;
    #    fastcgi_pass   127.0.0.1:9000;
    #    fastcgi_index  index.php;
    #    fastcgi_param  SCRIPT_FILENAME  /scripts$fastcgi_script_name;
    #    include        fastcgi_params;
    #}

    # deny access to .htaccess files, if Apache's document root
    # concurs with nginx's one
    #
    #location ~ /\.ht {
    #    deny  all;
    #}
}
So the server is listening on port 80. Unfortunately, we cannot reach the web server from our windows host machine,
as there is currently (2018-05-31) an open bug for accessing container IPs from a windows host
(don’t worry, we’ll fix that with port mappings in a second)).
So, in order to verify that the server is actually working, we’ll install curl inside the nginx container and fetch 127.0.0.1:80:
apt-get install curl -y
curl localhost:80
Looks like this:
root@15c6b8d8a2bf:/# apt-get install curl -y
Reading package lists... Done
Building dependency tree
[...]
Running hooks in /etc/ca-certificates/update.d...
done.
root@15c6b8d8a2bf:/# curl localhost:80
<!DOCTYPE html>
<html>
<head>
<title>Welcome to nginx!</title>
<style>
    body {
        width: 35em;
        margin: 0 auto;
        font-family: Tahoma, Verdana, Arial, sans-serif;
    }
</style>
</head>
<body>
<h1>Welcome to nginx!</h1>
<p>If you see this page, the nginx web server is successfully installed and
working. Further configuration is required.</p>

<p>For online documentation and support please refer to
<a href="http://nginx.org/">nginx.org</a>.<br/>
Commercial support is available at
<a href="http://nginx.com/">nginx.com</a>.</p>

<p><em>Thank you for using nginx.</em></p>
</body>
</html>
Looks good! Now let’s customize some stuff:
— point the root to /var/www
— place a «Hello world» index file in /var/www/index.html
sed -i "s#/usr/share/nginx/html#/var/www#" /etc/nginx/conf.d/default.conf
mkdir -p /var/www
echo "Hello world!" > /var/www/index.html
To make the changes become effective, we need to reload nginx via
nginx -s reload
root@15c6b8d8a2bf:/# nginx -s reload
2018/05/29 09:22:54 [notice] 351#351: signal process started
Check with curl, et voilá:
root@15c6b8d8a2bf:/# curl 127.0.0.1:80
Hello world!
With all that new information we can set up our nginx image with the following folder structure on the host machine:
C:\codebase\docker-php
+ nginx\
  + conf.d\
    - site.conf
  - Dockerfile
+ app\
  - index.html
  - hello-world.php
nginx\Dockerfile
FROM nginx:latest
nginx\conf.d\site.conf
server {
    listen      80;
    server_name localhost;
    root        /var/www;
}
app\index.html
Hello World
Clean up the «exploration» nginx container, cd into /c/codebase/docker-php/nginx and build the new image:
docker rm -f $(docker ps -aq)
cd /c/codebase/docker-php/nginx
docker build -t docker-nginx-image .
Pascal@Landau-Laptop MINGW64 /c/codebase/docker-php
$ docker rm -f $(docker ps -aq)
15c6b8d8a2bf
Pascal@Landau-Laptop MINGW64 /c/codebase/docker-php
$ cd nginx
Pascal@Landau-Laptop MINGW64 /c/codebase/docker-php/nginx
$ docker build -t docker-nginx-image .
Sending build context to Docker daemon  3.584kB
Step 1/1 : FROM nginx:latest
 ---> ae513a47849c
Successfully built ae513a47849c
Successfully tagged docker-nginx-image:latest
SECURITY WARNING: You are building a Docker image from Windows against a non-Windows Docker host. All files and directories added to build context will have '-rwxr-xr-x' permissions. It is recommended to double check and reset permissions for sensitive files and directories.
And then run the «new» container via
docker run -di --name docker-nginx -p 8080:80 -v "C:\codebase\docker-php\nginx\conf.d":/etc/nginx/conf.d/ -v "C:\codebase\docker-php\app":/var/www docker-nginx-image
where
-p 8080:80                                                  // maps port 8080 on the windows host to port 80 in the container
-v "C:\codebase\docker-php\nginx\conf.d":/etc/nginx/conf.d/ // mounts the conf.d folder on the host to the correct directory in the container
-v "C:\codebase\docker-php\app":/var/www                    // mounts the "code" directory in the correct place
Thanks to the port mapping we can now simply open http://127.0.0.1:8080/ in a browser on the host machine
and see the content of our app\index.html file.
If you want some more information about running nginx on Docker, check out
this tutorial.
Before we move on, let’s clean up
docker stop docker-nginx
Setting up php-fpm
We are already familiar with the official docker PHP image but have only used the cli-only version so far.
FPM ones can be pulled in by using the -fpm tags (e.g. like php:7.0-fpm).
As with nginx, let’s explore the php-fpm image first:
docker run -di --name php-fpm-test php:7.0-fpm
The first thing to note is, that the image automatically exposes port 9000 as a docker ps reveals:
$ docker ps
CONTAINER ID        IMAGE               COMMAND                  CREATED             STATUS                      PORTS                  NAMES
c5d23b694563        php:7.0-fpm         "docker-php-entrypoi…"   4 hours ago         Up 4 hours                  9000/tcp               php-fpm-test
When we examine the Dockerfile that was used to build the image
(click here and search for the «7.0-fpm» tag
that currently (2018-05-31) links here),
we can see that it contains an EXPOSE 9000 at the bottom.
What else we can we figure out…
winpty docker exec -it php-fpm-test bash
First, will check where the configuration files are located via php-fpm -i | grep config:
root@c5d23b694563:/var/www/html# php-fpm -i | grep config
Configure Command =>  './configure'  '--build=x86_64-linux-gnu' '--with-config-file-path=/usr/local/etc/php' '--with-config-file-scan-dir=/usr/local/etc/php/conf.d' '--enable-option-checking=fatal' '--disable-c
gi' '--with-mhash' '--enable-ftp' '--enable-mbstring' '--enable-mysqlnd' '--with-curl' '--with-libedit' '--with-openssl' '--with-zlib' '--with-libdir=lib/x86_64-linux-gnu' '--enable-fpm' '--with-fpm-user=www-da
ta' '--with-fpm-group=www-data' 'build_alias=x86_64-linux-gnu'
fpm.config => no value => no value
[...]
--with-config-file-path=/usr/local/etc/php is our suspect. So it is very likely,
that we will find the global directives config file at
/usr/local/etc/php-fpm.conf (unfortunately, we cannot resolve the location directly).
grep‘ing this file for include= reveals the location for the
pool directives config:
grep "include=" /usr/local/etc/php-fpm.conf
root@c5d23b694563:/var/www/html# grep "include=" /usr/local/etc/php-fpm.conf
include=etc/php-fpm.d/*.conf
Hm — a relative path. That looks kinda odd? Let’s get a little more context with the -C option for grep:
grep -C 6 "include=" /usr/local/etc/php-fpm.conf
root@c5d23b694563:/var/www/html# grep -C 6 "include=" /usr/local/etc/php-fpm.conf
; Include one or more files. If glob(3) exists, it is used to include a bunch of
; files from a glob(3) pattern. This directive can be used everywhere in the
; file.
; Relative path can also be used. They will be prefixed by:
;  - the global prefix if it's been set (-p argument)
;  - /usr/local otherwise
include=etc/php-fpm.d/*.conf
Ah — that makes more sense. So we need to resolve etc/php-fpm.d/*.conf relative to /usr/local.
Resulting in /usr/local/etc/php-fpm.d/*.conf (usually you’ll at least find a www.conf file in there).
The pool config determines amongst other things how php-fpm listens for connections (e.g. via Unix socket or via TCP IP:port).
cat /usr/local/etc/php-fpm.d/www.conf
root@c5d23b694563:/var/www/html# cat /usr/local/etc/php-fpm.d/www.conf
[...]
; The address on which to accept FastCGI requests.
; Valid syntaxes are:
;   'ip.add.re.ss:port'    - to listen on a TCP socket to a specific IPv4 address on
;                            a specific port;
;   '[ip:6:addr:ess]:port' - to listen on a TCP socket to a specific IPv6 address on
;                            a specific port;
;   'port'                 - to listen on a TCP socket to all addresses
;                            (IPv6 and IPv4-mapped) on a specific port;
;   '/path/to/unix/socket' - to listen on a unix socket.
; Note: This value is mandatory.
listen = 127.0.0.1:9000
[...]
php-fpm ist listening on port 9000 on 127.0.0.1 (localhost). So it makes total sense to expose port 9000.
Installing xdebug
Since we probably also want to debug php-fpm, xdebug needs to be setup as well. The process is pretty much the same as for the cli image:
pecl install xdebug-2.6.0
docker-php-ext-enable xdebug
php-fpm -m | grep xdebug
Of course we’ll also put that in its own Dockerfile:
C:\codebase\docker-php
+ php-fpm\
  - Dockerfile
php-fpm\Dockerfile
FROM php:7.0-fpm
RUN pecl install xdebug-2.6.0 \
    && docker-php-ext-enable xdebug
Clean up the test container and build the new image
docker rm -f php-fpm-test
cd /c/codebase/docker-php/php-fpm
docker build -t docker-php-fpm-image .
Connecting nginx and php-fpm
Now that we have containers for nginx and php-fpm, we need to connect them.
To do so, we have to make sure that both containers are in the same network and can talk to each other
(which is a common problem).
Docker provides so called
user defined bridge networks
allowing automatic service discovery. That basically means,
that our nginx container can use the name of the php-fpm container to connect to it.
Otherwise we would have to figure out the containers IP address in the default network every time we start the containers.
docker network ls
reveals a list of the current networks
Pascal@Landau-Laptop MINGW64 /
$ docker network ls
NETWORK ID          NAME                DRIVER              SCOPE
7019b0b37ba7        bridge              bridge              local
3820ad97cc92        host                host                local
03fecefbe8c9        none                null                loca
Now let’s add a new one called web-network for our web stack via
docker network create --driver bridge web-network
Pascal@Landau-Laptop MINGW64 /
$ docker network create --driver bridge web-network
20966495e04e9f9df9fd64fb6035a9e9bc3aa6d83186dcd23454e085a0d97648

Pascal@Landau-Laptop MINGW64 /
$ docker network ls
NETWORK ID          NAME                DRIVER              SCOPE
7019b0b37ba7        bridge              bridge              local
3820ad97cc92        host                host                local
03fecefbe8c9        none                null                local
20966495e04e        web-network         bridge              local
Start the nginx container and connect it to the new network via
docker start docker-nginx
docker network connect web-network docker-nginx
Finally, we need to mount the local code folder app\ we mounted to the nginx container at /var/www
also in the php-fpm container in the same location:
docker run -di --name docker-php-fpm -v "C:\codebase\docker-php\app":/var/www --network web-network docker-php-fpm-image
Note that we specified the network in the run command via the --network option.
We can verify that both containers are connected to the web-network by running
docker network inspect web-network
Pascal@Landau-Laptop MINGW64 /c/codebase/docker-php/php-fpm
$ docker network inspect web-network
[
    {
        "Name": "web-network",
        "Id": "20966495e04e9f9df9fd64fb6035a9e9bc3aa6d83186dcd23454e085a0d97648",
        "Created": "2018-05-30T06:39:44.3107066Z",
        "Scope": "local",
        "Driver": "bridge",
        "EnableIPv6": false,
        "IPAM": {
            "Driver": "default",
            "Options": {},
            "Config": [
                {
                    "Subnet": "172.18.0.0/16",
                    "Gateway": "172.18.0.1"
                }
            ]
        },
        "Internal": false,
        "Attachable": false,
        "Ingress": false,
        "ConfigFrom": {
            "Network": ""
        },
        "ConfigOnly": false,
        "Containers": {
            "3358e813423165880d59c8ebc2cb4c563ee8ad1d401595f8bfcf763ff5db8f4a": {
                "Name": "docker-php-fpm",
                "EndpointID": "d2f1d6285a0932817e1fb8839bef3a6d178f5306a2116307dba200038ea2a3a3",
                "MacAddress": "02:42:ac:12:00:03",
                "IPv4Address": "172.18.0.3/16",
                "IPv6Address": ""
            },
            "eaa5c05942788985e90a80fa000723286e9b4e7179d0f6f431c0f5109e012764": {
                "Name": "docker-nginx",
                "EndpointID": "274fa9a6868aff656078a72e19c05fb87e4e86b83aaf12be9b943890140a421d",
                "MacAddress": "02:42:ac:12:00:02",
                "IPv4Address": "172.18.0.2/16",
                "IPv6Address": ""
            }
        },
        "Options": {},
        "Labels": {}
    }
]
The «Containers» key reveals that the docker-php-fpm container has the IP address 172.18.0.3
and the docker-nginx container is reachable via 172.18.0.2.
But can we actually connect from nginx to php-fpm? Let’s find out:
Log into the nginx container
winpty docker exec -ti docker-nginx bash
and ping the IP
ping 172.18.0.3 -c 2
Pascal@Landau-Laptop MINGW64 /c/codebase/docker-php/php-fpm
$ winpty docker exec -ti docker-nginx bash
root@eaa5c0594278:/# ping 172.18.0.3 -c 2
bash: ping: command not found
.. well, after we make the command available by installing iputils-ping:
apt-get update && apt-get install iputils-ping -y
ping 172.18.0.3 -c 2
root@eaa5c0594278:/# apt-get update && apt-get install iputils-ping -y
root@eaa5c0594278:/# ping 172.18.0.3 -c 2
PING 172.18.0.3 (172.18.0.3) 56(84) bytes of data.
64 bytes from 172.18.0.3: icmp_seq=1 ttl=64 time=0.142 ms
64 bytes from 172.18.0.3: icmp_seq=2 ttl=64 time=0.162 ms

--- 172.18.0.3 ping statistics ---
2 packets transmitted, 2 received, 0% packet loss, time 1071ms
rtt min/avg/max/mdev = 0.142/0.152/0.162/0.010 ms
We can ping the container — that’s good. But we were also promised we could reach the container by its name docker-php-fpm:
ping docker-php-fpm -c 2
root@eaa5c0594278:/# ping docker-php-fpm -c 2
PING docker-php-fpm (172.18.0.3) 56(84) bytes of data.
64 bytes from docker-php-fpm.web-network (172.18.0.3): icmp_seq=1 ttl=64 time=0.080 ms
64 bytes from docker-php-fpm.web-network (172.18.0.3): icmp_seq=2 ttl=64 time=0.131 ms

--- docker-php-fpm ping statistics ---
2 packets transmitted, 2 received, 0% packet loss, time 1045ms
rtt min/avg/max/mdev = 0.080/0.105/0.131/0.027 ms
And we can — awesome! Now we need to tell nginx to pass all PHP related requests to php-fpm by changing the
nginx\conf.d\site.conf file on our windows host to
server {
    listen      80;
    server_name localhost;
    root        /var/www;

   location ~ \.php$ {
        try_files $uri =404;
        fastcgi_pass docker-php-fpm:9000;
        include fastcgi_params;
        fastcgi_param  SCRIPT_FILENAME $document_root$fastcgi_script_name;
    }
}
Note the fastcgi_pass docker-php-fpm:9000; line that tells nginx how to reach our php-fpm service.
Because we mounted the nginx\conf.d folder, we just need to reload nginx:
nginx -s reload
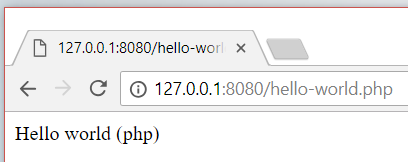
and open http://127.0.0.1:8080/hello-world.php on a browser on your host machine.
Btw. there’s also a good tutorial on geekyplatypus.com on how to
Dockerise your PHP application with Nginx and PHP7-FPM.
But since it’s using docker-compose you might want to read the next chapter first
Putting it all together: Meet docker-compose
Lets sum up what we have do now to get everything up and running:
1. start php-cli
2. start nginx
3. start php-fpm
docker run -di --name docker-php -v "C:\codebase\docker-php\app":/var/www --network web-network docker-php-image
docker run -di --name docker-nginx -p 8080:80 -v "C:\codebase\docker-php\nginx\conf.d":/etc/nginx/conf.d/ -v "C:\codebase\docker-php\app":/var/www  --network web-network docker-nginx-image
docker run -di --name docker-php-fpm -v "C:\codebase\docker-php\app":/var/www --network web-network docker-php-fpm-image
Hm. That’s alright I guess… but it also feels like «a lot». Wouldn’t it be much better to have everything neatly defined in one place?
I bet so! Let me introduce you to docker-compose
Compose is a tool for defining and running multi-container Docker applications.
With Compose, you use a YAML file to configure your application’s services.
Then, with a single command, you create and start all the services from your configuration.
Lets do this step by step, starting with the php-cli container. Create the file C:\codebase\docker-php\docker-compose.yml:
# tell docker what version of the docker-compose.yml we're using
version: '3'

# define the network
networks:
  web-network:

# start the services section
services:
  # define the name of our service
  # corresponds to the "--name" parameter
  docker-php-cli:
    # define the directory where the build should happened,
    # i.e. where the Dockerfile of the service is located
    # all paths are relative to the location of docker-compose.yml
    build:
      context: ./php-cli
    # reserve a tty - otherwise the container shuts down immediately
    # corresponds to the "-i" flag
    tty: true
    # mount the app directory of the host to /var/www in the container
    # corresponds to the "-v" option
    volumes:
      - ./app:/var/www
    # connect to the network
    # corresponds to the "--network" option
    networks:
      - web-network
Before we get started, we’re gonna clean up the old containers:
docker rm -f $(docker ps -aq)
To test the docker-compose.yml we need to run docker-compose up -d from C:\codebase\docker-php
cd "C:\codebase\docker-php"
docker-compose up -d
Pascal@Landau-Laptop MINGW64 /c/codebase/docker-php
$ docker-compose up -d
Creating network "docker-php_web-network" with the default driver
Building docker-php-cli
Step 1/2 : FROM php:7.0-cli
 ---> da771ba4e565
Step 2/2 : RUN pecl install xdebug-2.6.0     && docker-php-ext-enable xdebug
 ---> Using cache
 ---> 12be27256b12
Successfully built 12be27256b12
Successfully tagged docker-php_docker-php-cli:latest
Image for service docker-php-cli was built because it did not already exist. To rebuild this image you must use `docker-compose build` or `docker-compose up --build`.
Creating docker-php_docker-php-cli_1 ... done
Note that the image is build from scratch when we run docker-compose up for the first time.
A docker ps -a shows that the container is running fine, we can log in and execute source code from the host machine.
Pascal@Landau-Laptop MINGW64 /c/codebase/docker-php
$ docker ps -a
CONTAINER ID        IMAGE                       COMMAND                  CREATED             STATUS              PORTS               NAMES
adf794f27315        docker-php_docker-php-cli   "docker-php-entrypoi…"   3 minutes ago       Up 2 minutes                            docker-php_docker-php-cli_1
Logging in
winpty docker exec -it docker-php_docker-php-cli_1 bash
and running
php /var/www/hello-world.php
works as before
root@adf794f27315:/# php /var/www/hello-world.php
Hello World (php)
Now log out of the container and run
docker-compose down
to shut the container down again:
Pascal@Landau-Laptop MINGW64 /c/codebase/docker-php
$ docker-compose down
Stopping docker-php_docker-php-cli_1 ... done
Removing docker-php_docker-php-cli_1 ... done
Removing network docker-php_web-network
Add the remaining services to the docker-compose.yml file:
# tell docker what version of the docker-compose.yml we're using
version: '3'

# define the network
networks:
  web-network:

# start the services section
services:
  # define the name of our service
  # corresponds to the "--name" parameter
  docker-php-cli:
    # define the directory where the build should happened,
    # i.e. where the Dockerfile of the service is located
    # all paths are relative to the location of docker-compose.yml
    build:
      context: ./php-cli
    # reserve a tty - otherwise the container shuts down immediately
    # corresponds to the "-i" flag
    tty: true
    # mount the app directory of the host to /var/www in the container
    # corresponds to the "-v" option
    volumes:
      - ./app:/var/www
    # connect to the network
    # corresponds to the "--network" option
    networks:
      - web-network

  docker-nginx:
    build:
      context: ./nginx
    # defines the port mapping
    # corresponds to the "-p" flag
    ports:
      - "8080:80"
    tty: true
    volumes:
      - ./app:/var/www
      - ./nginx/conf.d:/etc/nginx/conf.d
    networks:
      - web-network

  docker-php-fpm:
    build:
      context: ./php-fpm
    tty: true
    volumes:
      - ./app:/var/www
    networks:
      - web-network
And up again…
docker-compose up -d
Pascal@Landau-Laptop MINGW64 /c/codebase/docker-php
$ docker-compose up -d
Building docker-nginx
Step 1/1 : FROM nginx:latest
 ---> ae513a47849c
Successfully built ae513a47849c
Successfully tagged docker-php_docker-nginx:latest
Image for service docker-nginx was built because it did not already exist. To rebuild this image you must use `docker-compose build` or `docker-compose up --build`.
Building docker-php-fpm
Step 1/2 : FROM php:7.0-fpm
 ---> a637000da5a3
Step 2/2 : RUN pecl install xdebug-2.6.0     && docker-php-ext-enable xdebug
 ---> Running in 4ec27516df54
downloading xdebug-2.6.0.tgz ...
Starting to download xdebug-2.6.0.tgz (283,644 bytes)
[...]
---> 120c8472b4f3
Successfully built 120c8472b4f3
Successfully tagged docker-php_docker-php-fpm:latest
Image for service docker-php-fpm was built because it did not already exist. To rebuild this image you must use `docker-compose build` or `docker-compose up --build`.
Creating docker-php_docker-nginx_1   ... done
Creating docker-php_docker-php-cli_1 ... done
Creating docker-php_docker-php-fpm_1 ... done
Only nginx and php-fpm needed to be built because the php-cli one already existed.
Lets check if we can still open http://127.0.0.1:8080/hello-world.php in a browser on the host machine:
Yes we can! So instead of needing to run 3 different command with a bunch of parameters we’re now down to
docker-compose up -d. Looks like an improvement to me
The tl;dr
The whole article is a lot to take in and it is most likely not the most efficient approach when you «just want to get started».
So in this section we’ll boil it down to only the necessary steps without in depth explanations.
- Download Docker for Windows
- Install Docker
- activate Hyper-V (Virtual Box will stop working)
- enable Disk Sharing in the settings
- Set up the following folder structure
««
C:\codebase\docker-php- nginx\
- conf.d\
- site.conf
- Dockerfile
- php-cli\
- Dockerfile
- php-fpm\
- Dockerfile
- app\
- index.html
- hello-world.html
- docker-compose.yml
«« - or simply
git clone [email protected]:paslandau/docker-php-tutorial.git docker-php && git checkout part_1_setting-up-php-php-fpm-and-nginx-for-local-development-on-docker
- nginx\
- Open a shell at
C:\codebase\docker-php - run
docker-compose up -d - check in browser via
- 127.0.0.1:8080
- 127.0.0.1:8080/hello-world.php
- run
docker-compose down
Your application code lives in the app\ folder and changes are automatically available to the containers.
This setup denotes the end of the first tutorial. In the next part we will learn how to set up Docker in PHPStorm,
especially in combination with xdebug.
Wrapping up
Congratulations, you made it! If some things are not completely clear by now, don’t hesitate to
leave a comment. Apart from that, you should now have a first idea on what docker is and how you
can use it.
If you want to go deeper, please check out the remaining articles of the
Docker PHP Tutorial series.
Please subscribe to the RSS feed or via email to get automatic
notifications when this next part comes out
Wanna stay in touch?
Since you ended up on this blog, chances are pretty high that you’re into Software Development
(probably PHP, Laravel, Docker or Google Big Query) and I’m a big fan of feedback and networking.
So — if you’d like to stay in touch, feel free to shoot me an email with a couple of words about yourself and/or
connect with me on
LinkedIn or
Twitter
or simply subscribe to my RSS feed
or go the crazy route and subscribe via mail
and don’t forget to leave a comment
Subscribe to posts via mail

Comments
Уровень сложностиПростой
Время на прочтение4 мин
Количество просмотров10K
Всем привет! В этой небольшой статье я очень сжато расскажу, как правильно настроить WSL в Windows 11 для локальной разработки Laravel-приложения. Мы собираемся установить php, mysql, nginx и composer, а также отредактировать файл hosts в самом Windows. Заранее прошу не гневаться на меня поклонников Docker, здесь я рассказываю именно про WSL.
Итак, без лишних промедлений, приступим. И начнем с того, что, как мы предполагаем, у нас есть Windows и всё. Если WSL уже установлен, львиную часть статьи можно пропустить.
Убедитесь в том, что ваша версия Windows совместима с WSL.
Установка WSL
Открываем PowerShell от имени Администратора и пишем:
wsl.exe --installПодождем, когда установятся все компоненты, перезапустим компьютер, после чего окно WSL откроется автоматически и сразу запустится Ubuntu (по умолчанию установится именно Ubuntu) система попросит вас указать имя пользователя и пароль для WSL.

Устновка PHP
Мы будем устанавливать php 8.3. Для этого пишем по очереди:
sudo apt-get update
sudo apt install software-properties-common
sudo add-apt-repository ppa:ondrej/php
sudo apt install openssl unzip php8.3-cli php8.3-bcmath php8.3-curl php8.3-mbstring php8.3-mysql php8.3-tokenizer php8.3-xml php8.3-zip php8.3-fpm
Если никаких ошибок не возникнет, то всё, что нужно установится и мы можем продолжать.
Установка Composer
Чтобы нам установить Composer проводим следующие операции:
cd ~
curl -sS https://getcomposer.org/installer -o /tmp/composer-setup.php
HASH=`curl -sS https://composer.github.io/installer.sig`
php -r "if (hash_file('SHA384', '/tmp/composer-setup.php') === '$HASH') { echo 'Installer verified'; } else { echo 'Installer corrupt'; unlink('composer-setup.php'); } echo PHP_EOL;"
sudo php /tmp/composer-setup.php --install-dir=/usr/local/bin --filename=composer
Запустив команду composer -v мы должны будем получить примерно вот это:

Установка MySQL
Теперь установим БД:
sudo apt-get install mysql-serverПосле этого мы можем поменять пароль пользователя на password или любой другой, какой вам больше нравится. Для этого пишем:
sudo mysql
ALTER USER 'root'@'localhost' IDENTIFIED WITH mysql_native_password BY 'password';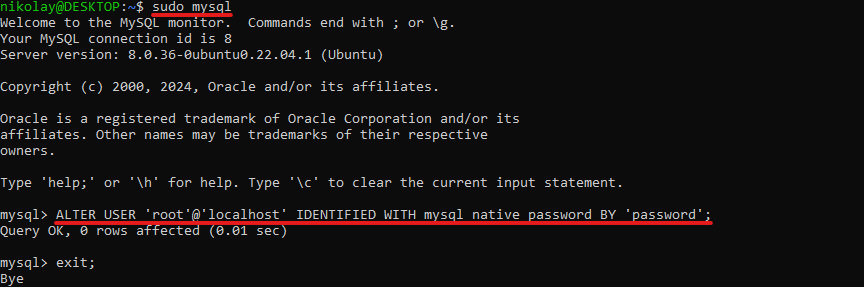
Пишем exit; и пробуем войти в БД с новым паролем. Должно всё получиться.
mysql -u root -pУстановка Laravel
Далее мы идем уже, скорее всего, по известному пути:
cd ~
mkdir dev
cd dev
composer create-project laravel/laravel test-app
Также для работы Laravel нам нужна БД, создаем и ее:
mysql -uroot -p -e "create database test"Обязательно в самой папке приложения Laravel нам надо отредактировать .env файл, примерно так:
DB_CONNECTION=mysql
DB_HOST=127.0.0.1
DB_PORT=3306
DB_DATABASE=test
DB_USERNAME=root
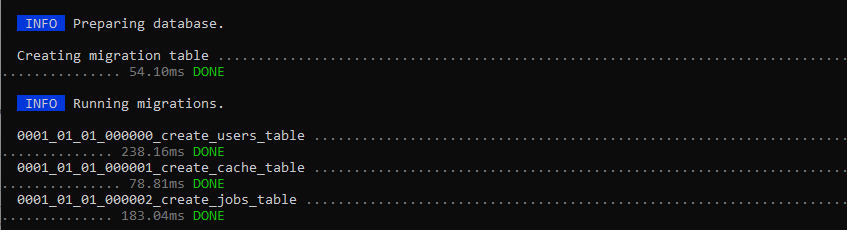
DB_PASSWORD=passwordТеперь устанавливаем в БД необходимые для Laravel таблицы с помощью artisan:
cd test-app
php artisan migrate
У нас должно получиться примерно вот это:
Установка и конфигурация NGINX
Последнее, что нам осталось сделать — установить вебсервер. Для этого пишем:
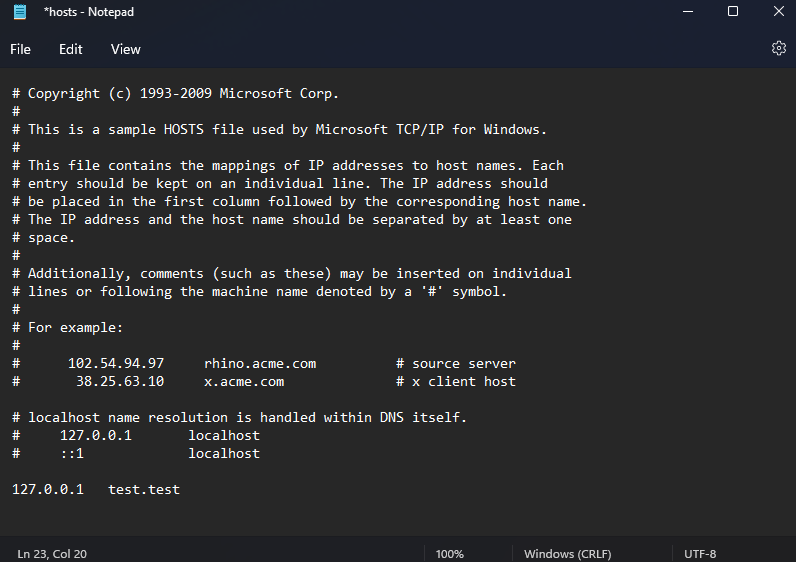
sudo apt-get install nginxТеперь важный момент: если мы хотим обращаться к нашему приложению по какому-то определенному адресу, тогда мы должны сделать некоторые правки в файле C:\Windows\System32\drivers\etc\hosts. Запускаем, к примеру, Блокнот обязательно от имени Администратора и добавляем в конце файла следующую запись:
127.0.0.1 test.test
Теперь давайте создадим конфигурационный файл nginx:
sudo nano /etc/nginx/sites-available/test.test.confВ этом файле мы пишем следующее:
server {
    listen 80;
    listen [::]:80;
    server_name test.test;
    root /home/nikolay/dev/test-app/public;

    add_header X-Frame-Options "SAMEORIGIN";
    add_header X-Content-Type-Options "nosniff";

    index index.php;

    charset utf-8;

    location / {
        try_files $uri $uri/ /index.php?$query_string;
    }

    location = /favicon.ico { access_log off; log_not_found off; }
    location = /robots.txt  { access_log off; log_not_found off; }

    error_page 404 /index.php;

    location ~ \.php$ {
        fastcgi_pass unix:/var/run/php/php8.3-fpm.sock;
        fastcgi_param SCRIPT_FILENAME $realpath_root$fastcgi_script_name;
        include fastcgi_params;
    }

    location ~ /\.(?!well-known).* {
        deny all;
    }
}
Поменяйте директивы server_name, root и, возможно, fastcgi_pass, если вы использовали другие пути и названия. После этого мы копируем созданный файл в директорию sites-enabled самого nginx.
sudo ln -s /etc/nginx/sites-available/test.test.conf /etc/nginx/sites-enabled/test.test.confПроверяем конфигурацию nginx:
sudo nginx -t
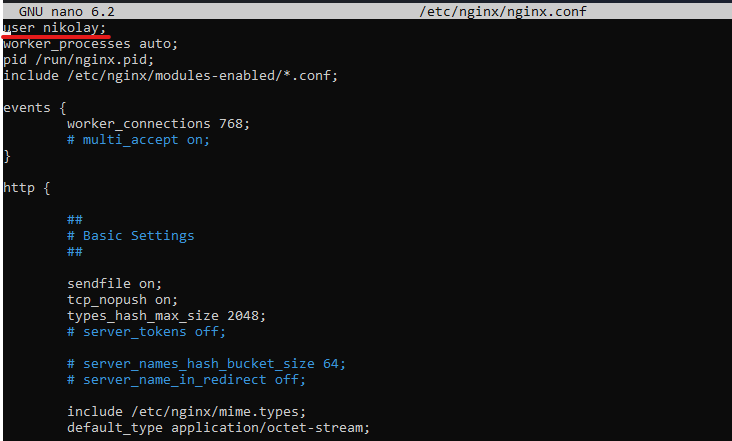
sudo nginx -s reloadЕще один важный момент: для того, чтобы у нас не было проблем с правами, мы должны немного изменить конфигурацию самого nginx:
sudo nano /etc/nginx/nginx.confТут мы меняем самую верхнюю строчку, чтобы она совпадала с именем пользователя WSL (в моем случае — nikolay):
Также меняем группу пользователя и самого пользователя в fpm:
sudo nano /etc/php/8.3/fpm/pool.d/www.conf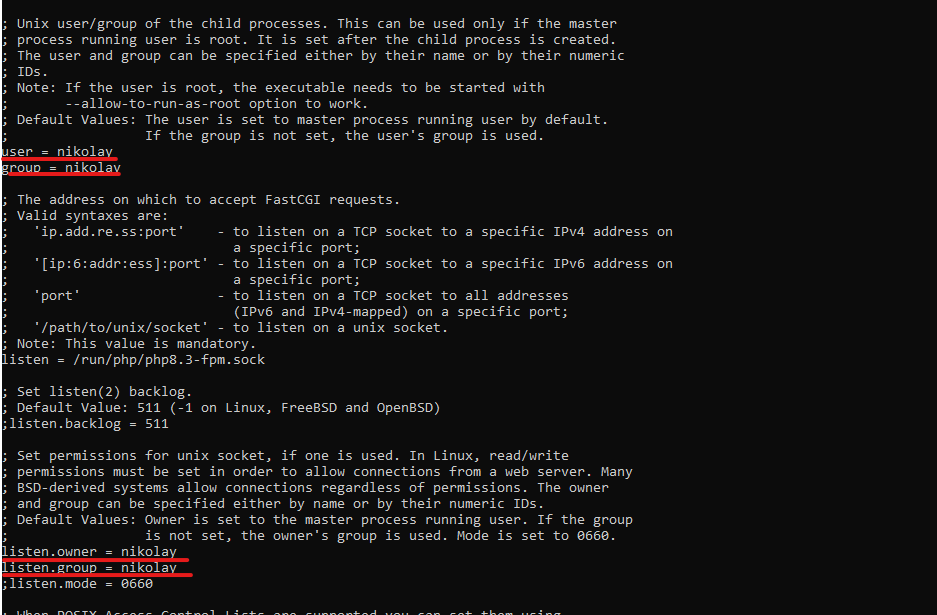
Собственно и всё! Теперь остается только перезапустить fpm и nginx:
sudo service php8.3-fpm restart
sudo service nginx restart
И теперь если мы зайдем через любой браузер по адресу http://test.test мы увидим главную страницу свежеустановленного Laravel.
Спасибо за внимание, надеюсь, эта небольшая инструкция будет полезна.
P.S. Дорогие читатели, автор ни в коей мере не настаивает на такой реализации разработки под Windows. Данная статья писалась как решение конкретной задачи, а не как рекомендация к немедленному действию.
Thought of writing a small tutorial on how to install NGINX and PHP on Windows. You can also use this as a reference if you wanted to install them on Windows Server too.
Note
This tutorial won’t teach you how to configure both PHP and NGINX configurations as there are a lot of tutorials focusing on that topic.
Setting up NGINX
- Download NGINX for Windows
- Go to
C:/directory and create a folder namedC:/nginx. - Unzip the downloaded
.zipfile inC:/nginxdirectory. - Go to
C:/nginxand create two new folders namedsites-availableandsites-enabled. - To test, if it’s working, double-click on
C:/nginx/nginx.exeand typelocalhostin the browser. You should be able to see a Welcome page. - Kill the NGINX process from Task Manager.
Setting up PHP
- Download PHP 8.1 for Windows.
- Go to
C:/directory and create a folder namedC:/phpor if you wanted to have multiple versions,C:/php8.1. - Unzip the downloaded
.zipfile inC:/phpdirectory. - Add PHP to your system environment variables by adding the path
C:/php - Open Command Prompt and type
php -v. You see should be able to see the version if it’s installed correctly.
Run NGINX and PHP as separate services
Generally, it’s good practice to run both PHP and NGINX as background services or else, you might have to start the processes manually every time the server goes down.
As I was looking for a way to do that, I stumbled upon this post on StackOverflow and it was quite helpful.
Install NSSM Service Manager
NSSM Service Manager is a free open-source alternative that helps you create a service with the help of GUI. Below are the steps that I followed:
- Download NSSM Service Manager
- Go to
C:/directory and create a folder namedC:/nssm. - Unzip the downloaded
.zipfile inC:/nssmdirectory.
Install NGINX as a service
- Open Command Prompt as an Administrator.
- Go to
C:/nssm/win64/directory. - Type
nssm install nginx - Define the path of the
nginx.exefile. - Click on
Install Service. - Press
Win+Rand typeservices.msc. - Look for
nginxand start the service. - Open your browser and type
localhostto see if it’s working correctly.
Install PHP as a service
- Open Command Prompt as an Administrator.
- Go to
C:/nssm/win64/directory. - Type
nssm install php - Define the path of the
php-cgi.exefile. - Add the arguments:
-b 127.0.0.1:9000 - Click on
Install Service. - Press
Win+Rand typeservices.msc. - Look for
phpand start the service.
Test to see if it works!
Before you proceed with the following steps, ensure that you include the *.conf files from the sites-enabled folder in your nginx.conf file.
Add the line include "C:/nginx/sites-enabled/*.conf"; in your nginx.conf file and follow the steps below:
- Go to
C:/nginx/sites-availabledirectory and createexample.com.conf. - Go to
C:/nginx/htmland create directory. - Refer to the sample configuration provided and make the necessary changes.
- To enable the site, you have to create a symlink:
mklink "C:\nginx\sites-enabled\example.com.conf" "C:\nginx\sites-available\example.com.conf". - Ensure the configuration doesn’t have any errors by typing
nginx -tinC:/nginxdirectory. - Restart the NSSM service.
- Add an entry in your hosts file:
127.0.0.1 example.com. - And you’re done!
Tip
If you get a «Connection Refused» or error that is similar to that, it’s most probably due to firewall or maybe the PHP service isn’t running.
Useful commands while using NSSM
# Start a service
nssm start "servicename"

# Restart a service
nssm restart "servicename"

# Stop a service
nssm stop "servicename"

# Install a service
nssm install "servicename"

# Remove/Uninstall a service
nssm remove "servicename"
Sample NGINX Virtual Host Configuration
server {

    # Your Domain Name
    listen 80;
    server_name example.com;

    autoindex off;
    add_header X-Frame-Options "SAMEORIGIN";
    add_header Strict-Transport-Security "max-age=31536000; includeSubDomains" always;
    add_header X-Content-Type-Options "nosniff";
    add_header X-XSS-Protection "1; mode=block";
    add_header Access-Control-Allow-Origin *;

    if (!-e $request_filename) {
        rewrite  ^/[_0-9a-zA-Z-]+(/wp-(content|admin|includes).*) $1 break;
        rewrite  ^/[_0-9a-zA-Z-]+(/.*\.php)$ $1 break;
    }

    # Uncomment these lines if SSL is provided
    #==========================
    #listen 443 ssl;
    #ssl_certificate your-ssl.pem;
    #ssl_certificate_key your-ssl.key;
    #ssl_protocols TLSv1 TLSv1.1 TLSv1.2;
    #ssl_prefer_server_ciphers on;
    #ssl_ciphers 'EECDH+AESGCM:EDH+AESGCM:AES256+EECDH:AES256+EDH';
    #==========================

    # Log files for Debugging
    access_log logs/example-access.log;
    error_log logs/example-error.log;

    # Directory
    root "C:/nginx/html/example.com";
    index index.php index.html index.htm;

    location / {
        try_files $uri $uri/ /index.php?$query_string;
    }

    location ~ /\.(?!well-known).* {
        deny all;
        access_log off;
        log_not_found off;
    }

    # Deny yaml, twig, markdown, ini file access
    location ~* /.+\.(markdown|md|twig|yaml|yml|ini)$ {
        deny all;
        access_log off;
        log_not_found off;
    }

    # PHP-FPM Configuration Nginx
    location ~ \.php$ {
        fastcgi_pass   127.0.0.1:9000;
        fastcgi_index  index.php;
        fastcgi_param  SCRIPT_FILENAME  $document_root$fastcgi_script_name;
        include        fastcgi_params;
    }
}
Conclusion
If you’ve gotten this far, give yourself a pat in the back.
Hope you’ve found this tutorial useful and please share it with your friends and colleagues if they really need it!