
-
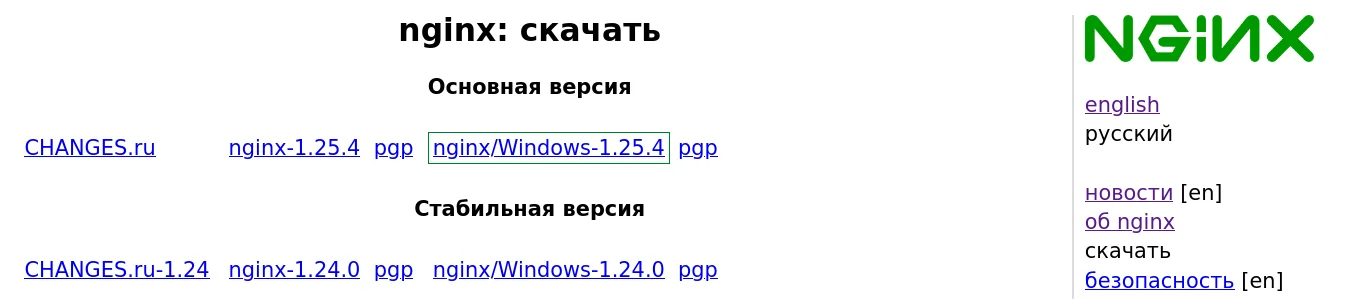
Скачиваем отсюда https://nginx.org/ru/download.html и распаковываем куда-нибудь.
-
Дальше читаем тут https://nginx.org/ru/docs/windows.html
ВНИМАНИЕ: командуstart nginxобязательно даем прямо из каталога, в котором лежит nginx.exe, в противном случае при дальнейшей работе будут ошибки (все пути в конфигурации прописаны как относительные, только поменяв их все, можно запускать откуда угодно).
Вообще рекомендуется держать консоль открытой в этом каталоге до самого конца выполнения инструкций, однако для работы nginx это необязательно — если её закрыть, он продолжит работать. -
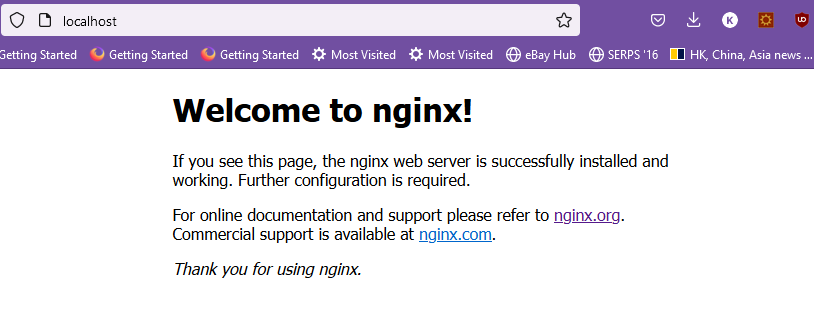
Открываем http://localhost/ — должно заработать.
Установка PHP
-
Скачиваем с https://windows.php.net/download (ZIP-архив Non Thread Safe x64), замечаем номер в «VC(число)» — понадобится на следующем шаге.
Прописываем каталог в PATH. -
Открываем командную строку, запускаем
php -v.
Должно выскочить окно с надписью «The program can’t start because VCRUNTIME140.dll».
Если запуск прошел без ошибок, пропускаем следующий пункт. -
Ищем на странице загрузки из п.1 в левой колонке ссылку на VC нужного номера. Скачиваем x64.exe, устанавливаем.
После этого возвращаемся на предыдущий пункт. На этот раз команда должна показать версию php.
Конфигурация локального сайта в nginx
-
Выбираем локальное имя хоста (как
localhost, только какое-то другое, например,mysite) и каталог, где будут находиться его файлы (например,D:\sites\mysite). -
В конец файла
(каталог nginx)/nginx.confперед последней закрывающей скобкой добавляем раздел:server { listen 80; server_name mysite; root D:\sites\mysite; } -
В консоли, находясь в каталоге nginx.exe, даем команду
nginx -s reload, чтобыnginxперечитал конфигурацию. -
Открываем файл
C:\Windows\System32\Drivers\etc\hosts, добавляем строчку127.0.0.1 mysiteФайл защищен системой ото всех пользователей, кроме администратора, поэтому перед записью понадобится открыть его свойства и дать там нужные права и потом вернуть, как было.
-
Открываем в браузере ссылку http://mysite/ (обязательно с
http://, иначе браузер станет отправлять в поисковые системы). Должна отобразиться страница 404 от nginx.
Налаживание взаимодействия nginx и PHP
-
В раздел
serverконфигурации добавляем такие строки:location ~\.php$ { fastcgi_pass 127.0.0.1:9123; fastcgi_param SCRIPT_FILENAME $document_root$fastcgi_script_name; include fastcgi_params; }(
9123— номер порта, можно выбрать какой-нибудь другой)Из консоли даем команду
nginx -s reload. -
В консоли переходим в каталог, куда распакован PHP. Даем команду
php-cgi.exe -b 127.0.0.1:9123Закрывать окно консоли нельзя, иначе интерпретатор PHP перестанет работать.
Можно прописать путь к каталогу PHP в системной переменной
PATHи запускать его без указания полного пути. -
Создаем файл
D:\sites\mysite\test.phpсо следующим содержимым:<?php echo "This is PHP script on mysite";Открываем http://mysite/test.php — текст должен отображаться.
Взаимодействие налажено!
См. также https://www.nginx.com/resources/wiki/start/topics/examples/phpfastcgionwindows/
PHP: ini-файл и модули расширений
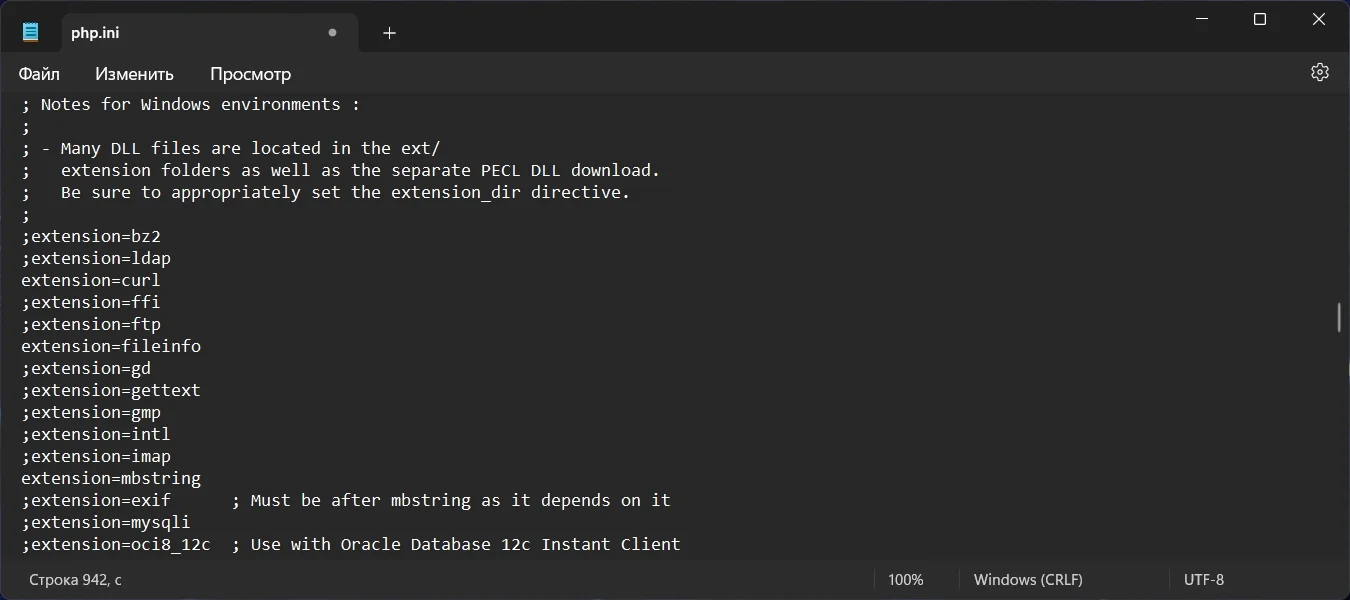
Вышеуказанные процедуры позволяют успешно запустить и использовать PHP, однако он будет «голым» — без расширений (в т.ч. таких необходимых, как mysqli, mbstring и др.) и без настроек, т.к. он не прочитает ни одного ini-файла.
PHP может автоматически загрузить файл php.ini из нескольких каталогов. Первое место, где он станет его искать — рядом с php.exe. В пакете есть файл php.ini-development. Нужно создать рядом его копию с именем php.ini, открыть и внести следующие изменения:
-
Раскомментировать строку
extension_dir = "ext"— в результате PHP станет искать модули расширений в подкаталогеextрядом сphp.exe
(относительный путь интерпретируется именно от exe-, а не от самого ini-файла)Проверяем, подключился ли файл, с помощью команды
php --ini. Результат должен быть примерно следующим:Configuration File (php.ini) Path: C:\Windows Loaded Configuration File: {каталог с дистрибутивом PHP}\php.ini Scan for additional .ini files in: (none) Additional .ini files parsed: (none)Вторая строчка говорит о том, что ini-файл успешно загрузился.
На первую строчку (про С:\Windows) внимания обращать не следует, т.к. ini-файла по указанном адресу нет.
-
Найти нужные расширения и раскомментировать строки, где они подключаются. Например,
extension=mysqliи т.д.Все расширения перечислены рядом, и найти нужные среди них несложно. Рекомендуется включить следующие:
- curl
- fileinfo
- gd
- mbstring
- exif
- mysqli
- soap
Просмотреть список подключенных расширений можно, дав команду
php -m. Непустой изначально список после вышеописанной манипуляции пополнится.
PHP загружает расширения при запуске exe-файла интерпретатора. Если нужно подключить новое, следует остановить php-cgi.exe (или php.exe соответственно) и запустить его заново.
PHP и MySQL
Чтобы установить связь между PHP и MySQL, не требуется никаких специальных действий, кроме собственно создания соединения (разумеется, должен быть включен соответствующий модуль, например, mysqli).
Проверить соединение можно так:
echo "Connecting to MySQL server... ";

// $host = 'localhost'; // если соединяемся через named pipe (аналог Unix-сокета),
$host = ".";            // то в качестве хоста указываем "."
$user = "someone";
$password = "a password";
$mysqli = new mysqli($host, $user, $password);

if ($mysqli->connect_error)
	echo $mysqli->connect_error;
else
	echo "Connected successfully!";
Об установке и минимальной настройке MySQL под Windows см. здесь.
Неудобства работы под Windows
-
в путях файловой системы используется обратный слэш (
\), а не прямой (/) — типаD:\sites\mysite\...вместо/sites/mysite/..., что влияет, в частности, на содержимое констант__DIR__и__FILE__;
как следствие, весь код, рассчитанный на разбор пути по слэшу, перестаёт работать -
невозможно установить русскую локаль с UTF-8:
setlocale(LC_ALL, 'rus')всегда приводит к использованию windows-1251, и изменить это никак не получается
Есть нужен веб-сервер для Windows, идеально подойдет веб-сервер Nginx с подключенным PHP через FastCGI. В статье будет показана настройка и связка Nginx с PHP на примере Windows 11. Аналогично происходит настройка в Windows 7/8/10.
1. Структура каталогов под сервера
Удобно когда все сервера и сервисы установлены в отдельной папке. Я рекомендую сделать структуру аналогично моей.
Создаем на диске D:\ папку server (если диск один, то создаем на C). В папке server будет находится все что относится в веб-серверу, базы данных, файлы сайта.
Структура будет выглядеть так:
# Папка для серверов
D:\server\
# Папка для nginx
D:\server\nginx\
# Папка для PHP
D:\server\php\
# Папка для веб-сайтов
D:\server\www\
Создаем необходимые папки.
Подобная архитектура удобна тем, что все сервера находятся на отдельном диске в отдельной папке. Можно без проблем сделать резервное копирование, обновление серверов и так далее.
2. Установка и настройка nginx
2.1. Установка nginx
Заходим на официальный сайт Nginx https://nginx.org/ru/download.html и скачиваем последнею версию
Стабильная версия больше подойдет если nginx используется для рабочих веб-сайтов, а не используется для разработки, тестирования новых возможностей nginx.
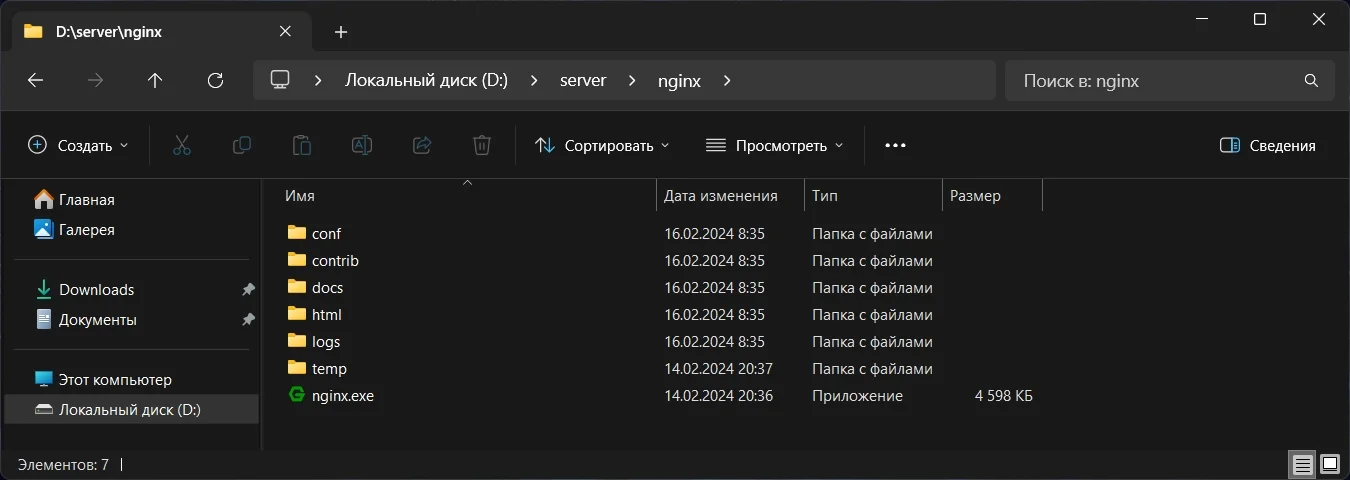
Извлекаем скаченный архив в папку D:\server\nginx\
2.2. Конфигурация nginx (nginx.conf)
Теперь необходимо настроить сам nginx и его работу в связке с PHP.
Открываем файл конфигурации nginx.conf (в моем случае D:\server\nginx\conf\nginx.conf) и настраиваем веб-сервер nginx
# Базовый файл конфигурации nginx + PHP FastCGI
#user  nobody;
worker_processes 1; # Количество запущенных процессов

#Лог ошибок
#error_log	logs/error.log;
#error_log	logs/error.log  notice;
#error_log	logs/error.log  info;

#pid		logs/nginx.pid;

events {
	worker_connections  1024; # Количество подключений к одному процессу
}

http {
	include			mime.types;
	default_type	application/octet-stream;

	# Лог доступа
	access_log		off;
	#access_log		logs/access.log  main;

	gzip  on; # Использовать сжатие

	# Разделов server может быть неограниченное количество
	#
	# Раздел server для домена сайта localhost по 80 порту
	server {
		listen		80; # Порт
		server_name	localhost; # Домен сайта

		charset utf-8; # Кодировка сайта

		error_log	logs/localhost.error.log; # Лог ошибок сайта
		access_log	logs/localhost.access.log; # Лог доступа сайта

		# Путь до папки сайта
		root	D:/server/www;

		# Обработка всех URI запросов начинающихся с /
		location / {
			#root	D:/server/www; # root определена в разделе server
			index	index.html index.php; # файлы в качестве индекса
		}

		# Настройка обработки php скриптов через PHP-FastCGI
		#
		# Обработка всех URI запросов оканчивающихся на .php
		location ~ \.php$ {
			# IP и порт PHP-FastCGI. С такими же параметрами нужно будет запускать php-cgi.exe
			fastcgi_pass	127.0.0.1:9000;
			fastcgi_index	index.php;
			# Путь до php скриптов, $document_root - путь из параметра root (папка сайта)
			fastcgi_param	SCRIPT_FILENAME  $document_root$fastcgi_script_name;
			include			fastcgi_params;
		}
	}
}
Сохраняем и закрываем файл.
3. Установка и настройка PHP
3.1. Установка PHP
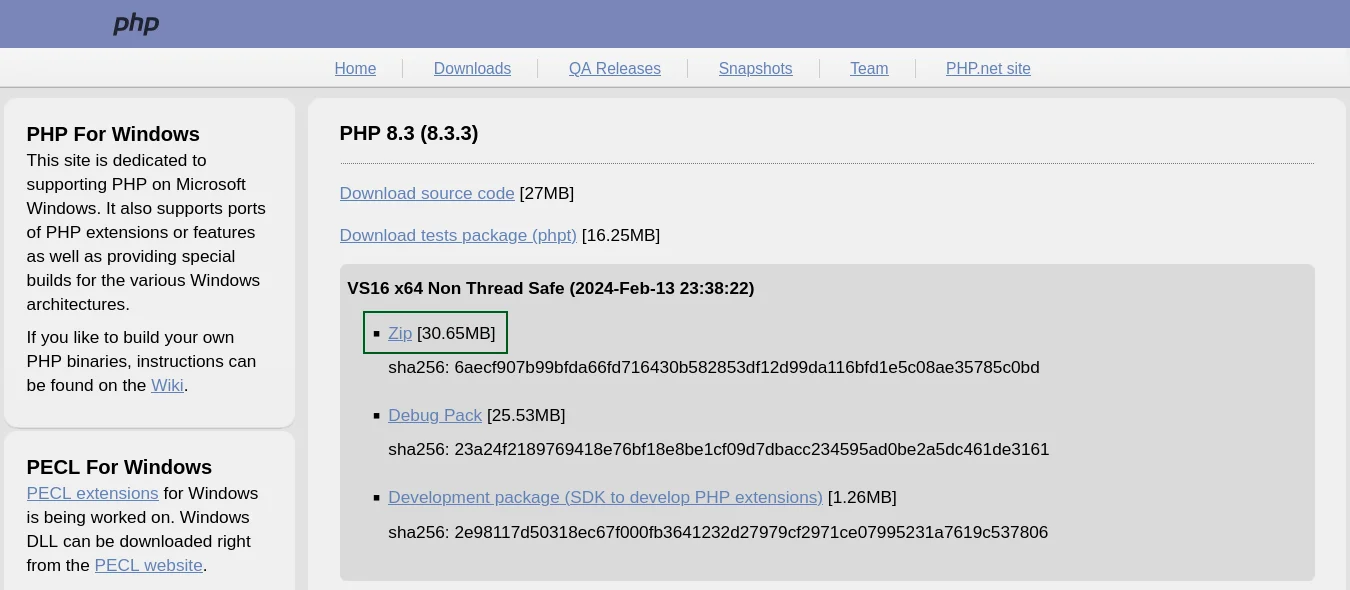
Заходим на сайт PHP https://windows.php.net/download и скачиваем последнею Non Thread Safe версию
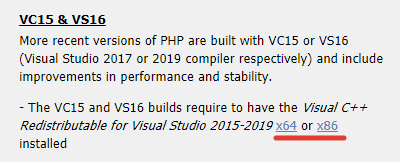
Если в Windows не установлены Visual C++ Redistributable для Visual Studio 2015-2019, их необходимо скачать (vc_redist.x64.exe и vc_redist.x86.exe) и установить.
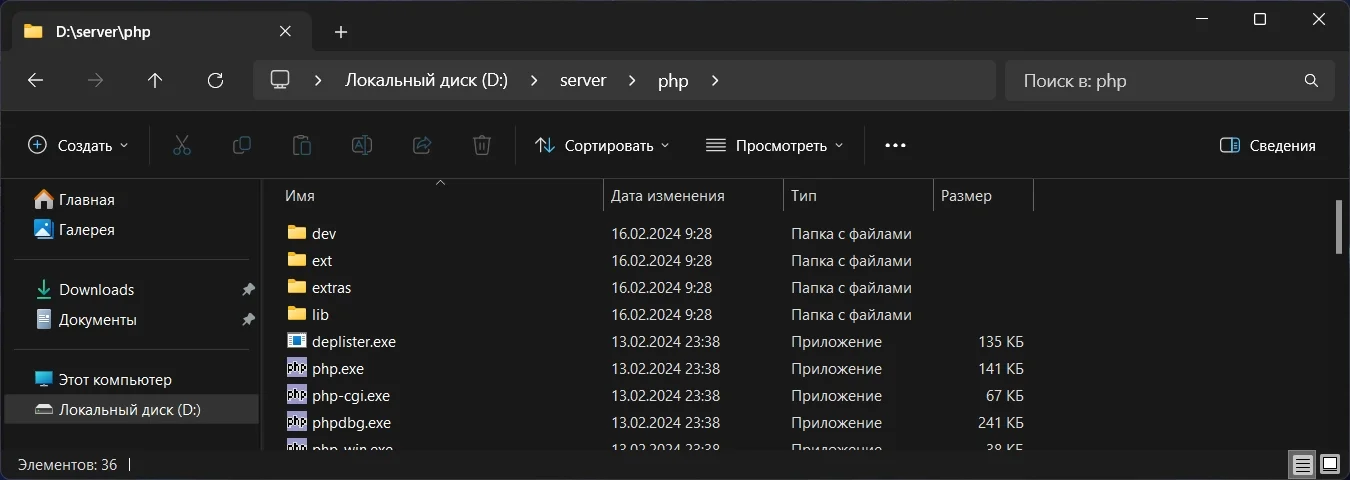
Извлекаем скаченный архив в папку D:\server\php\
3.2. Конфигурация PHP (php.ini)
По умолчанию в PHP содержатся два примера конфигурации php.ini-production и php.ini-development. Версия production используется для рабочих сайтов, в ней ошибки только записываются в лог файлы веб-сервера. Версия development используется при разработке, в ней ошибки выводятся на веб-страницу и записываются в лог файлы.
Копируем и переименовываем файл php.ini-production или php.ini-development в php.ini (это основной файл конфигурации PHP).
Открываем в тестовом редакторе файл php.ini (в моем случае D:\server\php\php.ini), находим параметр extension_dir и указываем папку с расширениями PHP
; Раскомментируем параметр для Windows (относительный путь)
extension_dir = "ext"
; Или можно указать полный путь до папки с расширениями
;extension_dir = "D:\server\php\ext"
Далее находим раздел Dynamic Extensions и включаем необходимые расширения
Сохраняем и закрываем файл.
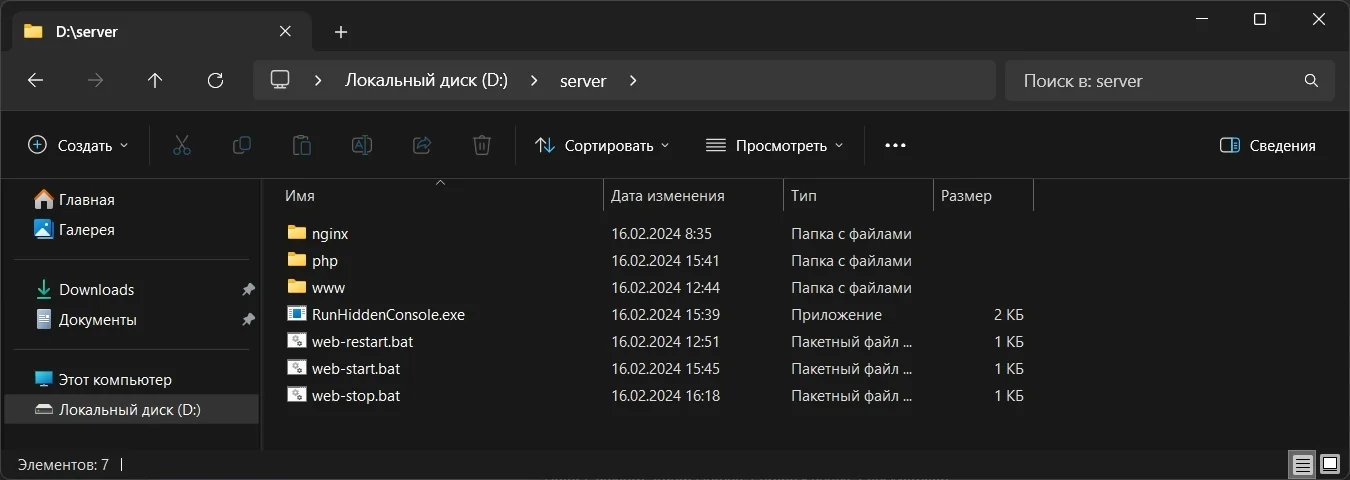
4. Скрипты запуска и остановки веб-сервера
В папке D:\server\ будут находится скрипты для управления веб-сервером.
После запуска php-cgi.exe (PHP FastCGI), он будет работать в открытом окне консоли. Если это не желательно, скачиваем утилиту RunHiddenConsole.exe в папку D:\server\ и тогда дальнейший запуск php-cgi.exe будет происходить через данную утилиту.
Создаем скрипт запуску веб-сервера web-start.bat
:: Запуск PHP FastCGI
:: Если файл RunHiddenConsole.exe существует, то запускаем PHP через утилиту
if exist "RunHiddenConsole.exe" (
	:: PHP будет запущен в скрытом режиме
	RunHiddenConsole.exe "php\php-cgi.exe" -b 127.0.0.1:9000 -c "php\php.ini"
) else (
	start php\php-cgi.exe -b 127.0.0.1:9000 -c "php\php.ini"
)

:: Запуск nginx
cd nginx
start nginx.exe
Создаем скрипт остановки веб-сервера web-stop.bat
taskkill /f /IM nginx.exe
taskkill /f /IM php-cgi.exe
Для удобства создаем скрипт перезапуска веб-сервера web-restart.bat
call web-stop.bat
call web-start.bat
В результате папка server выглядит следующим образом
5. Проверка веб-сервера nginx + PHP
Создаем в папке D:\server\www\ файл index.php следующего содержимого
<?php
	phpinfo();
?>
Запускаем веб-сервер скриптом web-start.bat
Открываем в браузере http://localhost/ и если все нормально, будет выведена информация о PHP.
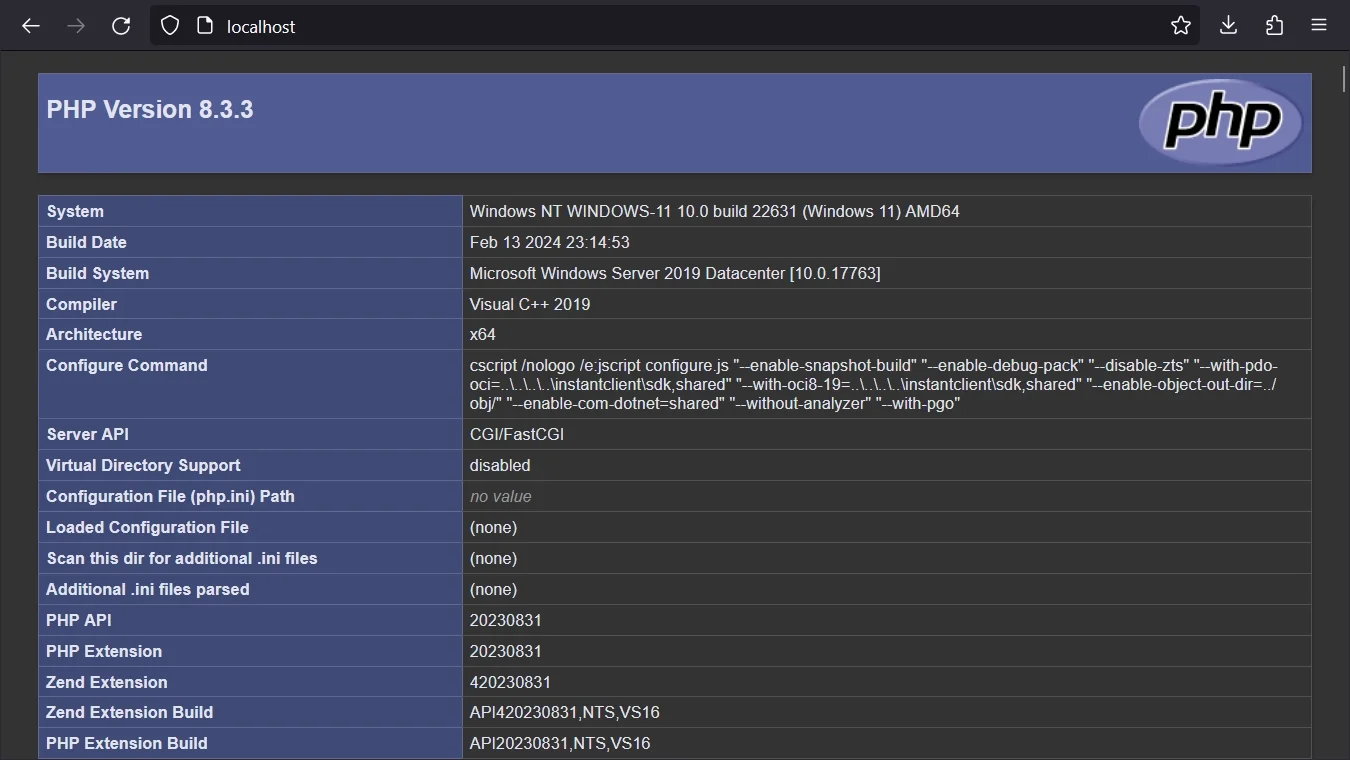
nginx в связке с PHP успешно установлены, настроены и работают.
Если что-то не работает, смотрим лог файлы nginx (D:\server\nginx\logs\) или запускаем PHP без скрытия консоли, чтобы увидеть ошибки в ней.
Introduction
In this post, I will go over details of how to install Nginx webserver and PHP on Windows 10, 11 or Windows Server. I will show where to download and how to do the configuration of Apache and integration with PHP.
I will also discuss some advanced configuration options for the setup as well.
Installing Nginx Webserver
Apache webserver files and all related information is located on the Nginx Opensource Project website.
Download Apache Webserver
You can access the Nginx source code repository if you are planning to build it from scratch. In our case, I will download a prebuilt version of the software from here.
Note that there are two versions of the server available to download.
- Mainline: This is the latest with the newest features. It should be used for testing the latest features. I find it very usable to development purposes as well.
- Stable: Lastest stable version to be used in production.
Either one of these will work for this guide. I will download the stable version to match what I have in production on my servers.
Go ahead and download the zip file from the Nginx website.
Installing Nginx Webserver
Once your download is complete, you can unzip the files in any location on your computer. I am going to install all the files in the C:\apps\nginx\ folder.
The structure of the folder will be:
C:\apps\nginx>dir
 Volume in drive C has no label.
 Volume Serial Number is 6615-FCF1

 Directory of C:\apps\nginx

04/09/2022  01:14 PM    <DIR>          .
04/09/2022  01:14 PM    <DIR>          ..
04/09/2022  01:10 PM    <DIR>          conf
04/09/2022  01:10 PM    <DIR>          contrib
04/09/2022  01:10 PM    <DIR>          docs
04/09/2022  01:10 PM    <DIR>          html
12/29/2022  01:47 PM    <DIR>          logs
04/09/2022  01:10 PM         3,751,936 nginx.exe
04/09/2022  01:14 PM    <DIR>          ssl-certs
04/09/2022  01:15 PM    <DIR>          temp
Copying the contents of the Nginx zip file is all that is required for a valid install of Nginx webserver on Windows.
In the next section I will go over details of running Nginx and serving file. But before we get to that let’s go over details of some important folders.
CONF Folder
Conf folder contains all configuration files, including the main nginx.conf file.
HTML Folder
html folder contains the default index.html file that comes with the webserver. html folder also has a 50x.html file that Nginx uses to show errors.
The default configuration will serve all files from this folder. You can override this behavior by using Virtual Host configurations. A setup I will review towards the end of this post.
LOGS folder
logs folder maintains logs, both access and error, for configured websites being served by Nginx.
Now that I have the default install complete, let’s go over details of running the webserver.
Running Nginx From Command Line
There are two ways to run Apache from the command line.
# First
C:\apps\nginx>nginx.exe

# Second
C:\apps\nginx>start nginx.exe
The first method will run the executable as a child process of the existing shell and will block until you exit the process by either killing the Nginx process through the Task Manager or by using another command prompt window and sending a stop or shutdown signal using the -s option to the nginx.exe executable.
C:\apps\nginx>nginx.exe -s stop (or use shutdown instead of stop)This will usually shutdown Nginx but I have found that the signal does not work consistently on Windows and therefore I use the Task Manager to kill the process.
Note: Pressing CTRL+C does not stop the Nginx webserver. Even closing the command prompt will not kill the Nginx process.
The second method uses the start command and will create a new command window that will execute the nginx.exe process and will exit. Even though the command prompt will exit the Nginx webserver will continue running.
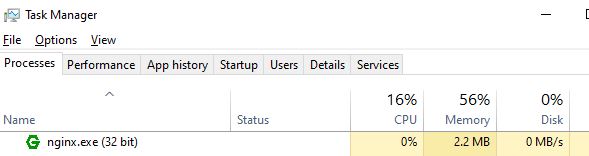
You can view the running process in Task Manager as well.
Validating Nginx Webserver Install
After Installing Nginx and running it from the command prompt you can go to the browser and open the URL http://localhost. The default index.html file will be viewable if all installation steps were correctly executed.
Installing Nginx as a Windows Service
Unlike Apache webserver on Windows, Nginx does not come with built-in commands to install it as a Windows service. You will have to download additional utilities to set it up as a service. Microsoft has a good article on how to create a user-defined service using Windows resource kit.
Another way to have Nginx start up when you login to Windows is by creating a link to nginx.exe from the Startup programs folder. Listed below are details on how to do this.
First press Windows+R key. This will pop open the run dialog. Enter shell:startup command.
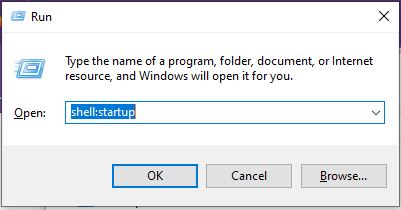
This will open the startup folder showing list of programs Windows will start upon user login.
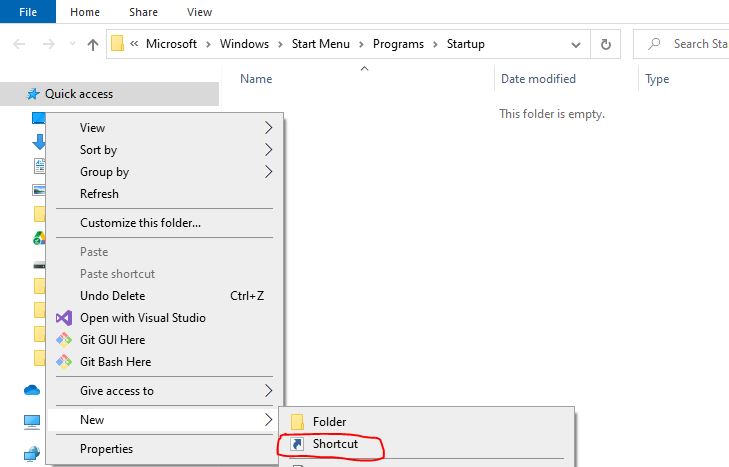
Create a new shortcut and browse to the Nginx folder and select nginx.exe.
Once this is complete you will have Nginx startup after logging in to Windows.
Installing PHP on Windows
To install PHP go to the website and download the latest version of PHP.
On the download page, you will find two different types of PHP downloads.
- NTS or Not thread-safe
- Thread-safe
I will be doing an install of PHP in FastCGI mode and therefore will be downloading the thread-safe version. Do note that NTS version has better performance.
Install PHP Locally
After downloading PHP zip file, unzip and copy the contents to a folder. I will install it at location C:\apps\lang\php. The folder contents will be:
C:\apps\lang\php>dir

 Directory of C:\apps\lang\php

01/15/2023  11:58 AM    <DIR>          .
01/15/2023  11:58 AM    <DIR>          ..
01/15/2023  11:51 AM           137,728 deplister.exe
01/15/2023  11:51 AM    <DIR>          dev
01/15/2023  11:51 AM    <DIR>          ext
01/15/2023  11:51 AM    <DIR>          extras
01/15/2023  11:51 AM         1,609,728 glib-2.dll
01/15/2023  11:51 AM            18,944 gmodule-2.dll
01/15/2023  11:51 AM        30,422,016 icudt71.dll
01/15/2023  11:51 AM         3,031,552 icuin71.dll
01/15/2023  11:51 AM            60,928 icuio71.dll
01/15/2023  11:51 AM         2,253,312 icuuc71.dll
01/15/2023  11:51 AM    <DIR>          lib
01/15/2023  11:51 AM         5,192,704 libcrypto-3-x64.dll
01/15/2023  11:51 AM            42,496 libenchant2.dll
01/15/2023  11:51 AM           289,792 libpq.dll
01/15/2023  11:51 AM           209,920 libsasl.dll
01/15/2023  11:51 AM           303,616 libsodium.dll
01/15/2023  11:51 AM         1,646,080 libsqlite3.dll
01/15/2023  11:51 AM           380,928 libssh2.dll
01/15/2023  11:51 AM           776,192 libssl-3-x64.dll
01/15/2023  11:51 AM             3,272 license.txt
01/15/2023  11:51 AM            20,972 news.txt
01/15/2023  11:51 AM           228,352 nghttp2.dll
01/15/2023  11:51 AM                43 phar.phar.bat
01/15/2023  11:51 AM            65,969 pharcommand.phar
01/15/2023  11:51 AM            69,120 php-cgi.exe
01/15/2023  11:51 AM            38,400 php-win.exe
01/15/2023  11:51 AM           142,336 php.exe
01/15/2023  11:51 AM            75,124 php.ini-development
01/15/2023  11:51 AM            75,272 php.ini-production
01/15/2023  11:51 AM            35,840 php8apache2_4.dll
01/15/2023  11:51 AM           932,824 php8embed.lib
01/15/2023  11:51 AM           278,016 php8phpdbg.dll
01/15/2023  11:51 AM         9,049,088 php8ts.dll
01/15/2023  11:51 AM           280,064 phpdbg.exe
01/15/2023  11:51 AM            30,888 readme-redist-bins.txt
01/15/2023  11:51 AM             5,364 README.md
01/15/2023  11:51 AM             2,285 snapshot.txt
The following files and folders are important to note:
EXT Folder
The ext folder includes all modules provided with PHP. Modules provided additional features which can be added to PHP by enabling them through config files.
PHP.INI* Files
Multiple sample config files are provided with PHP. We will use the config file to manipulate configuration settings as well as enabled various features.
Note: Please make a copy of the file php.ini-development and rename it to php.ini. This will be used later.
PHP.exe
This is a command line executable of PHP used to run command line scripts.
Add PHP to Windows Path
There is one additional step you will need to complete to ensure that all PHP modules will correctly work. For example, if you are going to enable the PHP CURL module, used with WordPress installs, then you need to add the PHP installation folder to the Windows path.
Edit the system environment variables by going to Settings and type env in the search box and open the “Edit the system” option. Click on the Environment Variables button and update the Path variable and add the PHP folder path.
Using my folder path, the setting will look like the following:
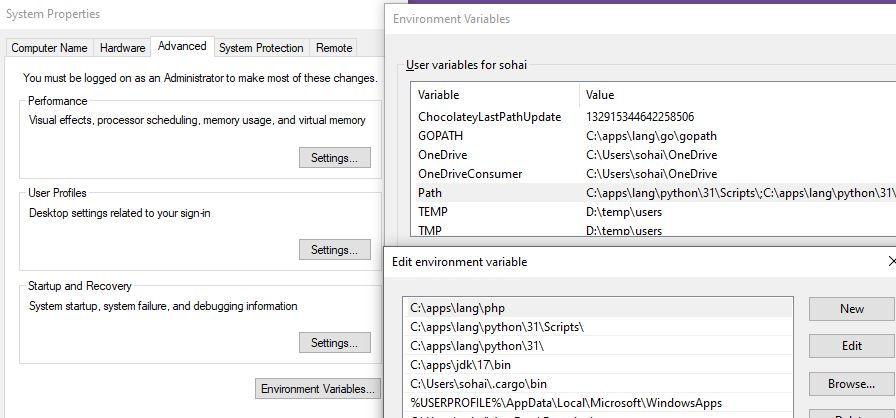
Once you have added the path. Save all changes.
Setup PHP FastCGI
Apache server on Windows can load PHP as a module. Nginx on the other hand does not directly load PHP as a module but uses the FastCGI mechanism to support web pages with PHP code.
Create PHP FastCGI Script
Create a new file, php-fcgi.bat in and save it to the folder C:\apps\lang\php\php-fcgi.bat.
Add the following content to php-fcgi.bat and save.
@ECHO OFF
ECHO Starting PHP FastCGI...
set PATH=C:\apps\lang\php;%PATH%   # I have already added PHP to the path so this line is optional.
start C:\apps\lang\php\php-cgi.exe -b 127.0.0.1:9123
Run the script from the command line.
C:\apps\nginx>start nginx.exeThis will start PHP fast CGI process in a new command prompt window.
Create PHP Test File
With the changes in place, let’s create a PHP test file.
Open a text editor and copy the following text to it.
In this file I am using a built in PHP funtion phpinfo, which prints PHP configuration as HTML text.
Save this file to the location C:\apps\nginx\html and name it index.php.
Testing Complete Nginx & PHP Install
Now that both Apache and PHP have been installed and configured, to test the setup by first making a change to Nginx webserver configuration file.
Open the file nginx.conf located at C:\apps\nginx\conf\nginx.conf and either add the following lines to the default server block or uncomment the existing PHP location block while updating the PHP port we setup in the script.
location ~ \.php$ {
	fastcgi_pass   127.0.0.1:9123;
	fastcgi_index  index.php;
	fastcgi_param  SCRIPT_FILENAME  $document_root$fastcgi_script_name;
	include        fastcgi_params;
}
After making the change above, start (or restart Nginx server) for the settings to take effect.
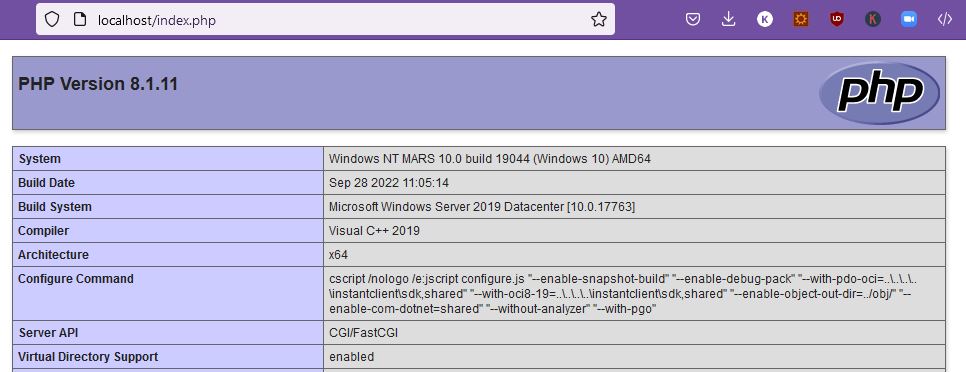
Once the server is up and running, then go to the browser and enter the url, http://localhost/index.php.
If everything is configured correctly a web page similar to the one below display PHP configuration will be shown.
This completes Nginx, PHP setup and configuration on computers running Windows 10, 11 or Windows Server.
Bonus Section
In this section, I will review some useful configuration tips.
Download All Configuration and Setup Files Used in this Post
You can download the complete set of configuration, executable scripts and utilities discussed and used in this tutorial from our website. Click on this link to download all tutorial files.
How to Start Nginx From Command Prompt
Go to the Nginx install folder. Let’s assume it is installed at C:\apps\nginx, and run the following command.
C:\apps\nginx>start nginx.exeHow to Stop Nginx on Windows from Command Prompt
You can use the -s signal options with either quit or stop command.
C:\apps\nginx>nginx.exe -s stopIf the Nginx webserver is not running then you will see the following message.
C:\apps\nginx>nginx.exe -s quit
nginx: [error] CreateFile() "C:\apps\nginx/logs/nginx.pid" failed (2: The system cannot find the file specified)
This just shows that the Nginx webserver is currently not running.
How to Install SSL Certification on Nginx
To install or setup a SSL certificate with Nginx you need to modify the server block.
The default nginx.conf file has a server block setup that is listening on port 80. Make the following changes to the existing server block or copy it to a new server block.
Here is an example of a server block set up to listen to incoming SSL requests. This configuration also supports PHP through FastCGI.
server {
	listen 443 ssl;
	listen [::]:443 ssl;

	server_name localhost;

	ssl_certificate C:/apps/nginx/ssl-certs/nginx.crt;
	ssl_trusted_certificate C:/apps/nginx/ssl-certs/nginx.crt;
	ssl_certificate_key C:/apps/nginx/ssl-certs/nginx.key;

	location / {
		root   html;
                index  index.html index.htm;
	}

	location ~ \.php$ {
		fastcgi_pass   127.0.0.1:9123;
		fastcgi_index  index.php;
		fastcgi_param  SCRIPT_FILENAME  $document_root$fastcgi_script_name;
		include        fastcgi_params;
	}
}
You can download sample certs from our website by clicking here.
How to Setup Nginx Virtual Hosts
For Nginx to serve multiple domains or hosts you need to create different server blocks, each one serving a different domain. To add an additional virtual host add the following code to existing nginx.conf file.
server {
	listen 80;

	server_name example.com;

	location / {
		root   html;
                index  index.html index.htm;
	}
}
This configuration adds the ability to serve domain example.com by Nginx.
Note: After making changes restart the Nginx webserver for it to pickup changes.
Hiding Command Prompt Windows For Background Tasks
I don’t like command prompt windows running programs but just hanging in the background. If you are like me then you probably would like to hide the PHP FastCGI program window.
There is a utility HideWindowsConsole that you can download my our website and use it to run PHP FastCGI.
Make the following changes to your PHP FastCGI script to start the script with a hidden window.
@ECHO OFF
ECHO Starting PHP FastCGI...
set PATH=C:\apps\php;%PATH%
C:\apps\misc\HideWindowsConsole.exe C:\apps\php\php-cgi.exe -b 127.0.0.1:9123
Conclusion
In this post, I went over details on setting up Nginx on the Windows operating system. On my Nginx web server page, you will find many more tutorials on Nginx.
- Сервер
- 14.06.2020
Структура директорий:
d:\server\ — директория для хранения ПО и данных сервераd:\server\bin\ — программное обеспечениеd:\server\bin\nginxd:\server\bin\phpd:\server\bin\mariadbd:\server\data\ — хранение данных (например логов)
Nginx
Скачиваем последнюю версию Nginx и размещаем в директории d:\server\bin\nginx.
Настройка
В файле конфигурации D:\server\bin\nginx\conf\nginx.conf нужно добавить строку внутри блока http
и создать директорию D:\server\bin\nginx\conf\vhosts
Виртуальный хост
Для теста можно создать хост для фреймворка Laravel. Для этого нужно разместить в директории D:\server\bin\nginx\conf\vhosts файл laravel.conf
server {
    listen 80;
    server_name laravel.test;
    root D:/projects/php/laravel.test/public;

    add_header X-Frame-Options "SAMEORIGIN";
    add_header X-XSS-Protection "1; mode=block";
    add_header X-Content-Type-Options "nosniff";

    index index.php;

    charset utf-8;

    location / {
        try_files $uri $uri/ /index.php?$query_string;
    }

    location = /favicon.ico { access_log off; log_not_found off; }
    location = /robots.txt  { access_log off; log_not_found off; }

    error_page 404 /index.php;

    location ~ \.php$ {
        fastcgi_pass   127.0.0.1:9000;
        fastcgi_param SCRIPT_FILENAME $realpath_root$fastcgi_script_name;
        include fastcgi_params;
    }

    location ~ /\.(?!well-known).* {
        deny all;
    }
}
После этого добавляем строку
127.0.0.1 localhost laravel.testв файл C:\Windows\System32\drivers\etc\hosts
PHP
Скачиваем PHP (Non Thread Safe) и размещаем в директории d:\server\bin\php. Также нужно установить компонент Visual C++ Redistributable for Visual Studio. Ссылку на эту программу можно найти в левой боковой колонке страницы
И подключаем необходимые модули расскоментируя строки extension=имя_модуля в файле D:\server\bin\php\php.ini
MariaDB
Скачиваем последнюю версию MariaDB. Я обычно выбираю MSI-пакет и устанавливаю в директорию d:\server\bin\mariadb. Впрочем эту программу можно разместить где угодно.
Но можно скачать архивный вариант и использовать разные версии сервера. Только нужно будет в bat-файлах настроить запуск и остановку сервера.
Запуск, остановка и перезапуск сервера
Нужно скачать полезную программу RunHiddenConsole.exe, которая позволяет скрыть консоль после запуска программы. Можно сохранить в директории d:\server\bin\.
bat-файлы для управления сервером
start.bat
pushd d:\server\bin\nginx
start nginx.exe
popd
d:\server\bin\RunHiddenConsole.exe "d:\server\bin\php\php-cgi.exe" -b 127.0.0.1:9000 -c "d:\server\bin\php\php.ini"
stop.bat
taskkill /IM nginx.exe /F
taskkill /IM php-cgi.exe /F
restart.bat
call stop.bat
call start.bat
EXIT /b
Источники:
- Развертывание PHP, FastCGI, nginx, Windows
- PHP-FastCGI on Windows

NGINX can interface with PHP on Windows via a FastCGI daemon, which ships with PHP: php-cgi.exe. You need to run php-cgi.exe -b 127.0.0.1: and use fastcgi_pass 127.0.0.1:; in the NGINX configuration file. After being launched, php-cgi.exe will keep listening for connections in a command prompt window. To hide that window, use the tiny utility RunHiddenConsole
First
- Download nginx, choose stable version.
- Download PHP, choose non stable version.
Second
- Extract nginx to «C:\nginx»
- Extract php to «C:\php»
- Create folder «www» in your «C» system , «C:\www»
Third
- Edit your nginx.conf at «C:\nginx\conf\nginx.conf»
-
Change root
root c:/www; -
Save nginx.conf
-
Open yout php folder, find php-ini-development
-
Edit your php-ini-development, like down below.
extension_dir = "ext" enable_dl = On cgi.force_redirect = 1 fastcgi.impersonate = 1 cgi.rfc2616_headers = 1 extension=php_gd2.dll extension=php_mbstring.dll extension=php_exif.dll extension=php_mysql.dll extension=php_mysqli.dll extension=php_pdo_mysql.dll date.timezone = "Asia/Jakarta" -
Save it.
-
Open your nginx.conf again
-
Uncoment on php configuration and change to this
# pass the PHP scripts to FastCGI server listening on 127.0.0.1:9999 location ~ \.php$ { fastcgi_pass 127.0.0.1:9999; fastcgi_index index.php; fastcgi_param SCRIPT_FILENAME $document_root$fastcgi_script_name; include fastcgi_params; } -
Save nginx.conf again.
Fourth
- Set Php path
- Open your environment variable
Create nginx start, stop & restart .bat
- Download RunHiddenConsole first, and move RunHiddenConsole.exe to «C:\».
-
Create file «nginx-start.bat», edit file with down below, make your php-cgi.exe port same as in nginx.conf
@ECHO OFF ECHO Starting PHP FastCGI... C:\RunHiddenConsole.exe C:\php8\php-cgi.exe -b 127.0.0.1:9999 ECHO Starting NGINX start nginx.exe popd EXIT /b -
Create file «nginx-stop.bat», edit with this
@ECHO OFF taskkill /f /IM nginx.exe taskkill /f /IM php-cgi.exe EXIT /b -
Create file «nginx-restart.bat»
    @ECHO OFF
    call nginx-stop.bat
    call nginx-start.bat
    EXIT /b
Test
- Doble click on «nginx-start.bat»
- Open your browser if every thing work you can see like this

- Create folder like «test-php» in «C:\www»
-
Create file «index.php»
<?php phpinfo(); ?> -
Open your browser and go to «localhost/test-php»
-
If every thing ok you can see

-
At the end , nginx php now working.


Notes:
Sometimes , nginx & php cannot working properly if your run with nginx-start.bat
so you need to run php manually
open your terminal, run your php «php-cgi -b 127.0.0.1:9999»
and now your nginx & php work properly