
Сетевая файловая система NFS является родным для мира Linux способом организации общего доступа к файлам по сети и ее взаимоотношения с Windows долгое время оставались напряженными. Однако последнее время ситуация начала меняться и Windows перешел от конфронтации к сотрудничеству с открытым ПО. Начиная с Windows 10 1607 (14393) в системе появился штатный NFS-клиент, который позволяет прозрачно подключать и использовать NFS-ресурсы. В данной статье мы расскажем, как его установить и использовать, а также разберем некоторые особенности эксплуатации.
Онлайн-курс по устройству компьютерных сетей
На углубленном курсе «Архитектура современных компьютерных сетей» вы с нуля научитесь работать с Wireshark и «под микроскопом» изучите работу сетевых протоколов. На протяжении курса надо будет выполнить более пятидесяти лабораторных работ в Wireshark.
Для установки NFS-клиента откройте оснастку Программы и компоненты и перейдите по ссылке Включение или отключение компонентов Windows, найдите там раздел Службы для NFS и включите его содержимое.

Также можно быстро выполнить установку при помощи PowerShell, для выполнения команды нужно запустить терминал с повышенными правами:
Enable-WindowsOptionalFeature -FeatureName ServicesForNFS-ClientOnly, ClientForNFS-Infrastructure -Online -NoRestartГрафических инструментов для подключения NFS-ресурсов нет, поэтому снова воспользуемся терминалом, только теперь запустим его без повышения прав:
mount -o anon \\192.168.233.184\mnt\nfs\doc Z:Команда mount поддерживает ряд опций, которые указываются после ключа -o, в данном случае опция одна — anon, что означает подключение анонимным пользователем. Затем указываем сетевой путь к экспортируемому ресурсу, обратите внимание, что NFS-клиент для Windows поддерживает только NFS v3 и поэтому путь нужно указывать не от корня NFS, а от корня файловой системы. И наконец буква диска куда будет примонтирован ресурс. Адрес NFS-сервера в нашем случае 192.168.233.184.
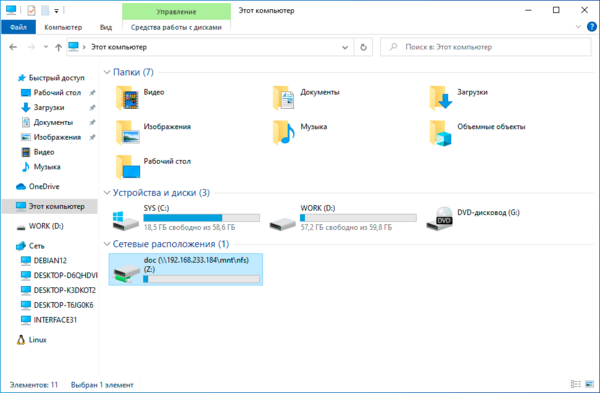
Если нигде не было допущено ошибок, то в проводнике появится новый сетевой диск с указанной буквой.
Для отключение используйте команду:
umount Z:У команды mount есть один существенный недостаток, сетевые диски, подключенные таким образом, не восстанавливаются при загрузке системы. Можно, конечно, пойти наиболее простым путем и добавить в автозагрузку пакетный файл с нужными командами, но лучше снова позвать на помощь PowerShell. Данную команду также нужно выполнять без повышения прав:
New-PSdrive -PSProvider FileSystem -Name Z -Root \\192.168.233.184\mnt\nfs\doc -PersistОбратите внимание, что букву диска для монтирования указываем без двоеточия, а опция -Persist предписывает подключить ресурс на постоянной основе.
Для отключения ресурса воспользуйтесь командой:
Remove-PSdrive -Name ZДля просмотра всех смонтированных NFS-ресурсов, неважно как они были подключены, используйте команду:
mount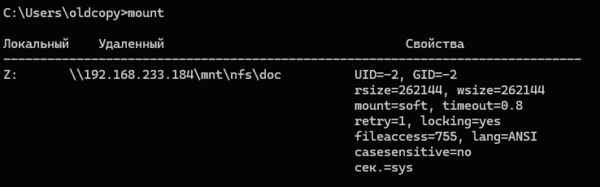
Как можем увидеть, при анонимном подключении Windows использует UID/GID = -2, если мы используем all_squash со стороны NFS-сервера, то это не имеет особого значения, в иных случаях нам может потребоваться указать иные идентификаторы. Это можно сделать через системный реестр, откройте ветвь:
HKEY_LOCAL_MACHINE\SOFTWARE\Microsoft\ClientForNFS\CurrentVersion\DefaultИ добавьте туда два параметра DWORD (32бит) с именами AnonymousUid и AnonymousGid и укажите в них нужные идентификаторы в десятичном виде. После чего перезагрузите компьютер.
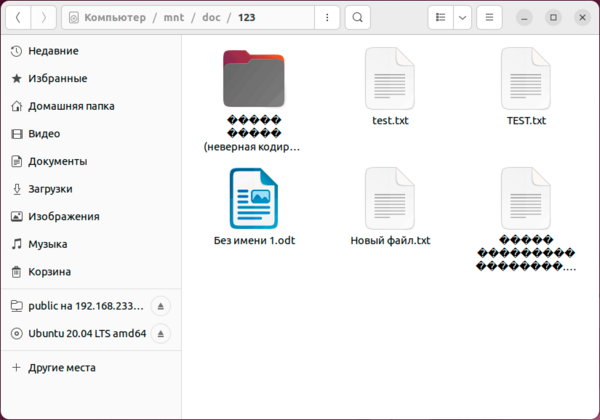
А теперь о проблемах. Для их понимания достаточно посмотреть на следующий скриншот:

Начнем с самого безобидного, регистра в именах файлов. Как мы помним — Linux система чувствительная к регистру, поэтому там TEST.txt и test.txt разные файлы. И если вы будете работать с ними в пределах NFS-ресурса, то проблем не возникнет, вы можете даже открыть оба файла одновременно, внести изменения и сохранить. Все это возможно потому, что NFS — это не протокол удаленного доступа, а именно сетевая файловая система.
Проблемы начнутся, если вы захотите скопировать их в свою систему. Неопытный пользователь вполне может допустить ошибку и перезаписать важный локальный файл.
А вот следующая проблема куда серьезней и не имеет приемлемого решения на сегодняшний день. Современные Linux системы давно работают с UTF-8, в то время как Windows продолжает использовать региональные кодовые страницы, например, CP-1251 для русского языка. Это приводит к тому, что имена файлов, набранные кириллицей (или любыми иными национальными символами) отображаются «крякозябликами». Сами файлы при этом доступны и могут быть отредактированы.
Если же мы со стороны Windows поместим на NFS-ресурс файл с кириллицей в имени, то со стороны Linux мы увидим веселые ромбики.
В качестве решения можно найти совет включить поддержку UTF-8 в Windows, которая пока находится в состоянии бета. Эта возможность доступа в языковых настройках панели управления.
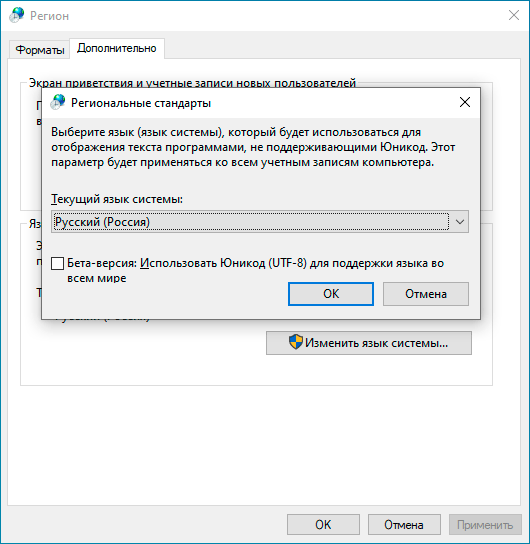
Но это решение из разряда «одно лечим — другое калечим» и покалечено будет гораздо больше, чем вылечено. Дело в том, что достаточно большое количество вполне современных программ ничего не знают об UTF-8 и не умеют с ним работать, в итоге веселые ромбики начнут попадаться вам в самых неожиданных местах вашей системы.
Поэтому, используя NFS-клиент для Windows следует четко понимать все плюсы, минусы и имеющиеся недостатки. Но в целом появление поддержки NFS в Windows — хорошо, так как делает поддержку гетерогенных сред проще.
Онлайн-курс по устройству компьютерных сетей
На углубленном курсе «Архитектура современных компьютерных сетей» вы с нуля научитесь работать с Wireshark и «под микроскопом» изучите работу сетевых протоколов. На протяжении курса надо будет выполнить более пятидесяти лабораторных работ в Wireshark.
In this short guide I will talk about how to mount a shared drive that is in Ubuntu or Debian that will be the server with the NFS (Network File System) drive, on a network drive accessible from Windows 10 who will play the role of client.
Table of Contents
-
Installation and configuration in Ubuntu or Debian as a server
- Drive options
-
Client installation and configuration in Windows 10
- Mounting the network drive
- Write permissions for the anonymous user
⇧
Installation and configuration in Ubuntu or Debian as a server
In the case of Debian, remove sudo from each command (it can even be executed the same).
Install the package «nfs-kernel-server»:
sudo apt install nfs-kernel-server⇧
Drive options
Then we edit the file /etc/exports with nano or with the editor of our preference:
sudo nano /etc/exportsThe file contains comments such as the following:
# /etc/exports: the access control list for filesystems which may be exported
#               to NFS clients.  See exports(5).
We add a line at the end with the following:
/home/user/folder 192.168.0.10(rw,sync,all_squash,anonuid=1000,anongid=1000)In the example above:
/home/user/folder it is the folder that will be shared by the network.
192.168.0.10 it is the IP of the client or clients that access the network resource. Only a static IP is shown, but we can use 192.168.0.1/24 to match between 192.168.0.1 and 192.168.0.254.
Mount options are in parentheses.
rwallow reading and writing.syncis optional in case we want a little more file integrity and avoid data loss, sacrificing a bit of performance.all_squashdowngrades the permissions of the files created from the client to the nobody user. For example, if in Windows 10 I am logged in as Administrator and created a new file, it will belong to user nobody.anonuidis the ID of the nobody user, or whatever user we want.anongidis The group ID of the user nobody.
In this case, I set anonuid and anongid to 1000, which is the user who owns the folder, /home/user/folder to preserve execute and write permissions.
With the changes made, we save the file CTRL + O, then Enter, and then we close with CTRL + X, this only if we use the nano editor from the terminal.
We restart the NFS server:
sudo service nfs-kernel-server restartWith this, the configuration on the server will be ready, any error that appears when restarting is necessary to check the configuration and obviously the description of the error.
⇧
Client installation and configuration in Windows 10
Windows comes with a default client, but it needs to be installed. The only detail is that I don’t remember if it is available in the Windows 10 Home version.
The easiest way to install it is to use the search bar and type Control Panel, because Windows 10 has several modern panels that hide the older options. Open Programs › Programs and Features and in the left panel we open Turn Windows features on or off.
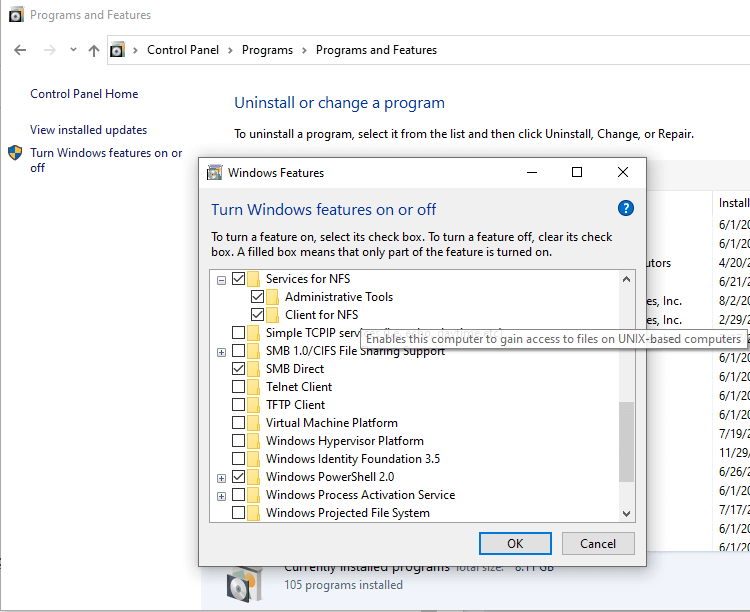
Mark the box Service for NFS with his two descendants Client for NFS and Administrative Tools. We click on OK and after some time the client will be installed.
⇧
Mounting the network drive
To mount the unit, we open the cmd (do not use PowerShell). We use the command:
mount -o anon \\192.168.0.20\home\user\folder k:The IP 192.168.0.20 is the server, followed by the shared folder and the drive letter that will be used. It is important to use the real full path of the resource as if we were personally on the server with the folder /home/user/folder, otherwise it won’t work. I have tried hiding the part of the path when mounting the drive, but it is a complicated process and not worth the extra effort.
The message, The command completed successfully. will indicate that everything is working properly.
⇧
Write permissions for the anonymous user
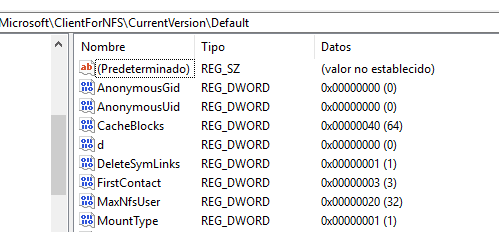
Normally and by default, Windows does not allow writing to this type of drive with the anonymous user. To enable writing, we have to open the Windows registry Regedit, and we headed towards: HKEY_LOCAL_MACHINE\SOFTWARE\Microsoft\ClientForNFS\CurrentVersion\Default.
There we will create a DWORD (32-bit) Value with the name AnonymousUid with the value of 0 with Base Decimal. Then create a DWORD (32-bit) Value with the name AnonymousGid with the value 0 with Base Decimal.
We have to restart the computer or the service Client for NFS, we can find it in the task manager in the Services tab.
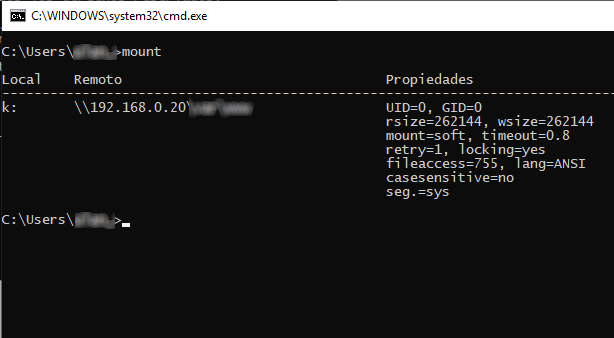
If we follow all the previous steps, and we already have the unit mounted, we open the CMD and execute the command mount, the mount will appear and in properties it will show UID=0 y GID=0. If any other number appears, check the entire procedure above.
Note: the procedure is almost the same in both Ubuntu and Debian, or any other variation like Kubuntu. No need to use Ubuntu Server. The NFS version to be used is 3 with Ubuntu 18.04 — 64-bits and Windows 10.
⇧
Related content

Servers used: RHEL 7.6 as NFS server & Windows 2016 as NFS Client
In this scenario, we have NFS server up and running with shares mounted across different Linux clients. The requirement here is, one of the share or a new share need to be mounted in Windows server with read/write access to AD user.
Installing NFS Client on Windows Server
Windows has built-in feature available to support NFS. However often this will not be enabled by default. We need to install this “optional feature” first.
Login to the client server. Ensure that you have admin rights to that server in order to do this.
- Start the command console as the administrator (Click Start > All Programs > Accessories > Windows Powershell or Command Prompt)
- Right-click the Windows Powershell or Command Prompt, and select Run as administrator.
- Verify that the feature is available using the command Get-WindowsFeature -Name NFS*
- You should be getting output as shown below:
Display Name                                            Name                       Install State
 ------------                                            ----                       -------------
[ ] Client for NFS NFS-Client Available- This shows, you have the feature available, but not installed.
- Run the command Install-WindowsFeature -Name NFS-Client to install the feature. Alternatively you can go through Add Roles and Features options with plenty of clicks. Command line are always easier way.
PS C:\Users\Admin_test> Install-WindowsFeature -Name NFS-Client

Success Restart Needed Exit Code      Feature Result
 ------- -------------- ---------      --------------
 True    No             Success        {Client for NFS}
Now that you have NFS Client features enabled. This now need to configure.
Configure NFS Client on Windows server
By default, NFS Client in windows uses Anonymous UID and GID value with -2. Often this works for just mounting, but give troubles while you try to insert / update contents.
- Open command prompt as admin and run command
nfsadmin client stop. This will stop NFS client services on your system. - We need to fix Anonymous
UIDandGIDto0to work better. Startregedit(Click search windows button, typeregedit) to enter registry editor. - Navigate to,
HKEY_LOCAL_MACHINE\SOFTWARE\Microsoft\ClientForNFS\CurrentVersion\Default- In the main window, right-click and select New > DWORD 32-bit Value. Set the name as
AnonymousGID. - Right-click and select New > DWORD 32-bit Value again. Set the name as
AnonymousUID. - Double-click on
AnonymousGIDandAnonymousUID, set the value as0and the base as Decimal respectively. - Click OK.
- Close Regedit.
- In the command prompt opened as admin, type
nfsadmin client start - Run the following command in a command prompt (not Powershell) to set the NFS configuration:
nfsadmin client localhost config fileaccess=755 SecFlavors=+sys -krb5 -krb5iNow that you have configured your NFS Client. We now need to export the directory in Linux to share.
Exporting directory in Linux with correct parameters
If Linux is using AD authentication, the NFS export features may not be work well with AD. So, it is better to use anonymous user with correct permission settings. This way we can avoid security risk by giving full read-write access to all of them ( user, group and others ). People tend to give permission level 777 to folders for easy fix. However, this invites more security risk.
NFS server in Linux always have a user called nfsnobody. When we mount a share in other places with anonymous option, this nfsnobody can play well with that. However we need to set its UID and GID correctly with the share we exports.
- Find out nfsnobody UID and GID using command
grep nfsnobody /etc/fstab - Often this will be 65534.
- Now export your share with options
rw,sync,no_root_squash,all_squash,anonuid=65534,anongid=65534 - If you are using /etc/exports, the content will be like this:
 /etc/exports:
/test_nfs_share *(rw,sync,no_root_squash,all_squash,anonuid=65534,anongid=65534) - The “all_squash” option maps all client requests to a single anonymous uid/gid on the NFS server
- If you are using NFS cluster on RHEL native cluster, run update the pcs resource with following command:
pcs resource update NFS_test_Share options=rw,sync,no_root_squash,all_squash,anonuid=65534,anongid=6553 - Set the folder permission:
chown nfsnobody:nfsnobody /test_nfs_share
chmod 770 /test_nfs_share - If you are using NFS cluster as stated above, don’t forget to refresh the resource by using the command:
pcs resource refresh NFS_test_Share
That’s all. We are now ready to mount the share on a windows server where it allowed to mount. You can do this using either of 2 ways as given below:
- Via command line as
mount -o anon \\<nfs server>\<exported share path> <drive letter>: - Open my computer –> This PC –> From top computer –> Map Network Drive
Your share is now ready and you can write contents to it.
Disclaimer:
The views expressed and the content shared in all published articles on this website are solely those of the respective authors, and they do not necessarily reflect the views of the author’s employer or the techbeatly platform. We strive to ensure the accuracy and validity of the content published on our website. However, we cannot guarantee the absolute correctness or completeness of the information provided. It is the responsibility of the readers and users of this website to verify the accuracy and appropriateness of any information or opinions expressed within the articles. If you come across any content that you believe to be incorrect or invalid, please contact us immediately so that we can address the issue promptly.
In this post I will explain how you can configure an NFS Server on a Windows 2016 Server and connect/mount the NFS exports on Linux clients, in my case I wanted to run a Linux virtual machine whist ensuring that the actual data resides on physical disks on my host machine ensuring that the data is automatically part of my nightly backup routine and did not need to run separate backup scripts on the VM(s).
A bit of background first…
In my home network I have a single (in an attempt to be eco-friendly) Intel i7 server running Windows Server 2016 Standard edition, I use this server for hosting my family media, files and various database engines and ActiveDirectory for local development (I’m a software engineer by trade!) in addition to several Hyper-V virtual machines that do various tasks, all of the virtual machines are running a derivative of Linux.
I currently have the following virtual machines setup and running on it (under Hyper-V):
- A Web Server and reverse proxy running Ubuntu Server 16.04 LTS – Hosting Gogs, Minio and various Nginx reverse proxy configurations for sites, services and API’s that sit on other VM’s in my network.
- An OpenVPN server running CentOS 7 – Providing secure VPN tunnel access for me when away from home.
- A Jenkins server running Ubuntu Server 16.04 LTS– Used for automated code testing and continuous integration.
- A MineCraft server running Ubuntu Server 16.04 LTS – Used by my daughter and friend to play online together.
In the past I used to run VMWare ESXi and hosted everything in their own virtual machine for better isolation and performance although since then, I had tested and was extremely happy with the performance of running virtual machines on top of Hyper-V and Windows Server so when I re-built my home server several months ago I decided to go down that route instead.
Anyway, enough of all that, let me explain why I have such a need for this kind of set-up…
My home server has 1x SDD (500GB for the host operating system and local applications) in addition to 2x WD Red 4TB hard drives in a hardware RAID1 configuration, I periodically backup this array over my LAN to a Buffalo NAS device.
My plan is to install a new VM running Ubuntu Server 16.04 that will host an instance of NextCloud, this will provide me, my family and friends with a free alternative to DropBox with masses of space in addition to all the other cool things that NextCloud offer such as encrypted video calls and the like.
By setting up an NFS server on the host operating system, instead of provisioning this Linux VM with a massive virtual hard disk (and taking drive space away from the host OS) I have instead provisioned it with a single 20GB virtual hard drive and will then use NFS shares on my Windows Server to host the files on the physical disk and thus be automatically part of my backup routine and alleviate the need for using rsync or rsnapshot etc. on the VM and transferring it at regular intervals.
Installing NFS Server on Windows Server 2016
First up, we need to login to our Windows Server and open up the Server Management tool, once open, click on the large text link labelled “Add Roles and Features” as shown here:
Once you have clicked on the “Add Roles and Features” link you should then be presented with this wizard:
Accept the default “Role-based or feature based installation” and then click Next…
On the next screen you’ll be asked to choose the server that you want to add the role or feature to, select your server from the list that appears (you’ll probably only have one in the list anyway!) and then click Next…
You will now be presented with a screen titled “Select server roles“, expand the following sections, then check the “Server for NFS” option as shown in the screenshot below:
Once checked, click on the “Next” button…
The next screen will just ask you to “Select features“, you can simply click “Next“!
Finally, you’ll be shown a screen asking you to confirm the installation items, we now choose “Install“, this screen and the selection of features and roles to add should look as follows:
Great! We now have an NFS server running on our Windows 2016 Server!
Creating an NFS share (export)
Now that we have the NFS server installed we can now go and share (or “export” as NFS likes to call it) a directory, as per my intro notes to this blog post, I plan to add this to my data RAID array.
So first up, lets go and create a new directory on our data disk (in my case this is my D: drive), I’ve decided to call the directory “NFS” and then, inside that folder we’ll create another directory called “VSVR-WEB040_data” – This folder will be explicitly shared with my VM (that is named ‘VSVR-WEB040‘, the “_data” portion I’ve just named as that is what I will mount the share locally on the VM as eg. /data).
Now that you have an NFS server installed you can share/export numerous directories to individual or multiple VM’s or even other physical servers in your network.
The result of setting up this directory structure is as follows:-
Next up, we’ll right-click on the newly created folder and choose “Properties” – This will enable us to “Share” it as well as lock down the access to only a specific IP address (that being my NextCloud VM)…
From the Properties window, select the “NFS Sharing” tab and then click on the button named “Manage NFS Sharing” this should then display the following window:
Ensure that the above screenshot matches your folder (eg. select all the checkboxes as per the above)
Next we’ll configure the permissions for the share, clicking on the “Permissions” button in the above screenshot will then display the following window:
As you can see from the above screenshot, the permissions for this share are very restrictive by default, this is basically saying that for ALL MACHINES trying to access this share they WILL NOT be granted any access.
We should leave the defaults as is as we will instead create another permission only granting our specific VM access, to do this click on the “Add” button, the following screen should then appear:
I’ve entered my virtual server IP address in to the “Add names” field already (172.25.87.40), you’ll then need to change the “Type of access” drop-down box to “Read/Write” and check the “Allow root access” checkbox.
Once completed, click the “OK” button!
That’s great, our Permissions form should now look as follows:-
Perfect! – We’re all done on the NFS server side configuration now!
Mounting the NFS share on the client-side
We can now mount the NFS share on our Ubuntu Server (the virtual machine), first we need to install the NFS tools, so we’ll login to our server (I’m using root but you should really use a user with sudo rights!)…
sudo apt-get install -y nfs-common
So before we configure fstab to automatically mount our NFS share at system boot, we’ll first test using the command line to make sure everything works as expected…
Before we can mount the NFS share we must first create a mount point, we will do this like so:
sudo mkdir /data
Now that we have created the mount point, we can mount the remote file-system as follows:
sudo mount -t nfs 172.25.87.20:/VSVR-WEB040_data /data
Once mounted you should be able to run the following commands, these commands will essentially create a file on our server and a text file with some content…
echo "This is a test file" > /data/test.txt
We can now jump back over to our Windows server and check our NFS server directory, we should see a file named test.txt and when we open it in Notepad, the contents should appear as follows:-
All going well, that has hopefully worked a charm for you and we can now move on to ensuring that our VM automatically mounts the NFS share at boot.
If for whatever reason wish to un-mount the share you can do it like so:
umount /data
Configuring fstab to mount our NFS share on system boot
Using a text editor on the Linux VM we will open up the /etc/fstab file and add the following line to the bottom of the file:
172.25.87.20:/VSVR-WEB040_data /data nfs auto,nofail,noatime,nolock,intr,tcp,actimeo=1800 0 0
You’ll obviously need to replace your server’s IP address with your own 😉
The result should look something like the below:
Once completed, save the file and you can now either attempt to automatically mount the share using this command:
sudo mount -a
…or you can reboot your server!
Once rebooted, login and you can then check and confirm that you have re-mounted your /data directory to the remote server by checking the output of:
df -h
You should be able to see and confirm the remote disk usage as demonstrated here:
OK, well that’s it, I hope this has been useful for you 🙂
Администрируя серверы на базе ОС Linux в среде, где в качестве основной клиентской ОС используется Windows, время от времени приходится сталкиваться с необходимостью что-либо скопировать с клиентской Windows на Linux-систему или наоборот, с Linux-системы на Windows. Чаще всего для этого используются возможности протоколов SSH/SCP с помощью таких инструментов, как например, утилита pscp.exe. Но когда приходится сталкиваться с файловыми Linux-серверами, позволяющими использовать возможности протокола NFS, мы можем задаться вопросами типа «может ли клиентская ОС Windows выступать в качестве NFS-клиента?», «есть ли в клиентской ОС Windows какая-то встроенная реализация клиента NFS?». Именно такие вопросы у меня возникли в период времени, который совпал с периодом, когда мы перебирались с Windows 8.1 на первый релиз Windows 10. Информация, которую в тот момент удалось найти по этому вопросу, заключалась в том, что функциональность NFS-клиента имеют только «старшие» редакции клиентских ОС Windows, такие как Windows 7 Ultimate/Enterprise, Windows 8/8.1 Enterprise и Windows 10 Enterprise. Однако в нашем случае использовалась ОС Windows 10 редакции Professional, поэтому пришлось отбросить эти мысли.
Недавно, читая обсуждения на форумах TechNet, я столкнулся с информацией о том, что с какого-то момента времени в ОС Windows 10 редакции Professional появилась возможность использовать функционал NFS-клиента. По информации из некоторых источников такая возможность появилась в Windows 10 версии 1607 (10.0.14393 / Anniversary Update).
Решив проверить эту информацию на имеющейся у меня под руками Windows 10 1803 (10.0.17134 / April 2018 Update) редакции Professional, я обнаружил, что теперь у нас действительно имеется возможность использования этого функционала.
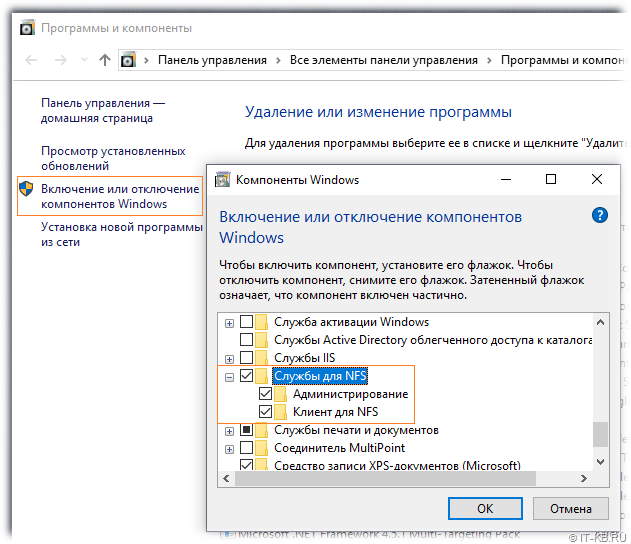
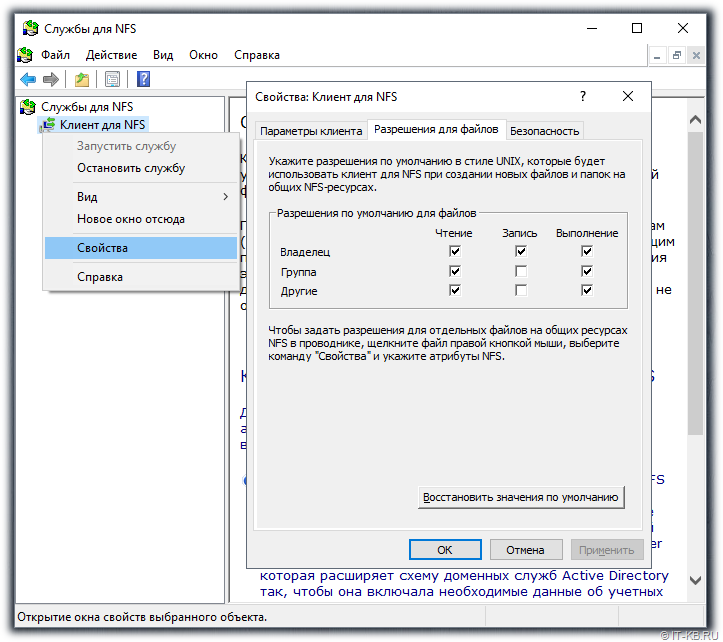
Чтобы включить NFS-клиента, можем воспользоваться оснасткой управления программами и компонентами appwiz.cpl. Здесь в перечне «компонентов Windows» можно найти доступные к включению «Службы для NFS«.
После завершения установки компонент в Панели управления в разделе «Администрирование» появится оснастка «Службы для NFS» (nfsmgmt.msc), в которой мы сможем управлять некоторым параметрами работы NFS-клиента.
Предполагаем, что на стороне NFS сервера уже настроены разрешения для доступа с клиентской системы, например, явно разрешён доступ по IP адресу клиента. Простейший пример установки и настройки NFS-сервера на стороне CentOS Linux можно найти в статье Вики «Установка и настройка сервера и клиента NFS в CentOS Linux 7.2».
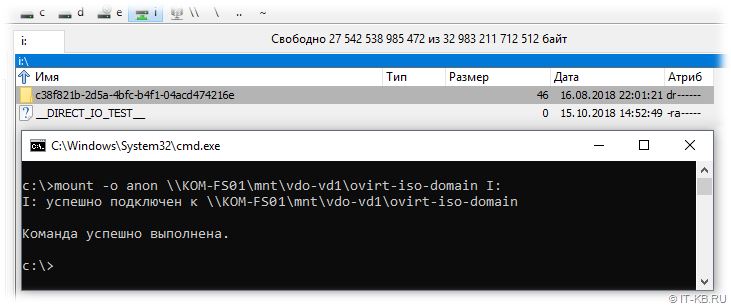
После настройки прав доступа на стороне NFS-сервера переходим на Windows 10 и выполняем подключение сетевого каталога с помощью утилиты «mount«. Простейший пример анонимного подключения к сетевому каталогу выглядит так:
mount -o anon \\KOM-FS01\mnt\vdo-vd1\ovirt-iso-domain I:
где:
- «-o anon» — подключаться с правами анонимного пользователя;
- «KOM-FS01» — имя NFS-сервера;
- «mnt\vdo-vd1\ovirt-iso-domain» — локальный путь к каталогу на NFS-сервере;
- «I» — буква диска Windows
Другие доступные параметры и ключи утилиты, можно посмотреть командой «mount /?«. Например, при подключении мы явно можем указать имя пользователь и пароль на NFS-сервере.
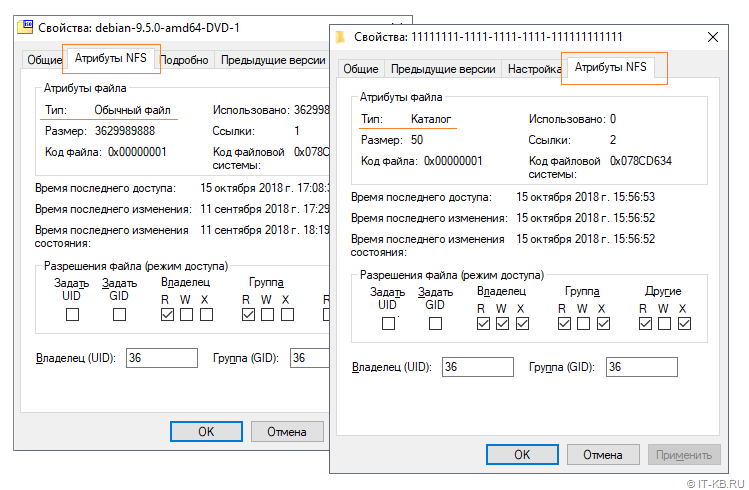
При открытии свойств каталогов и файлов в подключённом NFS-каталоге мы увидим специальную вкладку «Атрибуты NFS» с соответствующими атрибутами, в том числе и информацию о текущих разрешениях на каталог/файл, которыми, в случае достаточных прав, мы можем управлять.
При повторном выполнении команды mount без указания параметров, мы получим сведения о текущий подключениях NFS-клиента и свойствах этих подключений:
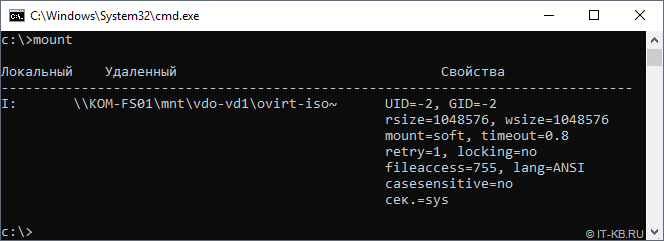
Здесь мы сможем увидеть то, с какими UID и GUID, выполнено подключение. Для анонимных подключений это по умолчанию -2/-2. Если по какой-то причине у нас возникнет необходимость изменить эти идентификаторы для всех анонимных клиентских подключений, то мы можем добавить пару отсутствующих по умолчанию параметров реестра типа DWORD (32-бита):
- AnonymousUid
- AnonymousGid
в ключ реестра:
HKEY_LOCAL_MACHINE\SOFTWARE\Microsoft\ClientForNFS\CurrentVersion\Default
В значениях созданных параметров можно записать нужные UID и GUID, которые будут использоваться при всех анонимных подключениях. На скриншоте ниже используется пример со значениями 1000:1000 (десятичное).
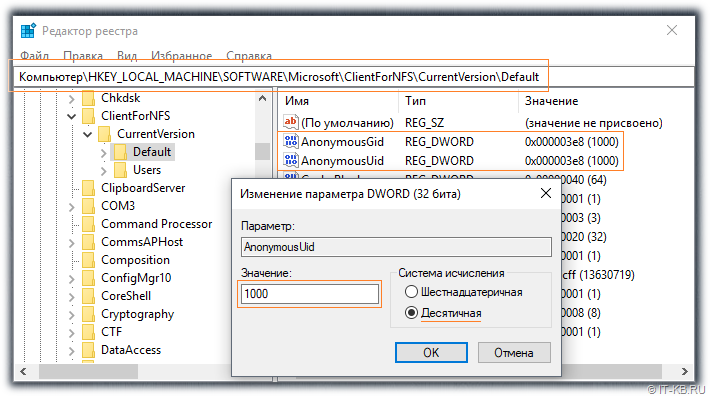
Если мы хотим, чтобы все анонимные подключения использовали root-овые идентификаторы, то в соответствующих параметрах реестра нужно указать AnonymousUid = 0 и AnonymousGid = 0. Указание root-овых идентификаторов может быть полезно в случае, если, например, нам требуется не только чтение, но запись в подключенном NFS-каталоге, а удалённый NFS-сервер разрешает запись только root-пользователю и/или членам группы root.
Для вступления изменений в силу потребуется выполнить остановку и повторный запуск службы клиента NFS из ранее упомянутой оснастки «Службы для NFS» (nfsmgmt.msc).
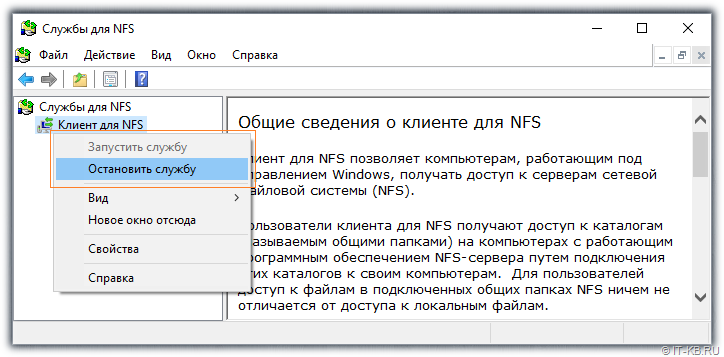
Либо, если перезапуск компьютера не составляет проблемы, то для вступления изменений в силу можно выполнить и перезагрузку клиентского компьютера.
Здесь хочу сделать маленькое отступление относительно перезапуска службы клиента NFS и поделиться своими наблюдениями.
Мои попытки перезапускать системную службу «Клиент для NFS» (NfsClnt) через стандартные механизмы, такие как оснастку управления службами services.msc или утилиту «net«, показали, что это по какой-то причине приводит к невозможности запуска службы после её остановки. Поэтому для перезапуска NFS-клиента лучше использовать именно «родную» оснастку. Хотя, опять же, замечено, что многократные остановки/запуски службы в оснастке «Службы для NFS» также могут привести к неадекватной работе NFS-клиента. В результате чего, например, утилита «mount» может перестать подключать NFS-каталоги, выдавая ошибку сети:
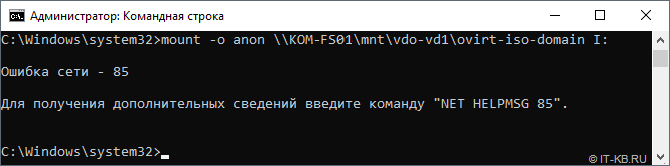
В таких случаях помогает только перезагрузка клиентского компьютера, после которой всё снова начинает работать.
После того, как нужные нам изменения внесены в реестр и служба клиента NFS успешно перезапущена, снова попытаемся подключить NFS-каталог и посмотрим командой «mount» сведения о подключениях.
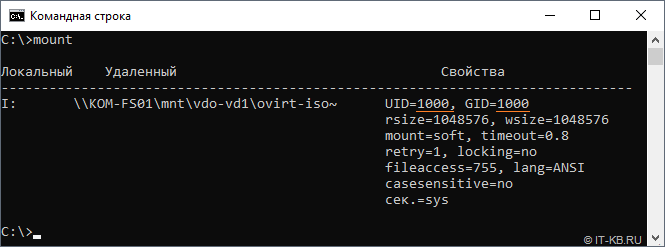
Как видим, теперь в качестве идентификаторов безопасности выступают именно те, что были ранее нами указаны в реестре.
Отключение подключенных по протоколу NFS сетевых ресурсов выполняется также просто, как и подключение, только с помощью другой утилиты – «umount«
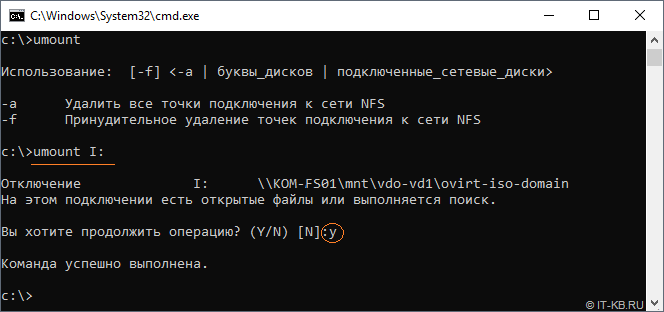
В общем это хорошо, что теперь у пользователей ОС Windows 10 редакции Professional есть штатная возможность работать с сетевыми файловыми ресурсами по протоколу NFS. Будем использовать это в работе.