
В первых версиях Windows 10 для входа в Центр управления сетями и общим доступом требовалось выполнить те же действия, что и в предыдущих версиях ОС — нажать правой кнопкой мыши по значку подключения в области уведомлений и выбрать нужный пункт контекстного меню. Однако, в последних версиях системы этот пункт исчез.
В этой инструкции подробно о способах открыть центр управления сетями и общим доступом в Windows 10, а также некоторая дополнительная информация, которая может оказаться полезной в контексте рассматриваемой темы.
Запуск Центра управления сетями и общим доступом в параметрах Windows 10

Первый способ попасть в нужный элемент управления сходен с тем, что присутствовал в предыдущих версиях Windows, однако теперь выполняется за большее количество действий.
Шаги для того, чтобы открыть Центр управления сетями и общим доступом через параметры будут следующими
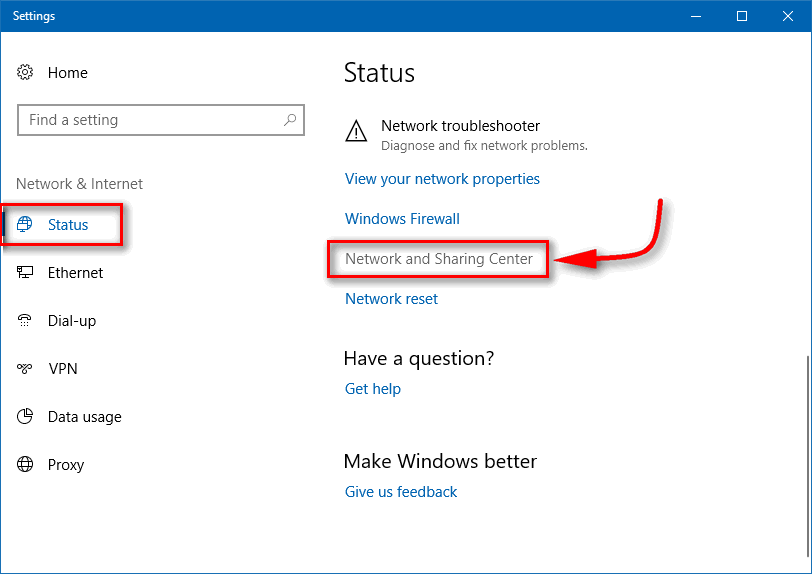
- Нажмите правой кнопкой мыши по значку соединения в области уведомлений и выберите пункт «Открыть параметры сети и Интернет» (или же можно открыть Параметры в меню Пуск, а затем выбрать нужный пункт).
- Убедитесь, что в параметрах выбран пункт «Состояние» и внизу страницы нажмите по пункту «Центр управления сетями и общим доступом».


Готово — то, что требуется, было запущено. Но это не единственный способ.
В Панели управления
Несмотря на то, что некоторые пункты панели управления Windows 10 стали перенаправлять на интерфейс «Параметров», находящийся там пункт для открытия Центра управления сетями и общим доступом остался доступным в прежнем виде.
- Откройте панель управления, на сегодняшний день проще всего это сделать, используя поиск в панели задач: просто начните набирать «Панель управления» в нем для открытия нужного пункта.
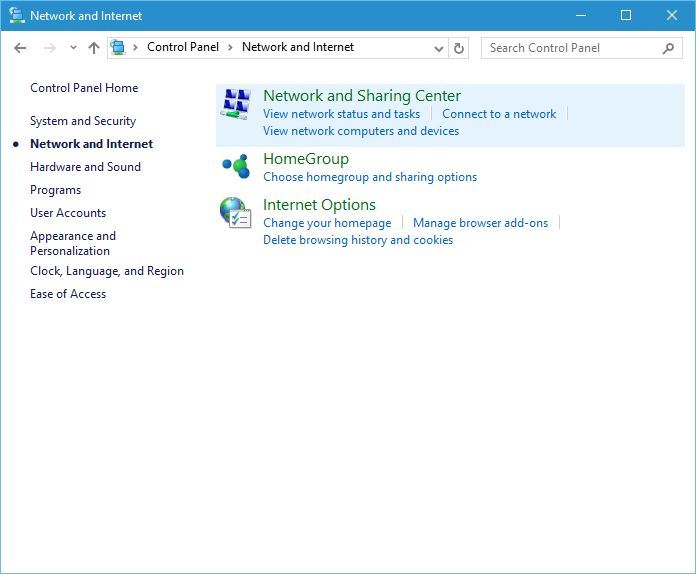
- Если у вас панель управления отображается в виде «Категории», выберите пункт «Просмотр состояния сети и задач» в разделе «Сеть и Интернет», если в виде значков, то среди них вы найдете «Центр управления сетями и общим доступом».


Оба пункта откроют нужный элемент для просмотра состояния сети и другими действиями над сетевыми подключениями.
С помощью диалогового окна «Выполнить»
Большинство элементов панели управления можно открыть с помощью диалогового окна «Выполнить» (или даже командной строки), достаточно знать необходимую команду. Такая команда есть и для Центра управления сетями.
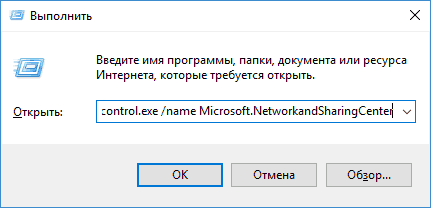
- Нажмите клавиши Win+R на клавиатуре, откроется окно «Выполнить». Введите в него следующую команду и нажмите Enter.
control.exe /name Microsoft.NetworkandSharingCenter

- Откроется центр управления сетями и общим доступом.
Есть и еще один вариант команды с тем же действием: explorer.exe shell:::{8E908FC9-BECC-40f6-915B-F4CA0E70D03D}
Дополнительная информация
Как упоминалось в начале руководства, далее — некоторая дополнительная информация, которая может быть полезна на тему:
- Используя команды из предыдущего способа, вы можете создать ярлык для запуска Центра управления сетями и общим доступом.
- Для открытия списка сетевых подключений (Изменение параметров адаптера) можно нажать Win+R и ввести ncpa.cpl
Кстати, если вам потребовалось попасть в рассматриваемый элемент управления из-за каких-либо проблем с Интернетом, возможно, пригодится встроенная функция — Сброс сетевых настроек Windows 10.
The Network and Sharing Centre is one of the most useful system settings in Windows 10. It allows users to view network connections, modify settings and manage access to various network resources. In this article we will explore how to access and use the Network and Sharing Center to enhance your productivity.
How to Access the
Network & Sharing Center in Windows 10
There are multiple ways you can access Network and
Sharing Center in Windows 10.
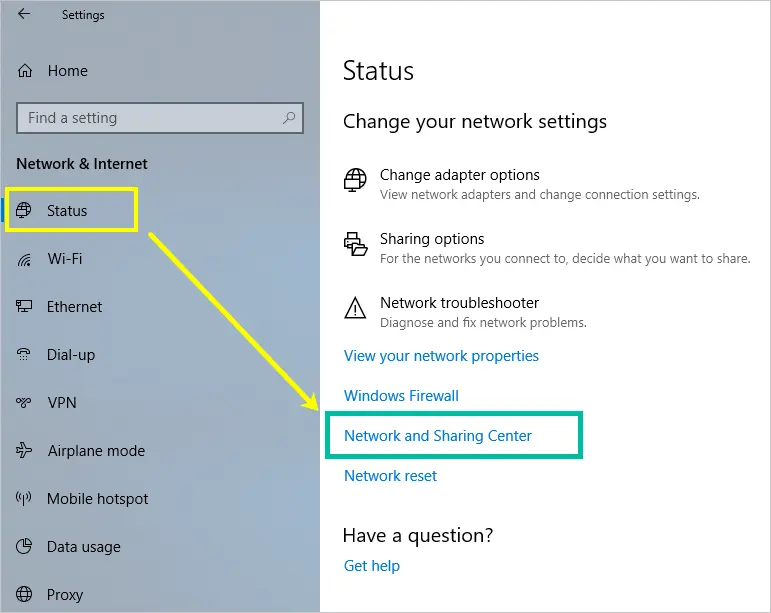
- Open the Windows Settings app by pressing “Win +
I” keys on your keyboard. And navigate to “Network and Internet” settings.

- Scroll down the status and click the “Network
and Sharing Center” link. It will open on a new window.
Alternatively, you can type, “network sharing” in Windows search box and open Network and Sharing Center. Otherwise you can open “Control Panel\Network and Internet\Network and Sharing Center” in File Explorer to open the settings in Control Panel.
Details on Network
and Sharing Center
The first
thing you see on the Network and Sharing window is a list of your active
network(s) connection status, as well as access and network type.

You can view many options to change the network settings below your active connection and on the left sidebar.
Customize Private
and Public Network Profiles
Under
the name of the active network, you can see the type of the network as “Private”
or “Public”. For example, in the above screenshot it shows as a public network.
Windows 10 allows you to customize the settings for the two profiles depending
on the level of the privacy you want. For instance, you can allow device
visibility and sharing when you are connected to your home network (private)
and disable sharing on a public network.
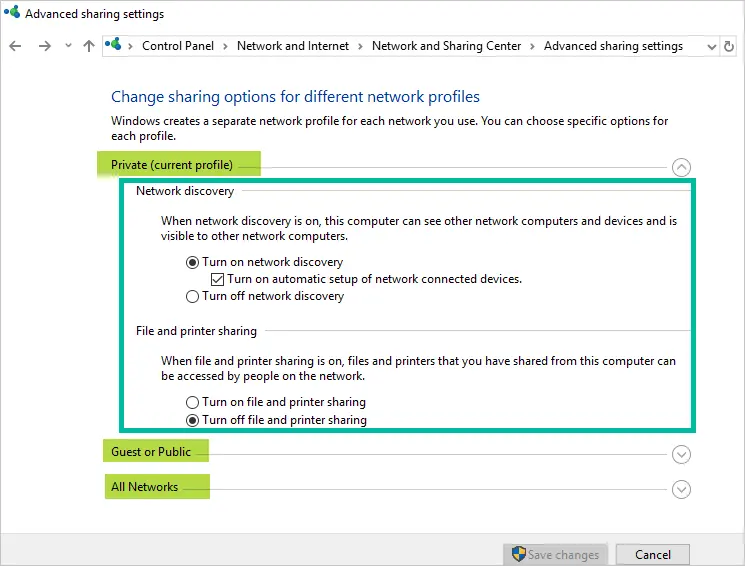
On
the left pane, go to “Change advanced sharing settings”. You will see three
groups for private, guest or public and all networks profile. Expand the
profile you want to change the settings and choose the available options.
Private Network
Profile Settings
Let
us expand the “Private” settings by clicking the down-facing arrow. You can
check the “Turn on network discovery” to allow your PC to find other computers
and devices on the network. This will also make your computer visible to other computers
in the network. Check the “Turn on file and printer sharing” option to allow
access to shared resources.
Public Network
Profile Settings
To
enhance privacy on public networks, expand the “Public” settings and turn off
both the network discovery and file & printer sharing.

All Network Profile
Settings
Click
on the “All Network” option to expand the section. You will see bunch of
options related to sharing of the resources that will affect both private and
public network profiles.

- Turn on public folder sharing to allow read and
write access to public files. - Turn off the option to limit the access to users
logged on to your computer. - Click the link under the “Media streaming”
option where you can turn on/off the feature to allow users to control access
to multimedia files on your computer.

- Under the “File sharing connection”, pick a file
encryption option to protect the sharing connection. - Finally, set “Password protected sharing” to
allow resources sharing with only authenticated users. - After changing the settings, click the “Save changes”
button at the bottom of the window.
Customizing the Current
Connection
Now,
let’s check how to customize the current active network connection. Go back to
main screen of “Network and Sharing Center” and click on your current connection.
It will be the name of your Wi-Fi name showing as a link against “Connections:”
option.
- This opens a “Wi-Fi Status” dialog, displaying information about the current connection. You can check the details including connection duration, connection speed and signal strength for wireless connections among other details.
- Additionally, you can use the “Disable” button to disconnect your PC from the network and “Diagnose” button to troubleshoot and fix connection issues.
- To enable/disable connection sharing, go to
“Properties” and then select the “Sharing” tab. - Under the “Internet Connections Sharing”, you
may tick the boxes to allow other users to connect to the internet through your
PC, as well as to control the shared connection. Click “Ok” to confirm the
changes.
- Close the network status dialog.
Setting Up New
Network or Connection
Go
back to the main screen of the Network and Sharing Center. Click on the “Set up
a new connection or network” link under the “Change your network settings” section.
This gives you the option to configure an access point or a router and to manually
set up a dial-up or VPN connections.

From
the resulting set-up wizard select the “Connect to a workplace” option and
click “Next”. On the next screen, choose an option to create a new connection. This
will give you two options to connect to a workplace network remotely:
- Either through a VPN over the internet or
- Directly through a dial-up connection.

Select
one of the options and follow the wizard to finish creating a new network
connection.
For
the other options:
- “Connect to the internet” – To manually connect to the internet via a dial-up or broadband network.
- “Set up a new network” – Used to view and configure routers and access points.
- “Manually connect to a wireless network” to add and connect to a new wireless network.
Troubleshooting
Network Problems
The
simplest way to identify a network problem is by clicking the “Change adapter
settings” option. This displays all your “Network connections” and their
status.
- If a network has an issue, you will notice a red
“X” mark attached. To diagnose the problem, click on the network and click
“Diagnose this connection” from the menu above the list.

- This will open Windows Network Diagnostics dialog. Windows will check for errors and suggest a solution. Follow the instructions to fix the network adapters error.

Conclusion
Windows
10 Network and Sharing Center gives you full control over your network
connections. It also helps to enhance resource sharing and privacy. The list
above is not exhaustive. You can do much more by tweaking these settings to
achieve the best performance.
Contents
Where is Network and Sharing Center in Windows 10? Has it disappeared? Actually, not yet. The thing is Microsoft gradually moves the applets from the Control Panel to a new Settings app.
If you have Windows 10 Fall Creators Update (version 1709) or later version installed on your PC, you won’t see familiar “Open Network and sharing center” any more when you right-click the Ethernet or Wi-Fi icon the Taskbar. You see “Open Network and Internet settings” instead.
Windows 10 is like a living organism that is constantly changing and evolving. That’s why we have to modify our tutorials related to this OS because after each update there are many things that won’t work any more.
In this post we will explain how to find and open Network and Sharing Center in Windows 10 of the latest version and create a shortcut on the desktop. By the way, there is a high probability that this guide won’t help after the next Windows 10 update.
How It Was Earlier And How It Is Now
Here is how it was before the Fall Creators Update:
How it is now:

Where is Network and Sharing Center in Windows 10 Version 1709 And Higher
To find your familiar applet you need to perform the following steps.
Method 1 to open the applet
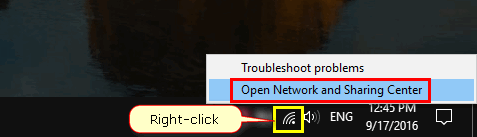
- Right-click the network icon in the Taskbar.
- Select “Open Network and Internet settings”:

- Now scroll down and click on the link named “Network and Sharing Center”:

Done!
Method 2 to open Network and Sharing Center
If you are unable to use method 2 for some reason, you can open the applet using the command line or a bat-file.
- Press Win+R.
- Copy and paste:
control.exe /name Microsoft.NetworkAndSharingCenter
- Hit Enter:
Create A Shortcut To Network And Sharing Center In Windows 10
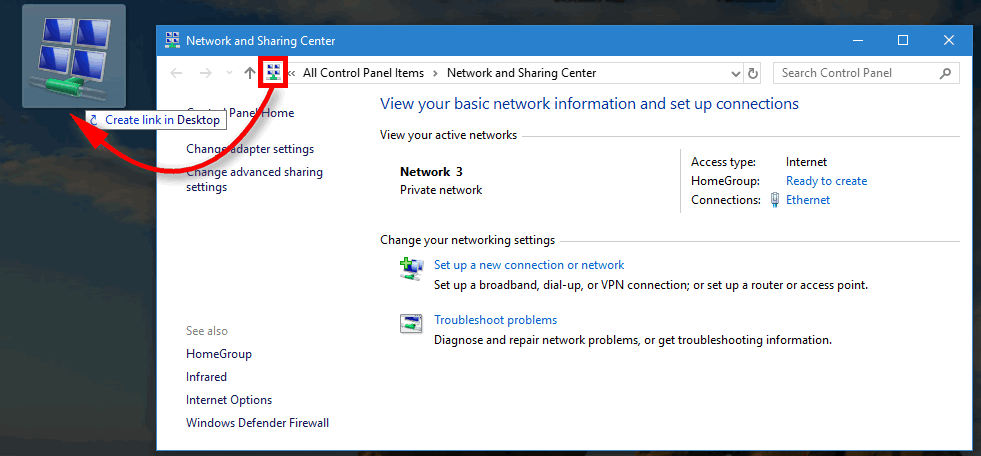
I think, you won’t feel happy to perform all those steps every time you need to open the deprecated applet. So, create a shortcut. All you need to do is drag and drop the icon from the address bar to the desktop:
It’s that easy!
The simplest way to do the same on Windows 11 is to:
- Press Start button on your keyboard.
- Type control
- Hit Enter.
- Click on Network and Sharing Center.

Note, that if you type Network and sharing in the search you will probably get to another section in the modern Settings app but not to what you are searching for.
Today, most of us access the internet on daily basis, and although our internet connections are created automatically by Windows 10, sometimes you need to change your network settings and make certain adjustments.
The simplest way to do that is to use Network and Sharing Center, so today we’re going to explain to you what is Network and Sharing Center and how to use it.
What is Network and Sharing Center and how does it work?
Network and Sharing Center was first introduced in Windows 7, as a part of the Control Panel, and it has remained a part of Windows through Windows 8 and Windows 10.
If you ever used Network and Sharing Center in Windows 7, you should know that it looks almost the same in Windows 10.
The only option that you might miss is the Manage wireless networks option which is now moved to a different place in order to allow users to connect quickly to a certain wireless network or change the wireless settings.
If you never used Network and Sharing Center before, you should know that you can access it with just a few clicks.
How to open the Network and Sharing Center in Windows 10?
1. From the taskbar
The simplest way to open Network and Sharing Center is to right-click your network icon in the bottom right corner and select Open Network and Sharing Center.
2. Using the Control Panel
Another way to open Network and Sharing Center is to use Control Panel. To access Control Panel and Network and Sharing Center do the following:
- Press Windows Key + X to open Power User Menu. Select Control Panel from the list.
- When Control Panel opens, click on Network and Internet section.

- Now select Network and Sharing Center.

3. By searching with the search bar
You can also access Network and Sharing Center by using the Search bar. To do that just press Windows Key + S, enter Network, and select Network and Sharing Center from the list of results.
Most users don’t know what to do when the Windows search box goes missing. Read this article to learn how you can get it back in just a couple of steps.
What are the things that you can do in the network and sharing center?
The first thing that you’ll notice when you open Network and Sharing Center is the View your active networks section.
This section gives you all the important information such as the name of your currently connected network as well as the type of network you’re connected to.

From this section, you can also use create your Homegroup by clicking Ready to create a link.
Homegroups allow computers on the same network to quickly and easily share files and printers, so if you have several computers connected to a network, you might want to create a Homegroup.

Next, there’s a Connections section, and you can click the connection that is listed there to see its details. For example, you can see the speed of your network connection and the number of received or sent bytes.
If you want to know more about your connection, there’s a Details section that shows you the name of the network adapter, your current IP address, as well as your MAC address.
If you want to know more about IP addresses, we already answered what is an IP address in one of our previous articles.
Due to privacy and security concerns, we strongly recommend to secure your network with a reliable VPN (Virtual Private Network). Get now Cyberghost VPN, a leader in the VPN market. It protects your PC from attacks while browsing, masks your IP address, and blocks all unwanted access.
We should also mention that you can disable your network connection from this window by clicking the Disable button.
Sometimes your network connection might have certain problems, and one of the simplest solutions is to disable your network connection and enable it again.
If disabling the connection doesn’t work, you can always use the Diagnose button that will scan for problems and automatically repair them.
Lastly, there’s a Properties button that allows you to update or remove your network driver and configure your network adapter. In addition, by using this window you can also set your IP address to be dynamic or static in your network.
Next, we have changed your networking settings section. In this section, you can create a new connection by using the Set up a new connection or network link.
When creating a new connection you’ll have three options: Connect to the Internet, Set up a new network, and Connect to a workplace.
Depending on what you need, you just need to click one of the options and follow the instructions in order to create a new connection.

If you have issues with your network adapter, there’s a Troubleshoot problems section that allows you to automatically fix various problems.
When you open Troubleshoot problems section you’ll see Internet Connections, Shared Folders, HomeGroup, Network Adapter, Incoming Connections, and Printer options.
By choosing one of these options you’ll run a troubleshooter for a specific option that will automatically scan and fix problems for you.

Does the troubleshooter fail to load with an error? Follow this useful guide and fix it in just a couple of simple steps.
There are also several options available in the sidebar. The change adapter settings option will list all network adapters that you have and allow you to quickly disable them, rename them or change any of their settings.

The next option is Change advanced sharing settings, and this option allows you to change how certain network profile works.
For example, you can turn network discovery on or off, thus allowing your computer to see other network devices that are connected to this network.
You can also turn on or off file and printer sharing, and change the way how homegroups work.

The next option is Internet Options, and from here you can change various settings related to your internet connection and Microsoft Edge or Internet Explorer.

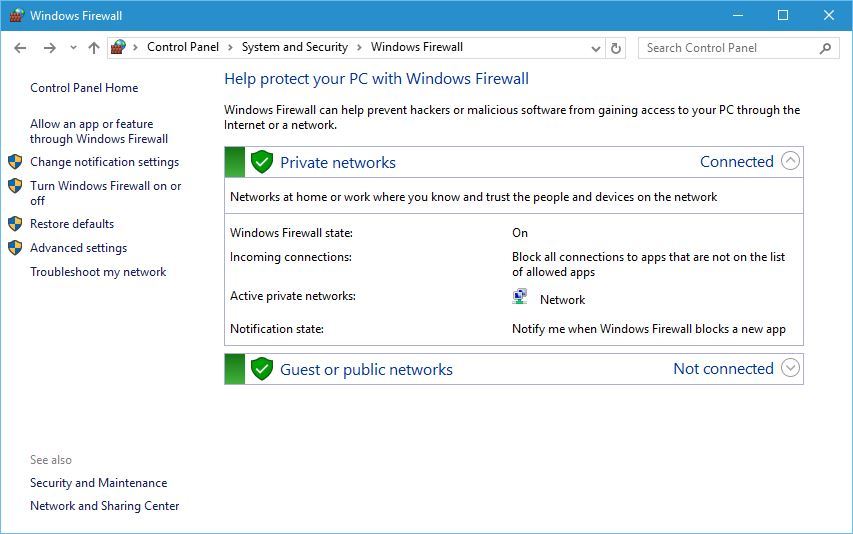
The last option is Windows Firewall, and by using this option you can turn Windows Firewall on or off, change firewall rules or block a certain application from accessing the Internet.
Network and Sharing Center on Windows 10 allows you to quickly access both basic and advanced options, and we hope that you now better understand how Network and Sharing Center works on Windows 10 after reading this article.
If you have any other questions, feel free to leave them in the comments section below.
Network and Sharing Center
How do you find the Network and Sharing Center in Windows 10?
- Press the ‘Start’ button
- Type ‘Control Panel’ and click the shortcut to Control Panel
- Click ‘Network and Internet’ (skip this step if your ‘view by’ isn’t set to ‘category’)
- Click ‘Network and Sharing Center’
Applies To: Windows 10
The Network and Sharing Center can be a bit hard to find in Windows 10, and there’s several ways to find it. The quickest way is by following the instructions above.

The Network and Sharing Center is part of the classic Windows Control panel, and being replaced by the more modern Network area of Settings:
