
In another article, we explained computer ports and what they’re used for. Other than that, what can we do with port information? Since all traffic in and out of the computer goes through ports, we can check on them to see what they’re doing. Maybe the port isn’t listening for traffic? Maybe something is using a port that shouldn’t be?
We’re going to use the Windows command netstat to see our listening ports and PID (Process ID). We’re also going to see what we can do with that information.

What Is Netstat?
The netstat command is a combination of the words ‘network’ and ‘statistics’. The netstat command works in all versions of Windows from Windows XP right up to Windows 10. It’s also used in other operating systems (OS) like Unix and Linux, but we’ll stick to Windows here.
Netstat can provide us with:
- The name of the protocol the port is using (TCP or UDP).
- The local IP address and name of the computer and the port number being used.
- The IP address and port number to which we’re connecting.
- The state of a TCP connection. For details on what these states are, read the Event Processing section of RFC 793.
- Use the key combination Win Key + X. In the menu that opens, select Command Prompt.
- Enter the command <pre>netstat -a -n -o</pre>. The parameters for netstat are preceded with a hyphen, not a forward slash like many other commands. The -a tells it to show us all active connections and the ports on which the computer is listening.
The -n tells netstat to show the IP addresses and ports as numbers only. We’re telling it to not try to resolve the names. This makes for a quicker and neater display. The -o tells netstat to include the PID. We’ll use the PID later to find out what process is using a specific port.

- View the results and take note of the addresses, port numbers, state, and PID. Let’s say we want to know what’s using port 63240. Note that its PID is 8552 and it’s connecting to the IP address 172.217.12.138 on port 443.

What’s Using That Port?
- Open Task Manager. That’s most easily done by using the key combination Ctrl + Shift + Esc.

- Click on the Details tab. To make this easier to find, click on the PID column header to sort the PIDs numerically.

- Scroll down to PID 8552 and see what process it is. In this case, it’s googledrivesync.exe. But is it really? Sometimes viruses can make themselves look like legitimate processes.

- In a web browser, go to ipinfo.io. Enter the IP address 172.217.12.138. As we can see, the IP address is registered to Google. So this googledrivesync.exe is a legitimate one.

How To Get Port, PID, & Process Name In PowerShell
PowerShell is Microsoft’s newer way to use a command-line interface with Windows. We say newer, but it’s been around for several versions. You should learn PowerShell even if you’re a home user.
Most Windows commands also work in PowerShell, plus we can combine them with PowerShell’s cmdlets – pronounced command-lets. Joe at Winteltools.com provides the script for this method.
- Open Notepad and enter the following code:
$netstat = netstat -aon | Select-String -pattern "(TCP|UDP)"
$processList = Get-Process

foreach ($result in $netstat) {
   $splitArray = $result -split " "
   $procID = $splitArray[$splitArray.length – 1]
   $processName = $processList | Where-Object {$_.id -eq $procID} |    select processname
   $splitArray[$splitArray.length – 1] = $procID + " " +      $processName.processname
   $splitArray -join " "
}

- Save the file as get-NetstatProcessName.ps1. Make sure to note where it’s being saved. It’s important to change the Save as type: to All Files (*.*) or it will get saved as get-NetstatProcessName.ps1.txt and it won’t work for us.

- Open PowerShell and navigate to the location in which the script was saved. In this case, it’s <pre>cd C:\Scripts</pre>. Hit Enter to run the command.

- Run the script using dot-sourcing to make it work. That means use ./ before the name of the file. The command will be <pre>./get-NetstatProcessName.ps1</pre>

- Now we can see all the traditional netstat info plus the process name. No need to open Task Manager anymore.

Go Get Them
We’ve covered two ways to use the netstat command to see listening ports. It can be used either in the old Command Prompt or within a PowerShell script. With the information it can give us, we’ve looked at how it can help us figure out what our computer is doing.
If you thought netstat is a great utility, take a look at some other Windows TCP/IP utilities like tracert, ipconfig, and nslookup. Or use Resource Monitor to get a better look into hidden website and Internet connections. There is a lot you can do to see exactly what your computer is doing.
Have you used netstat to solve a problem? Please tell us what you did. Any questions about how to use netstat? Please ask us in the comments below.
Related Posts
- How to Fix a “This file does not have an app associated with it” Error on Windows
- How to Fix an Update Error 0x800705b4 on Windows
- How to Resolve “A JavaScript error occured in the main process” Error on Windows
- How to Fix the Network Discovery Is Turned Off Error on Windows
- How to Change Folder Icons in Windows
Ready for the best newsletter in tech?
Get daily tips, tricks, guides, and special offers delivered right to your inbox.
При запуске новых сервисов в Windows, вы можете обнаружить что нужный порт уже занят (слушается) другой программой (процессом). Разберемся, как определить какая программ прослушивает определенный TCP или UDP порт в Windows.
Например, вы не можете запустить сайт IIS на стандартном 80 порту в Windows, т.к. этот порт сейчас занят (при запуске нескольких сайтов в IIS вы можете запускать их на одном или на разных портах). Как найти службу или процесс, который занял этот порт и завершить его?
Чтобы вывести полный список TCP и UDP портов, которые прослушиваются вашим компьютером, выполните команду:
netstat -aon| find "LIST"
Или вы можете сразу указать искомый номер порта:
netstat -aon | findstr ":80" | findstr "LISTENING"
Используемые параметры команды netstat:
- a – показывать сетевые подключения и открытые порты
- o – выводить идентфикатор професса (PID) для каждого подключения
- n – показывать адреса и номера портов в числовом форматер
По выводу данной команды вы можете определить, что 80 порт TCP прослушивается (статус
LISTENING
) процессом с PID 16124.

Вы можете определить исполняемый exe файл процесса с этим PID с помощью Task Manager или с помощью команды:
tasklist /FI "PID eq 16124"
Можно заменить все указанные выше команды одной:
for /f "tokens=5" %a in ('netstat -aon ^| findstr :80') do tasklist /FI "PID eq %a"
С помощью однострочной PowerShell команды можно сразу получить имя процесса, который прослушивает:
- TCP порт:
Get-Process -Id (Get-NetTCPConnection -LocalPort 80).OwningProcess - UDP порт:
Get-Process -Id (Get-NetUDPEndpoint -LocalPort 53).OwningProcess

Можно сразу завершить этот процесс, отправив результаты через pipe в командлет Stop-Process:
Get-Process -Id (Get-NetTCPConnection -LocalPort 80).OwningProcess| Stop-Process
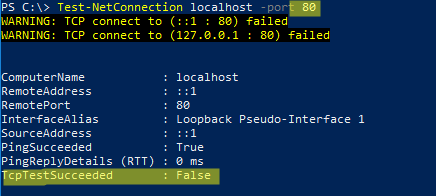
Проверьте, что порт 80 теперь свободен:
Test-NetConnection localhost -port 80
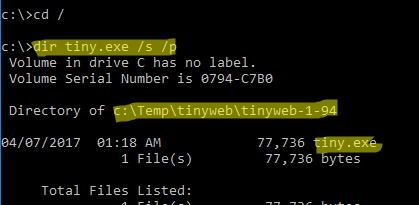
Чтобы быстрой найти путь к исполняемому файлу процесса в Windows, используйте команды:
cd /
dir tiny.exe /s /p
Или можно для поиска файла использовать встроенную команду where :
where /R C:\ tiny
В нашем случае мы нашли, что исполняемый файл
tiny.exe
(легкий HTTP сервер), который слушает 80 порт, находится в каталоге c:\Temp\tinyweb\tinyweb-1-94
The netstat command, meaning network statistics, is a Command Prompt command used to display very detailed information about how your computer is communicating with other computers or network devices.
Specifically, it can show details about individual network connections, overall and protocol-specific networking statistics, and much more, all of which could help troubleshoot certain kinds of networking issues.
Lifewire / Nez Riaz
Netstat Command Availability
This command is available from within the Command Prompt in Windows 11, Windows 10, Windows 8, Windows 7, Windows Vista, Windows XP, Windows Server operating systems, and some older versions of Windows, too.
Since netstat is a cross-platform command, it’s also available in other operating systems like macOS and Linux.
The availability of certain netstat command switches and other netstat command syntax may differ from operating system to operating system.
Netstat Command Syntax
netstat [-a] [-b] [-e] [-f] [-n] [-o] [-p protocol] [-r] [-s] [-t] [-x] [-y] [time_interval] [/?]
How to Read Command Syntax
| Netstat Command List | |
|---|---|
| Option | Explanation |
| netstat | Execute the netstat command alone to show a relatively simple list of all active TCP connections which, for each one, will show the local IP address (your computer), the foreign IP address (the other computer or network device), along with their respective port numbers, as well as the TCP state. |
| -a | This switch displays active TCP connections, TCP connections with the listening state, as well as UDP ports that are being listened to. |
| -b | This netstat switch is very similar to the -o switch listed below, but instead of displaying the PID, will display the process’s actual file name. Using -b over -o might seem like it’s saving you a step or two but using it can sometimes greatly extend the time it takes netstat to fully execute. |
| -e | Use this switch with the netstat command to show statistics about your network connection. This data includes bytes, unicast packets, non-unicast packets, discards, errors, and unknown protocols received and sent since the connection was established. |
| -f | The -f switch will force the netstat command to display the Fully Qualified Domain Name (FQDN) for each foreign IP addresses when possible. |
| -n | Use the -n switch to prevent netstat from attempting to determine host names for foreign IP addresses. Depending on your current network connections, using this switch could considerably reduce the time it takes for netstat to fully execute. |
| -o | A handy option for many troubleshooting tasks, the -o switch displays the process identifier (PID) associated with each displayed connection. See the example below for more about using netstat -o. |
| -p | Use the -p switch to show connections or statistics only for a particular protocol. You can not define more than one protocol at once, nor can you execute netstat with -p without defining a protocol. |
| protocol | When specifying a protocol with the -p option, you can use tcp, udp, tcpv6, or udpv6. If you use -s with -p to view statistics by protocol, you can use icmp, ip, icmpv6, or ipv6 in addition to the first four I mentioned. |
| -r | Execute netstat with -r to show the IP routing table. This is the same as using the route command to execute route print. |
| -s | The -s option can be used with the netstat command to show detailed statistics by protocol. You can limit the statistics shown to a particular protocol by using the -soption and specifying that protocol, but be sure to use -s before -p protocol when using the switches together. |
| -t | Use the -t switch to show the current TCP chimney offload state in place of the typically displayed TCP state. |
| -x | Use the -x option to show all NetworkDirect listeners, connections, and shared endpoints. |
| -y | The -y switch can be used to show the TCP connection template for all connection. You cannot use -y with any other netstat option. |
| time_interval | This is the time, in seconds, that you’d like the netstat command to re-execute automatically, stopping only when you use Ctrl-C to end the loop. |
| /? | Use the help switch to show details about the netstat command’s several options. |
Netstat Command Examples
Here are several examples showing how the netstat command might be used:
Show Active TCP Connections
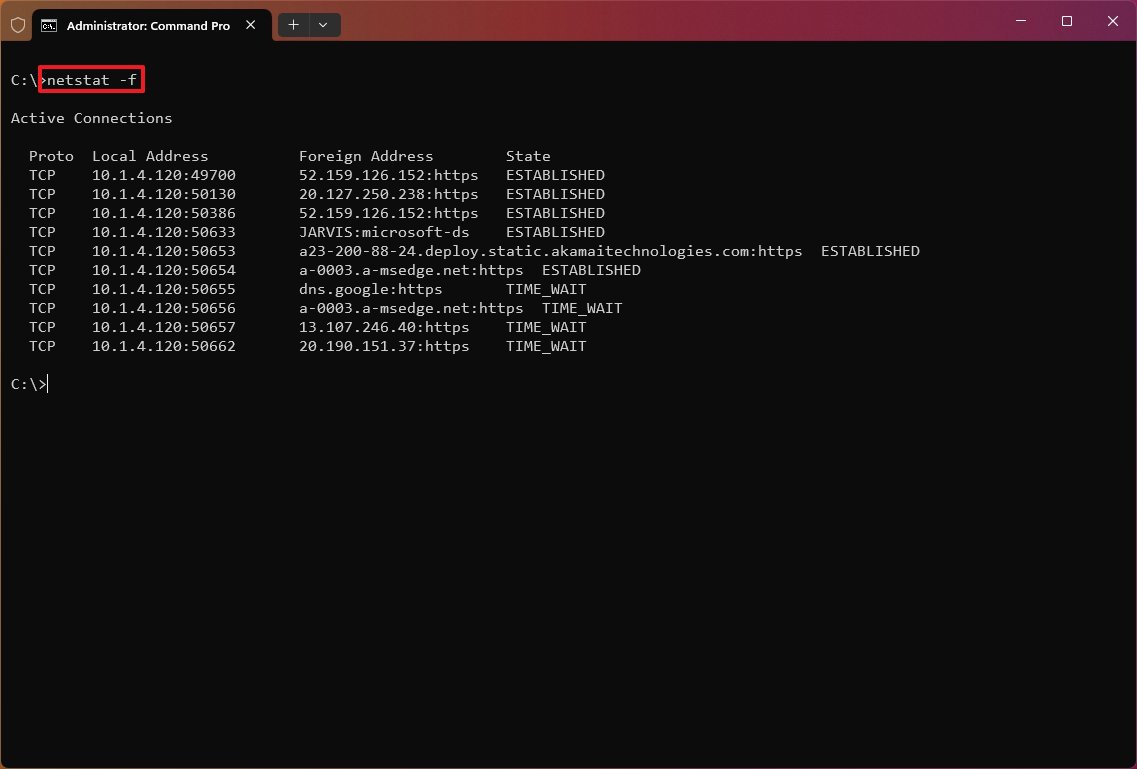
netstat -f
In this first example, we execute netstat to show all active TCP connections. However, we want to see the computers that we’re connected to in FQDN format [-f] instead of a simple IP address.
Here’s an example of what you might see:
Active ConnectionsProto Local Address Foreign Address StateTCP 127.0.0.1:5357 VM-Windows-7:49229 TIME_WAITTCP 127.0.0.1:49225 VM-Windows-7:12080 TIME_WAITTCP 192.168.1.14:49194 75.125.212.75:http CLOSE_WAITTCP 192.168.1.14:49196 a795sm.avast.com:http CLOSE_WAITTCP 192.168.1.14:49197 a795sm.avast.com:http CLOSE_WAITTCP 192.168.1.14:49230 TIM-PC:wsd TIME_WAITTCP 192.168.1.14:49231 TIM-PC:icslap ESTABLISHEDTCP 192.168.1.14:49232 TIM-PC:netbios-ssn TIME_WAITTCP 192.168.1.14:49233 TIM-PC:netbios-ssn TIME_WAITTCP [::1]:2869 VM-Windows-7:49226 ESTABLISHEDTCP [::1]:49226 VM-Windows-7:icslap ESTABLISHED
As you can see, there were 11 active TCP connections at the time netstat was executed in this example. The only protocol (in the Proto column) listed is TCP, which was expected because we didn’t use -a.
You can also see three sets of IP addresses in the Local Address column—the actual address of 192.168.1.14 and both IPv4 and IPv6 versions of the loopback addresses, along with the port each connection is using. The Foreign Address column lists the FQDN (75.125.212.75 didn’t resolve for some reason) along with that port as well.
Finally, the State column lists the TCP state of that particular connection.
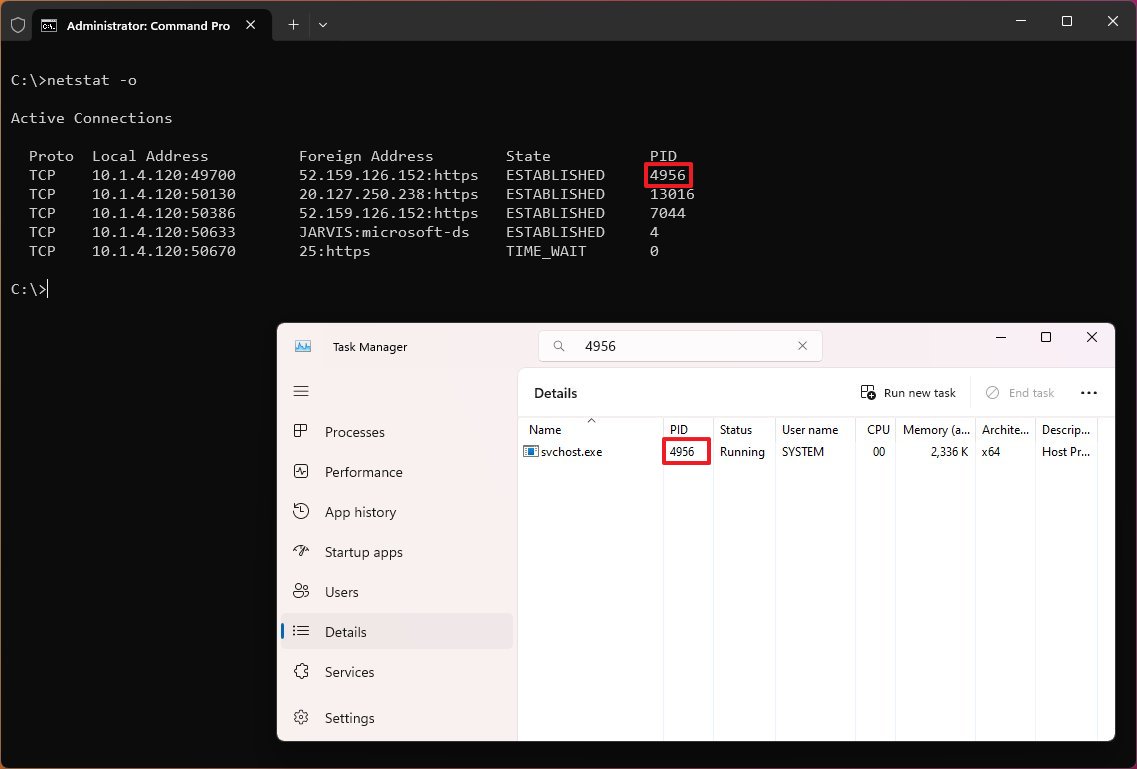
Show Connections and Process Identifiers
netstat -o
In this example, netstat will be run normally so it only shows active TCP connections, but we also want to see the corresponding process identifier [-o] for each connection so that we can determine which program on the computer initiated each one.
Here’s what the computer displayed:
Active ConnectionsProto Local Address Foreign Address State PIDTCP 192.168.1.14:49194 75.125.212.75:http CLOSE_WAIT 2948TCP 192.168.1.14:49196 a795sm:http CLOSE_WAIT 2948TCP 192.168.1.14:49197 a795sm:http CLOSE_WAIT 2948
You probably noticed the new PID column. In this case, the PIDs are all the same, meaning the same program on the computer opened these connections.
To determine what program is represented by the PID of 2948 on the computer, open Task Manager to the Processes tab, and note the Image Name listed next to the PID we’re looking for in the PID column.1
Using the netstat command with the -o option can be very helpful when tracking down which program is using too big a share of your bandwidth. It can also help locate the destination where some kind of malware, or even an otherwise legitimate piece of software, might be sending information without your permission.
While this and the previous example were both run on the same computer, and within just a minute of each other, you can see that the list of active TCP connections is considerably different. This is because your computer is constantly connecting to, and disconnecting from, various other devices on your network and over the internet.
Show Specific Connections Only
netstat -0 | findstr 28604
The above example is similar to what we’ve already looked at, but instead of displaying all connections, we’re telling the command to show only the connections that are using a specific PID, 28604 in this example.
A similar command could be used to filter out the connections with a CLOSE_WAIT state, by replacing the PID with ESTABLISHED.
Show Protocol-Specific Stats
netstat -s -p tcp -f
Here, we want to see protocol specific statistics [-s] but not all of them, just TCP stats [-p tcp]. We also want the foreign addresses displayed in FQDN format [-f].
This is what that netstat command produced for us:
TCP Statistics for IPv4Active Opens = 77Passive Opens = 21Failed Connection Attempts = 2Reset Connections = 25Current Connections = 5Segments Received = 7313Segments Sent = 4824Segments Retransmitted = 5Active ConnectionsProto Local Address Foreign Address StateTCP 127.0.0.1:2869 VM-Windows-7:49235 TIME_WAITTCP 127.0.0.1:2869 VM-Windows-7:49238 ESTABLISHEDTCP 127.0.0.1:49238 VM-Windows-7:icslap ESTABLISHEDTCP 192.168.1.14:49194 75.125.212.75:http CLOSE_WAITTCP 192.168.1.14:49196 a795sm.avast.com:http CLOSE_WAITTCP 192.168.1.14:49197 a795sm.avast.com:http CLOSE_WAIT
As you can see, various statistics for the TCP protocol are displayed, as are all active TCP connections at the time.
Show Updated Network Stats
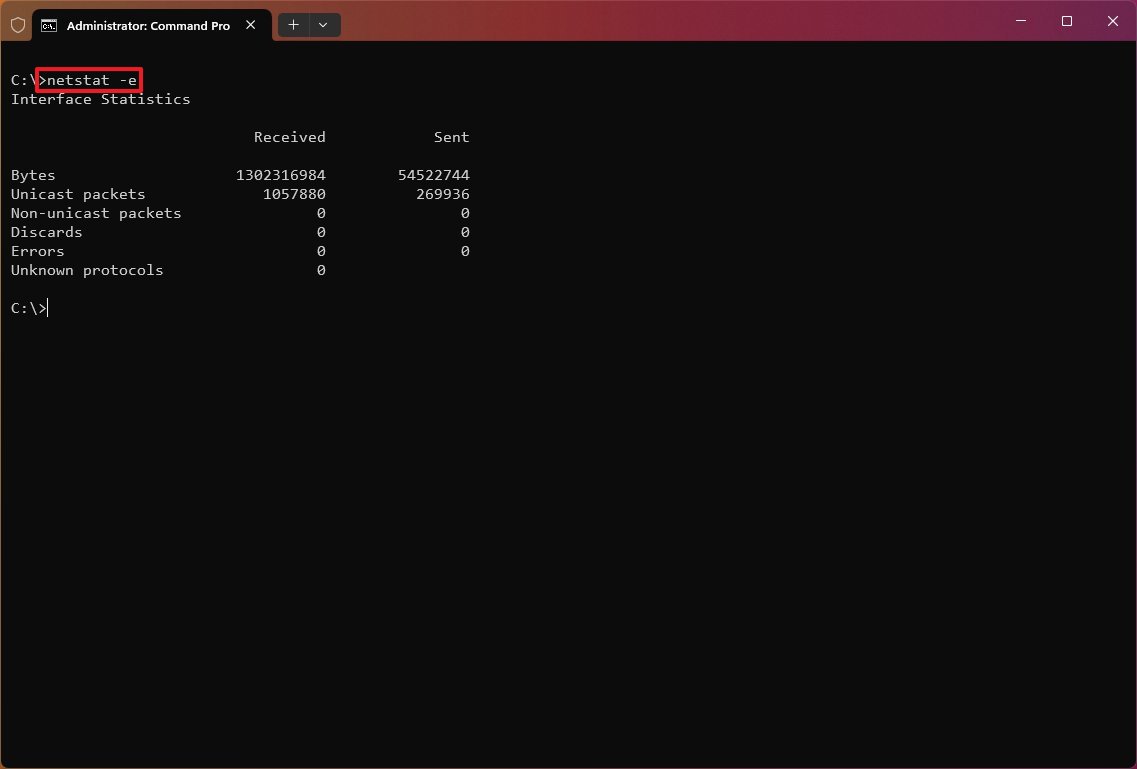
netstat -e -t 5
In this final example, netstat shows some basic network interface statistics [-e] that are continually updated in the command window every five seconds [-t 5].
Here’s what’s produced on screen:
Interface StatisticsReceived SentBytes 22132338 1846834Unicast packets 19113 9869Non-unicast packets 0 0Discards 0 0Errors 0 0Unknown protocols 0Interface StatisticsReceived SentBytes 22134630 1846834Unicast packets 19128 9869Non-unicast packets 0 0Discards 0 0Errors 0 0Unknown protocols 0^C
Various pieces of information, which you can see here and that we listed in the -e syntax above, are displayed.
The command only automatically executed one extra time, as you can see by the two tables in the result. Note the ^C at the bottom, indicating that the Ctrl+C abort command was used to stop the re-running of the command.
Netstat Related Commands
The netstat command is often used with other networking related Command Prompt commands like nslookup, ping, tracert, ipconfig, and others.
[1] You might have to manually add the PID column to Task Manager. You can do this by selecting PID after right-clicking the column headings in the Process tab. If you’re using Windows 7 or on older Windows OS, select the PID (Process Identifier) checkbox from View > Select Columns in Task Manager. You might also have to choose Show processes from all users from the bottom of the Processes tab if the PID you’re looking for isn’t listed.
FAQ
-
Run ntestat -ban and look through the list for the Process Identifier (PID) of iexplore.exe. This sill show you the proxy port and IP of your system.
-
In general, netstat commands are used to display TCP and IP address info, while nbstat commends specifically pertain to NetBIOS statitstics.
Thanks for letting us know!
Get the Latest Tech News Delivered Every Day
Subscribe
(Image credit: Future)
On Windows 11, the Network Statistics (netstat) tool has been around for a long time (including on Windows 10 and older versions), and it’s a command-line utility you can use in Command Prompt to display statistics for all network connections. It allows you to understand open and connected ports to monitor and troubleshoot networking problems for systems or apps.
The tool helps you to list active network (incoming and outgoing) connections and listening ports. You can view network adapter statistics and statistics for protocols (such as IPv4 and IPv6). You can even display the current routing table and much more.
In this how-to guide, I’ll show you the steps to use the netstat command to examine connections to discover open and connected network ports on Windows 11 (and 10).
How to use netstat on Windows 11 and 10
In the client version of Windows, you can get started with the Network Statistics tool with a simple command, but then you have a lot of options to view different network activities, and here’s how.
Netstats basics
To get started with netstat, use these steps:
- Open Start.
- Search for Command Prompt, right-click the top result, and select the Run as administrator option.
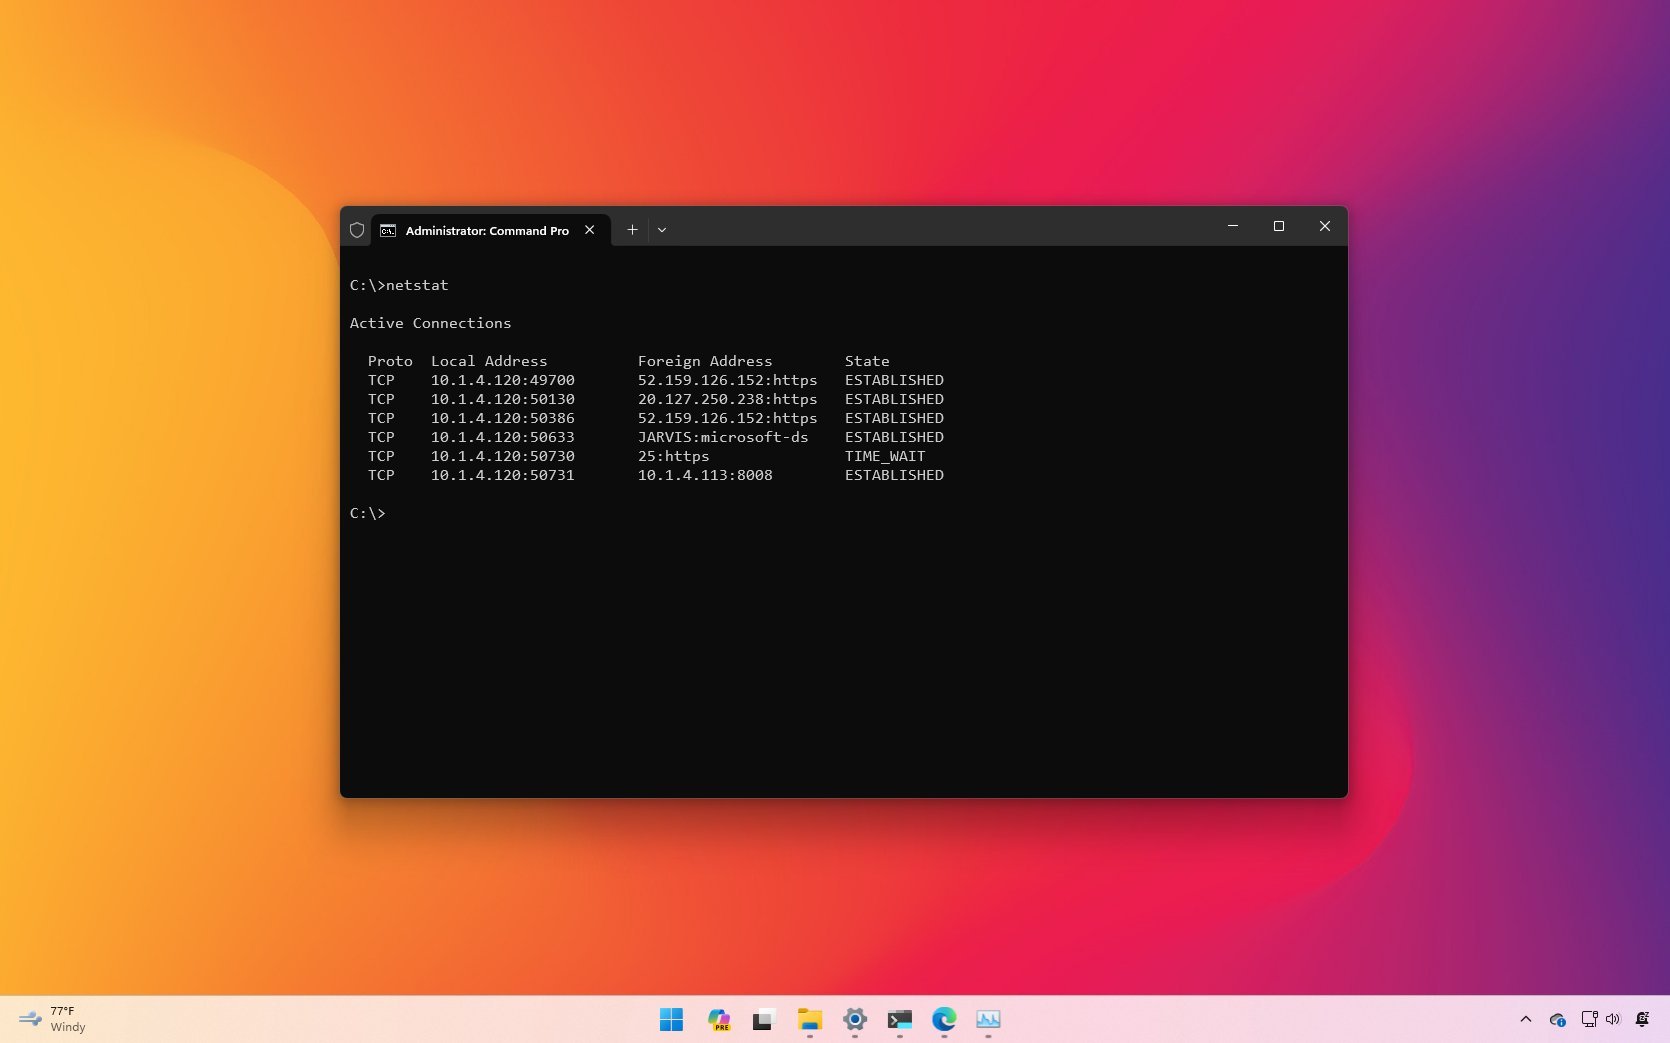
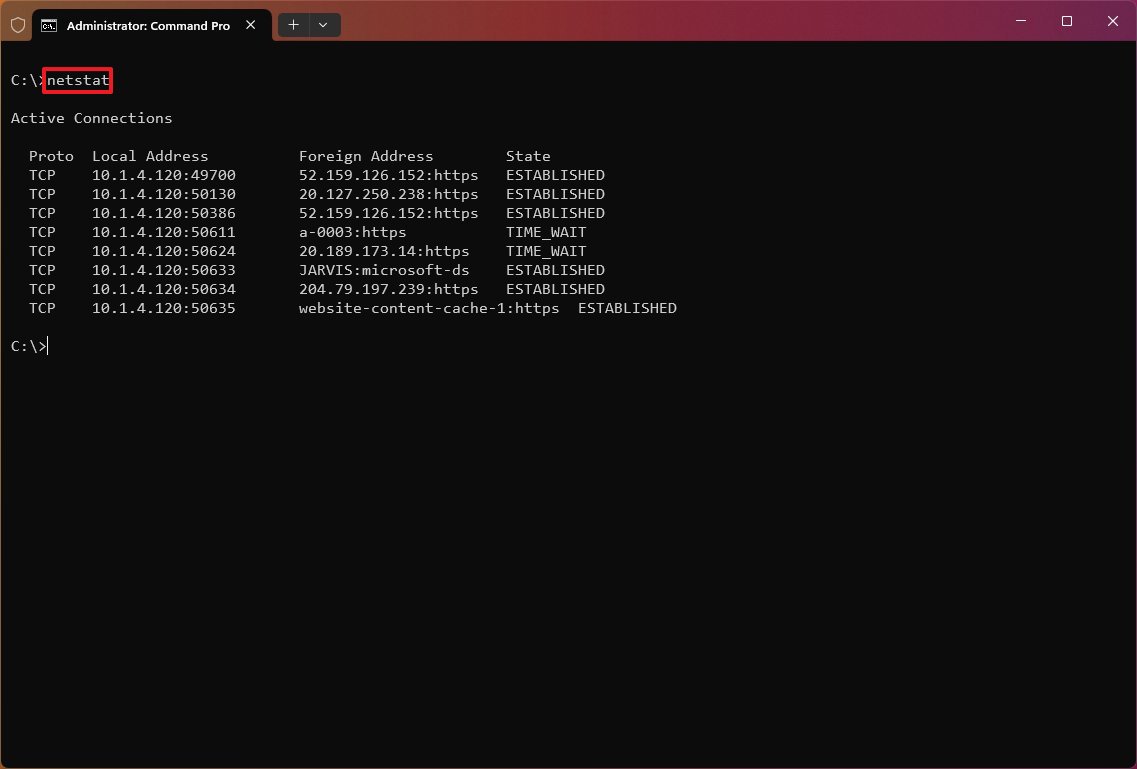
- Type the following command to show all active TCP connections and press Enter: netstat
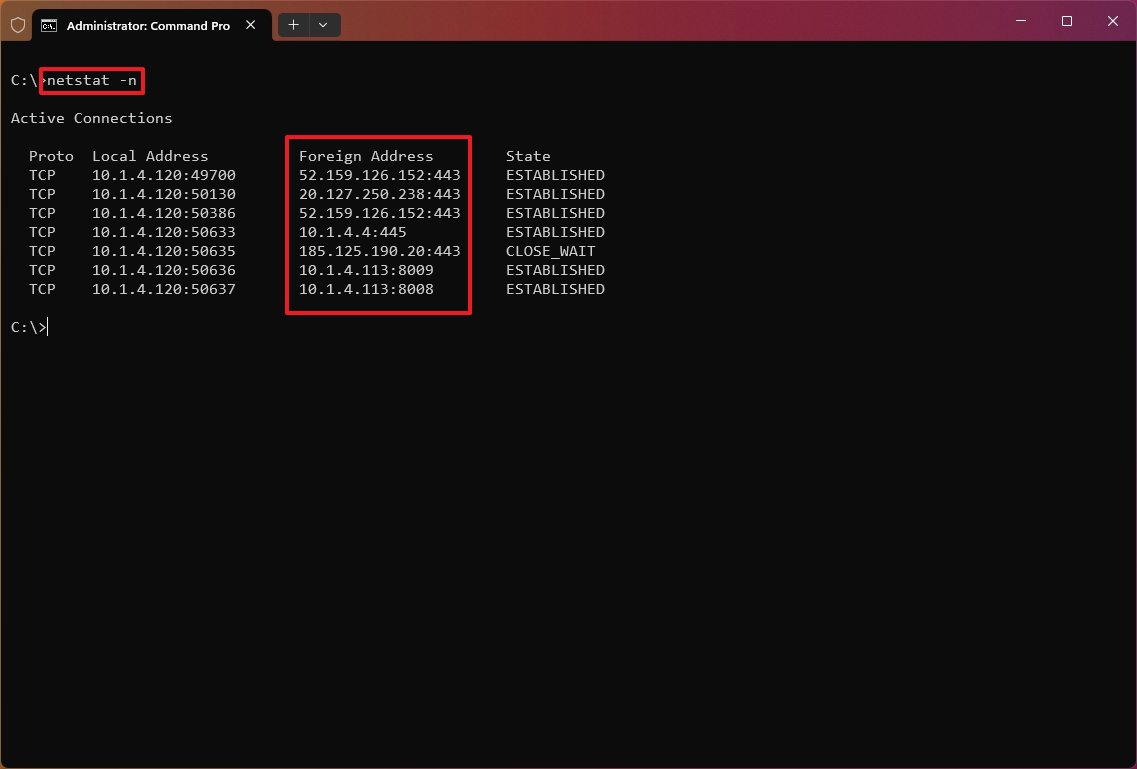
- (Optional) Type the following command to display active connections showing numeric IP address and port number instead of trying to determine the names and press Enter: netstat -n
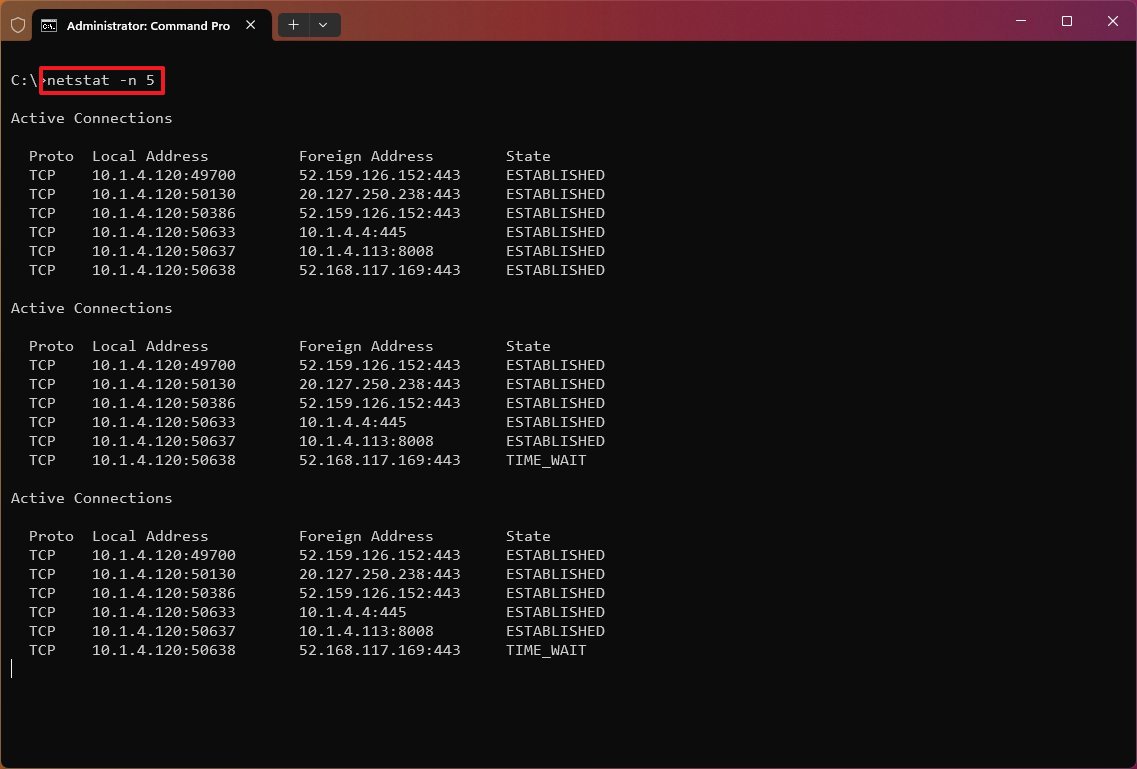
- (Optional) Type the following command to refresh the information at a specific interval and press Enter: netstat -n INTERVAL
In the command, replace «INTERVAL» with the number (in seconds) to re-display the information. This example refreshes the command in question every five seconds: netstat -n 5
- Quick note: When using the interval parameter, you can terminate the command using the «Ctrl + C» keyboard shortcut.
Once you execute the command, it’ll return a list of all active connections in four columns, including:
All the latest news, reviews, and guides for Windows and Xbox diehards.
- Proto: Shows the connection protocol (TCP or UDP).
- Local Address: Shows the computer’s IP address followed by a semicolon with the port number of the connection. The double-semicolon inside brackets indicates the local IPv6 address, and «0.0.0.0» refers to the local address.
- Foreign Address: Lists the remote device’s IP (or FQDN) address with the port number after the semicolon port name (for example, HTTPS, HTTP, Microsoft-ds, and wsd).
- State: Indicates where the connection is active (established), the local port has been closed (time_wait), and the program hasn’t closed the port (close_wait). Other status include, closed, fin_wait_1, fin_wait_2, last_ack, listen, syn_received, syn_send, and timed_wait.
Netstat parameters
The tool also includes several parameters you can use to display different information about the network connections on Windows 11 (and 10).
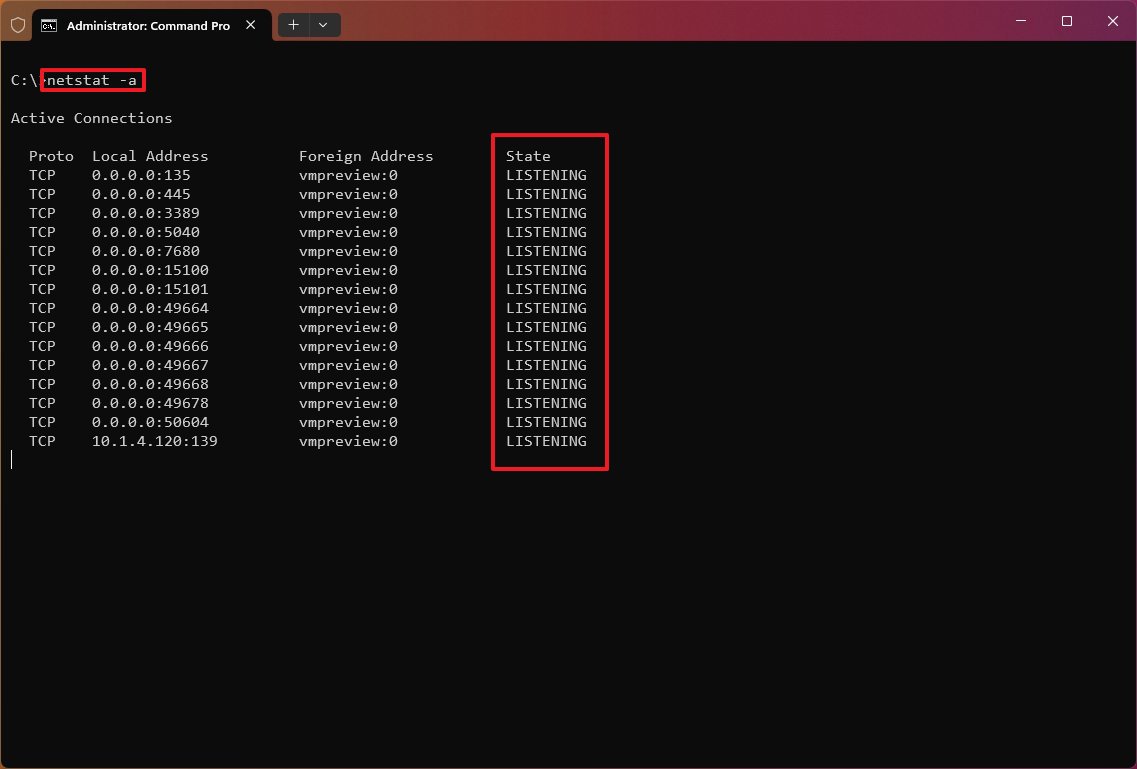
Show active and inactive connections
The «netstat -a» command displays all active and inactive connections and the TCP and UDP ports the device is currently listening to.
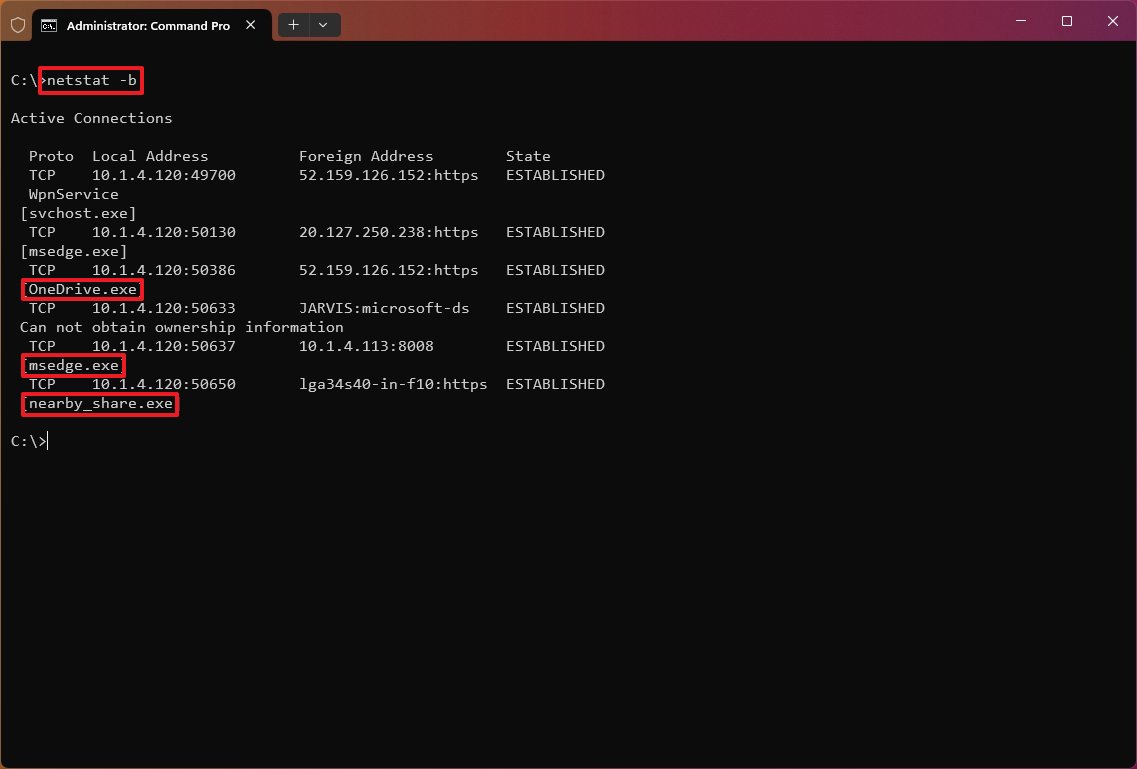
Show executable information
The «netstat -b» command lists all the executables (applications) associated with each connection. Sometimes, applications may open multiple connections.
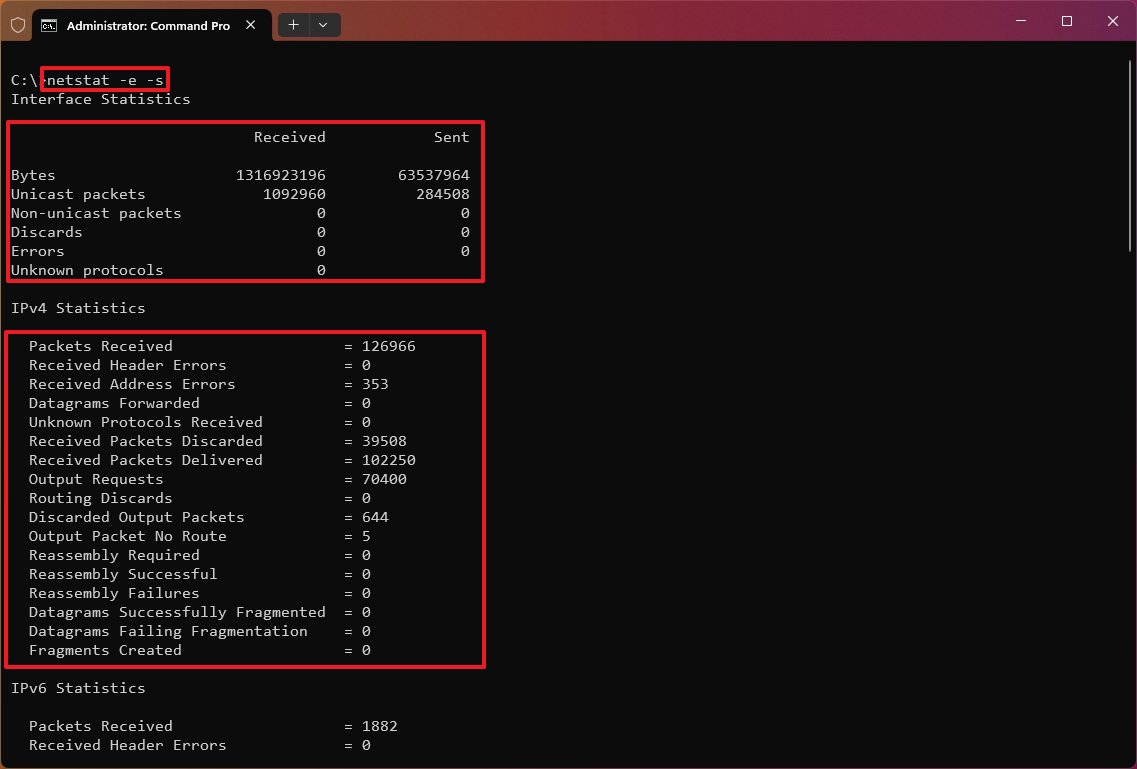
Show network adapter statistics
The «netstat -e» command generates a statistic of the network interface, which shows information like the number of bytes, unicast, and non-unicast sent and received packets. You can also see discarded packets, errors, and unknown protocols, which can help you troubleshoot networking problems.
Show FQDNS for foreign addresses
The «netstat -f» command shows the fully qualified domain name (FQDN) for foreign addresses. For example, «a23-200-88-24.deploy.static.akamaitechnologies.com:https» instead of «a23-200-88-24:http» or «23.200.88.24».
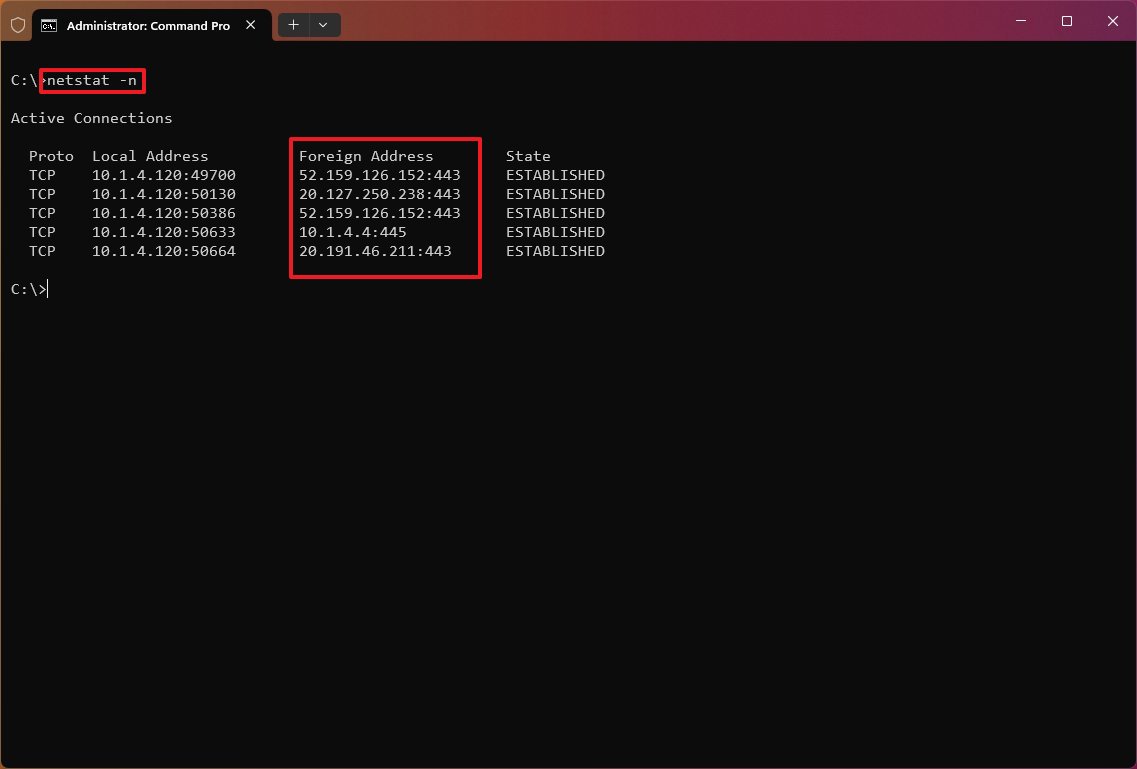
Show numerical form
The «netstat -n» command displays the addresses and ports in numerical form—for example, 52.159.126.152:443.
Show process ID
The «netstat -o» command shows active TCP connections like «netstat,» but with the difference that adds a fifth column to display the Process ID (PID) for each connection. The processes available in this view are the same in the «Details» tab of Task Manager, which also reveals the application using the connection.
Show connections by Protocol
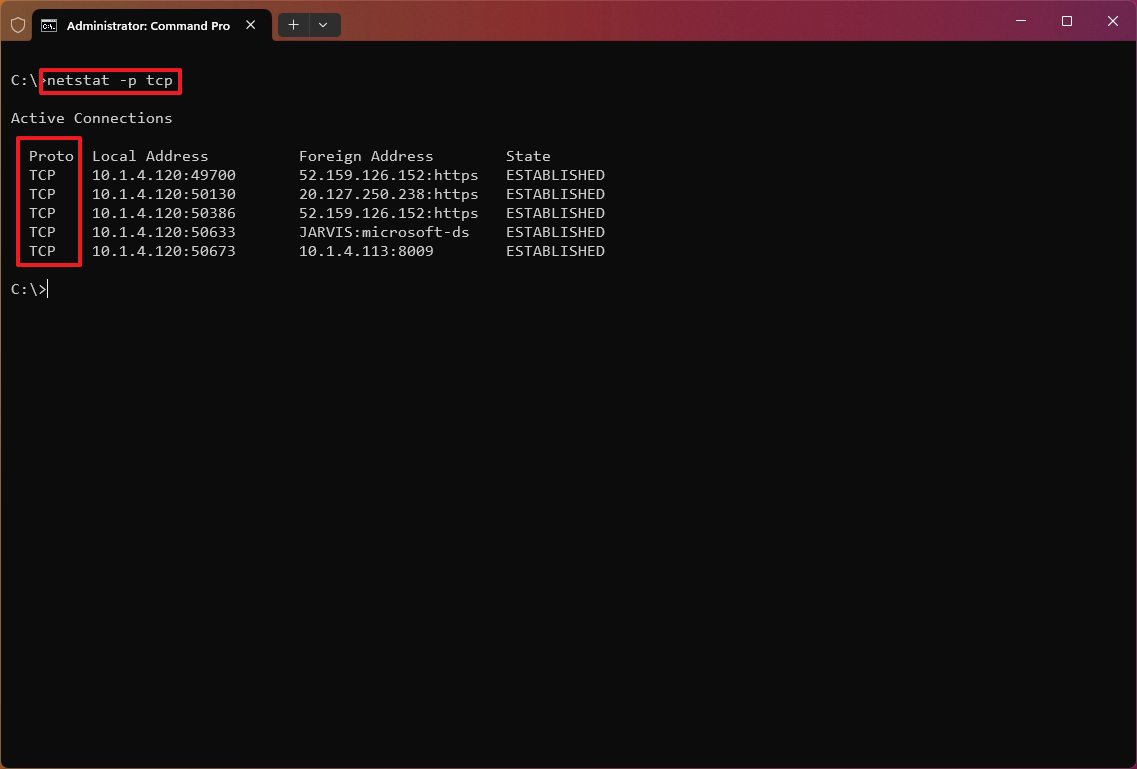
The «netstat -p» can be used to display connections per protocol that you have to specify using «TCP,» «UDP,» «TCPv6,» or «UDPv6» next to the command. For example, you can use the «netstat -p TCP» command to view a list of TCP connections.
Show listening and non-listening ports
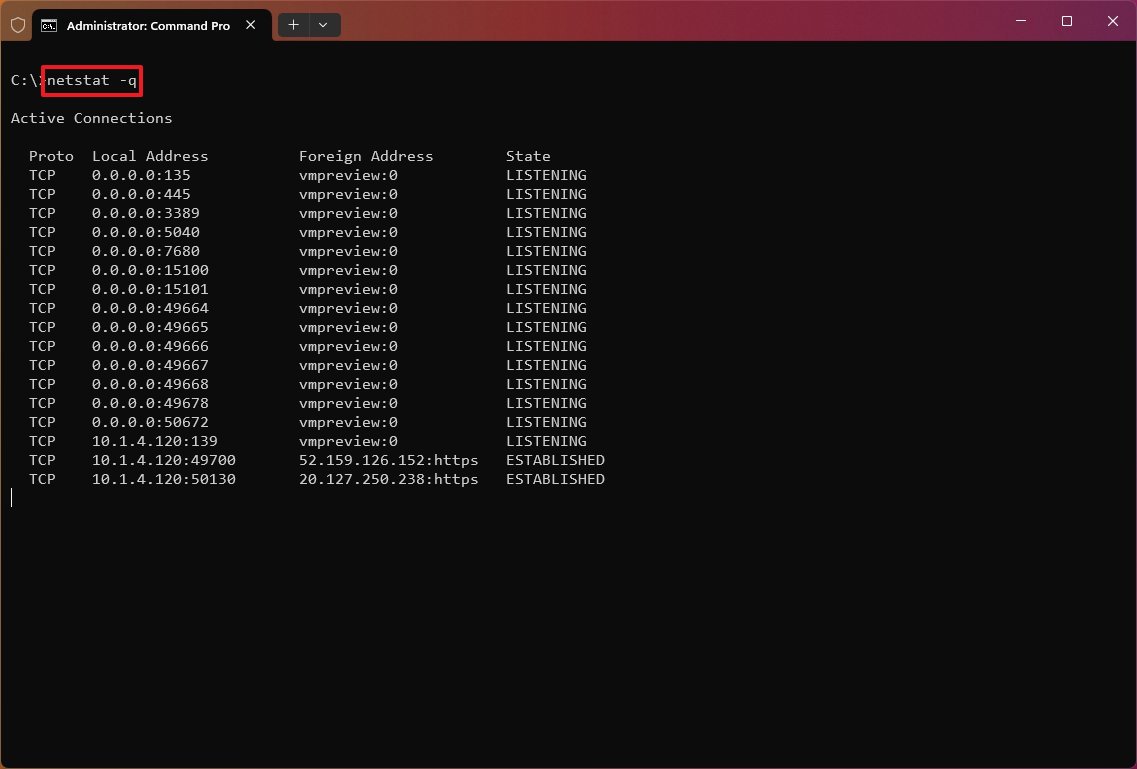
The «netstat -q» commands can produce a list of all the connections with the listening and bound non-listening ports.
Show statistics by Protocol
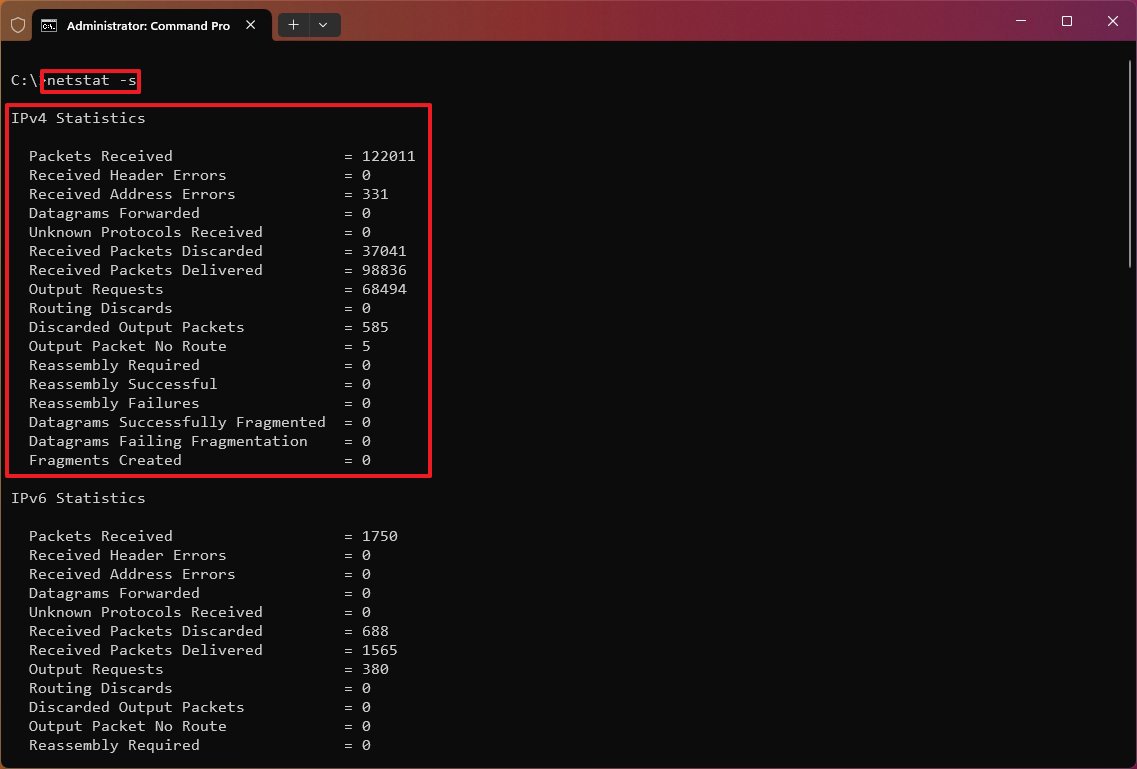
The «netstat -s» shows network statistics for the available protocols, including TCP, UDP, ICMP, and IP protocols (versions 4 and 6).
Show routing table
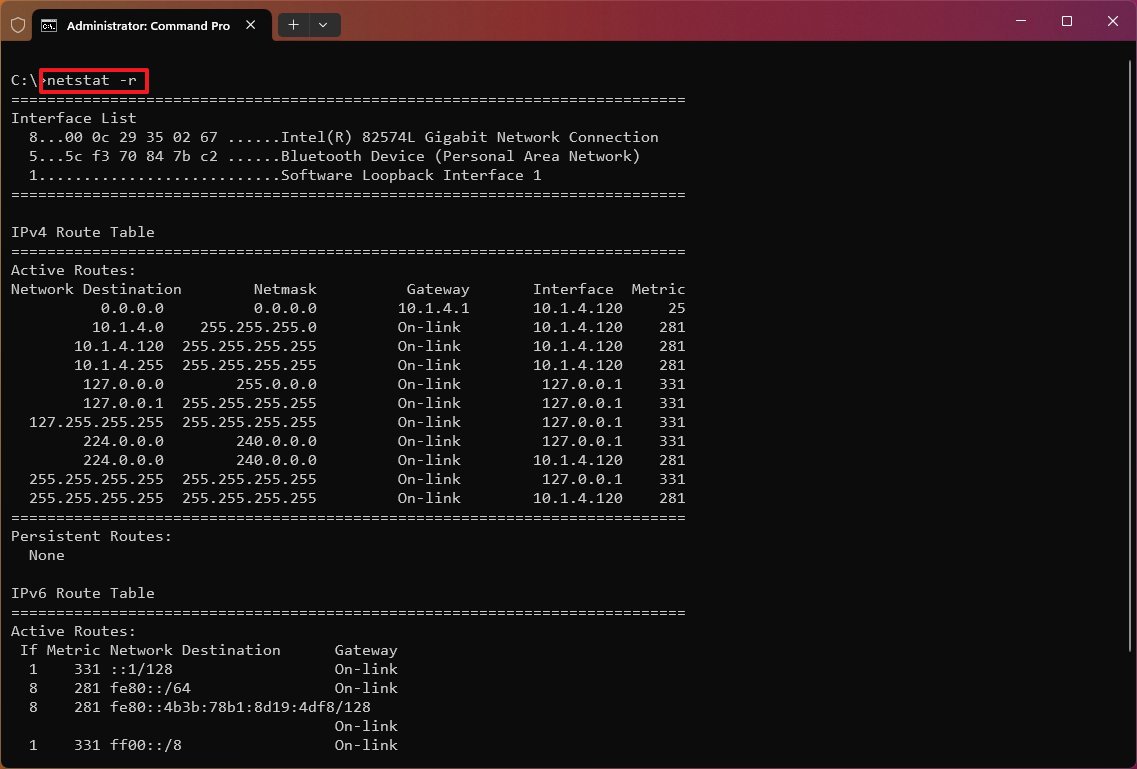
The «netstat -r» command displays the current network routing table that lists the routes to destinations and matrics known by the device for IP version 4 and version 6 (if applicable). If the returned information looks familiar, it’s because you can also output the data using the «route print» command.
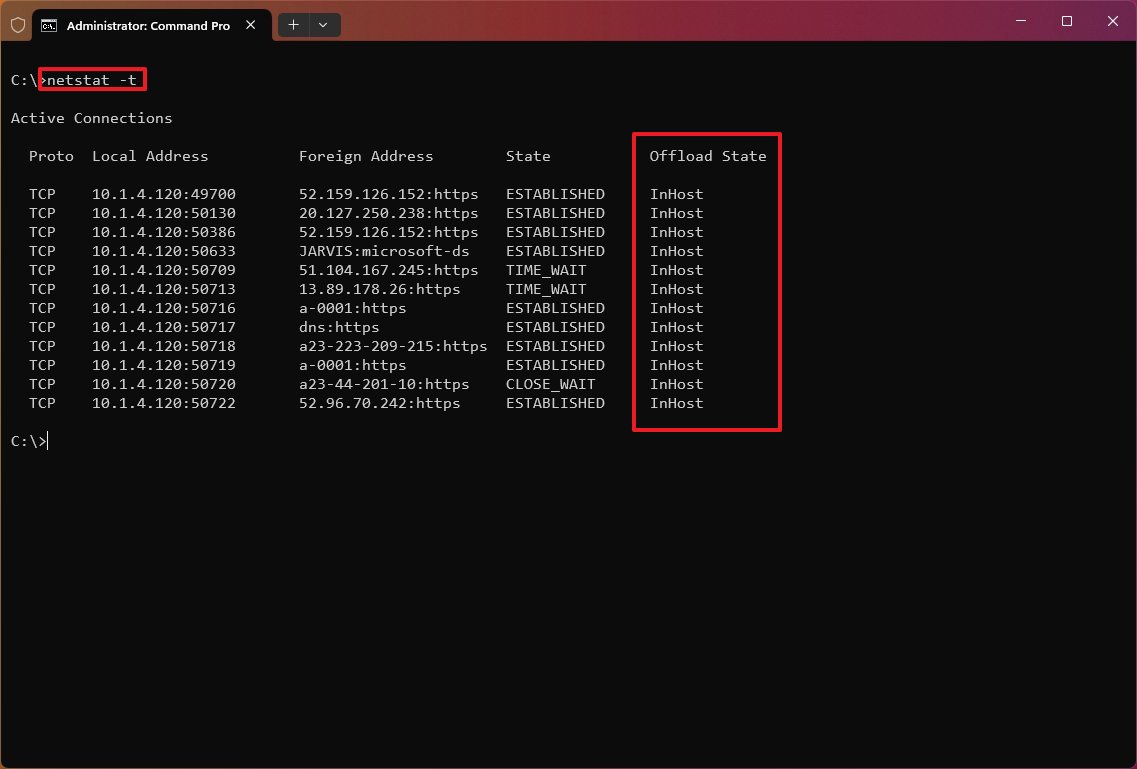
Show offload state connections
The «netstat -t» command generates a list of the current connection offload state. The offload state refers to the TCP Chimney Offload, which is a feature that transfers the network workload from the processor to the network adapter during data transmissions. The «InHost» value indicates that offloading isn’t enabled, and the «Offload» means that the feature is transferring the workload to the network adapter. (This feature is only present on supported network adapters.)
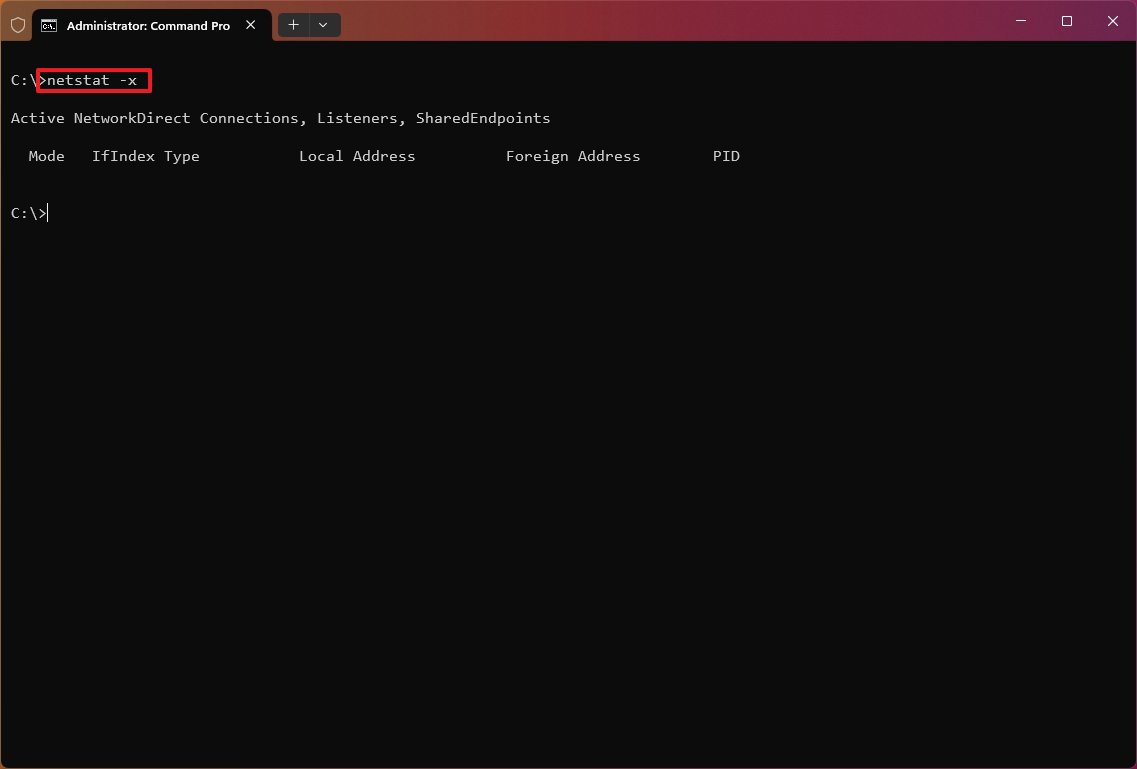
Show NetworkDirect connections
The «netstat -x» is another supported command, and it produces a list of NetworkDirect connections, shared endpoints, and listeners.
NetworkDirect is a specification for Remote Direct Memory Access (RDMA), which is a process that allows fast data transfers using the network adapter, freeing up the processor to perform other tasks. Usually, you’ll never use this command unless you’re using the Windows server version or a high-performance application with a network adapter that supports this feature.
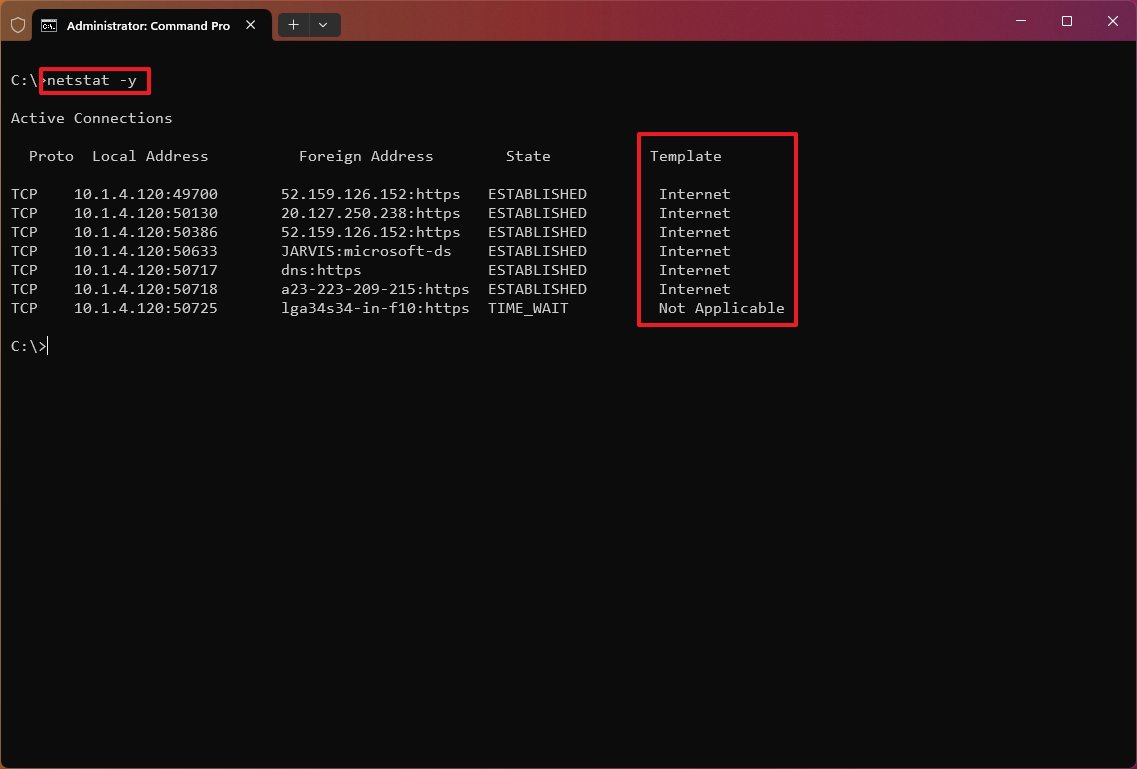
Show connection template
The «netstat -y» command displays TCP connection templates for all connections.
Combine parameters
When using the «netstat» command, you can combine the parameters to display various information for many cases.
For example, the «-e» parameter can also be used with the «-s» parameter to see statistics for each available protocol, and the «-o» parameter can be combined with «-a,» «-n,» and «-p» as necessary.
With the «netstat -p» command, you append the «s» parameter. You can display statistics from even more protocols, including «icmp,» «ip,» «icmpv6,» and «ipv6.»
Also, when using more than one parameter, you can combine them with a single «-.» For example, instead of writing the command «netstat -e -s,» you can write it like this: «netstat -es.»
To see all the available parameters and additional help, you can always use the «netstat /?» command.
Netstat search
In addition to displaying all the available statistic information, you can also output only the certain details you need using these steps:
- Open Start.
- Search for Command Prompt, right-click the top result, and select the Run as administrator option.
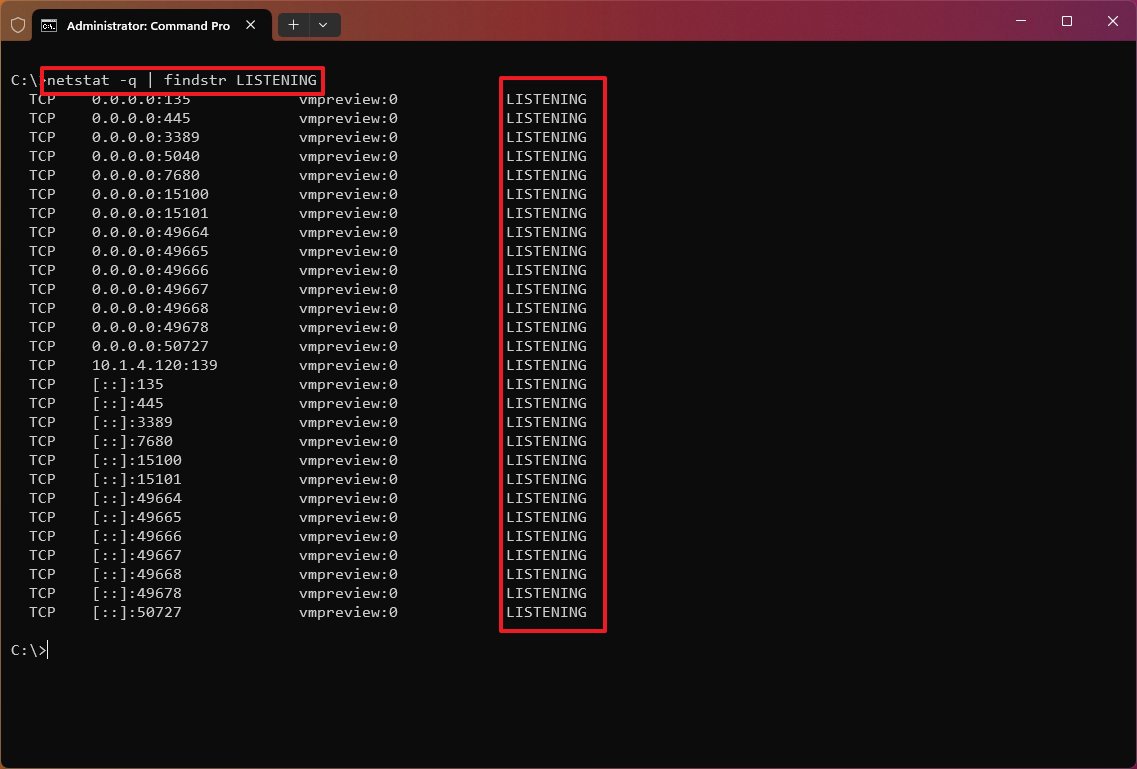
- Type the following command to list all the connections that have the state set to LISTENING and press Enter: netstat -q | findstr STRING
In the command, replace «STRING» for the information you want to list. Also, the findstr option is case-sensitive, which means you must enter the string you want to find with the exact casing. This example lists the connections set to «LISTENING:» netstat -q | findstr LISTENING
This other example shows all the connections from a foreign server FQDN, in this case, Amazon: netstat -f | findstr amazon
The «findstr» command isn’t part of the netstat tool. It’s a simple command to search for a text string in a file, but you can use it with many of the options for this tool to make more sense of the information you’re viewing.
The tool is not exclusive to Windows, as it’s also available across platforms, including Linux and macOS. Even though the parameters and syntax may be different, they all are very similar.
More resources
For more helpful articles, coverage, and answers to common questions about Windows 10 and Windows 11, visit the following resources:
- Windows 11 on Windows Central — All you need to know
- Windows 10 on Windows Central — All you need to know
Mauro Huculak has been a Windows How-To Expert contributor for WindowsCentral.com for nearly a decade and has over 15 years of experience writing comprehensive guides. He also has an IT background and has achieved different professional certifications from Microsoft, Cisco, VMware, and CompTIA. He has been recognized as a Microsoft MVP for many years.
Find Process ID of Process using given port in Windows
Once a while it happens that you try to start Tomcat and it complains “Port 8080 required by Tomcat v7.0 Server at localhost is already in use”. So that means there is already a process running in background that has occupied 8080 port. So how to identify the process in Windows task manager that is using port 8080? I am sure there must be a javaw.exe. But is there a better way to identify which process in windows is using a given port number? Yes…
How to Find Process ID of process that uses a Port in Windows
Our friend netstat will help us in identifying the process. netstat can list the running process and display information such as process id, port, etc. From this list we can filter the processes that has given port using findstr command.
List process by port number
Code language: Bash (bash)
netstat -ano | findstr 8080
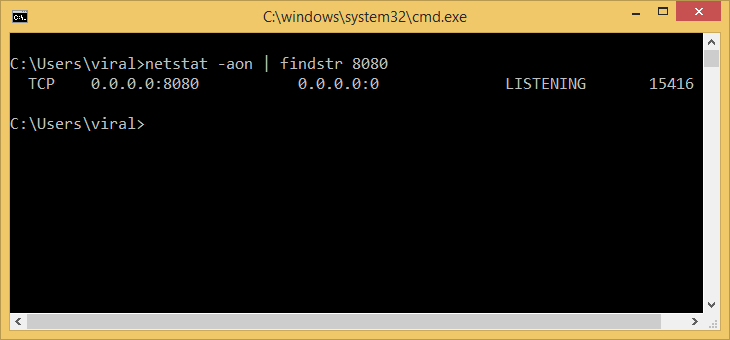
Output
Code language: Bash (bash)
Proto Local Address Foreign Address State PID TCP 0.0.0.0:8080 0.0.0.0:0 LISTENING 29848
-a– Displays all connections and listening ports.-o– Displays the owning process ID associated with each connection.-n– Displays addresses and port numbers in numerical form.
We can use netstat to list all the processes.
List all processes by PID
Code language: Bash (bash)
netstat -ano
Kill the Process by PID
Once we identify the process PID, we can kill the process with taskkill command.
Code language: Bash (bash)
taskkill /F /PID 12345
Where /F specifies to forcefully terminate the process(es). Note that you may need an extra permission (run from admin) to kill some certain processes.
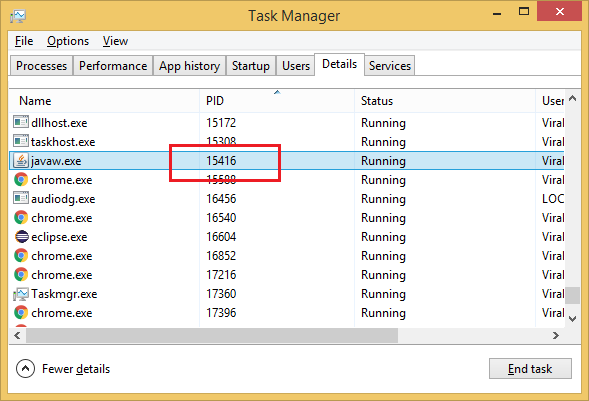
Or else you can use our old trusted Windows Task Manager to kill the process for given process id. If PID is not visible in your task manager then you can enable it by Right clicking on table header under Details tab, click Select Columns and then check PID.