
Любой системный администратор сталкивается с настройкой сетевых интерфейсов. Большинство для этой цели используют графический интерфейс Windows, что не всегда удобно. В этой статье я расскажу, как настроить сеть с помошью интерфейса командной строки cmd, используя встроенную утилиту netsh.
В операционных системах Windows есть специальная утилита netsh для настройки сетевого адаптера из командной строки cmd.
netsh.exe (network shell) — сетевая оболочка (программа) для ОС Windows, которая позволяет настраивать сетевые параметры, в том числе и удаленно. Данная утилита доступна на всех версиях Windows, начиная с Windows 2000.
Запуск командной строки:
Пуск —> Выполнить —> в строку вводим cmd.exe
Откроется черное окно с мигающим курсором. Тут мы и будем вводить перечисленные ниже команды (ну это для тех, кто никогда не работал с командной строкой).
Конфигурирование сетевых параметров (ip-адреса, сетевой маски и шлюза)
Уснановка ip-адреса, маски и шлюза.
netsh interface ip set address name="Local Area Connection" static 192.168.1.15 255.255.255.0 192.168.1.1
где
Local Area Connection — название вашего сетевого интерфейса.
192.168.1.15 — сетевой адрес (ip address).
255.255.255.0 — сетевая маска (network mask).
192.168.1.1 — шлюз (default gateway).
Установка дополнительного ip-адреса.
netsh interface ip add address name="Local Area Connection" 192.168.1.20 255.255.255.0
Включение автоматического получения ip-адреса, сетевой маски и шлюза от DHCP-сервера.
netsh interface ip set address "Local Area Connection" dhcp
Конфигурирование DNS и WINS серверов
Добавить предпочитаемый DNS сервер.
netsh interface ip set dns "Local Area Connection" static 8.8.8.8
Добавить альтернативный DNS сервер.
netsh interface ip add dns "Local Area Connection" 8.8.4.4
Добавить 3-й DNS сервер.
netsh interface ip add dns "Local Area Connection" 192.168.1.30 index=3
Установка автоматического получения предпочитаемого и альтернативного dns-сервера от DHCP-сервера.
netsh interface ip set dns "Local Area Connection" dhcp
Установка WINS.
netsh interface ip set wins "Local Area Connection" static 192.168.1.240
Включение и отключение сетевых интерфейсов
Отключение интерфеса
netsh interface set interface name="Local Area Connection" admin=DISABLED
Включение интерфеса
netsh interface set interface name="Local Area Connection" admin=ENABLED
Просмотр сетевых настроек
Расширеный вывод конфигурации сетевых интерфейсов.
netsh interface ip show config
Просмотр состояния интерфейсов (connected/disconnected).
C:\Windows\System32>netsh interface ip show interface
Инд  Мет         MTU         Состояние     Имя
---  ----------  ----------  ------------  ---------------------------
  1          50  4294967295  connected     Loopback Pseudo-Interface 1
 12          10        1300  disconnected  Local Area Connection
Просмотр таблицы маршрутизации.
netsh interface ip show route
Просмотр конфигурации IP-адресов.
netsh interface ip show addresses
Просмотр адресов DNS-сервера.
netsh interface ip show dnsservers
Просмотр адресов WINS-сервера.
netsh interface ip show winsservers
Сохранение и восстановление конфигурации сетевых интерфейсов
Ну а теперь самое интересное. Поговорим о том, как сохранить сетевые настройки в виде файла конфигурации и восстановить из файла конфигурации. Это может пригодиться тем, кто постоянно меняет сетевые настройки.
Сохранить сетевые настройки в виде файла.
C:\Windows\System32>netsh -c interface dump > C:\my-config.txt
Восстановить сетевые настройки из файла конфигурации.
C:\Windows\System32>netsh -f C:\my-config.txt
Вот и все. Мы рассмотрели далеко не все возможности утилиты Netsh.exe, а лишь самые часто используемые. Используя коммандную строку Windows и утилиту netsh можно намного облегчить себе жизнь.
Windows Command Prompt, or CMD, can be a handy tool for tweaking network settings. It lets you change IP addresses and DNS settings with commands like “netsh interface ip set address” and “netsh interface ip set dns“. This guide will show you how to do just that in Windows 11 or 10 using either CMD or PowerShell.
Also see: How to Check IP Address in Windows 11
Getting to know the “Netsh Interface IP” command
Netsh, or “network shell,” is a command-line tool in Windows that helps you manage network settings. It’s great for working with IP addresses and DNS settings. You can use netsh interface ip to handle IP addresses and netsh interface ip set dns for DNS configuration.
Related concern: What is Netsh.exe & its Popup and Crashing issues in Windows 11
Why use the command line?
Although many would argue that it would be more convenient to just adjust things through the GUI available like the network adapter’s properties to configure things like IP addresses and DNS, using command line, particularly the Netsh tool, will give you more freedom and some benefits:
- It’s quick. Commands run faster than navigating through menus.
- Great for automation. You can script these commands to set up many computers at once.
- Handy for remote management. Manage settings on computers across your network from anywhere.
- Helpful for troubleshooting. Get detailed info that can help fix network problems.
Pro tip: How to Find The IP Address of a Website in Windows 10 / 11
How to assign a Static IP Address
Setting a static IP address is useful for devices that need a constant address, like servers. Here’s how to do it with CMD:
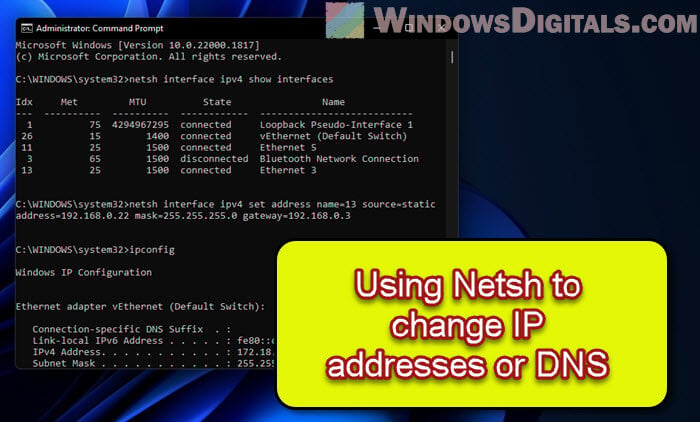
First up, open Command Prompt as an admin
Hit the Win key, search for cmd or Command Prompt, right-click the result, and pick Run as administrator. PowerShell works too.

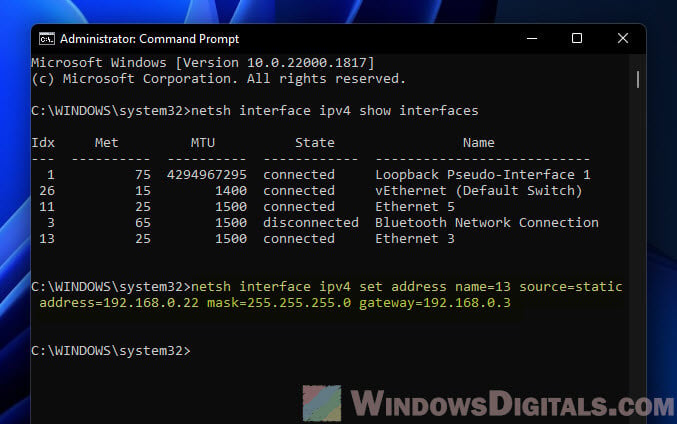
Next, see your network interfaces
Type this to list them:
netsh interface ipv4 show interfaces
Find the one you’re working with and remember its index number.

Now, set your IP, subnet mask, and gateway
Use this template, swapping in your own values:
netsh interface ipv4 set address name=<index> source=static address=<ip_address> mask=<subnet_mask> gateway=<gateway>
For instance, to assign 192.168.1.10 to interface number 3, you’d type:
netsh interface ipv4 set address name=3 source=static address=192.168.1.10 mask=255.255.255.0 gateway=192.168.1.1
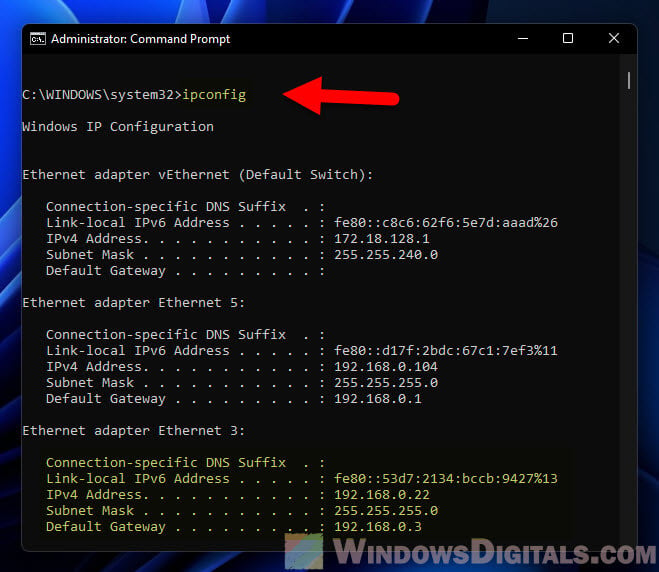
Lastly, make sure it worked
Type ipconfig to see if your new settings are listed.
Related issue: Windows 11 Ethernet “Unidentified Network” (How to Fix)
Switching to a Dynamic IP Address
Dynamic IP addresses, given out by a DHCP server, are the go-to for most networks. Here’s how to set one up:
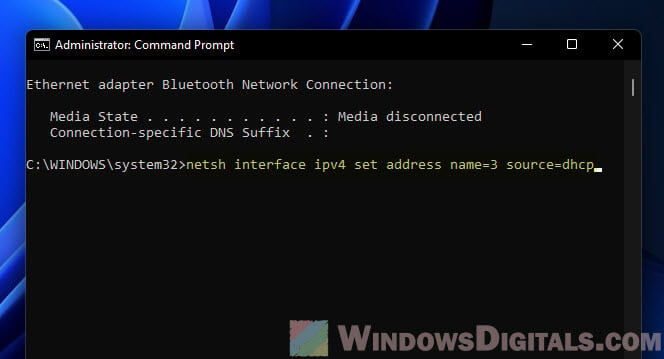
Step 1: Open Command Prompt as an administrator
Just like before.
Step 2: View the list of network interfaces
Run netsh interface ipv4 show interfaces to see your options and pick one.
Step 3: Switch to DHCP
Here’s the command, don’t forget to use your interface’s index:
netsh interface ipv4 set address name=<index> source=dhcp
For example, for interface 3, it’s:
netsh interface ipv4 set address name=3 source=dhcp
Step 4: Verify the changes
Run ipconfig to see if it’s set to get an IP address by itself.
Additional resource: Find MAC Address on Windows 11/10 with or without CMD
Setting up DNS Settings
DNS settings are what turn website names into IP addresses. Here’s how to tweak them:
See also: Change DNS to Google or Cloudflare in Windows 11/10
Step 1: Open Command Prompt as an administrator
As mentioned earlier.
Step 2: View the list of network interfaces
Use netsh interface ipv4 show interfaces to find the one to configure.
Step 3: Pick a primary DNS server
Replace the placeholders with your actual details:
netsh interface ipv4 set dns name=<index> static <primary_dns> primary
To use 8.8.8.8 as your primary DNS on interface 3:
netsh interface ipv4 set dns name=3 static 8.8.8.8 primary

Step 4: Add a backup DNS server (if you want)
Here’s how, just change <index> and <secondary_dns> to fit your setup:
netsh interface ipv4 add dns name=<index> addr=<secondary_dns> index=2
To set 8.8.4.4 as a backup for interface 3:
netsh interface ipv4 add dns name=3 addr=8.8.4.4 index=2
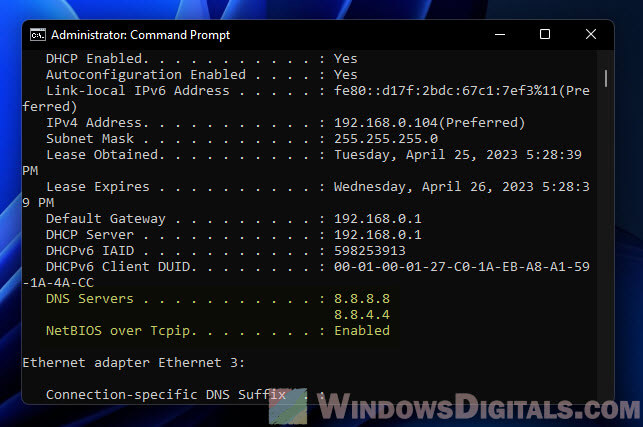
Step 5: Double-check everything
Run ipconfig /all to make sure your DNS settings are spot on.
Going back to default DNS Settings
If you want your DNS settings to go back to automatic, here’s what to do:
Step 1: Open Command Prompt as an administrator
Same process as before.
Step 2: View the list of network interfaces
Check your interfaces again with netsh interface ipv4 show interfaces.
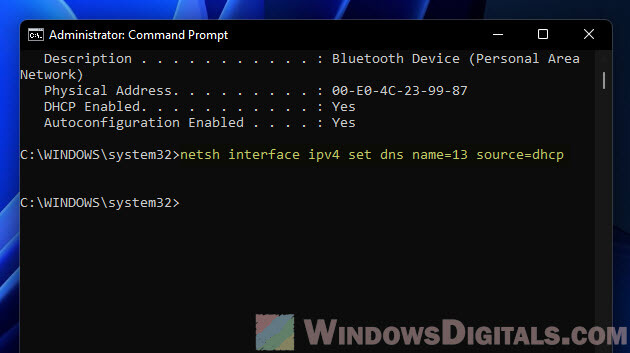
Step 3: Reset your DNS settings
Here’s how, remember to swap in your interface index:
netsh interface ipv4 set dns name=<index> source=dhcp
To reset interface 3‘s DNS:
netsh interface ipv4 set dns name=3 source=dhcp
Step 4: Make sure it’s all set
Run ipconfig /all to see if your computer is back to getting DNS settings on its own.
My two cents
Using the “netsh interface ip set address” and “netsh interface ip set dns” in CMD to adjust IP and DNS settings on Windows is especially useful when you need to manage a big network. If you are looking to automate stuffs like setting IP and DNS for a lot of computers in the network, this will certainly be one of the best ways.
Anyone who works with Windows network configurations will sooner or later come across the Network Shell (Netsh). The term refers to an interface between users and the operating system, which enables the administration and configuration of local, and remote network settings.
The range of applications includes settings for the Windows firewall and LAN/WLAN management as well as IP and server configuration. Moreover, networked infrastructure can also be protected from external attack. Using the command line tool, it’s also possible to diagnose problems and carry out repairs in the network. A big advantage of Netsh is that network-related administration tasks can be performed quickly and conveniently, and can be automated with scripts.
Netsh commands: starting the command prompt
It’s necessary to access the command line in order to use Netsh. There, you can open the “Run” menu as follows:
- Press the key combination [Windows] + [R]
- Enter “cmd” in the entry field (1)
- Click the “OK” button (2)

The command prompt will then launch. The service program will open after you enter “netsh” and confirm with [Enter].

If Netsh commands and scripts aren’t run or if more fundamental interventions in the network configuration are planned, you’ll need to start Network Shell with administrator rights. These steps are required on Windows 10:
- Right-click on the Windows symbol on the left side of the task bar or press the key combination [Windows] + [X].
- Choose the entry “Command Prompt (Admin)” in the context menu that appears:
Netsh includes the program file netsh.exe located in the Windows system folder (%windir%\system32). Directly opening the file streamlines the Netsh command entry procedure. You can enter the path C:\Windows\System32\netsh.exe into the address line of Windows Explorer and press [Enter]. You can then enter Netsh commands straight away in the entry window that appears.
Launching the file is even faster by using a shortcut. Once created, a simple mouse click will be enough to launch the command entry:
- Right-click on the Windows desktop. Click on the menu entry “New” (1) and then click on “Shortcut” in the next context menu (2):

- In the shortcut assistant, enter the path C:\Windows\System32\netsh.exe (1) and click on “Next” (2):

- You should give the shortcut a suitable name (1); the shortcut will then be placed on the desktop after clicking “Finish” (2):

How Netsh works
The service program Netsh provides an extensive command syntax. If you want to complete certain tasks, you’ll need to familiarize yourself with the specific structure of the Network Shell. The structure of the service program is based on contexts that represent various administration levels. Each context encompasses a certain network functionality (e.g. IP, LAN and firewall configuration). The program uses the files of the Dynamic-Link Library (DLL) for context-bound interaction with other Windows components. For instance, Netsh utilizes Dhcpmon.dll to change and manage DHCP settings.
To use a context, it’s necessary to switch to it in the command prompt of Windows. For example, the “LAN administration” context is accessed as follows:
- After opening the command prompt, enter “netsh” and confirm with [Enter].
- Then enter “lan” and confirm with [Enter].
- The command prompt will now show the context change: netsh lan>

After changing to the “LAN” context, a number of context-specific and cross-context commands will be available. The context-specific commands include “set” (which configures settings at interfaces). An example for a general and cross-context Netsh command is the help command “/?”, which lists the available sub-contexts and commands in each section. Entering it in the “LAN” section will produce the following list of context-specific and cross-context commands:

For instance, if you switch to the firewall context, the associated command reference will look like this:

Besides the context-bound structure, there are other special points to consider when using the program. Netsh can either be used in a non-interactive or interactive mode. In the non-interactive mode, for example, important network settings are exported to a text file and reimported for subsequent recovery.
In the interactive mode, direct requests can be initiated. If you enter “netsh interface ip show address”, the current IP address of the computer will be displayed. The interactive mode can be used online or offline. The online model directly implements operations, while the offline mode saves actions and runs them later. The saved actions are activated at the desired time via the Netsh command “commit”.
Netsh commands and their contexts
We’ve summarized the main Netsh commands with a short explanation of the contexts in the table below. In the case of general, cross-context commands, additional explanations are not necessary (right-hand column). Depending on the operating system version and the role in the network (client or server), the available commands may vary in some instances. The command entry on a computer with a Windows Server 2016 data center is as follows:
| Command | Implementation | Netsh context managed |
|---|---|---|
| .. | Switches to a context level higher | |
| ? | Displays a list of commands | |
| abort | Discards changes made in offline mode | |
| add | Adds a configuration entry to the list | |
| advfirewall | Switches to the “netsh advfirewall” context | Firewall (policies and configuration) |
| alias | Adds an alias | |
| branchcache | Switches to the “netsh branchcache” context | Branch cache settings |
| bridge | Switches to the “netsh bridge” context | Network bridge |
| bye | Ends the program | |
| commit | Applies changes made in offline mode | |
| delete | Deletes a configuration entry from the list of entries | |
| dhcpclient | Switches to the “netsh dhcpclient” context | DHCP client |
| dnsclient | Switches to the “netsh dnsclient” context | DNS client settings |
| dump | Displays a configuration script | |
| exec | Runs a script file | |
| exit | Ends the program | |
| firewall | Switches to the “netsh firewall” context | Firewall (policies and configuration) |
| help | Displays a list of commands | |
| http | Switches to the “netsh http” context | HTTP server driver (http.sys) |
| interface | Switches to the “netsh interface” context | IP configuration (v4, v6) |
| ipsec | Switches to the “netsh ipsec” context | IPSEC policies |
| ipsecdosprotection | Switches to the “netsh ipsecdosprotection” context | Protection against IPSEC denial-of-service attacks |
| lan | Switches to the “netsh lan” context | Wired network interfaces |
| namespace | Switches to the “netsh namespace” context | DNS client policies |
| netio | Switches to the “netsh netio” context | Commitment filters |
| offline | Sets the current mode to offline | |
| online | Sets the current mode to online | |
| popd | Switches to the context saved via pushd in the stack | |
| pushd | Applies the current context to the stack | |
| quit | Ends the program | |
| ras | Switches to the “netsh ras” context | Remote-access server |
| rpc | Switches to the “netsh rpc” context | RPC service configuration |
| set | Updates the configuration settings | |
| show | Displays information | |
| trace | Switches to the “netsh trace” context | |
| unalias | Deletes an alias name | |
| wfp | Switches to the “netsh wfp” context | Windows filtering platform |
| winhttp | Switches to the “netsh winhttp” context | Proxy and tracing settings of the Windows HTTP client |
| winsock | Switches to the “netsh winsock” context | Winsock configuration |
| wlan | Switches to the “netsh wlan” context | Wireless network interfaces |
Syntax parameters for Netsh – what do they mean?
To implement specific actions and tasks, Netsh commands can be given optional parameters. The syntax scheme for the combination of Netsh commands and parameters is as follows:
netsh [-a AliasFile] [-c Context] [-r RemoteComputer] [-u [DomainName\]UserName] [-p Password | *] [command | -f ScriptFile]The following parameters are all optional, so they can be added and used where needed.
| -a | Return to Netsh command prompt after running the alias file |
|---|---|
| AliasFile | Specifies the name of the text file that contains at least one Netsh command |
| -c | Switches to the specified Netsh context |
| Context | Placeholder for the context to be entered (e.g. WLAN) |
| -r | Causes the command to be run on a remote computer; the remote registration service must be executed there. |
| RemoteComputer | Name of the remote computer that is configured |
| -u | Indicates that the Netsh command is run under a user account |
| DomainName\ | Designates the user account domain (the standard value is the local domain if no special domain is specified) |
| UserName | Name of the user account |
| -p | A password can be entered for the user account |
| Password | Specifies the password for the user account that is stated with -u UserName |
| NetshCommand | Netsh command to be run |
| -f | Ends Netsh after running the script file |
| ScriptFile | Script to be run |
Resetting the TCP/IP Stack with Netsh
A common use for Netsh commands is to reset the TCP/IP stack, which provides for the exchange of data packages in networks. In the event of network and internet issues, this measure can help to remove defective or incorrectly configured TCP/IP protocols for example. The following repair command executes a reset and re-installs TCP/IPv4:
A protocol file can also be created that logs the changes made:
netsh int ip reset c:\tcpipreset.txtAfter running the reset, the computer will need to be restarted.
Netsh commands can also be used in batch files (*.bat) to automate routine tasks. Find out more in our guide “Removing Batch Files”.
Importing and exporting network settings
Netsh allows you to export current network settings into a plain text file. In case of network problems, a functioning and error-free configuration can then be quickly restored.
In the first step (export), the network configuration is read out, written into a text file (netcnfig.txt)), and saved in the example directory “Network Configuration” on the C:\ drive. Before the first export, you’ll need to manually create the “Network Configuration” folder on the destination drive (Netsh does not perform this step automatically). Then, switch to the command prompt and enter the code below:
netsh -c interface dump>c:\Network Configuration\netcnfig.txtThe following command entry is required for subsequently importing the settings:
netsh -f c:\Network Configuration\netcnfig.txtWindows 10 also supports copy and paste in the command prompt. You can simply copy the command syntax from this article and insert it into the entry window.
IP configuration with Netsh
A prevalent use case for Netsh is changing IP settings. If a computer in the network doesn’t contain a static IP address but an automatically assigned one, the Dynamic Host Configuration Protocol (DHCP) is used. This communication protocol automatically assigns IP addresses to clients in a network, and other required configuration data. This process takes multiple steps:
In the first step, the current settings and names of the available network adapters are requested:
netsh interface ipv4 show interface
Now a certain LAN adapter (in this case: Ethernet) is determined as the addressee for the IP assignment via DHCP.
netsh interface ipv4 set address name="Ethernet" source=dhcpNext, DHCP applies the dynamic administration for network settings that relate to the Ethernet adapter.
Activating and deactivating Windows firewall
If you wish to activate or deactivate the Windows firewall, all you need is a simple Netsh command syntax. A firewall is activated as follows:
netsh firewall set opmode enableFirewall deactivation requires the following command:
netsh firewall set opmode disableIn some contexts, Windows will recommend alternatives to network administration with Netsh. Here, Windows PowerShell is often suggested and you can find an introduction to it in our Digital Guide.
Was this article helpful?
The netsh command is a Windows command that enables you to display and modify the network configuration of Windows computers.
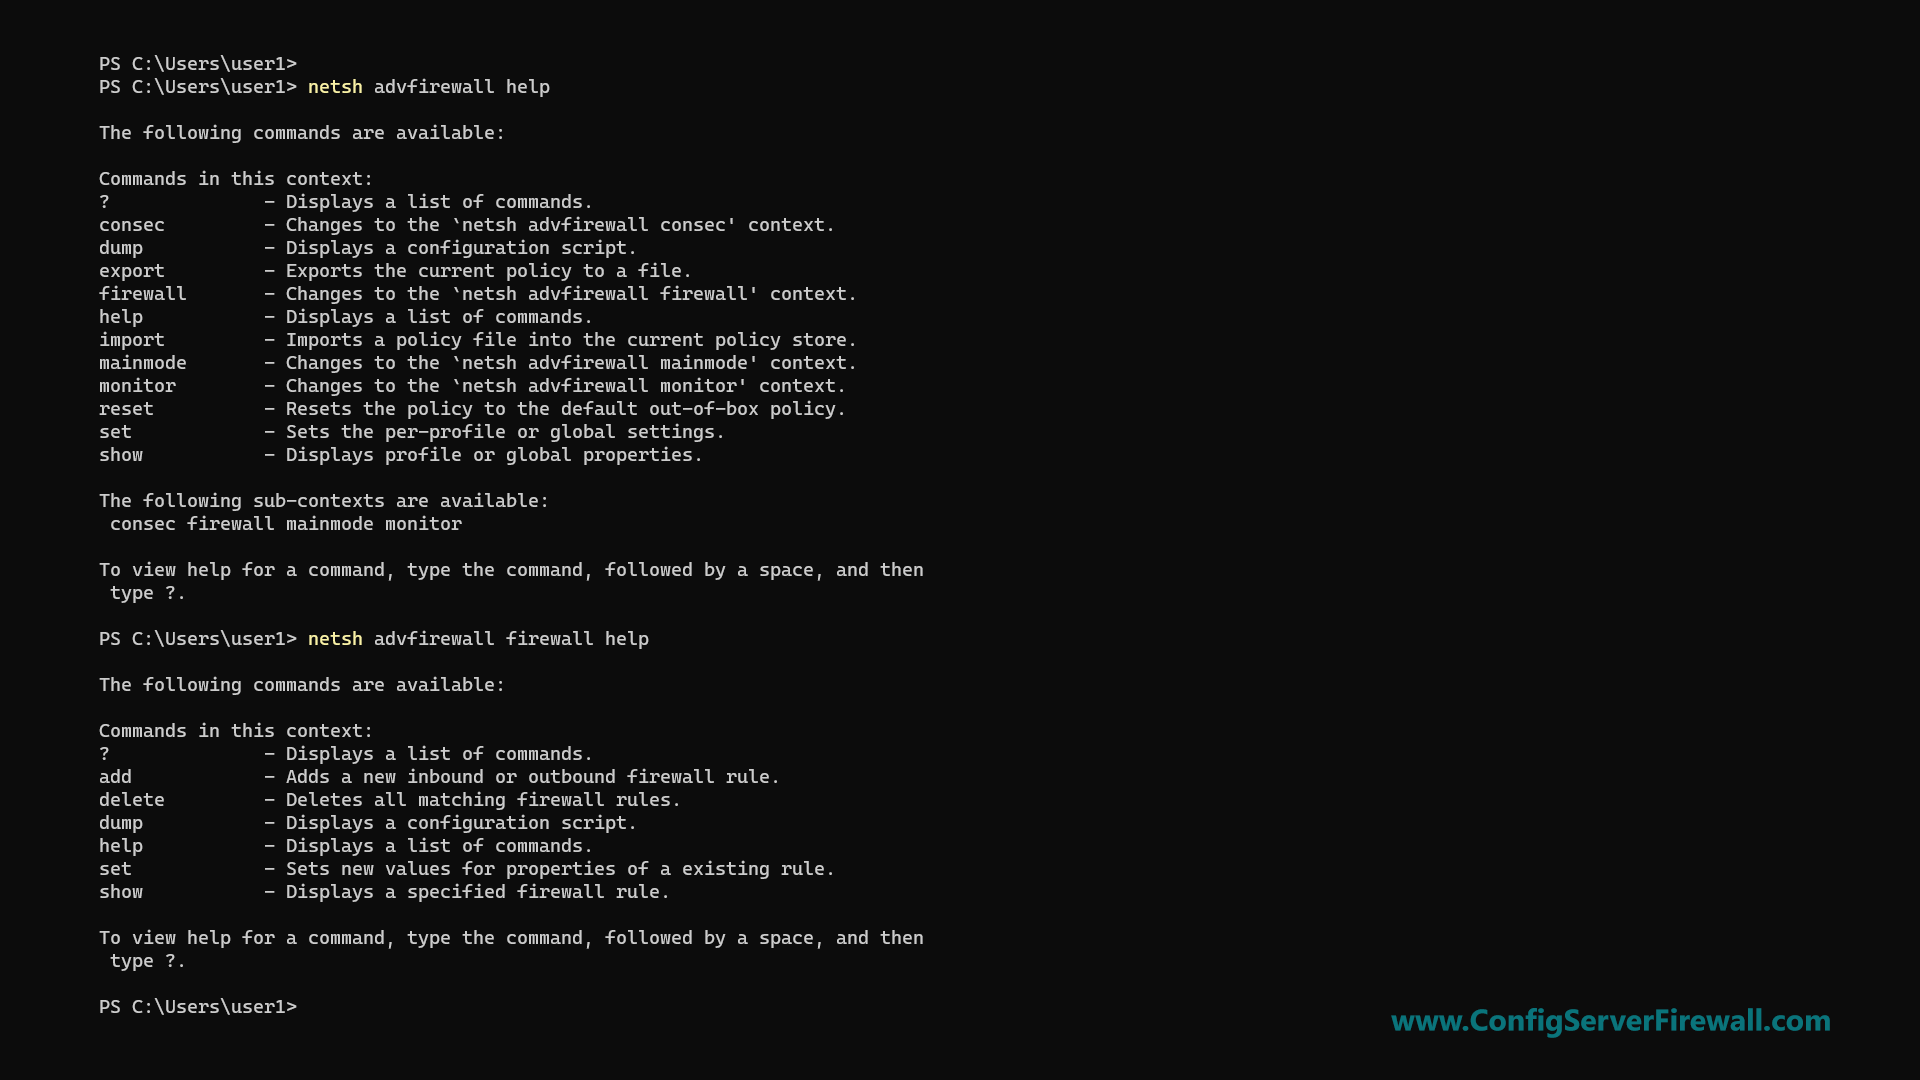
We can run the netsh command in both CMD and PowerShell. To get a list of the available contexts, run the following command:
netsh helpNetsh has multiple command contexts (subcommands). Each command context has multiple subcommands you can use. For example, to get a list of the available commands under the advfirewall context, run the help command as follows:
netsh advfirewall helpYou can run the help command for each context to see the different sets of available subcommands.
Configuring Network Interfaces
In the following section, we will be learning how to use the netsh command to configure Windows networking.
To list all network interfaces on your computer, run the following command:
netsh interface show interfaceUse the name parameter to show the status of a specific interface:
netsh interface show interface name="Ethernet"To check IP Addresses, use ipv4 and ipv6 contexts as follows:
netsh interface ipv4 show addresses
netsh interface ipv6 show addresses
To find the IP Address of a specific interface, use the name parameter:
netsh interface ipv4 show addresses name="Wi-Fi"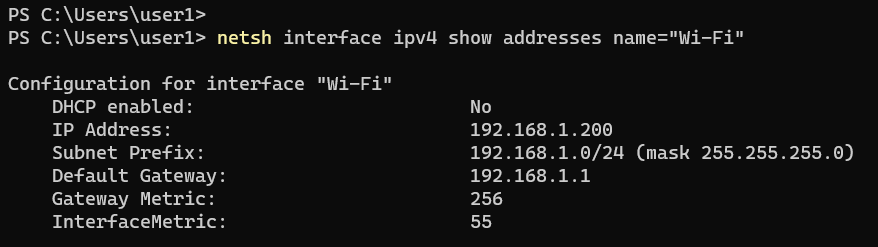
The show addresses command shows the IP Address, Subnet Mask, Default Gateway, and DHCP status.
Configuring IP Addresses
The following example shows how to assign a static IP Address to a network interface named Ethernet:
netsh interface ipv4 set address "Ethernet" static 192.168.1.10 255.255.255.0 192.168.1.1In the above example, 192.168.1.1 is the default gateway. The following is the long format of the same command:
netsh interface ipv4 set address name="Ethernet" source=static address=192.168.1.10 mask=255.255.255.0 gateway=192.168.1.1The following example shows how to configure a network interface to receive its IP configuration from the DHCP server:
netsh interface ipv4 set address name="Ethernet" source=dhcpConfiguring Name Servers
You can check DNS server addresses with the following two commands for IPV4 and IPv6, respectively:
netsh interface ipv4 show dnsservers
netsh interface ipv6 show dnsservers
Configure the NIC to receive DNS server address assignment from the DHCP server:
netsh interface ipv4 set dnsservers "Ethernet" source=dhcpThe following example shows how to set the primary DNS server address on the NIC named Ethernet:
netsh interface ipv4 set dnsservers name="Ethernet" static 192.168.1.1 primaryIt will remove any existing DNS server IP addresses. To add a name server without removing existing IP addresses, use the add dnsservers command:
netsh interface ipv4 add dnsservers "Ethernet" 192.168.1.1 index=1The above command sets the primary DNS server. If other IP addresses exist, they will move down on the list.
The following command sets the secondary DNS server:
netsh interface ipv4 add dnsservers "Ethernet" 192.168.1.2 index=2Configuring Windows Firewall
In the following section, we will be learning how to use netsh to configure Windows Defender Firewall.
First of all, you can check Windows Firewall status with the following command:
netsh advfirewall show allprofilesThe command will show the status for all Firewall profiles. To check a specific Firewall profile (public, for example), run the netsh command as follows:
netsh advfirewall show publicprofileThe netsh advfirewall show help command will show you the list of all Firewall profiles.

The following two commands turn on and off Windows Firewall, respectively:
netsh advfirewall set allprofile state off
netsh advfirewall set allprofile state on
The following examples show how to open ports, block ports, and allow programs through Windows Firewall.
Add an inbound Firewall rule to open port 80:
netsh advfirewall firewall add rule name="allow80" dir=in protocol=tcp localport=80 action="allow"Disable the above rule:
netsh advfirewall firewall set rule name="allow80" new enable=noAllow port 80 to IP Address 192.168.1.10 only:
netsh advfirewall firewall add rule name="allow80" dir=in protocol=tcp localport=80 remoteip="192.168.1.10" action=allowBlock port 80 from IP Address 192.168.1.10:
netsh advfirewall firewall add rule name="block80" dir=in protocol=tcp localport=80 remoteip="192.168.1.10" action=blockAllow a program through the Firewall:
netsh advfirewall firewall add rule name="netcat" dir=in program="C:\program files (x86)\nmap\ncat.exe" action=allowList all Firewall rules:
netsh advfirewall firewall show rule allList all inbound rules:
netsh advfirewall firewall show rule all dir=inDisplay all the settings for inbound rules called netcat:
netsh advfirewall firewall show rule name="netcat" verboseWhen using the netsh command, always use the help option to see the list of subcommands you can use. The help page also includes examples showing you how to use netsh to manage Windows networking and Firewall.
Netsh — мощная и полезная утилита командной строки, предназначенная для обновления и настройки параметров сети Windows
Netsh — мощная и полезная утилита командной строки, предназначенная для обновления и настройки параметров сети Windows. Но огромное количество возможностей, которые она предоставляет, может помешать разобраться с применением Netsh для решения типичных задач. Ниже приведены 10 готовых к использованию примеров настройки наиболее распространенных сетевых параметров и функций. Полную инструкцию по использованию Netsh можно найти в техническом руководстве Netsh Windows Server 2008 в центре загрузки Microsoft — «Windows Server 2008 Network Shell (Netsh) Technical Reference» (http://www.microsoft.com/downloads/details.aspx? FamilyID=f41878de-2ee7-4718-8499-2ef336db3df5).
Просмотр текущей конфигурации IP. Следующая команда поможет определить, используется ли служба DHCP или статическая адресация, а также покажет текущие настройки адреса IP, маску подсети, шлюз и сервер DNS:
netsh interface ip show config
Настройка удаленной системы. Одна из наиболее востребованных возможностей команды Netsh — способность работать с удаленными компьютерами так же легко, как с локальной системой. Ключ set machine позволяет выбрать удаленный компьютер в сети, с которым будет работать Netsh. Для этого необходимо зарегистрироваться в системе от имени учетной записи, обладающей административными правами на удаленном компьютере, после чего выбор удаленного компьютера осуществляется командой:
netsh set machine win2008–2
Поддержка IPv6. Netsh поддерживает работу с сетевыми стеками Windows IPv4 и IPv6. Для определения адреса IPv6 достаточно выполнить команду:
netsh interface ipv6 show address
Включение и отключение брандмауэра Windows. Netsh позволяет управлять встроенным брандмауэром Windows. Начиная с выпуска Windows Server 2008 более старые ключи Netsh firewall были заменены на advfirewall. Следующие две команды сначала отключают, а затем и включают заново брандмауэр Windows:
netsh advfirewall set currentprofile state off
netsh advfirewall set currentprofile state on
Открытие портов брандмауэра Windows. Netsh позволяет открывать порты брандмауэра для различных приложений. Следующий пример показывает, как открыть порт 1413 TCP для доступа к Microsoft SQL Server:
netsh advfirewall firewall
add rule name=»SQL Server»
dir=in action=allow
protocol=TCP localport=1434
Просмотр статуса установленных в системе сетевых адаптеров. Многие команды Netsh требуют указать имя сетевого интерфейса, который необходимо настроить. По умолчанию сетевые интерфейсы в Windows именуются Local Area Connection, но многие администраторы и пользователи изменяют это имя. Для определения имени системного сетевого адаптера или адаптера беспроводной сети применяются команды:
netsh interface show interface
netsh wlan show interface
Настройка сетевого адаптера для использования статического адреса IP. Приведенная ниже команда задает для сетевого адаптера с именем Local Area Connection сетевой адрес 192.168.0.100, маску подсети 255.255.255.0 и шлюз 192.168.0.254:
netsh interface ip
set address «Local Area Connection»
static 192.168.0.100
255.255.255.0 192.168.0.254 1
Настройка сервера DNS для сетевого адаптера. Как правило, при настройке компьютера для использования статического адреса IP необходимо также поменять настройки DNS. В следующем примере с помощью Netsh для сетевого интерфейса Local Area Connection настраивается сервер DNS с адресом 192.168.0.2:
netsh interface ip
set dns «Local Area Connection»
static 192.168.0.2
Добавление дополнительного сервера DNS в конфигурацию сетевого адаптера. Во многих сетях применяются резервные серверы DNS. Для добавления вторичного сервера DNS с адресом 192.168.0.4 можно воспользоваться командой:
netsh interface ip
add dnsserver «Local Area Connection»
192.168.0.3
Настройка сетевого адаптера для автоматического назначения адреса IP сервером DHCP. Netsh можно использовать для автоматической настройки сетевого интерфейса с целью получения динамического адреса IP и сервера DNS по протоколу DHCP:
netsh interface ip
set dns «Local Area Connection» dhcp
Майкл Оти Редактор Windows IT Pro и президент компании TECA (Портленд, шт. Орегон), занимающейся разработкой программного обеспечения и консалтингом. mikeo@windowsitpro.com