Вы тут: Главная → Windows → Fix | Как включить автоматический вход в систему в Windows 11 и Windows 10
В версии Windows 10 2004 (20H1) произошло небольшое изменение, которое непременно поставит в тупик людей, привыкших включать автоматический вход в систему. Сегодня я разберу ситуацию и покажу варианты решения проблемы.
[+] Сегодня в программе
Проблема: в netplwiz нет флажка для автоматического входа
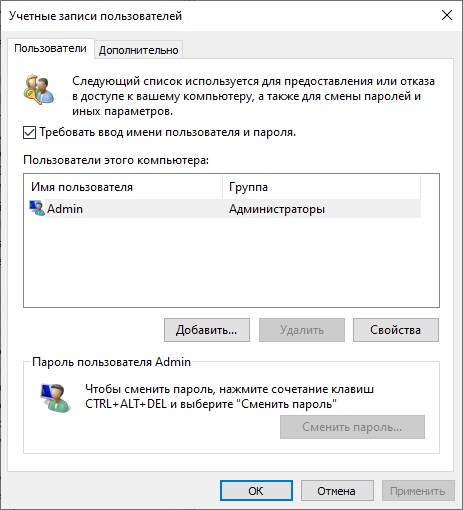
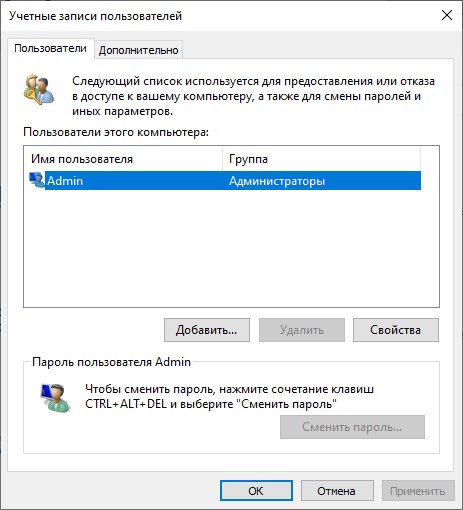
Испокон веков стандартный способ включения автоматического входа — апплет netplwiz также известный как control userpasswords2. Снимаете флажок Требовать ввод имени пользователя и пароля, вводите имя аккаунта и пароль — автоматический вход работает.
С появлением учетной записи Microsoft (MSA) появился нюанс – надо вводить почтовый адрес, а не имя учетной записи. Но с этим большинство разобралось уже, наверное.
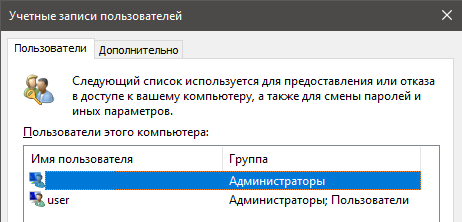
Однако, как вы догадались из ↑картинки, в Windows 10 20H1 появились новые грабли – флажок может отсутствовать!
Эта история с двойным дном.
Почему нет флажка
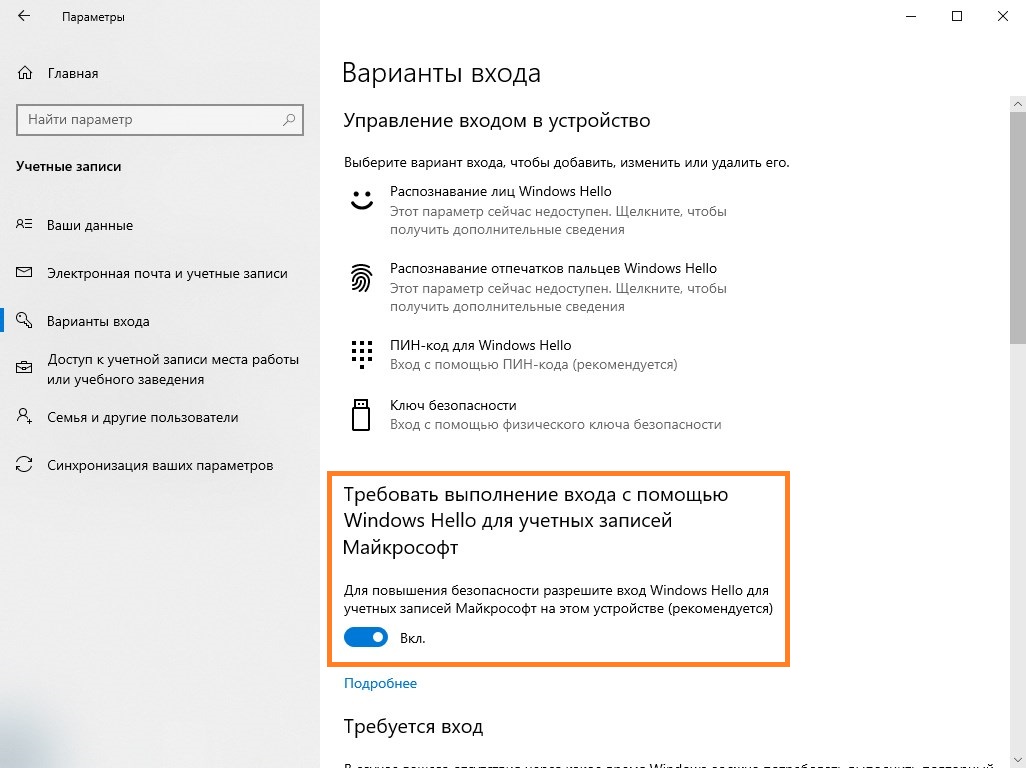
В Windows 10 20H1 флажок исчезает, если в Параметры – Учетные записи – Варианты входа включена настройка Требовать выполнение входа с Windows Hello для учетной записи Майкрософт.
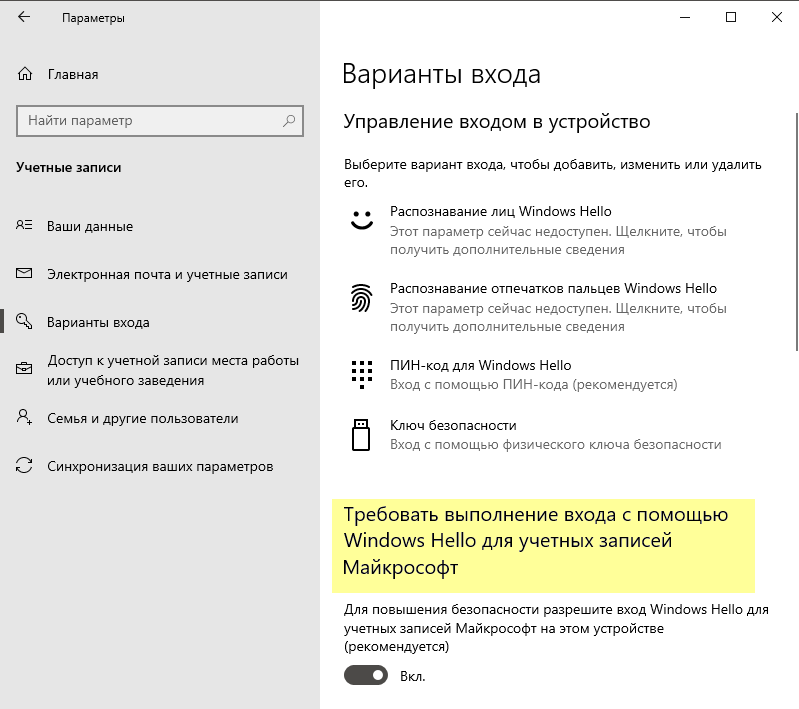
Логика просматривается, если вчитаться в текст. Лучше в английский, потому что в русском интерфейсе пропущено важное слово, искажающее смысл: разрешите вход только Windows Hello.
В сферу Windows Hello входят ПИН-код, биометрия и аппаратный ключ, но не вход с паролем. При включении настройки он исчезает из вариантов входа, как и графический пароль. Поэтому логично, что при включении параметра исчезает и настройка автоматическиого входа с паролем в netplwiz.
Исходя из описания, включение данной настройки рекомендуется. А это значит, что при чистой установке она включена, а флажка в netplwiz нет.
Если же вы обновлялись с предыдущей версии, настройка выключена (по крайней мере в 20H1). Так или иначе, для появления флажка в netplwiz достаточно выключить настройку в Параметрах.
Почему настройки нет в Параметрах или она заблокирована
Хорошо, когда настройка есть, но ее может не быть! 🤦♂️ Читая описание параметра в третий раз, можно заметить там аж два упоминания MSA.
Действительно, настройка доступна в Параметрах только при входе в систему с аккаунтом Microsoft!
Конечно, Windows давно и последовательно двигает пользователей к работе с аккаунтом Microsoft, и забота компании о его безопасности понятна. Не думаю, что в данном случае специально прятали от локальных учетных записей переключатель в Параметрах. Выглядит как дефект и безусловно претендует на высокое место в моей коллекции нестыковок Windows!
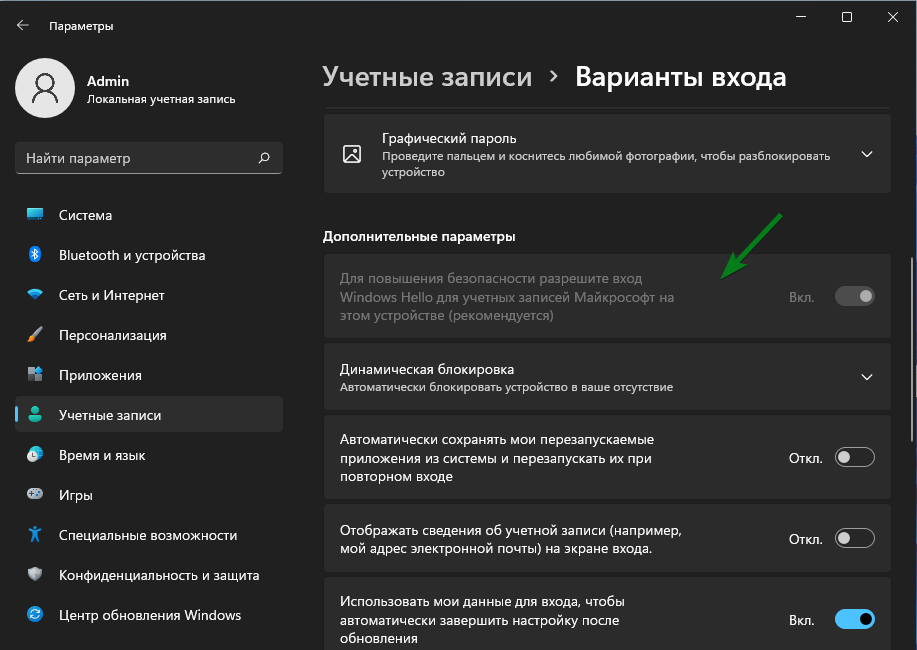
Upd. Я не ошибся, сочтя это поведение багом [UX]. В Windows 11 разработчики все-таки стали отображать настройку для локальных учетных записей, пусть и в заблокированном виде. Так хоть становится понятно, что для изменения нужна MSA.
К счастью, управлять параметром можно в реестре.
Как изменить настройку, не входя в аккаунт Microsoft
Понятно, что можно подключить MSA, подвинуть переключатель и перейти обратно к работе с локальной учетной записью. Но все проще!
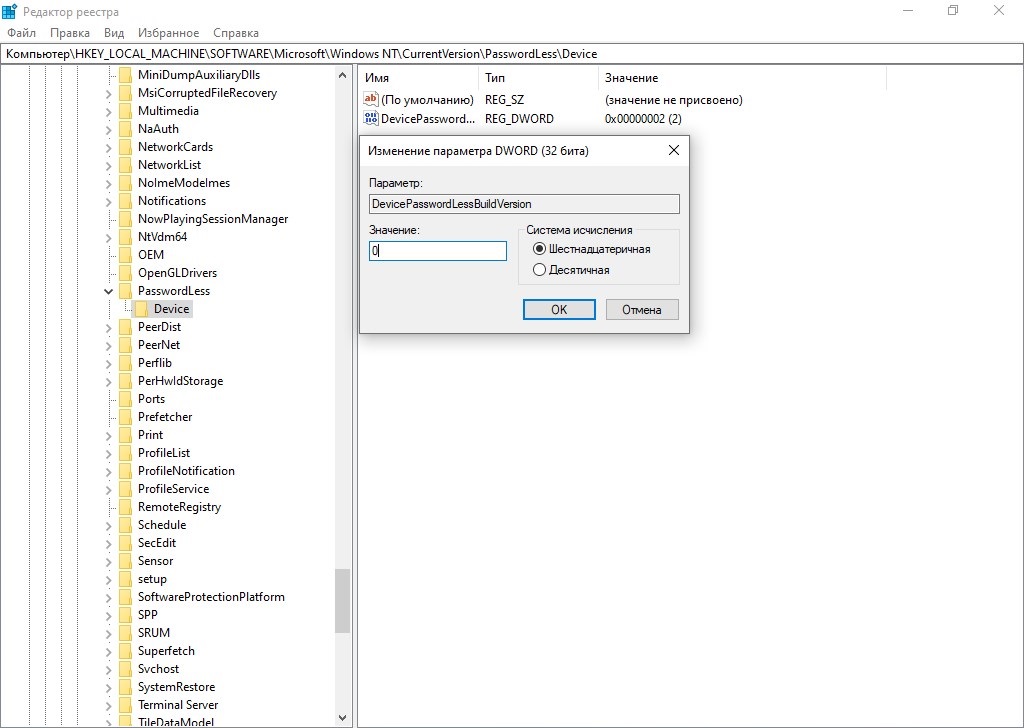
В разделе реестра HKLM\SOFTWARE\Microsoft\Windows NT\CurrentVersion\PasswordLess\Device параметр DevicePasswordLessBuildVersion принимает два значения: 0 – выключено, 2 – включено.
Соответственно, для выключения настройки достаточно выполнить одну команду PowerShell от имени администратора:
# Require Windows Hello sign in for Microsoft Accounts: 0 - off, 2 - on
New-ItemProperty -Path "HKLM:\SOFTWARE\Microsoft\Windows NT\CurrentVersion\PasswordLess\Device" -Name DevicePasswordLessBuildVersion -Value 0 -Type Dword -Force
После этого вожделенный флажок для включения автовхода появится в классическом диалоге. И будет еще один пункт в твикерах и скриптах сборщиков 
Другие способы включения автоматического входа
Можно настроить все в реестре руками, следуя KB324737. Пароль будет храниться в открытом виде, хотя это не должно особо волновать людей, включающих автовход 
Autologon от Sysinternals, как и netplwiz, кодирует пароль при записи в реестр.
См. также старую добрую статью об автоматическом входе на OSZone.
Дискуссия и опрос
Не думал, что в 2020 буду объяснять настройку автоматического входа Это не значит, что я его рекомендую, впрочем. Просто в чате инсайдеров одного товарища уж очень бомбило (даже после того как он сообразил войти с MSA). Я уверен, что он будет не один такой, и это даже справедливо — UX получился совсем неочевидный.
Сам я нахожу MSA очень удобной, как минимум для синхронизации. А вот почему люди не хотят работать в Windows с аккаунтом Microsoft, мне не совсем понятно. Расскажите в комментариях, почему вы используете или принципиально не используете учетную запись Microsoft. Во втором случае не забудьте сообщить, входите ли на смартфон с учетной записью Apple или Google.
Количественный опрос привязан к анонсу этой записи в моем канале Telegram.
При использовании инструкции как отключить запрос пароля при входе в Windows 10 в последних версиях системы вы можете столкнуться с тем, что в окне, где отключается запрос пароля нет отметки «Требовать ввод имени пользователя и пароля», а потому воспользоваться способом не получается.
Исправить это очень легко и ниже — два способа вернуть «галочку» в окно управления учетными записями пользователя, открываемого с помощью Win+R — control userpasswords2. Также может интересным: Как отключить ПИН-код и запрос на создание ПИН-кода Windows 10.
- Как вернуть пункт «Требовать ввод имени пользователя и пароля»
- Видео инструкция
Два способа вернуть «Требовать ввод имени пользователя и пароля» в окне «Учетные записи пользователей» Windows 10

Рассматриваемая в статье отметка пропадает, если в Windows 10 включена опция «Требовать выполнение входа с помощью Windows Hello для учетных записей Майкрософт». Если её отключить — появится и возможность снятия галочки «Требовать ввод имени пользователя и пароля»:
- Зайдите в Параметры (клавиши Win+I) — Учетные записи.
- Перейдите в раздел «Варианты входа».
- Отключите опцию «Требовать выполнение входа с помощью Windows Hello для учетных записей Майкрософт».


В некоторых случаях этот пункт может отсутствовать в указанном разделе параметров, в этом случае выполните следующие действия:
- Запустите редактор реестра (Win+R — regedit) и перейдите в следующий раздел (если он отсутствует, создайте такой раздел):
HKEY_LOCAL_MACHINE\SOFTWARE\Microsoft\Windows NT\CurrentVersion\PasswordLess\Device
- В этом разделе создайте параметр DWORD с именем DevicePasswordLessBuildVersion и значением 0 (ноль).
Обычно перезагрузка не требуется — если вы снова запустите control userpasswords2, вы увидите, что настройка «Требовать ввод имени пользователя и пароля» присутствует в окне и доступно её изменение.

Видео
В случае, если остаются вопросы — задавайте в комментариях, я постараюсь помочь.
Readers help support Windows Report. We may get a commission if you buy through our links.
Read our disclosure page to find out how can you help Windows Report sustain the editorial team. Read more
Some Microsoft users reported that there is no checkbox to manage this feature in the netplwiz property window. This is happening because Microsoft’s passwordless sign-in feature, like Windows Hello, is enabled.
When this feature is active, the system no longer uses passwords for login, so the option to require a username and password is hidden. Here’s how to get it back:
What can I do if there is no checkbox in netplwiz?
1. Disable Passwordless sign-in in Windows
1.1 Via. Registry Editor
NOTE
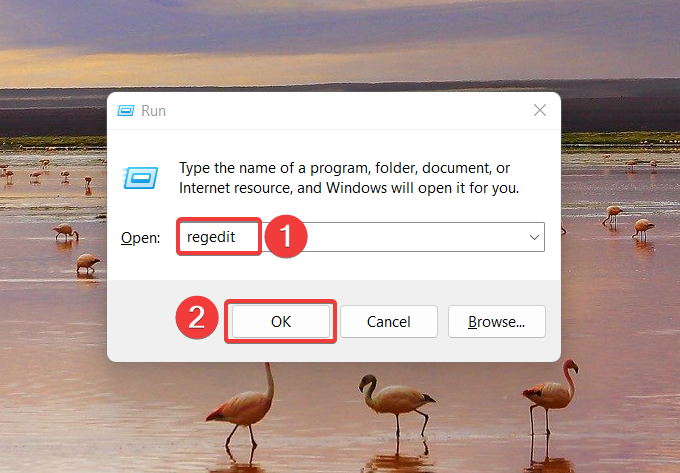
- Use the Windows + R shortcut key to launch the Run dialog box.
- Type the following command in the text box and press OK to execute it.
regedit
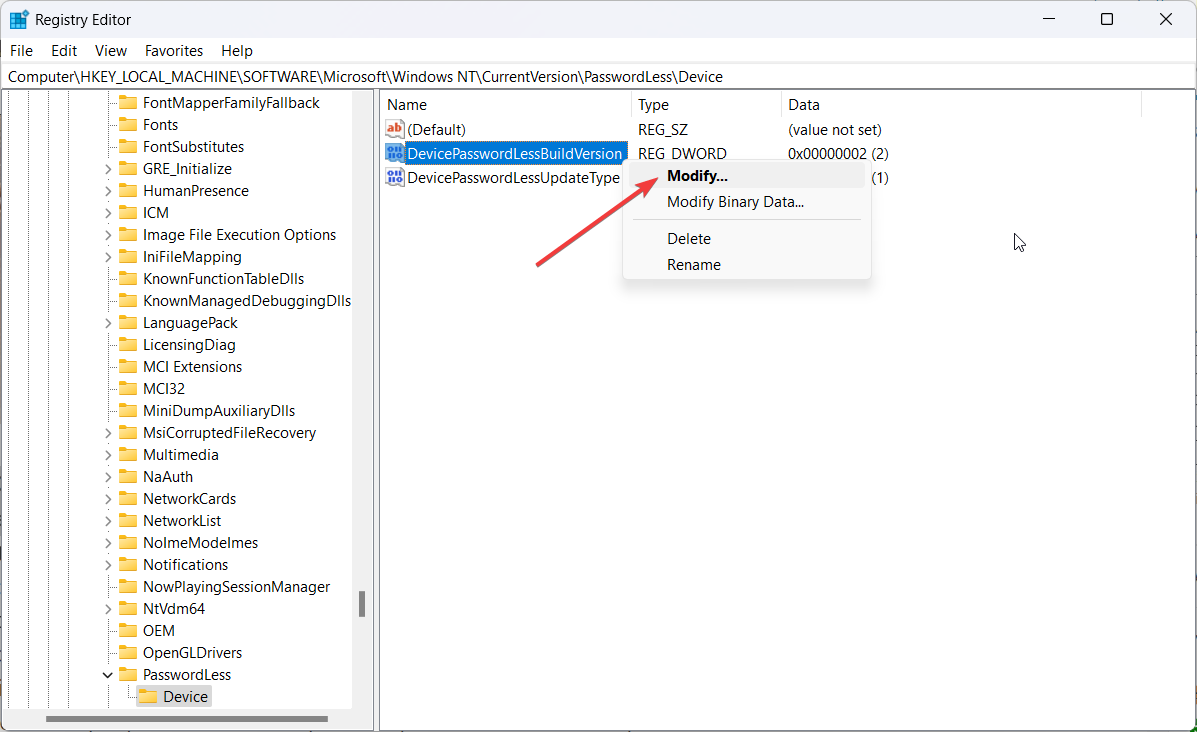
- Navigate to the following location in the registry editor window:
HKEY_LOCAL_MACHINE\SOFTWARE\Microsoft\Windows NT\CurrentVersion\PasswordLess\Device - Look for the DevicePasswordLessBuildVersion key in the right section. If not found, right anywhere and select the New option from the context menu followed by DWORD (32-bit) value.
- Rename the newly created DWORD (32-bit) as DevicePasswordLessBuildVersion.
- Right-click DevicePasswordLessBuildVersion and choose Modify from the context menu.

- Assign 0 in the Value data field and press OK to save the changes.
- Now close the Registry Editor to reboot your computer so that the changes can take effect.

If you don’t want to alter the key on your own, you can run these commands and get the same result.
1.2 Via Command Prompt
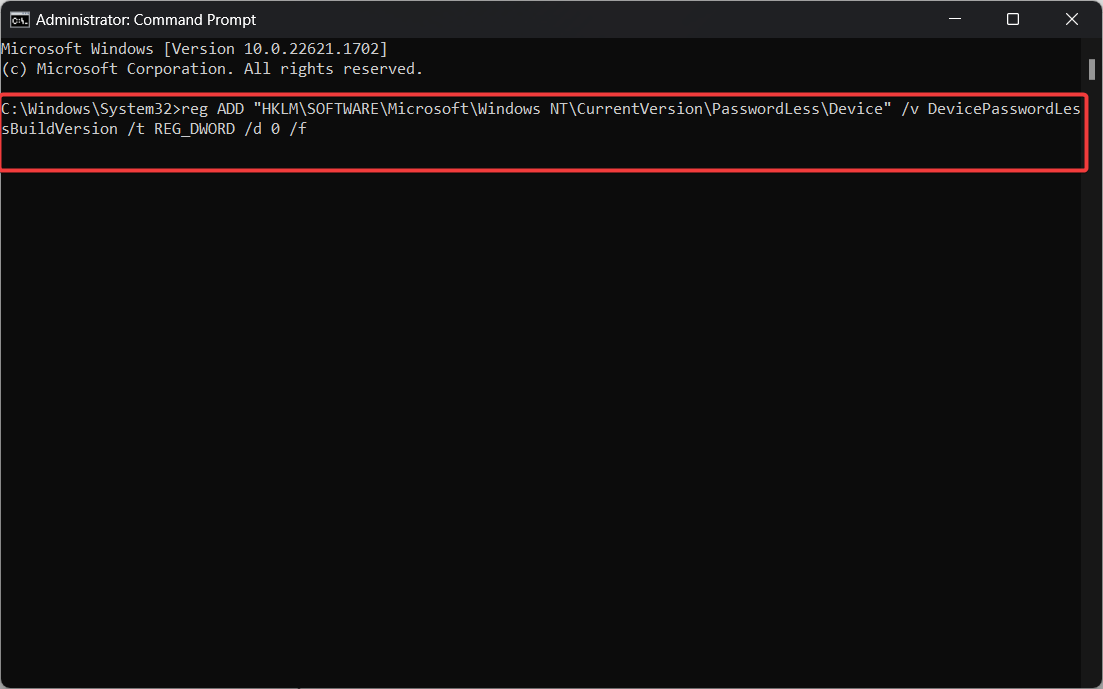
- Launch the Start menu, type cmd in the search bar on top, and choose the Run as administrator option from the search results.

- Click Yes on the User Action Control (UAC) prompt to launch Command Prompt with elevated permissions.
- Type or paste the following command and press Enter to execute it.
reg ADD “HKLM\SOFTWARE\Microsoft\Windows NT\CurrentVersion\PasswordLess\Device” /v DevicePasswordLessBuildVersion /t REG_DWORD /d 0 /f
- After executing the command, exit the command prompt window and reboot your PC.

Now access the user account settings window using the netplwiz command and look for the missing checkbox.
- iTunesMobileDevice.dll is Missing From Your Computer [Solved]
- SYNSOACC.DLL Could Not Be Located: How to Fix in Cubase
- Fix: Omen Gaming Hub Undervolting Not Working
- 5 Ways to Fix nvoglv32.dll Crash or Application Error in Windows
2. Adjust User Account settings
- Right-click the Start button and select Run.
- In the Run field, type control userpasswords2 and hit Enter.
- In the User Accounts dialog box, check the box for Users must enter a user name and password to use this computer.

- Click Apply, then OK.
- Restart your computer and check if netplwiz now shows the check box.

3. Disable Windows Hello sign-in
- Launch the Settings app using the Windows + I shortcut.
- Choose Accounts from the left navigation panel and select Sign-in options from the right section.

- Look for the For improved security, only allow Windows Hello sign-in for Microsoft accounts on this device option under Additional settings and move the toggle next to it in the Off position. If this option is not present, look for the Make your device passwordless option and disable it.


4. Disconnect the work or school accounts
- Launch the Settings window using the Windows + I shortcut.
- Choose Accounts from the left navigational menu and click the Access work or school option listed under Account settings.

- Look for any accounts currently added for work or school. If you find any click the expand the settings and press the Remove button.

Disconnecting the work or school accounts from your Windows PC will ensure that the missing Users must enter a user name and password checkbox is now visible in the netplwiz user settings window.
That’s it! We’re sure you could easily resolve the no checkbox issue in the netplwiz window by trying the workarounds recommended in this guide.
Before you leave, you may be interested to know the easiest ways to enable auto login in Windows.
For any questions or feedback, feel free to drop us a comment below.
Taiba Hasan
A postgraduate in Computer Applications, she is an avid technical writer who loves to craft content revolving around Windows, Android, and emerging technologies like SaaS. With How-To and troubleshooting guides, she aims to provide the best solutions for the problem and make technology less complicated for novice users.
Besides writing, she also loves to cook delicacies and spent time in her garden. In her free time, you will find her binge-watching web series or gazing the night sky.
UPDATED 1/8/2024: On Windows 10 (and Windows 11), you can configure the system to remove the password requirement and log in automatically using the legacy User Accounts (netplwiz) settings. However, this requires clearing the “User must enter a username and password to use this computer” option, and many times, you will find out that the option is missing.
The problem is a bug. Instead, it’s because Windows includes a sign-in feature that removes the use of a password in favor of Windows Hello for authentication. So, when the “Require Windows Hello sign-in for Microsoft accounts” option is enabled, it automatically disables and removes the “User must enter a username and password to use this computer” option from the User Accounts settings. (The same option is known as “For improved security, only allow Windows Hello sign-in for Microsoft accounts on this device” on Windows 11.)
The solution to configure sign-in automatically on Windows is to disable the passwordless feature from the Settings app to make the other option available in legacy accounts settings.
In this guide, I will teach you the steps to fix the missing “User must enter a user name and password to use this computer” option from the User Accounts settings on Windows 10 (or Windows 11).
- Fix missing credential requirements option on Windows 10
- Fix missing credential requirements option on Windows 11
Fix missing credential requirements option on Windows 10
To restore the users must enter the username and password option in the netplwiz settings, use these steps:
-
Open Settings on Windows 10.
-
Click on Accounts.
-
Click on Sign-in options.
-
Turn off the “Require Windows Hello sign-in for Microsoft accounts” toggle switch.


Once you complete the steps, the next time you open the netplwiz (User Accounts) settings, the option to disable requiring username and password to sign in will be available again.
Fix missing credential requirements option on Windows 11
To restore the users must enter the username and password option in the netplwiz settings, use these steps:
-
Open Settings on Windows 11.
-
Click on Accounts.
-
Click the Sign-in options page.
-
Turn off the “For improved security, only allow Windows Hello sign-in for Microsoft accounts on this device” toggle switch.


After you complete the steps, the option to require sign-in on Windows 11 will be available from the User Accounts settings.
Update January 8, 2024: This guide has been updated to ensure accuracy and reflect the steps to complete the configuration on Windows 11.
Why You Can Trust Pureinfotech
The author combines expert insights with user-centric guidance, rigorously researching and testing to ensure you receive trustworthy, easy-to-follow tech guides. Review the publishing process.
Windows 10
- 02.01.2021
- 52 045
- 17
- 10.06.2022
- 129
- 126
- 3
- Содержание статьи
- Описание проблемы
- Решение проблемы
- Комментарии к статье ( 17 шт )
- Добавить комментарий
Описание проблемы
В последних версиях Windows 10, начиная с первого обновления 2020 года (так же называемого 20H1 или 2005), можно обнаружить, что в настройках пользователей (которые доступны через команды control userpasswords2 или netplwiz) отсутствует галочка «Требовать ввод имени пользователя и пароля».
Решение проблемы
Причина такого явления в одном единственном параметре — «Требовать выполнение входа с помощью Windows Hello для учетных записей Майкрософт». Найти этот параметр можно следующим образом: Параметры — Учетные записи — Варианты входа. Для того, чтобы вернуть галочку «Требовать ввод имени пользователя и пароля», данный переключатель нужно перевести в положение «Выкл».
Однако, данный переключатель появляется в настройках только в том случае, если пользователем используется учетная запись Microsoft. В противном случае, данный параметр просто будет отсутствовать, при этом он будет включен по умолчанию и блокировать отображение галочки «Требовать ввод имени пользователя и пароля».
К счастью, это исправляется с помощью правки необходимого параметра реестра, а именно — в разделе HKEY_LOCAL_MACHINE\SOFTWARE\Microsoft\Windows NT\CurrentVersion\PasswordLess\Device нужно параметру DevicePasswordLessBuildVersion задать значение 0. Если же, такого параметра в реестре нет, то его нужно создать, выбрав тип DWORD32.
Для того, чтобы не делать все это руками, можно воспользоваться готовыми командами командной строки и PowerShell (которые необходимо выполнять от имени администратора!):
Командная строка:
REG ADD "HKLM\SOFTWARE\Microsoft\Windows NT\CurrentVersion\PasswordLess\Device" /v DevicePasswordLessBuildVersion /t REG_DWORD /d 0 /fПосле выполнения данной манипуляции, галочка «Требовать ввод имени пользователя и пароля» вернется на свое изначальное место.