
Readers help support Windows Report. We may get a commission if you buy through our links.
Read our disclosure page to find out how can you help Windows Report sustain the editorial team. Read more
Are you wondering what your PC’s Internet speed is? To check that, you’ll need to use a Net Speed Monitor for Windows 11.
Since Windows doesn’t have one by default, you need to get it by following these steps.
How can I add a Windows 11 net speed monitor?
1. Get Net Speed Meter
-
1. First, you’ll need to sign in to your Microsoft account to download a UWP app from MS Store. If you don’t have such an account, set one up from the Microsoft account page.
-
2. Click Start on Windows 11’s taskbar.
-
3. Then select the Microsoft Store app on the Start menu to open it.

-
4. Type Net Speed Meter in the MS Store’s search box.
-
5. Then select the Net Speed Meter app in the search results.
-
6. Click the Get button for Net Speed Meter to install it.
-
7. When installed, click the Open button on the Net Speed page.

-
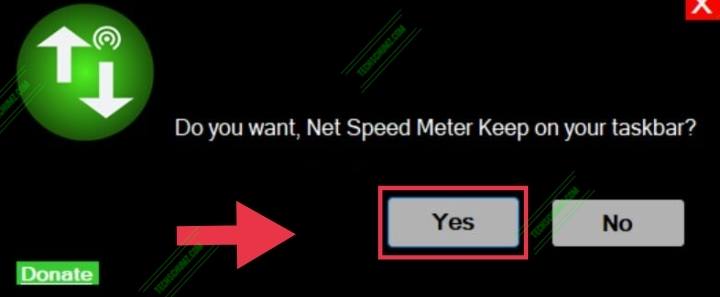
8. Select the Yes option when asked to keep Net Speed Meter on the taskbar. Then you’ll see Net Speed Meter on the desktop.
-
9. You can drag and that meter around the desktop by left-clicking it and holding the left mouse button.
-
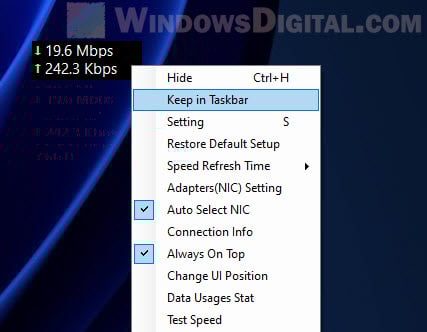
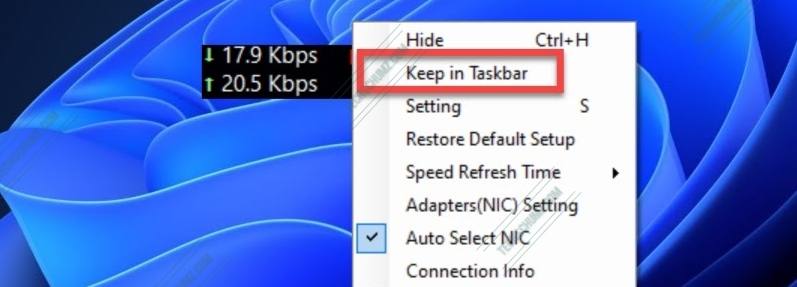
10. To add that speed meter to the taskbar, right-click it and select the Keep in Taskbar button.

-
11. You can customize Net Speed Meter by right-clicking it and selecting Setting. Then change the options according to preference.

-
12. For further instructions, you can right-click Net Speed Meter and select the How to use option.


If you’re looking for an internet speed meter for Windows 11, you should know that our first recommendation is Net Speed Meter. It is a Microsoft Store application that can be downloaded for free by all users with an account.
The Net Speed Meter app can be customized to your liking via Settings, and can be added to your Windows 11 taskbar for quick access.
2. Get 8GadgetPack
2.1 Install 8GadgetPack
- Click the Download button on the 8GadgetPack webpage.
- Then press the File Explorer taskbar button.
- Open the folder that includes the 8GadgetPack setup wizard.
- Double-click 8GadgetPackSetup to open the installer window.
- Click the Install button on the 8GadgetPack Setup window.

- Select the Show gadgets when setup exits checkbox.

- Press the Finish button. Then the 8GadetPack sidebar will open on the right of the Windows 11 desktop.


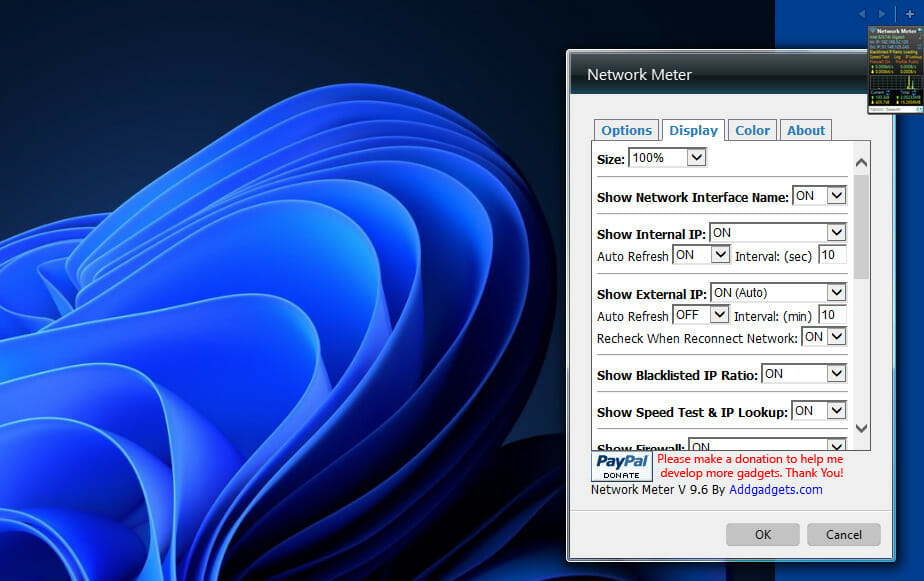
2.2 Add Network Meter to the sidebar
- Right-click the sidebar and select Add gadgets.

- Double-click Network Meter on the third page of the gadget list to add it to the sidebar.

- To configure the Network Meter, right-click its sidebar gadget and select Options.
- Select the Display tab.

- You can add or remove details the gadget displays by selecting ON or OFF drop-down menu options for them.
- To change the gadget’s colors, select the Color tab. Then you can click the codes there to open color palettes.


- Microsoft wants Windows 10 users to upgrade to Windows 11 or Copilot + PCs
- Windows 11 KB5055627 update makes File Explorer more fluid
- A few keyboard settings are moving from Control Panel to Settings app in Windows 11
Does the widgets bar include a network speed monitor in Windows 11?
The widget panel doesn’t include a network speed monitor. There are 11 widget options available there, and none of them add a net speed meter to the panel.
Can I check the connection speed in Windows 11 without third-party apps?
Windows doesn’t have any desktop feature that displays connection speed details, and the only option is to use third-party software.
How can I speed up my PC’s download speed?
If your Internet is slow on Windows 11, close as many background apps as you can on your PC. You can do that by turning off the Let apps run in the background option on the Settings’ Background apps tab.
You can also limit bandwidth for updates via the Windows Update tab’s advanced options in Settings.

You can also turn off any other devices you have connected to the Internet, such as tablets, smartphones, consoles, etc.
In some cases, you need to check network card speed and make sure that your network adapter isn’t bottlenecking your connection.
You can also try updating your network adapter’s driver if your PC’s download speed seems a lot lower than what it should be.
You can do that by scanning your computer with a third-party driver updater utility, such as Outbyte Driver Updater. Driver updater software enables you to download and install new drivers for PC devices in no time.
Moreover, don’t hesitate to use the best bandwidth limiter tools for those programs that use more bandwidth. Even if they are for Windows 10, you can also use them to see exactly what apps are more demanding in terms of network data.
A Windows 11 net speed monitor is a nice addition to the desktop. Net Speed Meter and 8GadgetPack’s Network Meter are two freely available ones that pack in numerous customization settings.
Either of those network speed monitors on your desktop will make it clearer how long your downloads and uploads might take. With one of those apps installed, you can proactively monitor your PC’s network speed. So, 8GadgetPack and Net Speed Meter are two Windows 11 apps worth noting.
Even more, check out the best resource monitor software for Windows 10. Most of these tools can be enjoyed by Windows 11 users as well. We also have a guide on the best tools to test Internet speed, so don’t miss them.
Which network speed monitor is your choice? Let us know in the comments area below.
Matthew Adams
Windows Hardware Expert
Matthew is a freelancer who has produced a variety of articles on various topics related to technology. His main focus is the Windows OS and all the things surrounding it.
He is passionate about the tech world, always staying up-to-date with the latest and greatest. With an analytical view, he likes problem-solving, focusing on errors and their causes.
In his free time, he likes to read and write about history and tries to always develop new skills.
The Internet today is full of surprises and hidden things that users may not be aware of. Having a traffic monitor to monitor your network speed from time to time can be crucial to let you know if there is anything that is using the internet bandwidth without your knowledge. It is also a great way to know how much internet speed an app is using when it is downloading or uploading something.
Back in Windows 10 and older versions of Windows, there was a simple and popular third-party app called “NetSpeedMonitor” that can display the real-time network or internet speed directly on the taskbar. Sadly, this app is not supported in Windows 11.
Also see: How to Know Which App is Using The Internet in Windows 11
How to add a network speed monitor in Windows 11
Fortunately, there are a few other apps that are able to do the same thing as NetSpeedMonitor to display a real-time network speed monitor on the taskbar in Windows 11. This guide will show you how to add a net speed monitor to the Windows 11 taskbar.
Traffic Monitor for Windows 11
Traffic Monitor is a free and open-source app that lets users display the live network speed on either the taskbar or as a floating gadget on the desktop in Windows. Most importantly, it works perfectly fine on Windows 11.
One huge feature that makes the app stands out among other similar network speed monitor apps is that Traffic Monitor can also display the CPU and Memory usage alongside the Network traffic usage.
Follow the steps below to install Traffic Monitor and add its net speed monitor to the Windows 11 taskbar or desktop.
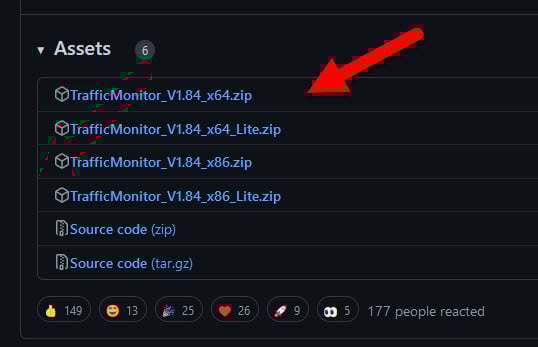
- Go to https://github.com/zhongyang219/TrafficMonitor/releases to download Traffic Monitor. Check the latest release and select the x64.zip under “Assets” to download it. You can download the Lite version but it has much lesser features.

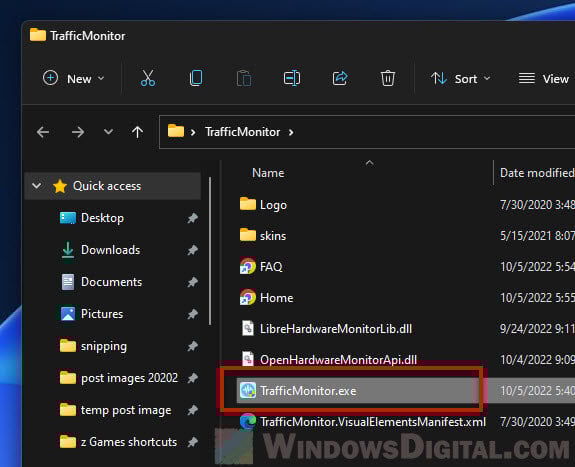
- Once downloaded, unzip the file and open the TrafficMonitor.exe from the extracted folder.

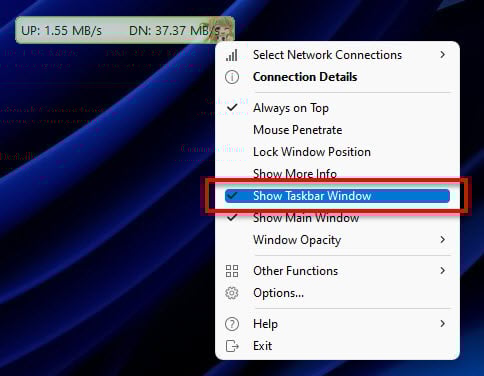
- The app will start off with a floating network speed monitor gadget on the desktop which you can move around easily. To enable it to show on the taskbar instead, right-click the floating network meter and select “Show Taskbar Window“.

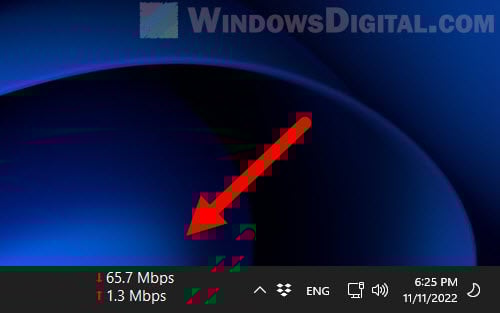
- The net speed monitor will now be displayed on the Windows 11 taskbar.

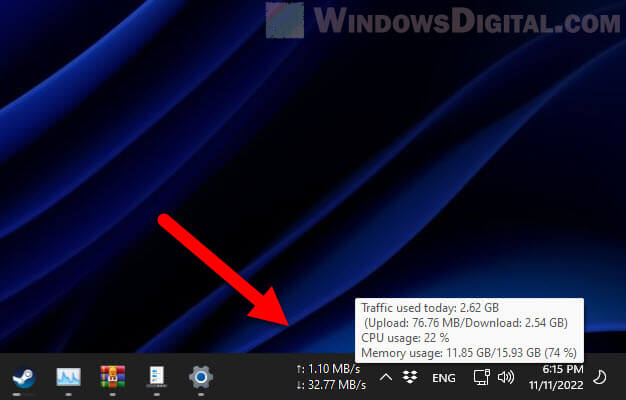
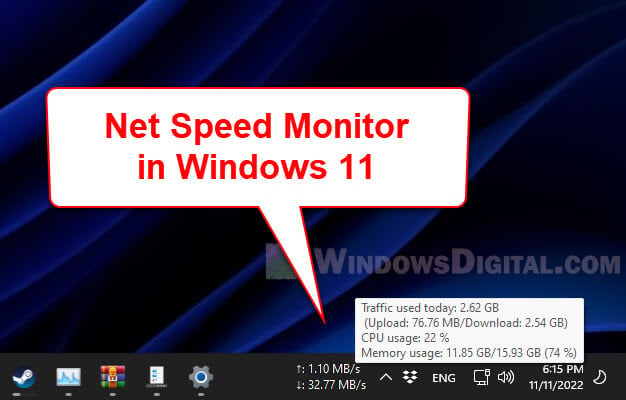
When you hover your mouse cursor over the speed meter, it will display more details such as the total traffic used today (upload and download), as well as the CPU and Memory usage in percentage.
If you don’t want the floating network meter to display on the desktop, right-click on the gadget and uncheck “Show Main Window”. This option will disable traffic monitor from showing on the desktop.

Read next: How to Change Ethernet Network Speed from 100 Mbps to 1 Gbps
Configure Traffic Monitor to auto start on Windows startup
As Traffic Monitor needs to be running in Windows 11 in order for the net speed monitor to continue displaying on the taskbar, to save you the hassles from having to run the app every time you startup your computer, you can set the app to automatically run when Windows starts.
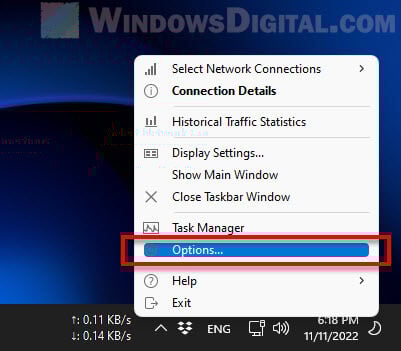
To do so, right-click the net speed monitor on the taskbar and select Options.
Next, go to the “General Settings” tab and enable the checkbox for “Auto run when Windows Starts” under Application Settings.
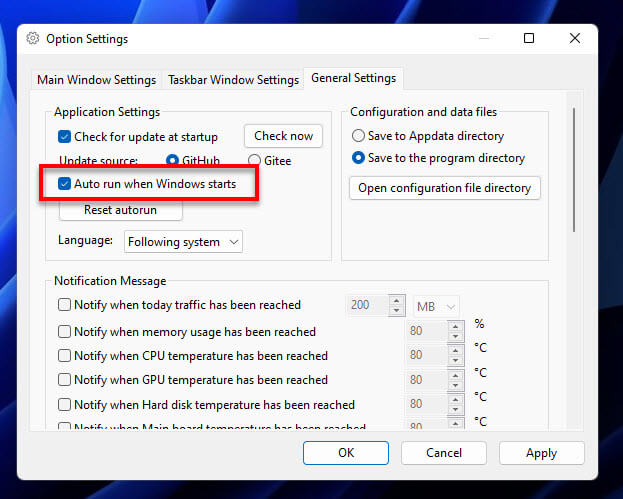
In the mean time, you can also configure other settings from the “Taskbar Window Settings” tab for the net speed monitor on the taskbar or the “Main Window Settings” tab for the floating meter.
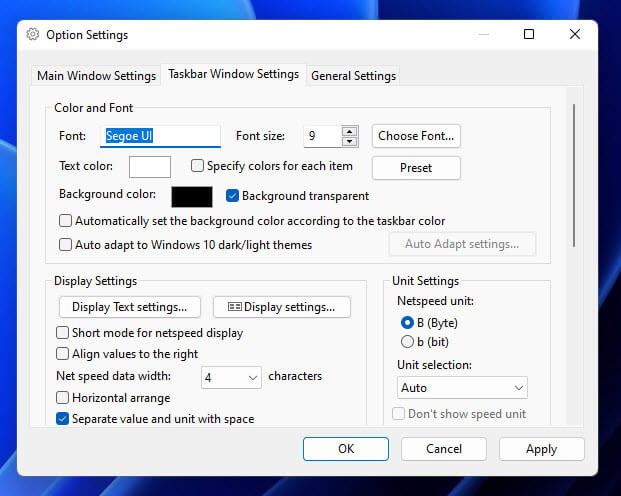
You can change settings such as the color and font of the speed meter, netspeed unit used (Byte or bit), and other display settings.
Related issue: Ethernet Internet Speed Capped at 100 Mbps (Fix)
Internet speed monitor app from Microsoft Store
Alternatively, you can look for a network or internet speed monitor app from the Microsoft Store.
- First, open Microsoft Store via Start menu.
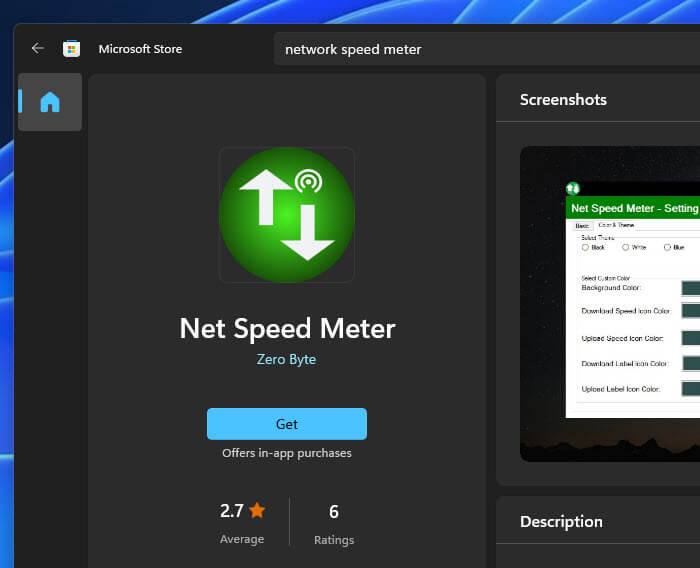
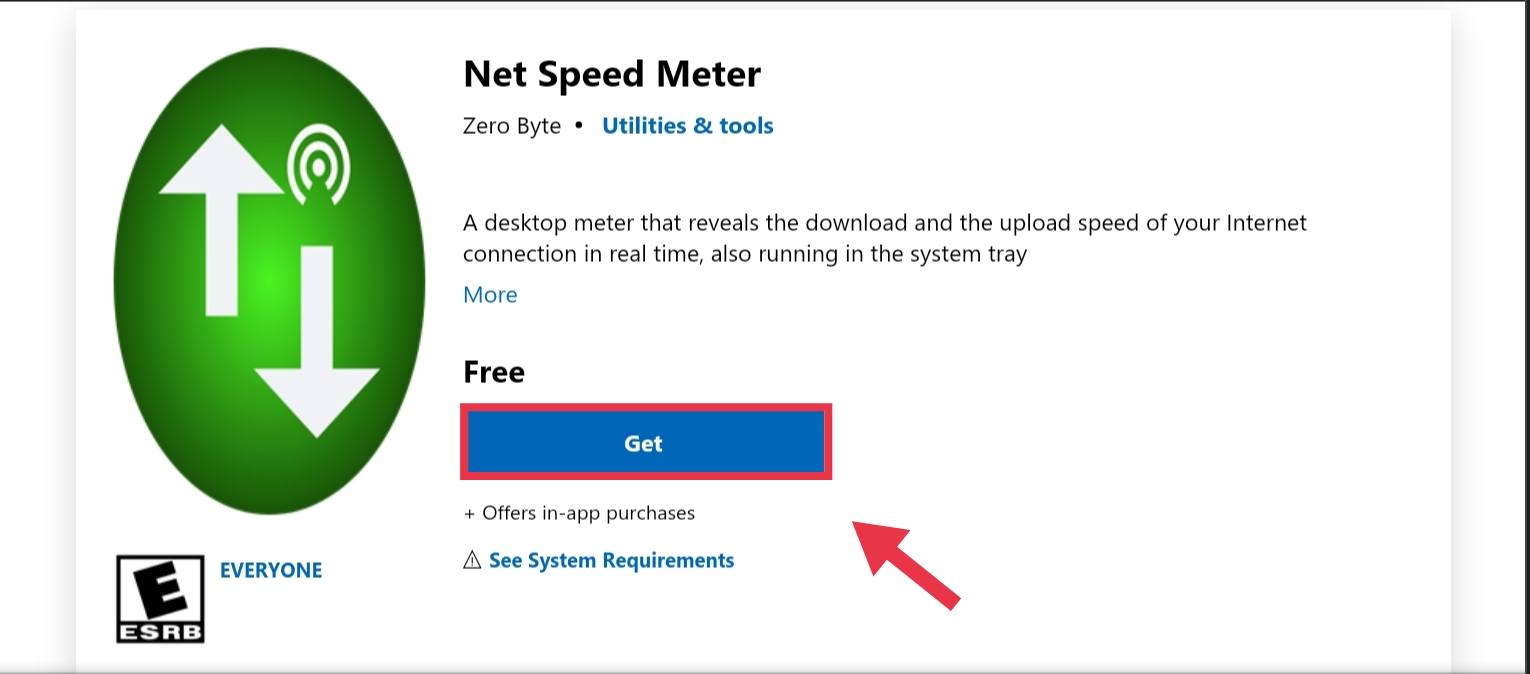
- Search for “Net Speed Meter” using the search bar in the Microsoft Store’s window.
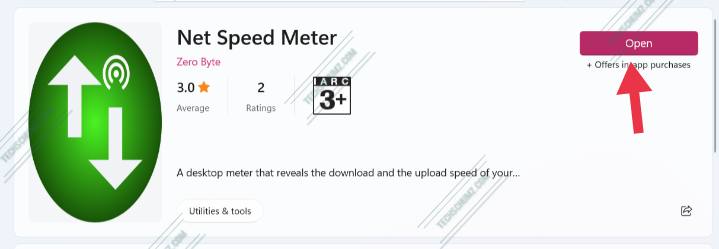
- Select Net Speed Meter and click Get to install the app.

- Once the installation is completed, click Open to launch the app.
- The app will start out as a floating network meter on the desktop. To move it to the taskbar instead, right-click the floating meter and select “Keep in Taskbar“.

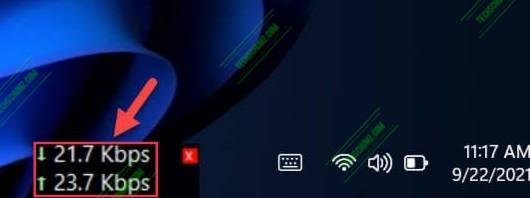
- The net speed monitor will then display on the taskbar in Windows 11.

Task Manager’s Performance tab or Resource Monitor
If you only want to monitor your network or internet speed without installing any third-party app, you can quickly view the network usage via the Task Manager Performance tab or the Resource Monitor in Windows 11. This method does not add any meter to the taskbar or on the desktop.
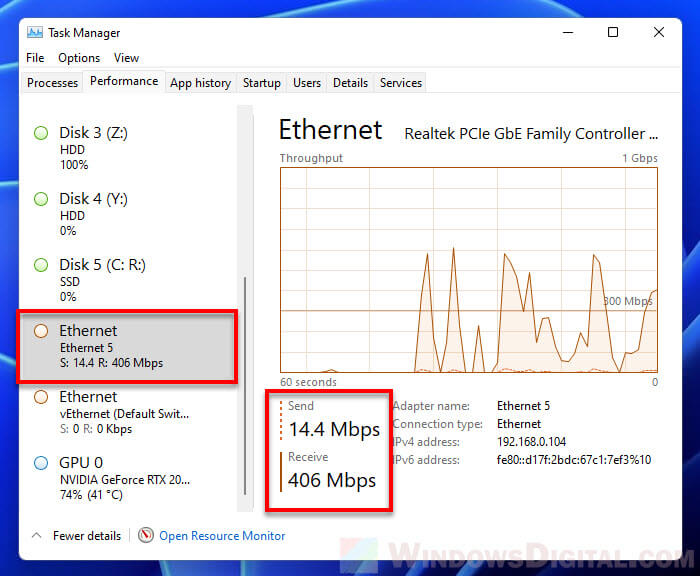
To check the internet speed via Task Manager, first press Ctrl + Shift + Esc to open Task Manager in Windows 11. If it isn’t already in full details mode, click “More details“.
Next, click the “Performance” tab and select your Ethernet or WiFi adapter from the left pane. The network speed usage will shown on the right – the “Send” and “Receive” speed.
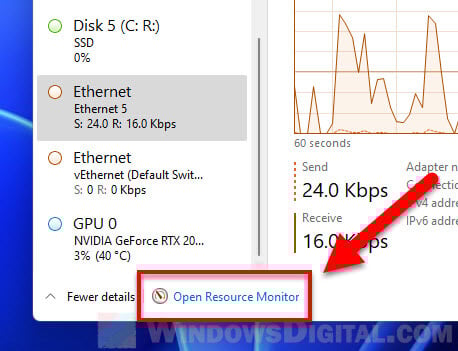
Alternatively, to view more details about which app or process is using the network bandwidth, you can use the Resource Monitor instead. To do so, click Open Resource Monitor at the bottom of the Task Manager window.
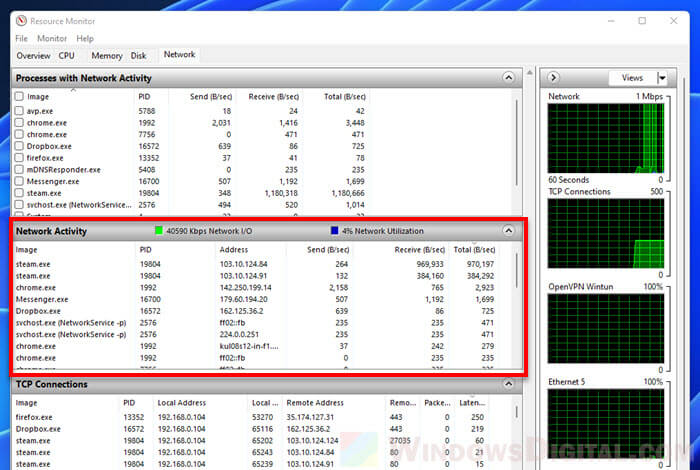
Then, select the Network tab and expand Network Activity. From there, you can view the network transfer speeds (Send, Receive and Total) of all running processes. You can sort the list by transfer speed by clicking the header of the relevant column you want to sort.
Recently, Microsoft released Windows 11 stable build for the general public. But still, Windows 11 doesn’t come with an Internet Speed Meter. Like, we get in the Android status bar. Yes, by going into Task Manager > Performance > Wi-Fi (Or Ethernet). You can check your current Internet speed. But, there isn’t any option to get a real-time internet speed meter in the Windows Taskbar. That means, there isn’t any way to check, how much your Computer is consuming the internet in real-time.
In this situation, third-party network speed indicator Software comes in handy. There are many free and paid tools available to show internet speed in the Taskbar. But, In this post, I will suggest to you some best tools. These tools will show you real-time internet upload and download speed on your Windows PC.
How Internet Speed Meter is helpful?
Network Speed Meter is very helpful if you don’t have a high-speed or stable Internet connection. In Windows, updates get downloaded automatically. And, if you have a slow connection, then, it can affect the work that you’re doing. Also, If your Internet speed fluctuates. Then, keeping an eye on real-time Internet speed is useful. Basically, it will help you to track connection problems.
Best Internet Speed Meter for Windows.
NetSpeedMonitor. (Free)
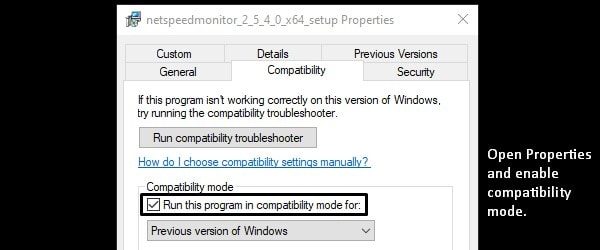
If you’re looking for free Internet Speed Monitor software. That can show you real-time download and upload speed. Then, this is the best tool, which you can use. There isn’t any specific site to download this software. You can download it from Softpedia for free. Though, this tool is designed to run only on Windows XP, Vista, and 7. So, it might not work directly in Windows 8 and 10, and Windows 11. You have to run the installer in compatibility mode.
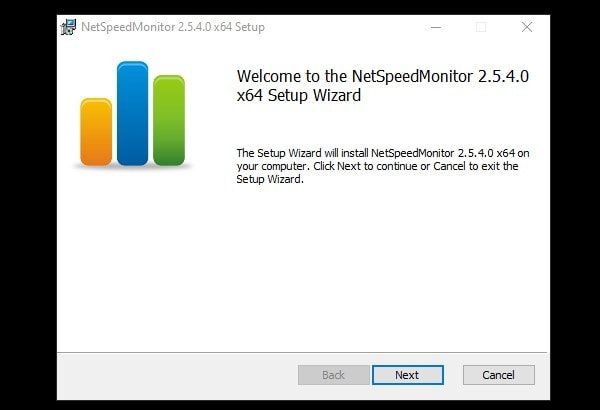
1. Download NetSpeedMonitor from Softpedia. Right-Click on the installer > Click on Properties.
2. Click on the Compatibility tab > Mark the “Run this program in compatibility mode for” and click on OK.
3. Now, you can install it and you will not get any compatibility error.
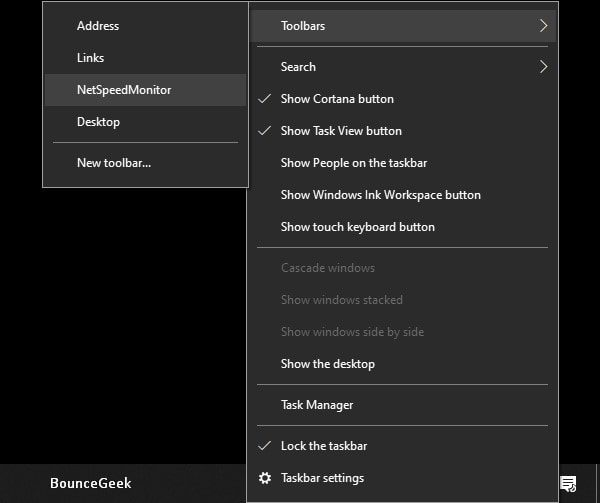
4. After installing NetSpeedMonitor, Right-click on the taskbar. Go to Toolbars and click on “NetSpeedMonitor”.
Note: In Windows 11 you won’t find the Toolbars option. So, scroll down, and you will find a tool to enable Toolbars.
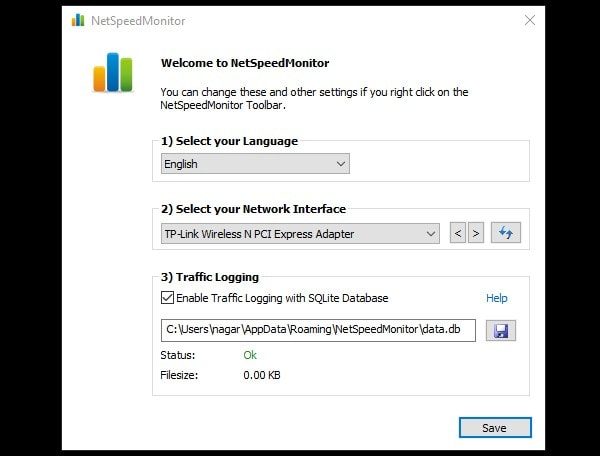
5. NetSpeedMonitor one-time setup window will now appear. Select the right network interface from it. And, click on save.
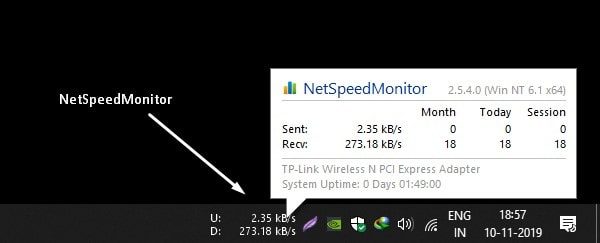
6. That’s it. You will now be able to see the speed meter by NetSpeedMonitor in Taskbar.
7. Right-Click on Net Speed Meter, and choose the “Configuration” option. You can select Bitrate and customize it.
NetWorx (Windows, macOS, and Linux.)
NetWorx is one of the most powerful tools to measure Internet Speed. It also helps to track suspicious activity on the network, like, hacker attacks and trojan horses. You can also use it as a bandwidth monitor if you have limited Internet. NetWorx also can identify the possible reasons or sources of network issues. The Software also can send you a visual and sound alert when the connection is down. Or, when some suspicious activity is occurring in Windows. With Networx, You can always see statistics of monthly and weekly bandwidth usage.
And, yes, you can enable Internet Speed Meter in Windows Taskbar or Toolbar. And, the speed meter will show you real-time upload and download speed. You can also customize the speed indicator graph. There are multiple graph types available to select. Like, histograms, numeric, polylines, and columns. You can also select the transfer rate unit between Bytes and Bits. But, I suggest you select Bytes/s.
Install Networx and Show Internet Speed Meter in Taskbar.
1. First, download the latest version of Networx and install it like normal Windows software. (During installation select recommended settings only.)
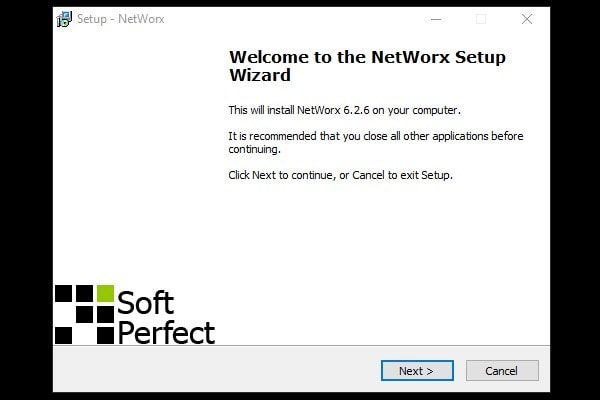
2. After installing it successfully, NetWorx welcome window will appear. Select Language and Click on Next.
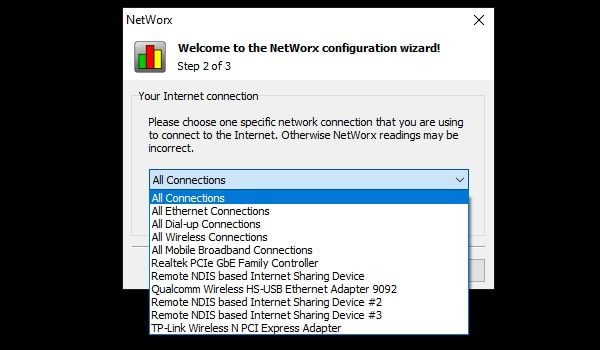
3. Now NetWorx will ask you to select your Internet Connection. You can either select a specific connection or can keep it on “All Connections”.
4. Click on Next, and then click on Finish.
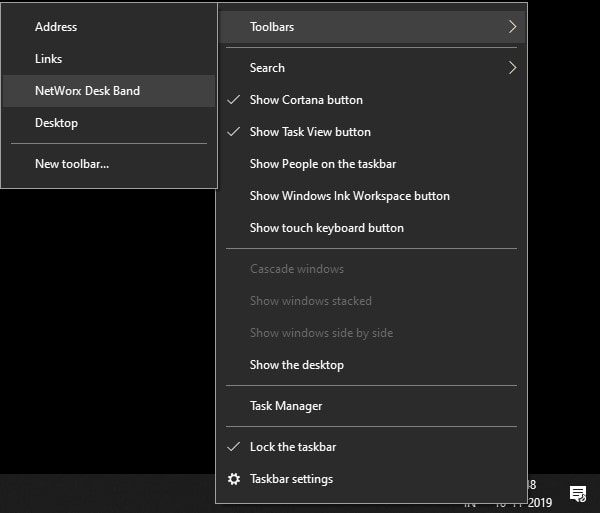
5. To show the Internet speed meter now in the toolbar. Right-Click anywhere in the taskbar. And then, take the mouse pointer over Toolbars. And, mark the “NetWorx Desk Band” option.
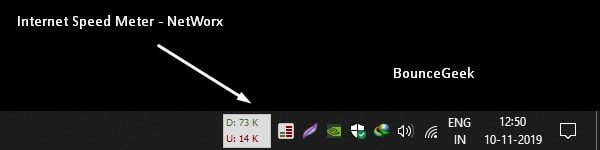
6. That’s it. You will be able to see real-time download/upload speed in Taskbar.
7. And, to customize graph settings, Right-Click on the Networx icon, and then click on Settings. (Don’t forget to select Bytes/s in the transfer unit rate. And, Apply the settings.)
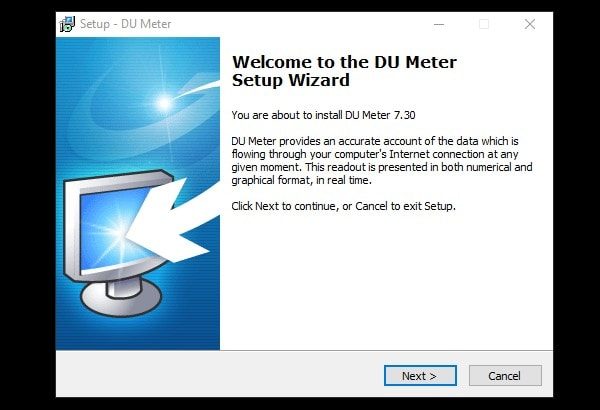
DU Meter.
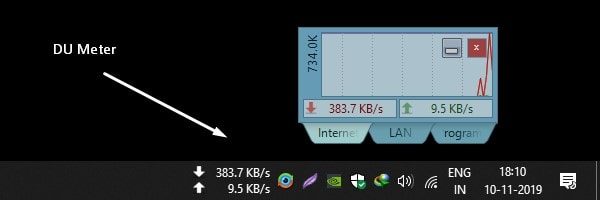
After NetWorx, DU Meter is the best Internet Speed Meter for Windows 10 and Windows 11. DU Meter comes with 30 days of free trial. And, if you find it useful then you can buy its license. There are two license plans available to choose from. Single-user and business licenses and Family Pack. Currently, for Indian users, it is available for $9.95. DU meter also allows adding a speed meter in the taskbar. And, that’s all you wanted.
You can customize the color & sound of the DU Meter. So basically, you can do audible network monitoring. Also, you can customize the traffic monitor Graph. Apart from the taskbar or toolbar, you can enable a floating window of the DU Speed monitor. The data transfer rate unit option is also available. It also shows the highest Internet speed.
1. Download DU Meter and install it on your Windows PC.
2. To enable Network Speed Monitor in the taskbar. Right-Click on the toolbar. Take the mouse pointer on Toolbars > Click on “DU Meter” to enable.

3. That’s it, now you will be able to see upload and download speed in Taskbar.
4. To enable or disable the floating Internet speed Monitor, Right-Click on the DU Meter icon. And, click on the Show/Hide DU Meter option. And, by clicking on “User options”, you can access settings. Can customize DU Meter.
Get Back Windows 11 Quick Launch Toolbar.
Microsoft has removed Quick Launch Toolbar in its latest version of Windows 11. And, all the mentioned Network speed monitor work with the Toolbar option. So, if you want to get back the toolbar option, then you have to install Explorer Patcher from Github. It’s a free and open-source add-on for Windows 11, that enables Windows 10 toolbar in Windows 11.
1. Simply download ExplorerPatcher from GitHub. Click on the Assets section to get the setup file.
2. Run the setup. Windows Protected screen might appear, click on More Info > Run Anyway.
3. UAC window will appear, click on Yes.
4. The screen will go black for a minute. And, after that, when you right-click on the taskbar you will get the toolbar option.
Yes, if you like you can uninstall it from Control Panel.
Summing-up
So, these are some of the best speed-tracking software for Windows 10/11. Personally, I found “NetSpeedMonitor” best. Because it’s free and offers what exactly you want. DU Meter and Networx come with a trial period. But, offers many other features, that’s why you need to buy a subscription. Though, if you don’t want to spend to get some extra features. Then, NetSpeedMonitor is best for you.
Want to enable NetSpeedMonitor for Windows 11? Here is the quickest and best way to do it. You can use this method or other methods are given to perform the same work without using any third-party application. We will tell you later about it…
Table of Contents
What is NetSpeedMonitor?
In Windows 10, NetSpeedMonitor was introduced by Microsoft as a built-in application. It is used to display real-time network and internet speed. As well as find all about your internet connection over bandwidth or Wi-Fi.
The application is quite handy, as you can make a floating gadget of NetSpeedMonitor on your screen. This way, you don’t need to open the app each time just to see the stats.
And to put the cherry on top, you can also use the built-in option to show it on the taskbar too. You can easily watch all about your internet connection on the taskbar.
NetSpeedMonitor in Windows 11
While the application was present on Windows 10, Microsoft removed it in Windows 11. You can’t find it inside Windows 11 at all. Instead, we are going to use these methods to download NetSpeedMonitor on Windows 11. Once downloaded then you will enable NetSpeedMontior on Windows 11.
Related Topic: How To Turn OFF Windows Defender on Windows 11?

While you will find the exact application, using the first method. Still, you are recommended to check other methods too. As you can find other alternative options there.
Download Traffic Monitor
Traffic monitor is an open-source application that is exactly like NetSpeedMonitor. Since the application is open source, you will find it free and safe to use.
It has great compatibility with Windows 11 and all other earlier versions. Like NetSpeedMonitor, you will find the gadget on the screen, taskbar, and all other features.
Traffic Monitor can check and give info about real-time network and internet speed. Not only internet usage but info about CPU, Memory, and other sections about your PC is also shown.
Click here “https://github.com/zhongyang219/TrafficMonitor/releases” and download the app.
Now you will click on one of the files given accordingly. Download the file and open it.
Inside you will find the “TrafficMonitor.exe” file, double-click on it. Do the installation on your Windows 11. After the installation, you will use the application.
NOTE: if you are experiencing any sort of error while installing or after the installation. Head to the end of this article to fix the issue.

TIP: Right-click on the floating gadget and select the Show Taskbar Window option. This will enable the application to show about internet connection on Taskbar.
Download from Microsoft Store
You can also find alternatives to this on Microsoft Store. Open Microsoft Store on Windows 11 and search for “Net Speed Meter”.

Click on Get to begin downloading the installation of the app. Once installed, you will see the Open option; click on it to run.
Go to the desktop and here you will find the Net Speed Meter gadget. Right-click on it and select the Keep in Taskbar option.
Use the built-in application in Windows 11
Another way is to use the taskbar application. Within the taskbar, you will find exact same feature. There is no need for any third-party application.
Open the Taskbar by using the CTRL+SHIFT+ESC buttons.
Normally, you will find your Taskbar with full details. However; some might experience the taskbar minimized.
So, click on More details, if your taskbar is minimized.
Now you will find the Performance tab, click on it and find Ethernet or Wi-Fi adapter.
Select the Ethernet or Wi-Fi adapter and click on the Open Resource Monitor option. You can find the option right at the bottom of your taskbar window.
Here you will select the Network tab; expand Network Activity. All the information about your bandwidth or Wi-Fi connection is given here.
Enable NetSpeedMonitor as a Startup app
NetSpeedMonitor is a great way to check about internet connection. However; it can be a drag to start the application manually on each restart. Instead, you can also select the built-in options inside.

To make NetSpeedMonitor a startup application, you are going to right-click on the Taskbar. Now select Options then General Settings. Don’t forget to check the Autorun when the Windows Starts options.
This way, NetSpeedMonitor will start on each Windows startup.
Can’t open NetSpeedMonitor on Windows 11

NetSpeedMonitor is not a built-in application and needs to be downloaded manually. After the installation, users experienced an error which is “Operating System Not Supported (Windows XP, Windows Server 2003, Windows Vista, or Windows 7”.
Here you can’t run the application at all. To fix the issue, here is what you are going to do.
Find the application installed and select the “.exe” file. Right-click on it and select Properties.
In Properties, you will find the Change compatibility option.
Select Run this program in compatibility mode for: and select the version. Once the version is selected then you will click on OK.
Now launch again NetSpeedMonitor and you have fixed the issue.
Again, NetSpeedMonitor is not a built-in application. So, you can’t just enable NetSpeedMontior on Windows 11, instead, you are going to download then install it. after the installation, compatibility of the application might be a problem that can be solved easily.
While Windows 11 includes a native internet bandwidth manager, it lacks an internet speed tracker. It means you can’t see how much internet your system is using in real-time. This is where internet speed meter tools come in handy. In this guide, we will introduce two different apps that you can use to enable and show the internet speed meter on Windows 11. These tools can show you the current internet upload and download speed on your Windows machine.
This information is extremely useful. It can assist you in determining whether or not your machine is using more internet bandwidth than expected. Internet speed monitoring can also assist you in tracking down connection issues in your network.
Table of Contents
We will use third-party apps to track internet speed because Windows does not support it. There is both free and paid software on the market that can do this. We tested several internet speed meter tools for Windows and found and recommend the Net Speed Meter and DU Meter to be the best.
1. Enable the Internet Speed Meter on Windows 11 Taskbar via Net Speed Meter
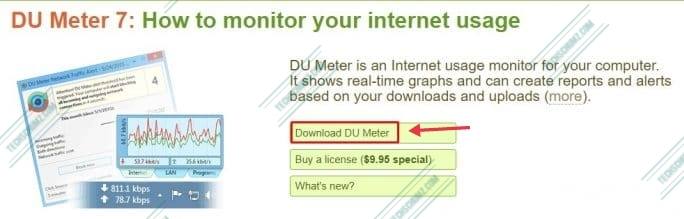
Step 1. First, Click here, it will take you to the Net Speed Meter download page, and click on “Get“.
Step 2. Install the app on your system and then open it when it’s done.
Step 3. Now, you’ll be asked if you want the Net Speed Meter on your taskbar, click “Yes” if you want.
Step 4. Finally, you have the Net Speed Meter ready. Now, right-click on the Net Speed Meter and then click “Keep in Taskbar” if you want to keep it on your Taskbar.
Step 6. Now, the Net Speed Meter app is on your Taskbar, and you can check your real-time internet speed from there.
That’s it! These are the steps for installing and using Net Speed Meter to enable and display the internet speed meter on your Windows 11 taskbar.
2. Display Internet Speed on Taskbar on Windows 11 via DU Meter
We will use DU Meter, a premium app, to turn on and display the internet speed meter on the Taskbar. However, the tool is free to download and you can use it for a 30-day trial period. So, let’s see how yon use it to add internet speed meter on your taskbar.
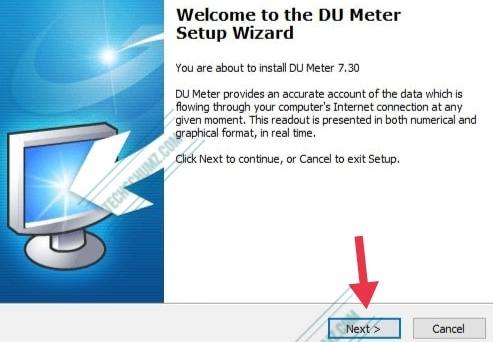
Step 1. First of all, download the DU Meter by going this link.
Step 2. After downloading it on your computer, run the installation file and follow the setup wizard.
Step 3. Next, you can set a limit for your monthly usage of internet if you want.
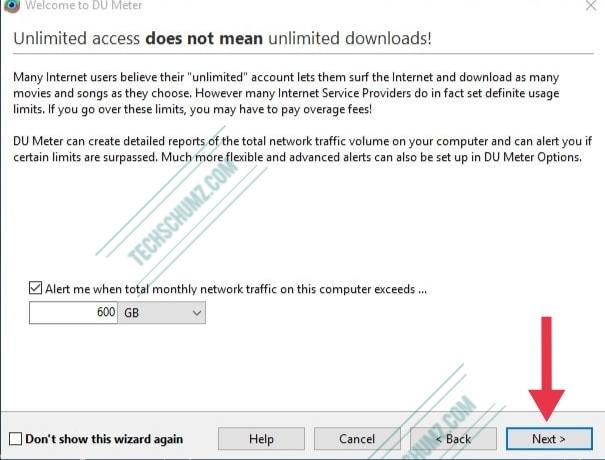
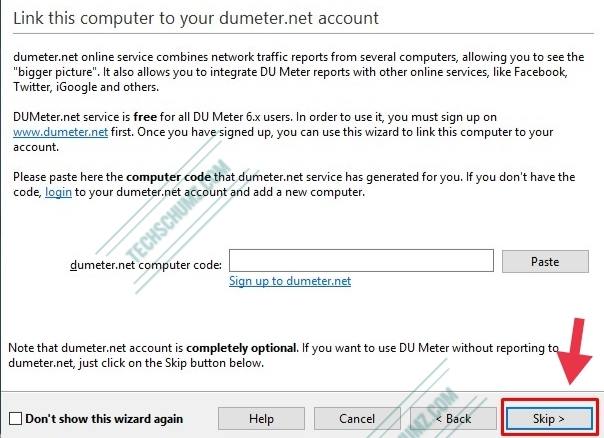
Step 4. Now, just click on “Skip“.
Step 5. Following the configuration of DU Meter, a popup will appear asking you to enable DU Meter on the taskbar. Simply press the “Yes” button.
Step 6. Now, The upload and download speeds are now visible on the Windows 11 taskbar.

This is how you can display the internet speed meter on Windows 11 Taskbar.
Final Words
These are two recommended apps that you can use to show the internet speed meter on Windows 11, One you can download from Microsoft Store and the other from your browser. They both are easy to use and will show you the real-time speed of your internet.
More Windows 11 Related Articles:
- How to Add Wireless Display on Windows 11
- How to Connect Galaxy Buds to a Windows 11 PC
- How to Download and Install Netflix on a Windows 11 PC