
Windows Management Instrumentation (WMI) is a powerful framework that allows administrators to manage and monitor Windows-based systems. It provides a standardized interface for accessing system information, enabling various administrative tasks and automation processes. When WMI is enabled, it unlocks a range of functionalities, such as querying system configurations, monitoring system health, and automating administrative tasks. This makes it an essential tool for effective system management.
Enabling WMI is crucial for maintaining a well-functioning IT environment. It allows for seamless integration with management tools, enhances monitoring capabilities, and supports the automation of routine tasks. By leveraging WMI, administrators can ensure efficient system management, improve productivity, and maintain system integrity across their networks.
- Part 1 :What is Google MDM? What Can You Do with It?
- Part 2 :What’s the feature difference between Google basic and advanced mobile management?
- Part 3 :How to Set up Advanced Google MDM and Manage Your Enterprise Devices?
- Part 4 :What Industries are Suitable for Using Google Mobile Device Management? And what are not?
Part 1: How to Enable WMI on Windows
This section covers the methods of enabling WMI on Windows. We will cover five methods, including service manager, PowerShell, group policy, firewall, and enabling remote WMI requests.
Method 1: Enabling WMI via Services Manager
Services Manager is a tool for Windows devices that allows the management and simplification of all the tasks related to Windows services. To enable WMI using Services Manager, follow the steps below:
- Step 1: Navigate to the search bar beside the Start menu and type `services.msc`.
- Step 2: Once the Services screen opens, look for Windows Management Instrumentation in the list and verify if its status is Running. If not, right-click on the service and select Start from the dropdown.
- Step 3: Additionally, ensure that the Startup Type is set to Automatic.
This enables the WMI services on the Windows device, providing an interface to the operating system’s access management information.
We have created a YouTube video to help you understand this guide better and faster.
How To: Enable the WMI Monitoring Service in Windows
Method 2: Enabling WMI with PowerShell
You can use Windows PowerShell to connect to the WMI on a remote computer. Although the remote connections in WMI depend on their configurations, you can establish the connection with a remote computer via PowerShell script.
If you want to connect to a remote computer using the same credentials you used to log in and intend to request impersonation (by default, its level is set to 3), the following is an example command:
  copy
    Copied!

  Get-WmiObject -Namespace "root\cimv2" -Class Win32_Process -Impersonation 3 -ComputerName Computer_B
However, if you want to connect to a remote computer using different credentials and set the impersonation level to 3, the following are the example commands:
  copy
    Copied!

  $Computer = "atl-dc-01"
  copy
    Copied!

  Get-WmiObject -Namespace "root\cimv2" -Class Win32_Process -Impersonation 3 -Credential `
  copy
    Copied!

  FABRIKAM\administrator -ComputerName $Computer
Similarly, you can connect to a group of remote computers in the same domain and to a remote computer in a different domain. For further details, refer to Microsoft’s official documentation.
Method 3: Enabling WMI via Group Policy (GPO)
To enable Windows Management Instrumentation (WMI) via Group Policy (GPO), you can configure the necessary settings to allow users or groups to access WMI services across multiple computers in a domain. To do so, follow the steps below:
- Step 1: Press `Win + R`, type `gpmc.msc`, and press `Enter` to open the Group Policy Management Console.
- Step 2: Navigate to the appropriate Organizational Unit (OU) where you want to apply the policy. Then right-click on the OU and select `Create a GPO in this domain, and Link it here…` or choose an existing GPO to edit.
- Step 3: Right-click the GPO and select `Edit` to open the Group Policy Management Editor.
- Step 4: Go to `Computer Configuration` > `Policies` > `Windows Settings` > `Security Settings` > `System Services`.
- Step 5: Find `Windows Management Instrumentation` in the list of services. Next, double-click on it to open its properties. Then set the startup type to `Automatic` to ensure the WMI service starts automatically with the system.
- Step 6: Still in the Group Policy Management Editor, go to `Computer Configuration` > `Policies` > `Administrative Templates` > `Network` > `Network Connections` > `Windows Firewall` > `Domain Profile`. Next, enable the policy `Allow inbound remote administration exception` to allow remote WMI queries.
- Step 7 (Optional): If you need to set specific permissions for users or groups to access WMI, you can do so by configuring a script or using additional tools like `wmimgmt.msc` to set permissions on the WMI namespaces.
- Step 8: Close the Group Policy Management Editor and ensure the GPO is linked to the correct OU and that it is enabled.
- Step 9 (Optional): On client machines, you can run `gpupdate /force` in the Command Prompt to apply the new policy settings immediately.
Method 4: Allowing WMI Through the Firewall
Accessing WMI services on the local machine is possible for all the users, but if it is about accessing these services over the remote server, you have to allow the firewall. To do so, follow the steps below:
- Step 1: Navigate to the search bar beside the Start menu and type cmd.
- Step 2: Right-click on the Command Prompt app and select Run as administrator from the dropdown.
- Step 3: Once it opens, enter the following command:
  copy
    Copied!

  netsh advfirewall firewall set rule group="windows management instrumentation (wmi)" new enable=yes
This should enable the WMI traffic through the Windows firewall.
Method 5: Enabling Remote WMI Requests
To allow the WMI users to access the remote server, it is significant to enable the remote WMI requests. To do so, follow the steps below:
This opens your remote server to accept the WMI requests.
Configuring Firewall and DCOM
If your account is a non-administrator on the target server, you need to grant DCOM remote launch permission to that set of users. Additionally, you have to enable the firewall for which the steps have been covered in Method 04.
To grant the permissions for activation and DCOM remote launch, follow the steps below:
- Step 1: Navigate to the search bar beside the Start menu and type Run. Once the dialogue box opens, type dcomcnfg and click on OK.
- Step 2: Expand the Component Services from the sidebar succeeded by the Computer. Right-click on My Computer and select Properties from the dropdown.
- Step 3: From the My Computer Properties screen, click on the COM Security tab.
- Step 4: Click on the Edit Limits button under the Launch and Active Permissions.
- Step 5: If the intended user account/group of users is not present in the list, click on Add to include it.
- Step 6: Once done, enable the Allow checkboxes for Remote Launch and Remote Activation options for these users.
- Step 7: Lastly, click on OK to close the dialogue box.
We have created a YouTube video to help you understand this guide better and faster.
How to enable DCOM setting on Windows
Part 2: How to Check if WMI is Enabled?
Checking if WMI is enabled is an important step to allow access to the remote server. Two of the methods to do so are as follows:
Check Using Services Manager
- Step 1: 1.Navigate to the search bar beside the Start menu and type services.msc.
- Step 2: 2.Once the Services screen opens, look for Windows Management Instrumentation in the list and verify if its status is Running.
Checking Using PowerShell
If you are checking it on a local machine, enter the following command in the PowerShell:
  copy
    Copied!

  Get-WmiObject -query "SELECT * FROM Win32_OperatingSystem"
For remote machines, use the following command:
  copy
    Copied!

  Get-WmiObject -query "SELECT * FROM Win32_OperatingSystem" -ComputerName [Your Computer Name]
Part 3: Advanced WMI Configuration
This section explores the details of two advanced WMI configurations, which can add more value regarding security and troubleshooting.
1 Setting Up Remote WMI Connections
When setting up remote connections, you can keep a few points in consideration for enhanced security. These include:
- Step 1: Open the firewall specifically for the DCOM port, which is 135. To do so, utilize the following command:
  copy
    Copied!

netsh advfirewall firewall add rule dir=in name="DCOM" program=%systemroot%\system32\svchost.exe service=rpcss action=allow protocol=TCP localport=135 - Step 2: Alternatively, you can establish a firewall for all services except for the WMI service. To do so, use the following command:
  copy
    Copied!

netsh advfirewall firewall add rule dir=in name ="WMI" program=%systemroot%\system32\svchost.exe service=winmgmt action = allow protocol=TCP localport=any - Step 3: When enabling and configuring the DCOM permissions, ensure they are enabled only for the required group of users. Additionally, the authorized users should only have the required level of permissions.
- Step 4: Audit and monitor the WMI access (further details on it are covered in the next section).
2 Enabling WMI Logging
Enabling WMI logging is an effective method to troubleshoot the problems in the WMI scripts. However, it is recommended to only enable the logging when performing the troubleshooting process. Having them enabled all the time can be expensive in terms of CPU usage. The steps to enable the logging include:
After enabling the logs, you can visualize them on the Trace screen.
AirDroid Business is an Windows and Android device management solution that can be used to enroll, manage, and monitor large fleet devices. With the centralized platform, organizations are able to deploy smartphones, tablets, rugged devices and others dedicated devices like kiosks and digital signage.
It’s available for Cloud Deployment & On-Premises Deployment.
Key features include: remote access & control, Google Play apps & enterprise’s apps management, policy, single & multi-apps kiosk mode, alerts & automated workflows, geofencing & location tracking, file transfer, notification, user management, reports, etc.
14-days Free Trial
FAQS
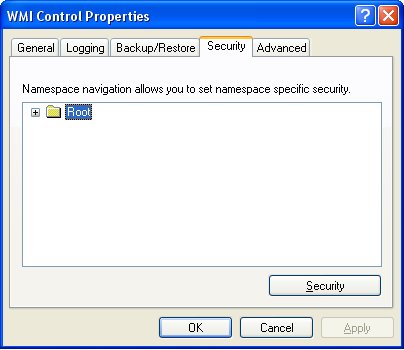
How do I enable WMI for a user?
To enable Windows Management Instrumentation (WMI) for a user, follow these steps:
- Step 1: Open the Computer Management console. You can do this by right-clicking on «This PC» or «My Computer» and selecting «Manage.»
- Step 2: Navigate to Services and Applications > WMI Control.
- Step 3: Right-click on WMI Control and select Properties.
- Step 4: Go to the Security tab, select the namespace you wish to configure (e.g., Root\CIMv2), and click Security.
- Step 5: Add the user or group you want to grant access to by clicking Add…, entering the user or group name, and clicking OK.
- Step 6: Assign the appropriate permissions (e.g., Enable Account, Remote Enable) and click OK.
How do I enable WMI activity?
To enable and monitor WMI activity, follow these steps:
- Step 1: Open the Event Viewer by typing «Event Viewer» in the Windows search box and selecting the application.
- Step 2: In the Event Viewer, navigate to Applications and Services Logs > Microsoft > Windows > WMI-Activity.
- Step 3: Expand WMI-Activity and click on Operational.
- Step 4: To enable logging, right-click on Operational and select Properties.
- Step 5: Check the box for Enable logging and click OK.
Enabling Windows Management Instrumentation (WMI) on Windows 10 is essential for system management and monitoring. This guide will walk you through the steps to enable WMI, ensuring your system is ready for administrative tasks and monitoring tools. In a few simple steps, from opening the Services console to starting the WMI service, you’ll be all set.
WMI is a powerful feature in Windows that allows for system management and monitoring. By following these steps, you will ensure WMI is enabled and running on your Windows 10 system.
Step 1: Open the Services Console
To start, you need to access the Services console.
Press the Windows key + R to open the Run dialog box, type «services.msc,» and hit Enter. This will open the Services console where you can manage various Windows services.
Step 2: Locate Windows Management Instrumentation Service
Once in the Services console, you need to find the specific service.
Scroll through the list of services until you locate «Windows Management Instrumentation.» This service is crucial for WMI functionality, so it’s important to ensure it’s available and ready to be enabled.
Step 3: Start the WMI Service
Now, you need to enable the service.
Right-click «Windows Management Instrumentation» and select «Start» from the context menu. If the service is already running, you might see the option to «Restart» instead, which can also ensure it runs smoothly.
Step 4: Set Service to Automatic
To keep WMI running after every restart, set its startup type to automatic.
Right-click the «Windows Management Instrumentation» service again, select «Properties,» and in the «Startup type» dropdown, choose «Automatic.» Click «Apply» and then «OK.»
Step 5: Confirm WMI is Running
Finally, verify that the service is active.
Check the status column in the Services console; it should now show that the WMI service is running. This confirmation means WMI is enabled and operational on your system.
After completing these steps, your Windows 10 system will have WMI enabled, allowing for effective system management and monitoring tasks through various tools and scripts.
Tips for Enabling WMI Windows 10
- Check Dependencies: Ensure dependent services like «RPC» are also running.
- Restart the Computer: Sometimes a reboot is necessary for changes to take effect.
- Use Elevated Permissions: Make sure you have administrative privileges when enabling WMI.
- Manual Restart: If issues persist, manually restarting the service can help.
- WMI Troubleshooting Tool: Utilize built-in tools like «wbemtest» for advanced troubleshooting.
Frequently Asked Questions
What is WMI used for?
WMI is used for system management and monitoring tasks. It allows administrators to query information and perform actions on the system.
Why would I need to enable WMI?
Enabling WMI is essential for using various administrative and monitoring tools that rely on this service for data.
Can I disable WMI if I don’t need it?
Yes, but it’s not recommended as many system management tools and applications rely on WMI.
What should I do if WMI service fails to start?
Check for dependencies, ensure you have the right permissions, and try restarting your computer.
Is WMI available on all versions of Windows?
WMI is available on most Windows versions, including Windows 10, and is enabled by default on many systems.
Summary
- Open the Services console.
- Locate Windows Management Instrumentation service.
- Start the WMI service.
- Set service to automatic.
- Confirm WMI is running.
Conclusion
Enabling Windows Management Instrumentation (WMI) on Windows 10 is a straightforward process that greatly enhances your ability to manage and monitor your system. By following the steps outlined above, you’ve ensured that your system is ready for various administrative tasks and monitoring tools.
Beyond simply enabling WMI, understanding its importance and functionality can empower you in maintaining your system more effectively. It’s not just a background service; it’s a key player in system administration. If you encounter any issues, refer back to the tips and FAQs provided to troubleshoot and resolve common problems.
For further reading, Microsoft’s official documentation on WMI provides in-depth insights and advanced configurations. Make sure to keep your system updated and revisit the WMI settings periodically to ensure everything runs smoothly. Enabling WMI may seem like a small step, but it opens up a world of possibilities for managing your Windows 10 system.
Kermit Matthews is a freelance writer based in Philadelphia, Pennsylvania with more than a decade of experience writing technology guides. He has a Bachelor’s and Master’s degree in Computer Science and has spent much of his professional career in IT management.
He specializes in writing content about iPhones, Android devices, Microsoft Office, and many other popular applications and devices.
Read his full bio here.
WMI comes installed on all of Microsoft’s modern operating systems (Windows 2000, Windows XP, Windows 2003, Windows Vista, Windows Server 2003/2008/2012/2016, Windows 8/8.1 and Windows 10). What this page will describe is how to enable remote access to WMI. The following steps should only take a minute or two of your time.
Step 1 — Enable remote WMI requests
This setting is usually all that needs to be changed to get WMI working (Steps 2 and 3 are typically not needed, but they might be in some circumstances).
- On the target server, go to Administrative Tools -> Computer Management.
- Expand Services and Applications.
- Right click for Properties on WMI Control.
Select the Security tab and then press the Security button:
Add the monitoring user (if needed), and then be sure to check Remote Enable for the user/group that will be requesting WMI data.
At this point go back and see if this fixes the problem. It might take a couple of minutes for the reports to re-generate.
Step 2 — Allow WMI through Windows firewall
All users (including non-administrators) are able to query/read WMI data on the local computer.
For reading WMI data on a remote server, a connection needs to be made from your management computer (where our monitoring software is installed) to the server that you’re monitoring (the target server). If the target server is running Windows Firewall (aka Internet Connection Firewall) like what is shipped with Windows XP and Windows 2003 (and above), then you need to tell it to let remote WMI requests through. This can only be done at the command prompt. Run the following on the target computer if it is running a Windows firewall:
netsh firewall set service RemoteAdmin enable
Step 3 — Enable DCOM calls on the remote machine
If the account you are using to monitor the target server is NOT an administrator on the target server, you need to enable the non-administrator to interact with DCOM by following the simple steps listed below. Follow the steps for:
- To grant DCOM remote launch and activation permissions for a user or group.
- To grant DCOM remote access permissions.
To grant DCOM remote launch and activation permissions for a user or group:
- Click Start, click Run, type DCOMCNFG, and then click OK.
- In the Component Services dialog box, expand Component Services, expand Computers, and then right-click My Computer and click Properties.
- In the My Computer Properties dialog box, click the COM Security tab.
- Under Launch and Activation Permissions, click Edit Limits.
In the Launch Permission dialog box, follow these steps if your name or your group does not appear in the Groups or user names list:
- In the Launch Permission dialog box, click Add.
- In the Select Users, Computers, or Groups dialog box, add your name and the group in the Enter the object names to select box, and then click OK.
- In the Launch Permission dialog box, select your user and group in the Group or user names box. In the Allow column under Permissions for User, select Remote Launch and select Remote Activation, and then click OK.
The following procedure describes how to grant DCOM remote access permissions for certain users and groups. If Computer A is connecting remotely to Computer B, you can set these permissions on Computer B to allow a user or group that is not part of the Administrators group on Computer B to connect to Computer B.
To grant DCOM remote access permissions:
Click Start, click Run, type DCOMCNFG, and then click OK.
In the Component Services dialog box, expand Component Services, expand Computers, and then right-click My Computer and click Properties.
In the My Computer Properties dialog box, click the COM Security tab.
Under Access Permissions, click Edit Limits.
In the Access Permission dialog box, select ANONYMOUS LOGON name in the Group or user names box. In the Allow column under Permissions for User, select Remote Access, and then click OK.
Readers help support Windows Report. We may get a commission if you buy through our links.
Read our disclosure page to find out how can you help Windows Report sustain the editorial team. Read more
When the Windows Management files are missing, you won’t be able to access the details in the System Information app. The error code reads, Cannot access the Windows Management Instrumentation software. Windows Management files may be moved or missing.
This is an intricate error since most users aren’t really acquainted with Windows Management Instrumentation. In short, it’s basically responsible for managing applications and devices on the network. Let’s now find out how to fix things.
Why are Windows Management files missing?
Here are some of the reasons that Windows Management files are missing:
- Running an outdated OS – If you haven’t updated Windows in a while, there might be issues, including the Windows Management Instrumentation service stopping.
- Corrupt system files – If the system files are corrupt, it affects the core functioning of the OS and prevents services from running and apps from operating effectively.
- Critical services are not running – If the Windows Management Instrumentation service failed or was not running, you will receive the error.
How can I fix missing Windows Management files?
Before trying the slightly complex and lengthy solutions listed below, here are a few quick ones:
- Restart the computer and check if it resolves the problem.
- Check if there are any available updates for Windows and install them.
If these don’t work, try the solutions listed next.
1. Run the Windows Management Instrumentation service
- Press Windows + S to open the Search menu, type Services in the text field, and click on the relevant search result.

- Scroll down, locate the Windows Management Instrumentation service, right-click on it, and select Properties.

- Now, select Automatic from the Startup type dropdown menu, select Start to run the service, and then click OK to save the changes.

- Now, head to the Dependencies tab, and make sure all the services listed here are running. You can follow the same steps for the Remote Procedure Call and other relevant services.


2. Rebuild the repository
- Press Windows + R to open Run, type cmd, and hit Ctrl + Shift + Enter.

- Click Yes in the UAC prompt.
- Paste the following command and hit Enter:
net stop winmgmt
- Again, press Windows + R, type system32, and then click OK.
- Open the webm folder here, and then rename the Repository folder to Repository.old.

- Now, head back to Command Prompt, and execute the following command:
net start winmgmt


Once done, verify if the Windows Management files missing error is fixed. Also, the solution might work when you get The Windows Management Instrumentation service has detected an inconsistent system shutdown error.
- Fix: PRIMARY_TRANSPORT_CONNECT_FAILED Error
- ERROR_IO_PRIVILEGE_FAILED: How to Fix
3. Register WMI components
- Press Windows + S to open Search, type Command Prompt, and then click on Run as administrator.

- Click Yes in the UAC prompt that appears.
- Now, paste the following three commands one at a time, and hit Enter after each:
cd /d %windir%\system32\wbemfor %i in (*.dll) do regsvr32 -s %ifor %i in (*.exe) do %i /regserver - Once done, restart the computer and check if the error is fixed.

- Fix: PRIMARY_TRANSPORT_CONNECT_FAILED Error
- ERROR_IO_PRIVILEGE_FAILED: How to Fix
- How to Fix MFReadWrite.dll is Missing on Windows N
4. Reregister the msinfo32.dll
- Press Windows + R to open Run, paste the following command, and hit Enter:
regsvr32 "C:\WINDOWS\PCHealth\HelpCtr\Binaries\msinfo.dll"
- Once the process is complete, launch System Information and check if it now opens properly.

This should fix things for good when you receive the Windows Management files missing error. If it doesn’t, head to the last solution.
5. Perform an in-place upgrade
- Go to Microsoft’s official website, choose the appropriate options from the dropdown menu, and download Windows 11 ISO file (or Windows 10, depending on the iteration you are running).

- Launch the ISO file and then click on Open in the prompt.

- Next, double-click the setup.exe file.

- Click Yes in the UAC prompt.
- Wait for things to initialize and click on Accept to agree to the license terms.

- Once everything is set, make sure the setup lists Keeps personal files and apps, and then click on Install.
- Now, wait for the installation process to complete.


If nothing else worked yet, an in-place upgrade would fix the Windows Management files missing error effortlessly, though it would take some time to complete. Also, you wouldn’t lose any files and, in the process, eliminate several other trivial issues.
Also, while you are fixing things, find out a few quick tweaks to improve Windows’ performance.
Tell us which fix worked for you in the comments section below.
Matthew Adams
Windows Hardware Expert
Matthew is a freelancer who has produced a variety of articles on various topics related to technology. His main focus is the Windows OS and all the things surrounding it.
He is passionate about the tech world, always staying up-to-date with the latest and greatest. With an analytical view, he likes problem-solving, focusing on errors and their causes.
In his free time, he likes to read and write about history and tries to always develop new skills.
Содержание
- Решение проблемы — нет службы Windows Management Instrumentation
- Что такое служба Windows Management Instrumentation?
- Определение и общая информация
- Преимущества WMI:
- Значение службы Windows Management Instrumentation
- Роль WMI в управлении и мониторинге Windows
- Преимущества использования службы WMI
- Возможные проблемы со службой WMI
- Причины возникновения ошибок в службе WMI
- Как исправить ошибки в службе WMI
Решение проблемы — нет службы Windows Management Instrumentation
Если вы столкнулись с сообщением «Нет службы Windows Management Instrumentation» на вашем компьютере или ноутбуке, то вы не одиноки. Несколько пользователей Windows сталкиваются с этой проблемой, которая может быть очень раздражающей и мешать нормальной работе с операционной системой. Но не отчаивайтесь! В этой статье мы рассмотрим причины возникновения данной проблемы и предоставим несколько возможных решений.
Windows Management Instrumentation (WMI) является важной службой в операционной системе Windows, которая позволяет управлять и мониторить различные компоненты и процессы системы. Она обеспечивает доступ к информации о железе, программном обеспечении и конфигурации компьютера через специальные запросы и команды.
Когда возникает проблема «Нет службы Windows Management Instrumentation», это означает, что служба WMI не работает или не может быть запущена. В результате программы и компоненты, которые зависят от этой службы, могут перестать функционировать должным образом.
Проблема «Нет службы Windows Management Instrumentation» может быть вызвана несколькими факторами, включая повреждение файлов системы, конфликты с другими службами или программами, а также ошибки в самой операционной системе. Счастливо, большинство этих проблем можно решить с помощью нескольких простых действий.
В следующей части статьи мы рассмотрим некоторые стандартные методы решения проблемы «Нет службы Windows Management Instrumentation». Они включают перезапуск службы WMI, выполнение командной строки для восстановления службы, проверку и исправление поврежденных файлов системы и многое другое. Будьте уверены, что мы предоставим подробные инструкции по каждому из этих методов, чтобы помочь вам решить проблему быстро и эффективно.
Теперь, когда мы ознакомились с основными причинами проблемы «Нет службы Windows Management Instrumentation», давайте двигаться дальше, чтобы найти ее решение. Необходимо следовать нашим инструкциям и тестировать каждый метод, чтобы определить, какой наилучшим образом решает вашу проблему. Помните, что эти рекомендации предназначены для пользователей с разным уровнем опыта, поэтому вы безусловно найдете подходящий вариант для себя.
Не смотря на то, что проблема «Нет службы Windows Management Instrumentation» может показаться сложной и непонятной, не паникуйте. С нашей помощью вы сможете легко восстановить работу службы WMI и наслаждаться безупречной работой вашего компьютера.
Что такое служба Windows Management Instrumentation?
WMI предоставляет полный спектр возможностей для мониторинга и управления различными аспектами операционной системы Windows, включая процессы, службы, сетевые настройки, устройства и многое другое. Она также предоставляет программный интерфейс (API), который позволяет разработчикам создавать пользовательские приложения для работы с WMI.
Одним из ключевых преимуществ WMI является его возможность работать на удаленных компьютерах. Администраторы могут удаленно управлять и мониторить компьютеры в сети без необходимости физического присутствия на каждом из них. Это очень полезно для масштабных сетей и централизованного управления компьютерными ресурсами.
- WMI предоставляет доступ к различным видам информации о системе, таким как конфигурация железа и программного обеспечения, статус и параметры процессов и служб, настройки сети и многое другое.
- С помощью WMI можно мониторить состояние и производительность системы, а также отслеживать события и ошибки.
- WMI также позволяет управлять различными аспектами операционной системы, например, запускать и останавливать службы, изменять настройки безопасности, управлять процессами и др.
WMI является мощным инструментом для администраторов и разработчиков, предоставляющим широкие возможности для управления и мониторинга компьютерных ресурсов в операционной системе Windows.
Определение и общая информация
В основе WMI лежит CIM-инфраструктура (Common Information Model), которая предоставляет стандартные модели и способы описания информации о компонентах и связях между ними. WMI использует объектную модель CIM для представления системных ресурсов в виде объектов, а также для выполнения запросов и управления ими.
Основное преимущество использования WMI заключается в его универсальности и расширяемости. Он поддерживает большое количество стандартных классов и методов, а также позволяет создавать пользовательские классы и расширять функциональность системы. Благодаря гибкости и мощности WMI, разработчики и администраторы могут эффективно управлять и мониторить системные ресурсы на всех компьютерах в сети.
Преимущества WMI:
- Универсальность: WMI может использоваться в различных операционных системах Windows и является стандартом для управления ресурсами.
- Расширяемость: WMI позволяет создавать пользовательские классы и расширять функциональность системы.
- Гибкость: WMI предлагает широкий набор стандартных классов и методов для управления и мониторинга ресурсов, а также поддерживает выполнение пользовательских запросов.
- Мощность: WMI обладает высоким уровнем функциональности и позволяет выполнить широкий спектр операций, начиная от получения информации о системе до управления сервисами и компонентами.
Значение службы Windows Management Instrumentation
Основными преимуществами WMI являются его гибкость и масштабируемость. С помощью WMI можно получать информацию о состоянии и настройках компьютера, а также изменять эти параметры. Например, с помощью WMI можно узнать, какие процессы выполняются на компьютере, какие службы запущены, какие сетевые ресурсы доступны и другую важную информацию. Также WMI позволяет выполнять различные операции, такие как запуск и остановка служб, изменение настроек аппаратного обеспечения и многое другое.
Одним из основных способов работы с WMI является использование языка запросов WQL (Windows Management Instrumentation Query Language). С помощью WQL можно выполнять запросы к WMI, получать данные и выполнять различные операции. Язык WQL похож на SQL (Structured Query Language), однако он специально разработан для работы с WMI.
В целом, служба Windows Management Instrumentation играет ключевую роль в управлении и мониторинге компьютерных систем на основе операционной системы Windows. Она предоставляет широкий функционал для работы с данными и выполнения операций, что делает ее незаменимым инструментом для программистов и системных администраторов.
Роль WMI в управлении и мониторинге Windows
Одной из ключевых функций WMI является предоставление доступа к данным, связанным с аппаратными ресурсами компьютера. WMI может возвращать информацию о процессоре, памяти, жестких дисках, сетевых адаптерах и других компонентах. Это позволяет администраторам системы получать ценные сведения о нагрузке на компьютер и состоянии аппаратных ресурсов, что помогает оптимизировать работу компьютера и предотвращать потенциальные проблемы.
Кроме аппаратных ресурсов, WMI также предоставляет доступ к информации о программном обеспечении. Администраторы системы могут получать список установленных приложений, версии программного обеспечения, установленные обновления и другую полезную информацию. Это позволяет эффективно управлять программами и обновлениями на компьютере, обнаруживать уязвимости и обеспечивать безопасность системы.
WMI также поддерживает механизм мониторинга событий в операционной системе Windows. Это означает, что администраторы могут создавать скрипты или программы, которые реагируют на определенные события, такие как запуск приложений, изменение настроек или возникновение ошибок. Это позволяет создавать мощные системы мониторинга и автоматизации, которые помогают обнаруживать и решать проблемы в реальном времени.
- WMI предоставляет широкие возможности для управления и мониторинга Windows.
- Он позволяет получить информацию о аппаратных ресурсах компьютера.
- WMI также предоставляет доступ к данным о программном обеспечении.
- Механизм мониторинга событий в WMI позволяет реагировать на различные события в системе.
Преимущества использования службы WMI
- Универсальность: Служба WMI поддерживает широкий спектр функций и возможностей, позволяя получать информацию о состоянии операционной системы, аппаратного обеспечения, сетевых подключениях и других компонентах системы. Это позволяет системным администраторам эффективно управлять и мониторить компьютеры в сети.
- Гибкость в настройке: Системные администраторы могут создавать пользовательские запросы и скрипты, используя язык запросов WMI (WQL) или специальные инструменты, такие как PowerShell. Это дает им возможность получать и обрабатывать только необходимую информацию и настраивать службы WMI для своих конкретных потребностей.
- Автоматизация: Служба WMI позволяет автоматизировать ряд задач, таких как конфигурация, мониторинг и управление системой. С помощью WMI администраторы могут создавать скрипты и программы, которые выполняют операции на нескольких компьютерах одновременно, сокращая время и усилия, затрачиваемые на обслуживание больших сетей компьютеров.
Использование службы WMI является эффективным и удобным способом управления и мониторинга компьютеров в сети. Ее универсальность, гибкость в настройке и способность к автоматизации задач делают WMI незаменимым инструментом для системных администраторов, которые стремятся обеспечить эффективную и безопасную работу компьютеров в сети.
Возможные проблемы со службой WMI
Одной из распространенных проблем является отключение или повреждение службы WMI. Это может произойти из-за неправильной установки или обновления операционной системы, ошибок реестра или конфликтов с другими установленными приложениями. Если служба WMI не работает правильно, пользователи могут столкнуться с проблемами при мониторинге системы, управлении удаленными компьютерами и выполнении других операций, зависящих от функциональности WMI.
Другим распространенным проблемным сценарием является неполадка в самом WMI. Это может произойти, когда служба работает нестабильно или не может предоставить точную информацию о системе. Возможные причины включают отсутствие или повреждение важных файлов WMI, сбои в работе драйверов или аппаратных средств, изменения конфигурации системы и другие факторы, которые могут повлиять на работу WMI.
Если вы столкнулись с проблемами со службой WMI, возможны несколько подходов к их решению. В первую очередь, рекомендуется проверить корректность установки или обновления операционной системы, а также отсутствие конфликтов с другими приложениями. Если проблема все еще сохраняется, можно попробовать перезапустить службы, связанные с WMI, или восстановить поврежденные файлы WMI. Если все это не помогает, необходимо обратиться к специалистам, чтобы они могли более детально проанализировать и решить проблему.
Причины возникновения ошибок в службе WMI
1. Несоответствующие или поврежденные конфигурационные файлы
Один из главных источников проблем с WMI связан с конфигурационными файлами. Если файлы конфигурации WMI становятся несоответствующими или поврежденными, то служба WMI может перестать работать правильно. Нарушение целостности этих файлов может быть вызвано неправильной установкой программного обеспечения, атакой вредоносного ПО или сбоями в работе системы. В результате возникают ошибки при выполнении запросов к WMI, такие как «Нет службы WMI» или «Невозможно подключиться к службе WMI».
2. Конфликты с другими службами или программами
Второй причиной ошибок в службе WMI может быть конфликт с другими службами или программами, которые используют WMI для своей работы. Если несколько служб или программ одновременно пытаются получить доступ к WMI, могут возникнуть конфликты, которые приведут к сбоям и ошибкам. Например, некоторые антивирусные программы могут блокировать доступ к WMI, что может вызвать ошибку при выполнении запросов или мониторинге системных ресурсов.
В целом, чтобы избежать ошибок в службе WMI, важно поддерживать целостность конфигурационных файлов, регулярно обновлять программное обеспечение, проверять конфликты с другими службами или программами. При возникновении ошибок необходимо принять меры для их устранения, такие как проверка и восстановление WMI, перезапуск службы WMI или обновление системы и программного обеспечения.
Как исправить ошибки в службе WMI
1. Перезагрузите службу WMI
Первым шагом в решении проблем с WMI является перезагрузка службы. Для этого откройте «Службы» в панели управления, найдите «Windows Management Instrumentation» в списке служб, щелкните правой кнопкой мыши и выберите «Перезапустить». Это может помочь восстановить нормальную работу WMI, если проблема была временной.
2. Проверьте целостность WMI-репозитория
Следующим шагом является проверка целостности WMI-репозитория. WMI-репозиторий — это база данных, которая содержит информацию о компонентах WMI. Если репозиторий поврежден, это может привести к ошибкам в работе WMI. Чтобы проверить целостность репозитория, выполните следующие действия:
- Откройте командную строку от имени администратора
- Введите команду «Winmgmt /verifyrepository» и нажмите Enter
- Дождитесь завершения проверки репозитория
Если проверка выявила какие-либо ошибки, введите команду «Winmgmt /salvagerepository», чтобы попытаться восстановить репозиторий. После этого перезагрузите компьютер и проверьте, работает ли служба WMI без ошибок.
3. Обновите драйверы и установите обновления
Некоторые проблемы с WMI могут возникать из-за устаревших драйверов или отсутствующих обновлений операционной системы. Регулярно проверяйте наличие обновлений для вашей операционной системы и устанавливайте их по мере необходимости. Кроме того, обновите все драйвера на вашем компьютере до последних версий, чтобы обеспечить совместимость с WMI и избежать возможных конфликтов.
Следуя этим методам, вы сможете исправить ошибки в службе WMI и вернуть ее к нормальному состоянию. Помните, что WMI является важной составляющей операционной системы Windows, поэтому следует устранить проблемы с его работой как можно скорее для стабильной и безопасной работы вашего компьютера.
В данной статье освещалась проблема отсутствия службы Windows Management Instrumentation (WMI) и предлагались различные способы ее решения. Мы рассмотрели важность наличия WMI для эффективного управления и мониторинга компьютерной среды, а также популярные инструменты, которые можно использовать для работы с этой службой.
Как выяснилось, WMI является мощным инструментом, позволяющим получить доступ к информации о компьютерных ресурсах и выполнить различные операции на удаленных компьютерах. Однако, когда возникает проблема с WMI, это может вызывать перебои в работе или полное отсутствие возможности управления компьютерами.
В статье было рассмотрено несколько способов восстановления службы WMI. Во-первых, мы рекомендуем проверить наличие и правильность установки службы, а также ее зависимостей. Во-вторых, можно воспользоваться утилитой wmidiag.vbs, которая поможет выявить и исправить проблемы в WMI. Также стоит обратить внимание на возможность использования PowerShell для работы с WMI.
Подводя итог, можно сказать, что наличие службы WMI является важным аспектом для эффективного управления компьютерами. Использование специализированных инструментов и проведение диагностики могут помочь в решении проблем, связанных с WMI. Однако, необходимо иметь в виду, что каждый конкретный случай может требовать индивидуального подхода и дополнительных мер по диагностике и восстановлению службы.