
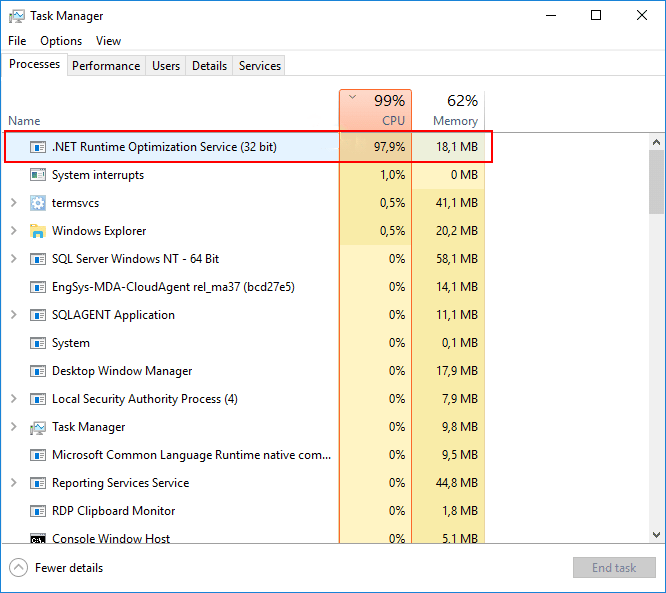
Пользователи Windows 11, 10 и более ранних версий ОС при высокой нагрузке на процессор, заглянув в диспетчер задач, могут обнаружить, что систему грузит процесс mscorsvw.exe или .NET Runtime Optimization Service.
В этой инструкции подробно о том, что это за процесс, а также о том, что делать, чтобы снизить нагрузку на систему со стороны .NET Runtime Optimization Service.
Что за процесс mscorsvw.exe или .NET Runtime Optimization Service
.NET Runtime Optimization Service и соответствующий ему процесс mscorsvw.exe служит для оптимизации библиотек .NET Framework и приложений, написанных с его использованием. Более детально (но на английском) об этом можно прочесть в статье разработчиков на сайте Майкрософт.
По умолчанию, NET Runtime Optimization Service выполняется в двух случаях:
- После установки .NET Framework
- После получения обновлений .NET Framework
Обычно процесс запускается при простое компьютера, вызывая при этом высокую нагрузку на процессор, что в целом нормально для выполняемых задач.
Действия при высокой нагрузке на систему
Если высокая нагрузка со стороны mscorsvw.exe не является постоянной проблемой, достаточно однократно дождаться, когда .NET Runtime Optimization Service выполнит все задачи, обычно это происходит в течение нескольких минут. Снимать задачу в диспетчере задач не следует, кроме случаев крайней необходимости, когда требуется прямо сейчас прекратить высокую нагрузку на CPU.
Майкрософт на официальном сайте предлагает дополнительные возможности, позволяющие сократить время, необходимое для выполнения задач NET Optimization Service:
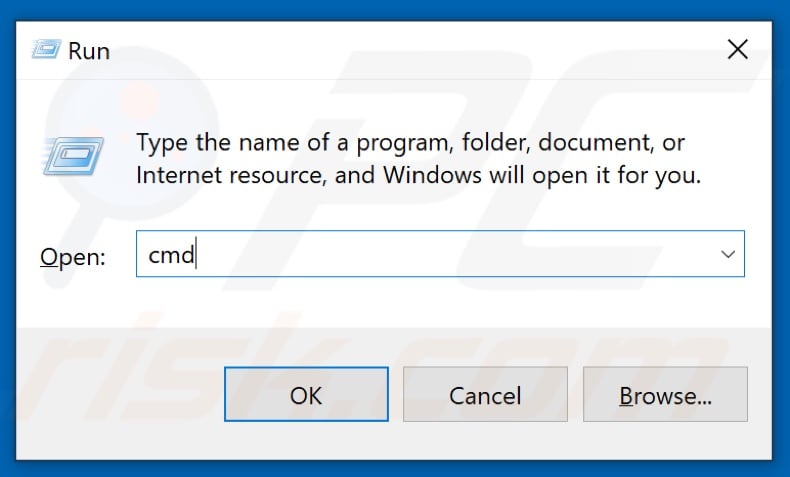
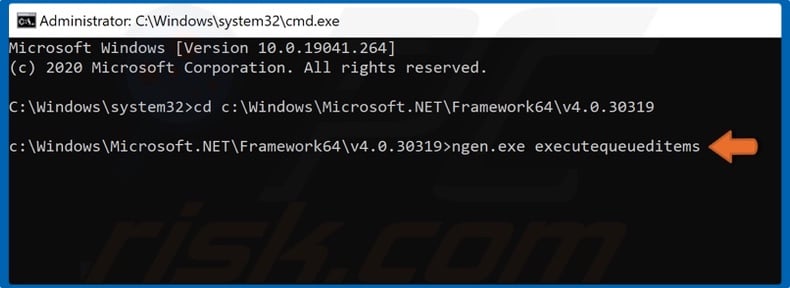
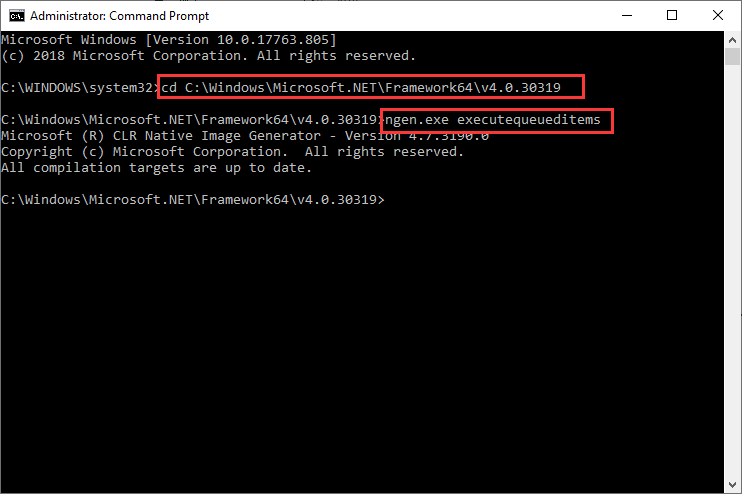
- Запустить командную строку от имени администратора и по порядку использовать команды
cd C:\Windows\Microsoft.NET\Framework\v4.0.30319
ngen.exe executequeueditems
schTasks /run /Tn "Microsoft\Windows\.NET Framework\.NET Framework NGEN v4.0.30319"
- В x64 версиях Windows дополнительно использовать ещё две команды
cd C:\Windows\Microsoft.NET\Framework64\v4.0.30319
ngen.exe executequeueditems
schTasks /run /Tn "Microsoft\Windows\.NET Framework\.NET Framework NGEN v4.0.30319 64"
- Использовать один из официальных скриптов со страницы GitHub.
Теоретически, но очень маловероятно, процесс mscorsvw.exe может оказаться вредоносным файлом. При таких подозрениях вы можете открыть расположение файла с помощью контекстного меню в диспетчере задач, а затем проверить этот исполняемый файл на VirusTotal.
How to Fix .NET Runtime Optimization Service High CPU Usage on Windows 10
It’s a known issue that .NET Runtime Optimization Service can randomly, and also after updating .NET Framework, start utilizing an unreasonable amount of a computer’s CPU processing power. Here, we will discuss this issue and provide proven methods for fixing this issue.

.NET Runtime Optimization Service is a component of the Windows 10 operating system. Its purpose is to optimize .NET Framework, which, in turn, optimizes applications that require .NET Framework to launch and run faster. Its executable is called mscorsvw.exe, but you will typically see it in Task Manager as .NET Runtime Optimization Service.
Under normal conditions, .NET Runtime Optimization Service doesn’t cause high CPU usage. However, if, for some reason, the process takes longer than it should, that might cause this service to utilize more CPU resources than necessary. You may see multiple .NET Runtime Optimization Service (mscorsvw.exe) processes when you open Task Manager.
There are a few likely reasons why .NET Runtime Optimization Service causes high CPU utilization.
- The optimization process runs too slow, taking more than the usual 5-10 minutes to complete its task.
- The service might have been corrupted and needs to be restarted.
- .NET Runtime Optimization Service might have been infected by malware. Alternatively, your PC might have been infected with malware disguised as .NET Runtime Optimization Service.
Before you attempt to tackle the issue of .NET Runtime Optimization Service hogging your CPU’s resources, you should install anti-malware software and scan your computer for threats that may have been disguised as this service.
Video on How to Fix .NET Runtime Optimization Service High CPU Usage
Table of Contents:
- Introduction
- Method 1. Optimize .NET Runtime Optimization Service
- Method 2. Run the Official Script Made By Microsoft
- Video on How to Fix .NET Runtime Optimization Service High CPU Usage
Download Computer Malware Repair Tool
It is recommended to run a free scan with Combo Cleaner — a tool to detect viruses and malware on your device. You will need to purchase the full version to remove infections. Free trial available. Combo Cleaner is owned and operated by Rcs Lt, the parent company of PCRisk.com read more.
Method 1. Optimize .NET Runtime Optimization Service
1. Hold down Windows+R keys to open Run.
2. Type CMD and hold down Shift+Ctrl+Enter keys to open Command prompt with administrative privileges.

3. Type in the cd c:\Windows\Microsoft.NET\Framework64\v4.0.30319 command in the Command prompt and hit Enter.
Note: If you’re running the 32-bit version of Windows type in cd c:\Windows\Microsoft.NET\Framework\v4.0.30319 instead and hit Enter.
4. Then, type in ngen.exe executequeueditems and hit Enter.
[Back to Table of Contents]
Method 2. Run the .NET Runtime Optimization Speed Up Script

1. Go to Microsoft’s GitHub page to download the official script.

2. Right-click the Raw button and select Save link as.
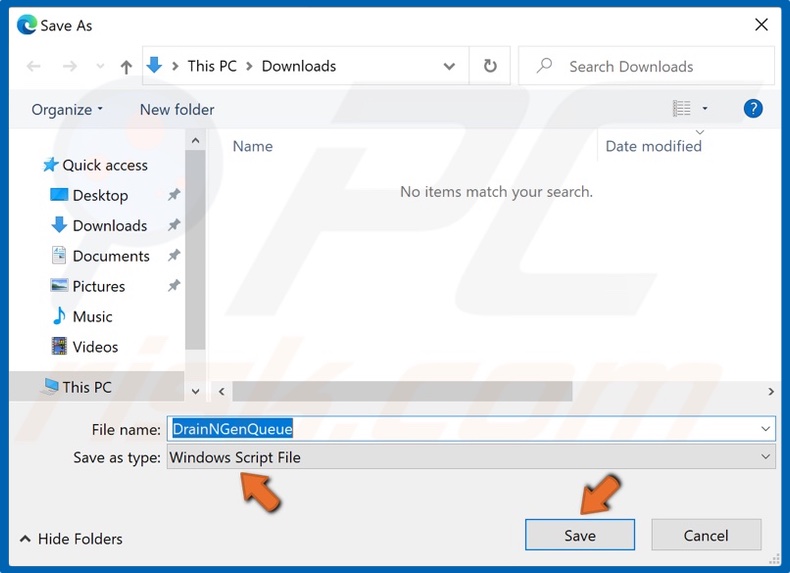
3. Make sure that the Save as type is Windows Script file and click Save to download DrainNGenQueue on your PC.

4. Then, open the script file, and the Command prompt will execute the script and close automatically.
Did this article help you fix .NET Runtime Optimization Service high CPU usage? Let us know by leaving a comment in the discussion section below.
[Back to Top]
When you open tasks manager, you may notice that the .NET runtime optimization service consumes high CPU, which could affect system performance. What is .NET runtime optimization service? How to fix .NET Runtime Optimization Service high CPU issue? Please keep on reading this post from MiniTool.
You may have never noticed the mscorsvw.exe or .NET Runtime Optimization Service if you don’t open task manager. What is .NET Runtime Optimization Service? Actually, the .NET Runtime Optimization Service, also known as Mscorsvw.exe, is component of Windows. It is used to optimize your machine to launch apps and program faster.
Normally the .NET Runtime Optimization Service will not cause high CPU but if the optimization process takes too long, it may cause high CPU usage. And the following has summarized some other reasons for the .NET Runtime Optimization Service high CPU usage.
- The .NET Runtime Optimization Service runs too slowly on your PC.
- Your computer may be running malware disguised as a service, or the service may be infected.
- The .NET Runtime Optimization Service may be corrupted.
Since the .NET Runtime Optimization Service can the make applications on your system launch faster, you should not disable the service directly when it consumes high CPU. Is there any other way to remove the .NET Runtime Optimization Service high CPU usage Windows 10/8/7 issue?
Well, the answer is positive. The following will show you some reliable methods that have proven to be effective fixes and help a lot of users who encounter the .NET Runtime Optimization Service high CPU usage issue. So if you come across the mscorsvw.exe CPU issue, why not have a try?
Solution 1. Scan Your PC for Malware
As I mentioned before, malware infection could lead to the .NET Runtime Optimization Service high CPU. If you have the encounter this issue, you can run anti-malware software such as Malwarebytes and Avast to perform a full scan. Both of them can be downloaded from their official website.
After the scanning process is finished, you can check if the .NET Runtime Optimization Service high CPU usage issue gets fixed.
Solution 2. Speed up the .NET Runtime Optimization Service
As you know, if the service runs too slowly, you can encounter .NET Runtime Optimization Service high CPU. By running the following commands, the process can be speeded up.
Step 1. Input cmd in the Windows 10 Cortana search box. Then right-click the best match Command Prompt to run it as administrator.
Step 2. If the operating system is installed on the C drive, type the following commands and hit Enter:
- For 32-bit operating system: cd C:WindowsMicrosoft.NETFrameworkv4.0.30319
- For 64-bit operating sysytem: cd C:WindowsMicrosoft.NETFramework64v4.0.30319
Step 3. Type the following command and hit Enter.
ngen.exe executequeueditems
Step 4. Check if the CPU usage has gone back to normal from the Task Manager.
These commands instruct the .NET Runtime Optimization Service to complete tasks faster by using all available cores of the CPU (up to six cores). So the high CPU issue should be fixed after running the above commands.
Solution 3. Run the Official Script Made By Microsoft
If you don’t like running the command yourself or if you are running an older version of Windows, you can run the official script made by Microsoft to speed up the service.
Step 1.Click here to visit the GitHub page of the official script.
Step 2. Right-click on the Raw button and choose Save link as.
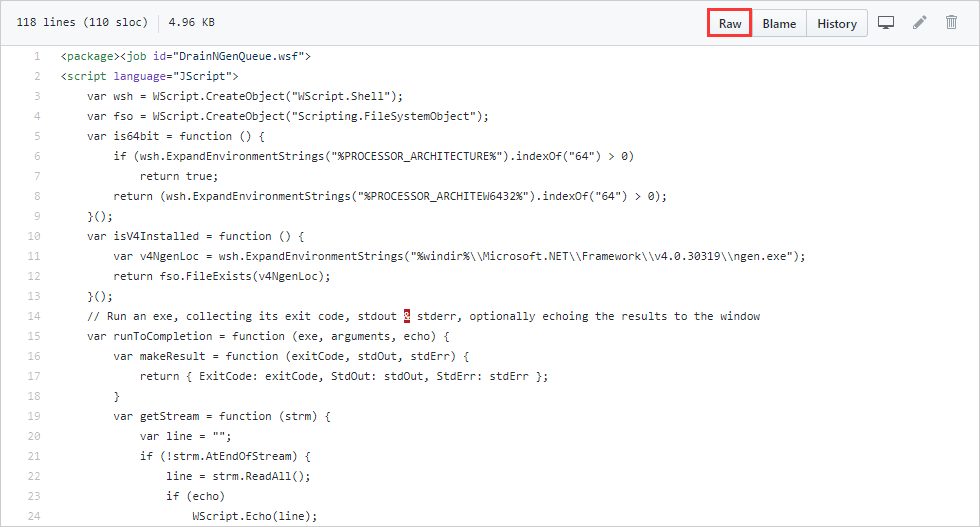
Step 3. Make sure that the file type is Windows Script file and the save the file on your hard drive.
Step 4. Execute the file to run the script.
Step 5. If you need to choose a program to run it with, you can select Windows Script Host.
By running the script, the NET Runtime Optimization service can finish its task faster and the .NET Runtime Optimization Service issue should be fixed.
Solution 4. Restart the Service
Restarting the service may also help you resolve the mscorsvw.exe high CPU usage issue, as it will complete the process more quickly this time. Let’s see how to restart the service together.
Step 1. Right-click Windows Start menu and choose Run to open the Run box. You can also press Windows logo key + R keys on the keyboard to bring up the Run dialog box.
Step 2. Copy and paste services.msc into the Run box and hit Enter.
Step 3. On the interface, scroll down to find and right click NVIDIA Telemetry Container to choose Restart from the menu.
Step 4. Then right click NVIDIA Telemetry Container and choose Properties from the right-click menu.
Step 5. In the Properties window, set NVIDIA Telemetry Container Startup Type as Automatic.
Step 6. Click Apply and OK to save the changes.
After that, you can open task manager and check whether high CPU usage of the Net Runtime Optimization Service goes back to normal.
Conclusion
After applying the above fixes, have you fixed the Net Runtime Optimization Service high CPU issue on Windows 10/8/7? Hope this post helps you.
If you notice that your computer suddenly starts running slow, and you see a process called .NET Runtime Optimization Service (Mscorsvw.exe) in the Task Manager is causing exceptionally high CPU usage on Windows 11 or Windows 10, this guide will explain what it is and how to deal with this process.
Also see: What is Microsoft Edge WebView2 Runtime and How to Uninstall it?
What is .NET Runtime Optimization Service Mscorsvw.exe?
.NET Runtime Optimization Service, also known as mscorsvw.exe, is a key part of Windows. It pre-compiles .NET assembly files to speed up the launch of applications made with .NET framework.
Chances are, you’ve used apps made with .NET Framework without even knowing it. The .NET Runtime Optimization Service works to speed up your Windows so that apps start quicker. Normally, it runs in the background when your PC is idle, and stops once it’s done compiling.
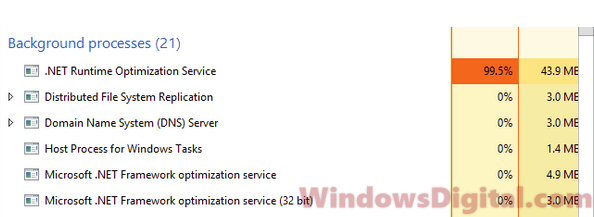
However, if you have many .NET programs or if your PC isn’t very fast, it might take a while for this service to finish its job, leading to high CPU usage in Windows 11/10 during the process.
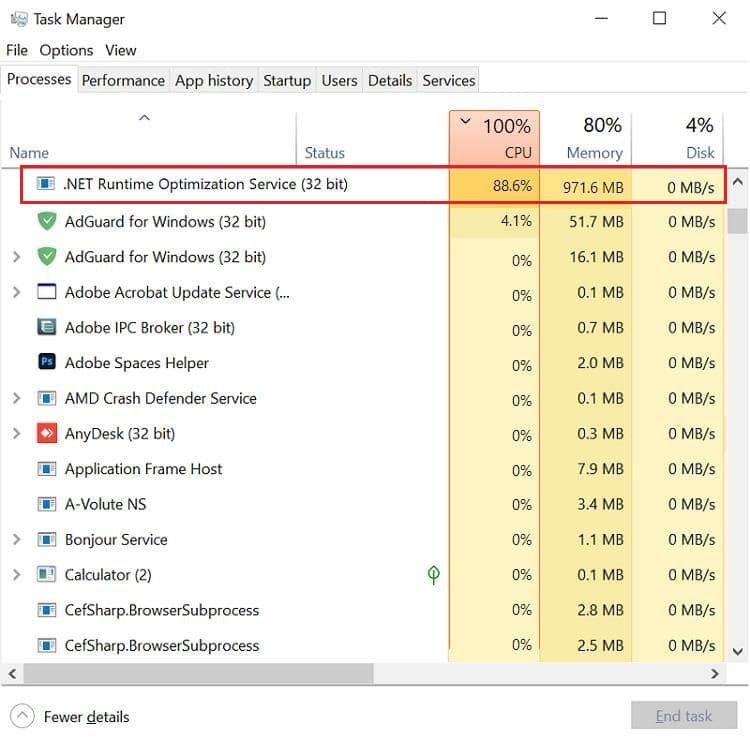
The service might also show up as several mscorsvw.exe processes at the same time, causing spikes in CPU, RAM, or Disk usage up to 100%.
Why is the .NET Runtime Optimization Service CPU usage so high?
Although ending the service isn’t recommended because it helps your PC, you can stop it temporarily by clicking End Task in Task Manager when selecting the process. This stops it for now, but it will restart when your PC is idle again.
You don’t need to worry about this process too much as it will stop on its own after finishing its tasks. It runs only when a new .NET app is installed on your system or when you install the .NET Framework Redist.
If the .NET Runtime Optimization Service continues running with high CPU usage, the issue might be with the specific program it’s trying to optimize. Rather than stopping the service, try fixing or uninstalling the problematic program first.
If you’re still bothered by how much CPU it uses, or if you want to completely stop the service, keep reading.
Speed up the .NET Runtime Optimization Service
Before you think about disabling the service, consider speeding it up to finish its tasks quicker. Normally, the .NET Runtime Optimization Service uses only one CPU core. To speed it up, right-click on the process in the Details tab in Task Manager, choose Set Affinity, then make sure all CPU cores are checked. Right-click the process again and choose Set Priority, then select High.
After this change, the .NET Runtime Optimization Service might still cause a temporary spike in CPU usage up to 100%, but it will complete its tasks faster and then stop automatically.
How to stop the problem service?
We don’t suggest disabling the service, but if you choose to, here’s how you can do it:
- Press Win+R on your keyboard to open the Run window.
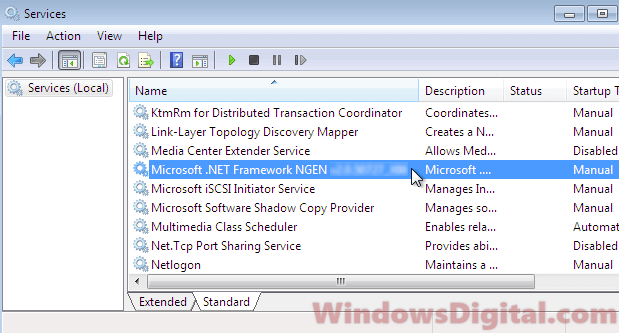
- Type services.msc and press Enter.
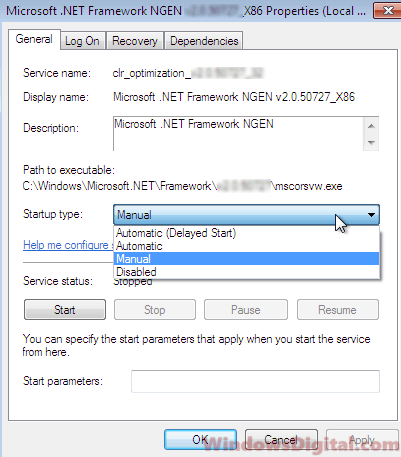
- Double-click on the service named Microsoft .NET Framework NGEN.

- Select Disabled from the Startup type dropdown menu.

- Click Apply, then OK.
Close the Services panel and restart your PC to see if the issue is resolved.
The regedit way to disable the service
If you can’t access the Services panel or simply prefer another method, you can disable the service via Registry Editor. But, please use this method only if you know what you’re doing. Making any mistakes in the registry can cause very serious and catastrophic issues. It’s always a good idea to create a system restore point first before making any changes in the registry so you can go back if things go south.
Press Win+R, type regedit to open Registry Editor, and navigate to the following folder. If you see multiple clr_optimization folders, choose the latest version number.
HKEY_LOCAL_MACHINE\SYSTEM\CurrentControlSet\services\clr_optimization_(version number)

Double-click on the Start registry. In the value data field, enter 4 (to disable the service). This value represents the startup type for the .NET Runtime Optimization Service. Enter 2 for Automatic, 3 for Manual, and 4 for Disabled.
Once you’re done, close the Registry Editor and restart your computer to check if the high CPU usage issue is resolved.
Update your .NET Framework
Another way to maybe reduce high CPU usage by the .NET Runtime Optimization Service is to keep your .NET Framework updated. Microsoft often rolls out updates that boost both performance and security. To update, you can check Windows Update for any available updates for .NET Framework or download the latest version directly from Microsoft’s official website.
Some final words
The .NET Runtime Optimization Service is an important part of Windows that helps .NET apps start faster. Although it can cause high CPU usage in Windows 11/10, it usually stops when it’s done.
If you’re dealing with ongoing high CPU usage, look into fixing or removing the .NET program causing the problem first. If you really need to stop the service, you can do so temporarily or permanently using Task Manager or Registry Editor, although it’s generally best to let it run since it’s usually doing something beneficial for your PC.
You may often, come across an application or a background system process hogging an abnormal amount of system resources. The high system resource usage of a process can tremendously slow down other operations of the system and can turn your PC into a laggy mess. It may also cause it to crash entirely. We have already covered a plethora of processes and high CPU usage issues on our website. In addition, today, we will be discussing the occasional .NET Runtime Optimization service high CPU usage problem and how to bring it back to an acceptable level.

Table of Contents
How to Fix .NET Runtime Optimization Service High CPU Usage on Windows 10
As you might be aware, this .NET framework is used by Microsoft and other third parties for developing and running Windows applications among other things. The executable file for this service, named mscorsvw.exe, is an official Windows component and performs the task of optimizing .NET framework viz pre and re-compiling .NET libraries. This helps applications and programs launch faster. The optimization service is designed to run in the background when your PC is sitting idle for a brief period of 5-10 minutes.
Why .NET Runtime Optimization Service Results in High CPU Usage?
Sometimes the service can take longer than usual to re-compile .NET libraries. This results in
- Your PC service running slower than usual.
- Glitch instances in your computer.
- The service rendering corrupt.
- Utilization of system resources by malware.
Considering the impact of this service on individual app performance, its immediate termination at the first sight of mischief is not recommended. If the service seems to be taking too long to finish its operation, you have the option to speed things up by executing a few commands or a script. Other fixes include scanning the computer for malware and viruses, restarting the service, and performing a clean boot, as explained in the next segment.
Method 1: Perform Clean Boot of PC
It is quite possible that the service is having a hard time recompiling the libraries for a particular third-party application and is therefore, consuming more CPU power to finish the task. You can perform a clean boot wherein only essential drivers and startup programs are loaded, to examine if it is indeed one of the third-party programs prompting the high CPU usage issue for the .NET Runtime Optimization service. The steps to perform Windows 10 clean boot are as follows:
1. Press Windows + R keys simultaneously to launch Run dialog box.
2. Type msconfig and hit the Enter key to open System Configuration.

3. Go to the Services tab and check the box marked Hide all Microsoft services.

4. Then, click on the Disable All button, shown highlighted. It will stop all the third-party and unnecessary services from running in the background.

5. Save the changes by clicking on Apply > OK buttons.

6. A pop-up enquiring whether you would like to Restart or Exit without restart will appear, as shown. choose the Exit without restart option.
7. Again, launch the System Configuration window by repeating Steps 1-2. Switch to the Startup tab.

8. Click on the Open Task Manager hyperlink, as shown.

Note: Check the Startup impact column for all the listed applications/processes and disable those with a High Startup impact.
9. Right-click on the application (e.g. Steam) and choose Disable option, as depicted below.

10. Finally, close down all the active application windows and restart your PC. It will start in a clean boot state.
11. Now, check the .NET Runtime service CPU usage in the Task Manager. If it is normal, enable third-party programs one at a time to pin down the culprit application and uninstall it to avoid such issues in the future.
Also Read: How to Fix hkcmd High CPU Usage
Method 2: Boost .NET Framework Processes
Since terminating this service is not an option, you can instead give this service a little boost by allowing it to use additional CPU cores. By default, the service only uses one core.
- You can either execute a couple of commands yourself
- or simply download an official Microsoft script from GitHub and run it.
Option I: Via Command Prompt
1. Click on Start, type Command Prompt and click Run as administrator, as shown.

2. Type the given command and press the Enter key to execute.
Note: The commands that need to be executed differ based on system architecture.
- For 32-bit systems: cd c:\Windows\Microsoft.NET\Framework\v4.0.30319
- For 64-bit systems: cd c:\Windows\Microsoft.NET\Framework64\v4.0.30319

3. Next, execute ngen.exe executequeueditems, as depicted below.

Also Read: Fix Steam Client Bootstrapper High CPU on Windows 10
Pro Tip: Determine if Windows PC is 32-bit & 64-bit
If you are not sure about your system architecture, simply follow the given steps:
1. Hit Windows + R keys together to open Run dialog box.
2. Type msinfo32 and click on OK to open System Information window.
3. Here, check the System Type label to check for the same.

Also Read: What is HKEY_LOCAL_MACHINE?
Option II: Via GitHub Script
1. Go to the GitHub page for the script.

2. Right-click on the Raw button and choose the Save link as… option, as shown.

3. Change the Save as type to Windows Script File and click on Save.

4. Once downloaded, open the file with Windows Script Host.
Also Read: Fix DISM Host Servicing Process High CPU Usage
Method 3: Restart .NET Runtime Optimization Service
Services can often glitch and then, exhibit strange behavior such as utilizing unnecessarily high amounts of system resources or staying active for a prolonged period of time. The glitched instance can happen due to the bugs present in the current Windows OS build. Here’s how to solve .NET runtime optimization service high CPU usage by restarting the service:
Note: This solution only works for systems with a dedicated NVIDIA-powered graphics card.
1. Press Windows + R keys simultaneously to launch Run dialog box.
2. Type services.msc and click on OK to open Services application.

3. Scroll through the list and locate the NVIDIA Telemetry Container service.
4. Right-click on it and choose Properties from the context menu, as shown.

5. Click on the Stop button first. Wait for the Service Status to read Stopped, and then click on the Start button to get it going again.

6. Make sure the Startup type: is set to Automatic.

7. Once the service restarts, click on Apply > OK to save the changes and close the Properties window.

8. Press Ctrl + Shift + Esc keys together to open Task Manager and check if the service still utilizes high CPU resources.
Also Read: What is Google Chrome Elevation Service
Method 4: Detect & Remove Malware
If the service abnormal consumption of CPU persists, run a virus/malware scan to rule out the possibility of infections. Malicious applications can sneak onto your PC if you are not careful. These programs will disguise themselves and pretend to be official Windows components, and cause several issues such as high CPU usage. You can employ the native Windows Defender to scan your PC or you can use any other specialized security programs that come in handy. Follow these steps to fix .NET runtime optimization service high CPU usage issue by removing the malware from your PC:
1. Hit Windows + I keys simultaneously to open Settings.
2. Here, click on Update & Security, as shown.

3. Go to the Windows Security menu and click on Virus & threat protection

4. Click Quick scan to scan your PC to check if there is any malware present or not.

5. If there is any malware found then, click on Start actions to remove or block them and restart your PC.

Recommended:
- Fix Touchpad Scroll Not Working on Windows 10
- How to Change Startup Programs in Windows 10
- How to Mute Microphone in Windows 10
- 7 Ways to Fix Computer Keeps Crashing
Hopefully, one of the above solutions has fixed .NET runtime optimization service high CPU issue on your PC. If the same issue comes back to haunt you later, check for available Windows update or reinstall the latest version of .NET framework. Also, if you have any queries/suggestions regarding this article, then feel free to drop them in the comments section.